Device Manager Policies
Now that USB, CD-ROM and Phone devices are all blocked, you may want to configure some policies for device usage.
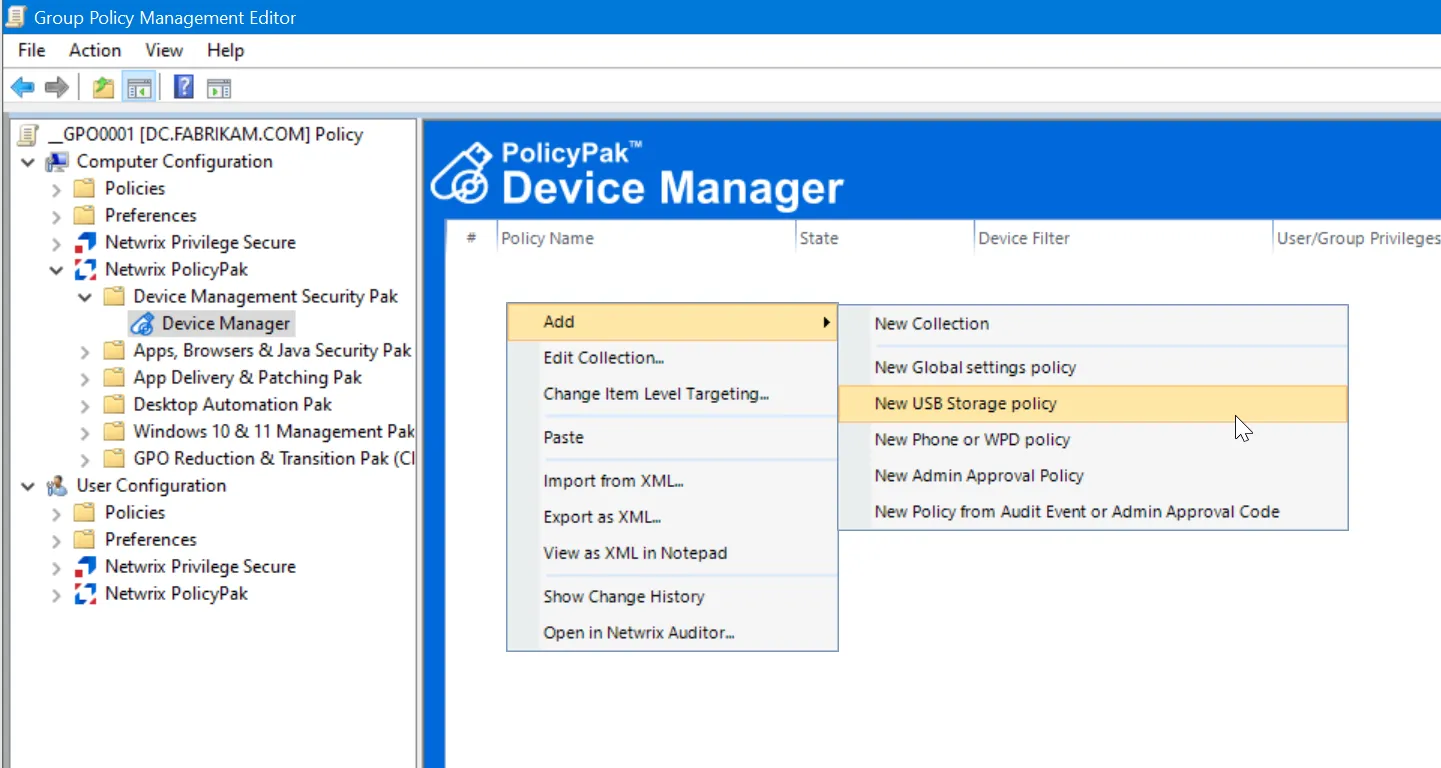
There are two main policy types in Endpoint Policy Manager Device Manager besides Global settings policy:
- USB Storage Policy — Manage USB and CD-ROM / DVD device types
- Phone/WPD Policy — Manage Phone / WPD device types
USB Storage Policies (for USB and CD-ROMs/DVDs)
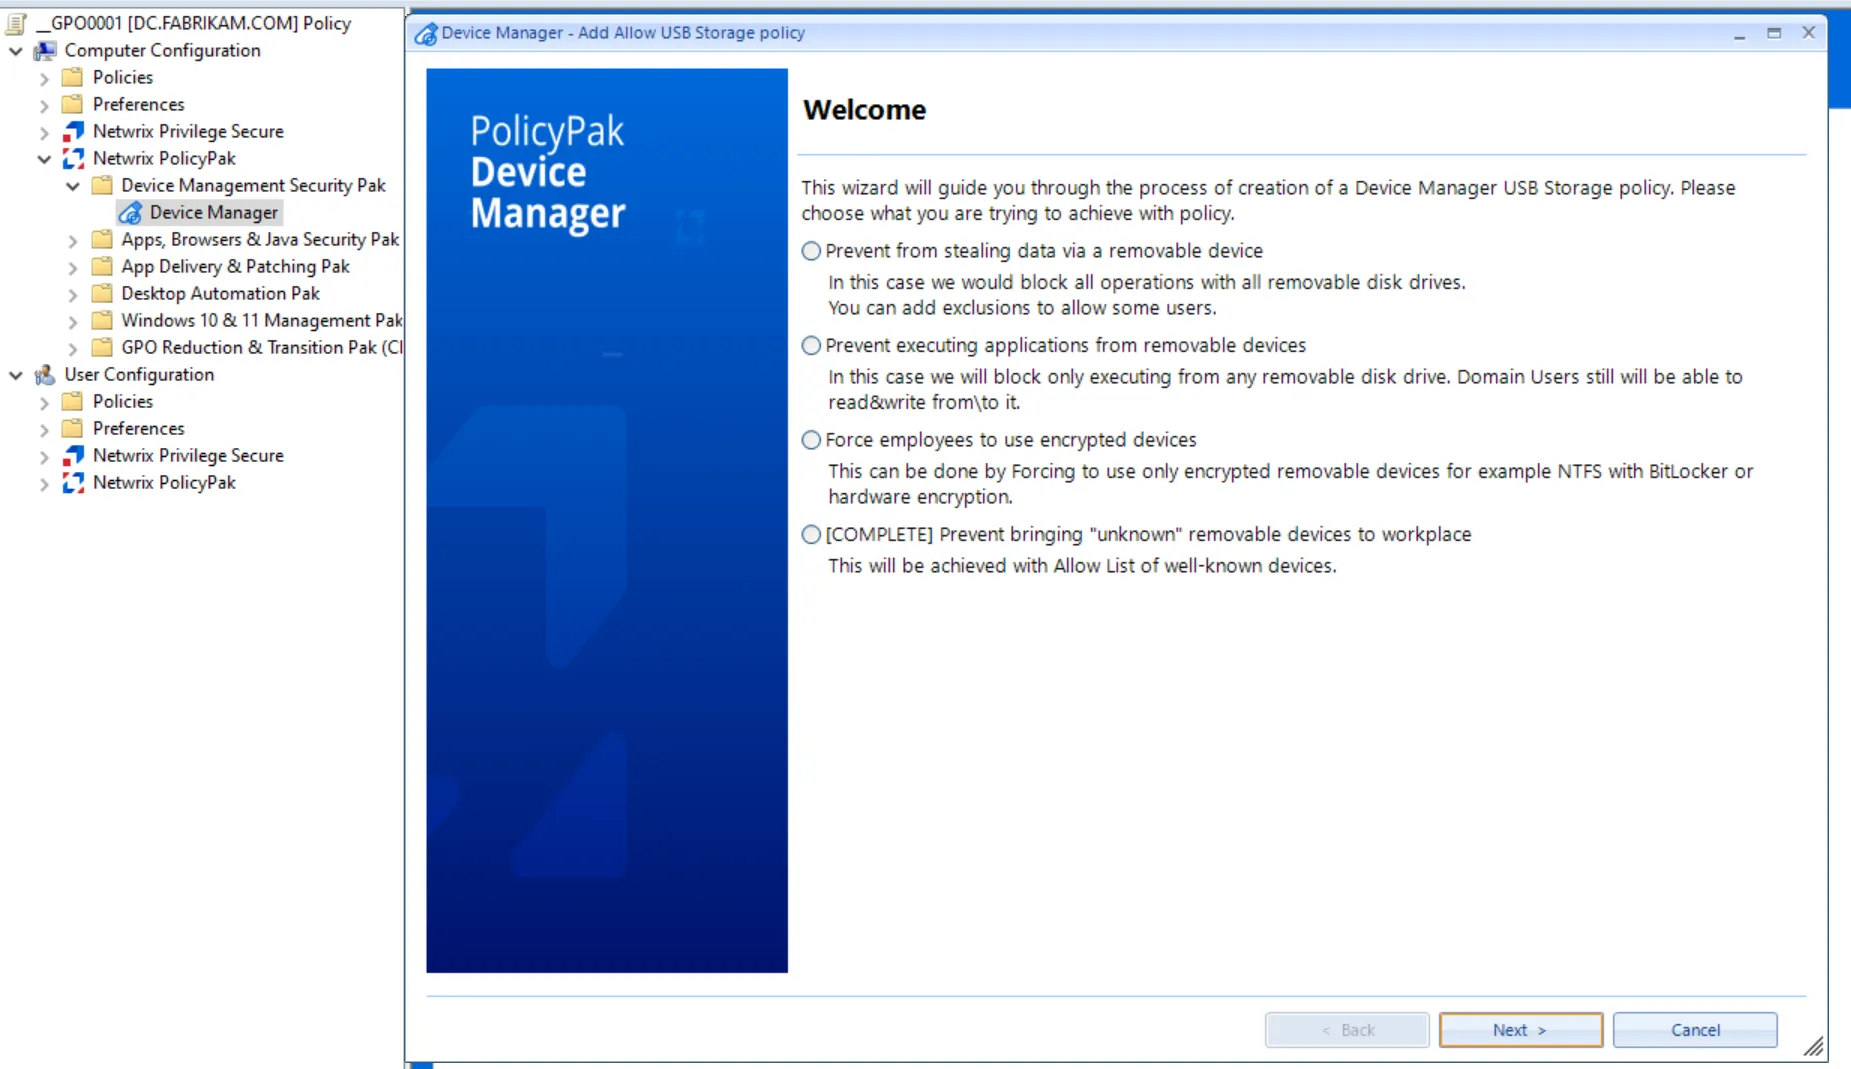
In this section you will create USB Storage policies which are suitable for USB and also CD-ROM and DVDs.
Without a Global Settings policy in place, creating a new USB policy will ask you some questions to guide you down a path to configure both a Global Settings policy and USB policy at the same time.
With a Global Settings policy already in place, when you create a USB policy, you will be prompted to select between two options, as shown on the Welcome window. Without going into every permutation of what's possible in Endpoint Policy Manager Device Manager with regard to USB policy, we will explore the most popular path, which is Allow Users to use specific devices.
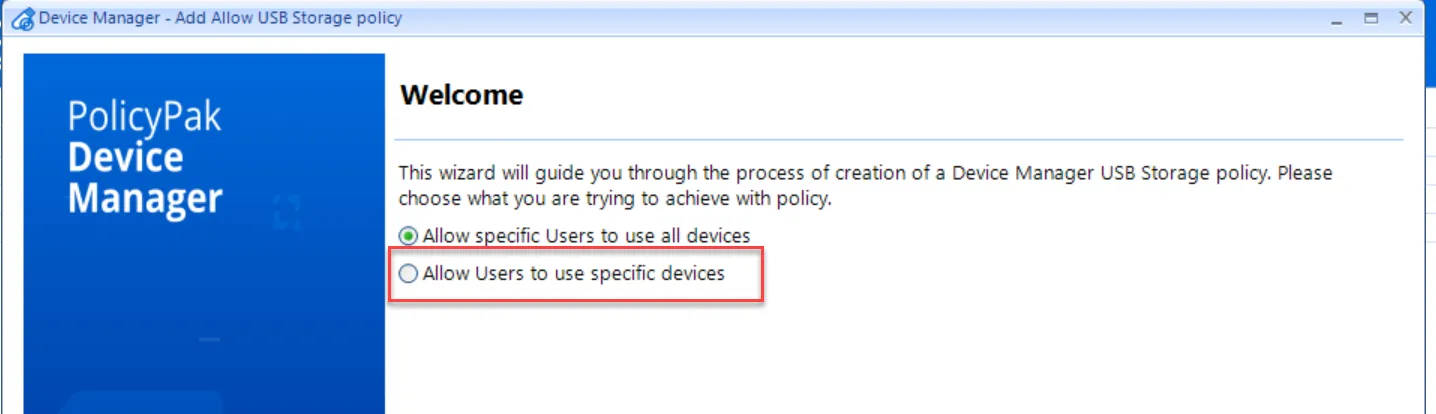
This path lets you configure who will use what devices, and what kind of access will they have on those devices.
Allow specific devices with details gained from:
- The Pop-Up on the endpoint
- The Endpoint Policy Manager Device Manager Helper Tool
- Other Methods like Windows Device Manager or vendor documentation
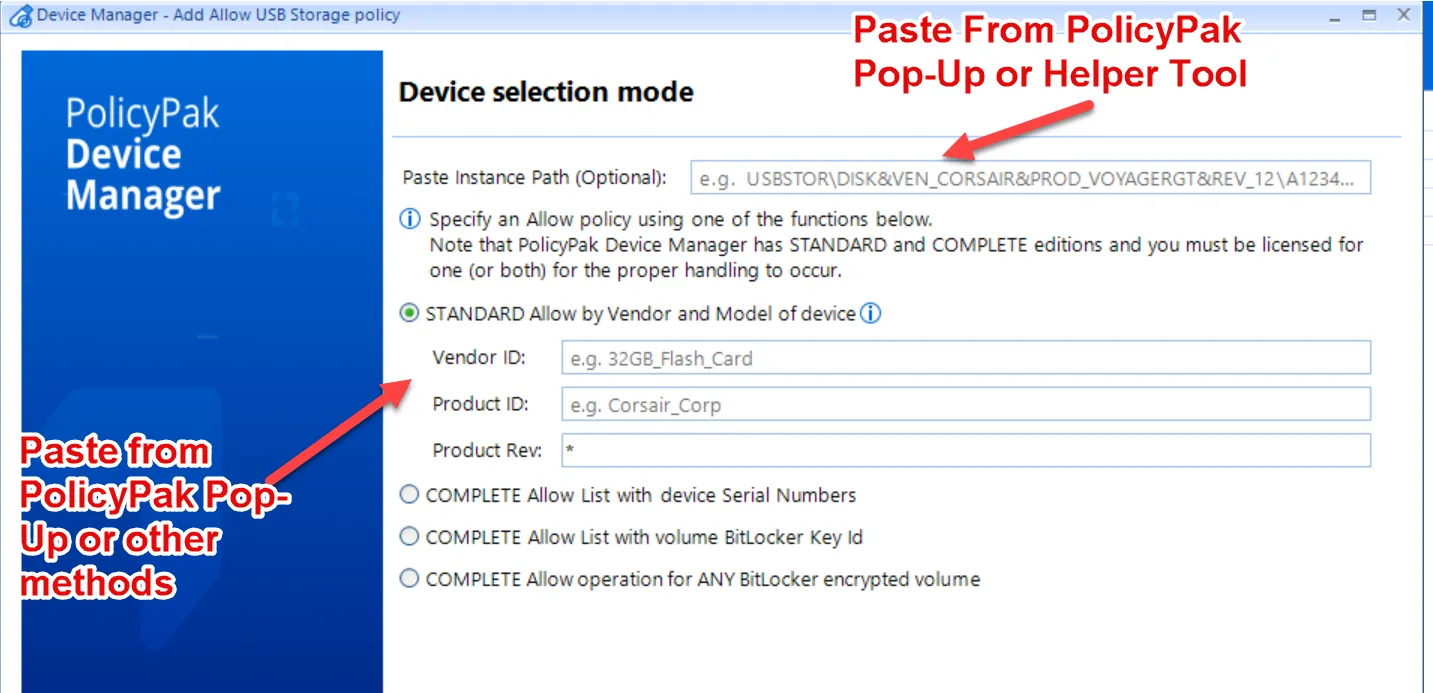
The most reliable way to get what you need is either from the Endpoint Policy Manager Pop-Up on the endpoint or from the Endpoint Policy Manager Device Manager Helper Utility.
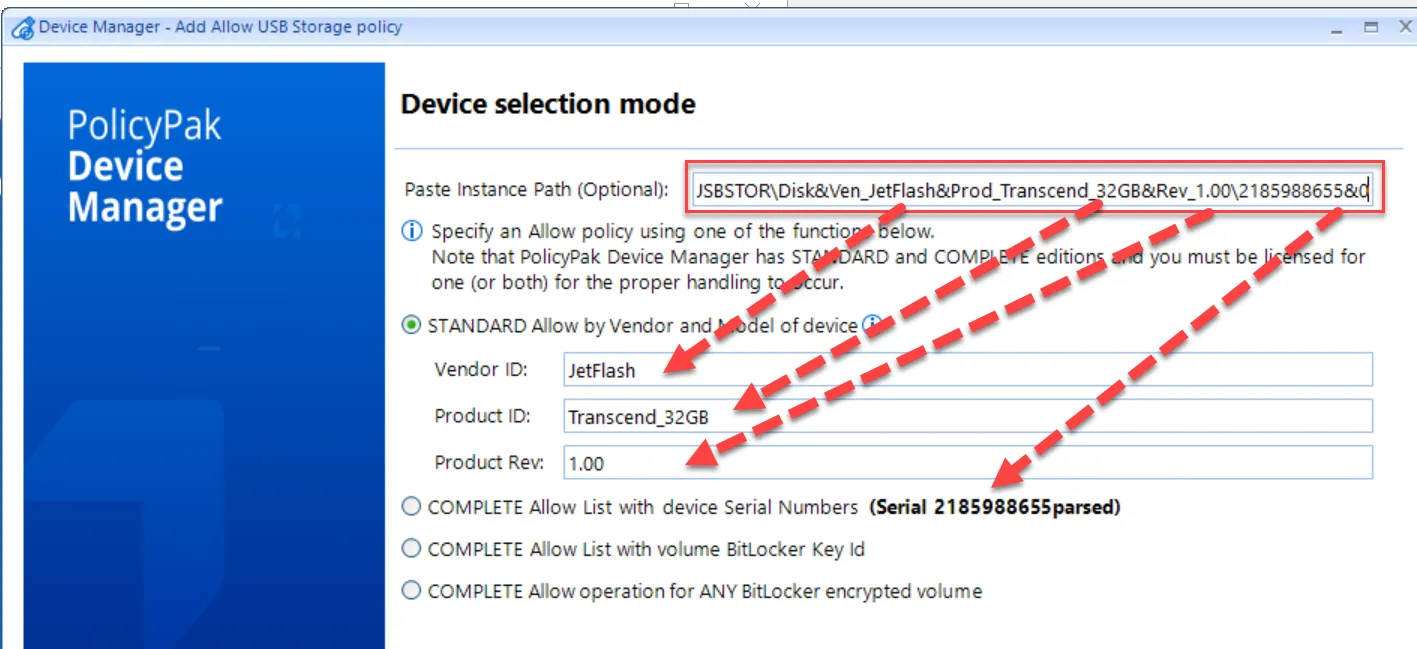
This is an example copy/paste from the pop-up as seen earlier:
Device Info: Product = Transcend_32GB, Vendor = JetFlash, Revision = 1.00, DevInstPath Serial = 2185988655
Device Instance Path: USBSTOR\Disk&Ven_JetFlash&Prod_Transcend_32GB&Rev_1.00\2185988655&0
Policy Info: GpoName = PPDM with AA, GpoId = D13C5DEE-86D4-40A9-AA1A-7A34CFBCC883, Collection = Device Manager, CollectionId = 5896A6F0-F04D-43DB-BD33-FF3B804920DC
The simplest way to populate the Device Selection Mode screen is to take the Device Instance Path and copy and paste it into the editor. When you do, the Vendor ID, Product ID, Product Rev and Serial Number are all auto-detected.
NOTE: You may ignore the STANDARD or COMPLETE designations in the Endpoint Policy Manager Device Manager UI. Typically, Endpoint Policy Manager is sold in Enterprise or SaaS editions and in those configurations you get COMPLETE (meaning all the features).
At this point, you may use:
- Allow by Vendor and Model of device — Must have at least Vendor and Product ID to proceed, and this specifies a USB type to continue
- Allow list with device Serial Numbers — Similar to "Vendor and Model of device" but also additionally restricts to a specific serial number
- Allow list with volume Bitlocker Key ID — Use the PP Device Manager Helper tool to get the Bitlocker Key ID and place here to restrict a specific device
- Allow operation for ANY Bitlocker Encrypted volume — A blanket policy to allow for any Bitlocker Encrypted volume
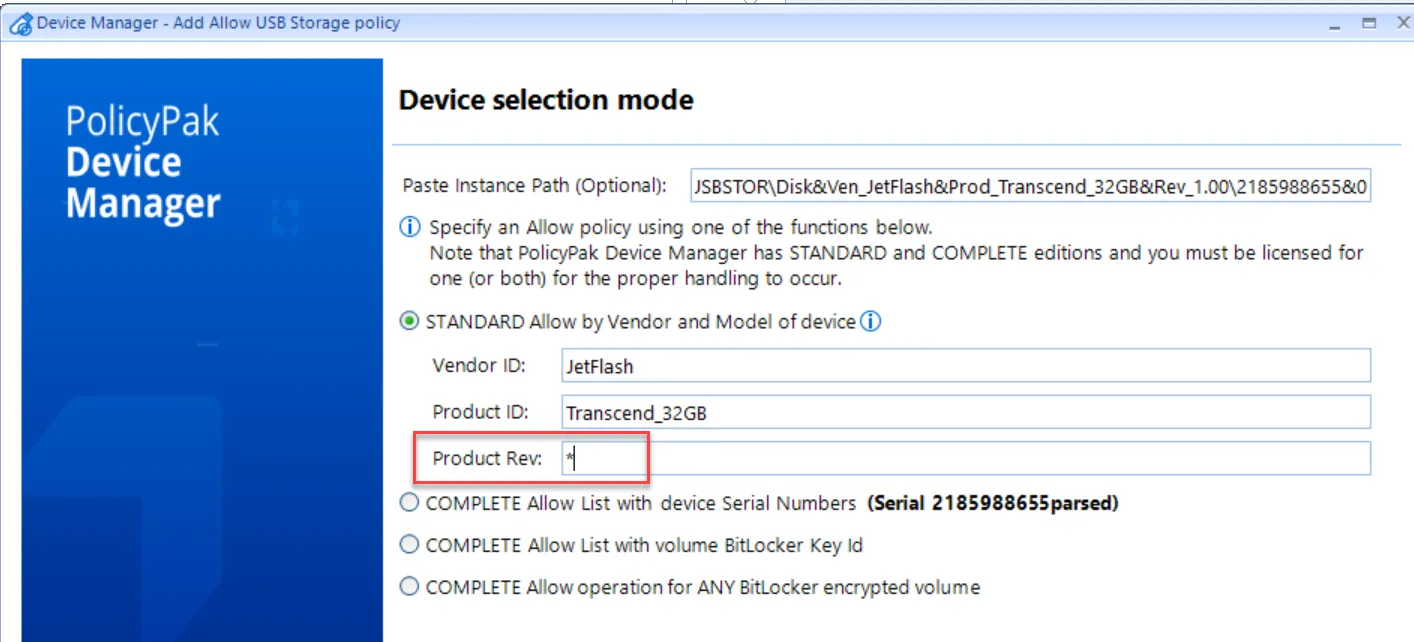
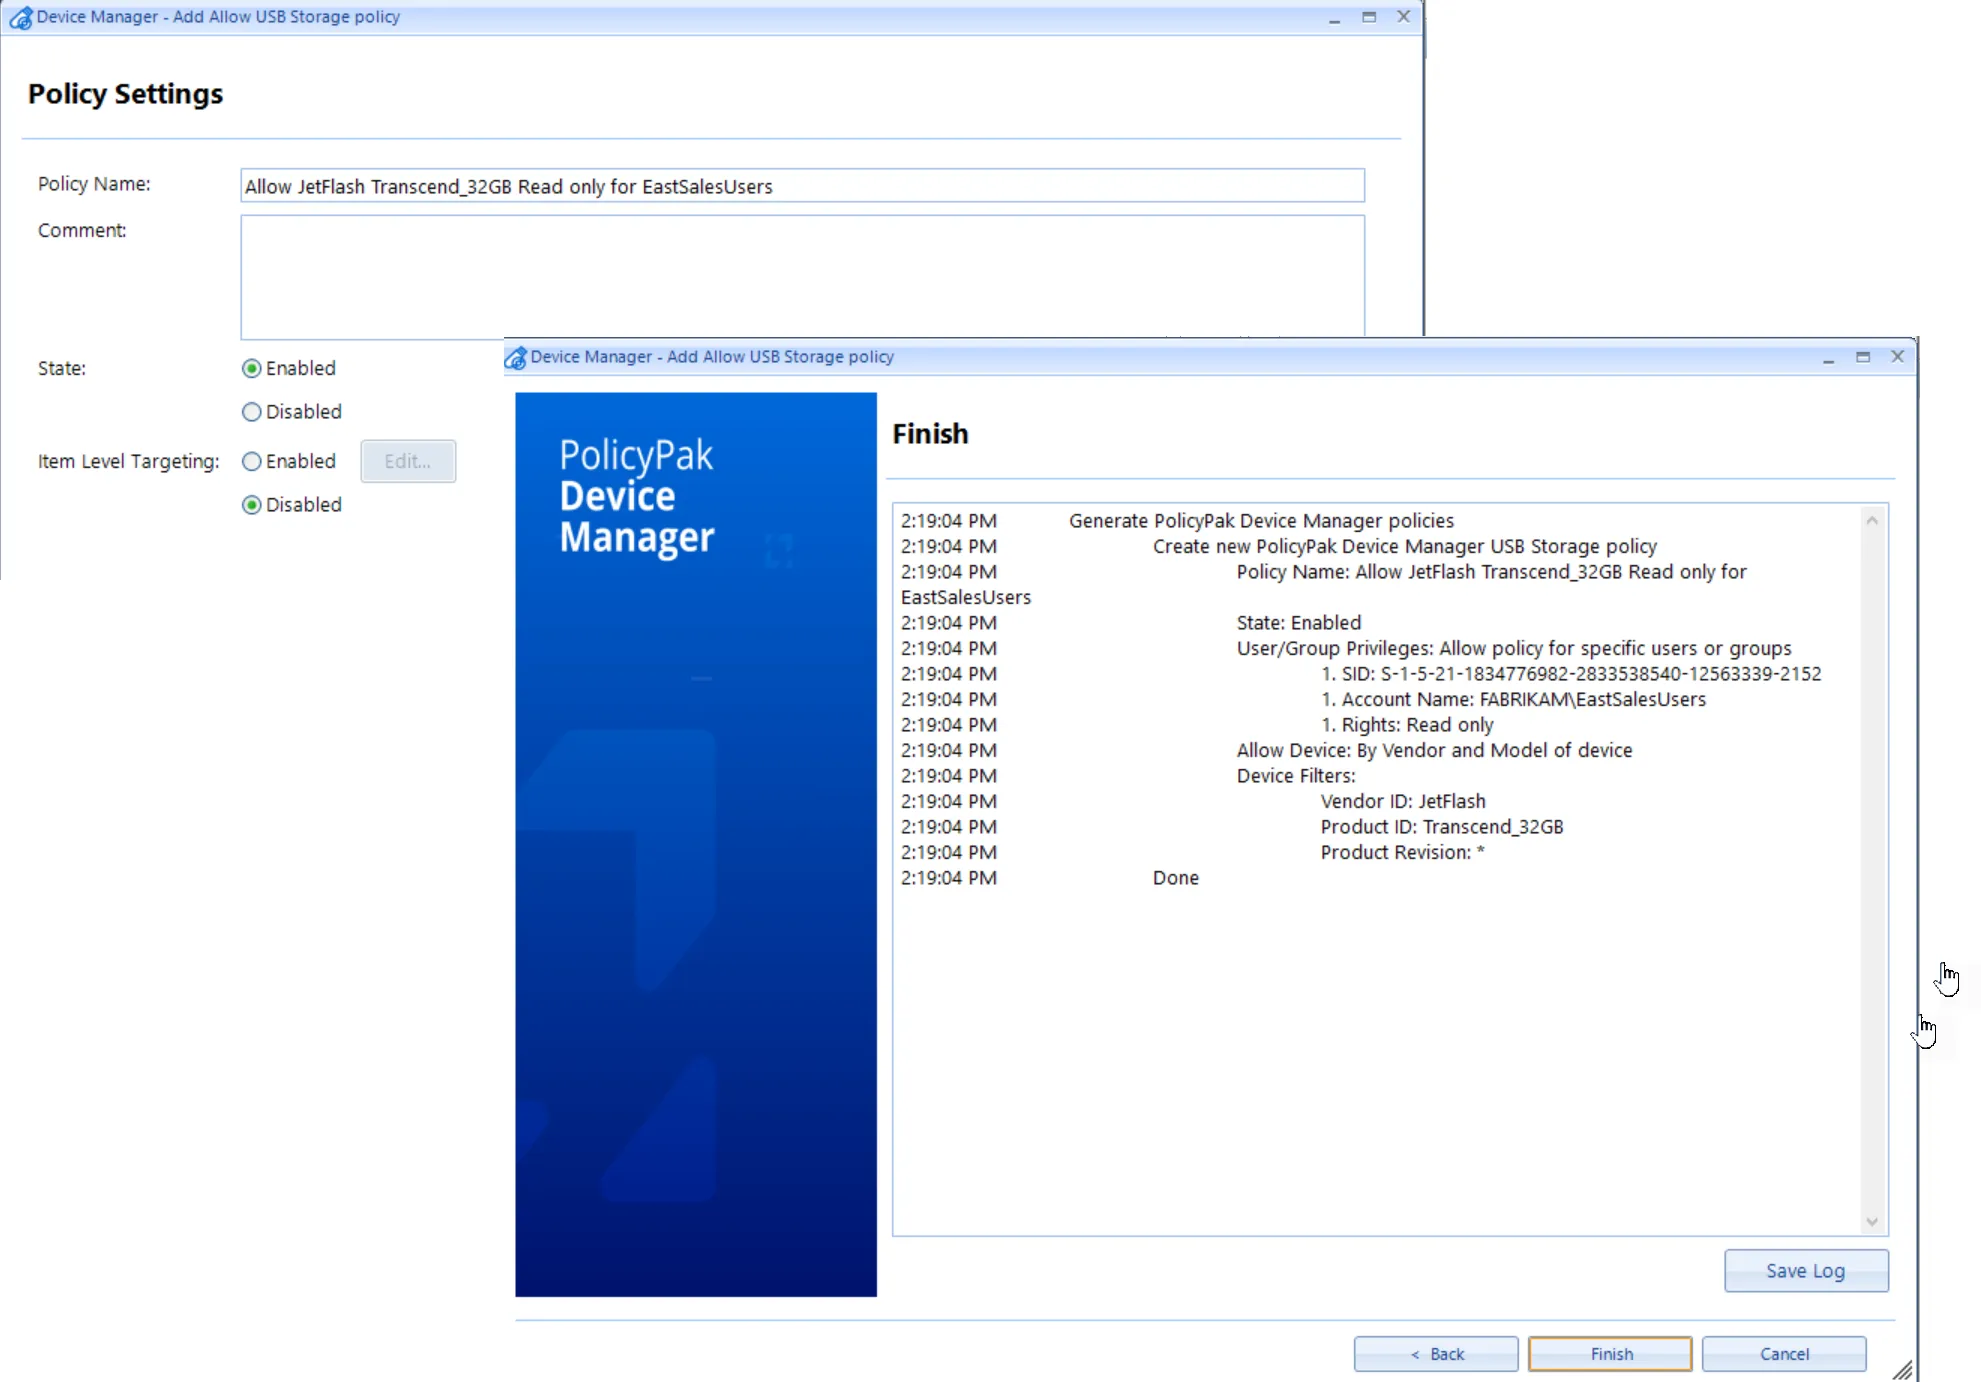
For this walkthrough, we suggest you use: Vendor ID and ProductID and in the Product Rev, you replace it with a * meaning all revisions.
On the next screen, you can Add domain member meaning an Active Directory user or group. Alternatively you can select Add member... and select a specific SID which can be useful if you're adding users not-joined to Active Directory, and only using an MDM service.
NOTE: To get an overview of how to acquire SIDs with your MDM service and then use them with Endpoint Policy Manager Device Manager, see the How do I get Azure AD SIDs and use them with Item Level Targeting? and Block and Allow USB and CD-ROMs with your MDM solution topics for additional information.
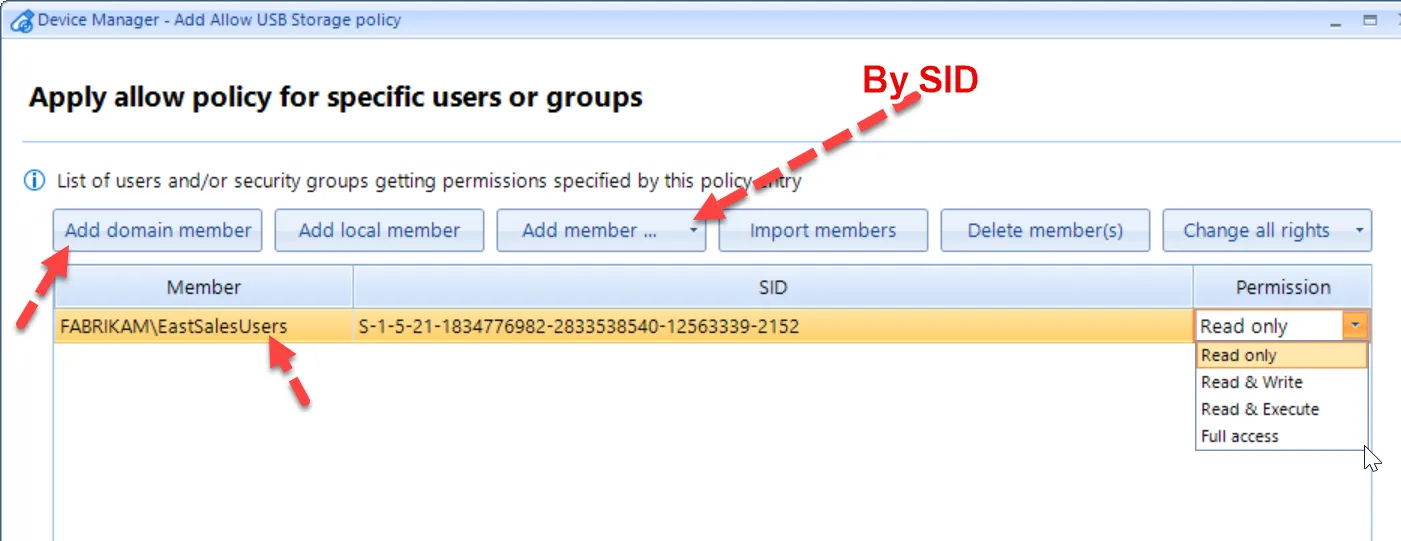
In this way you're specifying which user gets what permission. For this example, select Read Only.
The next screen lets you give this policy a name, set the state to Enabled or Disabled, and/or use Item Level Targeting.
The final screen shows the writing of the policy. You can click Finish.
After the policy is delivered to the endpoint and refreshed (using GPupdate for domain joined machines for example), the results can be seen on the endpoint.
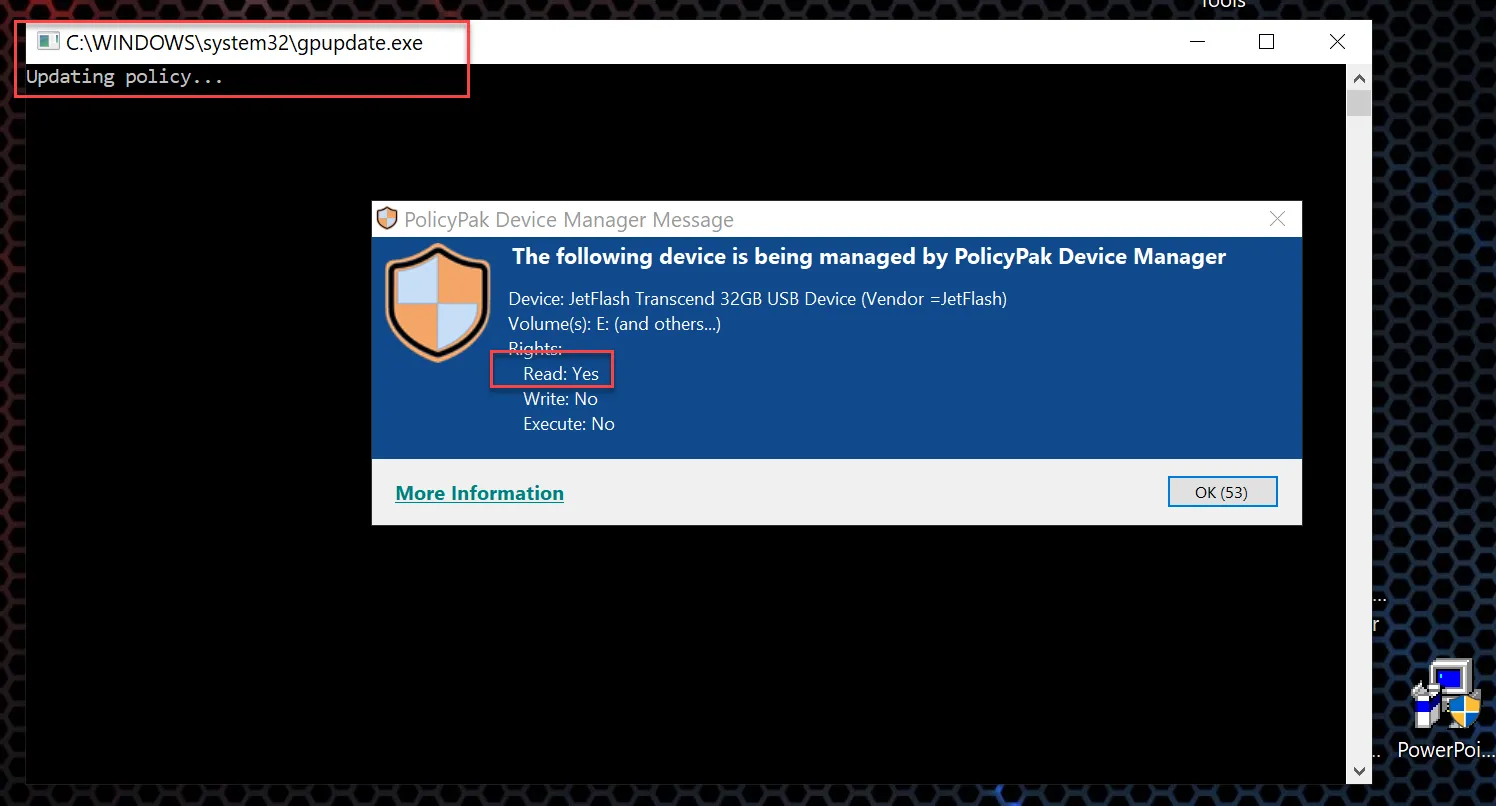
Now, reading from this USB is allowed, but other operations (like Write and Execute) will produce errors.
In this Quickstart you used Vendor and Product ID to allow Read access to a specific user group. However, as a reminder you may also use Endpoint Policy Manager Device Manager to:
- Allow specific user(s) to use all devices. This is useful if you want some people to have blanked access to all devices. Not usually advised. See the Allow ONE user (or group) access to USB and/or CD-ROM and DVDs topic for additional information.
- Allow specific devices based upon Serial Number(s). See the Permit specific devices by serial number topic for additional information.
- Allow specific devices based upon BitLocker Key ID (restricts a specific BitLocker device) or Allow ANY BitLocker encrypted volume (useful if you just want to make sure users are using Bitlocker to keep data always encrypted). See the Restrict access only to Bitlocker drives topic for additional information.
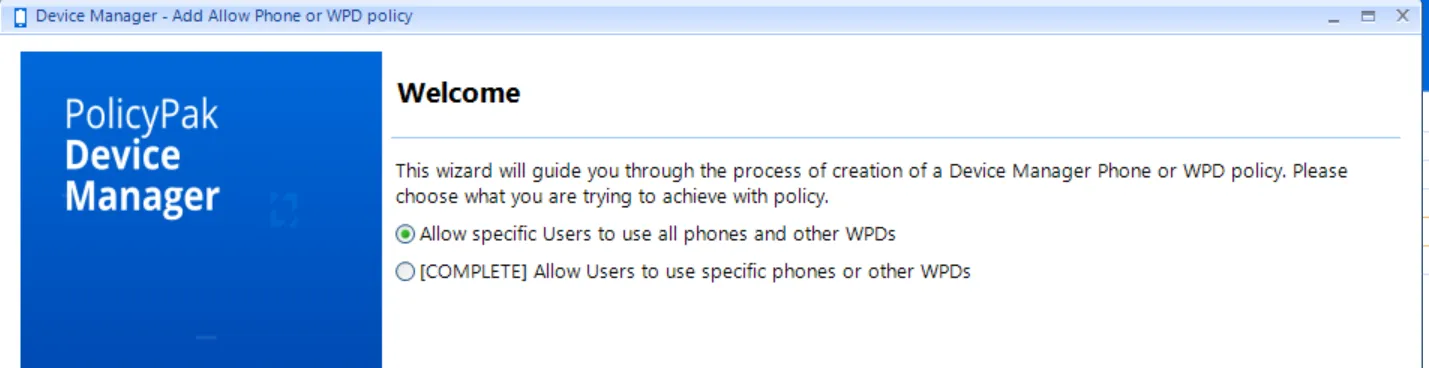
Phone / WPD Policies
WPD stands for Windows Portable Device. WPDS are any kinds of portable storage devices like music players which may have addressable storage. Phone/WPD policies are only Allow/Deny. There is no way to dial in the rights to these devices.
NOTE: Not every kind of Phone or WPD device may be immediately supported because they sometimes use protocols which are unexpected. You may open a support case to investigate if we can attempt to support your unique Phone/WPD device.
If creating a Phone/WPD policy in place with no Global Settings policy, a Wizard will help guide you to configure both a Global Settings policy and a Phone/WPDpolicy at the same time.
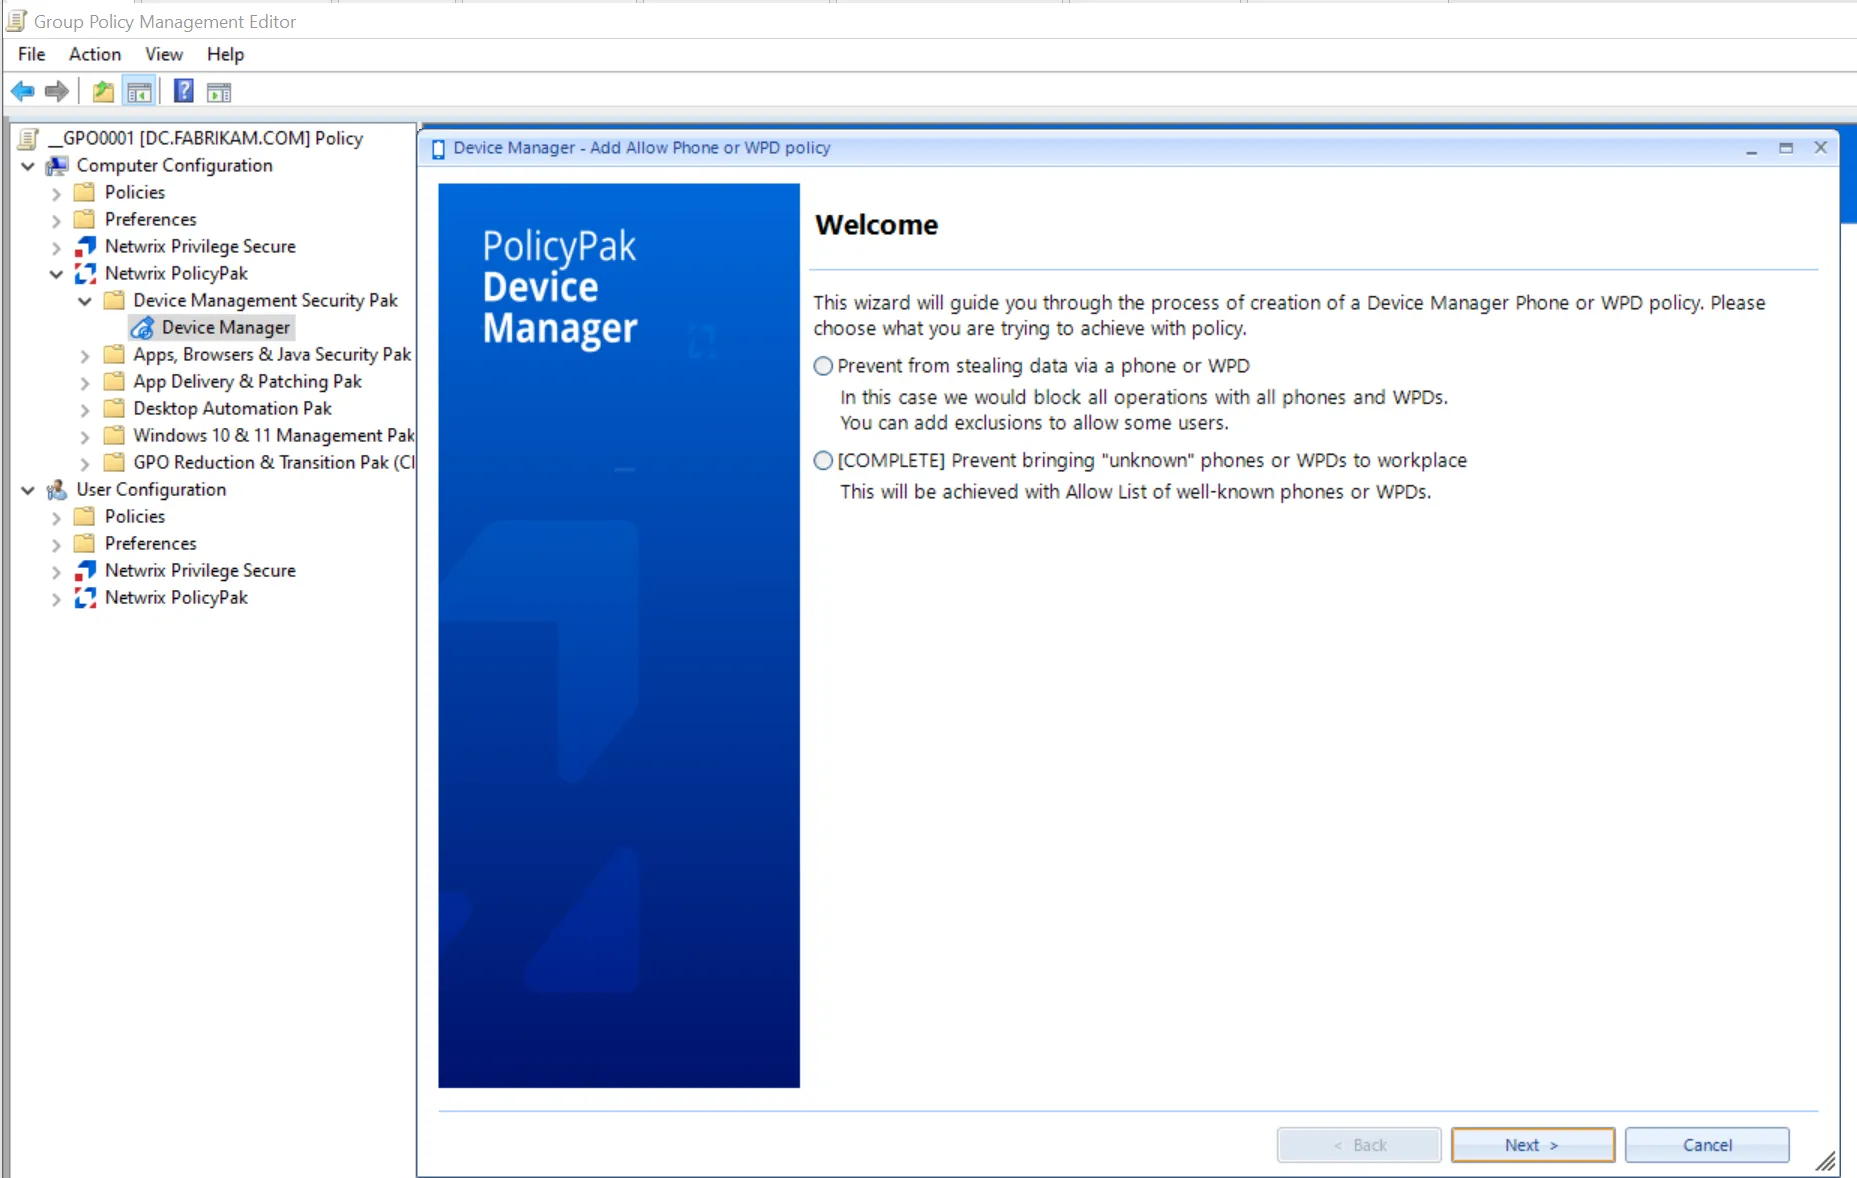
If you already have a Global Settings policy in place, the editor will ask what's seen below, which is similar to the questions when adding a USB device earlier.
The typical route is Allow Users to use specific phones or other WPDs.