How can I roll out the latest Endpoint Policy Manager CSE with Active Directory in a controlled manner using Rings ?
Microsoft recommends that you use to rings concept when performing rollouts of their updates and patches. As such, Netwrix Endpoint Policy Manager (formerly PolicyPak) also strongly recommends you do the same.
Please familiarize yourself with this article before continuing: Using Rings to Test and Update the Endpoint Policy Manager Client-Side Extension and/or Cloud Client (And How to Stay Supported)
If you wish to configure or fine-tune the CSE auto-download process, you may create a file called
update.config, which must be placed within the Endpoint Policy Manager Central Storage CSE folder,
as seen below.
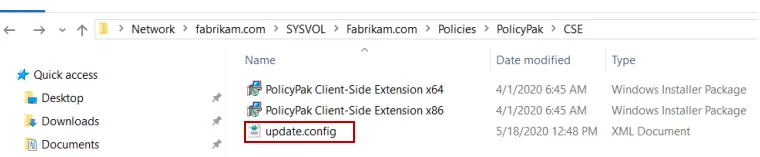
This file can be manually created in order to configure or fine-tune the CSE auto-download process.
This file should be created in the Endpoint Policy Manager Central Storage CSE folder, and the file
name "update.config" must match exactly, otherwise, the file is ignored. The CSE attempts to read
this file once every 90 minutes, but that is configurable in the update.config file itself.
There are two ways to use the newly updated updates.config file:
- Using specific dates and times to make rings and perform a rollout
- Using relative number of hours to make rings and perform a rollout
The idea is that you specify which computers are in what ring. You may have as many rollout rings as you like. Then, you can use the RingCatchAll, which will automatically work for computers which are not specified to be in any ring.
CAUTION: You must pick ONE style and NOT mix the styles.
Therefore, if the first Ring element uses DateTime, then RingCatchAll MUST use DateTime too. If the first Ring element uses HoursBeforeUpdate, then RingCatchAll MUST use HoursBeforeUpdate too.
Some notes:
<DateTime>2021-12-05 15:00:00</DateTime>: This is YEAR-MONTH-DAY and 24:00:00 format.<RandomOffset>60</RandomOffset>: Is optional parameter but doesn't work by itself.<RingCatchAll>is optional. If a computer is not specified within a specific ring, then it will automatically know it should be in the<RingCatchAll>ring.
Example 1: Using specific dates and times to make rings and perform a rollout
<?xml version="1.0" encoding="UTF-8"?>
<PolicyPak>
    <CSE>
        <Updates>
            <Enabled>True</Enabled>
            <GenerateReports>True</GenerateReports>
            <ReportsRoot>\\PDC\Share\Reports</ReportsRoot>
            <CheckForUpdatesInterval>1000</CheckForUpdatesInterval>
            <Rings>
                <Enabled>True</Enabled>
                <Items>
                    <Ring>
                        <DateTime>2021-12-20 13:00:00</DateTime>
                        <RandomOffset>20</RandomOffset>
                        <Computers>
                            <Computer>Clean10.fabrikam.com</Computer>
                        </Computers>
                    </Ring>
                </Items>
                <RingCatchAll>
                    <DateTime>2021-12-21 14:00:00</DateTime>
                    <RandomOffset>60</RandomOffset>
                </RingCatchAll>
            </Rings>
       </Updates>
    </CSE>
</PolicyPak>
Example 2: Using relative number of hours to make rings and perform a rollout
With this method you set your rings apart with number of hours between updates.
NOTE: Use the <HoursBeforeUpdate> value to specify how many hours to delay. Note that if
<HoursBeforeUpdate> is 0, then the update should perform immediately after the CSE checks in and
sees what ring it is in.
<?xml version="1.0" encoding="UTF-8"?>
<PolicyPak>
    <CSE>
        <Updates>
            <Enabled>True</Enabled>
            <GenerateReports>True</GenerateReports>
            <ReportsRoot>\\PDC\Share\Reports</ReportsRoot>
            <CheckForUpdatesInterval>1000</CheckForUpdatesInterval>
            <Rings>
                <Enabled>True</Enabled>
                <Items>
                    <Ring>
                        <HoursBeforeUpdate>2</HoursBeforeUpdate>
                        <RandomOffset>60</RandomOffset> <!-- : Number of minutes. This is an optional parameter and doesn't work by itself. -->
                        <Computers>
                            <Computer>Clean10.fabrikam.com</Computer>
                        </Computers>
                    </Ring>
                    <Ring>
                        <HoursBeforeUpdate>48</HoursBeforeUpdate>
                        <Computers>
                            <Computer>W20h2computer.fabrikam.com</Computer>
                        </Computers>
                    </Ring>
                </Items>
                <RingCatchAll>
                    <HoursBeforeUpdate>72</HoursBeforeUpdate>
                </RingCatchAll>
            </Rings>
        </Updates>
    </CSE>
</PolicyPak>
Breakdown of the parameters for the update.config file and how to use them:
| Parameter | Function | Values | Default if Not Present |
|---|---|---|---|
| Enabled | Enables/disables auto-update | True or False | Enabled (True) by default |
| CheckForUpdatesInterval | Sets a schedule for when the CSE will perform an auto check for a new version | Interval (in minutes) when checking for an update | The default value is 360 (6 hours). |
| MSIROOT | Enables you to point to any share of your choice to house the CSE update (instead of using the Endpoint Policy Manager Central Storage and CSE directory) | Any share name, such as \server123\PPCSES | Defaults to \sysvol\sysvol\ <domain name>\policies\policypak \CSE directory |
| GenerateReports | Facilitates reports to show success or failure of machines' updates | True or False | Disabled (False) by default |
| ReportsRoot | Sets a share up to receive CSE update reports | Any share name, such as \server123\Reports | This is not defined and will not generate reports if GenerateReports is not set. |
| CheckForConfigInterval | Tells the CSE how often to check for updates within this configuration file | Any interval (in minutes) | Defaults to 90 minutes |
| CSE32FILEname | Optional value if you wish to expressly change the name of the 32-bit Endpoint Policy Manager Client-Side Extension MSI | Any file name ending in MSI | By default, the auto-update mechanism is looking for Endpoint Policy Manager Client-Side Extension x86.MSI |
| CSE64FILEname | Optional value if you wish to expressly change the name of the 64-bit Endpoint Policy Manager Client-Side Extension MSI | Any file name ending in MSI | By default, the auto-update mechanism is looking for Endpoint Policy Manager Client-Side Extension x64.MSI |
NOTE: The ReportsRoot value should be set if GenerateReports is enabled (true).
NOTE: ReportsRoot and MSIROOT parameters supports environment variables, such as %LogonServer% and so on, if you care to use them.
Setting up the Reports Share and Verifying Reports Are Working:
The share for reports should have the following permissions:
- Administrator should be set to Read/Write (owner)
- Domain Computers should be set to Read, Write, Create (but not Delete)
- NTFS permissions should allow for All.

NTFS permissions should be set up as shown below, where Domain Computers has all rights, except Full Control.
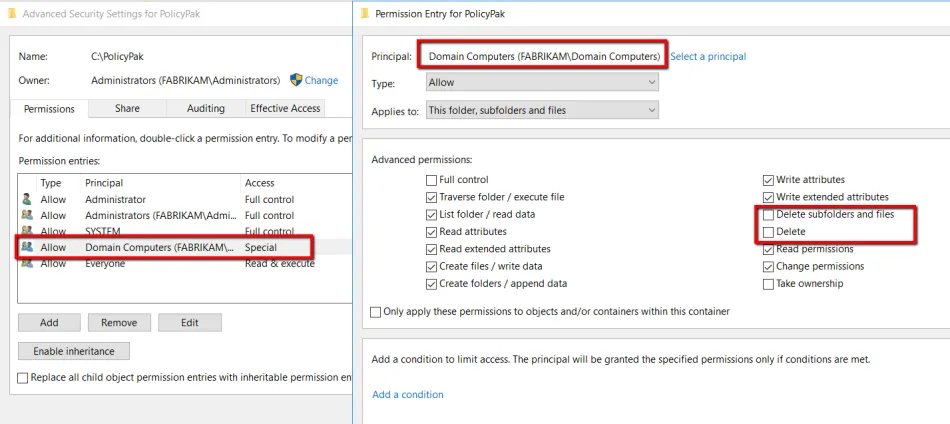
This way, domain computers (that is, endpoints) will be able to write reports but not delete reports that they create. When enabled and configured, inside the share, you'll see log files named in the following way:
<ReportsRoot>\<fully qualified computer name>.log. An example of this naming convention would be:
\\dc\Reports\WIN7COMPUTER32.fabrikam.com.log
When you look inside the file, you will see something similar to the following text, with one line for each CSE update that is performed.
Fri Mar 15 22:54:25 2013: CSE has been updated from 3.7.545 to 4.1.711
Sat Mar 16 23:09:46 2013: CSE has been updated from 4.1.711 to 4.2.721
Manually Triggering Updates
Endpoint Policy Manager products have four command-line commands to help with updating on demand.
ppupdate /cseupdatering. Forces a machine to check if the machine is in theupdate.configfile.ppupdate /cseupdate. When run from a target computer, this command will instruct the CSE to reread theupdate.configfile, which is present in the SYSVOL. You might want to do this if you recently updated theupdate.configfile and would like the client to know about those changes. Note that this command will not perform the actual update of the CSE, instead it will simply read the file and honor the new schedule and any changes.ppupdate /cseupdatenow. When run from a target computer, this command will instruct the CSE to reread theupdate.configfile and perform any needed updates immediately.ppupdate /cseupdatenow /force. When run from a target computer, this command will instruct the CSE to reread theupdate.configfile and perform any needed updates immediately.
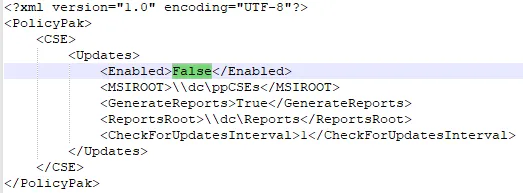
NOTE: This is necessary only when the update.config file's enabled variable is set to "False"
and, thus, not performing any updates normally.
Troubleshooting CSE Automatic Updates
All machines should report something to the log files share (if set up in the update.config file)
and produce either a success or failure message. If you do not see a particular machine update or
perform a report, you can troubleshoot that machine individually. On the client machine, inspect the
following two Endpoint Policy Manager On-Prem Suite's log files:
- Endpoint Policy Manager MSI logs are generated in
%programdata%\endpointpolicymanager\ppInstall-<build>.log. - Additional logs (to see if the CSE is finding the
update.configfile at all) are found in%programdata%\endpointpolicymanager\ppWatcher.log(for 32-bit machines) or%programdata%\endpointpolicymanager\ppWatcher_x64.log(for 64-bit machines).