How to install and configure the PPC Client for a Non-Persistent VDI Image in VMware Horizon
The end goal is to install the Netwrix Endpoint Policy Manager (formerly PolicyPak) Cloud (PPC) Client in a non-registered state on the Gold image, then unregister the PPC client on any provisioned VDIs at shutdown before re-provisioning. Below is an example using VMware Horizon 7, though the same process should work for other VDI Solutions as well.
Step 1 – Boot up the Gold Image VM to the OS screen and login with an account that has local Administrator privileges.
Step 2 – Create a folder called PPC Client under the root of the C: drive on the Gold Image VM.
Step 3 – Download the required Endpoint Policy Manager Cloud Client MSI package (version
20.5.2449.838 or higher) to the Gold Image Desktop, and save it under the C:\PPC Client folder on
the Gold Image VM.
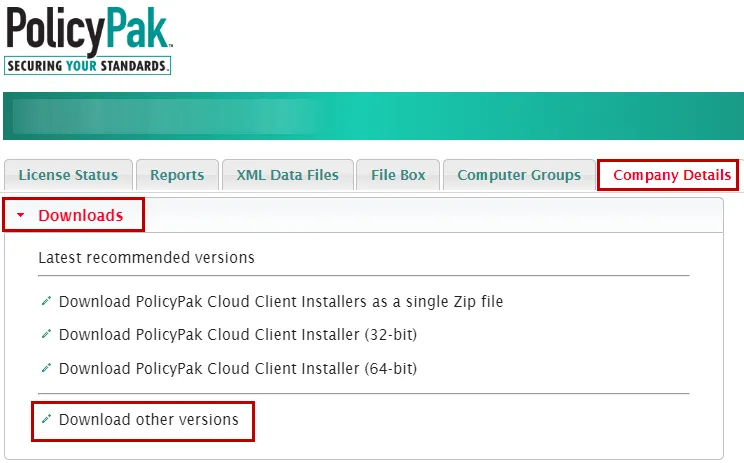
Endpoint Policy Manager Cloud Client version 20.5.2449.838 and higher can be found within your PPC Portal on the following page https://cloud.endpointpolicymanager.com/ManageCustomer/UserList under the Downloads section, by clicking on the Download other versions link at the bottom of the page.

Step 4 – On the Gold Image VM, while logged in as a local administrator, install the Endpoint
Policy Manager Cloud Client MSI that you copied under "C:\PPC Client", (double-click MSI to
install, etc.)
If you would like all VDIs created from this Master Image to automatically join one or more computer groups, you should install the PPC Client using the command line instead, for example:
msiexec /i "PolicyPak Cloud Client for[Customer name].msi" JOINTOKEN="AZAEllLPLTY9XKUA3CYO+ths="
The JOINTOKEN value is specific to each environment, the value used above is provided as an example only. For more information on using JOINTOKEN to automatically assign computers to computer groups in PPC please see this video: Endpoint Policy Manager Cloud: Automatically Join Groups with JOINTOKEN
Step 5 – Next, create an empty text file named logoff.bat under the same folder where we saved
the PPC Client MSI earlier (C:\PPC Client). Edit logoff.bat using notepad and add the line
below:
PPCloud /sysprep
NOTE:
-
If using JOINTOKEN then you must also specify the JOINTOKEN value for the PPCloud /sysprep command above.
For example:
PPCloud /sysprep /jointoken:AZAEllLPLTY9XKUA3CYO+ths= -
When testing using Logoff, remember to restart the Endpoint Policy Manager Cloud Client service to have it register with the PPC portal again if needed.
-
PPCLOUD /SYSPREP requires local administrator rights. You need to use Endpoint Policy Manager Least Privilege Manager to also create a rule to allow PPCloud /SYSPREP to run elevated if the user logging off is not an Administrator of the computer. If you need help with creating this LPM policy please contact support.

The ppcloud /sysprep switch was intended to be used on the golden image. It can be used only after the PPCloud Client is installed. There's no need to use the full path, and you can run ppcloud /sysprep from the Command Prompt, or PowerShell.
This unregisters the computer (no record on PPC portal, no license consumed, etc.), removes all the policies, and stops the Endpoint Policy Manager Cloud Client service. The machine will be registered with the Endpoint Policy Manager Cloud portal after a reboot (i.e. after the image is deployed as a VDI). You can use it regardless of whether Microsoft's sysprep tool is involved or not.
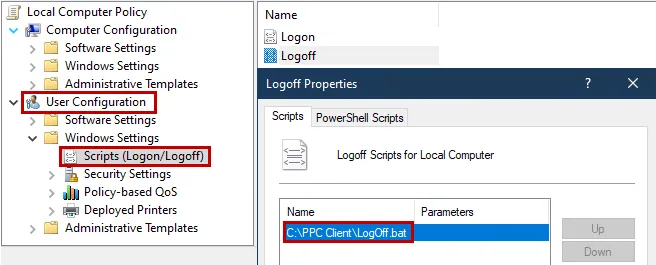
Step 6 – Run GPEDIT.MSC and add an entry under User Configuration > Windows Settings >
Scripts (Logon/Logoff) under Logoff that points to the logoff.bat file you previously
created, then click OK to save the settings.
Step 7 – Shutdown the Gold Image VM.
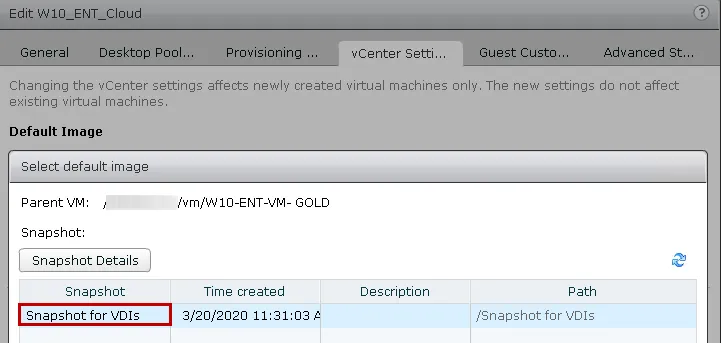
Step 8 – Take a snapshot to be used for new VDIs, then import your updated Gold Image into your VDI solution (update the Desktop Pool settings to use the new snapshot etc.).

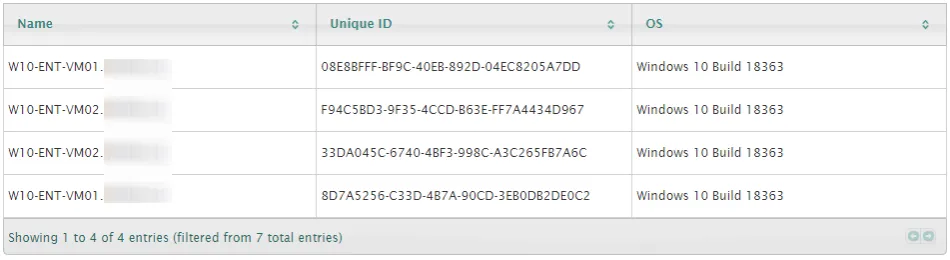
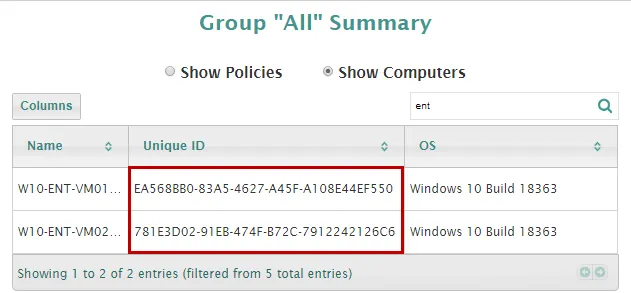
Step 9 – Deploy two VDIs, then check in your PPC portal to ensure the newly created VDIs are registered successfully and have different Unique IDs. The VDIs by default will show up in the All computer group. Take note of the Unique IDs for these VDIs (screenshot etc.). You can use the Columns button to change which columns are visible so you can see the Unique ID column.
Step 10 – Log into both VDIs using the VMware Horizon Client, wait for the OS to load completely, then logoff or shutdown both VDIs. Within the PPC portal you should see the two machines disappear almost immediately when the logoff task runs on each machine.
Step 11 – Wait for the two VDIs to be deleted and re-provisioned, then check in your PPC portal to see if both of the VDIs received new Unique IDs. If they did, then the process was successful.
Step 12 – If instead you see duplicate machine names similar to the screenshot below then the process failed. Revisit the steps above to see if anything was missed. If after verifying all steps you find that this process still did not work for you please contact support for further assistance.