How do I add the Least Privilege Manager Helper tools to the Left and Right side of the Start Menu?
To give your users a little more control over their computer, The LPM Helper Tools allow the administrator to give the end-user power over printers, network connections and the ability to uninstall applications.
This article will explain the process of adding the helper to the Windows Start Menu – Left and/or right side.
For more information on the Helper Tools, click Overcome Network Card, Printer, and Remove Programs UAC prompts.
To enable the helper tools and give the power to the users, click Endpoint Policy Manager Least Priv Manager Tools Setup, and follow the directions. The helper tool must be enabled to work.
Adding the LPM Helper Tools to the Right Start Menu
For this side, Start Screen Manager will be used to place the icons.
Step 1 – Open the GPMC on your management station and create a new GPO where desired and edit it
NOTE: This can also be added as part of the Least Privilege Manager policy GPO used to enable the helper tools
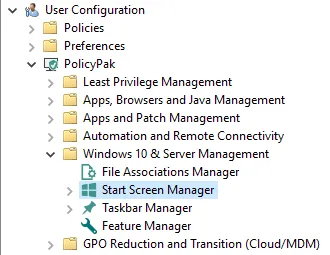
Step 2 – Expand User or Computer Configuration -> Netwrix Endpoint Policy Manager (formerly PolicyPak) -> Windows 10 & Server Management and click on Start Screen Manager
(this example will use the user configuration)
Step 3 – Add a new Collection

Step 4 – Name the Collection and under Layout Mode, select either Full (Replacement of the user's start menu) and Partial (Preserving the user's start menu). Partial Preserve is generally recommended as the end users still have access to modify the rest of the start menu.
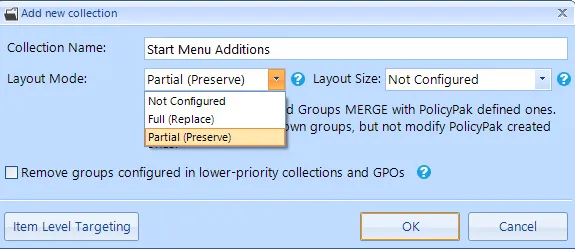
NOTE: Item Level Targeting may be used to filter who or what gets the policies within this collection
Step 5 – Open the collection and add a New Group

Step 6 – Complete Group information
-
Group Name: The title of the group that will appear on the end user's start menu
-
State: Enabled
-
Action: choose between Create, Replace and Update
- The default, and recommended here, is to "Update" any existing group and check "Create if not present"
-
Update Mode: If Update is the selected action, and the group name you selected already exists, do you want to new icons at the top or tail of the group?
-
Placeholder: If an application / link is missing and the tile cannot be created, do you want a Gap in its place, or an Edge Link (a tile that will open in the Edge Browser)?
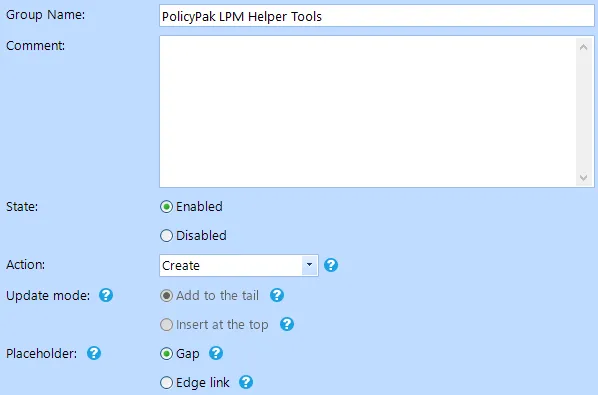
NOTE: ILT can also be implemented here instead of at, or in addition too, the collection level.
Step 7 – Open the new group just created
Step 8 – Add new Desktop Application

Step 9 – Select Custom Application

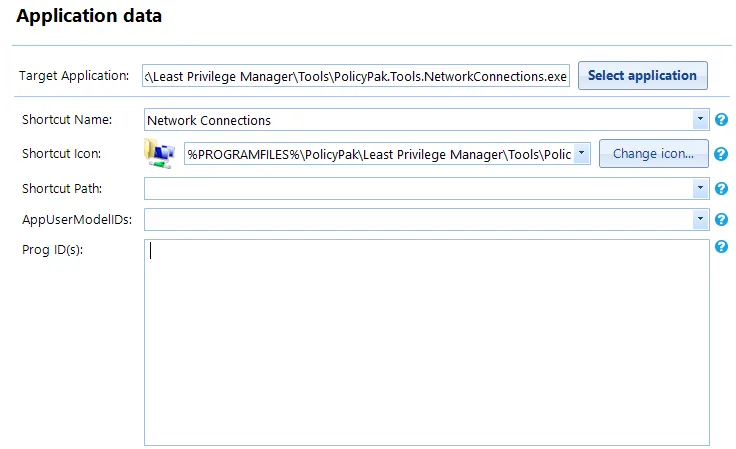
Step 10 – Click "Select application" and browse to "C:\Program Files\PolicyPak\Least Privilege Manager\Tools" and select one of the three EXEs

Step 11 – Complete Application data page
- Shortcut Name: Rename to something descriptive
- Shortcut Icon: If path is not complete, click on Change icon… and browse back to EXE directory and select the same file
Step 12 – Set icon size and position as desired, if different from default

Step 13 – Confirm settings and Finish
Step 14 – Repeat steps 7 through 12 for each Helper Tool needed
- Network Connections
- Printers
- Remove Programs
The changes will be implemented on the User's computer once Group Policy has been updated (either automatically or manually by running "GPUpdate", and the user, at minimum, logs off and back on again.
Adding the LPM Helper Tools to the Left (All Applications) Menu
If you have already created tiles on the right start menu, these, and any other tiles you created using Start Screen Manager or Task Bar Manager, will appear in a folder named "Endpoint Policy Manager Start Screen Manager". If this is sufficient, you can leave it as is. However, if you had not completed the right-side option above, or would like to separate the icons into their own folder, continue with the process below.
Step 1 – Open the GPMC on your management station and create a new GPO where desired or use the GPO for the right-side icons
NOTE: This can also be added as part of the Least Privilege Manager policy GPO used to enable the helper tools.
Step 2 – Expand User or Computer Configuration -> Preferences -> Windows Settings and click on Shortcuts

Step 3 – Right-click and create a New -> Shortcut

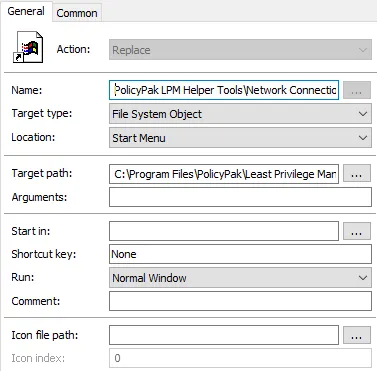
Step 4 – Fill in the shortcut properties page as follows
-
General Tab
-
Name: Name of the shortcut, including parent folder (e.g. "Endpoint Policy Manager LPM Helper Tools\Network Connections" – This is what will be seen in All Apps)
-
Target type: File System Object
-
Location: Start Menu
-
Target Path: Click "…" and browse to "C:\Program Files\PolicyPak\Least Privilege Manager\Tools" and select one of the three EXEs (e.g. C:\Program Files\PolicyPak\Least Privilege Manager\Tools\endpointpolicymanager.Tools.NetworkConnections.exe)
-
-
Common Tab
-
Check "Remove this item when it is no longer applied"

-
Step 5 – Click OK to close the window
Step 6 – Repeat steps 3 through 5 for each Helper Tool needed
- Network Connections
- Printers
- Remove Programs
Changes to the Left side are immediate and do not need a log off.