Deep Packet Inspection
The Deep Packet Inspection functionality provides a certain degree of granularity, allowing you to fine-tune the content inspection functionality to the network specifications.
NOTE: Enabling Deep Packet Inspection could impact upload speed of inspected files. Use our network extension instead of Packet Filter as a possible workaround (i.e., turn Intercept VPN Traffic on).
CAUTION: Newer Linux Ubuntu versions have 'snap'-based applications installed by default, affecting Endpoint Protector Client functionality. This may result in missing file-related events in DPI file resolution. The reliance on 'snap'-based applications also affects file-related web browser activities, exacerbating this limitation. Consider non-’snap’-based applications (where possible) as alternative configurations for optimal functionality.
CAUTION: To ensure consistent DPI behavior after enabling or disabling the feature or upgrading the Endpoint Protector, a restart of your computer is required.
Deep Packet Inspection Certificate
The Deep Packet Inspection functionality uses Certificates generated from Endpoint Protector Root Certificate Authority to intercept network traffic by Deep Packet Inspection and for Client-Endpoint Protector Server communication.
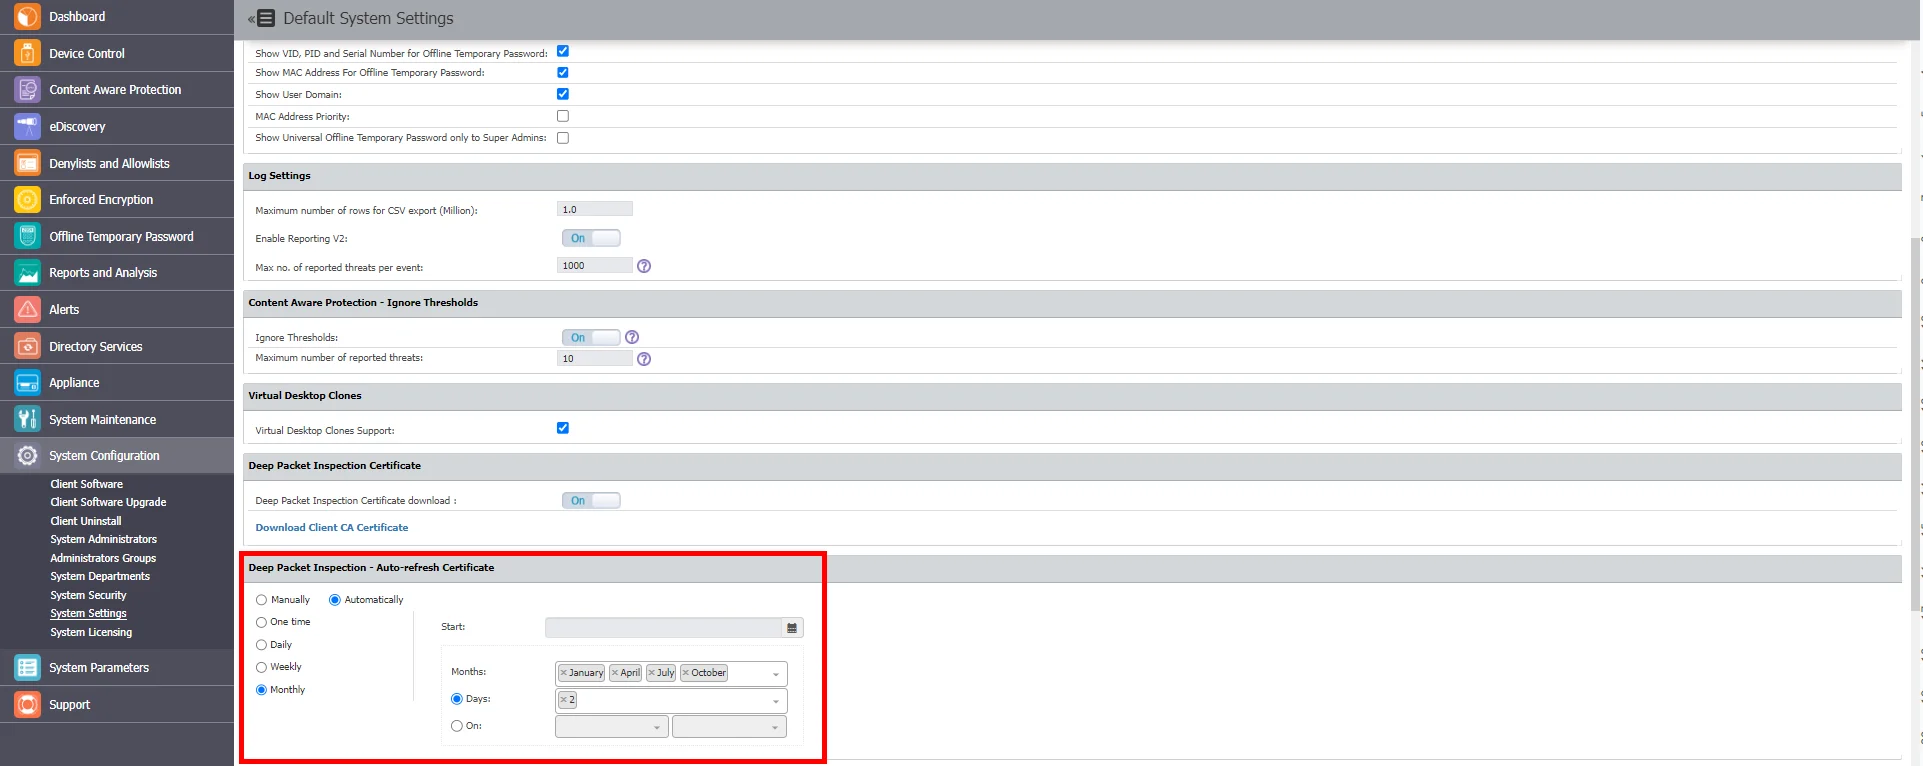
Endpoint Protector offers the option to automatically refresh Certificates with various scheduling alternatives. After a new Certificate is generated, it will be sent in to the Client and replace the existing one.
To configure Deep Packet Inspection - Auto-refresh Certificate feature, please reference the following steps:
Step 1 – Go to System Configuration > System Settings> Deep Packet Inspection - Auto-refresh Certificate and chose Automatically option
Step 2 – Choose one of available scheduling options and Save changes.
Step 3 – New Certificate will be distributed automatically to the endpoints after it is generated.
Step 4 – Reboot the endpoint to enforce a new Certificate.
NOTE: Issuing the Deep Packet Inspection Certificate on Windows is handled automatically and transparently by the Endpoint Protector Client. No additional steps are required.
Deep Packet Inspection Certificate on macOS
Due to the latest changes in the macOS 11.0 that affect Deep Packet Inspection, a new Root Certificate is needed in order for the Deep Packet Inspection feature to work on the mentioned macOS version.
NOTE: Deep Packet Inspection will only work on macOS 11.0 and newer if Deep Packet Inspection Certificate is added for the Endpoint Protector Client.
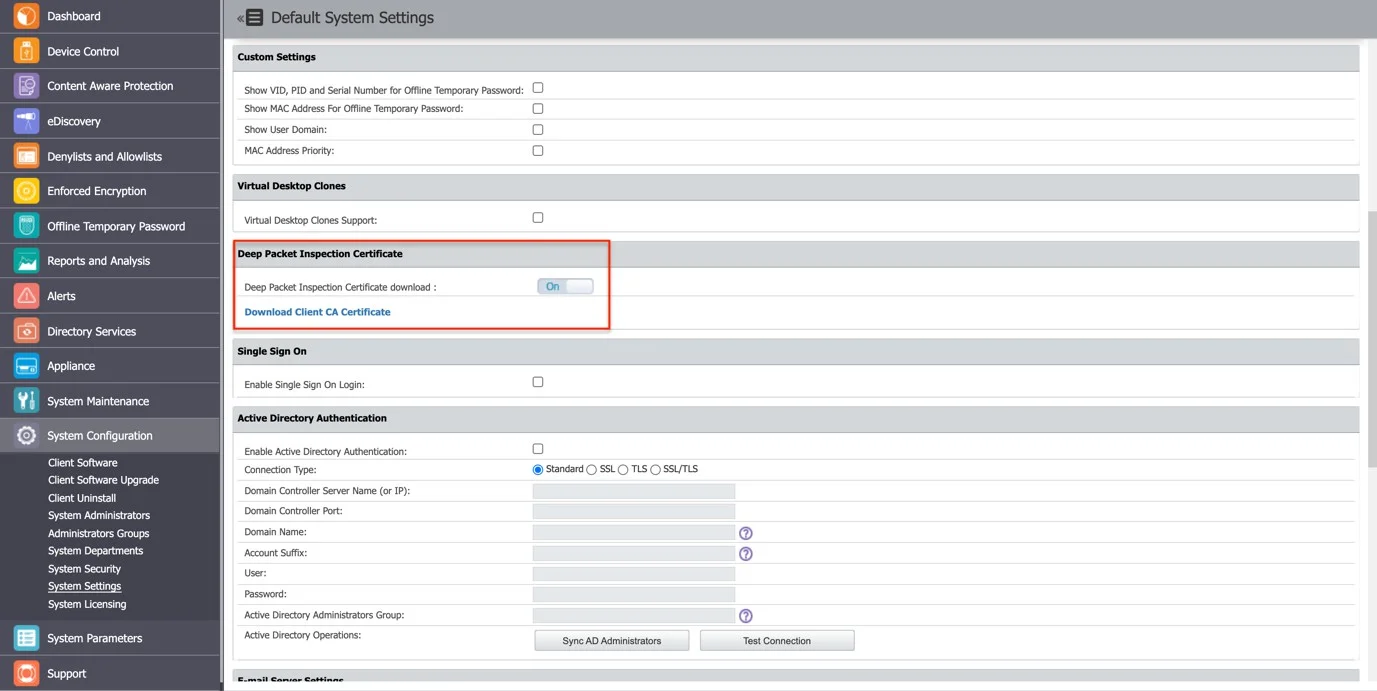
This certificate can be downloaded from System Configuration, System Settings, and Deep Packet Inspection Certificate and added manually or automatically through deployment solutions.
To add it manually, follow these steps.
Step 1 – Go to System Configuration >System Settings >Deep Packet Inspection Certificate,
and download the CA Certificate.
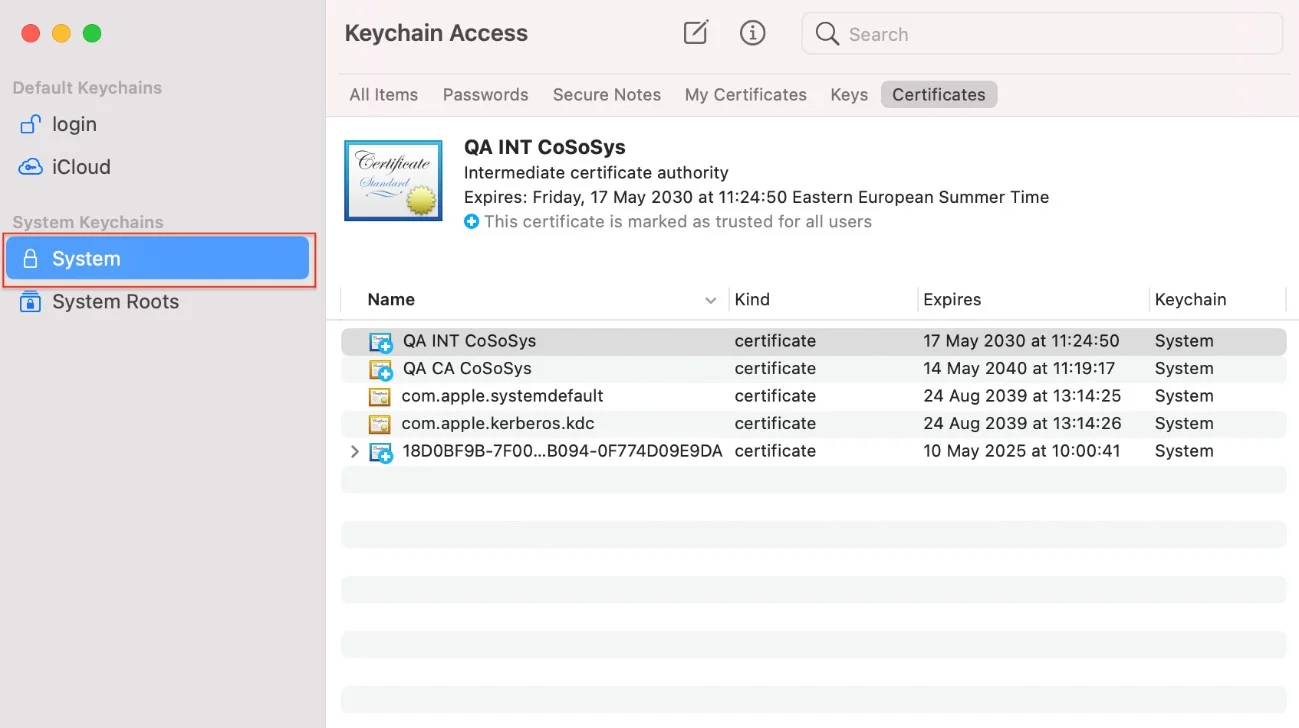
Step 2 – Open the Keychain Access application from your macOS and select System.
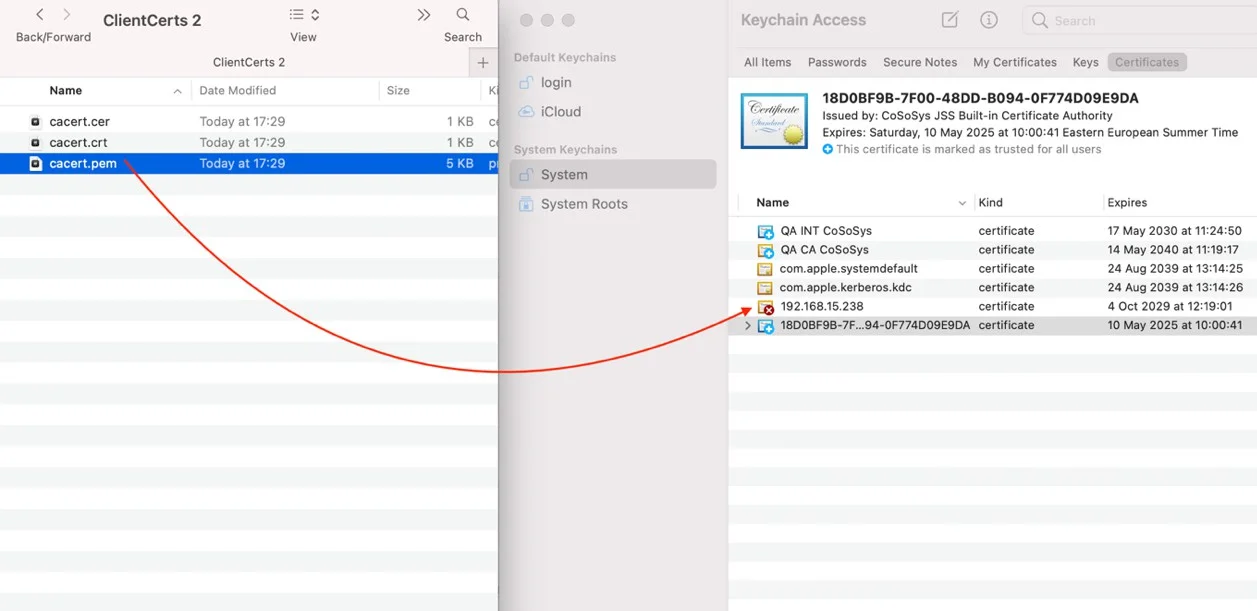
Step 3 – Decompress the downloaded ClientCerts file.
Step 4 – Select cacert.pem file and drag and drop it on System > Keychain Access.
Step 5 – Double click the X from the newly added certificate and from the Trust section, select Always Trust.
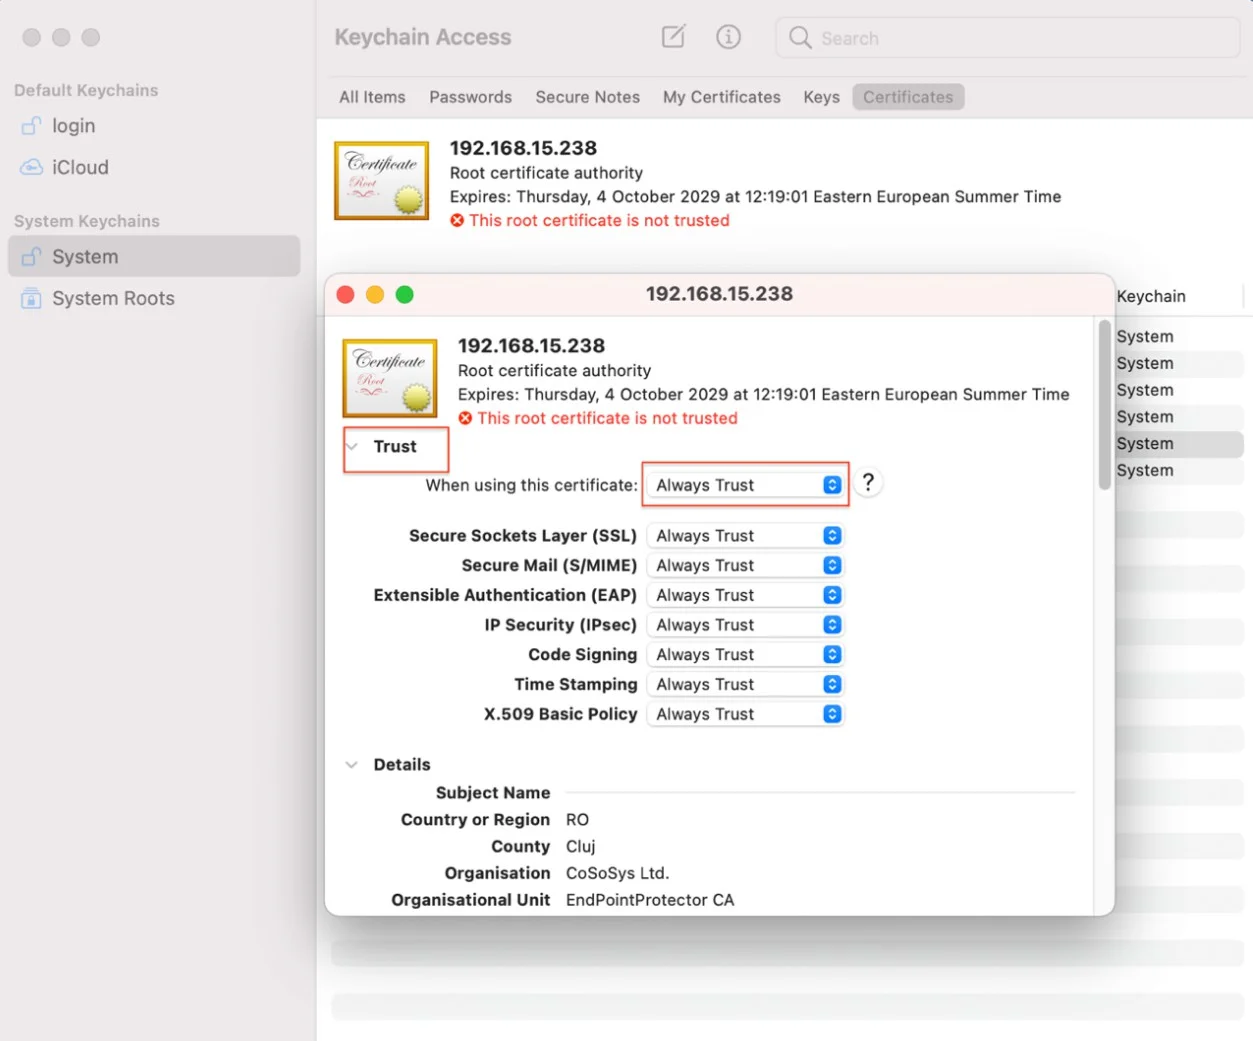
Step 6 – Save the changes.
CAUTION: Please be aware that regenerating the Server Certificate Stack will require macOS and Linux users to manually add the new certificate into the keychain. On Windows, the certificate will be updated automatically.
Deep Packet Inspection Certificate on Linux
Due to system-level requirements in Linux, adding the Deep Packet Inspection certificate involves specific steps to ensure compatibility. The certificate enables Endpoint Protector to perform secure inspection for printing and file transfers to MTP devices. The process differs slightly for Debian-based and Red Hat-based systems.
NOTE: Ensure the cacert.pem certificate is downloaded from the Endpoint Protector Server and properly configured for your Linux distribution.
Follow the steps below, specific to your Linux distribution, to configure the certificate manually.
Debian-based Systems (e.g., Ubuntu)
Step 1 – Download the archived certificates from the Endpoint Protector Server.
Step 2 – Unzip the certificate file:
unzip ClientCerts.zip
Step 3 – Copy the cacert.pem file to the trusted certificate directory and rename it to .crt:
sudo cp cacert.pem /usr/local/share/ca-certificates/cacert.crt
Step 4 – Update the system's certificate store:
sudo update-ca-certificates
Red Hat-based Systems (e.g., RHEL, Fedora)
Step 1 – Download the archived certificates from the Endpoint Protector Server.
Step 2 – Unzip the certificate file:
unzip ClientCerts.zip
Step 3 – Copy the cacert.pem file to the appropriate directory for trusted anchors:
sudo cp cacert.pem /etc/pki/ca-trust/source/anchors/
Step 4 – Update the system's certificate store:
sudo update-ca-trust
Additional Resources
For more details on certificate installation and management on Linux, see the following references:
- Installing a Root CA Certificate in Ubuntu's Trust Store
- Configuring the CA Trust List on Red Hat
- Managing CA Certificates on Linux
CAUTION: Ensure the certificate is added correctly for the Endpoint Protector Client to function properly. If the Server Certificate Stack is regenerated, Linux users must manually reconfigure the certificate using the steps above.
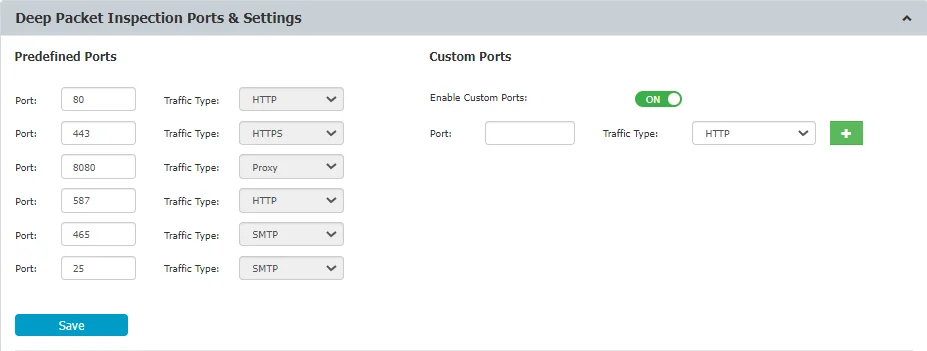
Deep Packet Inspection Ports and Settings
From this section, you can correlate the monitored applications with the ports used in each network, manage settings and add allowed domains for the Gmail provider.
By default, the Deep Packet Inspection functionality comes with a list of predefined ports (80, 443, 8080, etc.). You can add ports from this section, if custom ports are used in a specific network, particularly by one of the monitored applications defined as an Exit Point within a Content Aware Protection Policy.
In this section you can also manage the following settings:
-
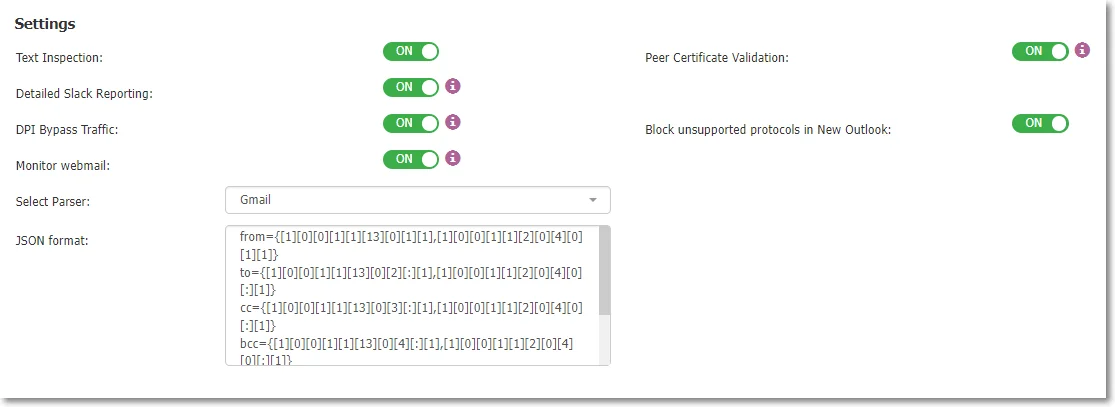
Text Inspection - enable this setting to monitor confidential content typed in Teams, Skype, Slack, Mattermost or Google Spreadsheet, Facebook Post, Facebook Comment, and Instagram Comment online applications.
NOTE: For comprehensive visibility while using 'Teams over web' in a MS Edge browser, make sure to enable Edge under Policy Exits Points > Applications > Web Browser in the CAP policy.
CAUTION: In blocking mode, Instant Messaging events related to platforms such as Slack and Google Chat might be generated multiple times. This behavior is attributed to the tools' inherent retry mechanisms when a message is blocked. Endpoint Protector is designed to block all such retry attempts for enhanced security.
-
Detailed Slack Reporting – to access this setting, ensure Text Inspection is enabled and use Reporting V2 from System Configuration > System Settings. Once enabled, you can view Destination Details for Slack on the Content Aware Report page in the Reports and Analysis section.
NOTE: This setting requires an active Internet connection for the Endpoint Protector Client.
-
Block unsupported protocols in New Outlook – Enable this setting to block the send email functionality in the New Outlook without interacting with the Outlook legacy functionality.
-
Monitor webmail – Enable this setting to scan the subject and body for Gmail, Outlook and Yahoo on the browser. Attachments will be monitored regardless of this setting.
CAUTION: When using Yahoo, the email recipients whitelist for attachments will work only if the attachment is uploaded after the recipients are added. If the recipients are modified after the attachment has been added, the file will not be scanned again and validated against the new recipients list. Inconsistent behavior may be experienced on Linux machines.
You can also use the Monitor webmail feature to detect source code for web browsers emails in subject and body. For email applications, source code can be detected in subject, and for the body, source code cannot be enabled for detection without breaking other functionality.
NOTE: Always use Monitor webmail with Extended Source Code Detection setting enabled.
-
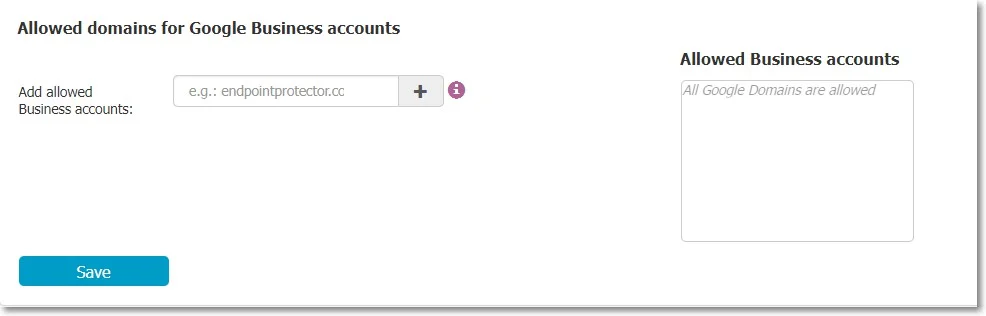
Allowed domains for Google Business accounts - You can use this setting to allow the users to access specific Google domains for professional usage when Deep Packet Inspection is enabled.
To specify the allowed business accounts, type an entry on the Add allowed Business accounts and then click +
The new entry will be displayed on the Allowed Business accounts list, from where you can delete by clicking X.
CAUTION: Endpoint Protector will block access to all Google domains (business and private) used for Gmail, Google Drive, Google Docs, etc. that are not listed here. If the list remains empty, no Google domain will be blocked.
Monitor Webmail JSON Format Parser Usage
To use this setting, you need to be familiarized with JSON concepts and structures.
Go over the following Syntax examples considering the values used are the default values from the Endpoint Protector Server UI:
-
You can specify multiple paths, separated by a comma "," inside the curly brackets. The paths will then be parsed and used, in the specified order, one by one, until the information is successfully extracted
-
[:] takes all entries from the array and parses the result, and can be used with both of the following examples:
-
Subject extraction example for Yahoo:
__subject={requests[:].payloadParts[:].payload.message.headers.subject}__-
Uses named key-value pairs and arrays ([])
for example; If the [:] array located at the requests key has 3 elements, the path will be expanded for each element:
- requests[0].payloadParts[:].payload.message.headers.subject
- requests[1].payloadParts[:].payload.message.headers.subject
- requests[2].payloadParts[:].payload.message.headers.subject
The process is then repeated for the payloadParts array,
-
-
Subject extraction example for Gmail:
__subject={[1][0][0][1][1][13][0][7]}__- Uses only nested arrays
- The subject here is located at a specific path inside nested arrays without having to go through all elements of a specific array and use [:]
RECOMMENDED: It is advised, that due to recent changes applied by cloud providers, to not apply any changes in the JSON parser, unless Monitor Webmail is not working
Note on Peer Certificate Validation Usage
If Deep Packet Inspection is ON and Peer Certificate Validation is enabled then you cannot access unsecured websites and a certificate warning message is displayed.
If Deep Packet Inspection is ON and Peer Certificate Validation is disabled then you can access unsecured websites and no certificate warning messages are displayed.
For Example; your organization uses an SSL inspection proxy or gateway. The certificates injected by the proxy or gateway cannot be validated on the endpoint because they are either invalid or the issuer CA certificate is not installed in the "Trusted Root Certification Authorities" in the computer certificate store. To allow Deep Packet Inspection to work in this case you must skip peer certificates validation. Endpoint Protector Client assumes that in this case the peer certificate validation is performed by the proxy or gateway so that security is not compromised.
Deep Packet Inspection Applications
From this section, you can enable or disable the Deep Packet Inspection functionality for each application that is subject to this functionality.
NOTE: Only the applications that support Deep Packet Inspection are available in the list below.
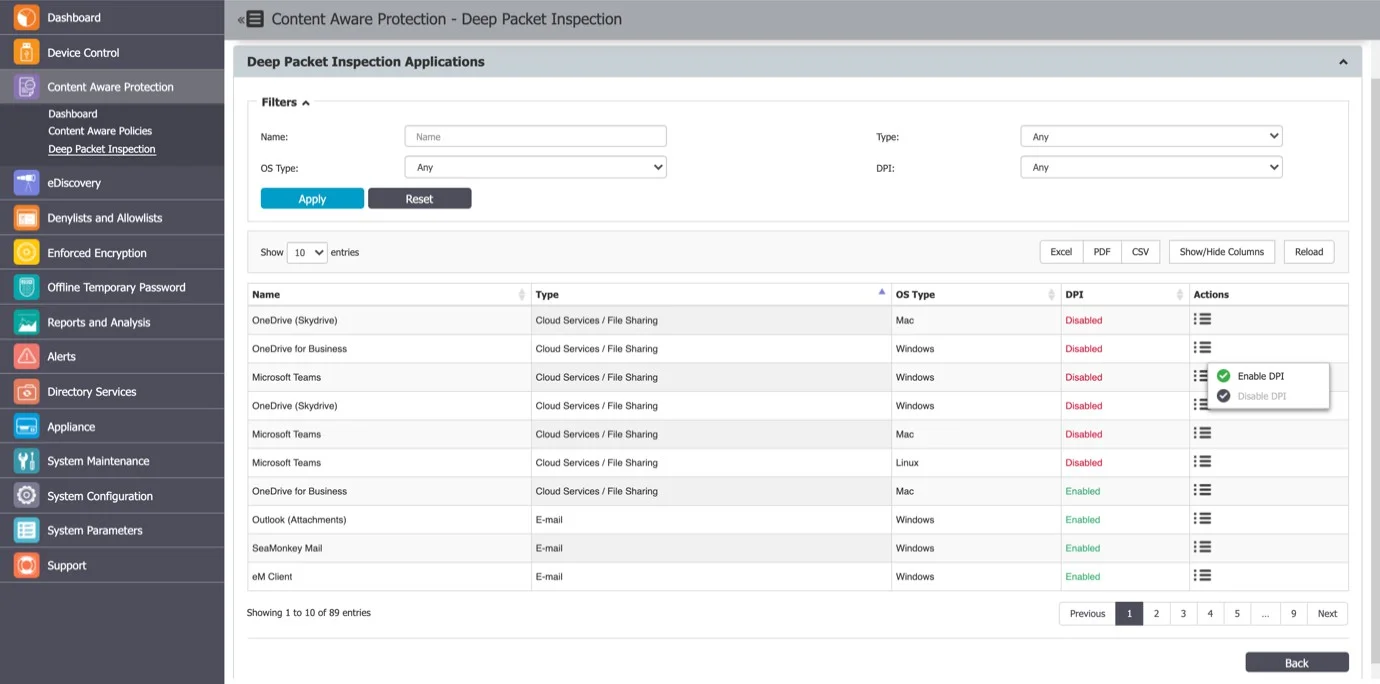
NOTE: The Deep Packet Inspection functionality needs to be first enabled from Device Control > Settings (Global, Groups, Computers, etc.). For detailed information on, refer to the Device Control topic.
Certificate status matrix
The following table lists when Endpoint Protector Server reports specific states:
| OS | is Available | is Trusted | Server Side |
|---|---|---|---|
| macOS | N/A | N/A | N/A |
| macOS | N/A | 0 | N/A |
| macOS | N/A | 1 | N/A |
| macOS | 0 | N/A | Not added |
| macOS | 0 | 0 | Not added |
| macOS | 0 | 1 | Not added |
| macOS | 1 | N/A | Not trusted |
| macOS | 1 | 0 | Not trusted |
| macOS | 1 | 1 | Trusted |
| Linux | N/A | N/A | N/A |
| Linux | N/A | 0 | N/A |
| Linux | N/A | 1 | N/A |
| Linux | 0 | N/A | N/A |
| Linux | 0 | 0 | N/A |
| Linux | 0 | 1 | N/A |
| Linux | 1 | N/A | N/A |
| Linux | 1 | 0 | N/A |
| Linux | 1 | 1 | N/A |
| Windows | N/A | N/A | |
| Windows | 0 | Not added | |
| Windows | 1 | Trusted |
NOTE: Linux has dedicated certificate stores.
NOTE: On Windows, if the certificate is added, it is automatically trusted.