Denylists
Custom Content
Custom Content denylists are custom-defined lists of terms and expressions detected as sensitive content by Endpoint Protector, available for both Content Aware Protection and eDiscovery modules.
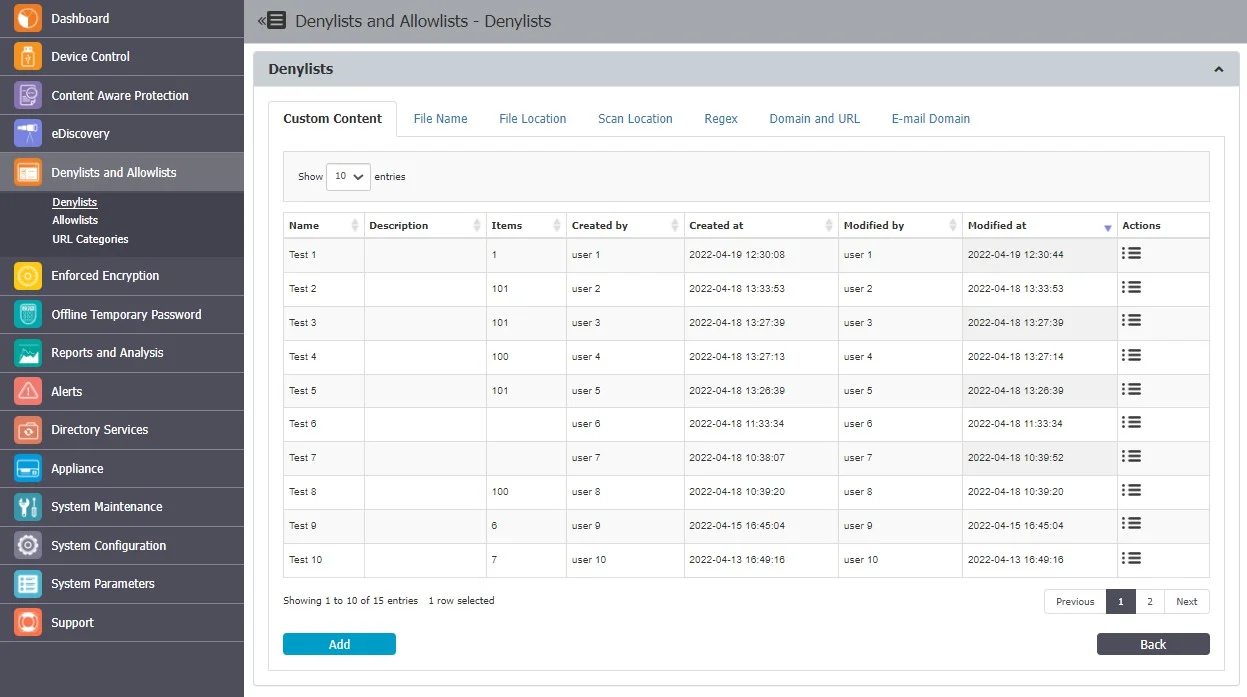
From this section, you can view and add e-mail custom content denylists and from the Actions column, you can edit, delete or export an existing denylist.
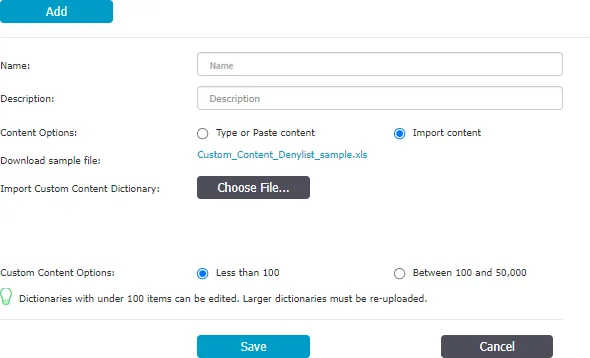
To create a new denylist, under the list of available denylists, click Add, provide a name and description and then type or paste items at least three characters separated by a new line, comma, or semicolon. You can import content using the sample file provided on the form and then select the option based on the number of uploaded items.
NOTE: Dictionaries of under 100 items can be edited, while larger dictionaries have to be uploaded again.
Once the denylist is created, it will be displayed on the Custom Content list and will be available when creating or editing a Content Aware Protection or eDiscovery policy.
File Name
File Name Denylists are custom-defined lists of file names detected by Endpoint Protector, available for both Content Aware Protection and eDiscovery modules.
From this section, you can view and add filename denylists and from the Actions column, you can edit, delete or export an existing denylist.
To create a new denylist, under the list of available denylists, click Add, provide a name and description and then type or paste the file names separated by a new line, comma, or semicolon. You can import content using the sample file provided on the form.
You can define the content by adding the filename and extension, or just the extension.
Examples: Matching and Non-Matching for File Names like “example.pdf”:
- Matching – example.pdf, my_example.pdf
- Non-Matching – example.txt, myexample.txt, test.pdf, example.pdf.txt, test_example.pdf_test.zip
Examples: Matching and Non-Matching for File Extensions like “.epp”:
- Matching – test.epp, mail.epp, 123.epp
- Non-Matching – 123.epp.zip, mail.epp.txt
Once the denylist is created, it will be displayed on the File Name list and will be available when creating or editing a Content Aware Protection or eDiscovery policy.
CAUTION: For Content Aware Protection, the File Name Denylists work only for Block & Report type Policies. The Case Sensitive and Whole Words Only features do not apply.

File Location
File Location Denylists are custom-defined lists of locations identified by Endpoint Protector. File transfers within this location are automatically blocked, regardless of the content inspection rules or permissions defined in various Policies.
File Location Denylists are available for both Content Aware Protection and eDiscovery modules.
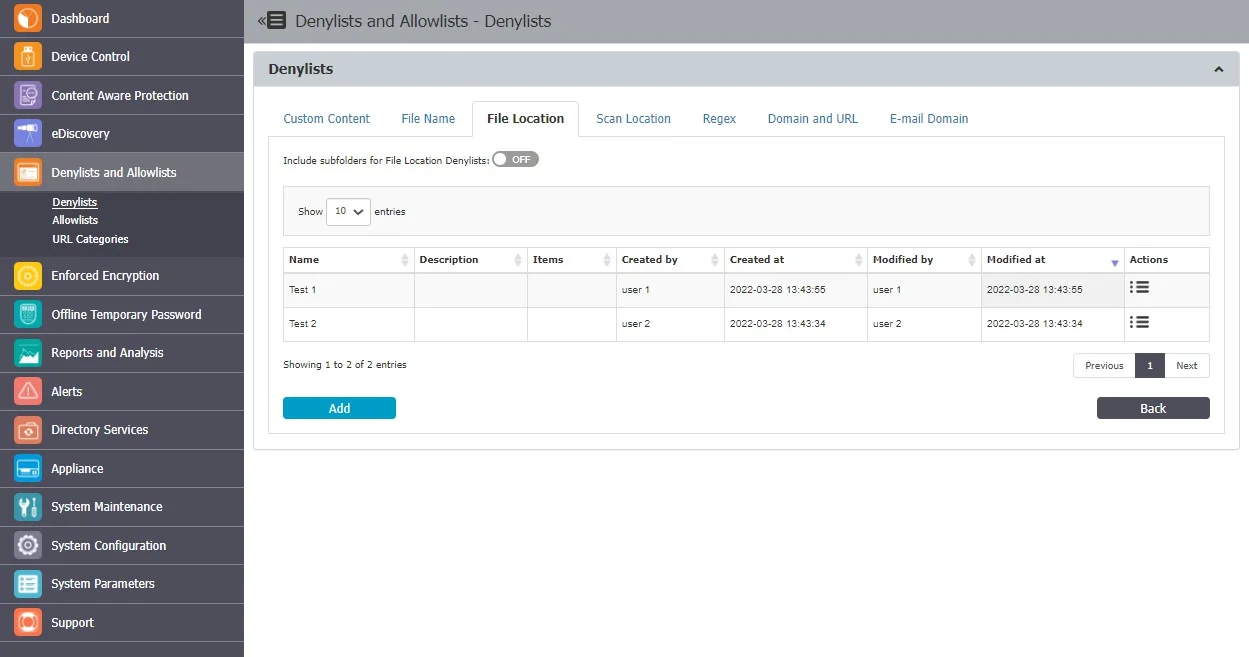
Enabling the option to Include subfolders for File Location Denylists will affect all other File Location Denylists and Allowlists throughout the system. By default, the File Location Denylists apply to all files located in the specific folder but also to any other files located in containing subfolders.
NOTE: In addition to defining the File Location Denylist, the browser or application used to transfer files also needs to be selected from within the Content Aware Protection Policy.
From this section, you can view and add file location denylists and from the Actions column, you can edit, delete or export an existing denylist.
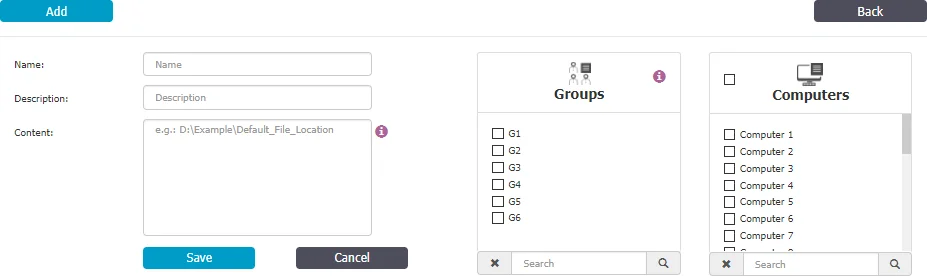
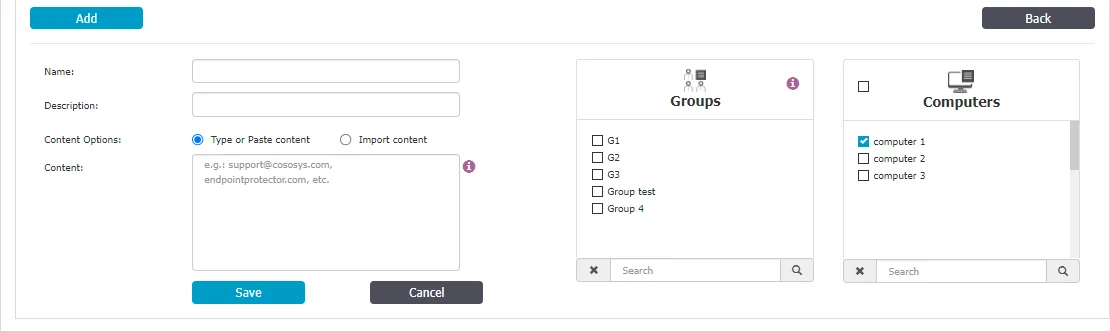
To create a new denylist, under the list of available denylists, click Add, provide a name and description, add the items separated by a new line, comma, or semicolon and then select the groups and computers.
NOTE: File Location Denylist will not apply to groups of users, only to groups of computers. File Location Denylist will only apply for the selected computer groups after 15 minutes.
You can use wildcard patterns in the File Location Denylists to specify wildcard matching. To match a desktop folder on Windows, use the pattern "?:\Users\*\Desktop".
Wildcards Usage Examples for File Location
| Wildcards Type | File Location | Results matched | Results not matched |
|---|---|---|---|
| Implicit | C:\temp | C:\temp\file.txt C:\temp\test\file2.txt C:\tempfile.txt | C:\temp1\file.txt C:\Windows\file.txt |
| Explicit | C:\Windows\* | C:\Windows\regedit.exe C:\Windows\system32\notepad.exe | C:\Windows.old\regedit.exe C:\Windows.old\system32\notepad.exe |
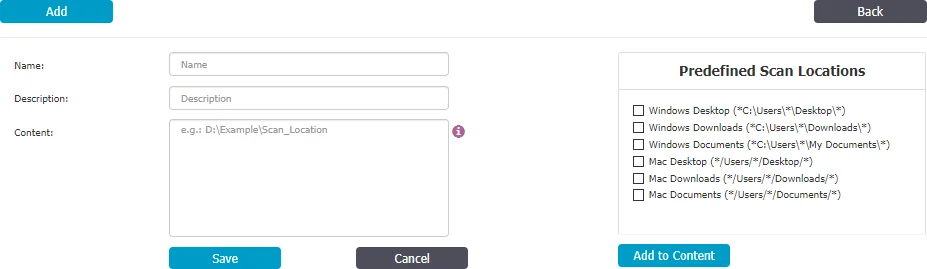
Scan Location
Scan Location Denylists are custom-defined lists of locations identified by the eDiscovery module. Data at rest within this location are automatically inspected for content, depending on the rules defined in various Policies.
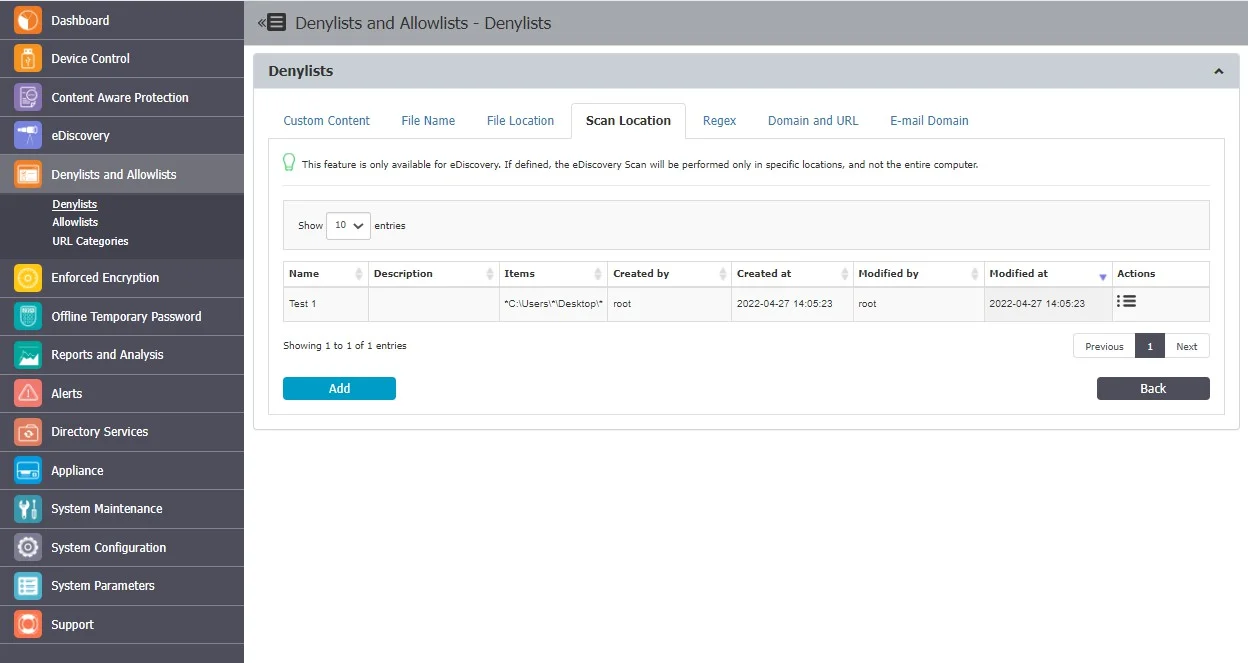
From this section, you can view and add scan location denylists and from the Actions column, you can edit or delete an existing denylist.
To create a new denylist, under the list of available denylists, click Add, provide a name and description, add the scan locations separated by a new line, comma, or semicolon or select from the Predefined Scan Locations and then Add to Content.
When defining a Scan Location, use these special characters to define the path:
- * - to replace any word
- ? - to replace any character
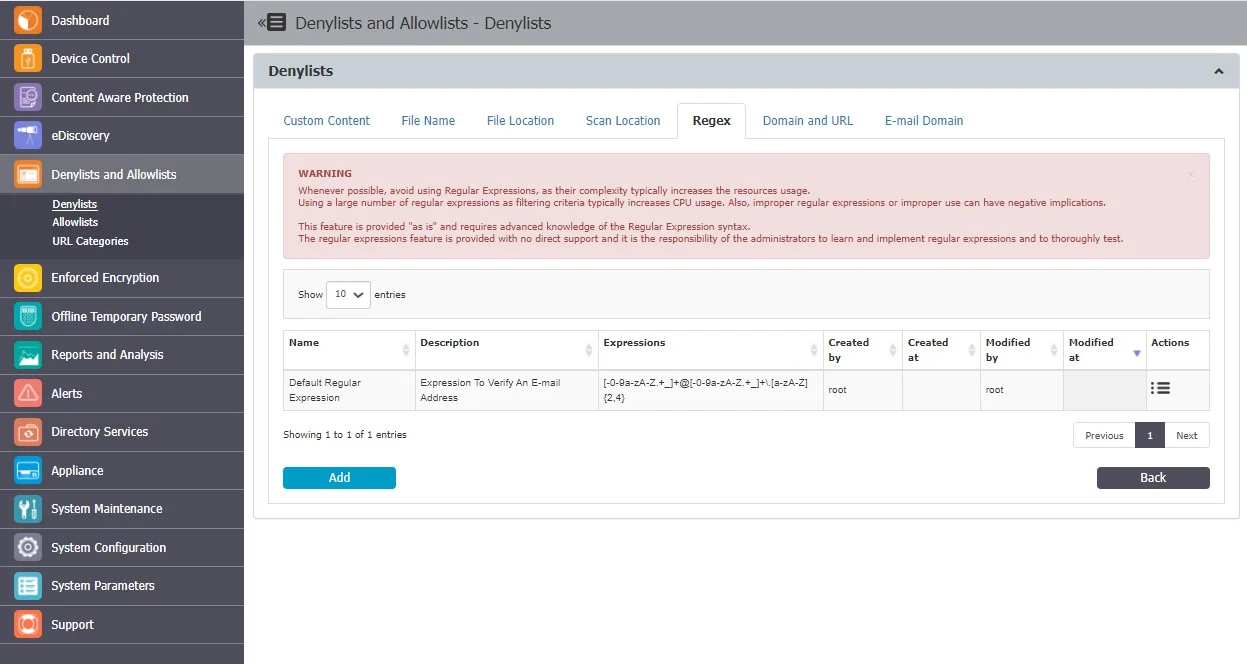
Regex
Regular Expressions are sequences of characters that form a search pattern, mainly for use in pattern matching with strings.
You can create a regular expression to find a certain recurrence in the data that is transferred across the protected network. Regex Denylists are available for both the Content Aware Protection and eDiscovery modules.
CAUTION: If possible, avoid using Regular Expressions, as their complexity typically increases the resources usage. Using a large number of regular expressions as filtering criteria typically increases CPU usage. Also, improper regular expressions or improper use can have negative implications.
From this section, you can view and add regex expressions and from the Actions column, you can edit or delete an existing denylist.
To create a new denylist, under the list of available denylists, click Add, provide a name and description and then add the regex expression.
You can test a regular expression for accuracy using the right-side option. Add the content and then click Test. If the Regular Expression has no errors, then the same content should appear into the Matched content box, as shown below:
- To match an E-mail – [-0-9a-zA-Z.+]+@[-0-9a-zA-Z.+]+.[a-zA-Z]4
- To match an IP – (25[0-5]|2[0-4][0-9]|[01]?[0-9][0-9]?)(.(25[0-5]|2[0-4][0-9]|[01]?[0-9][0-9]?))3
NOTE: This feature is provided “as is” and requires advanced knowledge of the Regular Expression syntax. No direct support is offered and it is the responsibility of the customers to learn and implement regular expressions and to thoroughly test.

Domain and URL
Domain and URL Denylists are custom-defined lists of web addresses identified by Endpoint Protector. Access to domains and URLs from these lists will be denied.
NOTE: Domain and URL Denylists are available only for the Content Aware Protection module.

From this section, you can view and add domain and URL denylists and from the Actions column, you can edit, delete or export an existing denylist.
To create a new denylist, under the list of available denylists, click Add, provide a name and description and then type or paste items separated by a new line, comma, or semicolon. You can import content using the sample file provided on the form.
You can create or import up to 100 lists of dictionaries, each dictionary comprising up to 50000 web domains.
NOTE: Dictionaries comprising up to 100 web domains can be edited, but for more extensive dictionaries, you will need to import them again.
You can define the content by adding the file name, file name and extension, or just the extension - pdf, test1example.pdf. example.endpointprotector.com, *example.com, *example*example, https://website.com
Once the denylist is created, it will be displayed on the Domain and URL list and will be available when creating or editing a Content Aware Protection policy.

E-mail Domain
E-mail Domain Denylists are custom-defined e-mail addresses and domains applicable to groups and computers that block the user from sending emails.
CAUTION: This feature blocks the user from sending emails regardless of content and type. As the denylist applies to the computer, not the policy, it blocks emails sent from the applications you select that have Report Only or Block and Remediate policies with no remediation possible.
NOTE: This feature is only available for Content Aware Protection when Deep Packet Inspection is enabled and only impacts applications that retrieve the email recipients and are selected on Content Aware Protection Policy.
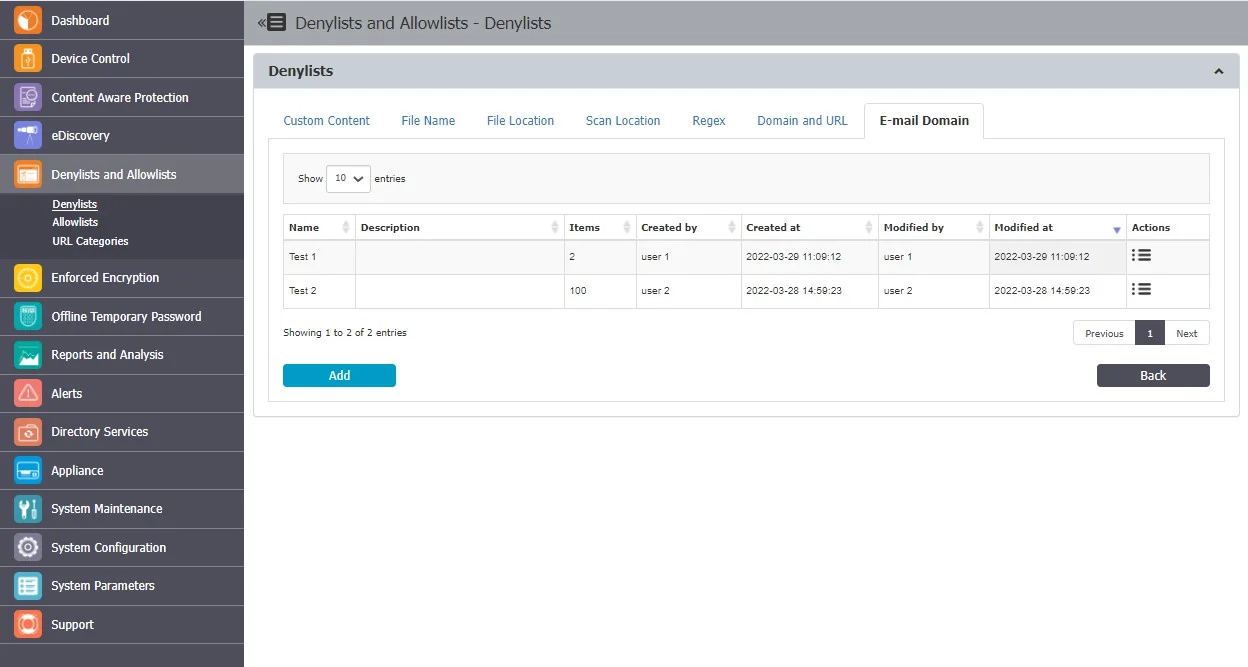
From this section, you can view and add e-mail domain denylists and from the Actions column, you can edit, delete or export an existing e-mail domain denylist.
To create a new denylist, under the list of available denylists, click Add, provide a name and description, add the items separated by a new line, comma, or semicolon and then select the groups and computers. You can import content using the sample file provided on the form.
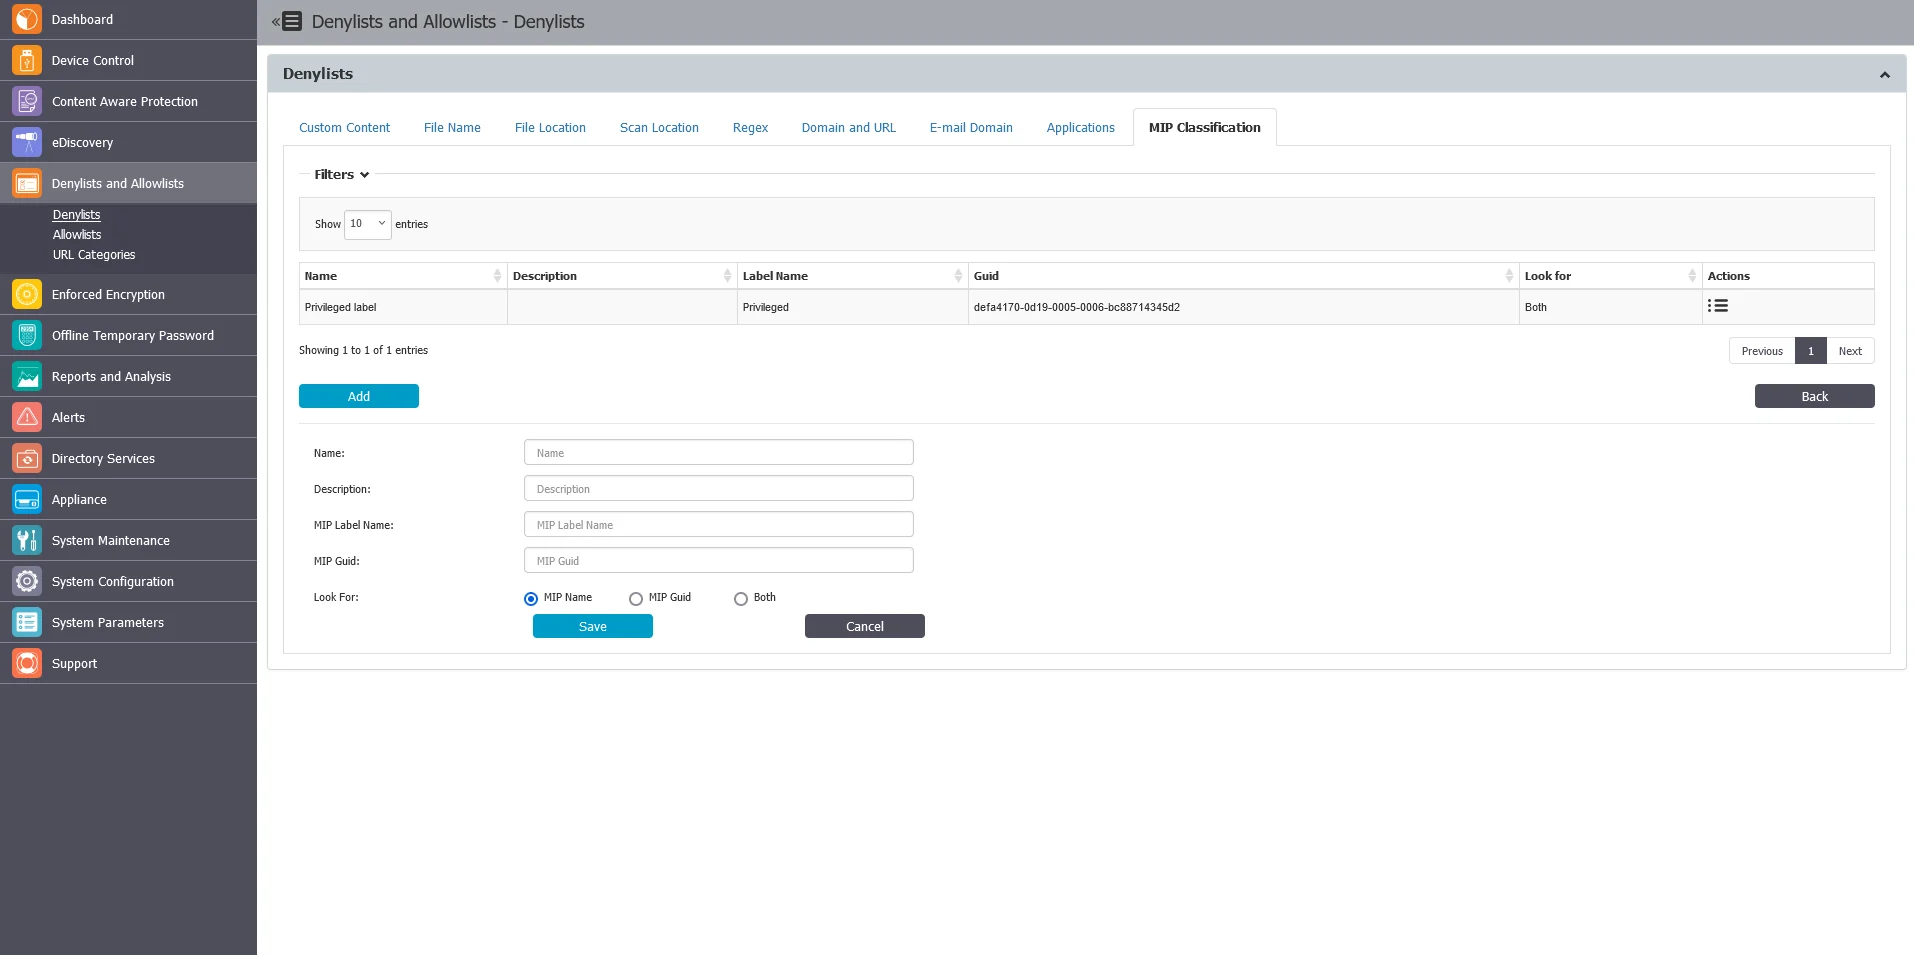
Microsoft Information Protection
This section covers the use of Microsoft Purview Information Protection (MPIP) (formerly known as Microsoft Information Protection (MIP) and Azure Information protection (AIP)), including classification within Endpoint Protector 5.9.4+ Content Aware Protection and eDiscovery policies.
MPIP is a Microsoft toolset enabling organizations to enforce data classification, file encryption, and Rights Management Services (RMS) on user data.
Since the 5.9.4 release, Endpoint Protector allows direct label definition for Content Aware Protection and eDiscovery policies via the Endpoint Protector Server interface.
The Endpoint Protector Server offers three options for defining MIP labels:
- MIP Label Name – Specify the human-redable name of the MIP label.
- MIP GUID – Utilize the unique identifier associated with the MIP label.
- Both – Combine both the label name and GUID for maximum accuracy.
This flexibility allows administrators to avoid creating custom dictionaries to recognize MIP-labeled files.
MIP labels can be used along other CAP conditions, including content-aware and label-aware data scanning. This enable granular control over data protection based on MPIP classifications.
NOTE: While Endpoint Protector can currently recognize MIP-encrypted files by their GUID (if they follow the latest MIP format used by office web tools labeling), content-aware scanning for these files is not yet supported.
NOTE: Endpoint Protector Server in Microsoft Entra (formerly Azure AD) applications is unnecessary. Endpoint Protector relies on information with labeled files. This might change in future releases.
Applications
This section introduces the documentation related to CLI (Command Line Interface) commands denylists usage. CLI commands denylists empower customers with greater control over application start events and offer the capability to scrutinize command line arguments used to launch specific applications. This functionality enhances the precision of CAP (Content Aware Protection) policies, enabling users to gain visibility and control over the usage of particular applications.
Example: Consider the scenario of controlling the startup mode of an application, as illustrated by the example below for Google Chrome:
chrome.exe --incognito
With CLI commands denylists, you can define criteria for command line arguments that match specific application behaviors. This allows you to create CAP policies tailored to your organization's needs, ensuring that the launch and behavior of applications align with your security and compliance requirements.
NOTE: Certain native command line utilities such as ls, md, cd, which are embedded in the
Operating System Core, may not be captured by CAP visibility. These commands are integral to the
functioning of the operating system and are typically excluded from CAP policies, and are not an
egress channel.
Follow the steps to define CLI command denylist policies.
Step 1 – Navigate to Denylists > Application tab in the Endpoint Protector Console.
Step 2 – Define your criteria based on the command line arguments used by the applications you want to control.
Step 3 – Incorporate these criteria into your CAP policies as arguments to ensure precise control and monitoring of application usage.

Follow these steps and leverage CLI commands denylists to enhance your organization's security posture and ensure that applications are used in compliance with your policies and regulations.
NOTE: The Endpoint Protector Client has limited visibility into activity within PowerShell and
PowerShell ISE environments, as well as basic command-line operations on macOS and Linux systems
(actions like touch, cp, cd, mv, and mkdir). To ensure Denylists entries match processes
with default parameters, use the wildcard character "*" at the end of the Application Name field
(e.g, notepad.exe *.