Agent
The Endpoint Protector Agent enforces the Rights and Settings it receives from the Endpoint Protector Server on the protected endpoints (Windows, Mac, and Linux).
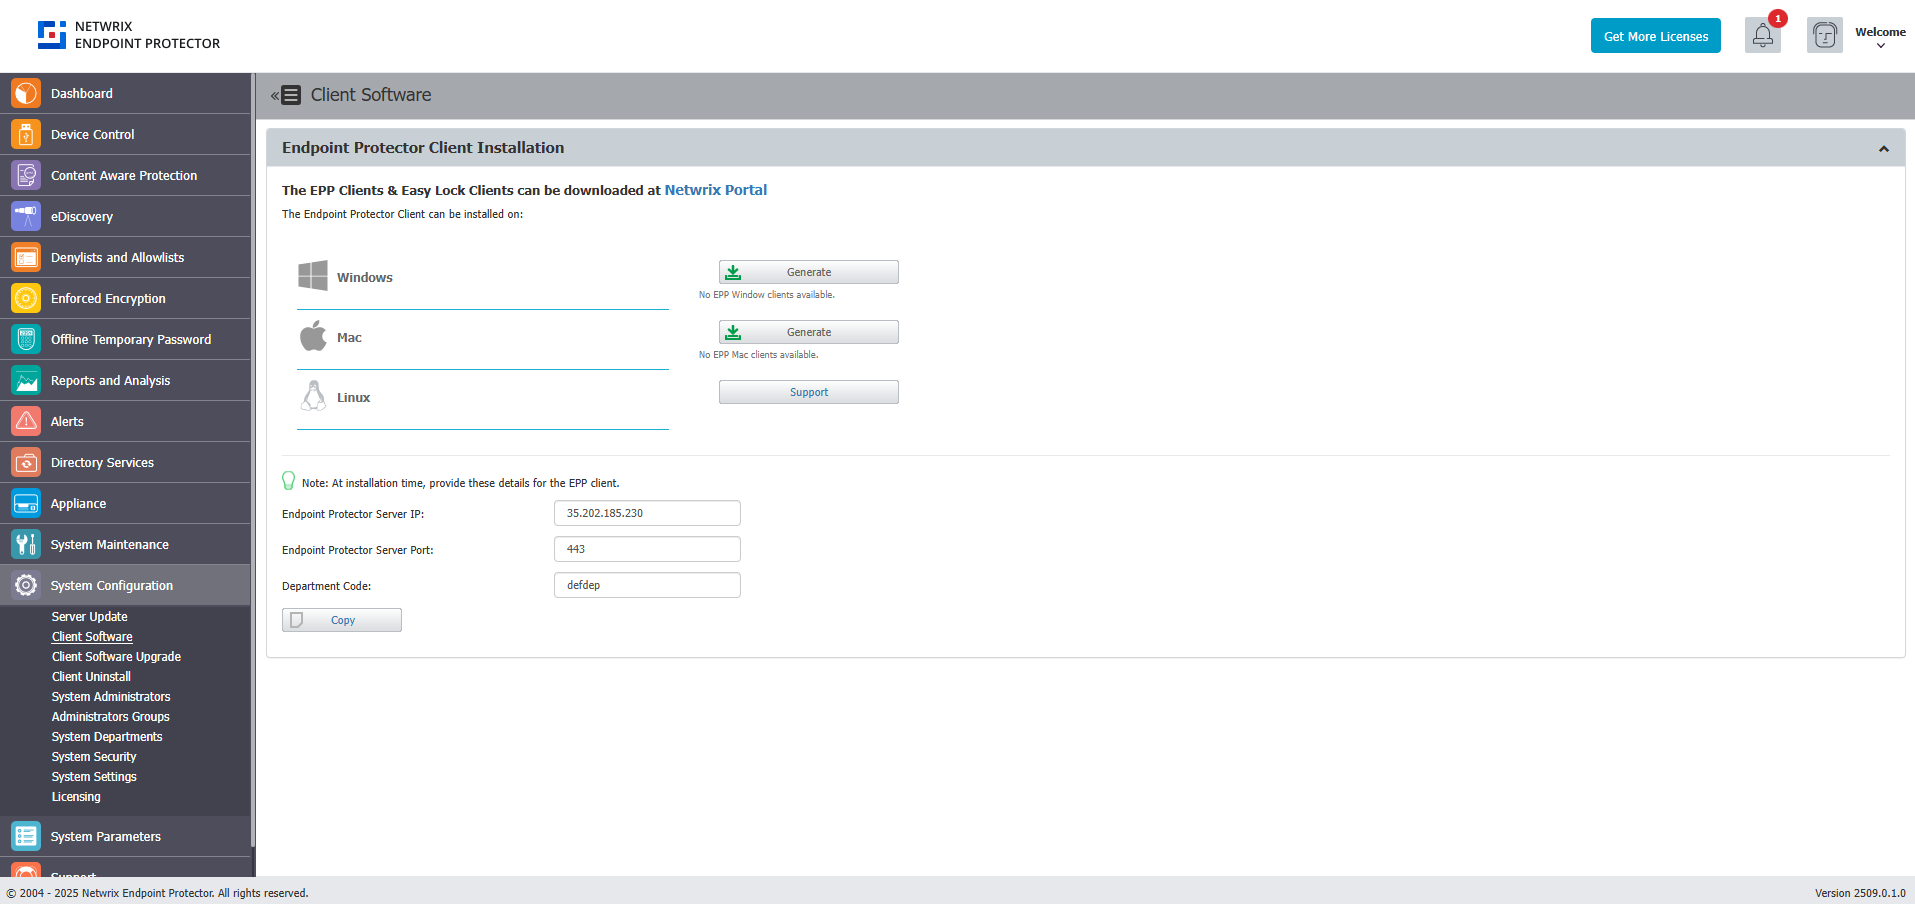
You can download the Endpoint Protector Agent directly from the Endpoint Protector UI. For detailed information about downloading the Endpoint Protector Agent, refer to the Client Software topic.
You can use tools like Active Directory or JAMF to deploy the Endpoint Protector Agent in large networks.
Starting with Endpoint Protector Server version 5.8.0.0, an additional security feature is available to protect the integrity of the Agent. This feature, accessible via Device Control on the Global Settings page, is the Tamper Mode setting. It prevents unauthorized termination or modification of the Endpoint Protector Agent.
When enabling Debug logging, deploying a fresh installation, or during upgrade processes that require a reload of critical drivers/services (such as Deep Packet Inspection (DPI), browser plugins, or Outlook add-ins), restart the operating system. This mandatory first step in troubleshooting ensures that all dependencies initialize properly.
Lightweight, Cross-Platform Architecture
The Endpoint Protector Agent doesn't require OS kernel-level integration. This reduces the risk of conflicts with other security software, such as antivirus, endpoint detection and response (EDR), and host-based intrusion prevention system (HIPS) solutions, and keeps the Agent's footprint on the endpoint to a minimum.
Kernel Independence
The Agent doesn't inject kernel-level drivers or extensions on Windows, macOS, or Linux. This avoids the stability and compatibility risks associated with kernel-mode components, such as system crashes from driver conflicts or extension issues after an OS update.
On Linux specifically, the Agent doesn't depend on Dynamic Kernel Module Support (DKMS) or require a rebuild after each kernel update. This removes the operational risk of endpoint protection breaking after a routine kernel update — a common problem with kernel-module-based agents.
Cross-OS Feature Parity
The Agent maintains feature parity across Windows, macOS, and Linux for Device Control (DC), Content Aware Protection (CAP), and eDiscovery. The Enforced Encryption Client, which provides FIPS 140-3 validated removable media encryption, offers full parity between Windows and macOS.
Netwrix designs Endpoint Protector for full feature parity across Windows, macOS, and Linux from initial release, rather than treating Linux as a delayed follow-up to Windows and macOS support. The only differences between operating systems are in the specific applications that content inspection covers, since the native applications and file-handling behaviors on each OS are inherently platform-specific.
Processor Architecture Support
The EPP Client supports both x86-64 and ARM64 processor architectures across Windows, macOS, and Linux:
- Windows — x86-64 and ARM64 (Windows on ARM)
- macOS — x86-64 (Intel) and ARM64 (Apple Silicon)
- Linux — x86-64 and ARM64 (RHEL 10.x and Ubuntu 26.04)
This gives Netwrix consistent endpoint coverage as organizations adopt ARM-based hardware, such as Apple Silicon Macs, Windows on ARM devices, and ARM-based Linux servers.
Agent Installation
To see which distributions EPP supports, check the supportability article.
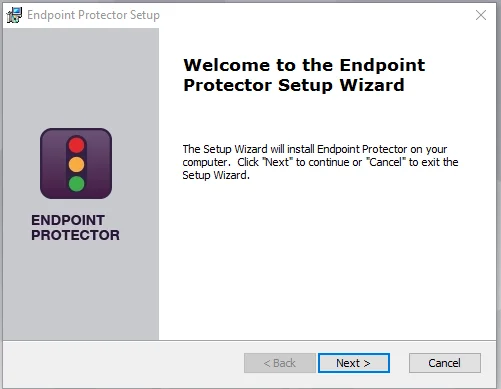
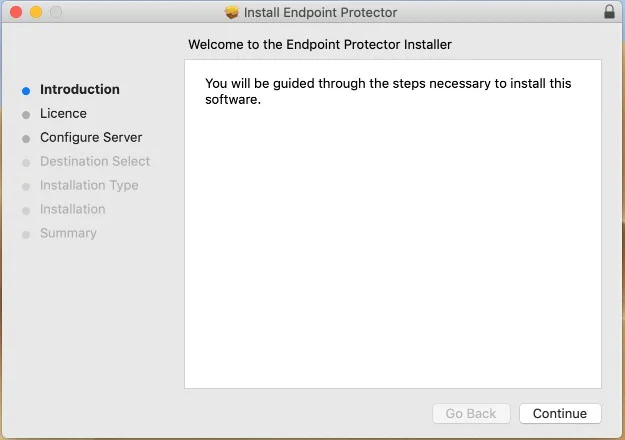
For Windows and Mac, installing the Endpoint Protector Agent requires minimal input. The installation folder and server information come pre-configured, and you can download the Agent from the Endpoint Protector Server.
For Linux installation instructions, read the readmeLinux.txt file available under the Read this before installing link.
The main supported Linux distributions include:
- Ubuntu
- RedHat
For Ubuntu-based distributions outside the officially tested and certified list, such as Mint Linux, and RHEL-based distributions such as Rocky Linux, Oracle Linux, or CentOS, the EPP Client installer built for the corresponding base version generally works without additional configuration. In some cases, the Linux administrator might need to manually adjust dependencies to match the base distribution. For installation steps, see Linux install guide under Agent Install Parameters in the Agent documentation.
Netwrix provides optional distributions on the product portal upon request, after the Netwrix Product Team validates them. The following are examples of on-demand distributions:
- Debian
- Fedora
- Pardus OS
- AWS Linux
- OpenSUSE
- SUSE
- SLED Linux Enterprise Server
Beyond this list, Netwrix can also build a Client for the latest version of other custom Linux distributions on request, as a Feature Request (FR) through Netwrix Support. Netwrix Product Management reviews and prioritizes these requests, which may involve a billable service. For details, see Linux Clients in the Netwrix Endpoint Protector Agent Support Policy.
Agent install parameters
To improve the Endpoint Protector installation process, use the Endpoint Protector tool to run installation-related actions, identify your current Linux distribution, and view Endpoint Protector Release Notes.
Use the following commands:
- i - install
- u - uninstall
- rn - release notes
- l - distribution list
Optional CLI commands for installers
Windows
You can also apply manual proxy settings using CLI commands:
Example:
msiexec.exe /i "C:\Work\Tools\EPPClientSetup.5.7.1.5_x86_64.msi" /q REBOOT=ReallySuppress RUNNOTIFIER=0 /log "C:\Windows\TEMP\epp-upgrade.log" WSIP="epp.example.com" WSPORT="8080" DEPT_CODE="defdep" PROXYIP="127.0.0.1" PROXYPORT="80" AUTHUSR="user_name" AUTHPASS="password"
Where:
- PROXYIP – IP of the proxy
- PROXYPORT – Port of the proxy
- AUTHUSR – Username (if the proxy requires authentication)
- AUTHPASS – Password (if the proxy requires authentication)
You can also use the following CLI commands to install Endpoint Protector Client in a specific working mode.
- WSIP – server address (use the server's fully qualified domain name (FQDN) instead of an IP address)
- WSPORT – server port number
- DEPT_CODE – department code
- IPV6MAPPING – IPV6 Mapping IPv4 addresses
- SUPPRESSRD – suppress FileRead/FileDelete events for NS and Removable devices
- DISABLECAP – disabling loading of CAP drivers (CAP will not work)
Starting with the 2511 Clients release, the install parameters "IPV6MAPPING," "SUPPRESSRD," and "DISABLECAP" will persist during the EPP Client upgrade process.
macOS
For macOS, contact the Netwrix Support team to obtain the latest version of the installer script, which lets you customize installation parameters.
Linux
For Linux, you can use CLI arguments only in the options.sh file to bypass proxy settings. To do so, follow these steps:
Step 1 – Access the installation folder, open a Terminal, and run the following command:
cd pathToLinuxClientFolder
Step 2 – To run commands as root, run the following command and enter your password.
sudo su
Step 3 – Open the options.sh configuration file with the following command:
gedit options.sh
Step 4 – In the configuration file, you see the following fields for the proxy setup:
#EPPCLIENT_HTTPS_PROXY=
#export EPPCLIENT_HTTPS_PROXY
Step 5 – Remove the # before each entry to apply the proxy setups.
Step 6 – For the first proxy setup, EPPCLIENT_HTTPS_PROXY, add the proxy server information in the address:port:user:password format.
Example: EPPCLIENT_HTTPS_PROXY=address:port:user:password
Step 7 – Save the changes, and then run the installation without a VPN connection:
bash install.sh
Additional CLI commands for Linux in specific mode:
- #EPPCLIENT_SUPRESSRW - suppress FileRead/FileDelete events for NS and Removable devices
- #EPPCLIENT_DISABLECAP - disabling loading of CAP drivers (CAP will not work)
Bypass Proxy Settings
You can bypass proxy settings for all operating systems.
Windows and macOS
Endpoint Protector Wizard Installer
Select the option to Use Manual Proxy Settings from the Endpoint Protector Wizard installer and then provide the following information:
- Proxy IP – IP of the proxy server
- Proxy Port – Port of the proxy
- Select the Use authentication checkbox
- Username – add proxy server username
- Password – add proxy server password
Increased Communication Security
During interactive installation, the installer wizard includes an Increased Communication Security checkbox. When you enable it, the EPP Client uses certificate-based authentication during the registration process and for all subsequent communication with the EPP Server. This option corresponds to the Client Registration Certificate feature configured on the server side. Before enabling it, ensure that you deployed a cryptographic identity signed by the EPP Root CA to the endpoint and that it appears in Certificate Manager under Local Computer → Certificates → Personal.
This option requires you to enable and configure the Client Registration Certificate feature on the EPP Server (Appliance → Server Maintenance → Client Registration Certificate) before you install the client. Enabling it without the corresponding server-side configuration prevents the client from registering.
Installation on macOS with Deep Packet Inspection and VPN Traffic Intercept Active
To install on macOS with Deep Packet Inspection and VPN Traffic Intercept active, complete the following steps:
Step 1 – Open the Endpoint Protector Server.
Step 2 – Go to the System configuration section, select Client Software and then download the macOS Endpoint Protector Agent.
Step 3 – Decompress the downloaded file.
Step 4 – Open the .pkg file, follow the installation steps, and grant the requested permissions.
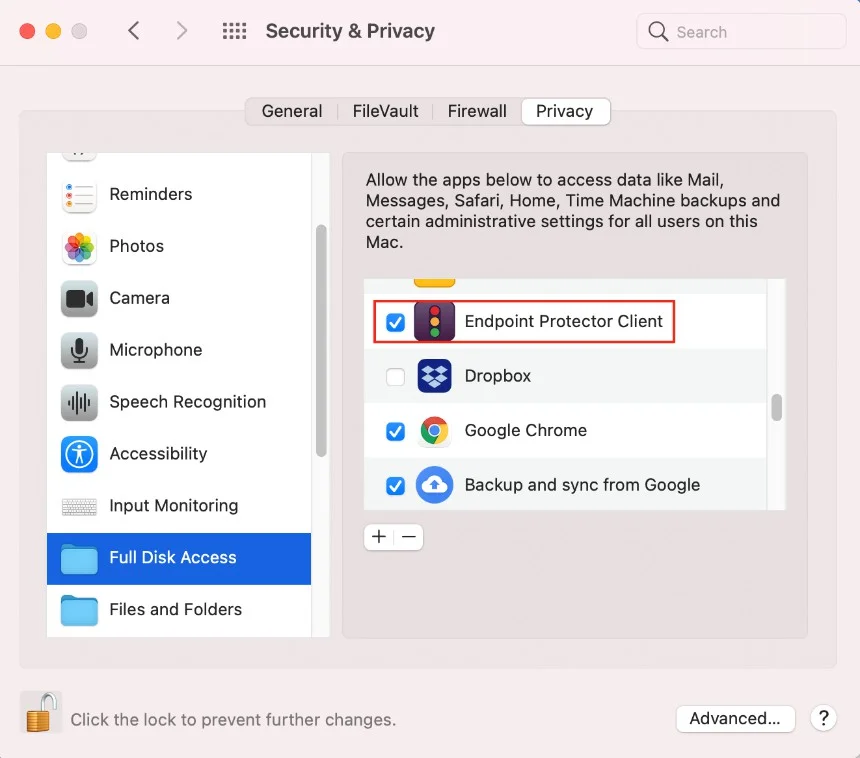
Step 5 – After the installation is complete, go to System Preferences > Security & Privacy > Privacy tab > Full Disk Access. Search for Endpoint Protector Client, select the checkbox, and then save the changes.
Step 6 – Open the Endpoint Protector Server and activate Deep Packet Inspection by navigating to Device Control > Users/Computer/Group/Global Settings > Manage Settings > Endpoint Protector Client > Deep Packet Inspection.
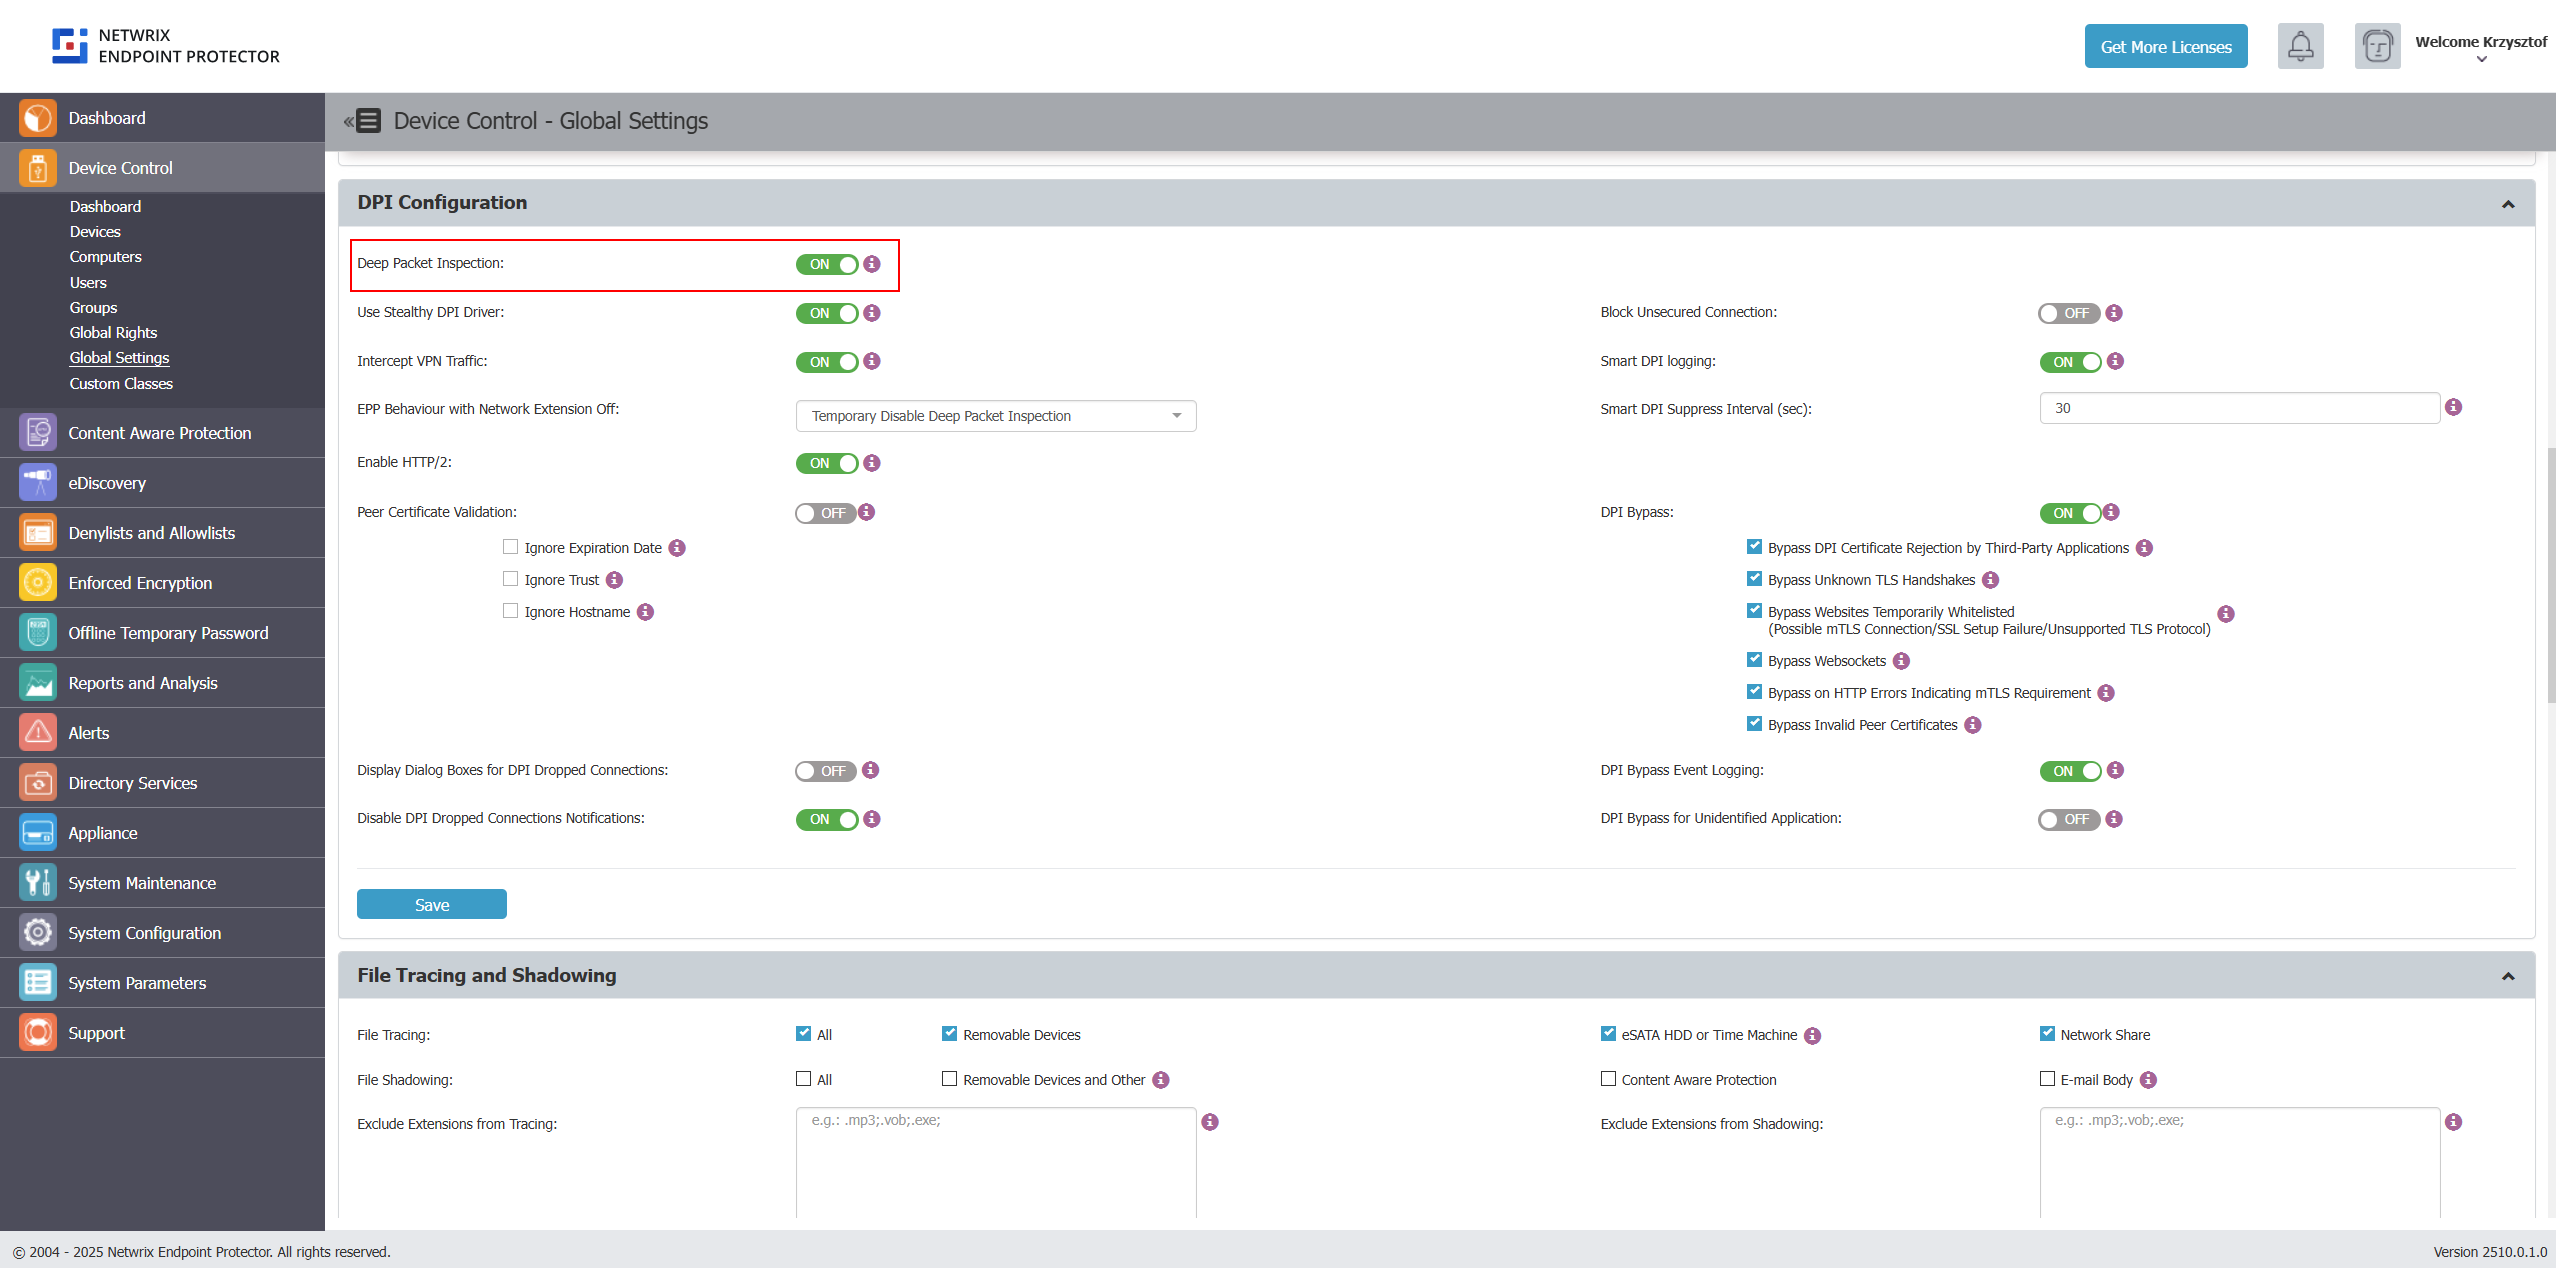
To learn about Deep Packet Inspection and its configurable options, see the documentation section for DPI.
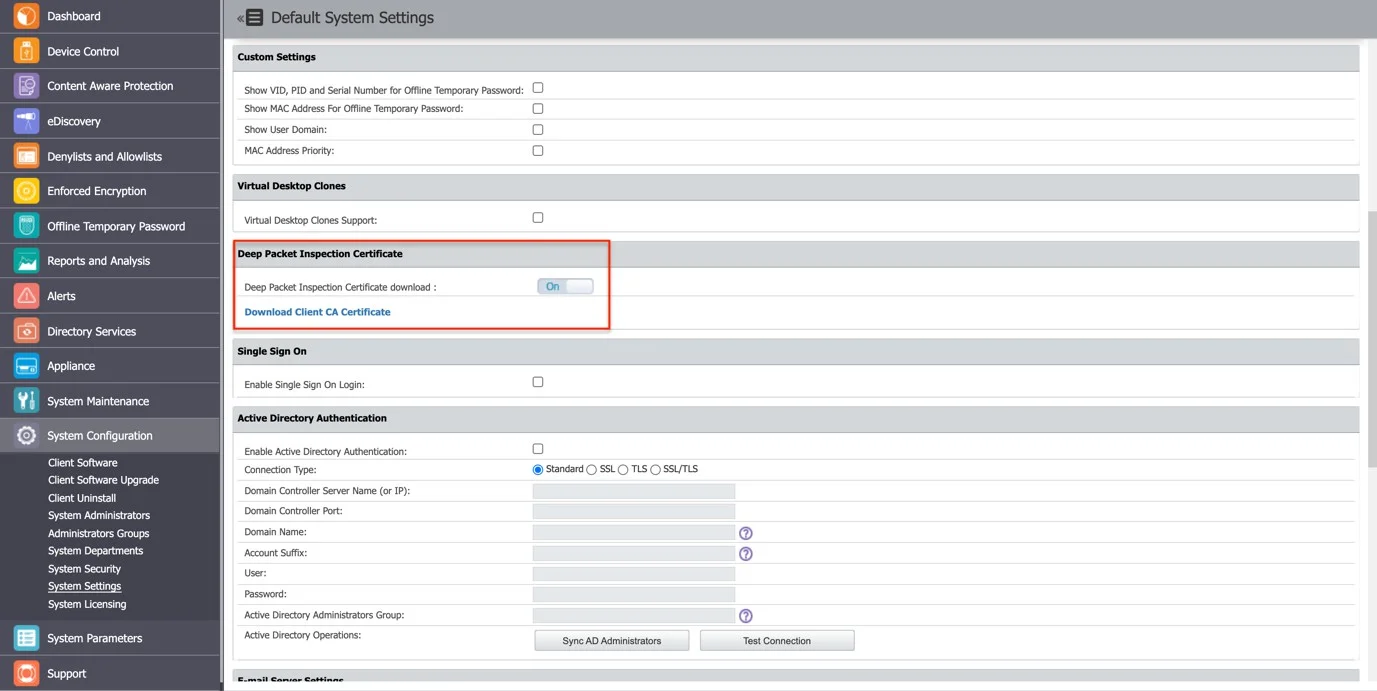
Step 7 – Go to the System Configuration section, then System Settings > Deep Packet Inspection Certificate, and download the CA Certificate.
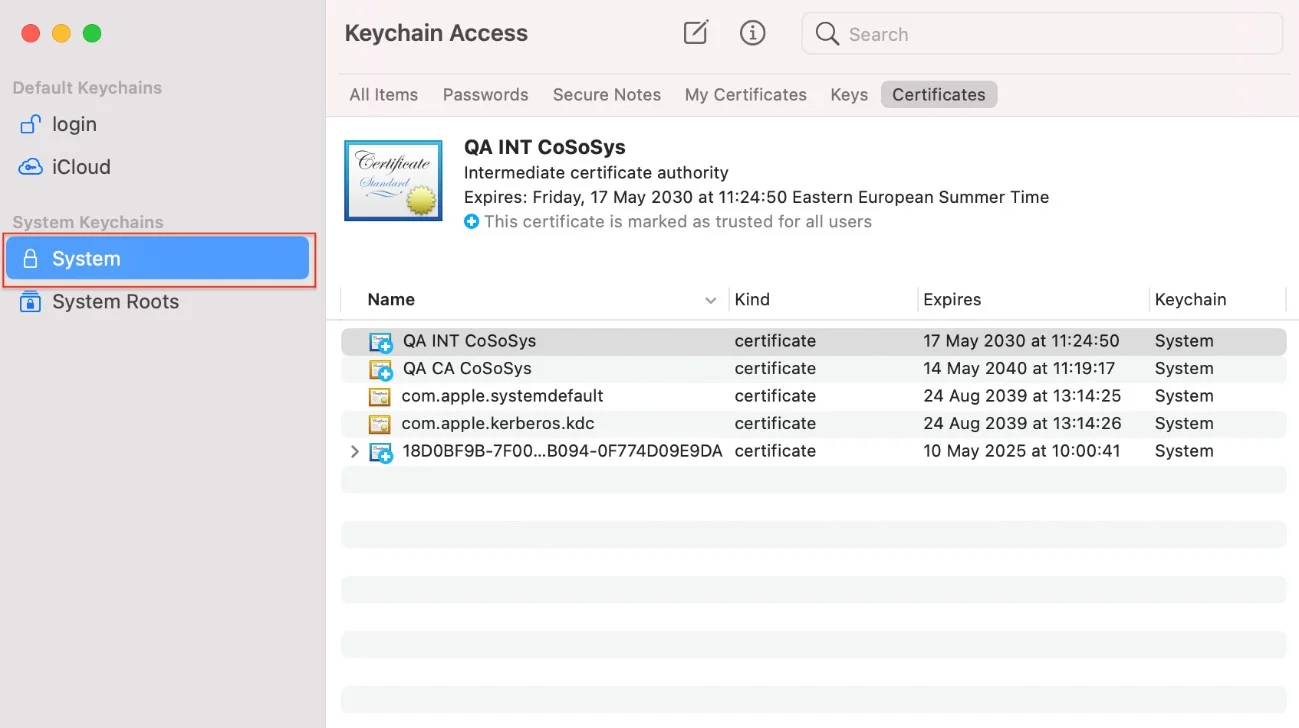
Step 8 – Open the Keychain Access application from your macOS and select System.
Step 9 – Decompress the downloaded ClientCerts file.
Step 10 – Select cacert.pem file and drag and drop it on System > Keychain Access.
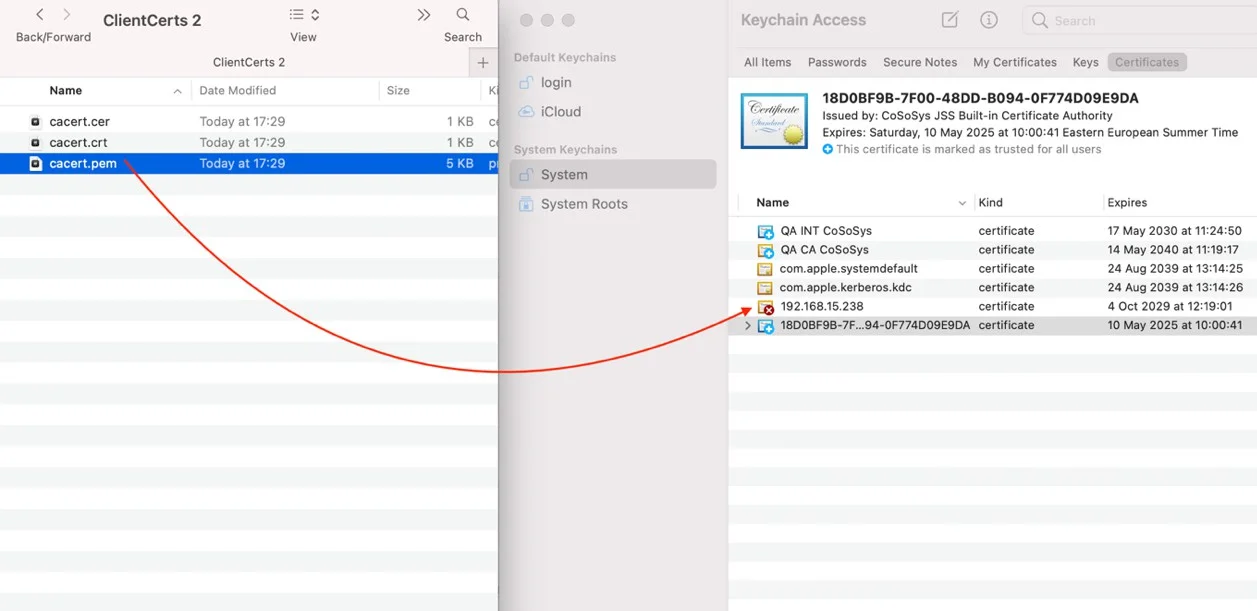
Step 11 – Double-click the X on the newly added certificate and on the Trust section, select Always Trust.
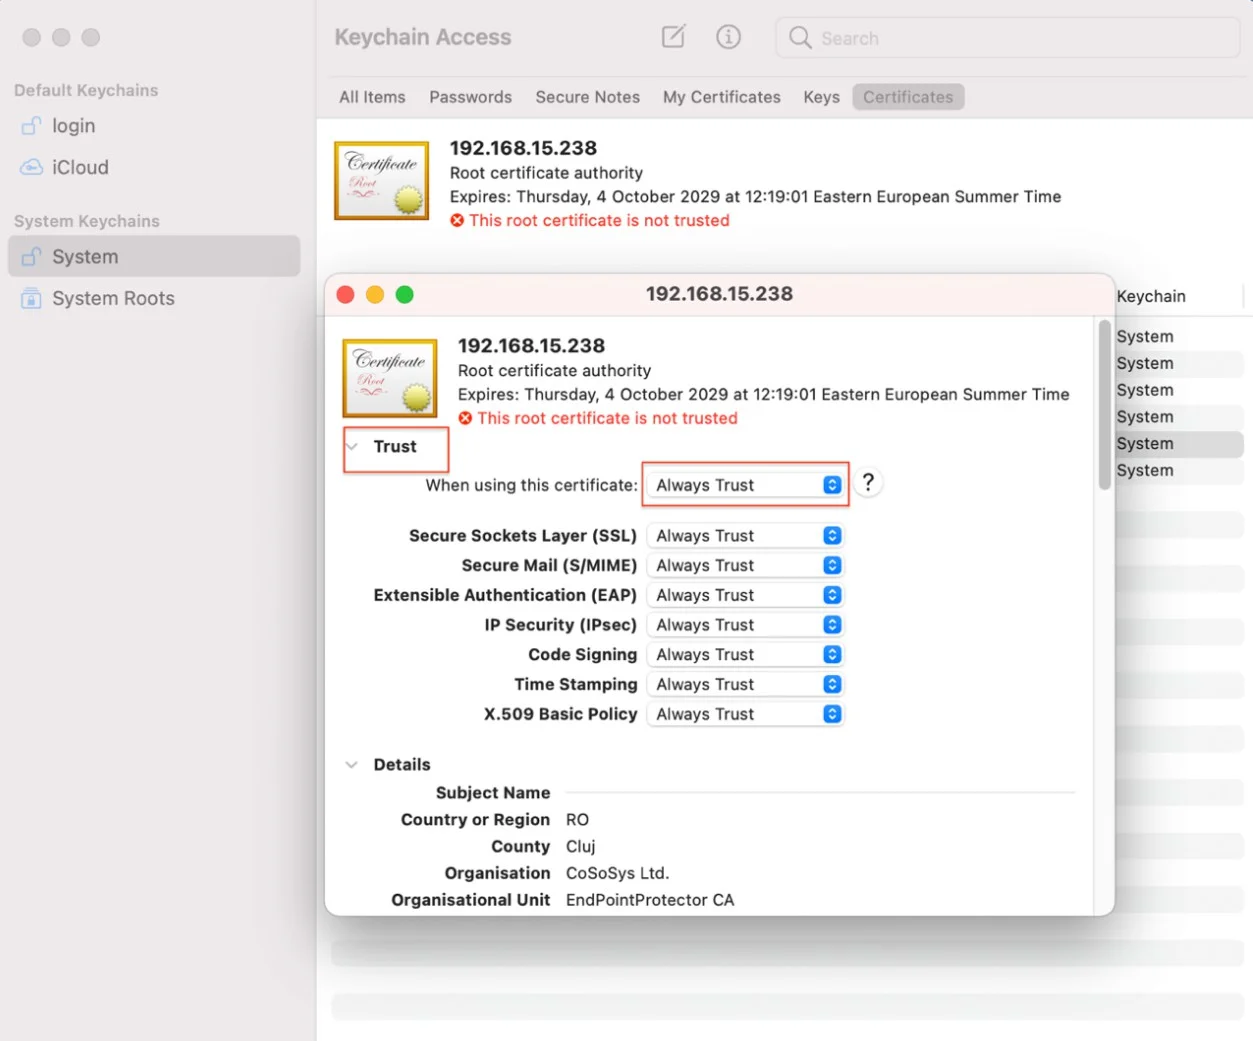
Step 12 – Save the changes.
Step 13 – Activate Intercept VPN Traffic.
Step 14 – Select one option for EPP behavior when network extension is disabled.
- Temporarily Disable Deep Packet Inspection – this option temporarily disables Deep Packet Inspection
- Block Internet Access – this option ends the Internet connection until the end user approves the Endpoint Protector Proxy Configuration after restarting the computer.
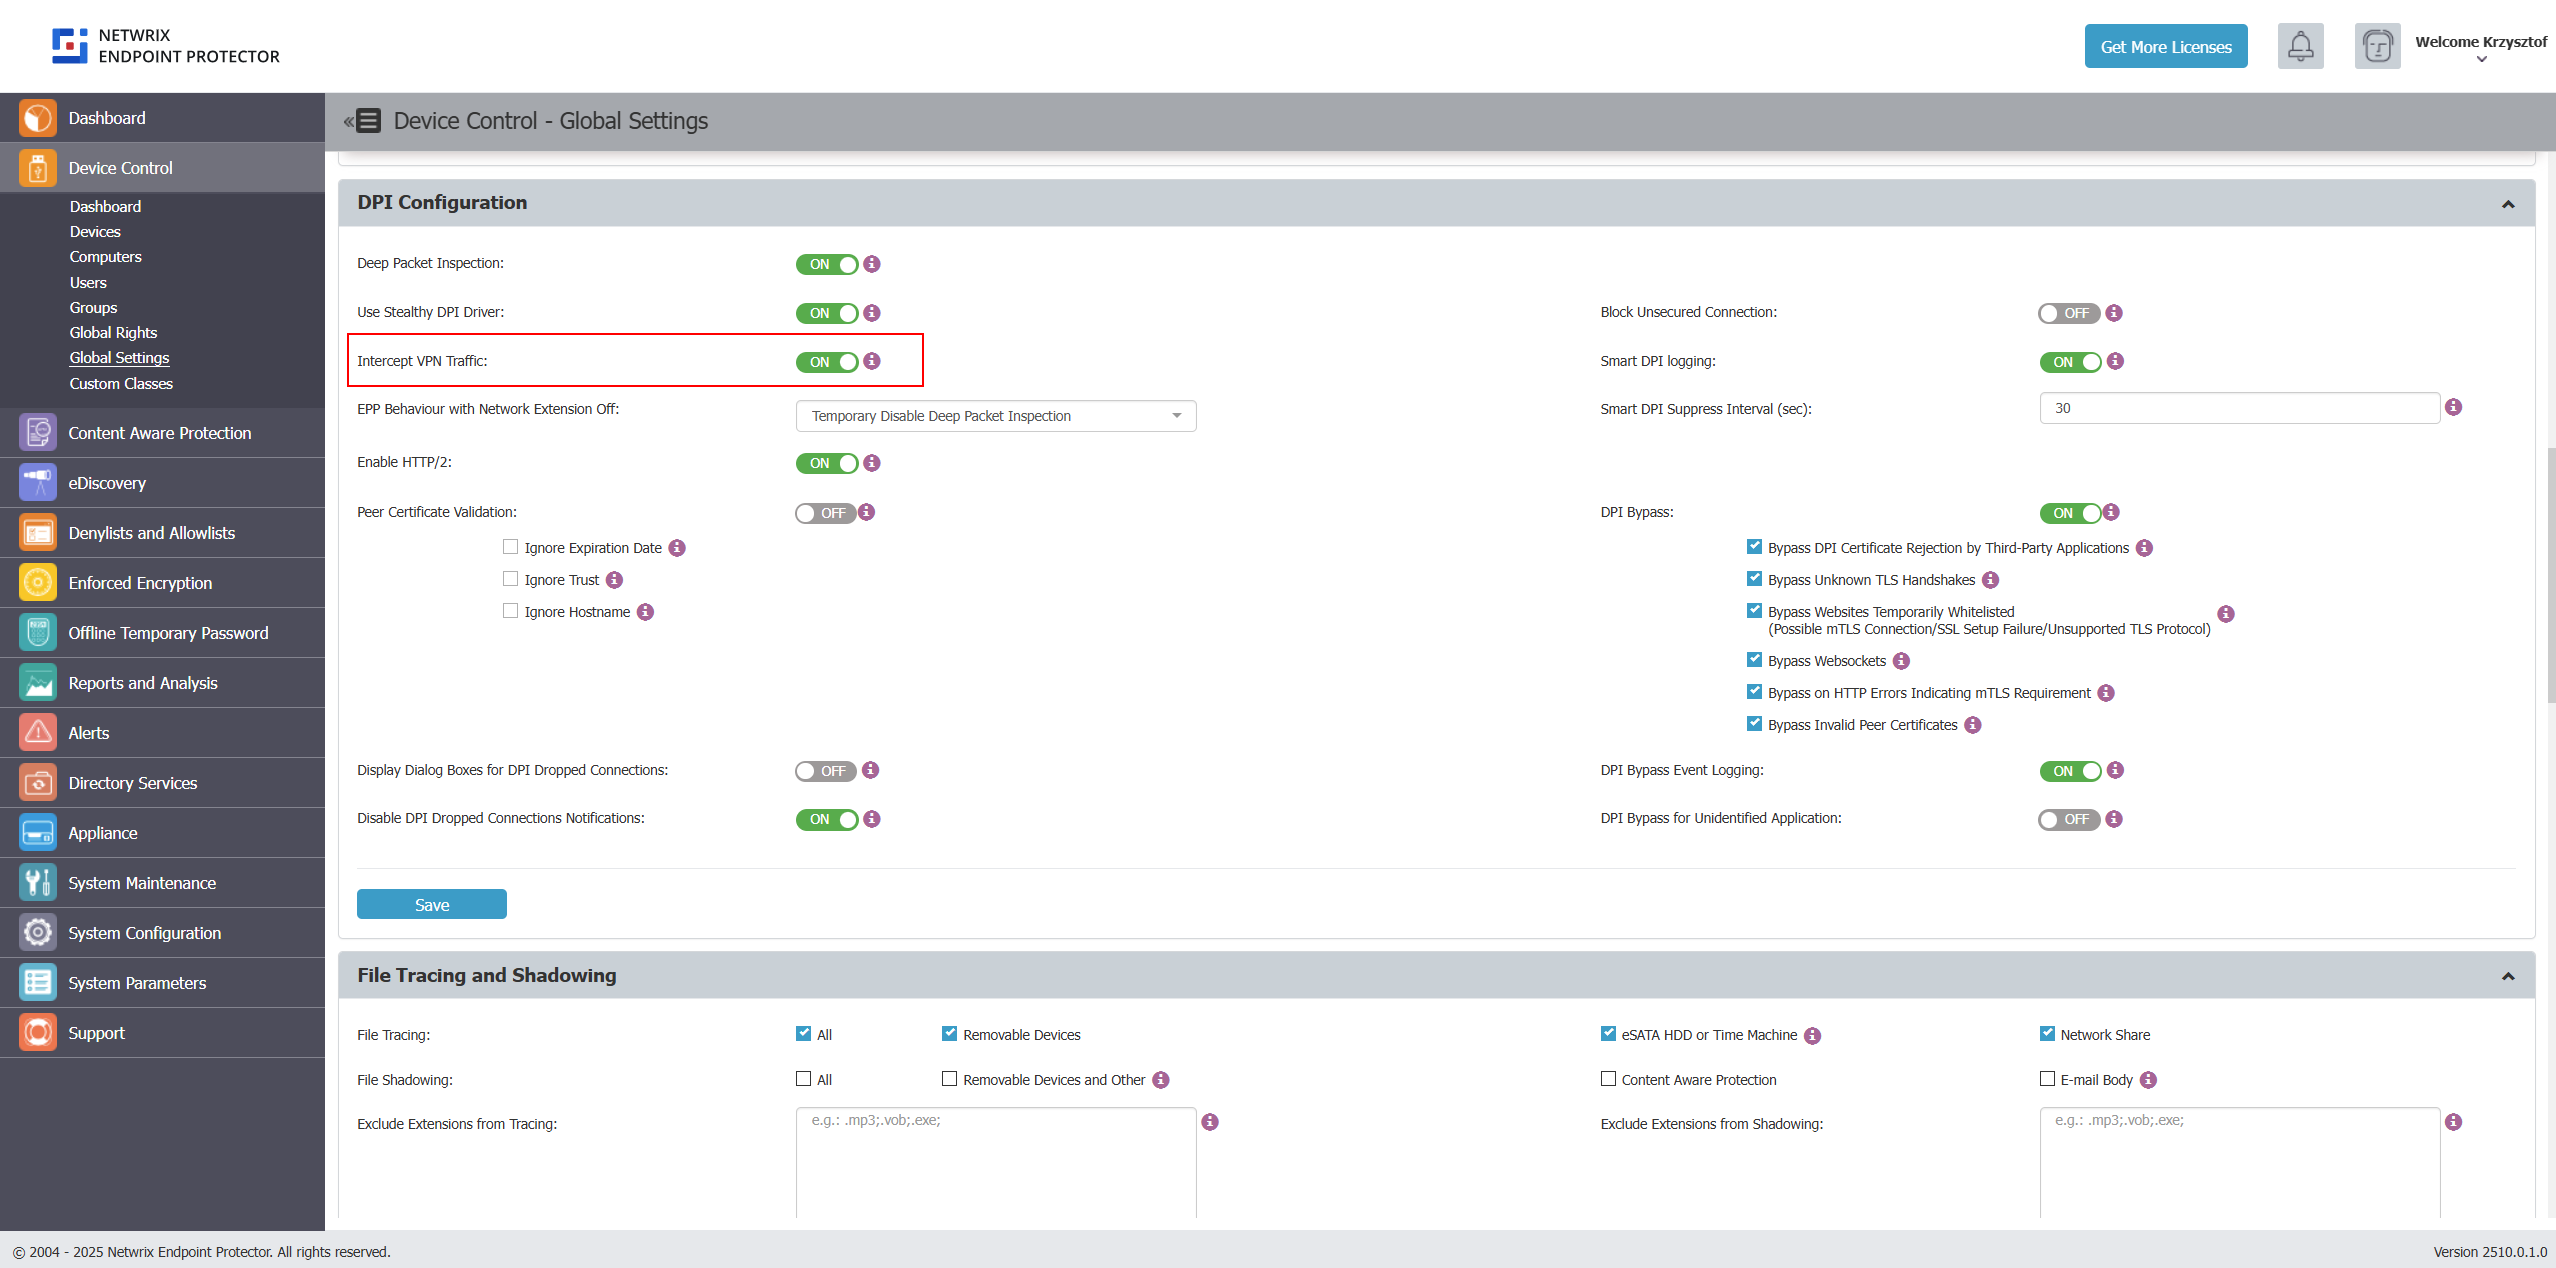
Step 15 – Save the changes.
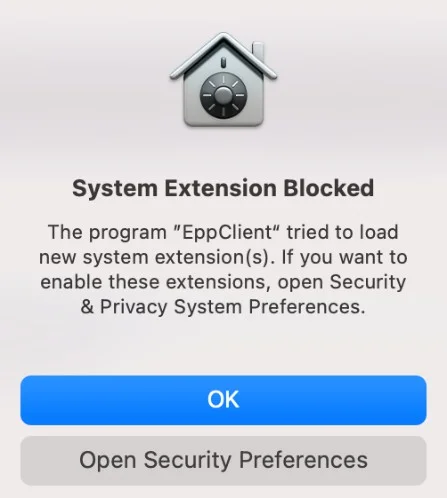
Step 16 – The following pop-up displays, informing the end user that macOS blocked a System Extension and that the user must allow it.
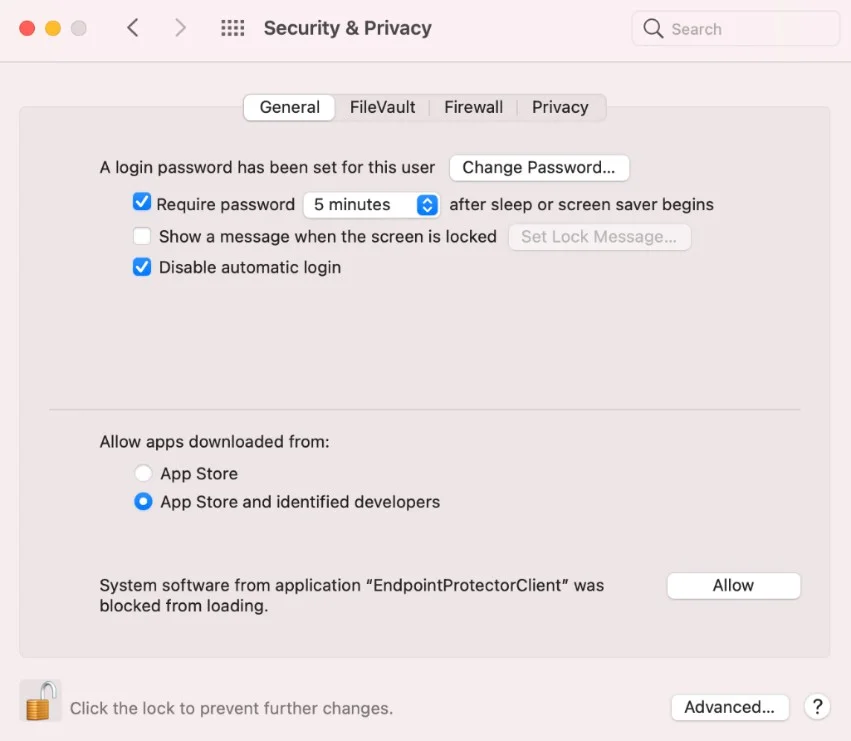
Step 17 – Go to System Preferences > Security and Privacy > select the General tab and allow the Endpoint Protector Client Extension.
Step 18 – Allow the Endpoint Protector Proxy Configuration from the pop-up window.
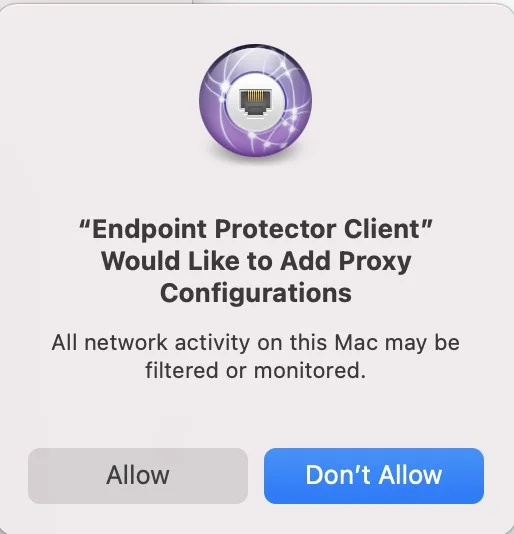
The macOS Endpoint Protector Client installation is now complete.
If EPPNotifier isn't visible or notifications don't display after the installation or upgrade of the Endpoint Protector Client on macOS, resolve this issue by restarting your machine. If you install and then uninstall the Endpoint Protector Client on macOS, you may still see EPPNotifier in the Notification settings. To remove it from the list, right-click and select "Reset notifications."
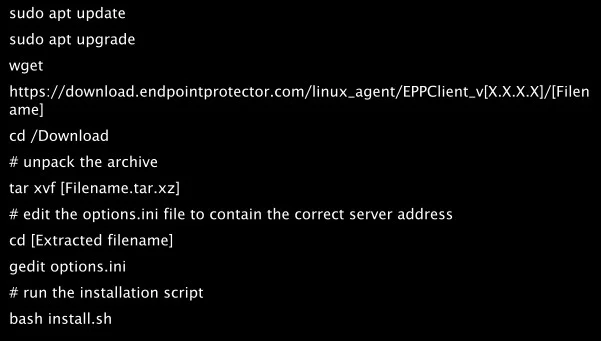
Debian Based Distributions
While the installation process is similar, each distribution and version have their own particularities.
The following are several examples of supported distributions:
- Ubuntu
- Debian
Ubuntu-based distributions like Mint Linux generally work without additional configuration when you use the EPP Client installer built for the corresponding Ubuntu base version. For example, Mint Linux 22.3 might work with the EPP installer for Ubuntu 24.04 LTS. In some cases, the Linux administrator might need to manually adjust dependencies to match the base distribution.
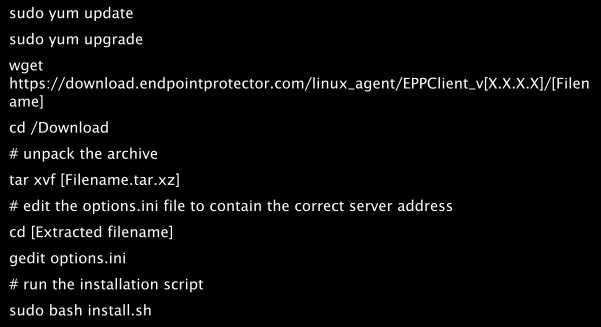
RedHat based distributions
While the installation process is similar, each distribution and version have their own particularities.
The following are several examples of supported distributions:
- RedHat
- Fedora
- AWS Linux 2
RedHat (RHEL)-based distributions like Rocky Linux, Oracle Linux, and CentOS generally work without additional configuration when you use the EPP Client installer built for the corresponding RHEL base version. For example, Oracle Linux 10.1 might work with the EPP installer for RHEL 10.1. In some cases, the Linux administrator might need to manually adjust dependencies to match the base distribution.
- OpenSuse
- SUSE
- SLED Linux Enterprise Server
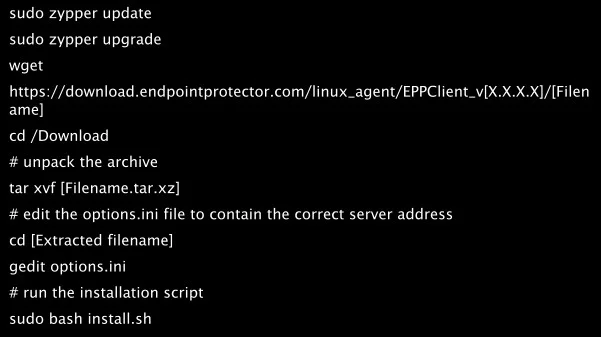
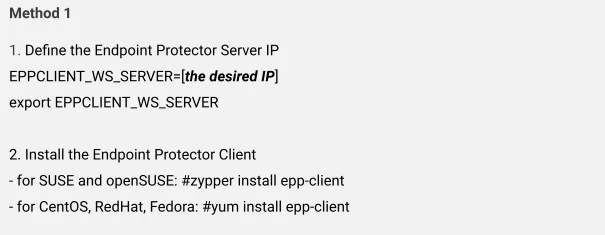
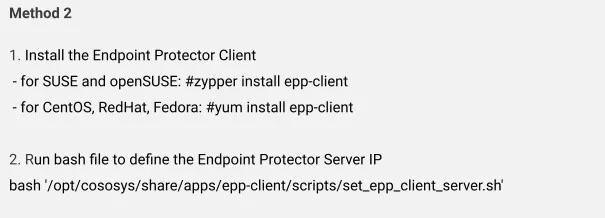
Setting the Server IP
For all RedHat-based distributions, after you run these commands, complete one additional step to set the Endpoint Protector Server IP.
Based on each distribution, follow the corresponding method:
WSL - Windows Subsystem for Linux
With the Windows Subsystem for Linux (WSL), you can run native Linux distributions directly within your Windows environment.
WSL1
You can't install the Endpoint Protector Client directly as an application within WSL.
While direct installation isn't possible, you can still manage and control the usage of WSL applications through the Application Denylist feature in Endpoint Protector. With this feature, you can define specific applications or processes associated with WSL that you want to restrict and monitor.
To use Denylists to control WSL applications, complete the following steps:
Step 1 – Navigate to the Denylists and Allowlists section within the Endpoint Protector Console.
Step 2 – Create a new Denylist entry.
Step 3 – In the Application Name field, specify the WSL application you want to control. This could be:
wsl *– This wildcard entry will match all WSL applications.wsl.exe– This entry will specifically target thewsl.exeexecutable.wsl.exe --help– This entry will target the specific commandwsl.exe --help.wsl --list– This entry will target thewsl --listcommand.
Endpoint Protector Client can't directly control the usage of WSL Bash command-line tools on Windows.
WSL2
WSL2 lets you start a lightweight virtual machine with a specific Linux distribution, and offers two options for controlling it:
- Configure an Application Denylist, as with WSL1, to block WSL2 usage entirely.
- Deploy a dedicated Linux EPP Client inside the WSL2 Linux machine to gain EPP visibility into it. The EPP Server treats the installed instance as a separate machine, which lets you apply more granular policies.
Netwrix has only tested Ubuntu 26.04 (ARM and x64) and RHEL 10 (x64) in its lab.
EPP Client Integrity Checks
This article explains key EPP Client behaviors related to integrity checking, policy synchronization, and service termination. It covers how the EPP Client validates itself at startup, how it communicates and downloads policy changes, and how it classifies and reports different types of client termination.
Client Integrity Check Overview
The Client Integrity check runs automatically at EPP service/daemon startup. It verifies two things:
- The existence of all expected EPP component files on the endpoint.
- The validity of file signatures (signature validation applies to Windows only).
If the check passes without issue, the EPP Client reports the status as Client Integrity OK, confirming all EPP component files are present and their signatures are valid (on Windows).
If the check fails for any reason, the EPP Client reports a Client Integrity Failure event in the EPP Server.
File Existence vs. Missing Installation File
When the daemon starts, it checks that all expected files are present and reports any that are missing. Two related terms you may encounter:
| Term | Meaning |
|---|---|
| Install files | The full set of files that should be present on the endpoint after a successful EPP Client installation. |
| Installation file missing | The startup check couldn't find one or more expected files. This condition triggers a Client Integrity Failure event. |
Tamper mode
Tamper mode provides increased self-protection for the EPP Client. When you disable tamper mode, the EPP Client relies on standard self-protection mechanisms: watchdog, service auto-restart, and Client Integrity checks. When you enable tamper mode, the EPP Client also blocks unauthorized termination and modification.
With tamper mode enabled:
- EPP Client installation folders on Windows and macOS have restricted access.
- The EPP Client prevents unauthorized actors from unloading processes on Windows and daemons on macOS.
To enable tamper mode, see Client Mode.
Requires EPP Client version 2605 hotfix 1 or later (2605.x.2.x) for the full feature set.
Policy Received Events
How Policy Synchronization Works
Each time the EPP Client communicates with the EPP Server, it presents the hash of its current configuration XML. The server compares this hash against the current expected configuration:
- If the hashes match, the server takes no action.
- If the hashes differ, the server exposes the updated configuration with a new hash for the client to download, and raises a Policy Received event. The EPP Client then automatically downloads and applies the new settings.
Any change to Computer or User settings — including configuration items, rights, or policies — modifies the configuration XML and its hash, which triggers this process.
Client Termination Event Types
How the EPP Client Classifies Termination
If the EPP Client service didn't stop cleanly, the agent evaluates the state of relevant files, registry keys, and drivers to determine what happened. Based on the results, the agent reports one of three events:
| Event Type | Condition & Meaning |
|---|---|
| Unplanned Client Termination | All files, registry keys, and drivers are intact. The service stopped or terminated unexpectedly, with no signs of tampering or removal. |
| Forced Uninstall Attempt | The service stopped or terminated, and one or more files, registry keys, or drivers are in an unexpected state — indicating a partial or unauthorized removal attempt. |
| Uninstall Attempt | Someone deliberately initiated an uninstall of the EPP Client — either directly on the endpoint (e.g. via Add/Remove Programs) or remotely from the EPP Server using the Uninstall Client action. |
The EPP Client agent reports these three event types, which appear in the EPP Server event log for the relevant endpoint.