Directory Services
From this section, you can import and synchronize the entities (Users, Computers, and Groups) from the company's Active Directories. Base Search Path and Advanced Groups Filter scope synchronization to specific organizational units or groups, so large, multi-region Active Directory structures with many entities sync efficiently without importing the entire directory.
This section of the documentation is provided as a best-effort guideline to support deployment. Since third-party products can change frequently, the screenshots and images may not always reflect the latest interfaces or features. For the most up-to-date information, refer to the official resources from the product vendor.
Microsoft Active Directory
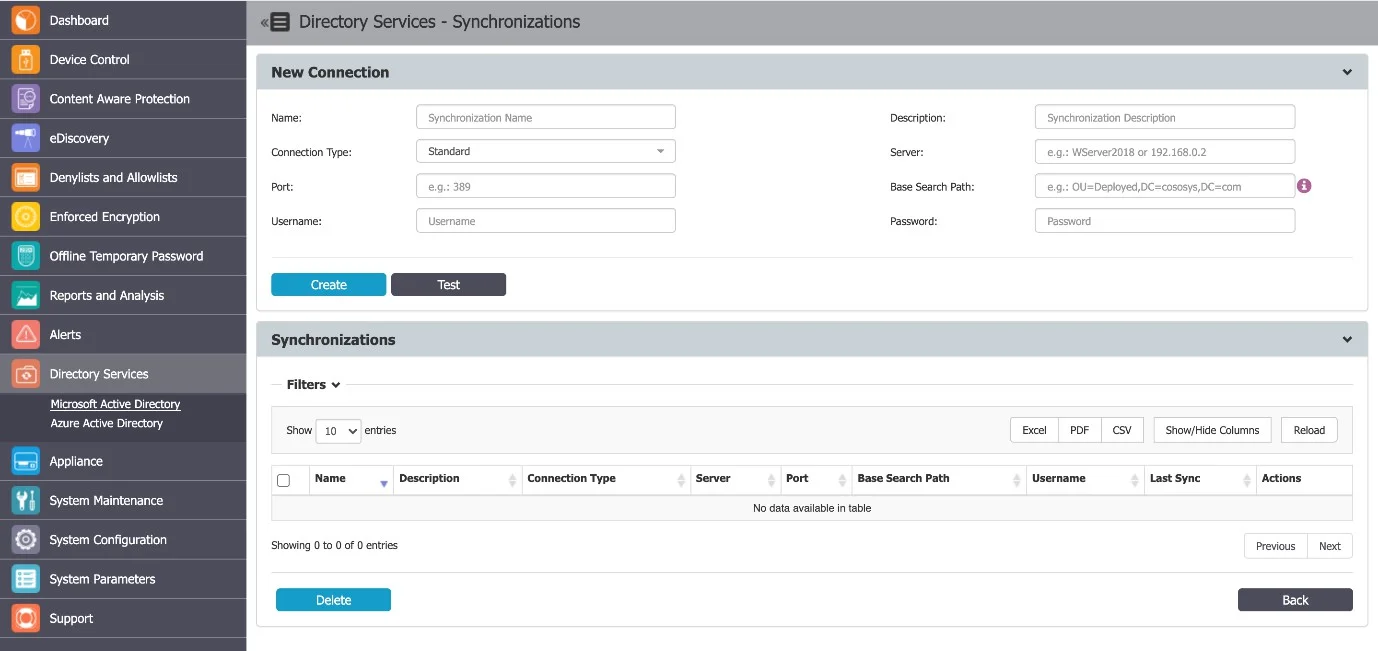
You can create and manage connections from the Directory Services, Microsoft Active Directory section. The required information includes the Connection Type, Server, Port, Username, and Password.

When importing many entities, use Base Search Path to show only relevant information. Importing the entire AD structure can slow the import tree display.
To verify the information is correct, click Test.
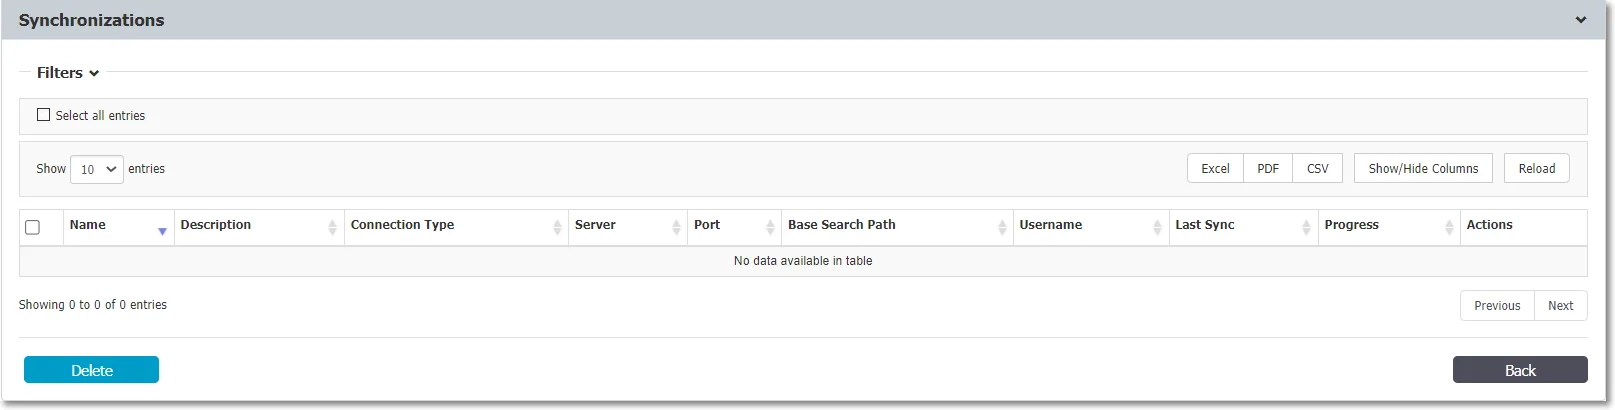
After you create a new connection, it appears in the synchronization list, where you can edit it to include the required entities.
For the defined connections, several synchronization options are available. From this section, you can also change the connection credentials and synchronization interval.
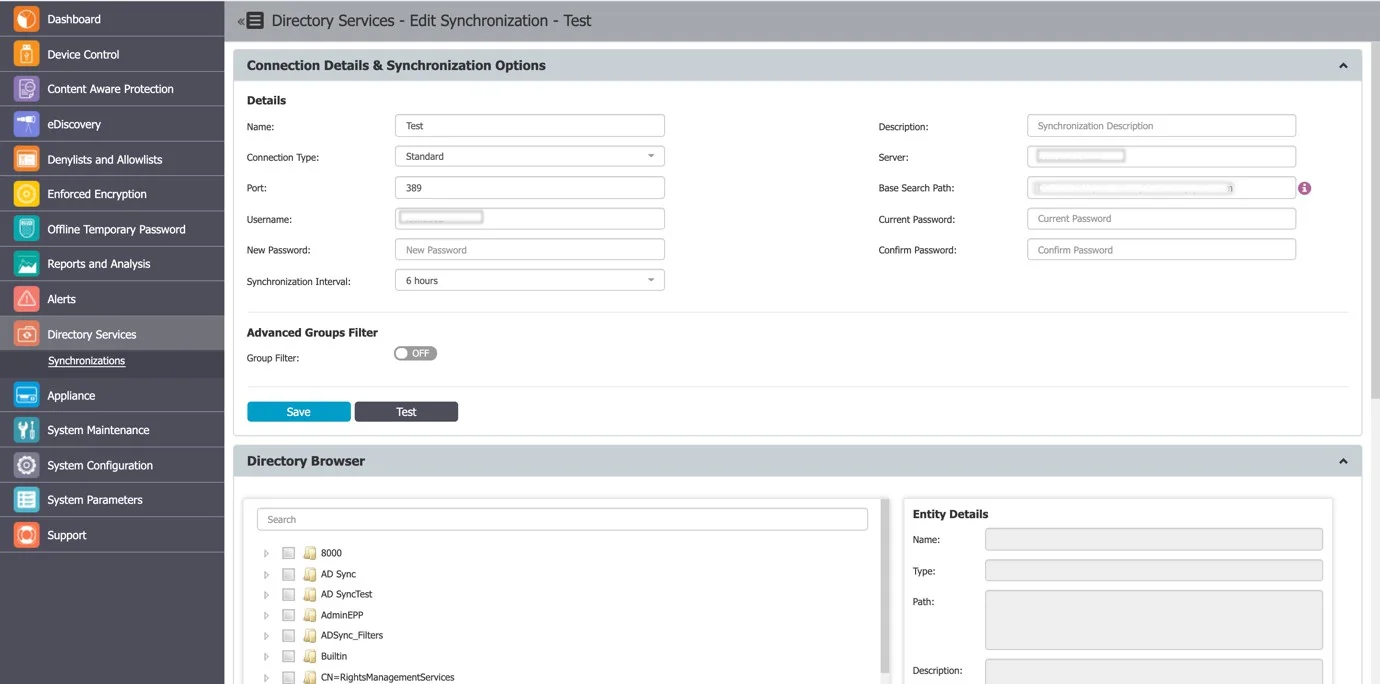
Use the Advanced Groups Filter to import and synchronize only specific groups, ignoring all other entities.
From the Directory Browser section, you can select the entities to sync.
You can view only Organizational units (OU) and Groups in the Directory Browser.
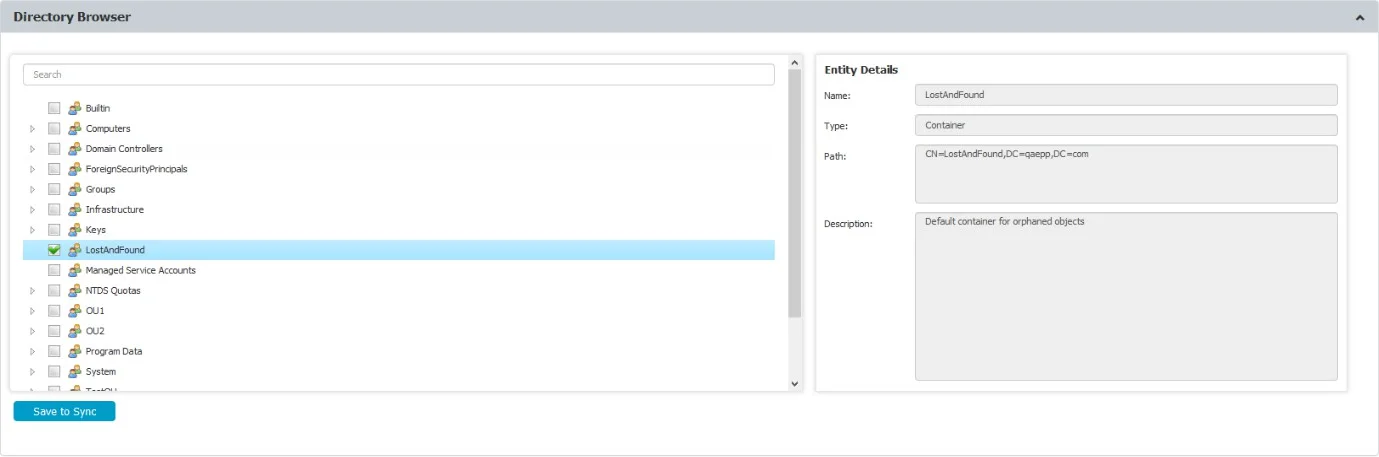
After you select the entities, you can save them to sync.
Microsoft Entra ID
You can create and manage connections from the Directory Services, Microsoft Entra ID. From this section, Endpoint Protector synchronizes the users of Groups from Microsoft Entra ID with the Endpoint Protector Server. The API platform retrieves group membership recursively.
Example
- Group 1 - User 1, User 2, User 3
- Group 2 - Group 1, User 4
- Group 3 - Group 2, User 5
If you select Group 3 for the synchronization operation, Endpoint Protector imports and creates only Group 3 on the Endpoint Protector Server. It also imports User 5 and adds it as a member of Group 3. Endpoint Protector parses Group 2 and all subsequent groups, retrieves only the Users, and doesn't add the actual groups to the server.
After synchronization, the Endpoint Protector Server shows:
- Group 3 - User 5, User 4, User 3, User 2, User 1
Configure Microsoft Entra ID
Create the Application on Microsoft Entra ID
Step 1 – Log in to Azure Portal.
Step 2 – Go to Microsoft Entra ID.
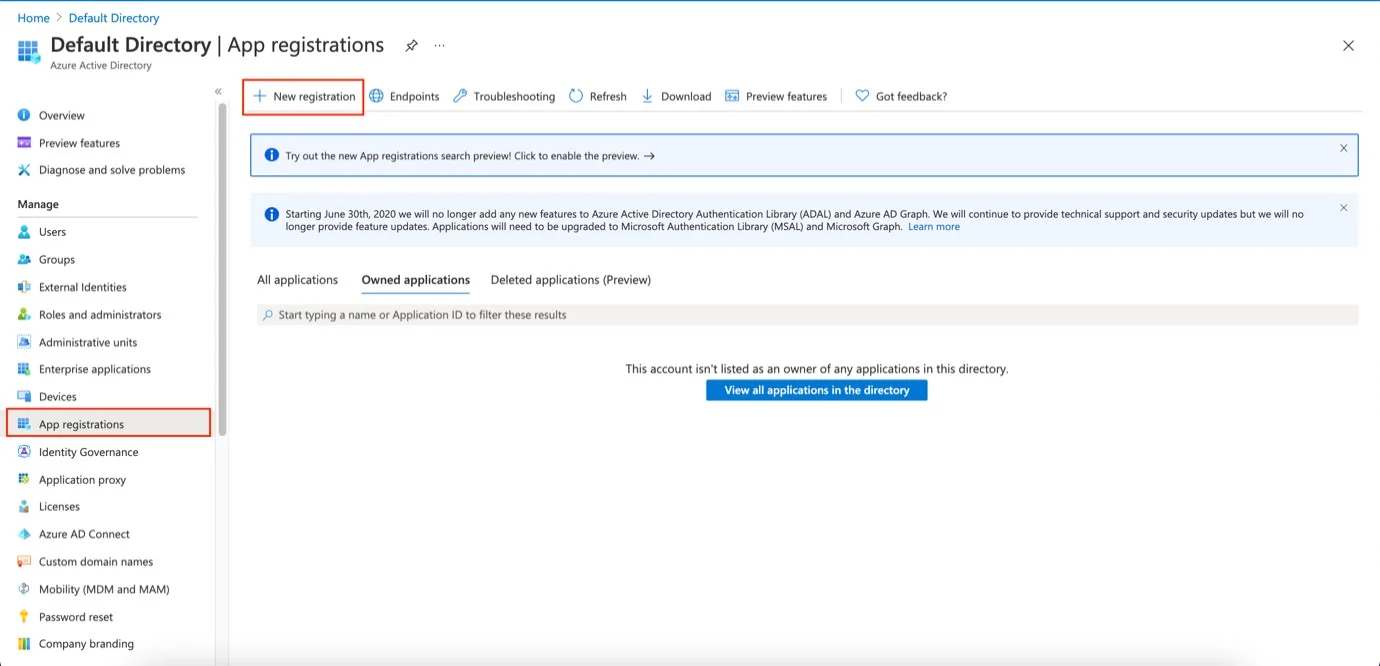
Step 3 – Click App Registrations from the Manage section on the Active Directory menu on the left side, then on New Registration.
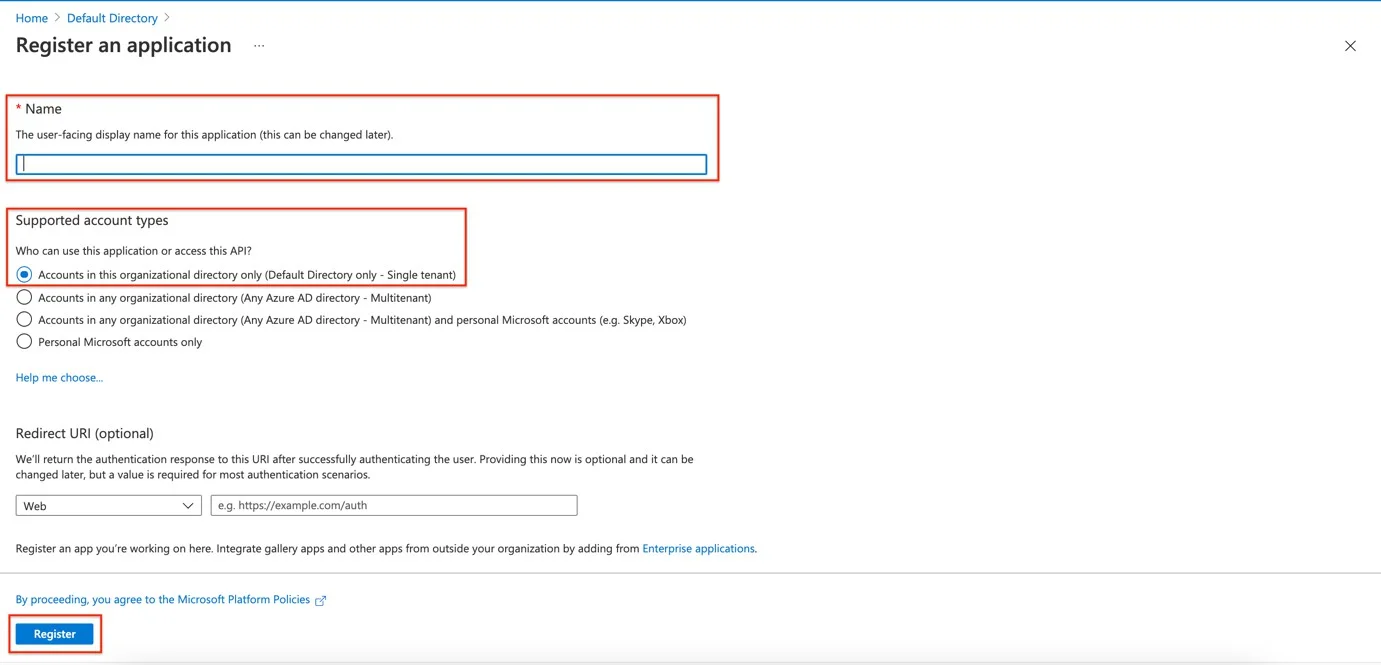
Step 4 – On the Registration page enter your Name.
Step 5 – On the Supported account type select Default Directory.
Don't fill in the Redirect URI field.
Step 6 – Click Register.
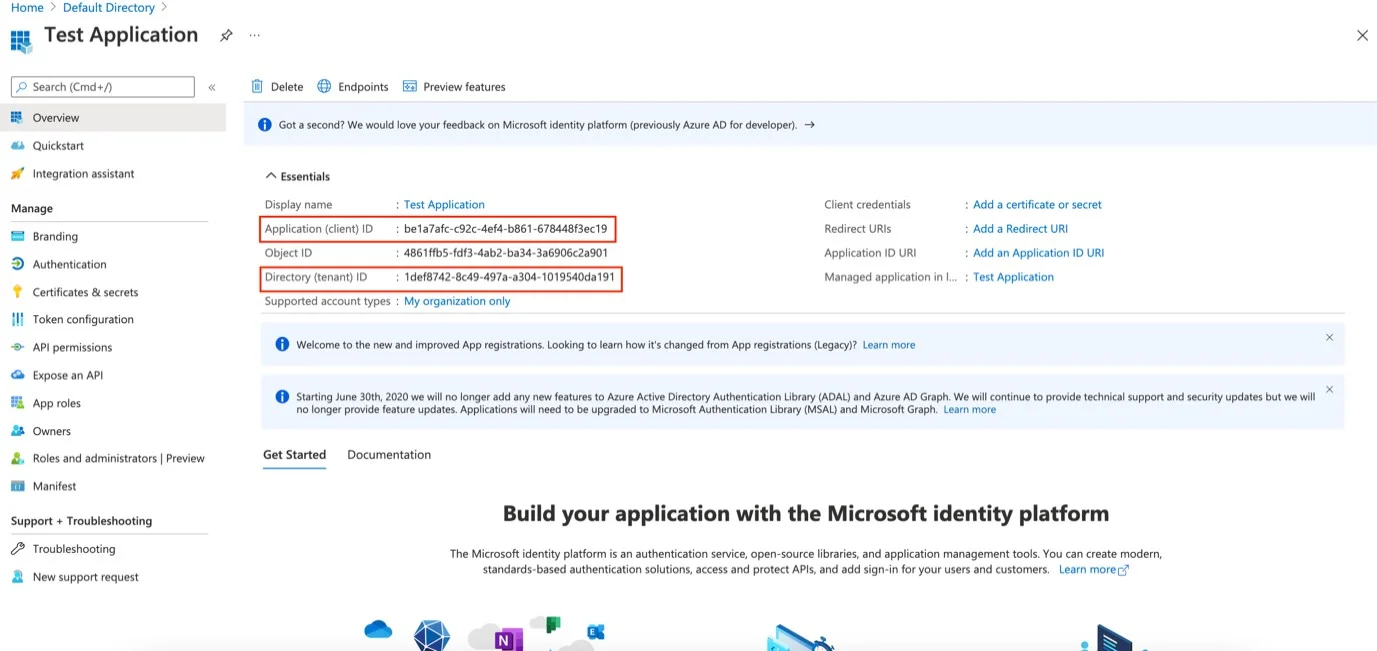
Step 7 – On the Essentials section save the following information:
- You'll need the Application (client) ID for the Application (client) ID field on the Endpoint Protector Server
- You'll need the Directory (tenant) ID for the Tenant ID field on the Endpoint Protector Server
Create a Secret ID for the Application
Endpoint Protector uses the secret ID as an authentication method to gain access to the application via Graph API.
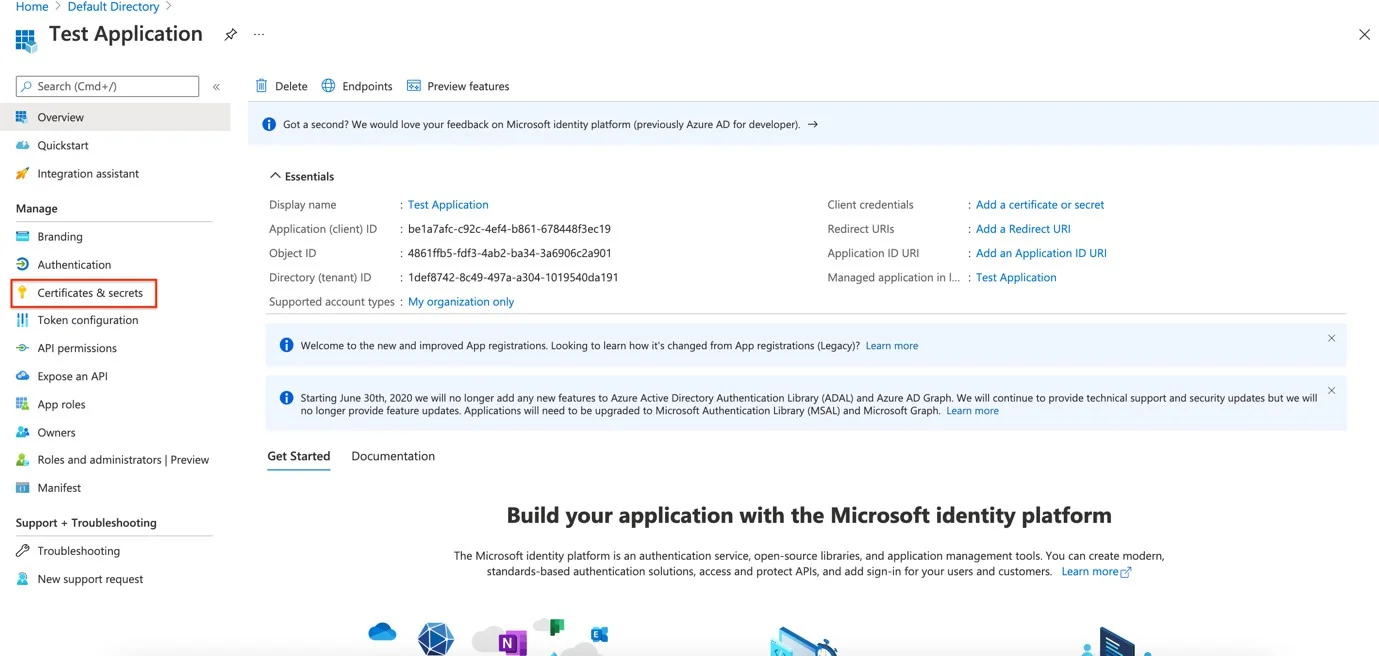
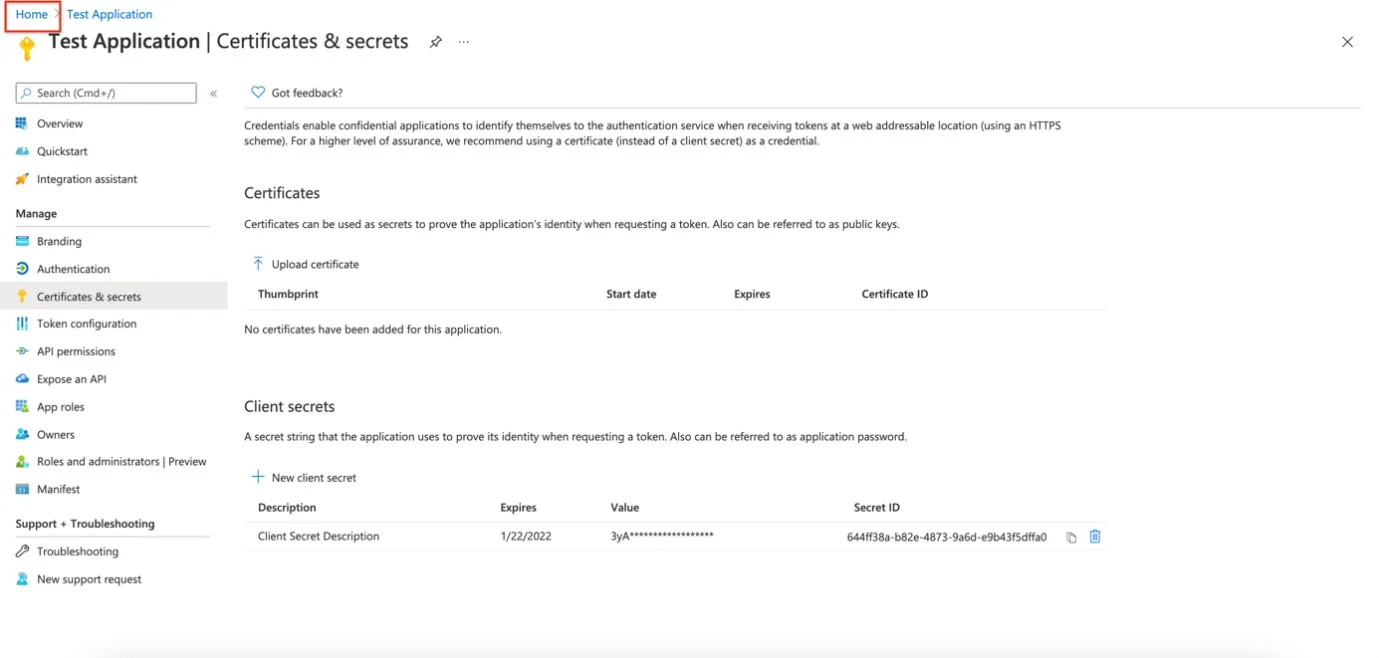
Step 1 – Click Certificates & Secrets on the side menu from the Manage section.
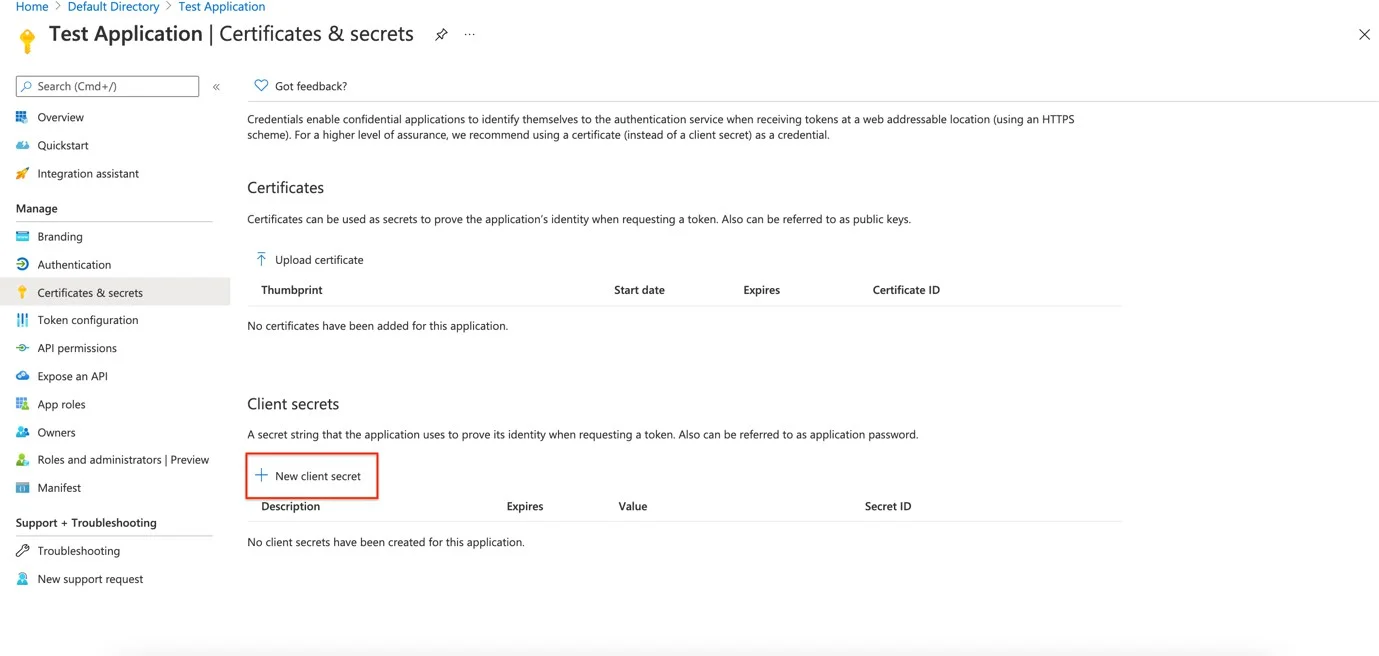
Step 2 – Click New client secret on the Certificates & secrets page.
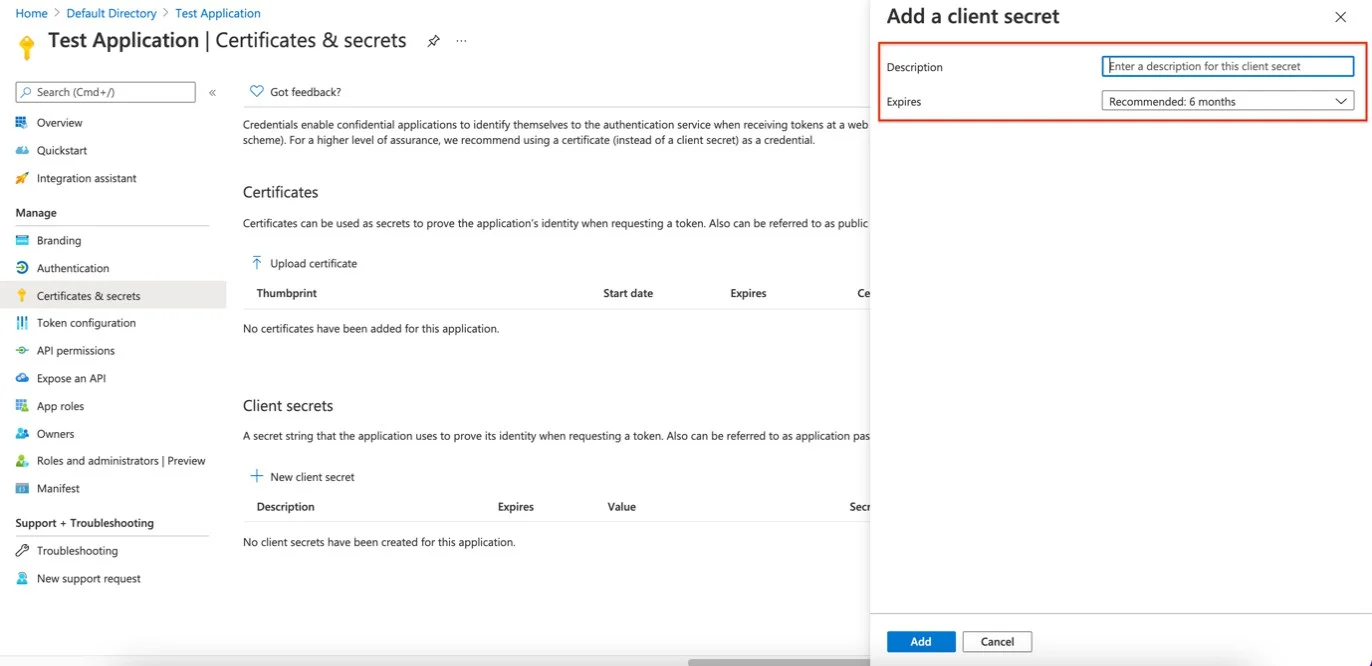
Step 3 – Enter a Description for the secret ID.
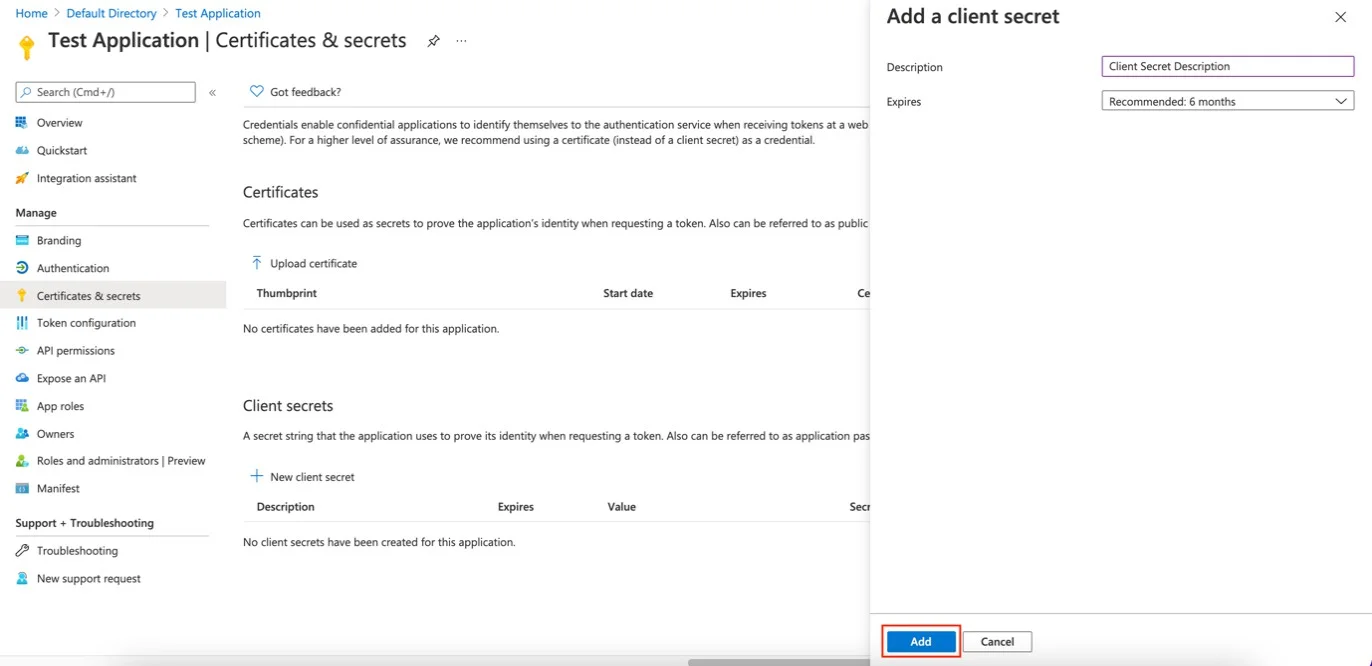
Step 4 – Click Add and Add a client secret section.
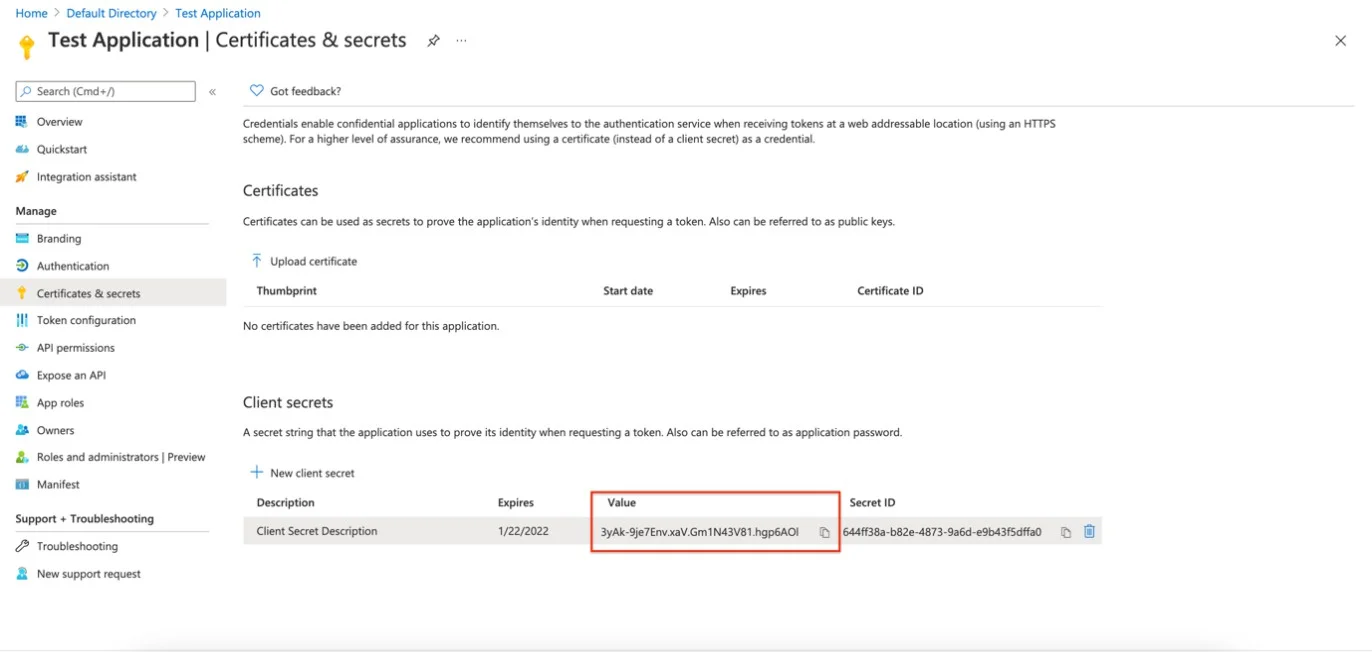
Step 5 – Copy the Secret ID value to the clipboard and store it safely, because you'll need it later.
When you navigate back, the secret ID is no longer visible.
Create Users/Groups Using Graph API
Step 1 – Click Home and then Microsoft Entra ID.
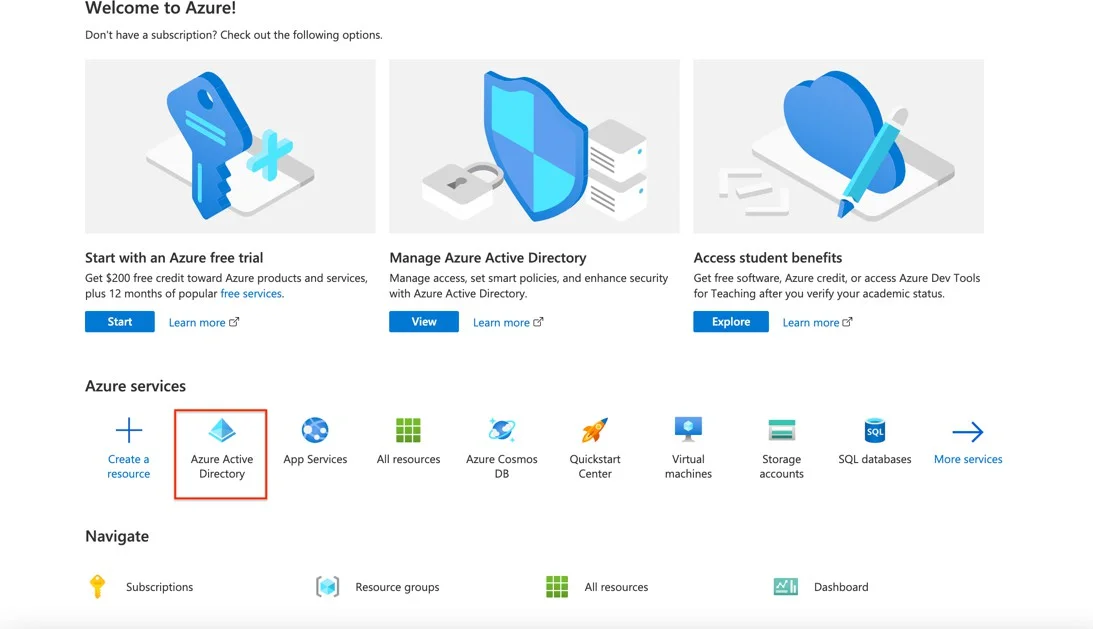
Step 2 – Click Add from the Default Directory| Overview page
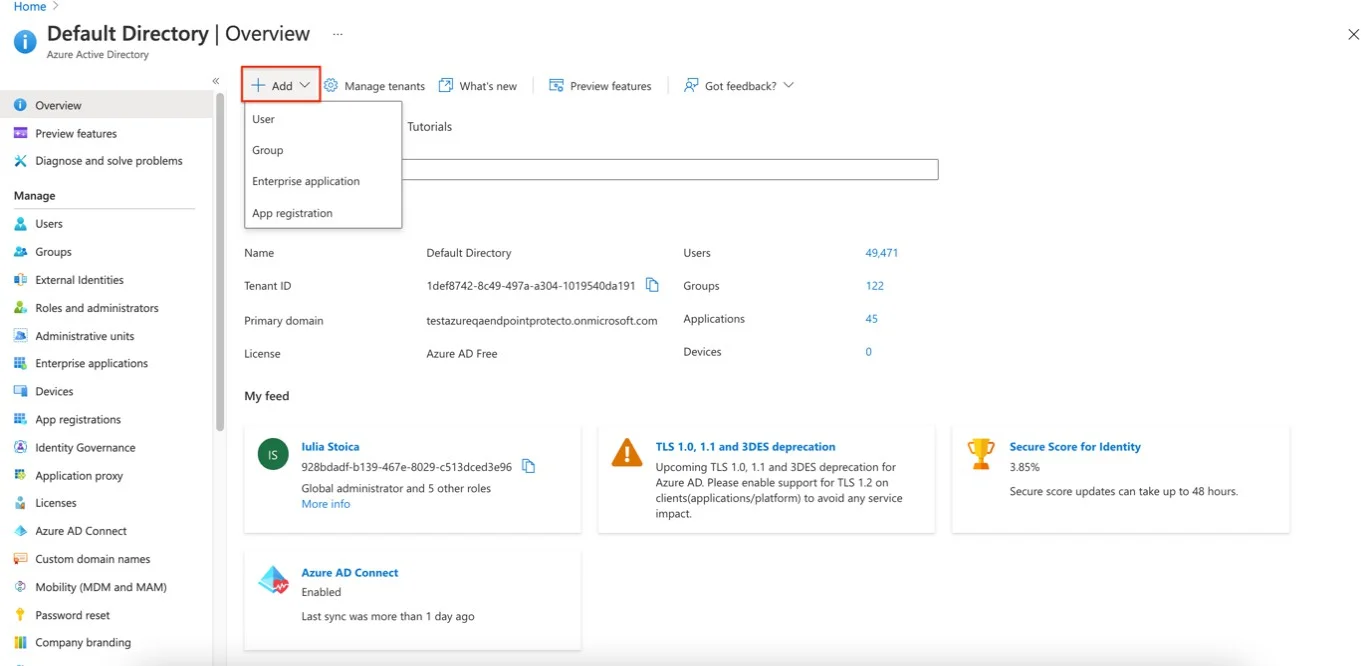
Step 3 – Click Add User.
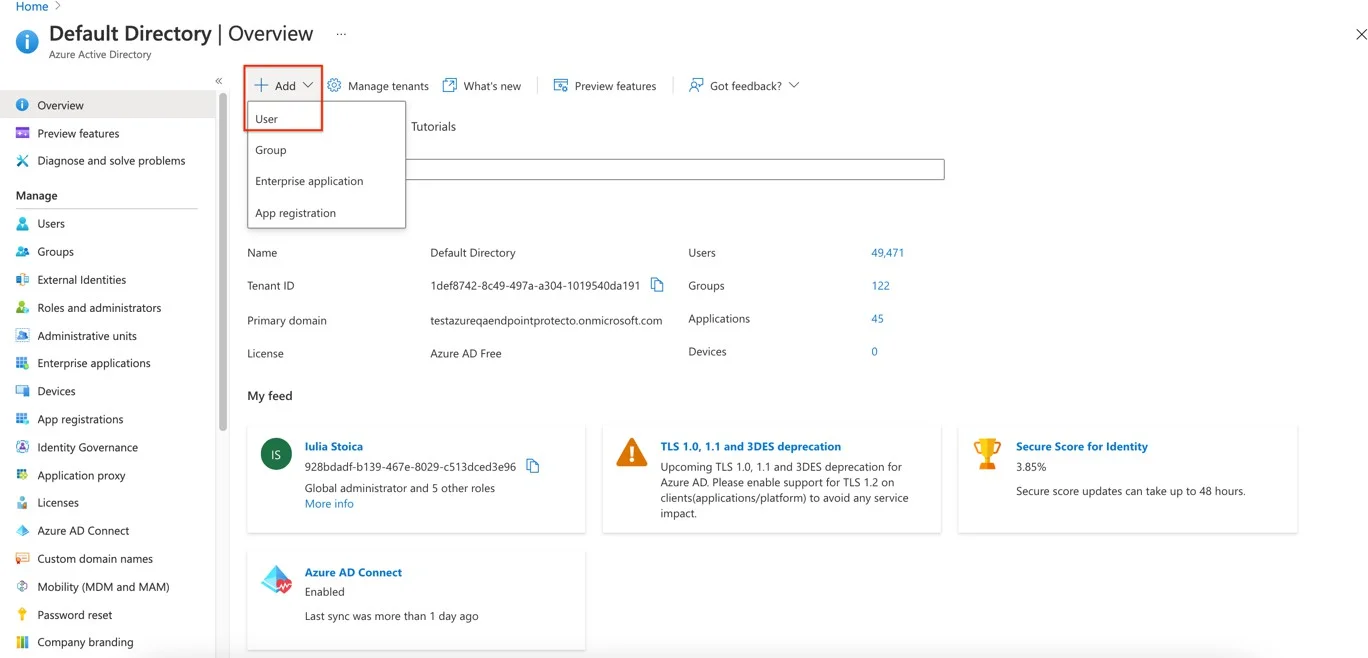
- Select Create User.
- Enter the Username and select the Domain.
- Enter the Name.
- Either click Auto-generate password or create one on your own.
- Add the Department.
- Click Create.
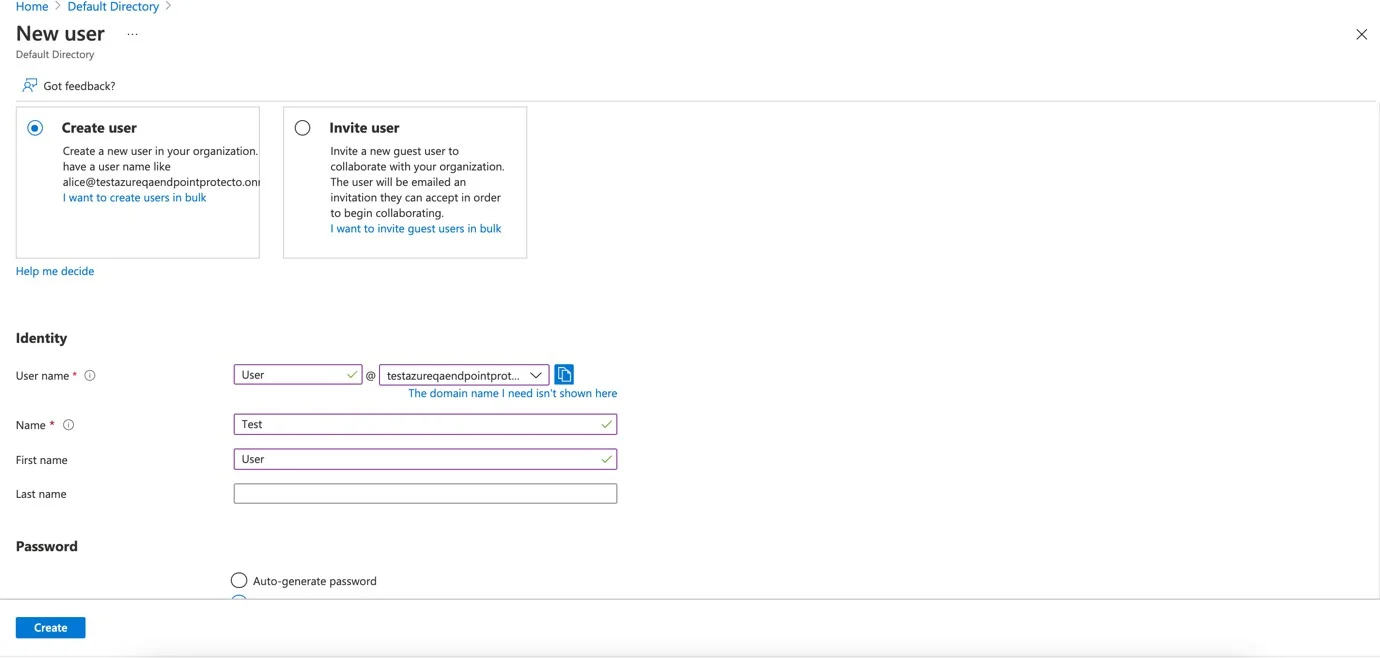
Step 4 – Repeat Steps 1 and 2, then click Group.
- Select group type security.
- Enter a name for the group.
- Click No members selected to add membership.
- Search for the newly created user and click Select.
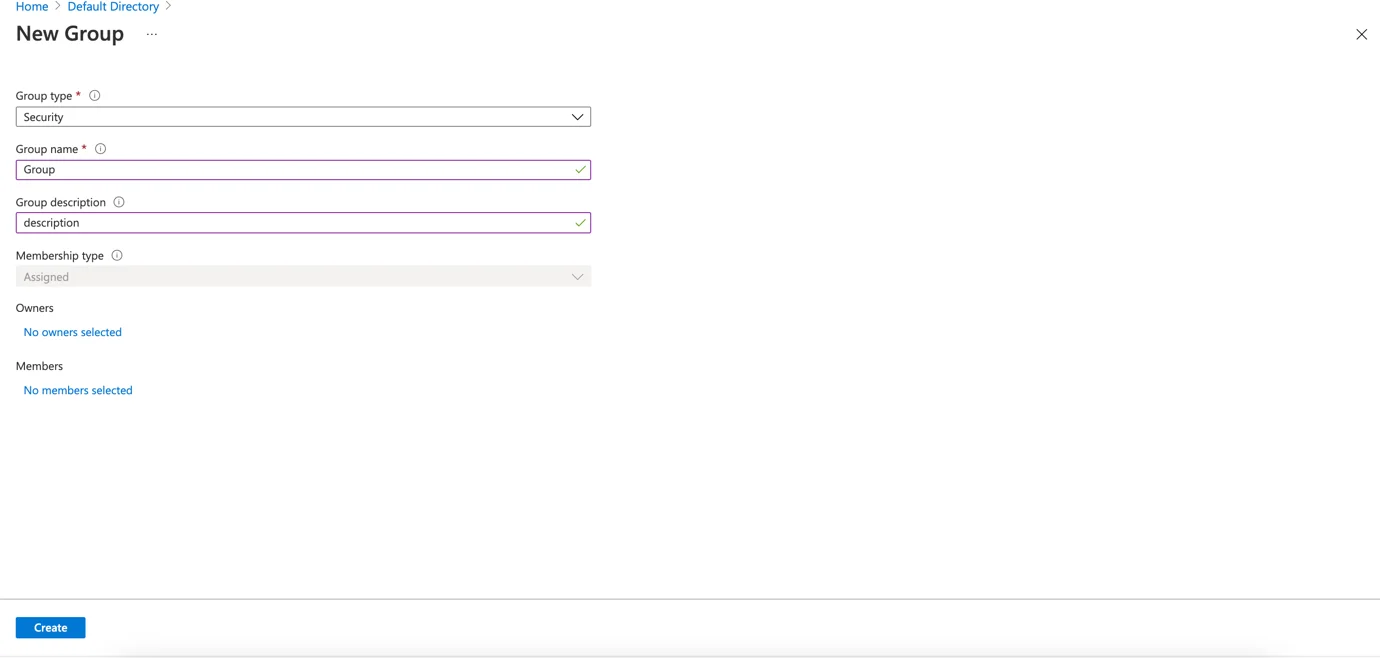
Add Permissions to the Application
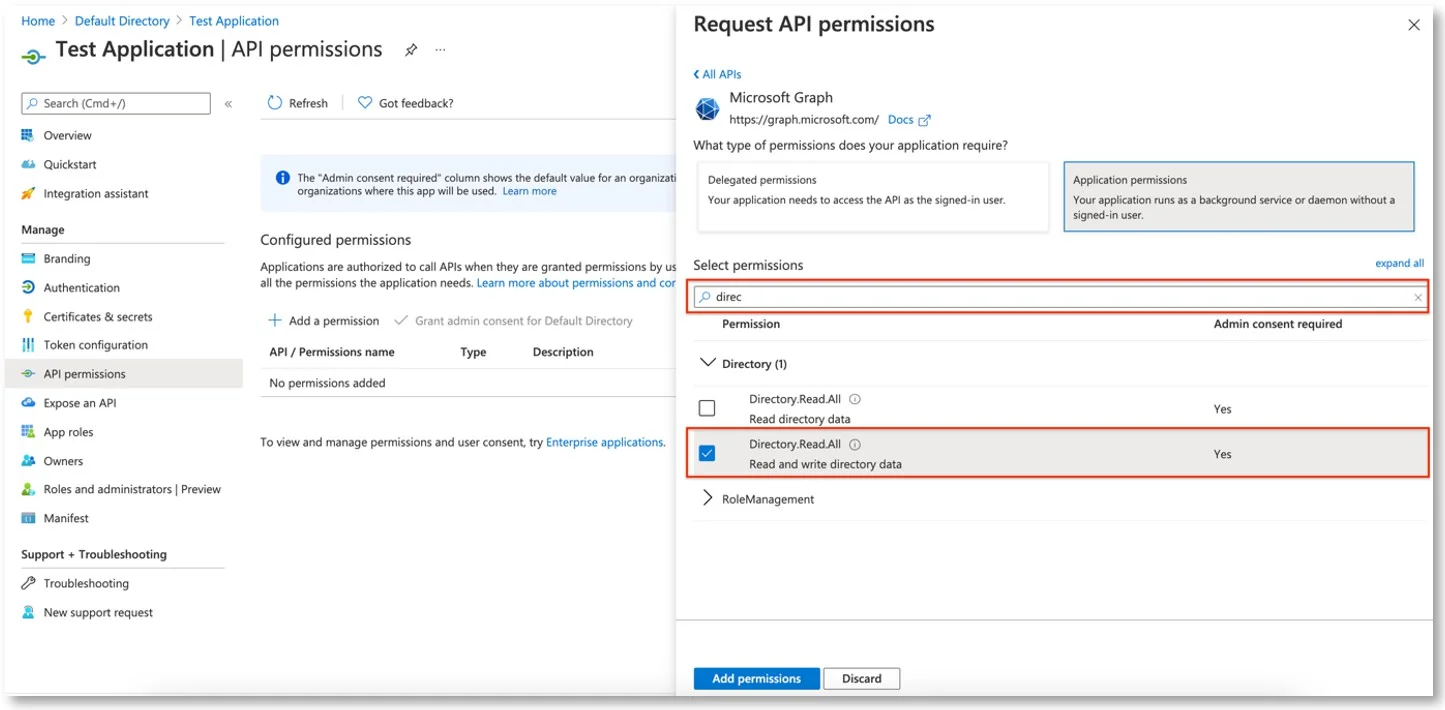
Permissions to add to the application:
- Directory.Read.All
- Group.Read.All
- User.Read.All
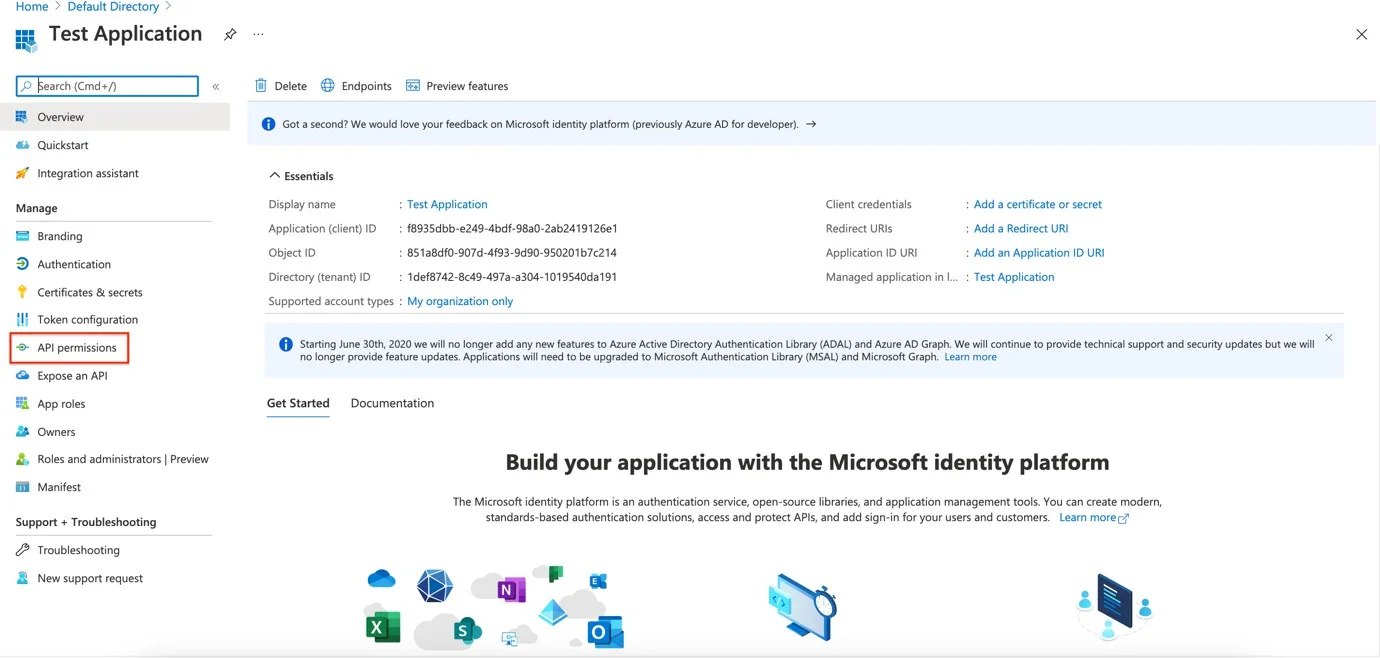
ensure the created application is open then:
Step 1 – Click API Permissions.
Step 2 – Click Add a Permission.
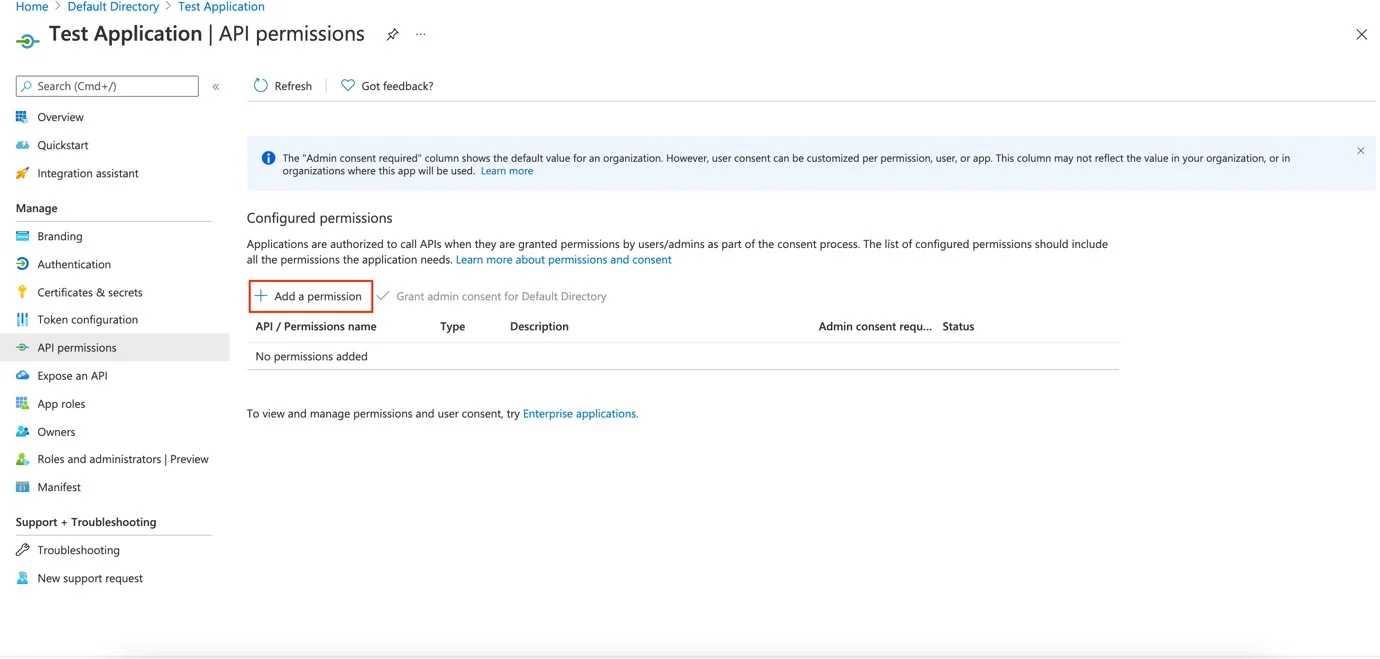
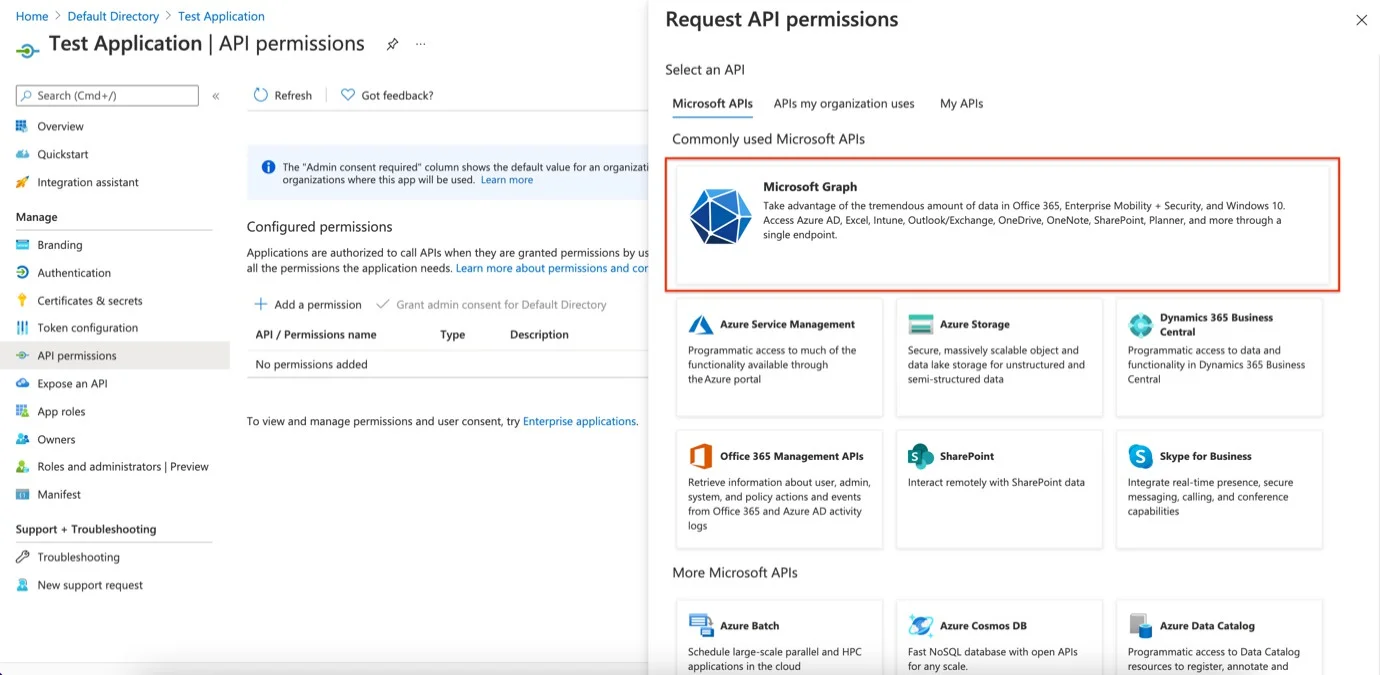
Step 3 – Click Microsoft Graph.
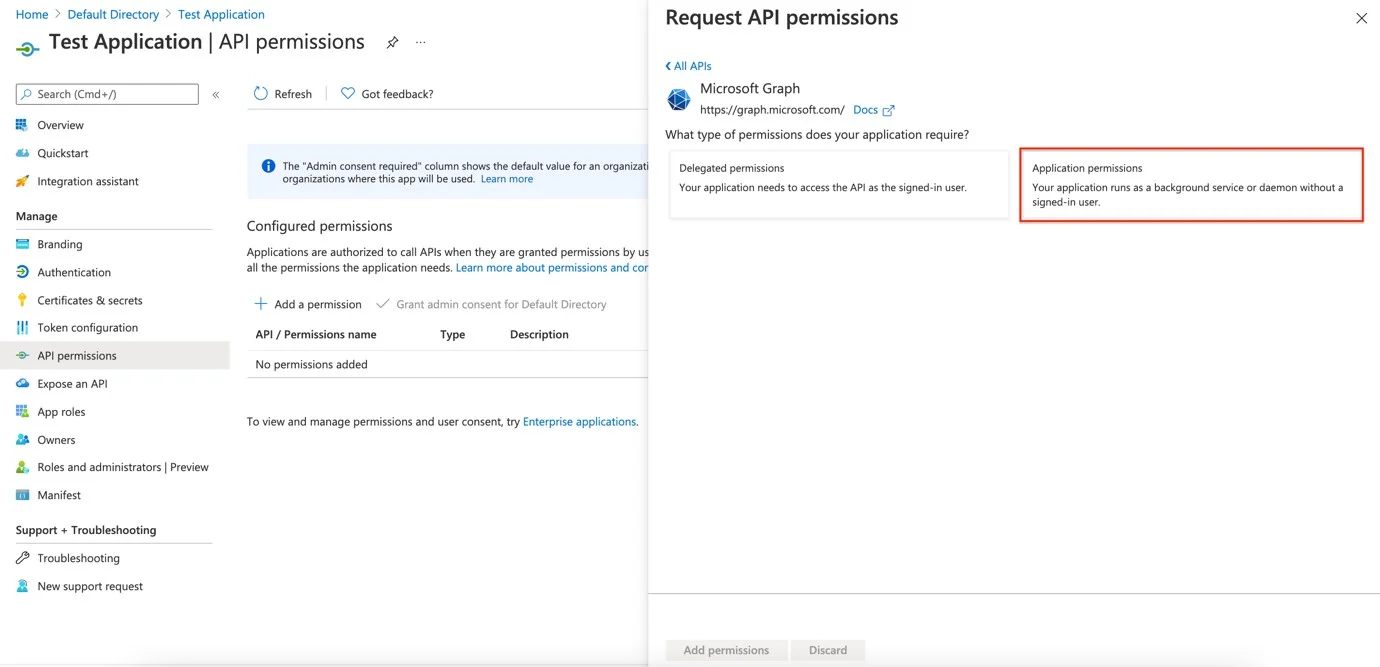
Step 4 – Click Application Permissions.
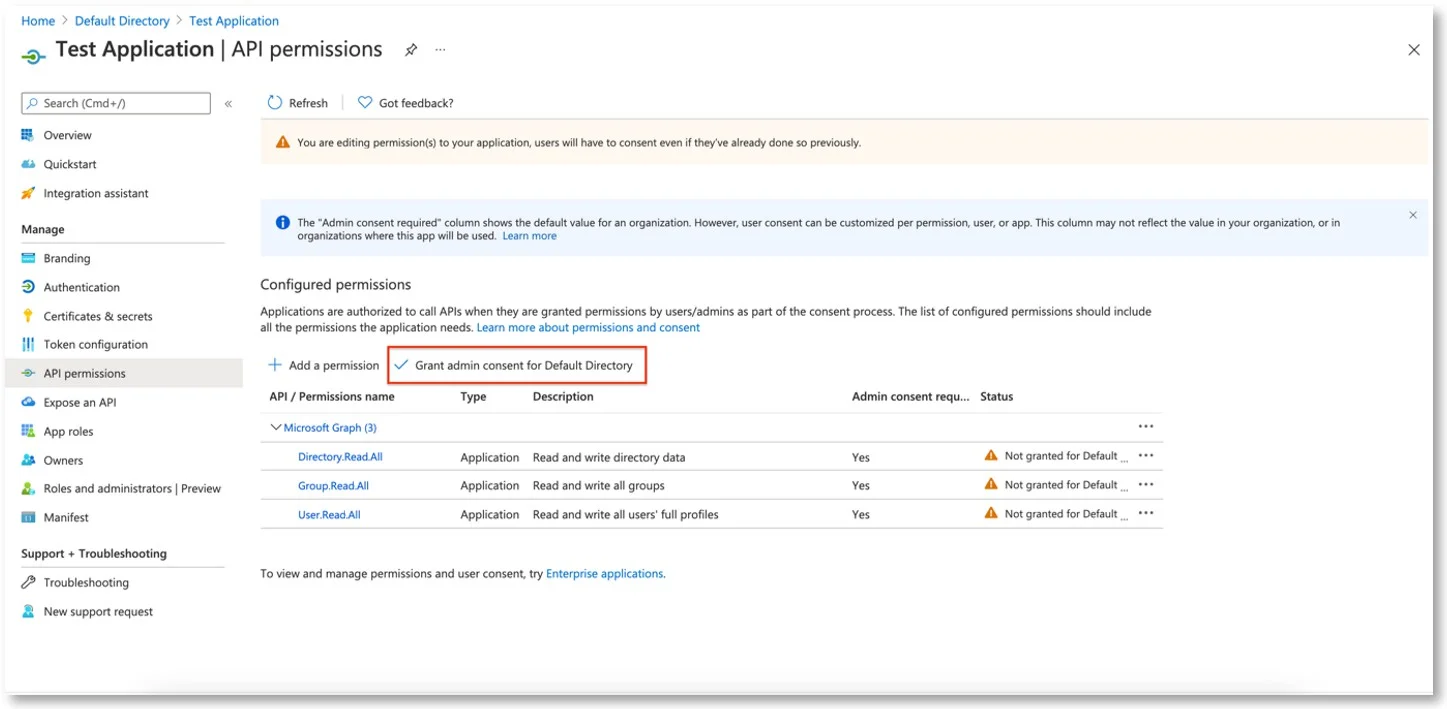
Step 5 – Search for each of the required permissions and check it. (Directory.Read.All, Group.Read.All, User.Read.All)
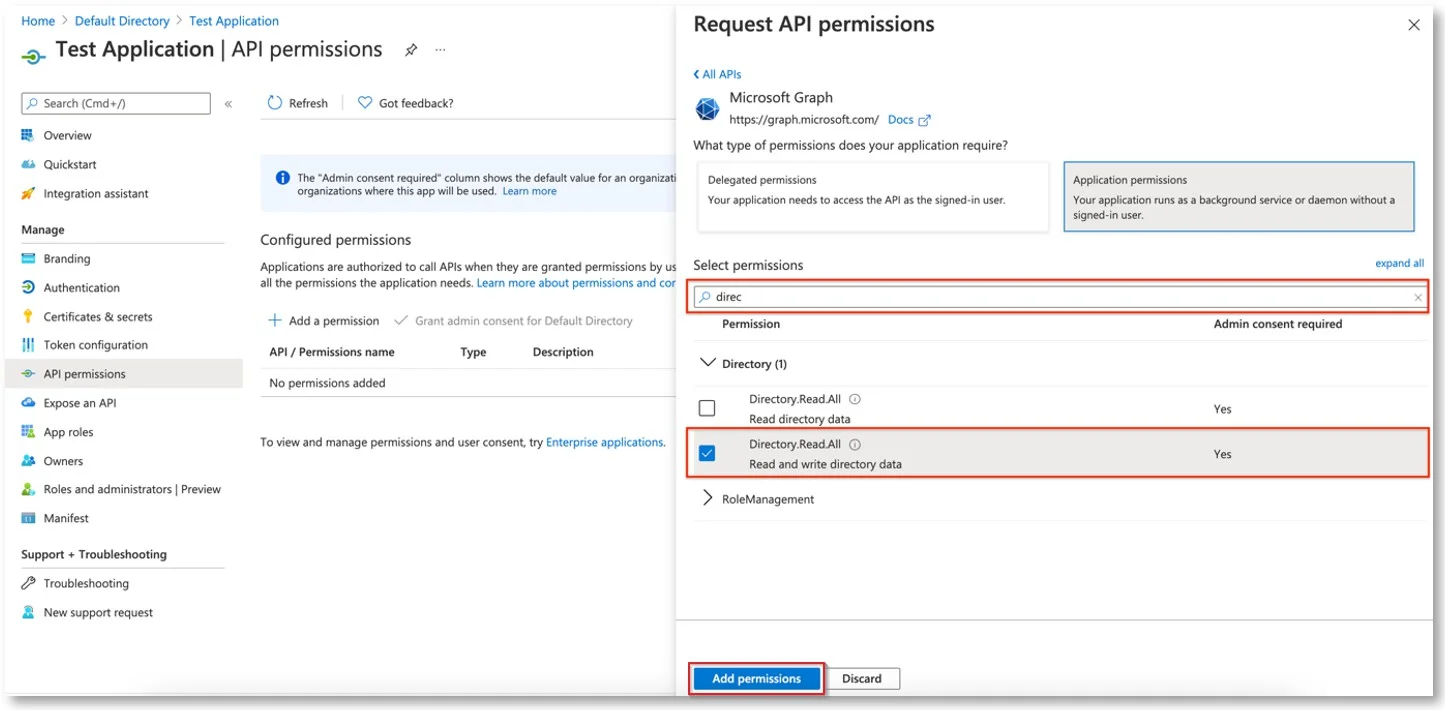
Step 6 – Click Add Permissions.
Step 7 – Click Grant admin consent for Default Directory from the API Permission page.
Add Graph Application to Server
Step 1 – Open the Endpoint ProtectorServer and navigate to Directory Services > Microsoft Entra ID.
Step 2 – Click Add to add an API Consumer. Use one API Consumer for multiple synchronization jobs.
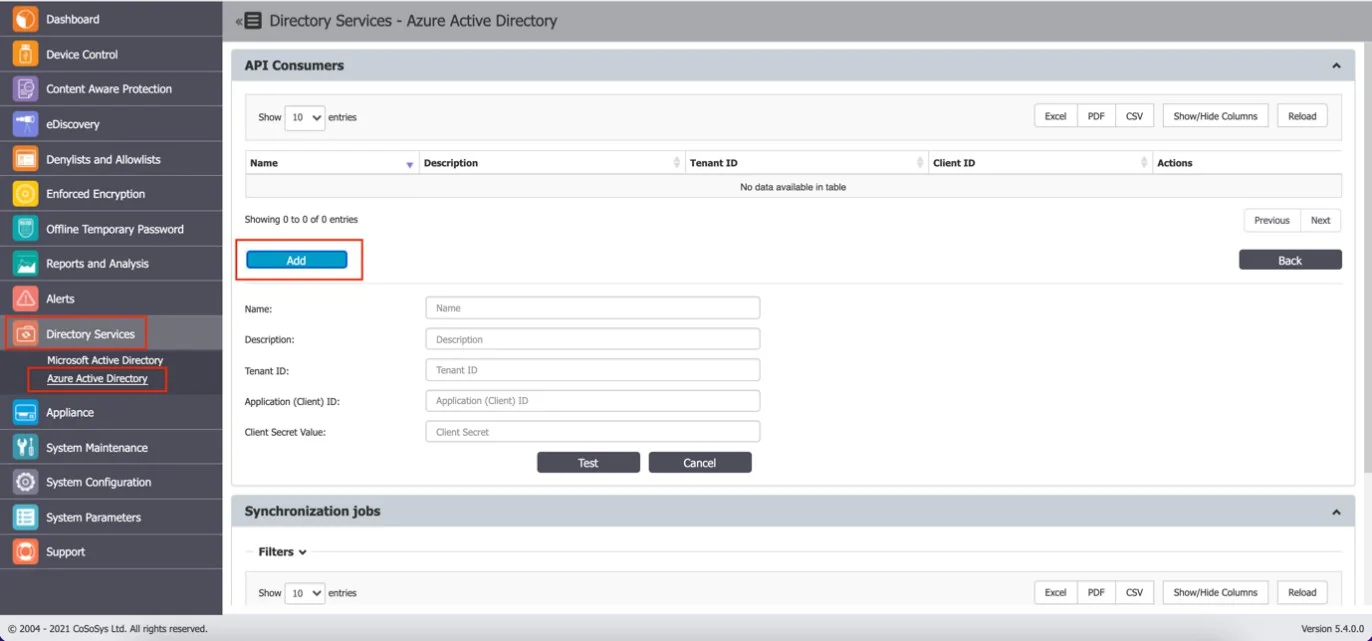
Step 3 – Provide the following details:
- Name
- Description
- Directory (tenant) ID saved earlier on the Tenant ID field
- Application (client) ID saved earlier on the Application (Client) ID field
- Secret ID saved earlier in the Client Secret Value field
- Azure Cloud Environment – select the cloud environment that matches your tenant:
- Commercial (default) – uses
login.microsoftonline.comandgraph.microsoft.com - GCC High – uses
login.microsoftonline.usandgraph.microsoft.us(for US government and regulated-industry tenants)
- Commercial (default) – uses
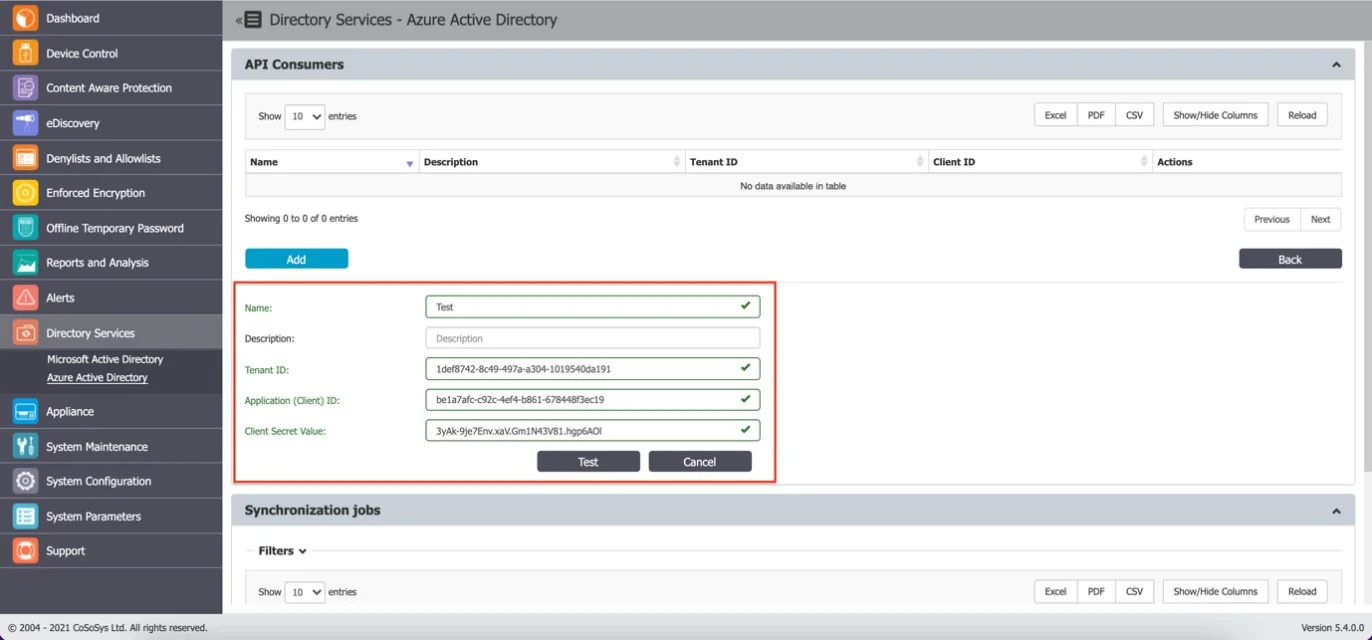
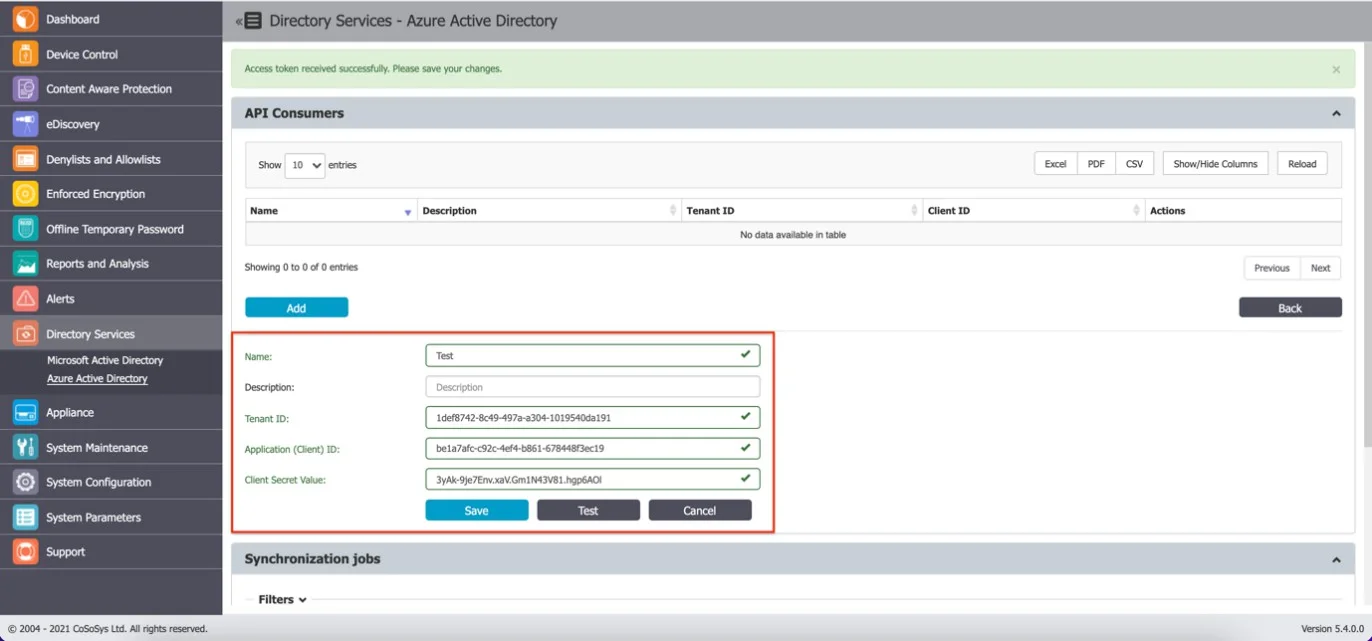
Step 4 – Click Test and then Save.
Create a Synchronization Job on the Server
Step 1 – Click Create Sync Job.
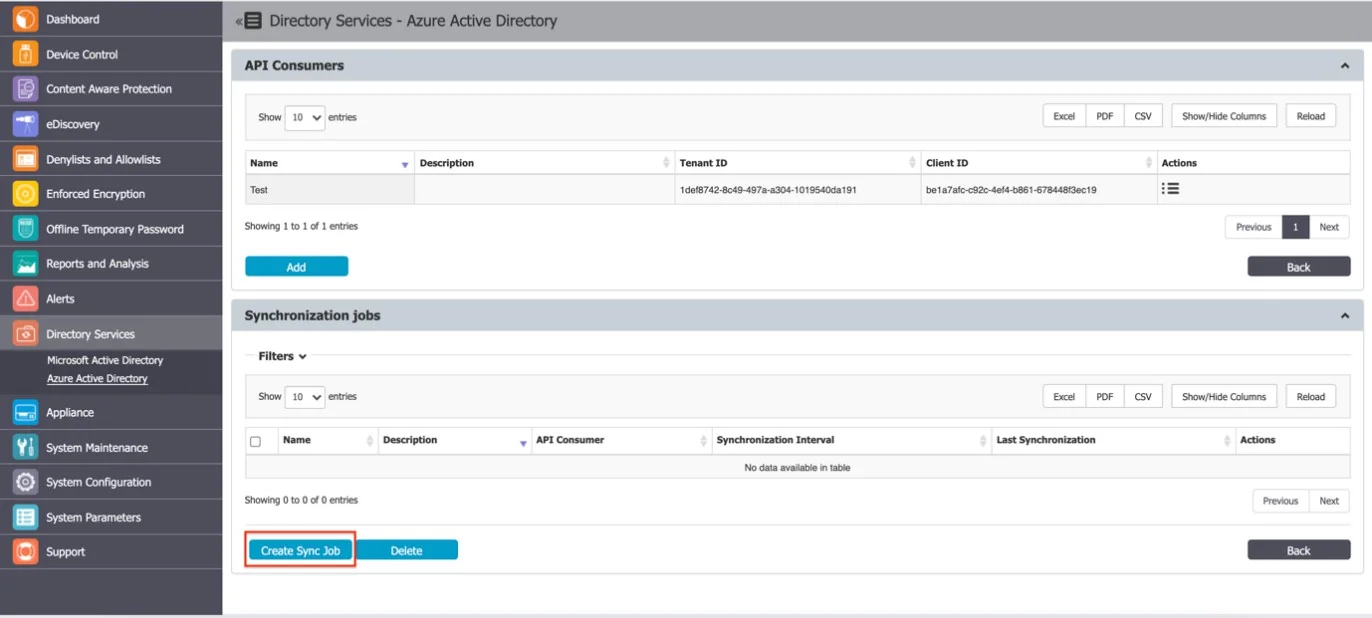
Step 2 – Provide Synchronization information:
- Name
- Description
- Select the created API Consumer
- Select Sync Interval
Step 3 – Click Save.
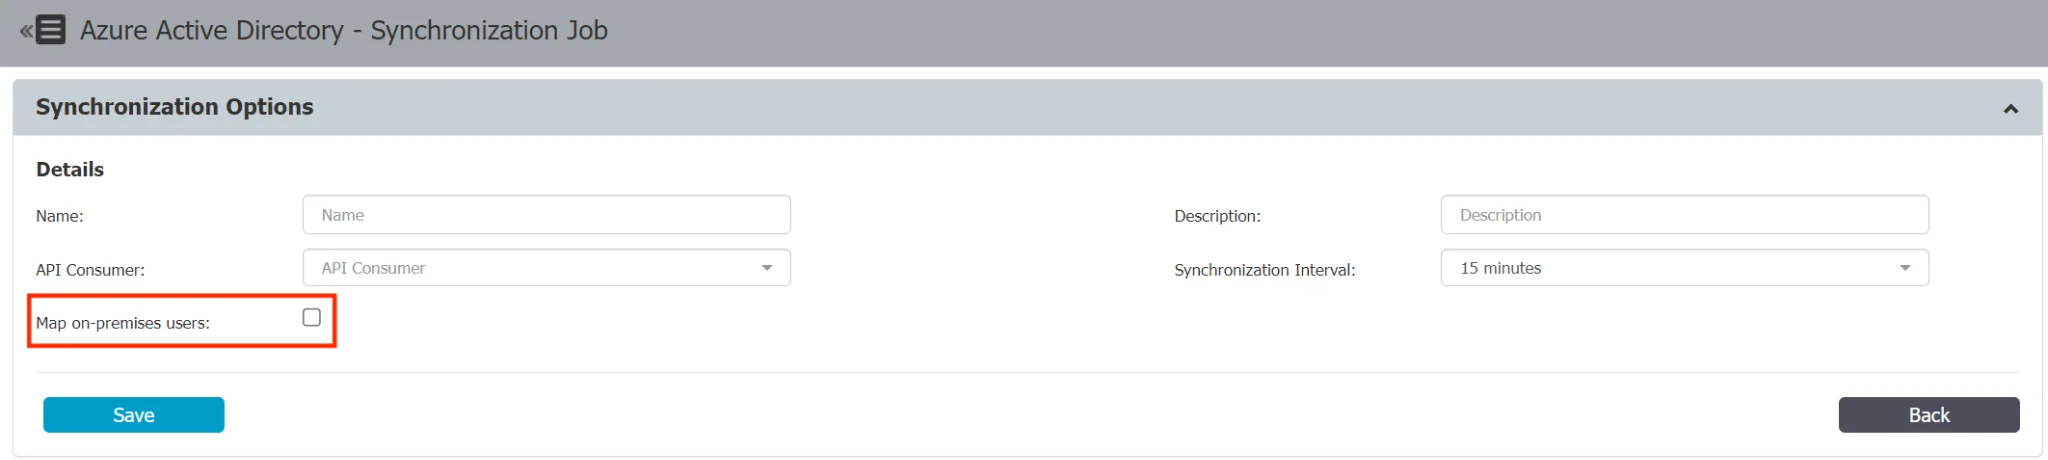
The Map on-premises users switch in the Microsoft Entra ID connector controls how Endpoint Protector retrieves user names in hybrid environments with both a local Active Directory and Microsoft Entra ID. This switch has two states:
- Unmarked (feature disabled) – Endpoint Protector uses the "userPrincipalName" Azure AD attribute to retrieve user names. This attribute is the primary source for user identification and account mapping.
- Marked (feature enabled) – Endpoint Protector uses the "onPremisesSamAccountName" Azure AD attribute to retrieve user names, ensuring accurate synchronization between the local Active Directory and Azure AD.
By using this feature, Endpoint Protector ensures seamless synchronization of user names, preventing duplicate usernames. Enable or disable the "Map on-premises users" feature based on your specific hybrid environment setup and requirements.
You can configure both Commercial and GCC High environments simultaneously using separate API Consumer connections. Each connection syncs independently.