Enforced Encryption
Enforced Encryption, Formerly known as EasyLock, is a cross-platform solution that protects data with government-approved FIPS 140-3 validated encryption. For USB devices, you must deploy it on the root of the device. Use the Drag & Drop interface to copy files to and from the device.
Because Enforced Encryption uses FIPS 140-3 validated cryptography, it helps organizations meet regulatory frameworks that require validated encryption for removable media. This includes the Cybersecurity Maturity Model Certification (CMMC), which enforces security standards that defense contractors must meet to handle Controlled Unclassified Information (CUI).
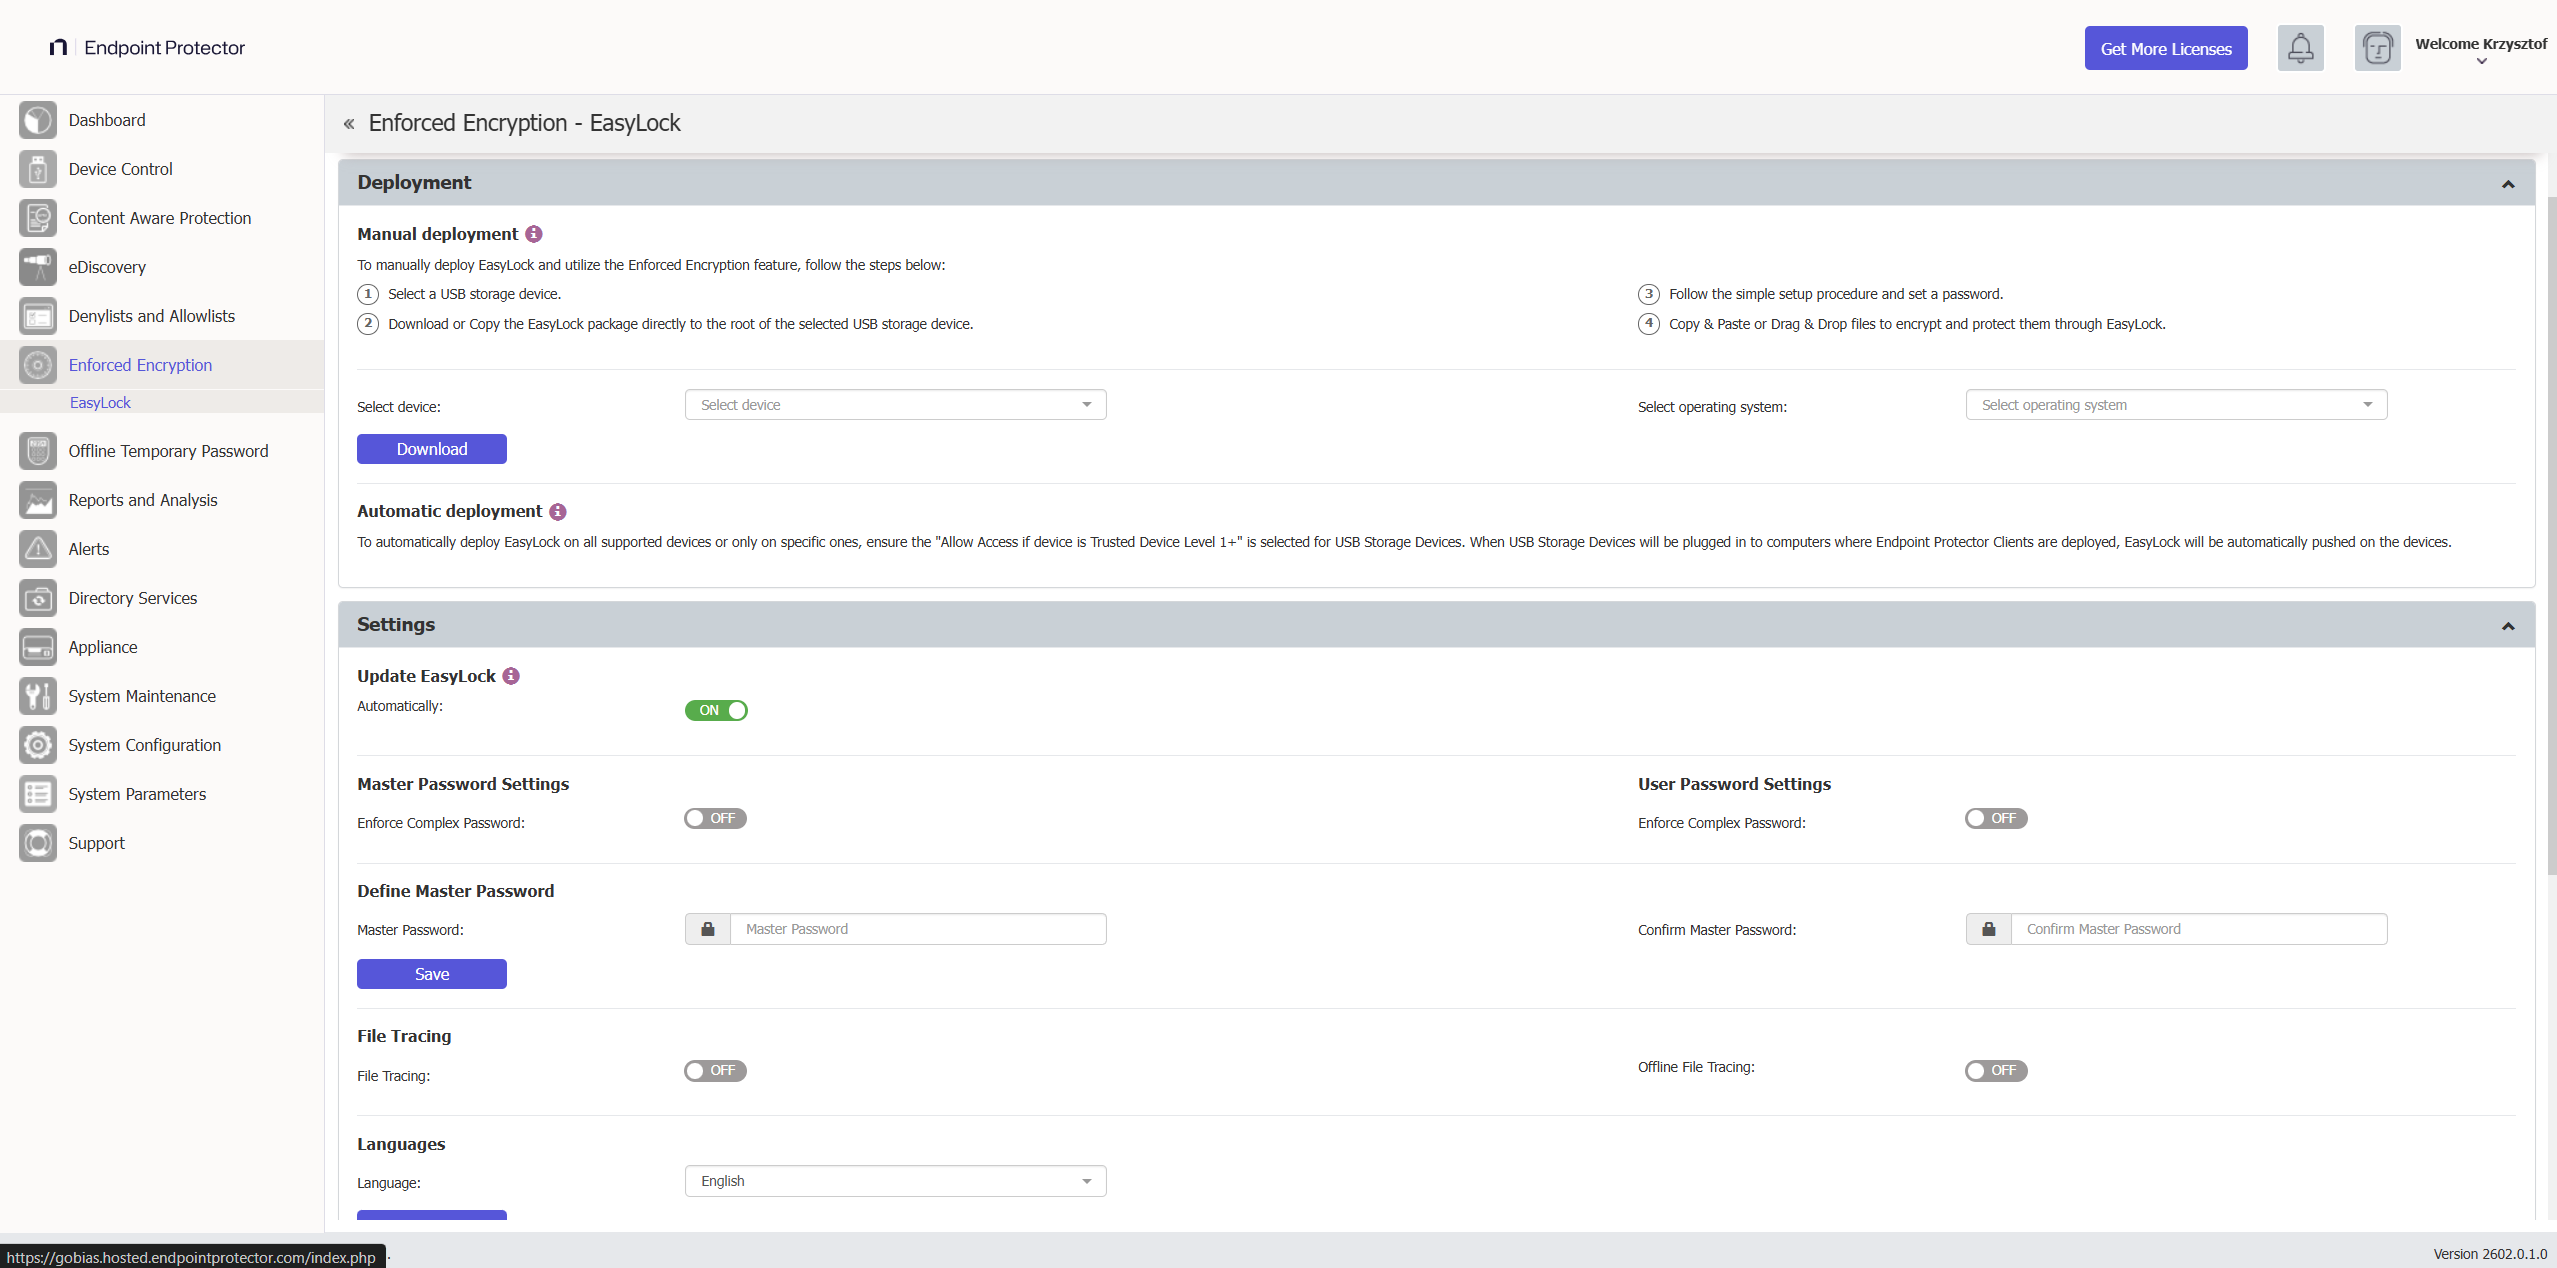
Used in combination with Endpoint Protector, Enforced Encryption lets Endpoint Protector identify USB storage devices as Trusted Device™ Level 1. This can ensure that protected computers use USB Enforced Encryption. The user can access data stored on the device via the password they configured or via a Master Password set by the Endpoint Protector administrator. Any user can open the encrypted data only after decrypting it, which requires copying the information out of Enforced Encryption.
Enforced Encryption isn't compatible with devices that have a write-protection mechanism in place, preventing the modification or deletion of data. A hardware component (for example, a switch on the USB device) or a software component can enforce the write-protection mechanism.
While Endpoint Protector can detect any Enforced Encryption USB encrypted device as a Trusted Device™ Level 1, to use the Enforced Encryption feature, you must use a specific Enforced Encryption version. This is available for the Endpoint Protector User Interface.
Enforced Encryption works in read-only mode if you formatted the device on Windows, configured Enforced Encryption on Windows, or encrypted some files on Windows. On macOS, you can decrypt these files, except on NTFS, which isn't compatible with Enforced Encryption.
Enforced Encryption Endpoint Application
The Enforced Encryption application is available for two platforms: Windows and macOS. Both operating systems have the same interface, and each one can read data encrypted on the other.
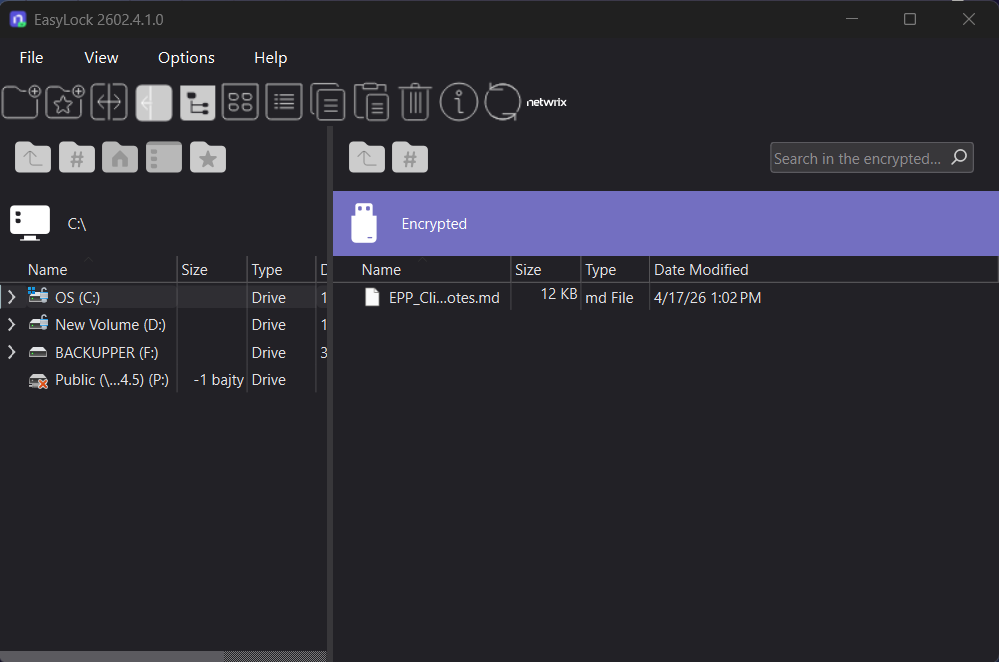
Enforced Encryption 140-3 FIPS Validated Engine
Starting with Netwrix Enforced Encryption version 3.0.0.2 (5.9.4.2 release), Netwrix introduced a new encryption engine, replacing the previous 256-bit AES CBC-mode encryption with FIPS 140-3 validated cryptography. This FIPS 140-3 validated encryption provides the highest standards of data protection, ensuring compliance with the latest industry regulations. While the new encryption engine is fully backward compatible for existing users, allowing for a seamless upgrade and continued use of previously encrypted drives, USB sticks encrypted with the FIPS 140-3 validated engine will not be compatible with older Enforced Encryption Clients. Therefore, Netwrix recommends updating EE Clients to ensure compatibility.
To verify the version of the 140-3 FIPS validated engine and view certification details, check the "About" section in the Enforced Encryption application.

Enforced Encryption Settings
From this section, you can remotely manage Enforced Encryption encrypted devices. Before using these features, you must configure a Master Password.
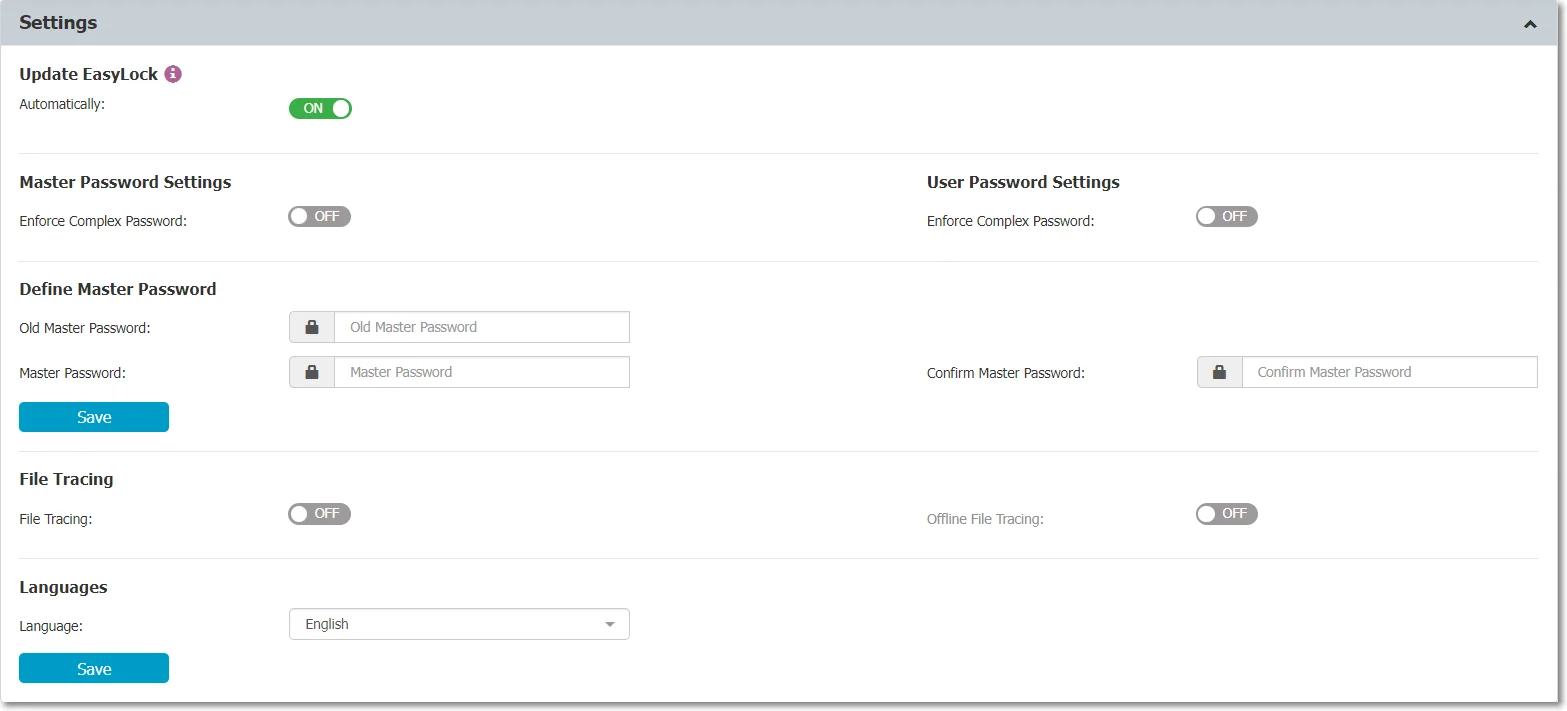
In the Settings section, you can configure the Master Password, enable the Enforced Encryption File Tracing, and define the installation and execution of Enforced Encryption only on computers where the Endpoint Protector Client is present.
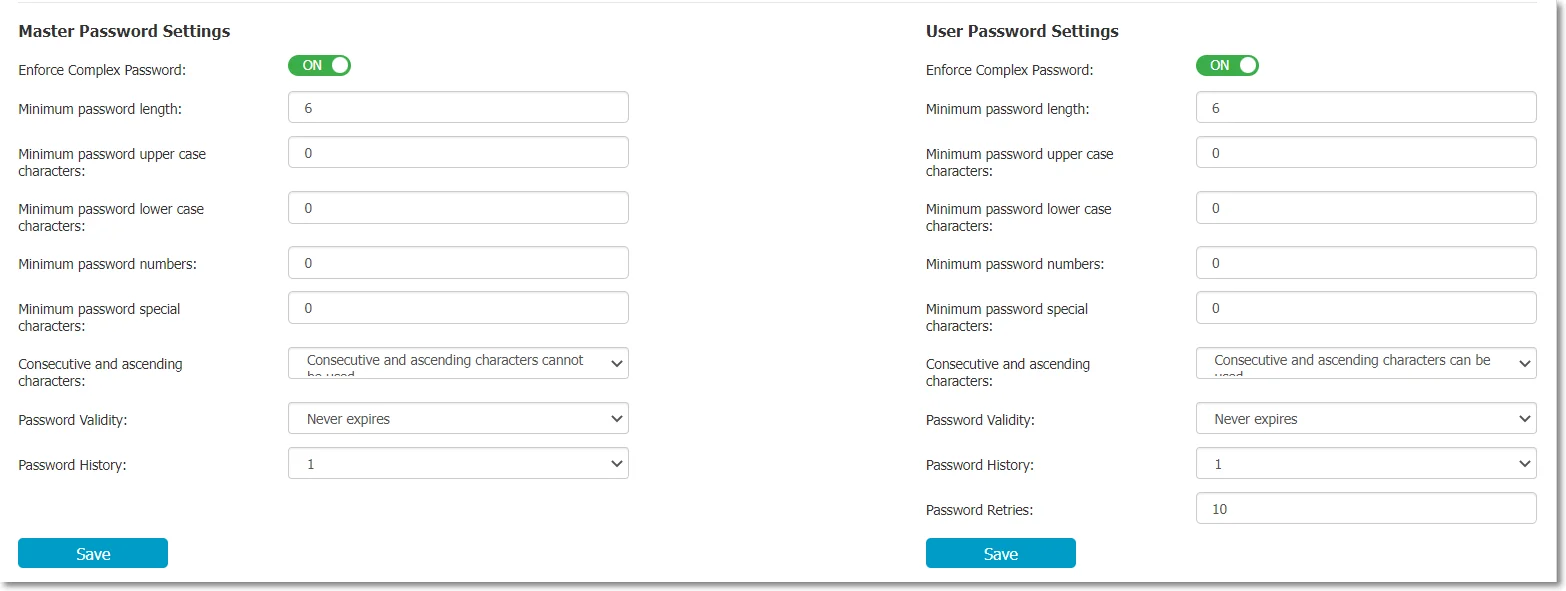
For both the Master Password and the User Password, you can enforce complex rules. If you enable these, you can set the password lengths, minimum characters, validity, history, and other settings.
Endpoint Protector allows tracing of files copied and encrypted on portable devices using Enforced Encryption. You can activate this option from inside the Settings window located under the Enforced Encryption tab.

When you enable File Tracing, Endpoint Protector records all data transferred to and from devices using Enforced Encryption. If the Client is present, it automatically sends this information to the Server, regardless of whether File Tracing is enabled for that computer in Device Control.
If the Endpoint Protector Client isn't present, the device stores the information locally in an encrypted format and sends it later from any other computer with the Endpoint Protector Client installed.
The additional Offline File Tracing option stores information on the device before sending it to the Server. The device sends the file list only when someone connects it again, and only if the Client is present and can communicate with the Server.
Additionally, Easy Lock performs File Shadowing for transferred files if the Client is present and you enable File Shadowing on the computer where events occur through Device Control. This is a real-time event—the device stores no shadowing information.
Enabling global File Tracing will not automatically activate the File Tracing option on Enforced Encryption Trusted Device™ and vice versa.
After deploying the Enforced Encryption Client with Read-Only (RO) mode enabled, ensure you launch the EE Client for the first time on the EPP Client-managed computer to complete the configuration process.
When multiple users or different machines use an Enforced Encryption (EE) encrypted USB drive with varying EE settings, the settings will not update automatically. To apply individual computer or user settings, the EPP administrator must update the related EE settings on the EPP Server at the computer/user level each time the USB drive is used on a specific computer or by a particular user. These settings will remain stored in the EE USB drive's configuration until you make further modifications.
Enforced Encryption Deployment
Enforced Encryption is supported for both Mac and Windows computers.
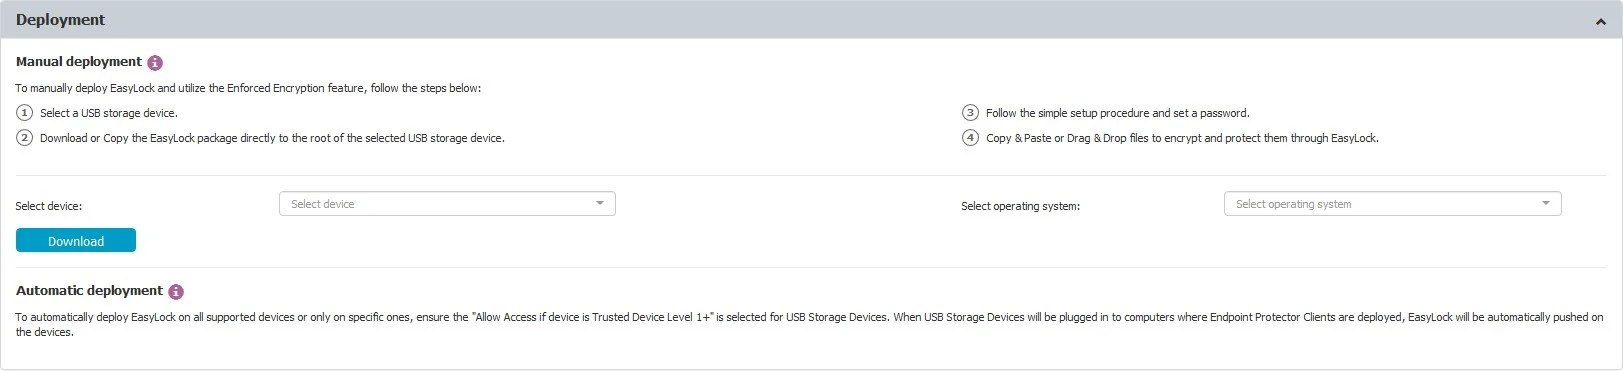
Deployment happens automatically if you select Allow Access if Trusted Device™ Level 1+ for USB Storage Devices. You can do this in Device Control, Global Rights section, or by using the quick links provided, as shown in the preceding image.
You can also deploy the Enforced Encryption Client directly on a USB stick through the EPP Client Notifier.
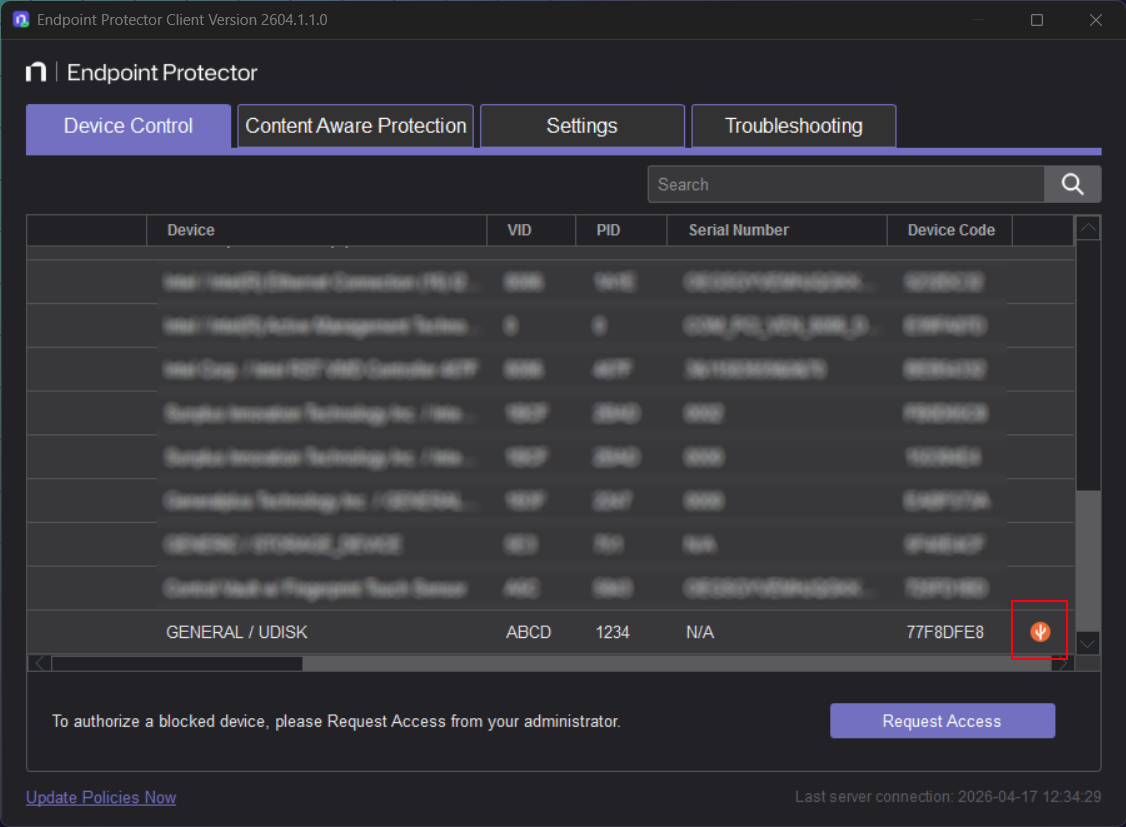
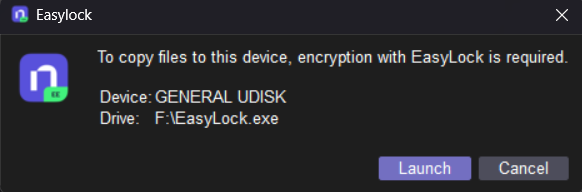
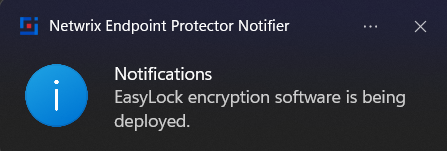
When you click it, an OS popup should appear indicating that the process has started.
Manual deployment is also available. Download links for both Windows and Mac are available in this section. Copy the downloaded Enforced Encryption file onto the USB storage device and run it from the root of the device. Due to extended security features for manual deployment, you must redownload Enforced Encryption from the Endpoint Protector interface each time you encrypt a new USB storage device.
After successful deployment, the application asks the user to configure the encryption password, as shown in the following image.
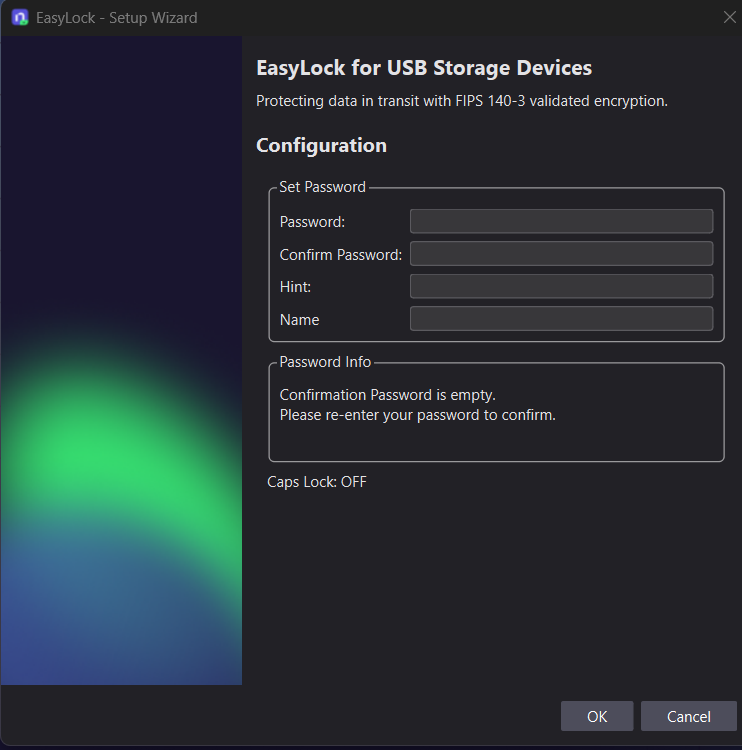
If you configure everything correctly, the Enforced Encryption login screen should appear.
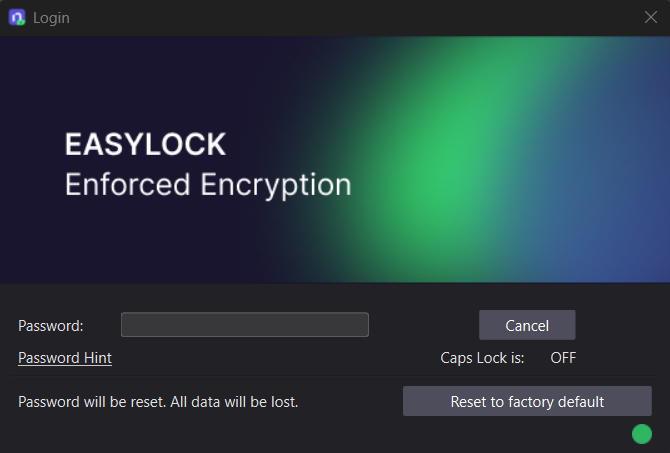
Both Enforced Encryption deployments require the user only to configure a password.
On Macs, Enforced Encryption and Trusted Device™ Level 1 don't support USB storage devices with multiple partitions.
Automatic Updates (Update EasyLock)
The Update EasyLock toggle controls whether Enforced Encryption clients update automatically when a new version is available on the Endpoint Protector Server, instead of requiring users to manually redownload and redeploy Enforced Encryption on each USB storage device.
Since the Endpoint Protector Server 2509 release, Enforced Encryption changed its communication logic with the Endpoint Protector Server. Regular EPP clients can remain on an older supported version for a period after a server migration, but you must update EE clients to the latest version immediately after the server migration completes — don't treat this as a lower-priority, staged rollout. Delaying the EE client upgrade can cause EE-protected drives to lose synchronization with the server or fail to communicate correctly.
You'll find the Update EasyLock toggle in Global Settings — Enforced Encryption configuration. If you're migrating the Endpoint Protector Server, see Enforced Encryption Client Requires Immediate Update for the full migration-specific guidance.
Enforced Encryption in Read-Only mode
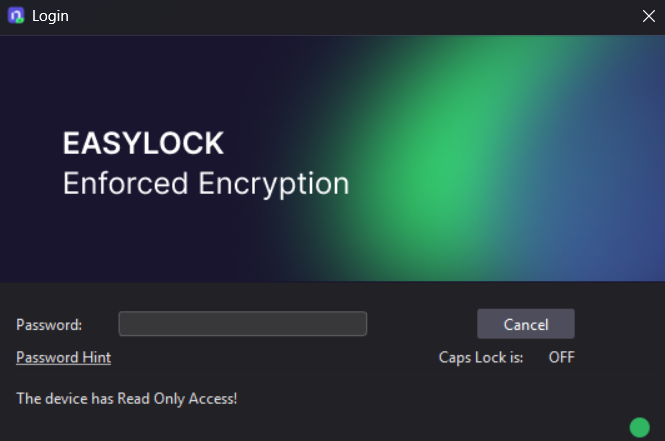
Netwrix Enforced Encryption Read-Only Mode for unmanaged computers is an innovative feature designed to maintain data security standards across non-corporate devices. It allows administrators to grant access to EE encrypted drives on personal computers, conference room setups, or exhibition areas while ensuring security through a Read-Only configuration. This enables the seamless transfer of corporate data across different environments, providing robust protection without sacrificing accessibility.
To activate this mode, navigate to the "Global Settings" section related to Enforced Encryption, and switch on the "EE Read-Only mode" toggle. refer to Global Settings - EE configuration.
Enforced Encryption Clients
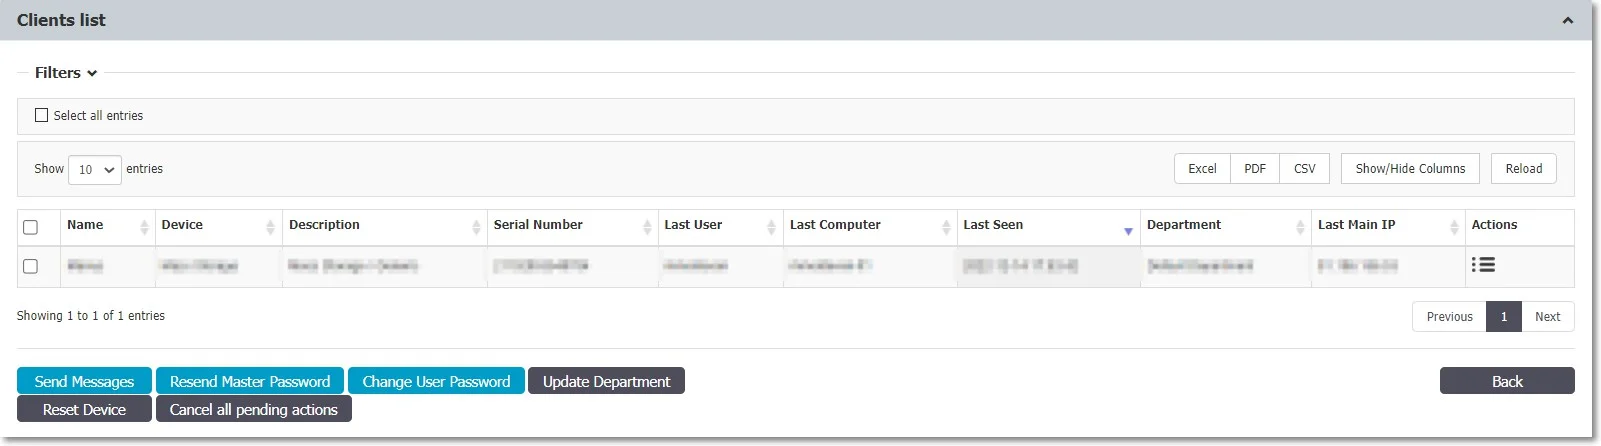
The Clients list section lists all Enforced Encryption enforced devices. Selecting Manage Client Action displays a list of Actions History, along with options to manage devices by sending a message, changing the user’s password, resetting the device, resending the master password, and more.
Trusted Device™
Protecting Data in Transit is essential to ensure no third party has access to data in case a device is lost or stolen. The Enforced Encryption solution lets administrators protect confidential data on portable devices in case of loss or theft. Use Trusted Device™ to ensure computers where Endpoint Protector is present accept only encrypted devices. Trusted Device™ must receive authorization from the Endpoint Protector Server; otherwise, they remain unusable. There are four levels of security for Trusted Device™:
- Level 1 – Minimum security for office and personal use with a focus on software-based encryption for data security. You can turn any USB Flash Drive and most other portable storage devices into a Trusted Device™ Level 1. It doesn't require any specific hardware but it does need an encryption solution such as Enforced Encryption
- Level 2 – Medium security level with biometric data protection or advanced software-based data encryption. It requires special hardware that includes security software and has been tested for Trusted Device™ Level 2.
- Level 3 – High-security level with strong hardware-based encryption that is mandatory for regulatory compliance such as SOX, HIPAA, GBLA, PIPED, Basel II, DPA, or PCI 95/46/EC. It requires special hardware that includes advanced security software and hardware-based encryption that has been tested for Trusted Device™ Level 3.
- Level 4 – Maximum security for military and government use. Level 4 Trusted Device™ include strong hardware-based encryption for data protection and are independently certified (e.g., FIPS 140). These devices have successfully undergone rigorous testing for software and hardware. It requires special hardware that is available primarily through security-focused resellers.
- Level 1+ – Derived from Level 1, it ensures that Endpoint Protector automatically deploys Enforced Encryption 2 with Master Password on USB storage devices plugged into computers where the Endpoint Protector Client is present.
If you enable a Trusted Device™ Level 1 right and connect a Trusted Device™ level 2, 3, or 4, the right applies accordingly.
The following table lists Trusted Device™ devices:
| Device Names | Trusted Device™ Level |
|---|---|
| Enforced Encryption Encrypted devices | 1 |
| AT1177 | 2 |
| UT169 | 2 |
| UT176 | 2 |
| Trek ThumbDrive | 2 |
| BitLocker Encrypted devices | 3 |
| FileVault Encrypted devices | 3 |
| Buffalo Secure Lock | 3 |
| CTWO SafeXs | 3 |
| Integral Crypto | 3 |
| Integral Crypto Dual | 3 |
| Integral Courier Dual | 3 |
| IronKey Secure Drive | 3 |
| iStorage datAshur | 3 |
| Kanguru Bio Drive | 3 |
| Kanguru Defender | 3 |
| Kanguru Elite (30, 200 & 300) | 3 |
| Kanguru Defender Elite | 3 |
| Kingston DataTraveler Locker+ | 3 |
| Lexar 1 (Locked I Device) | 3 |
| Lexar Gemalto | 3 |
| SaferZone Token | 3 |
| ScanDisk Enterprise | 3 |
| Verbatim Professional | 3 |
| Verbatim Secure Data | 3 |
| Verbatim V-Secure | 3 |
| iStorage datAshur Pro | 4 |
| Kanguru Defender (2000 & 3000) | 4 |
| SafeStick BE | 4 |
| Stealth MXP Bio | 4 |