Okta
This connector exports and fulfills entries from/to Okta application.

Overview
Okta is an access management solution that provides SSO and federation capabilities for single sign-on, multi-factor authentication, and API access management. Okta's platform is widely used by organizations to protect accesses for digital identities in an increasingly complex and interconnected digital world.
Prerequisites
Implementing this connector requires:
- Reading first the appsettings documentation
- An Okta Token with specific permissions on the target instance
See the appsettings.agent topic for additional information.
Configuration
To configure the Okta connector it is necessary to:
Step 1 – Create a new user for Netwrix Usercube.
In order to do so you must connect to the Okta administration console
https://myexample-admin.okta.com and create a new Netwrix Usercube user.
NOTE: For some Okta deployments it is possible to create a service account or to Manage an Okta user account as a service account.
Step 2 – Assign administrator role and permissions to the Netwrix Usercube user.
Step 3 – Generate a Token for the Netwrix Usercube user.
See the Okta documentation for additional information.
Export
This connector exports a list of users, groups, applications with their attributes specified in the connector's configuration, to CSV files.
Configuration
This process is configured through a connection in the UI and/or the XML configuration, and in the appsettings.agent.json > Connections section.
Code attributes enclosed with <> need to be replaced with a custom value before entering the
script in the command line.
appsettings.agent.json
{
  ...
  "Connections": {
    ...
    "<ConnectionIdentifier>": {
      ...
    }
  }
}
The identifier of the connection and thus the name of the subsection must:
- Be unique
- Not begin with a digit
- Not contain
<,>,:,",/,\,|,?,*and_.
For example:
Code attributes enclosed with <> need to be replaced with a custom value before entering the
script in the command line.
appsettings.agent.json
{
    "Connections": {
        ...
        "OktaExportFulfillment": {
            "Server": " https://<YourCompany>.okta.com",
            "ApiKey": "<GeneratedUserToken>",
        }
    }
}
Setting attributes
| Name | Type | Description |
|---|---|---|
| Server required | String | URI of the data system. |
| ApiKey required | String | User token value. |
Output details
This connector can create, delete and update users, groups and applications, and is meant to generate the following to the ExportOutput folder :
- A CSV file, named
<connectionIdentifier>_users.csv, with one column for each property either having a ConnectionColumn or which is used in an entity association; - A CSV file, named
<connectionIdentifier>_groups.csv, with one column for each property either having a ConnectionColumn or which is used in an entity association; - A CSV file, named
<connectionIdentifier>_apps.csv, with one column for each property either having a ConnectionColumn or which is used in an entity association; - A CSV file, named
<connectionIdentifier>_groupsapps.csv, with one column for each property either having a ConnectionColumn or which is used in an entity association; - A CSV file, named
<connectionIdentifier>_groupsusers.csv, with one column for each property either having a ConnectionColumn or which is used in an entity association;
For example, with the following entity type mapping for users:
Code attributes enclosed with <> need to be replaced with a custom value before entering the
script in the command line.
<EntityType Identifier="User" DisplayName_L1="User">
    <Property Identifier="Groups" DisplayName_L1="Groups" Type="ForeignKey" />
    <Property Identifier="OktaSyncPrpov_users_id" DisplayName_L1="id" IsKey="true" TargetColumnIndex="6" Type="String" />
    <Property Identifier="UserType" DisplayName_L1="User Type" TargetColumnIndex="128" Type="ForeignKey" />
    <Property Identifier="activated" DisplayName_L1="activated" TargetColumnIndex="4" Type="String" />
    <Property Identifier="created" DisplayName_L1="created" TargetColumnIndex="5" Type="String" />
    <Property Identifier="lastLogin" DisplayName_L1="lastLogin" TargetColumnIndex="7" Type="String" />
    <Property Identifier="lastUpdated" DisplayName_L1="lastUpdated" TargetColumnIndex="8" Type="String" />
    <Property Identifier="passwordChanged" DisplayName_L1="passwordChanged" TargetColumnIndex="9" Type="String" />
    <Property Identifier="profile_city" DisplayName_L1="City" TargetColumnIndex="10" Type="String" />
    <Property Identifier="profile_costCenter" DisplayName_L1="Cost center" TargetColumnIndex="11" Type="String" />
    <Property Identifier="profile_countryCode" DisplayName_L1="Country code" TargetColumnIndex="12" Type="String" />
    <Property Identifier="profile_department" DisplayName_L1="Department" TargetColumnIndex="13" Type="String" />
    <Property Identifier="profile_displayName" DisplayName_L1="Display name" TargetColumnIndex="14" Type="String" />
….
</EntityType>
  <EntityTypeMapping Identifier="User" ConnectionTable="OktaExportFulfillment_users" Connector="Okta">
    <Property Identifier="OktaExportFulfillment_users_id" ConnectionColumn="id" IsPrimaryKey="true" IsUniqueKey="true" />
    <Property Identifier="activated" ConnectionColumn="activated" />
    <Property Identifier="created" ConnectionColumn="created" />
    <Property Identifier="lastLogin" ConnectionColumn="lastLogin" />
    <Property Identifier="lastUpdated" ConnectionColumn="lastUpdated" />
    <Property Identifier="passwordChanged" ConnectionColumn="passwordChanged" />
    <Property Identifier="profile_city" ConnectionColumn="profile.city" />
    <Property Identifier="profile_costCenter" ConnectionColumn="profile.costCenter" />
    <Property Identifier="profile_countryCode" ConnectionColumn="profile.countryCode" />
    <Property Identifier="profile_department" ConnectionColumn="profile.department" />
    <Property Identifier="profile_displayName" ConnectionColumn="profile.displayName" />
  </EntityTypeMapping>
And the following entity type mapping for groups:
Code attributes enclosed with <> need to be replaced with a custom value before entering the
script in the command line.
  <EntityType Identifier="Group" DisplayName_L1="Group">
    <Property Identifier="Applications" DisplayName_L1="Applications" Type="ForeignKey" />
    <Property Identifier="OktaSyncPrpov_groups_id" DisplayName_L1="id" IsKey="true" TargetColumnIndex="5" Type="String" />
    <Property Identifier="Users" DisplayName_L1="Users" Type="ForeignKey" />
    <Property Identifier="created" DisplayName_L1="created" TargetColumnIndex="4" Type="String" />
    <Property Identifier="lastMemberShipUpdated" DisplayName_L1="lastMemberShipUpdated" TargetColumnIndex="6" Type="String" />
    <Property Identifier="lastUpdated" DisplayName_L1="lastUpdated" TargetColumnIndex="7" Type="String" />
    <Property Identifier="profile_description" DisplayName_L1="Description" TargetColumnIndex="8" Type="String" />
    <Property Identifier="profile_name" DisplayName_L1="Name" TargetColumnIndex="9" Type="String" />
    <Property Identifier="type" DisplayName_L1="type" TargetColumnIndex="10" Type="String" />
  </EntityType>
  <EntityTypeMapping Identifier="Group" ConnectionTable="OktaExportFulfillment_groups" Connector="Okta">
    <Property Identifier="OktaExportFulfillment_groups_id" ConnectionColumn="id" IsPrimaryKey="true" IsUniqueKey="true" />
    <Property Identifier="created" ConnectionColumn="created" />
    <Property Identifier="lastMemberShipUpdated" ConnectionColumn="lastMemberShipUpdated" />
    <Property Identifier="lastUpdated" ConnectionColumn="lastUpdated" />
    <Property Identifier="profile_description" ConnectionColumn="profile.description" />
    <Property Identifier="profile_name" ConnectionColumn="profile.name" />
    <Property Identifier="type" ConnectionColumn="type" />
  </EntityTypeMapping>
And the following entity type mapping for applications:
Code attributes enclosed with <> need to be replaced with a custom value before entering the
script in the command line.
 <EntityType Identifier="Application" DisplayName_L1="Application">
    <Property Identifier="Groups" DisplayName_L1="Groups" Type="ForeignKey" />
    <Property Identifier="OktaSyncPrpov_apps_id" DisplayName_L1="id" IsKey="true" TargetColumnIndex="5" Type="String" />
    <Property Identifier="created" DisplayName_L1="created" TargetColumnIndex="4" Type="String" />
    <Property Identifier="label" DisplayName_L1="label" TargetColumnIndex="6" Type="String" />
    <Property Identifier="lastUpdated" DisplayName_L1="lastUpdated" TargetColumnIndex="7" Type="String" />
    <Property Identifier="name" DisplayName_L1="name" TargetColumnIndex="8" Type="String" />
    <Property Identifier="status" DisplayName_L1="status" TargetColumnIndex="9" Type="String" />
  </EntityType>
  <EntityTypeMapping Identifier="Application" ConnectionTable="OktaExportFulfillment_apps" Connector="Okta">
    <Property Identifier="OktaExportFulfillment_apps_id" ConnectionColumn="id" IsPrimaryKey="true" IsUniqueKey="true" />
    <Property Identifier="created" ConnectionColumn="created" />
    <Property Identifier="label" ConnectionColumn="label" />
    <Property Identifier="lastUpdated" ConnectionColumn="lastUpdated" />
    <Property Identifier="name" ConnectionColumn="name" />
    <Property Identifier="status" ConnectionColumn="status" />
  </EntityTypeMapping>
Then we will have C:/identitymanagerContoso/Sources/OktaExportFulfillment_users.csv as follows:
id, status, created, activated, statusChanged, lastLogin, lastUpdated, passwordChanged, type.id, profile.city, profile.costCenter, profile.countryCode, profile.department, profile.displayName
And C:/identitymanagerContoso/Sources/OktaExportFulfillment_groups.csv as follows:
id, created, lastUpdated, lastMemberShipUpdated, type, profile.description, profile.name
And C:/identitymanagerContoso/Sources/OktaExportFulfillment_apps.csv as follows:
id, created, lastUpdated, status, name, label
Fulfill
The Okta connector writes to Okta to create, update and delete entries, initiated manually through the UI or automatically by enforcing the policy. See the Evaluate Policy topic for additional information.
Configuration
Same as for export, fulfill is configured through connections.
For example:
Code attributes enclosed with <> need to be replaced with a custom value before entering the
script in the command line.
appsettings.agent.json
{
    "Connections": {
        ...
        "OktaExportFulfillment": {
            "Server": " https://<YourCompany>.okta.com",
            "ApiKey": "<GeneratedUserToken>",
        }
    }
}
Password reset
The password reset settings configuration is described in the appsettings.agent.json file. See the appsettings.agent topic for additional information.
Credential protection
Data protection can be ensured through:
- RSA encryption, configured in the appsettings.encrypted.agent.json file
- An Azure Key Vault safe
- A CyberArk Vault able to store Okta Login, Password, Account and Server.
Configure Okta for Usercube Authentication
This guide shows how to configure the OIDC to set up the authentication to Usercube.
Create the Application
On the Okta dashboard, select the Applications section. Click on the Add Application button.
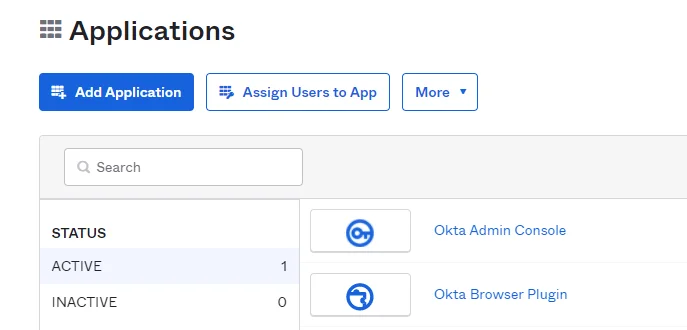
Then click on the Create New App button.
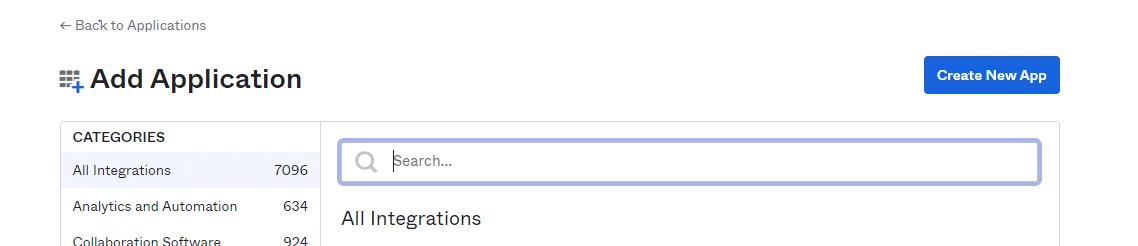
Select the platform "Native app". The only sign-on method is the OpenID Connect. Click on Create.

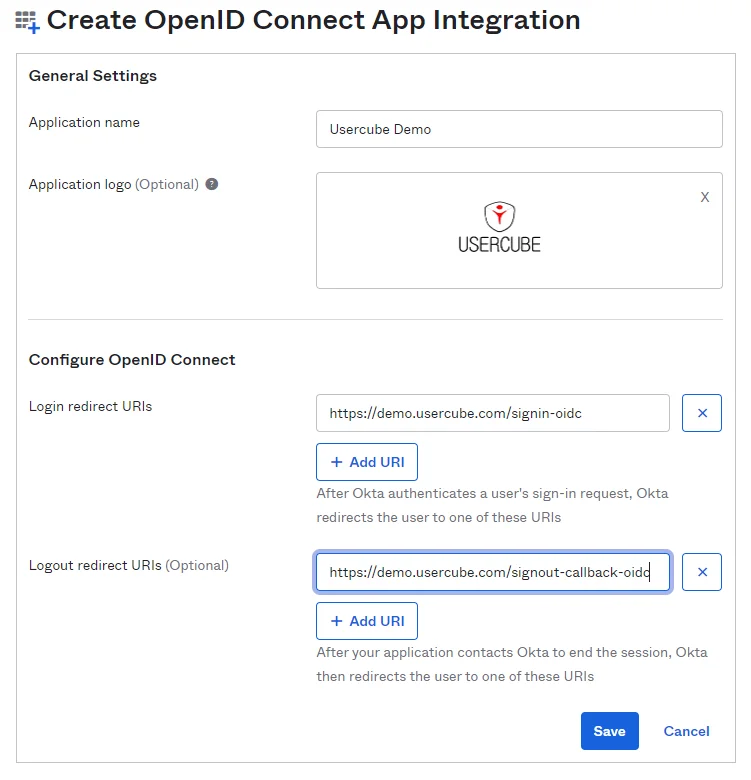
In General Settings, name your Application. You can also add a logo.
In the Configure OpenID Connect section, enter the connection redirection URL in the part: Login redirect URLs. To find out this URL, just take the URL of the Usercube application and add: "/signin-oidc". The Usercube disconnection redirection URL is also necessary. To construct it, take Usercube's URL again and, at the end, add: "/signout-callback-oidc".
The Logout redirect URLs section is marked as optional but it is mandatory for Usercube.
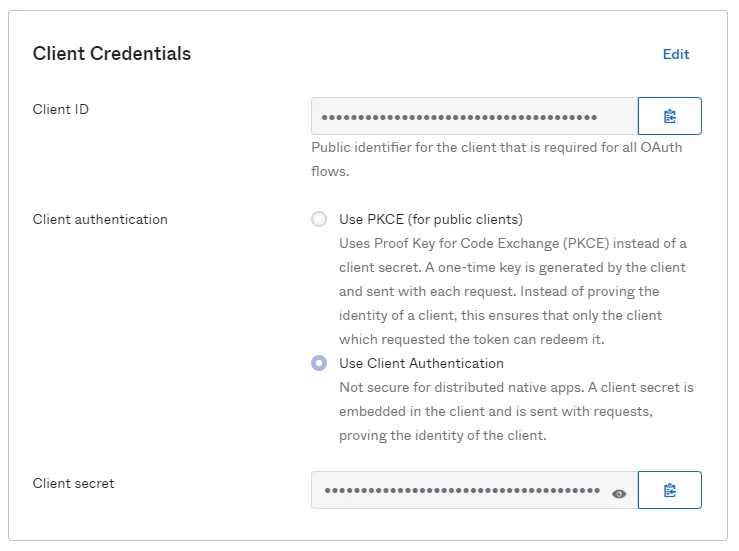
Configure the Client Credentials
The client secret in Usercube is required for the OIDC connection. You must therefore configure this OIDC connection option in the application. In the Application Dashboard, click on Edit in the Client Credentials section. Select the option Use Client Authentication and save the changes.
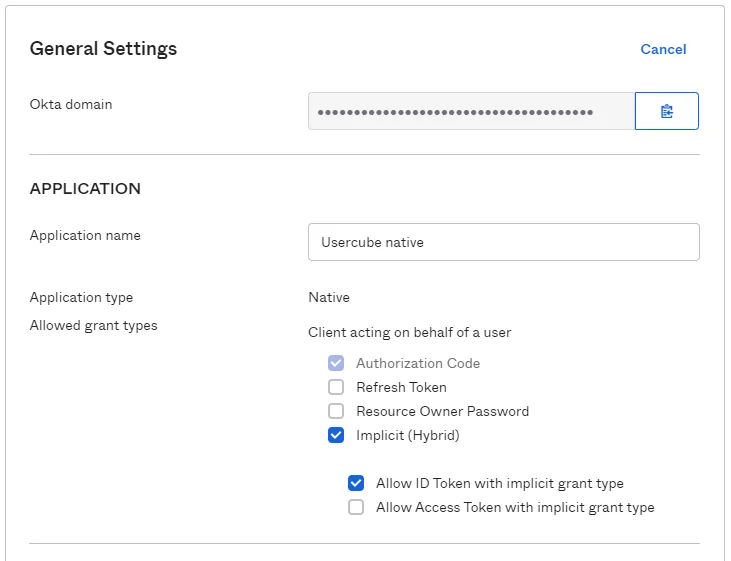
Configure the Application Settings
In the Application section, check the box Implicit (Hybrid) so that the connection with Usercube can operate correctly. Allow ID Token with implicit grant type is optional.
Configure the appsettings.json
In the authentication section of your appsettings file, the OpenId section must be configured with the following information:
- ClientId: Client ID found in the Okta Client Credentials section
- ClientSecret: Client secret found in the Okta Client Credentials section
- Authority: Okta Domain found in the Okta General Settings section
- SaveToken: True
appsettings.json
{
  ...
  "OpenId": {
    "Enabled": true,
    "Okta": {
      "AuthenticationScheme": "Okta authentication",
      "DisplayName": "Okta authentication",
      "ClientId": "Client ID",
      "ClientSecret": "Client secret",
      "Authority": "Okta Domain",
      "SaveToken": true
    }
  }
}