Configure Secured Options
This guide shows how to configure secured options to ensure data security in a connection's parameters.
Overview
A connection's parameters fall into two categories: regular or secured options.
The particularity of secured options is that, once set, they will never again be shown to users. Hence, extra care should be taken while specifying them.
There are several types of secured options: a simple field or multiple key-value fields.
Configure a Secured Option
Configure a secured option by proceeding as follows:
-
Among a connection's parameters, identify the secured option:
-
for a simple field:

-
for multiple key-value fields:

Contrary to simple fields, multiple-key-value secured options are not restricted to a given property. They are arbitrary and can be set to anything.
-
-
Fill the field(s) and, if needed, click on the eye icon to make the content visible.

For example, for a simple field in an AD connection, the
LoginandPasswordare by default hidden with ??????: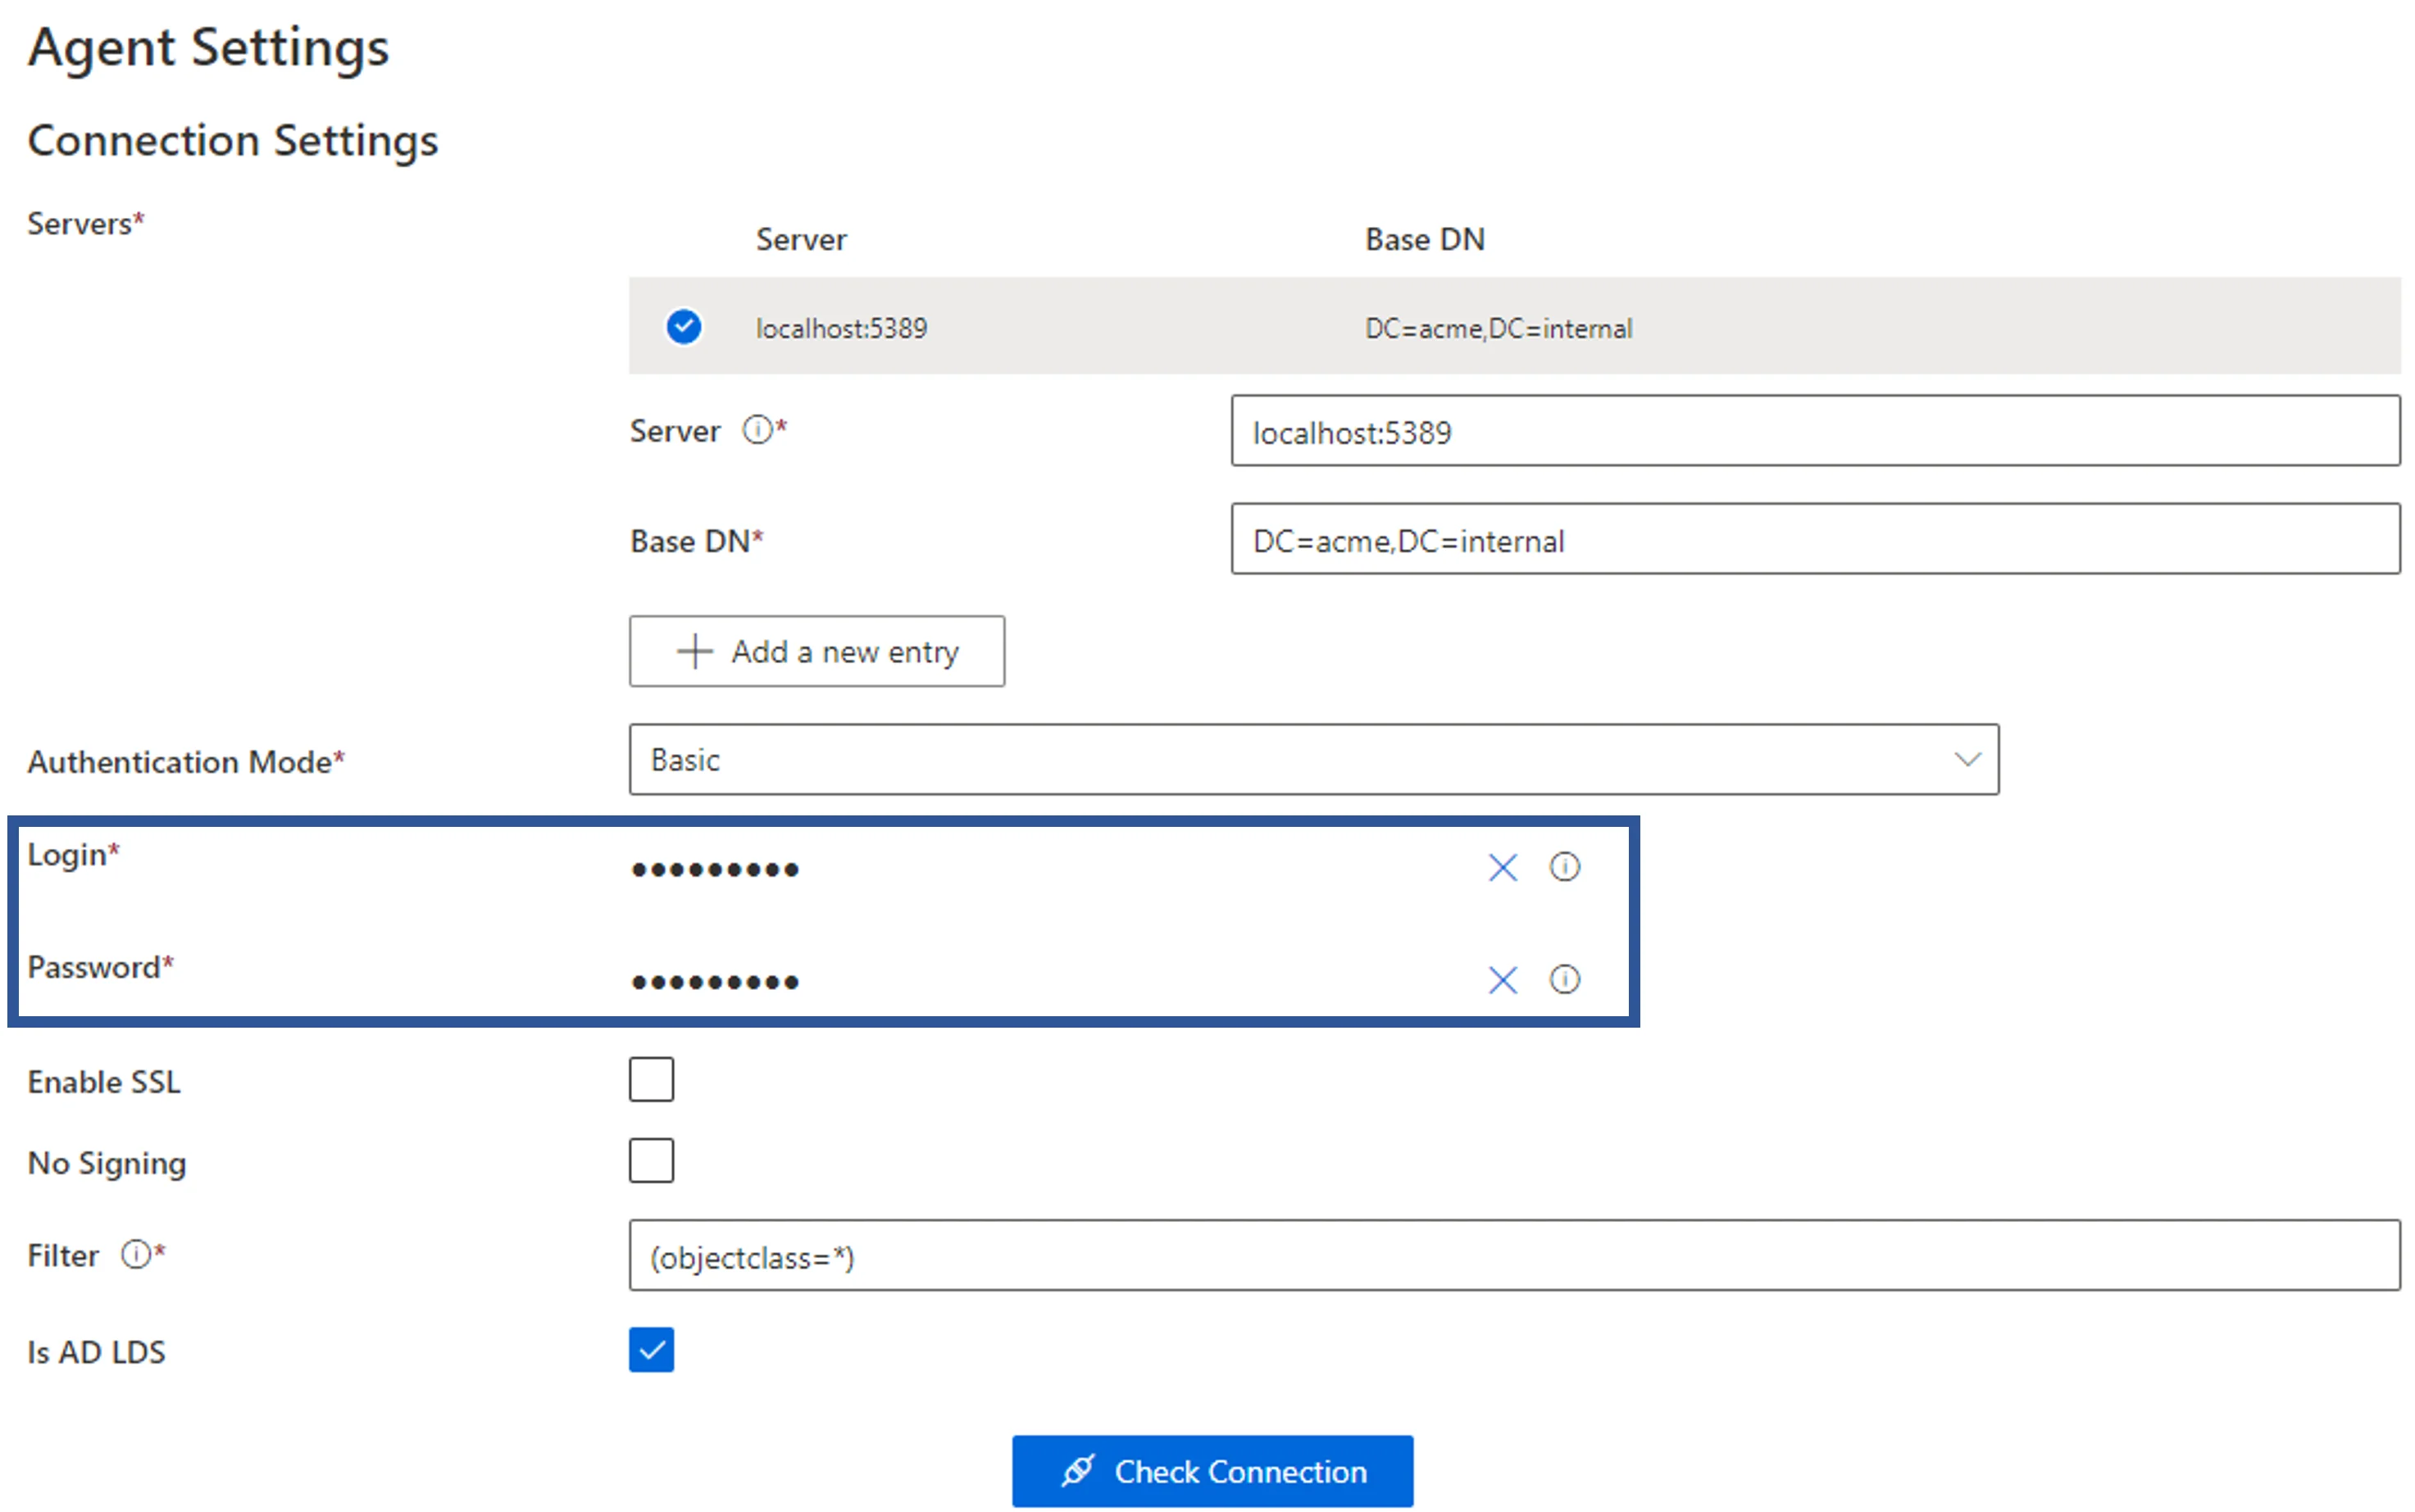

For example, for multiple key-value fields in an SQL connection, some elements of the connection string might be sensitive and need to be hidden:

In this example, the database name and the minimal pool size are secured options:

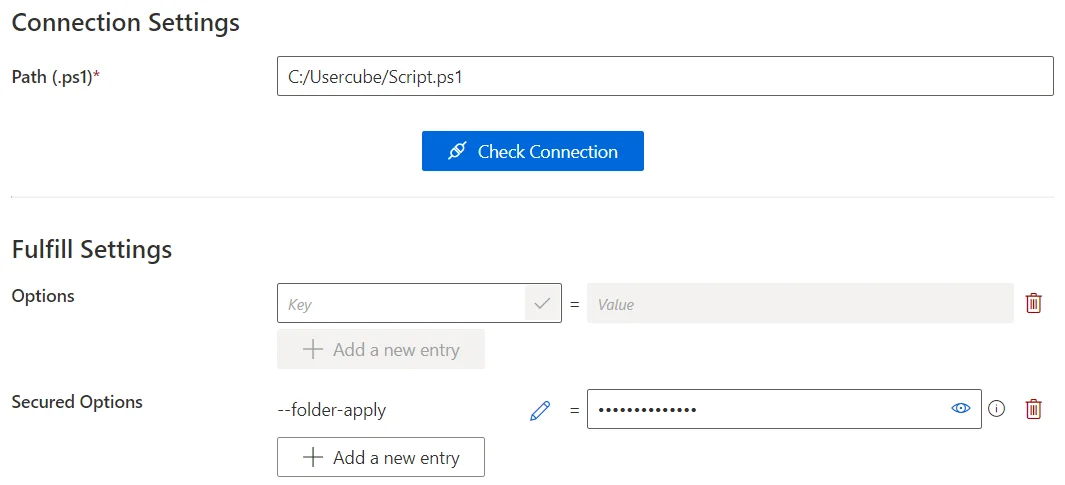
Another example of multiple key-value fields in a Powershell connection:
-
Once saved, any secured option's value can no longer be seen. However, it can still be modified by deleting the value and re-specifying it.
Run the Banking Demo Application
This guide shows how to set up and run the Banking demo application.
Banking Application Description
The Banking application is a demo application that represents a web based external system. The Banking application contains:
-
A main page.
-
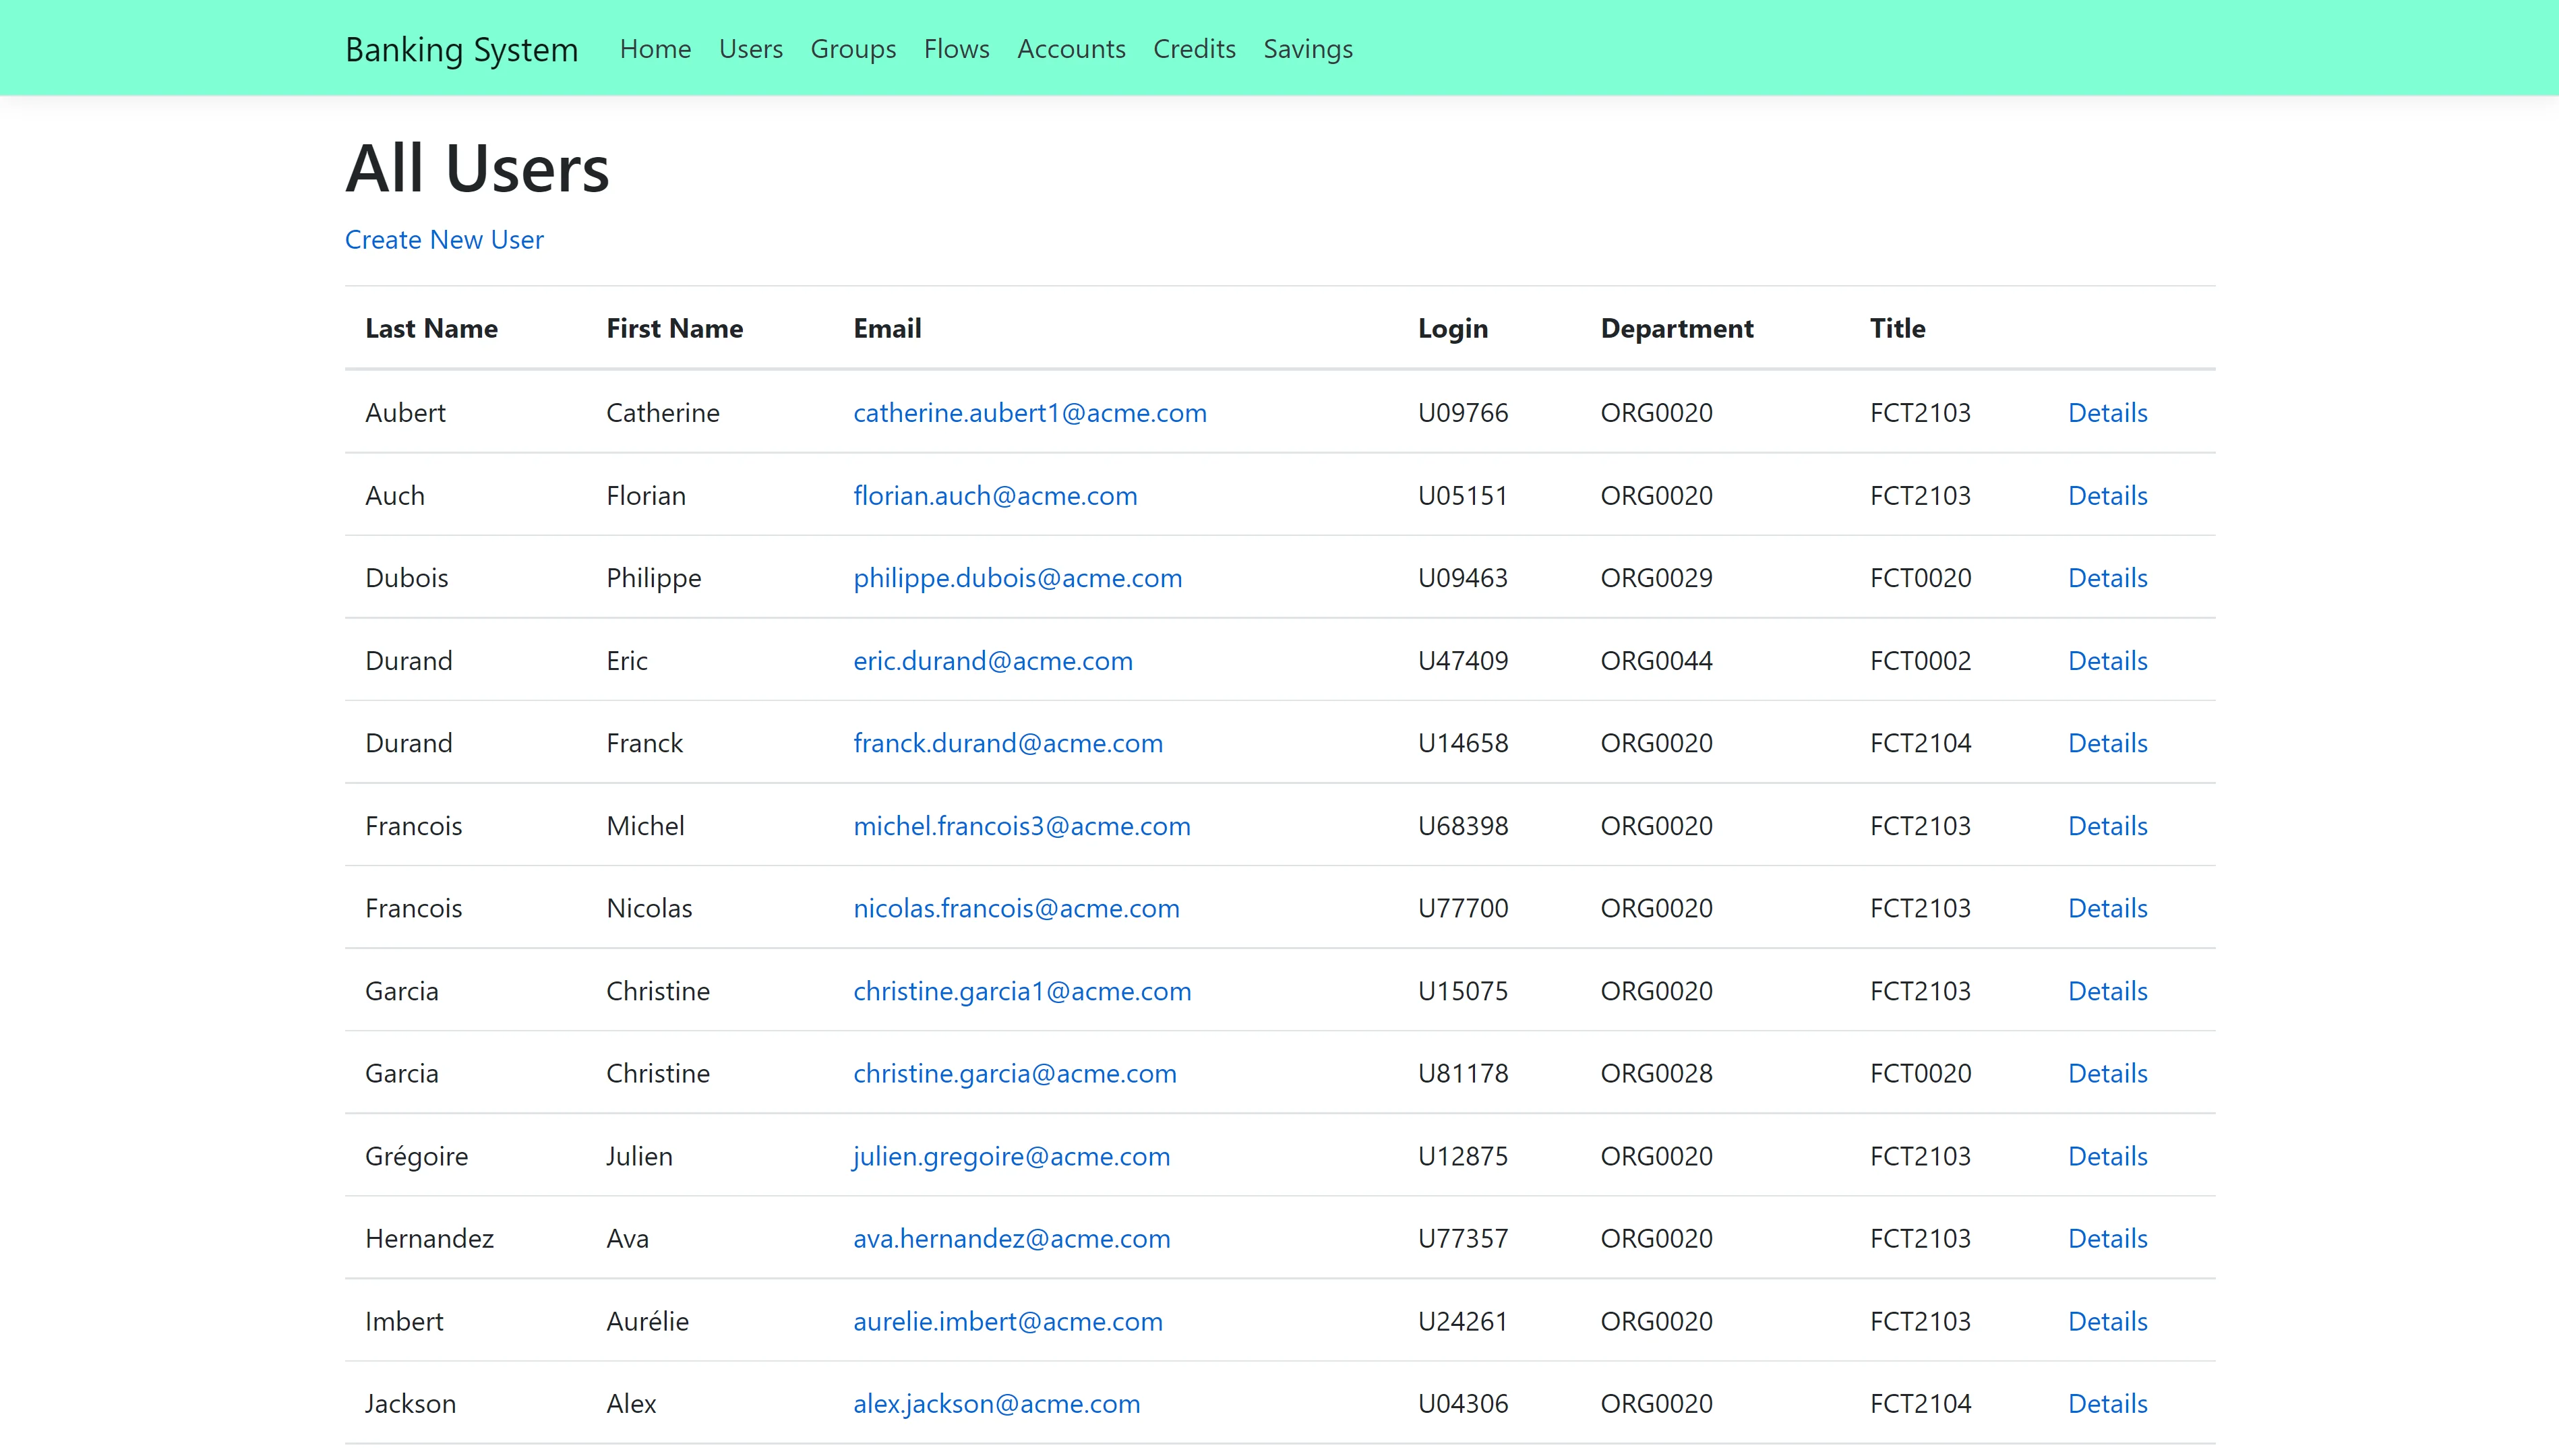
A list of users, accessible by clicking on Users at the top of the page. It is possible to add a user by clicking on Create New User.
-
A list of groups, accessible by clicking on Groups at the top of the page. Clicking on Details on a group shows the users belonging to that group.
-
A user's details page for each user, accessible by clicking on Details on a user in the users list.
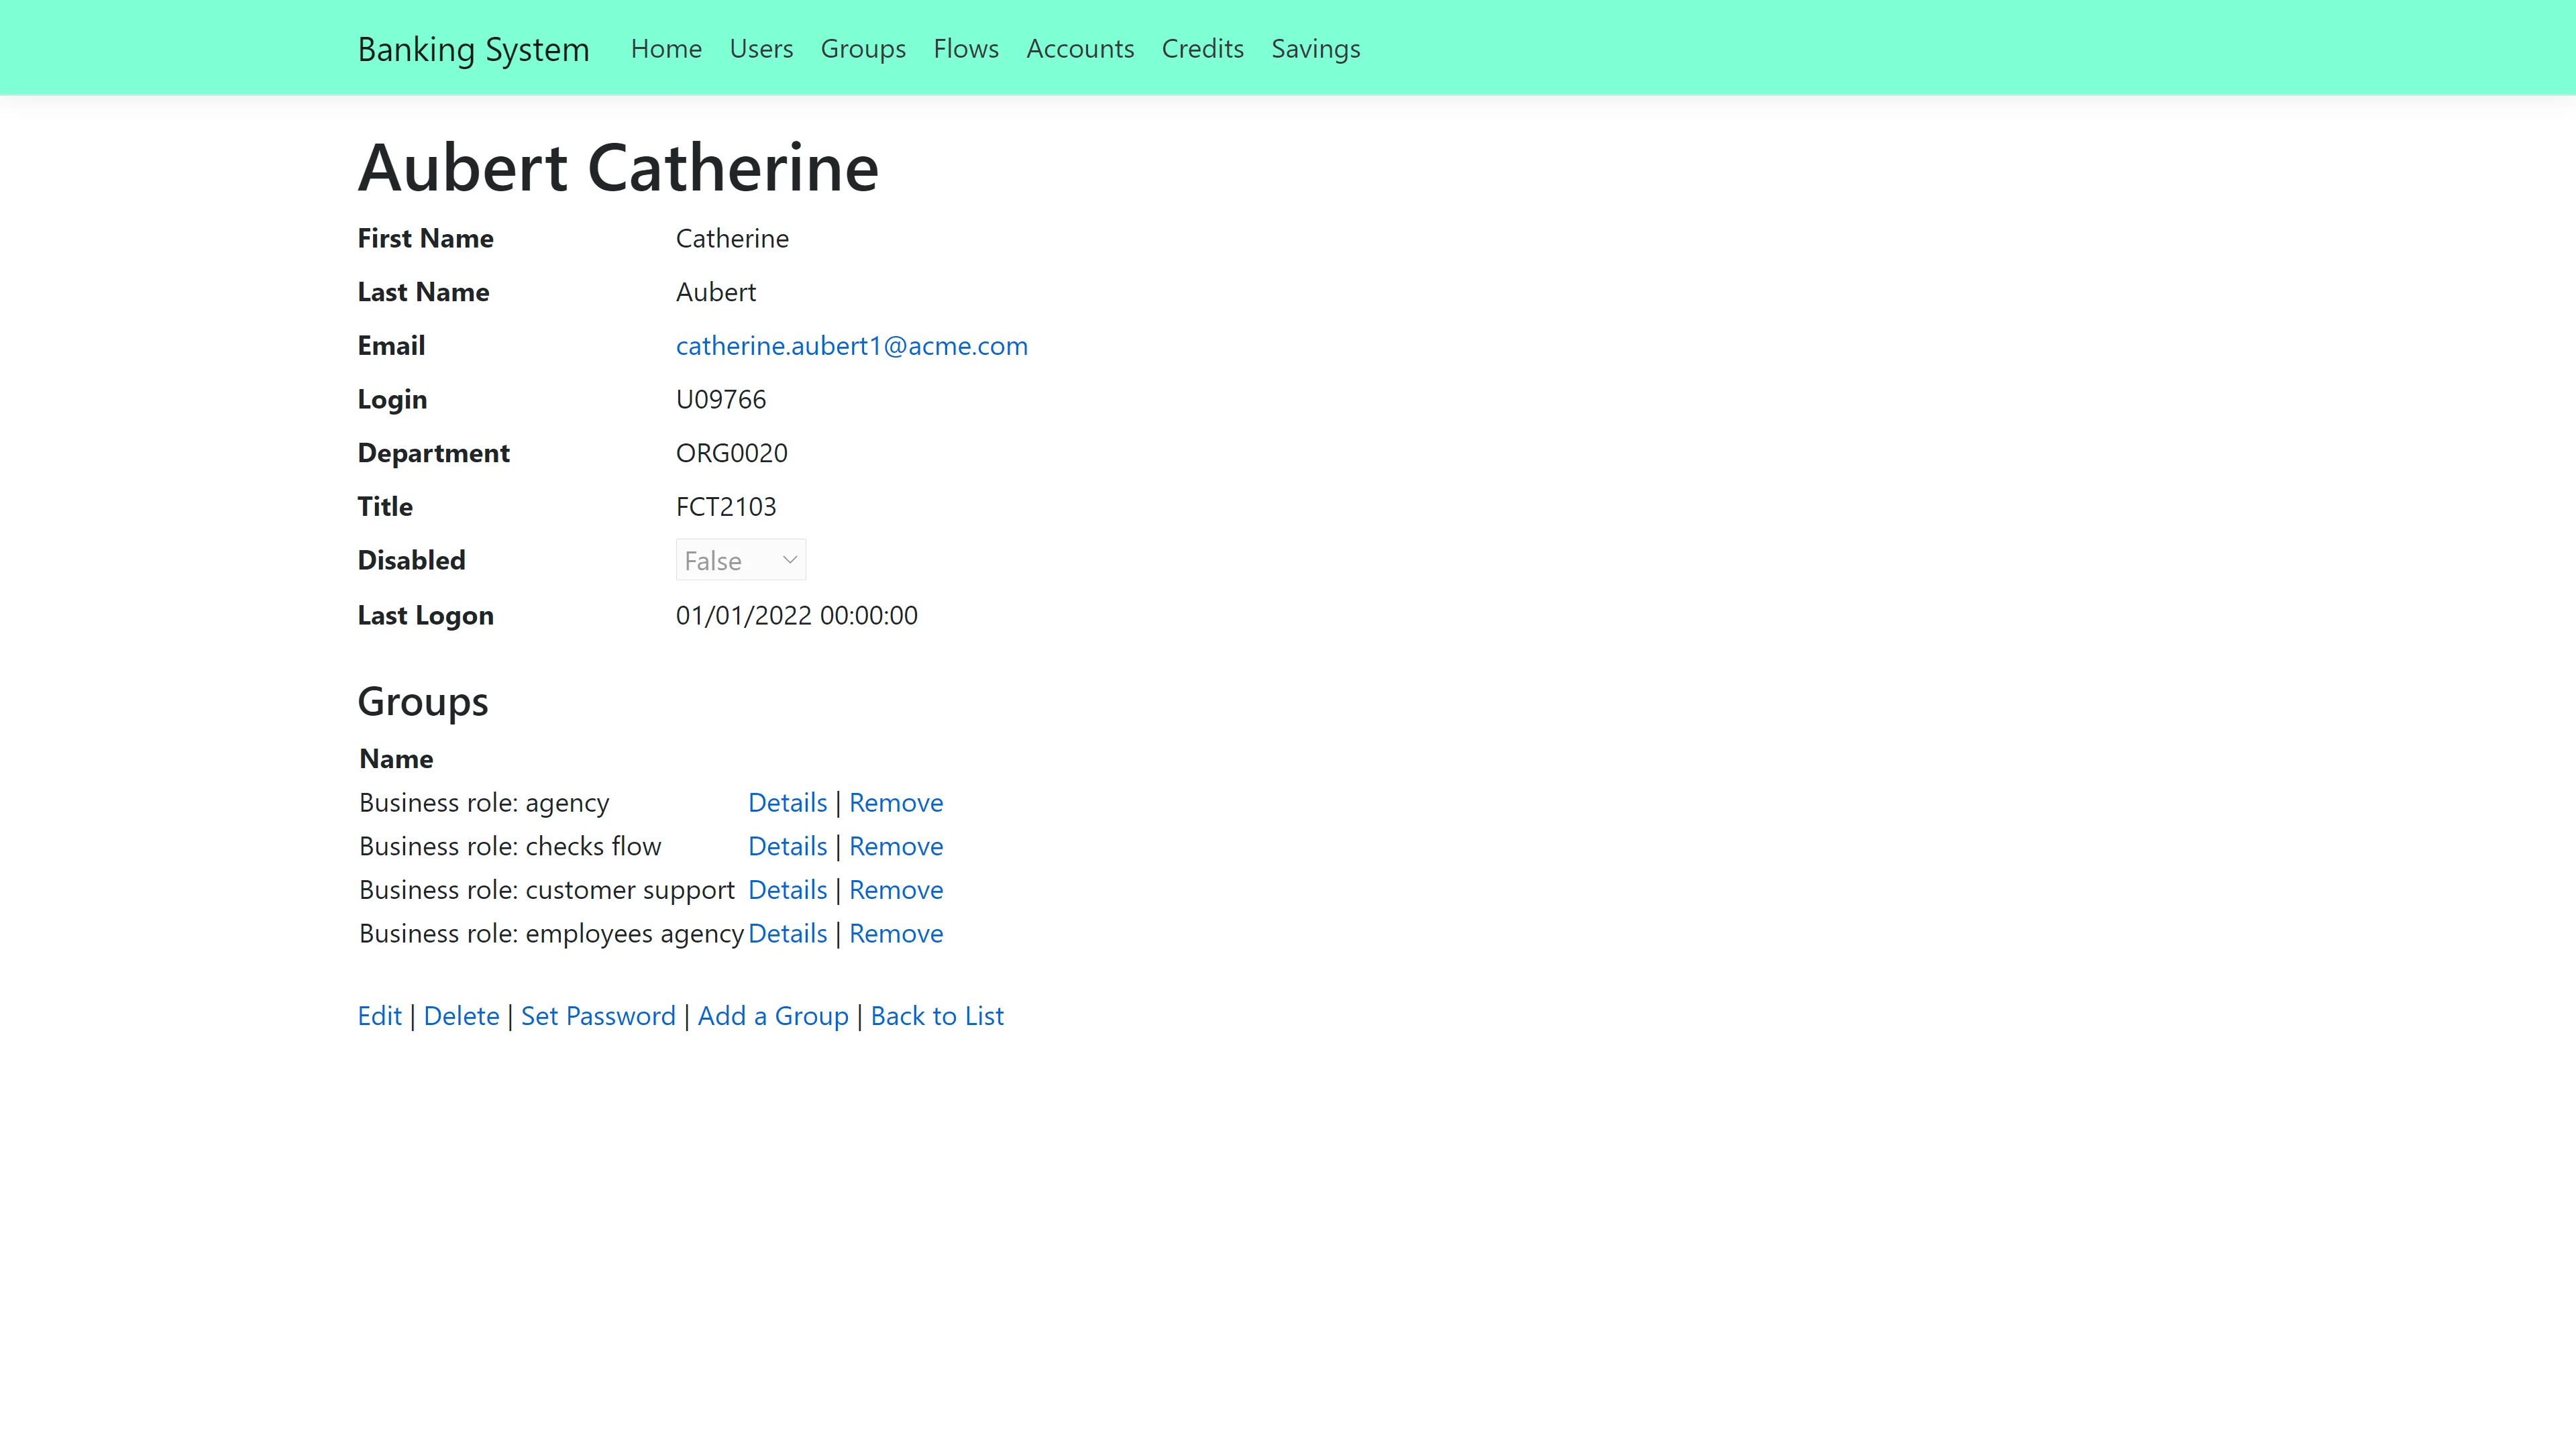
The most interesting part of the Banking application is a user's page. On a user's page, it is possible to:
- Edit the user's information
- Delete the user
- Add the user to a group
- Remove the user from a group
- Set the user's password
The Banking application uses a database named BankingSystem as a data source. The changes made to
a user are applied to the database, and will be saved.
Running the Banking Application
The Banking Application is part of the Usercube SDK, and comes with prefilled sources. To run the Banking application:
- Download the Usercube SDK.
- Download the Usercube runtime.
- Create a database named
BankingSystem. - Go to the
Runtimefolder. - Run
./identitymanager-FillBankingDatabase.exe --connection-string {connection string} --sources-path {sources path} --banking-sql-path {banking sql path}, replacing{connection string}with theBankingSystemdatabase connection string,{sources path}with the path toSDK/DemoApps/Sources, and{banking sql path}with the path toSDK/DemoApps/Banking. - Go to the
SDK/DemoApps/Bankingfolder. - Run
./Banking.exein a command prompt. - In a web browser, enter the URL
localhost:5000.
The Banking application is running, and the web browser is on the Banking home page.
To set the Banking application to another port, run
./Banking.exe --urls http://localhost:{port number}. To access the application, enter the URL
localhost:{port number} in a web browser.
Some ports are not recognized by web browsers, or may already be used. Choose a port wisely.
Run the HR Demo Application
This guide shows how to set up and run the HR demo application.
HR Application Description
The HR application is a demo application that represents a web based external system. The HR application contains an employee list.
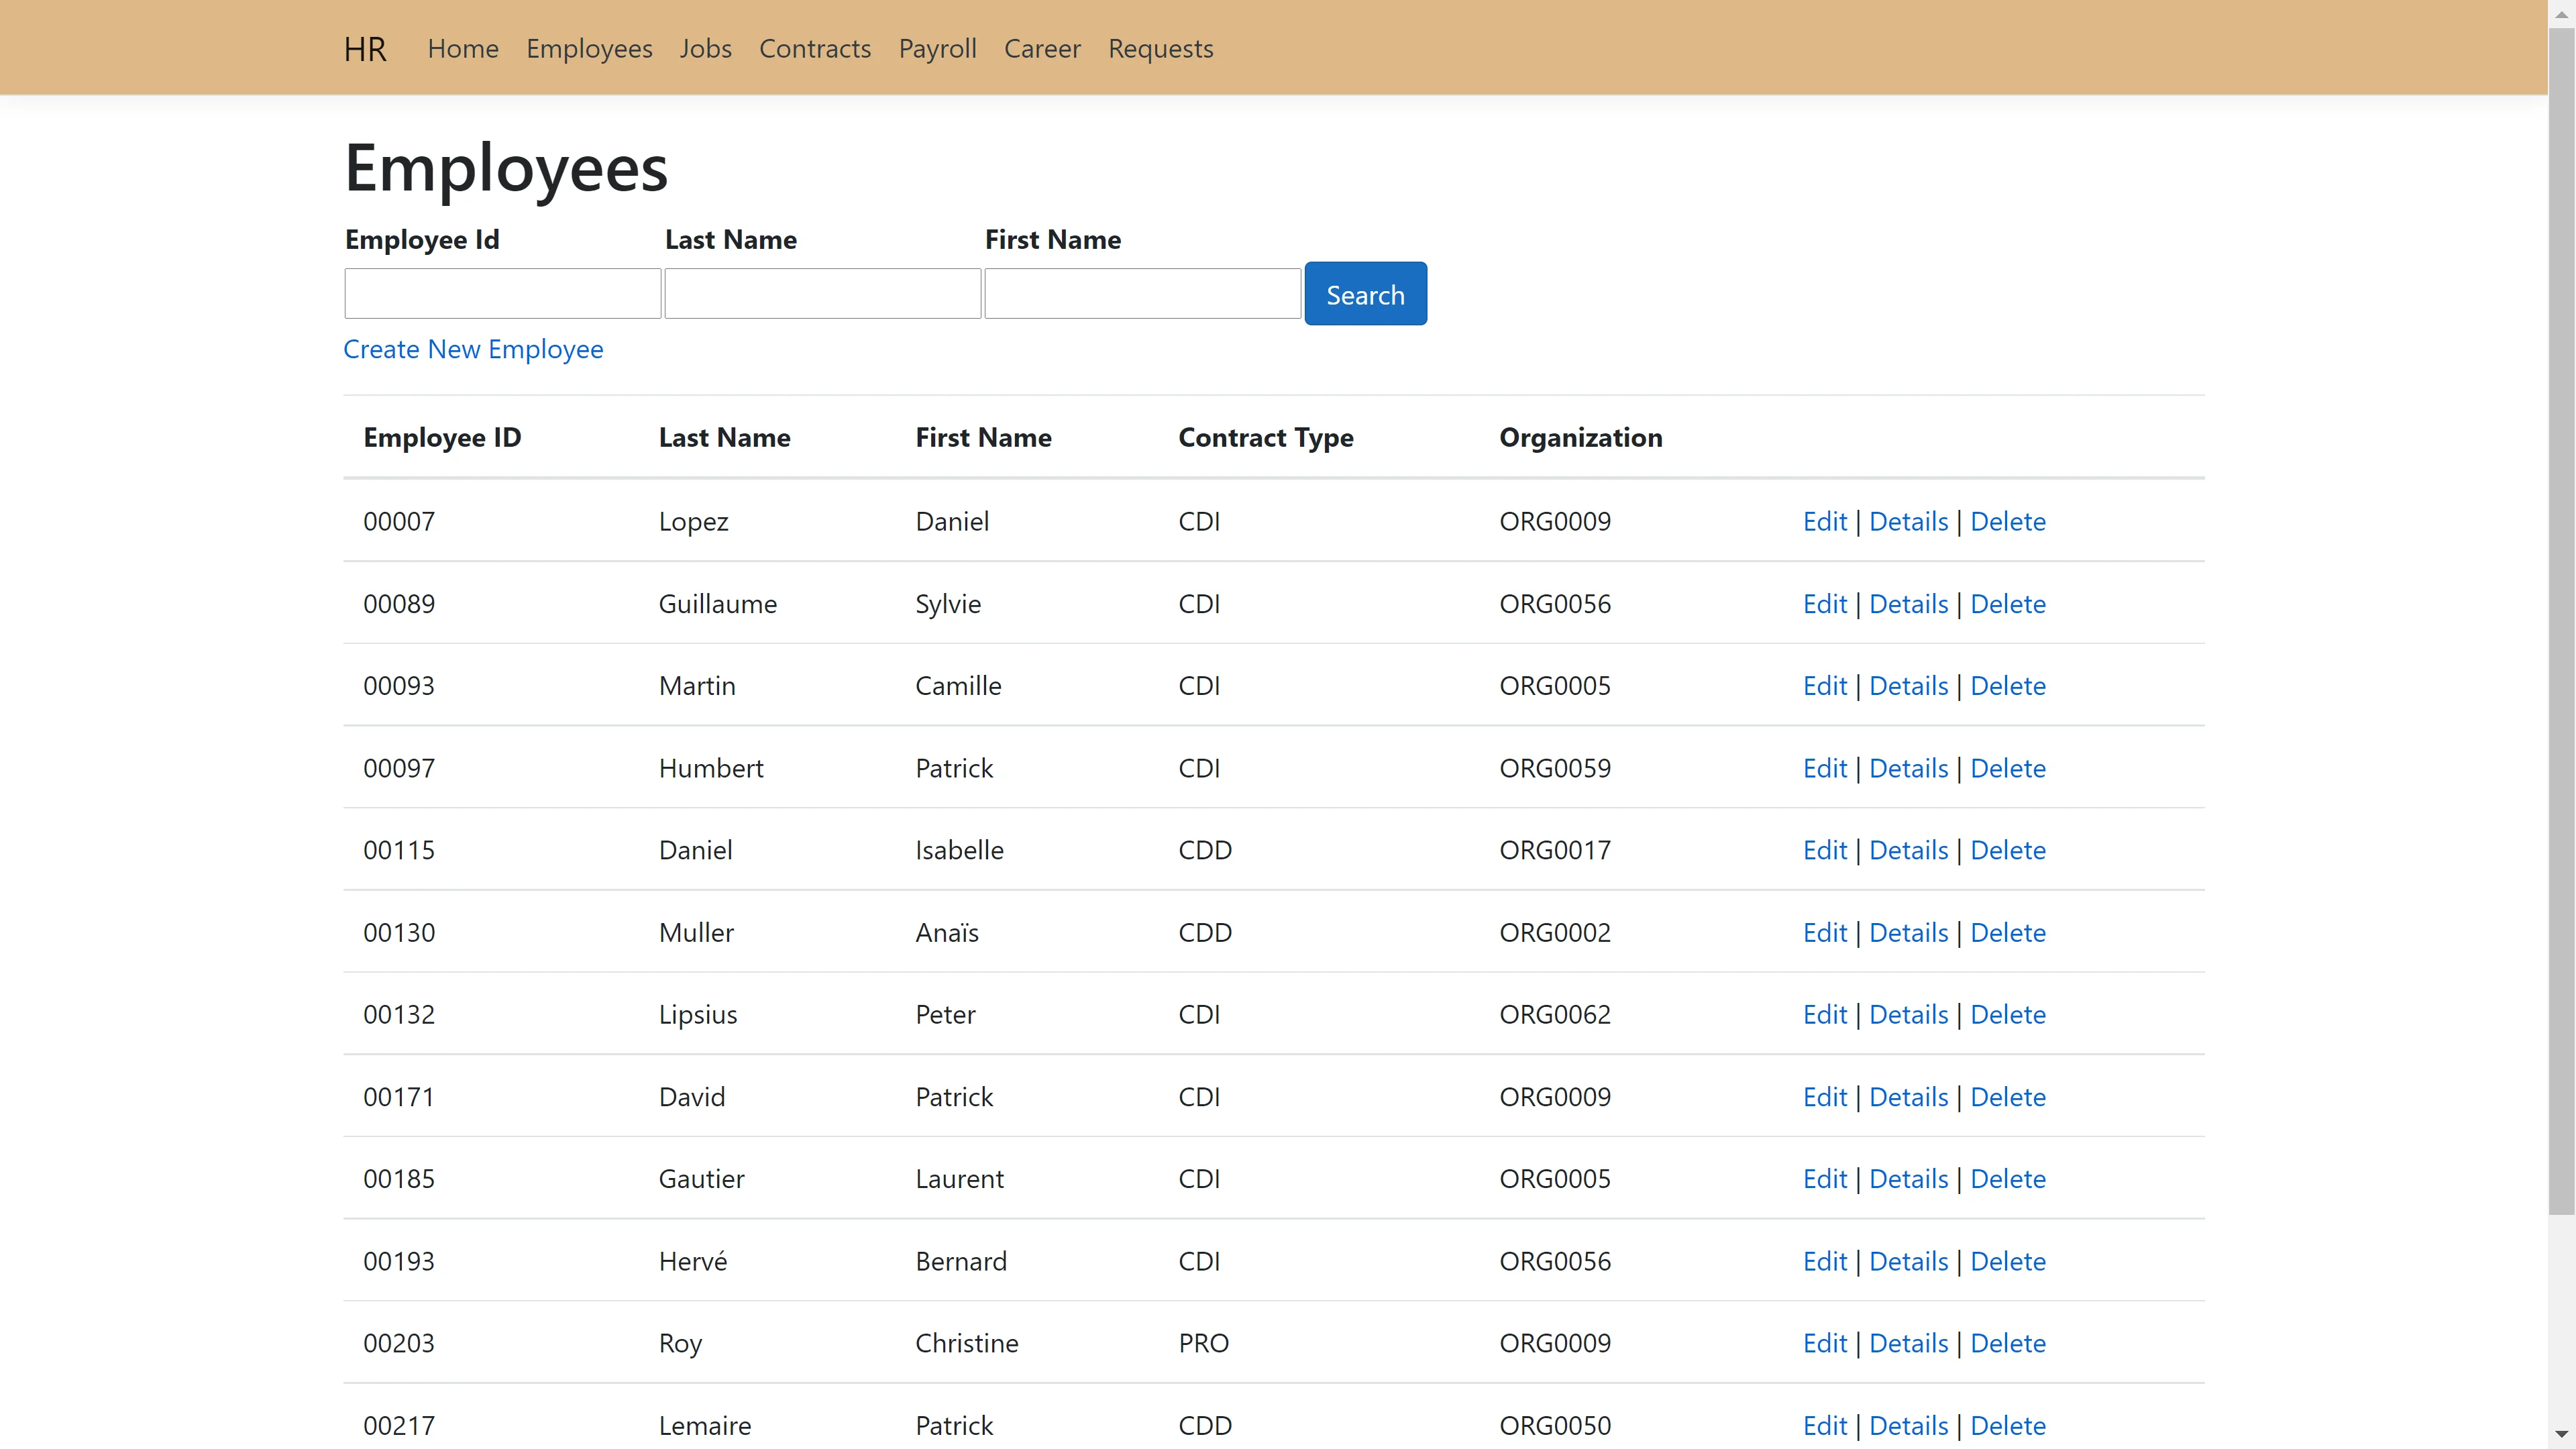
Each employee also has their own page, with the possibility to edit their profile or delete them. It is also possible to add a new employee.
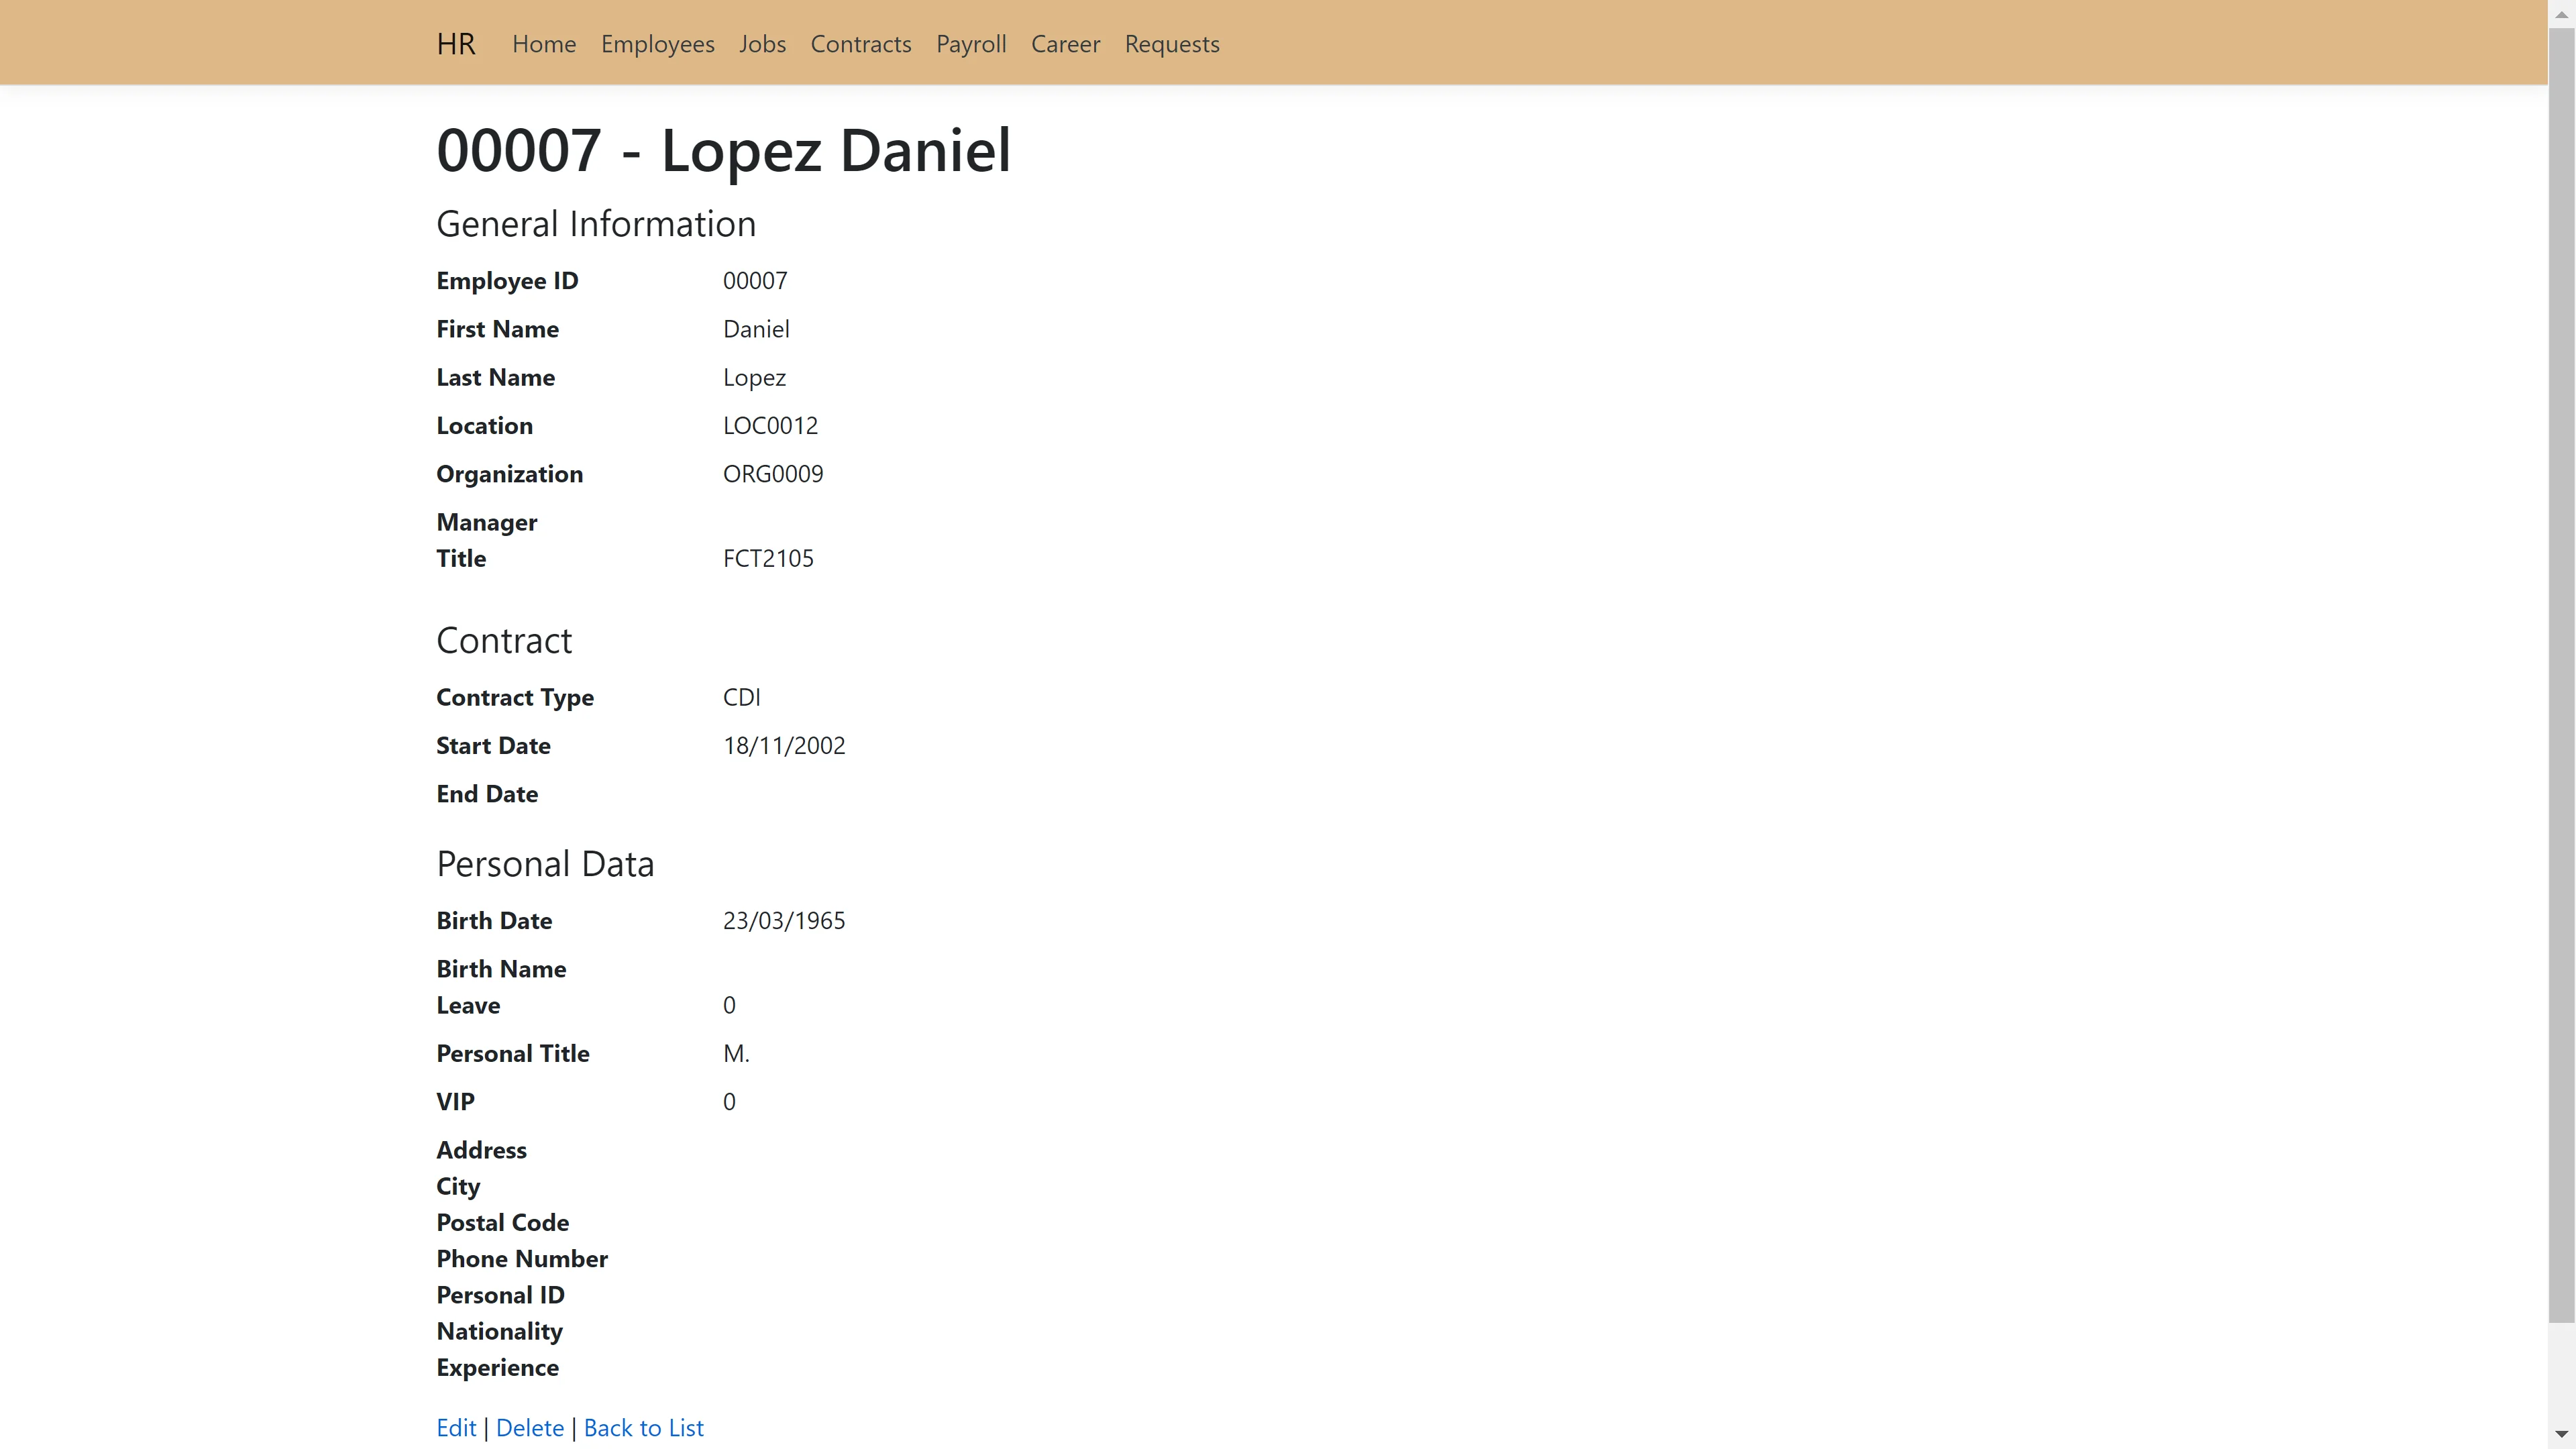
The HR application uses csv files as data sources. When a user is added, deleted, or edited, the csv file will be modified, and the changes will be saved.
Running the HR Application
The HR Application is part of the Usercube SDK, and comes with prefilled sources. To run the HR application:
- Download the Usercube SDK.
- Go to
SDK/DemoApps/HR. - Modify appsettings.json > CSVPath to
"..\\Sources". - Run
./HR.exein a command prompt. - In a web browser, enter the URL
localhost:5000.
The HR application is running, and the web browser is on the HR application employee list.
To set the HR application to another port, run ./HR.exe --urls http://localhost:{port number}. To
access the application, enter the URL localhost:{port number} in a web browser.
Some ports are not recognized by web browsers, or may already be used. Choose a port wisely.
How-Tos
These guides will help you set up connectors with practical step-by-step procedures.
-
Run the Banking Demo Application
Set up the Banking demo application in order to test a connector with a web based external system.- #### Run the HR Demo Application Set up the HR demo application in order to test a connector with a web based external system.- #### Create a Connector How to implement a connector via XML to connect Usercube to an external system.- #### Register for Microsoft Entra ID Grant Usercube a service account with Microsoft Identity Platform with the right permissions to authenticate to Microsoft Entra ID.- #### Configure Secured Options Configure secured options to ensure data security in a connection's parameters.- #### Set Up Incremental Synchronization How to implement an incremental synchronization job for a given connector via XML, to upload the related system's resources to Usercube.- #### Write a Template for a Ticket Connector Write a template that will be used by a Ticket connector to complete the title and the description of the ticket.- #### Write a PowerShell Script for Synchronization Write a PowerShell script used by a PowerShellSync connector.- #### Write a PowerShell Script for Provisioning Write a PowerShell script used by a PowerShellProv connector.- #### Fulfill Microsoft Exchange via PowerShell Set up a PowerShell connector to fulfill data in a PowerShell-compliant system, here Microsoft Exchange Server.- #### Write a Robot Framework Script Write a Robot Framework script that will be used by the Robot Framework connector.- #### Interact with a Web Page via Robot Framework Write a Robot Framework script that interacts with a web based external system.- #### Interact with a GUI Application via Robot Framework Write a Robot Framework script which interacts with an external application.- #### Export CyberArk Data via SCIM Set up a SCIM connector to extract data from your CyberArk instance into CSV source files that will in turn be fed to the synchronization task and to Usercube's resource repository.- #### Provision Salesforce Users' Profiles via SCIM Provision a user's account profile in a Salesforce system with the SCIM connector.- #### Set up SharePoint's Export and Synchronization Set up a SharePoint connector to extract data from your SharePoint instance into CSV source files that will be fed to the synchronization task and to Usercube's resource repository.
Interact with a GUI Application via Robot Framework
This guide shows how to write a Robot Framework script which interacts with an external application.
Example: Interacting with an application via a GUI
Consider an external system that is accessible through a GUI program, and that does not offer an API. In this situation, we can either interact manually with the external system , or with a Robot Framework connection.
Prerequisites
This guide will focus only on how to interact with a GUI application. The guide on how to write a Robot Framework script explains the basics of Robot Framework. The basic prerequisites can be found on the Robot Framework connector page.
The requirements specific to the Robot Framework FlaUI library are as follows:
- Python 3.7 or 3.8. For Python 3.9, using
pip install wheelin the command prompt may solve installation errors. - Robot Framework FlaUI library: use
pip install --upgrade robotframework-flauiin the command prompt. - The application with the GUI.
Other Robot Framework libraries can interact with applications. The [desktop part of the zoomba library] can also interact with a program, but requires an appium server.
While not strictly required, it is highly recommended that the Robot Framework FlaUI library documentation be consulted.
Inspecting tools
Most FlaUI keywords require an XPath locator. These XPaths can be found using the FlaUI inspection
tool. Download the
FlaUI inspection tool zip archive, then extract the
files to a folder. The inspection tool can be launched simply by running FlaUIInspect.exe.
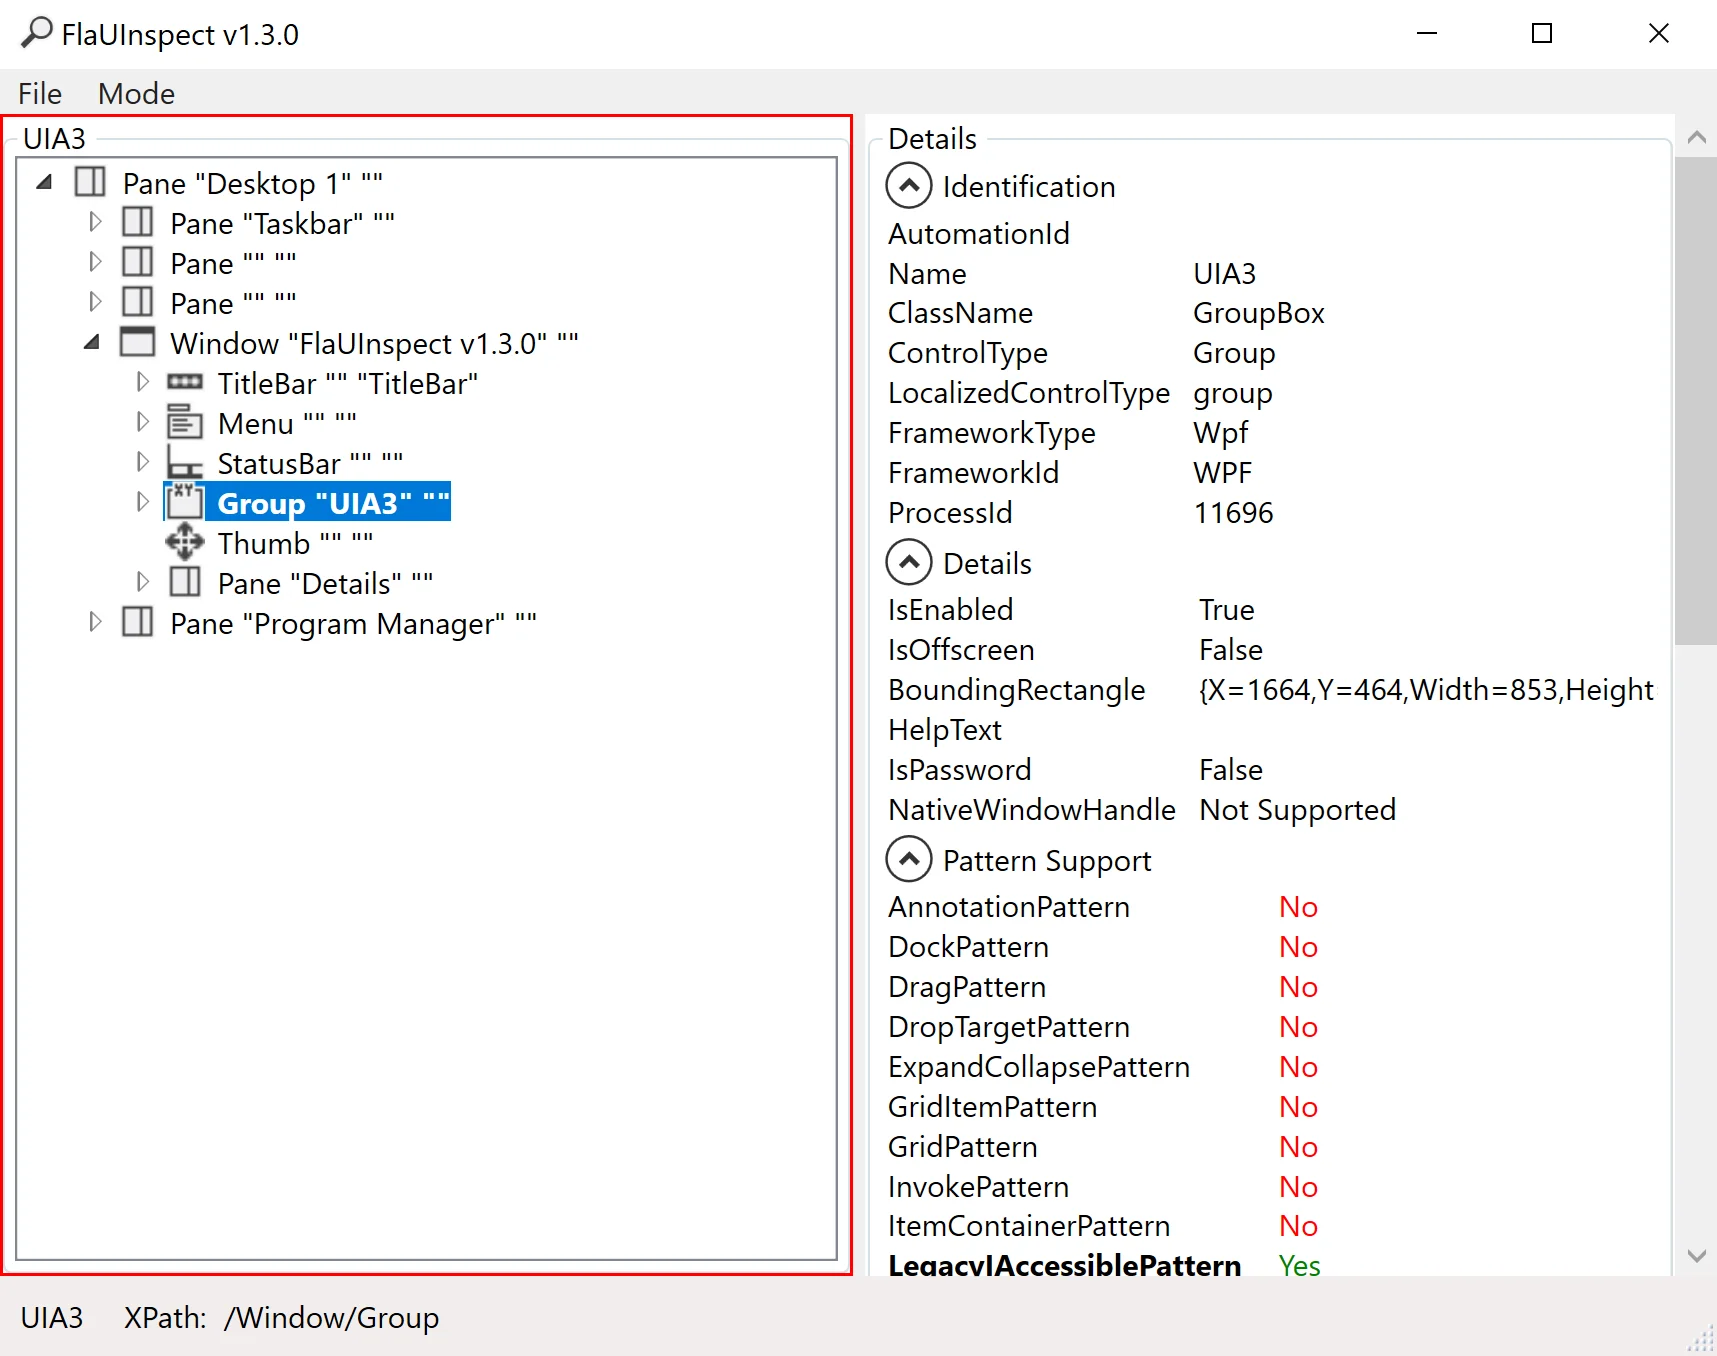
This tool lets you choose the UIA (UI Automation) version. Picking UIA3 should work in most use cases.
The FlaUI inspection tool shows each window that is open on the computer. To find the element the script is supposed to interact with, it is possible to manually search through the windows, and through the elements. However, the easiest way is to use the Hover Mode, which is accessible in the tool bar by clicking on Mode > Hover Mode (use Ctrl). To see the XPath, click on Mode > Show XPath.
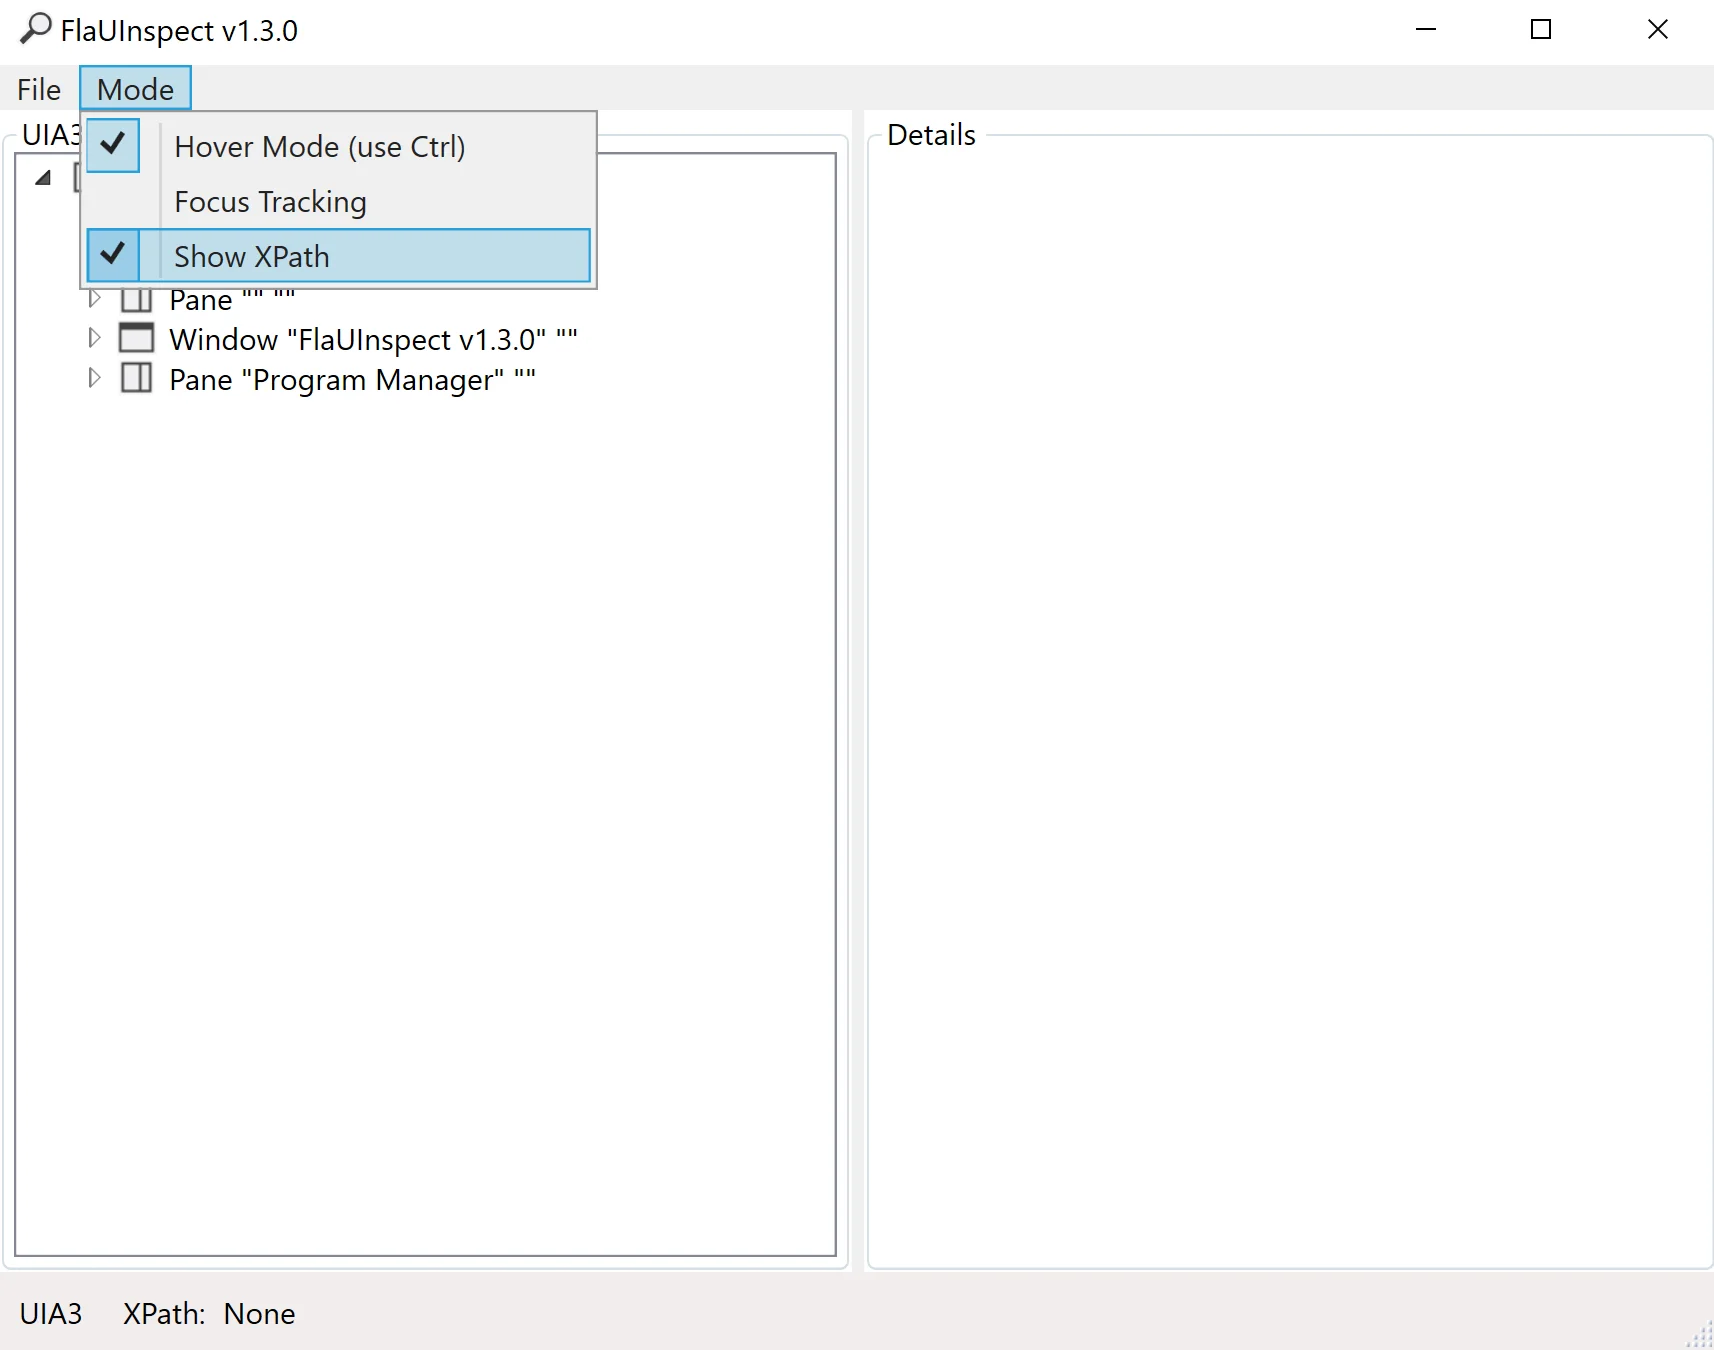
To see the XPath of an element, hover over the element, and press control. A red box should appear around the element, and the FlaUI inspection tool should show the element's information. The XPath should be at the bottom left of the FlaUI element.
As an example, imagine an application showing a list of files and folders. Targeting a specific file
would produce an XPath in the shape of /Window/Pane[3]/Pane/Pane[2]/List/Group[1]/ListItem[1]. The
important parts of this path are the beginning and the end. The beginning of the XPath specifies the
window. The middle part of the XPath, in most cases, is irrelevant.
The last part of the XPath however, /Group[1]/ListItem[1], is what should be modified to find the
right file. Group[1] means the element is in the first file group. ListItem[1] means the element
is the first file of the group. Depending on the file explorer view mode, the XPath may end with
Edit[1], which means the targeted element is the name section of the file.
As the Window's number may change, it should be specified by name. For the Downloads folder,
Window[@Name='Downloads'] specifies the window. The file may not always be at the same position,
so it should also be specified. If the file is FlaUInspect.exe, it can be specified with
ListItem[@Name='FlaUInspect.exe']. The Group may also change. It is not easy to find the right
group, so the best method is to remove the groups, by right clicking, then selecting Group by >
(None).
Use Case: Set a file to read-only
Consider an HR system that creates a file for each employee. When an employee retires, it may be interesting to set the file to read-only, so that it is not modified by accident. It is possible to set the file to read-only by provisioning it with the Robot Framework.
Define settings
As with every other Robot Framework script, the Usercube Robot Framework resource needs to be imported to launch the provisioning. The FlaUI library also needs to be imported to use its keywords.
*** Settings ***
Resource C:/identitymanagerDemo/Runtime/identitymanagerRobotFramework.resource
Library FlaUILibrary
Define variables
The Variables section contains variables that are used in the rest of the script. As the section
is at the start of the script, the variables are easy to update. In this case, the folder's name and
path are important variables that may be changed.
*** Variables ***
${FOLDERNAME} RobotFrameworkIdentity
${FOLDERPATH} C:/identitymanagerDemo/${FOLDERNAME}
Define custom keywords
To modify a file's properties, the script needs custom keywords that allow the desired actions to be accomplished. In this case, to navigate through the explorer program. These keywords were written with the Windows 10 File Explorer in mind.
| Keyword | Details |
|---|---|
| Open Explorer | Opens and attaches the explorer program to FlaUI. A program can be attached to FlaUI by its name or by its Pid, which stands for process identifier. The Launch Application keyword returns a Pid, however the program may launch multiple processes. In the case of the explorer, it is almost always running, even if no explorer windows are open. The Pid returned may not be the correct one. Attaching by the program name seems to work in this case. |
| Open Folder | Opens the folder specified in the Variables section. Accessing the address bar is not trivial, as it is not a text field until it is clicked. However, clicking on most elements of the address bar does not open the text field. In this keyword, the icon in the address bar is clicked, which opens the text field. |
| Get File Name | Returns the file's name. This allows the computation of the file's name through a keyword instead of an expression, which can make syntax easier. |
| Set File To Read Only | Sets the file corresponding to the user to read only. This keyword calls the other keywords in the right order, and is used to simplify the readability of the script. |
| Open File Properties | Right clicks on a file, then opens the file's properties. The right click is on the file's image, but it could be changed to any of the file's fields. Note that changing the folder's view mode or ordering may alter the file's XPath. |
| Select Read Only | Selects the read only option. This keyword simply clicks on the radio button, then clicks on the Ok button. If the radio button is already ticked, the file will no longer be in read only mode. The script clicks on the Ok button as it automatically closes the properties window, unlike the Apply button. |
| Close Explorer | Clicks on the cross to close the explorer window. It is also possible to close the program with the Close Application keyword, however that also closes the background explorer process, so closing only the window is better. |
Open Explorer
    Launch Application explorer
    Attach Application By Name explorer
    Open Folder

Open Folder
    Click /Window[@Name='File Explorer']/Pane[2]/Pane[3]/ProgressBar/Pane/ToolBar/SplitButton
    Set Text To Textbox /Window[@Name='File Explorer']/Pane[2]/Pane[3]/ProgressBar/ComboBox/Edit[@Name='Address'] ${FOLDERPATH}
    Press Key s'ENTER'

Get File Name
    [Arguments] ${order}
    [return] ${order['Changes']['Identifier']}.txt

Set File To Read Only
    [Arguments] ${order}
    ${FileName}= Get File Name ${order}
    Open File Properties ${FileName}
    Select ReadOnly ${FileName}

Open File Properties
    [Arguments] ${filename}
    Right Click /Window[@Name='${FOLDERNAME}']/Pane[3]/Pane/Pane[2]/List/ListItem[@Name='${filename}']/Image
    Click /Menu[@Name='Context']/MenuItem[@Name='Properties']

Select Read Only
    [Arguments] ${filename}
    Click /Window[@Name='${filename} Properties']/CheckBox[@Name='Read-only']
    Click /Window[@Name='${filename} Properties']/Button[@Name='OK']

Close Explorer
    Click /Window[@Name='${FOLDERNAME}']/TitleBar/Button[@Name='Close']
Define mandatory keywords
To provision the system, the script must contain the three mandatory keywords: ExecuteAdd,
ExecuteDelete, and ExecuteModify. In this case, only ExecuteDelete is implemented. (It is
considered, perhaps foolishly, that employees will not come out of retirement!)
*** Keywords ***
ExecuteAdd
    [Arguments] ${order}
    Log To Console ExecuteAdd is not implemented

ExecuteDelete
    [Arguments] ${order}
    Set File To Read Only ${order}

ExecuteModify
    [Arguments] ${order}
    Log To Console ExecuteModify is not implemented
Define test cases
Although the Robot Framework is used for provisioning in Usercube, it is most often used for
testing, which is why the Test Cases section defines what should happen when Usercube starts the
Robot Framework task. The Launch Provisioning keyword is the one that will fetch the provisioning
orders.
*** Test Cases ***
Run Provisioning
    Open Explorer
    Launch Provisioning
    Close Explorer
Read the full script
The full script is as follows:
*** Settings ***
Resource C:/identitymanagerDemo/Runtime/identitymanagerRobotFramework.resource
Library FlaUILibrary

*** Variables ***
${FOLDERNAME} RobotFrameworkIdentity
${FOLDERPATH} C:/identitymanagerDemo/${FOLDERNAME}

*** Keywords ***
ExecuteAdd
    [Arguments] ${order}
    Log To Console ExecuteAdd is not implemented

ExecuteDelete
    [Arguments] ${order}
    Set File To Read Only ${order}

ExecuteModify
    [Arguments] ${order}
    Log To Console ExecuteModify is not implemented

Open Explorer
    Launch Application explorer
    Attach Application By Name explorer
    Open Folder

Open Folder
    Click /Window[@Name='File Explorer']/Pane[2]/Pane[3]/ProgressBar/Pane/ToolBar/SplitButton
    Set Text To Textbox /Window[@Name='File Explorer']/Pane[2]/Pane[3]/ProgressBar/ComboBox/Edit[@Name='Address'] ${FOLDERPATH}
    Press Key s'ENTER'

Get File Name
    [Arguments] ${order}
    [return] ${order['Changes']['Identifier']}.txt

Set File To Read Only
    [Arguments] ${order}
    ${FileName}= Get File Name ${order}
    Open File Properties ${FileName}
    Select ReadOnly ${FileName}

Open File Properties
    [Arguments] ${filename}
    Right Click /Window[@Name='${FOLDERNAME}']/Pane[3]/Pane/Pane[2]/List/ListItem[@Name='${filename}']/Image
    Click /Menu[@Name='Context']/MenuItem[@Name='Properties']

Select Read Only
    [Arguments] ${filename}
    Click /Window[@Name='${filename} Properties']/CheckBox[@Name='Read-only']
    Click /Window[@Name='${filename} Properties']/Button[@Name='OK']

Close Explorer
    Click /Window[@Name='${FOLDERNAME}']/TitleBar/Button[@Name='Close']

*** Test Cases ***
Run Provisioning
    Open Explorer
    Launch Provisioning
    Close Explorer
Interact with a Web Page via Robot Framework
This guide explains how to write a Robot Framework script that interacts with a web based external system.
Example: Interacting with a web-based application
Consider an external system that is accessible through a web interface, and that does not offer an API. In this situation, we can either interact manually with the external system , or with a Robot Framework connection.
Prerequisites
This guide will focus only on how to interact with a web-based application. The guide on how to write a Robot Framework script explains the basics of Robot Framework. The basic prerequisites can be found on the Robot Framework connector page.
The prerequisites are explained in detail at the Robot Framework selenium pypi page.
The requirements specific to the Robot Framework Selenium library are as follows:
- Robot Framework selenium library: use
pip install --upgrade robotframework-seleniumlibraryin the command prompt. - A web browser.
- A web driver that corresponds to the web browser and its version. Webdrivers can be found in the
Selenium website.
This web driver should be in your path. To check that the web driver is in your path, use
gcm {webdriver_name}. As an example for Edge, usegcm MicrosoftWebDriver.
The web driver for Edge is called msedgedriver.exe, but the Robot Framework may expect it to be
called MicrosoftWebDriver.exe depending on the python version. Renaming the web driver from
msedgedriver.exe to MicrosoftWebDriver.exe should fix this issue.
If the browser is updated, the web driver should also be updated.
While not strictly required, it is highly reccomended to look at the Robot Framework selenium library documentation.
Selenium basics
Selenium is a web browser automation tool. Selenium can automatically perform scripted actions in a web browser. Selenium is not easy to use on its own, and it is easier to use Selenium via the Robot Framework. However, the basics are still the same.
The basic structure of a web page is defined with HTML. It is accessible with the inspect tool, which can be opened by pressing the F12 key on most browsers. For Selenium, we want to find information on specific parts of the page. Inspecting an element can be done by right clicking the element, and clicking Inspect.
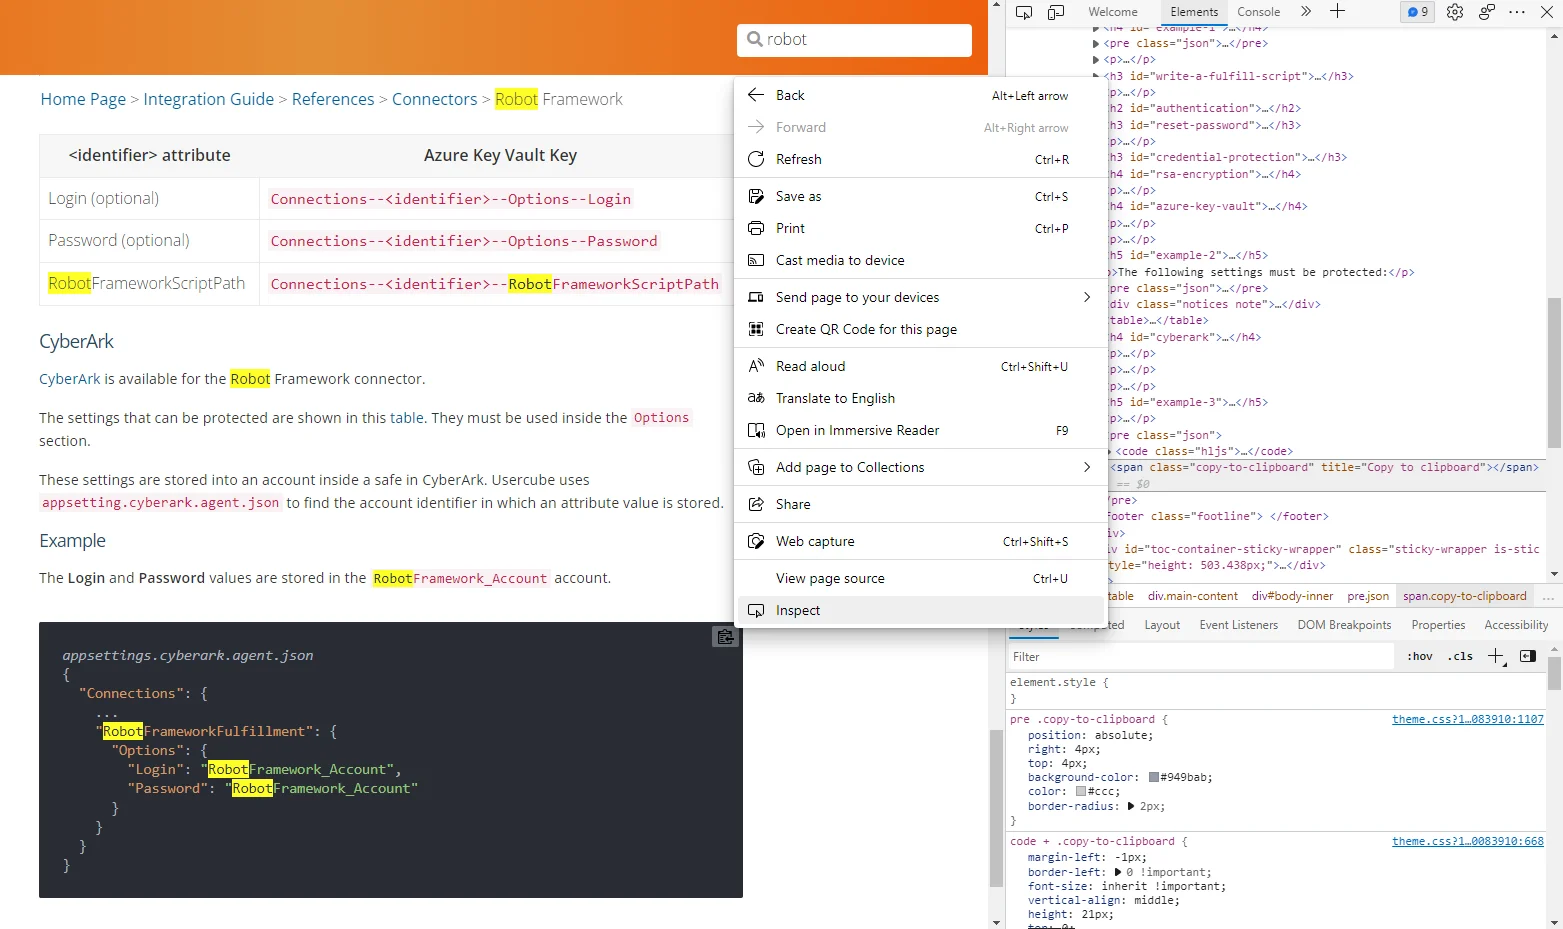
Suppose the goal of the script is to copy the content of the code block, and paste it to a file, to
ensure that the file is up to date with the documentation. To do this, the Robot Framework has to
click on the copy to clipboard button with the keyword
Click Element.
Locating elements
As stated in the Robot Framework SeleniumLibrary documentation, the keyword Click Element requires
an element locator. The element locator identifies which element the Robot Framework should click.
To ensure the right element is clicked, the element locator should only match the one element which
should be clicked.
In the HTML, the button has a class class="copy-to-clipboard". The element locator
class:copy-to-clipboard matches the button. However, there are other buttons with the same class
on the page. The easiest way to click the right button is with an XPath element locator.
XPath element locators
Each element on the web page has an XPath, and each XPath uniquely identifies an element. This means that we can always use an XPath locator. To get the XPath of an element, inspect the element, then right click it in the HTML, and click on Copy > Full XPath.
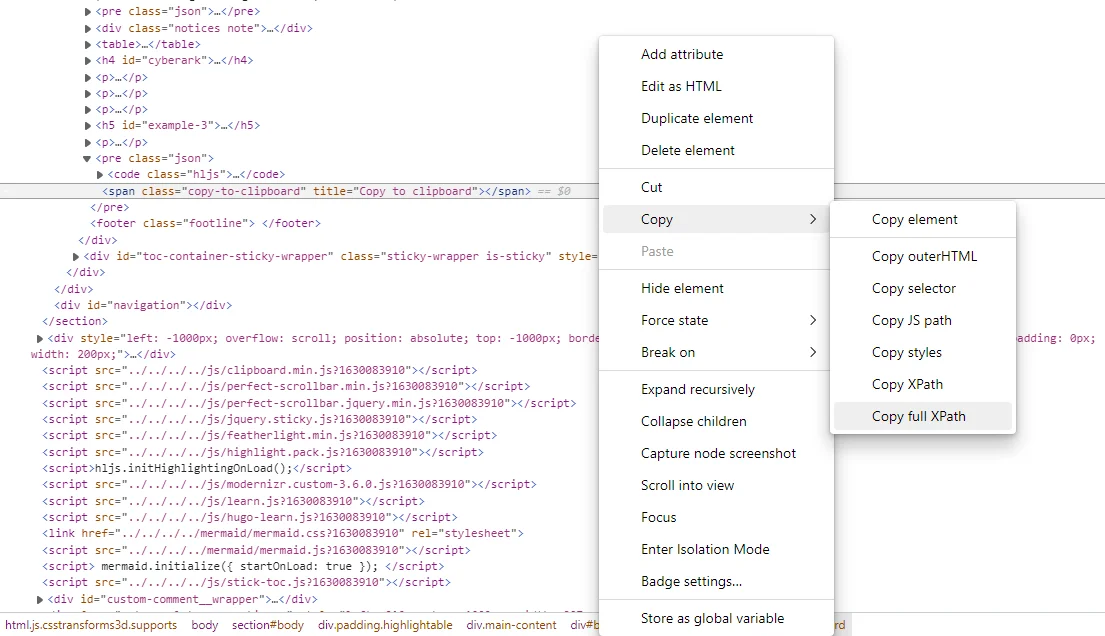
For the copy to clipboard button, the XPath is
/html/body/section/div[2]/div[3]/div[1]/pre[4]/span.
XPaths change as the page is updated. Using a location strategy other than the XPath strategy should reduce the maintenance needs of the script.
Hypertext references and API calls
Some elements have links to other websites or pages of the same website. In the HTML inspection,
these elements are likely to have a href attribute containing the link. Href stands for
hypertext reference. By going directly to the linked URL instead of clicking the link, the script
does not need to specify an element locator for the link.
In some cases, an API can be called simply by going to the right URL. This URL may be used as a
shortcut to avoid having to fill in text fields. The href attributes may show the format of the
API calls.
Use Case: Fulfill groups in a Banking system
The Banking system is a Usercube demo application that represents an external system. The Banking system stores basic information on its users such as their names, mail addresses� The most interesting part of the Banking system is the groups functionality, as users can belong to multiple groups, and groups can have multiple users.
The goal of this use case is to extract the existing associations between groups and users from the Banking system into Usercube, then provide a way to add users to a group and remove users from a group. To showcase the password generation, the script will generate a password for the provisioned users' accounts.
Connector configuration
As stated in the previous part, the Banking connector is supposed to link the users and their groups. This means that the connector has a user entity type, and a group entity type, with an entity association between them.
The Banking connector has to be able to extract the data, and fulfill the Banking system. The fulfillment of the Banking system can only be done through its web application, which means the Robot Framework Selenium library will be used. The extraction of the data will be performed through an SQL connection.
For simplicity's sake, only the user's Login is kept.
<Connector Identifier="Banking" DisplayName_L1="Banking" Agent="Local"/> <Category Policy="Default" Identifier="Banking" DisplayName_L1="Banking" /> <Connection Connector="Banking" DisplayName_L1="Banking Extract Database" Identifier="BankingExtractDatabase" Package="Usercube.SQL.SQLServer@0000001"/> <Connection Connector="Banking" DisplayName_L1="Banking Fulfillment" Identifier="BankingFulfillment" Package="Usercube.RobotFramework@0000001"/> <EntityType Identifier="Banking_Group" DisplayName_L1="Banking - Group" DisplayName_L2="Banking - Groupe"> <Property Identifier="name" DisplayName_L1="Group Name" IsKey="true" TargetColumnIndex="1" Type="String" /> <Property Identifier="users" DisplayName_L1="Users" Type="ForeignKey" /> </EntityType> <EntityType Identifier="Banking_User" DisplayName_L1="Banking - User" DisplayName_L2="Banking - Utilisateur"> <Property Identifier="login" DisplayName_L1="Login" IsKey="true" TargetColumnIndex="1" Type="String" /> <Property Identifier="groups" DisplayName_L1="Groups" Type="ForeignKey" /> </EntityType> <EntityTypeMapping Identifier="Banking_Group" Connector="Banking" ConnectionTable="BankingExtractDatabase_"dbo"."um_groups""> <Property Identifier="name" ConnectionColumn="name" IsPrimaryKey="true" /> </EntityTypeMapping> <EntityTypeMapping Identifier="Banking_User" Connector="Banking" ConnectionTable="BankingExtractDatabase_"dbo"."um_users""> <Property Identifier="login" ConnectionColumn="login" IsPrimaryKey="true" /> </EntityTypeMapping>
<EntityAssociation Identifier="Banking_Users_Groups" DisplayName_L1="User" IsProperty1Collection="true" IsProperty2Collection="true" Property1="Banking_Group:users" Property2="Banking_User:groups" /> <EntityAssociationMapping Identifier="Banking_Users_Groups" Column1="group" Column2="user" ConnectionTable="BankingExtractDatabase_"dbo"."um_usersgroups"" EntityPropertyMapping1="Banking_Group:name" EntityPropertyMapping2="Banking_User:login" Connector="Banking" /> <ViewTargetResourceTemplate EntityType="Banking_Group" Profile="Administrator" /> <ViewTargetResourceTemplate EntityType="Banking_User" Profile="Administrator" />
The notion of groups in the Banking system is replaced by the notion of single roles in Usercube. A user belonging to the accountant group in the Banking system has the accountant single role in Usercube. To automate the correspondance, the connector's configuration requires a rule between the group resource and the single role. This can be done with a navigation rule for each single role and corresponding group.
For simplicity's sake, only three roles are kept.
<SingleRole Identifier="BAGR09" DisplayName_L1="Banking role: all transactions" DisplayName_L2="M�tiers : op�rations toutes r�gions" Category="Banking" EntityType="Directory_User" Policy="Default" /> <SingleRole Identifier="BAG002" DisplayName_L1="Banking role: agency" DisplayName_L2="M�tiers : agence" Category="Banking" EntityType="Directory_User" Policy="Default" /> <SingleRole Identifier="BAG003" DisplayName_L1="Banking role: employees agency" DisplayName_L2="M�tiers : agence personnel" Category="Banking" EntityType="Directory_User" Policy="Default" /> <ResourceType Identifier="Banking_NominativeUser" DisplayName_L1="Banking User (nominative)" Policy="Default" TargetEntityType="Banking_User" Category="Banking" SourceEntityType="Directory_User" BlockProvisioning="false"> <ScalarRule Property="login" Expression="C#:person:return person.Login;" /> <NavigationRule Property="groups" Resource="Business role: all transactions" SingleRole="BAGR09" /> <NavigationRule Property="groups" Resource="Business role: agency" SingleRole="BAG002" /> <NavigationRule Property="groups" Resource="Business role: employees agency" SingleRole="BAG003" /> </ResourceType> <ResourceTypeMapping Identifier="Banking_NominativeUser" Connection="BankingFulfillment" /> <ResourceCorrelationRule ResourceType="Banking_NominativeUser" TargetBinding="login" Policy="Default" SourceMatchedConfidenceLevel="100" SourceExpression="C#:person:return "U" + person.EmployeeId;" />
Define settings
As with every other Robot Framework script, the resource needs to be imported to launch the provisioning. The SeleniumLibrary also needs to be imported to use its keywords.
*** Settings ***
Resource C:/identitymanagerDemo/Runtime/identitymanagerRobotFramework.resource
Library SeleniumLibrary
Define variables
The variables in the Variables section can serve two purposes.
- Values that should be modified easily: The browser and the Banking web application URL change with the provisioning environment.
- Values that are used multiple times: The Banking web application URL is used three times in the script. This avoids editing mistakes that happen when only one of the instances is modified.
*** Variables ***
${BROWSER} edge
${BANKINGURL} http://localhost:5011
Define custom keywords
The script defines several custom keywords. As the element locators may not be easily understandable, it is important that the keywords are not long, and have descriptive names.
| Keyword | Details |
|---|---|
| Modify User | Sets a password for the user, then applies the provisioning order. This keyword does everything the Execute Modify keyword should do, so that it can be used for error handling. As the provisioned resource type may not have password reset settings, the password generation could fail, which is why it is called by the Try Keyword keyword. |
| Restart Banking And Fail | Restarts the Banking Application, then fails the keyword execution. This keyword should be used when the Banking application is in an unknown state. |
| Launch Banking App | Launches the Banking web application. To check that the web browser is on the right page, the title of the page is verified with the Title Should Be keyword. |
| Set Password | Generates a password for the provisioned user, sets their Banking password to that password, then sends a notification. This keyword attempts to send the notification as soon as the password is set. First, this ensures that the notification is sent even if the rest of the script would crash. Second, this keeps the password in memory for the least amount of time possible, which reduces security risks. |
| Add Group To User | Selects the group that should be added, and clicks the Save button. This keyword also verifies that the web browser has the expected title. The Click Element At Coordinates keyword is used to reset the state of the page, as selecting the group hides the Save button. |
| Search User And Add Group | Goes to the page to add groups to the right user, and calls Add Group To User. This keyword also verifies that the web page has the expected title. |
| Add Groups | Calls Search User And Add Group for each group in the provisioning order. |
| Add All Groups | Computes the number of groups to add, and if there is at least one, calls Add Groups. The only way to find the number of groups to add is in the Changes > groups_add section of the provisioning order. This section does not exist if there are no groups to add, so the Run Keyword And Ignore Error is called to avoid propagating the error. |
| Remove Group From User | Goes to the URL corresponding to the API call to remove the group from the user. |
| Remove Groups | Calls Remove Group From User for each group in the provisioning order. |
| Remove All Groups | Computes the number of groups to remove, and if there is at least one, calls Remove Groups. The only way to find the number of groups to remove is in the Changes > groups_remove section of the provisioning order. This section does not exist if there are no groups to remove, so the Run Keyword And Ignore Error is called to avoid propagating the error. |
*** Keywords ***
Modify User
    [Arguments] ${order}
    Try Keyword Set Password ${order}
    Catch Keyword Go To ${BANKINGURL}/User
    Title Should Be All Users - Banking System
    Add All Groups ${order}
    Remove All Groups ${order}

Restart Banking And Fail
    Close Browser
    Launch Banking App
    Fail ${Provisioning failed, restarting the browser}

Launch Banking App
    Open Browser ${BANKINGURL} ${BROWSER}
    Title Should Be Home Page - Banking System

Set Password
    [Arguments] ${order}
    Go To ${BANKINGURL}/User/SetPassword/${login}
    Title Should Be Edit ${login} - Banking System
    ${password}= Generate Password
    Input Text id:Password ${password}
    Click Element xpath:/html/body/div/main/div[1]/div/form/div[2]/input
    Send Password Notification

Add Group To User
    [Arguments] ${groupName}
    Select From List By Value name:group ${groupName}
    Click Element at Coordinates name:group 250 0
    Click Element xpath:/html/body/div/main/div[1]/div/form/div[2]/input
    Title Should Be All Users - Banking System

Search User And Add Group
    [Arguments] ${login} ${groupName}
    Go To ${BANKINGURL}/User/AddGroup/${login}
    Title Should Be Add Group to ${login} - Banking System
    Add Group To User ${groupName}

Add Groups
    [Arguments] ${order} ${length}
    FOR ${i} IN RANGE ${length}
        Search User And Add Group ${order['Resource']['login']} ${order['Changes']['groups_add'][${i}]['name']}
    END

Add All Groups
    [Arguments] ${order}
    ${status} ${length}= Run Keyword And Ignore Error Get Length ${order['Changes']['groups_add']}
    Run Keyword If '${status}' == 'PASS' Add Groups ${order} ${length}

Remove Group From User
    [Arguments] ${login} ${groupName}
    Go To ${BANKINGURL}/User/RemoveGroup/${login}?groupId=${groupName}

Remove Groups
    [Arguments] ${order} ${length}
    FOR ${i} IN RANGE ${length}
        Remove Group From User ${order['Resource']['login']} ${order['Changes']['groups_remove'][${i}]['name']}
    END

Remove All Groups
    [Arguments] ${order}
    ${status} ${length}= Run Keyword And Ignore Error Get Length ${order['Changes']['groups_remove']}
    Run Keyword If '${status}' == 'PASS' Remove Groups ${order} ${length}
Define mandatory keywords
To be able to provision the system, the script must contain the ExecuteAdd, ExecuteDelete, and
ExecuteModify keyword. As the Banking system is only able to modify existing accounts, only the
Execute Modify keyword is implemented.
To simplify error handling, the Execute Modify keyword only calls the Modify User keyword. As
only a single keyword is needed, it can be called within the Try Keyword keyword. This means that
the error handling can be handled with the Catch Keyword keyword.
*** Keywords ***
ExecuteAdd
    [Arguments] ${order}
    Log To Console ExecuteAdd is not implemented

ExecuteDelete
    [Arguments] ${order}
    Log To Console ExecuteDelete is not implemented

ExecuteModify
    [Arguments] ${order}
    Try Keyword Modify User ${order}
    Catch Keyword Restart Banking And Fail
Define test cases
Although the Robot Framework is used for provisioning in Usercube, it is most often used for
testing, which is why the Test Cases section defines what should happen when Usercube starts the
Robot Framework task. Note that the Launch Provisioning keyword is mandatory for the provisioning
to happen.
As the browser should always be closed after the tests, a teardown is used to ensure that regardless of the script's execution state, the browser is closed.
*** Test Cases ***
Run Provisioning
    Launch Banking App
    Launch Provisioning
    [Teardown] Close Browser
Read the full script
The full script is as follows:
*** Settings ***
Resource C:/identitymanagerDemo/Runtime/identitymanagerRobotFramework.resource
Library SeleniumLibrary

*** Variables ***
${BROWSER} edge
${BANKINGURL} http://localhost:5011

*** Keywords ***
ExecuteAdd
    [Arguments] ${order}
    Log To Console ExecuteAdd is not implemented

ExecuteDelete
    [Arguments] ${order}
    Log To Console ExecuteDelete is not implemented

ExecuteModify
    [Arguments] ${order}
    Try Keyword Modify User ${order}
    Catch Keyword Restart Banking And Fail

Modify User
    [Arguments] ${order}
    Try Keyword Set Password ${order}
    Catch Keyword Go To ${BANKINGURL}/User
    Title Should Be All Users - Banking System
    Add All Groups ${order}
    Remove All Groups ${order}

Restart Banking And Fail
    Close Browser
    Launch Banking App
    Fail ${Provisioning failed, restarting the browser}

Launch Banking App
    Open Browser ${BANKINGURL} ${BROWSER}
    Title Should Be Home Page - Banking System

Set Password
    [Arguments] ${order}
    Go To ${BANKINGURL}/User/SetPassword/${login}
    Title Should Be Edit ${login} - Banking System
    ${password}= Generate Password
    Input Text id:Password ${password}
    Click Element xpath:/html/body/div/main/div[1]/div/form/div[2]/input
    Send Password Notification

Add Group To User
    [Arguments] ${groupName}
    Select From List By Value name:group ${groupName}
    Click Element at Coordinates name:group 250 0
    Click Element xpath:/html/body/div/main/div[1]/div/form/div[2]/input
    Title Should Be All Users - Banking System

Search User And Add Group
    [Arguments] ${login} ${groupName}
    Go To ${BANKINGURL}/User/AddGroup/${login}
    Title Should Be Add Group to ${login} - Banking System
    Add Group To User ${groupName}

Add Groups
    [Arguments] ${order} ${length}
    FOR ${i} IN RANGE ${length}
        Search User And Add Group ${order['Resource']['login']} ${order['Changes']['groups_add'][${i}]['name']}
    END

Add All Groups
    [Arguments] ${order}
    ${status} ${length}= Run Keyword And Ignore Error Get Length ${order['Changes']['groups_add']}
    Run Keyword If '${status}' == 'PASS' Add Groups ${order} ${length}

Remove Group From User
    [Arguments] ${login} ${groupName}
    Go To ${BANKINGURL}/User/RemoveGroup/${login}?groupId=${groupName}

Remove Groups
    [Arguments] ${order} ${length}
    FOR ${i} IN RANGE ${length}
        Remove Group From User ${order['Resource']['login']} ${order['Changes']['groups_remove'][${i}]['name']}
    END

Remove All Groups
    [Arguments] ${order}
    ${status} ${length}= Run Keyword And Ignore Error Get Length ${order['Changes']['groups_remove']}
    Run Keyword If '${status}' == 'PASS' Remove Groups ${order} ${length}

*** Test Cases ***
Run Provisioning
    Launch Banking App
    Launch Provisioning
    [Teardown] Close Browser
Export CyberArk Data via SCIM
This guide shows how to set up a SCIM connector to extract data from your CyberArk instance into CSV source files that will in turn be fed to the Synchronization task and to your Usercube resource repository. It will focus on registering Usercube within the target CyberArk instance, configuring the connector, and building the job to perform regularly scheduled synchronization.
Prerequisites
External system configuration
Usually CyberArk provides the environment to use AAM (Application Access Manager) and SCIM (System for Cross-domain Identity Management). For example, PrivateArk Server, PrivateArk and other tools can be found on a VM-based environment.
It is strongly recommended that you follow the official CyberArk SCIM Server Implementation Guide (the CyberArk team can provide this document) in order to set up the environment. When you've completed the installation or if CyberArk has already installed it, you can verify the installation:
-
Log into PrivateArk Client, locate and open the SCIM Config safe.
-
Check the presence of the following objects:
Encryption-key: The SCIM Server uses a local cache to store objects retrieved from the Vault. Although no credentials (other than the ones in the SCIM Config safe, which are not stored on the cache) are retrieved, we encrypt the cache with this encryption key. The key is randomly generated, and not exposed by the installer, but can be changed if desired.GlobalConfig.yml: This is the configuration file for the overall SCIM server settings. It is responsible for the setting of performance parameters and additional added features.Usercube-account: This is a privileged account to allow Usercube to authenticate its REST API requests to the SCIM Server. The password for this account must be the same as the Usercube-user (Usercube can be replaced by any other name like �Client').SCIM-account: This is a privileged account, managed by the Central Policy Manager (CPM is the module of the PAM tool that is responsible for managing the passwords and any policies/exceptions configured), which allows the SCIM server to retrieve the password for SCIM-user through an Application Identity Manager (AIM) Credential Provider call.
-
Verify that the following Users were created in the PrivateArk Client:
-
Go to Tools > Administrative Tools.
-
Select Users and Groups.
-
Ensure the following users have been created:
SCIM-user: This is a CyberArk user with full privileges for creating and managing Safes, Accounts, Permissions, and Users. This user is required by the CyberArk's Command Line Interface (PACLI, used to perform quick Vault-level functions without logging in to the PrivateArk client) on the SCIM server for logging into the Vault and managing objects on behalf of client applications such as Usercube.Client-user: This is a CyberArk user for authenticating requests made to the SCIM server using the REST API. (The name �Client-user' can change and be replaced by �Usercube-user' for example.)
Now we can consider that the installation is correct, the login is
Usercube-userand the passwordCyberArk1. -
Usercube configuration
This step sets up the Usercube Agent to use the SCIM connector and access the CyberArk data.
The settings must be entered in the appsettings.agent > Connections section.
Connect to the target CyberArk instance
In the Connections section, add one new subsection that will contain the credentials for the
target CyberArk. Use a meaningful name to remember which CyberArk is accessed via this section.
This example connects via the
SCIMCyberArkExportconnection to the CyberArk system:appsettings.agent.json
{
...
"Connections": {
...
"SCIMCyberArkExport": {
...
}
}
}
Input credentials
In the newly created subsection, fill in:
- The Server attribute with the CyberArk's address. It has the form:
https://host:port/CyberArk/scim. - The Login attribute with the User's login value (in our example,
Usercube-user). - The Password attribute with the User's login value (in our example,
Cyberark1).
For example:
appsettings.agent.json
{
...
"Connections": {
...
"SCIMCyberArkExport": {
"Server": "https://host:port/CyberArk/scim",
"Login": "Usercube-user",
"Password": "Cyberark1"
}
}
}
For pedagogical reasons, this guide focuses on the simplest way to set up the export, but it's not the most secure. Hence it is strongly recommended that you protect credentials using Azure Key Vault or CyberArk in a production environment. NETWRIX recommends completing this guide once, testing the configuration, and only then, switching to a more secure way of storing credentials.
Set exported objects, exported attributes and export files
This step focuses on choosing and setting up the list of SCIM objects and attributes to be exported.
The Filter attribute defines what is exported. It is located in the
appsettings.agent > Connections > SCIMCyberArkExport subsection previously created.
Choose objects to export
The list of objects to export depends on the Role Model requirements. The list will evolve iteratively as the project's needs become clearer.
The SCIM entities available in a CyberArk implementation are:
- Users: CyberArk Users.
- Containers: Containers/CyberArk Safes.
- ContainerPermissions: Permissions on CyberArk Safes.
- Privileged Data: Privileged Data/CyberArk Accounts.
- Groups: CyberArk Groups.
Filters are defined in the next part.
Filtering
An exhaustive list of entities and attributes provided by CyberArk is available in their
technical documentation
or the SCIM Swagger UI.
The Filter and FilterGroup setting syntax is detailed in the
SCIM optional attributes.
SCIMSyntax must also be set to CyberArk because the CyberArk system doesn't strictly follow all
the SCIM rules at the moment.
Example
The following example sets up the Users, ContainerPermissions, Containers and Groups for export.
For Users, we give an example for each type of attribute:
- userName is an attribute of the base schema.
- ldapFullDN is an attribute of the
urn:ietf:params:scim:schemas:cyberark:1.0:Userschema because it is separated by�. - givenName is a sub-attribute of the attribute
namebecause it is separated by:.
Notice the * that separates the entities.
appsettings.agent.json
{
  ...
  "Connections": {
    ...
    "SCIMCyberArkExport": {
      "Server": "https://host:port/CyberArk/scim",
      "Login": "Usercube-user",
      "Password": "Cyberark1",
      "Filter": "Users;urn:ietf:params:scim:schemas:cyberark:1.0:User�ldapFullDN|ldapDirectory id userName active name:givenName|middleName|familyName emails:value phoneNumbers:value title profileUrl source nativeIdentifier*ContainerPermissions;id user:value group:value container:value rights*Containers;id displayName type name",
      "FilterGroup": "Groups;id displayName",
      "SCIMSyntax": "CyberArk"
    }
  }
}
Set up export files
The export generates CSV source files that will be fed to the Synchronization task.
The SCIM connector generates one file per entity, the name is generated as: EntryFile + '_' +
FilterEntity or MembersFile + '_' + FilterGroupEntity.
Moreover, SyncCookiesFile can be specified to indicate the location of the cookie file for an
incremental export.
For more details, see SCIM optional attributes.
The target directory and file name are chosen freely. However, NETWRIX strongly recommends using the
working directoryTemp/ExportOutput
folder and choosing file names that start with the CyberArk_ prefix.
Example
With the following example, the resulting files are:
C:/identitymanagerDemo/Temp/ExportOutput/CyberArk_Users.csvC:/identitymanagerDemo/Temp/ExportOutput/CyberArk_ContainerPermissions.csvC:/identitymanagerDemo/Temp/ExportOutput/CyberArk_Containers.csvC:/identitymanagerDemo/Temp/ExportOutput/CyberArk_members_Groups.csv
appsettings.agent.json
{
  ...
  "Connections": {
    ...
    "SCIMCyberArkExport": {
      "Server": "https://host:port/CyberArk/scim",
      "Login": "Usercube-user",
      "Password": "Cyberark1",
      "Filter": "Users;urn:ietf:params:scim:schemas:cyberark:1.0:User�ldapFullDN|ldapDirectory id userName active name:givenName|middleName|familyName emails:value phoneNumbers:value title profileUrl source nativeIdentifier*ContainerPermissions;id user:value group:value container:value rights*Containers;id displayName type name",
      "FilterGroup": "Groups;id displayName",
      "EntryFile": "C:/identitymanagerDemo/Temp/ExportOutput/CyberArk",
      "MembersFile": "C:/identitymanagerDemo/Temp/ExportOutput/CyberArk_members",
      "SCIMSyntax": "CyberArk"
    }
  }
}
Every file contains the data as CSV, with one column per attribute.
Build the Connector
Declare a connector
To be used for export tasks, a connector must be declared in the applicative configuration and linked to an Agent.
It is strongly recommended that the applicative configuration be stored in the
working directoryConf
folder as a set of xml files organized by connector.
-
In the
Conffolder, create aSCIMCyberArkdirectory. -
In the
SCIMCyberArkdirectory create aCyberArk Connector.xmlfile.This file contains the declaration of the connector and the associated Entity Model.
-
Use the
<Connector>element to declare the connector with the following attributes:- Identifier identifies this connector in the
applicative configuration.
We recommend using a meaningful name such as
CyberArk. If several connections to several CyberArk targets are possible, only one CyberArk Connector per Agent is used. - DisplayName_Li, i ? [1..16] are used in the UI.
- Agent is the identifier of the Agent that will run this connector's export task. The
Agent's identifier can be found in the agent's
appsettings.agent> OpenId > AgentIdentifier.
- Identifier identifies this connector in the
applicative configuration.
We recommend using a meaningful name such as
-
Don't forget the
<?xml>and<ConfigurationFile>elements (see example below).
This example declares the
CyberArkconnector on theLocalagent:Conf/SCIMCyberArk/CyberArk Connector.xml
<?xml version="1.0" encoding="utf-8"?><ConfigurationFile xmlns:xsi="http://www.w3.org/2001/XMLSchema-instance" xmlns:xsd="http://www.w3.org/2001/XMLSchema" xmlns="urn:schemas-usercube-com:configuration"> ...
<Connector Identifier="CyberArk" DisplayName_L1="CyberArk" Agent="Local" /> <Connection Identifier="SCIMCyberArkExport" Connector="CyberArk" DisplayName_L1="CyberArk" Package="Usercube.SCIM.CyberArk@0000001" /> ...
</ConfigurationFile>
Build the entity model
The exported data to be written to the resource repository must be aligned with the Entity Model.
The Entity Model should match as closely as possible the structure of the CyberArk data relevant for Usercube. It is designed by analyzing the CyberArk data structure, and describing said data with Entity Types and Entity Associations. Eventually, it is up to the integration team to design the Entity Model that best serves the Role Model needs. It will most likely be refined iteratively throughout the project integration.
A good starting point for the Entity Model is to mirror the shape of the exported CyberArk SCIM objects. This guide provides a few examples that can serve this purpose. Thus, CyberArk SCIM objects such as Users and Groups can be described by Entity Types, and group membership by Entity Associations.
The Entity Model
for the CyberArk connector is written in the
applicative configuration.
It is strongly recommended to write the entity model to the newly created
Conf/SCIMCyberArk/CyberArk Connector.xml file.
Write entity types
Declaring an
Entity Type is
achieved with the <EntityType> tag and the following attributes:
- Identifier is the entity type's name. It must be unique among the entity types. It is strongly
recommended to prefix this name with the connector's name. An example for CyberArk is
CyberArk_User. - DisplayName_Li, i ? [1..16] are used in the UI to identify this
Entity Type for
the end-user. DisplayName_L1 is the name of the entity type in language number one. If this
language is English, a good example value would be
CyberArk - User.
Example
Conf/SCIMCyberArk/CyberArk Connector.xml
...
<EntityType Identifier="CyberArk_User" DisplayName_L1="CyberArk - User"> ...
</EntityType>...
The CyberArk SCIM objects attributes are modeled by
Entity Properties,
with the <Property> tags declared as children of the <EntityType>.
Remember that there are several kinds of
properties
(determined by the TargetColumnIndex): scalar and navigation.
- Scalar properties can be defined to represent scalar attributes such as
userName,activeorgivenName. - Navigation properties represent associations such as group memberships.
Finally, the main attributes of the <Property> tag are the following:
- Identifier identifies the property with a mandatory unique name. It must be unique among the entity properties for this entity type.
- DisplayName_Li, i ? [1..16] are used in the UI.
- Type defines the type of property. A scalar property type can be:
String,Bytes,Int16,Int32,Int64,DateTime,Bool,Guid,Double,Binary,Byte, orOption. The navigation property type isForeignKey. - TargetColumnIndex defines in which column of the resource table the property is stored. See
more details at
TargetColumnIndex.
Example
This example defines an entity type named CyberArk_User to match the attributes selected for
extraction from CyberArk in the previous example.
Notice the omitted TargetColumnIndex attribute and the presence of Type="ForeignKey" for the
groups and containers properties. If omitted, this attribute indicates that the properties are
navigation properties.
Conf/SCIMCyberArk/CyberArk Connector.xml
...
<EntityType Identifier="CyberArk_User" DisplayName_L1="CyberArk User" DisplayName_L2="Compte CyberArk"> <Property Identifier="CyberArk_id" DisplayName_L1="Id" IsKey="true" TargetColumnIndex="0" Type="String" /> <Property Identifier="userName" DisplayName_L1="User Name" TargetColumnIndex="6" Type="String" /> <Property Identifier="active" DisplayName_L1="Active" TargetColumnIndex="7" Type="String" /> <Property Identifier="givenName" DisplayName_L1="First Name" TargetColumnIndex="8" Type="String" /> <Property Identifier="middleName" DisplayName_L1="Middle Name" TargetColumnIndex="9" Type="String" /> <Property Identifier="familyName" DisplayName_L1="Last Name" TargetColumnIndex="10" Type="String" /> <Property Identifier="emails" DisplayName_L1="Emails" TargetColumnIndex="11" Type="String" /> <Property Identifier="phoneNumbers" DisplayName_L1="Phone Numbers" TargetColumnIndex="12" Type="String" /> <Property Identifier="title" DisplayName_L1="Title" TargetColumnIndex="13" Type="String" /> <Property Identifier="profileUrl" DisplayName_L1="Profile Url" TargetColumnIndex="14" Type="String" /> <Property Identifier="dn" DisplayName_L1="DN" TargetColumnIndex="15" Type="String" /> <Property Identifier="source" DisplayName_L1="Source" TargetColumnIndex="16" Type="String" /> <Property Identifier="ldapFullDN" DisplayName_L1="LdapFullDN" TargetColumnIndex="17" Type="String" /> <Property Identifier="ldapDirectory" DisplayName_L1="LdapDirectory" TargetColumnIndex="18" Type="String" /> <Property Identifier="groups" DisplayName_L1="Groups" Type="ForeignKey" /> <Property Identifier="containers" DisplayName_L1="containers" Type="ForeignKey" /></EntityType>...
Write entity associations
Entity Types are associated through their navigation properties with Entity Association elements.
Example
The following example declares an n-n association between a CyberArk_User and CyberArk_Group.
The groups property of a CyberArk_User is a collection of Group IDs (modeled as an
CyberArk_Group EntityType) of which this CyberArk_User is a member.
The Users property of a CyberArk_Group is a collection of CyberArk_UserIDs which are members
of this Group.
Conf/SCIMCyberArk/CyberArk Connector.xml
...
<EntityAssociation Identifier="CyberArk_Group_Members" DisplayName_L1="Group Members" IsProperty1Collection="true" Property1="CyberArk_Group:Users" IsProperty2Collection="true" Property2="CyberArk_User:groups" />...
The exact nature of the IDs are described by the associated EntityAssociationMapping.
Notice the format of the Property1 and Property2 xml attributes: the name of the entity type
followed by : and the name of an entity property. It is a
binding
that describes in one expression both the target entity type and property.
Create mapping
The entity type must be mapped property by property to the exported attributes of CyberArk SCIM objects (namely, the columns of the CSV source files generated by the export).
The EntityTypeMapping, EntityAssociationMapping, and EntityPropertyMapping elements serve this purpose.
Write the entity type mapping
The EntityTypeMapping element maps scalar properties from the CSV source file to an entity type.
The CSV source file path is written to the ConnectionTable xml attribute. The target entity type name is written to the Identifier xml attribute.
Conf/SCIMCyberArk/CyberArk Connector.xml
...
<EntityTypeMapping Identifier="CyberArk_User" Connector="CyberArk" ConnectionTable="SCIMCyberArkExport_Users" > ...
</EntityTypeMapping>...
To do so, the entity type mapping uses the
EntityPropertyMapping
element with the <Property> tag. This maps the CSV column from ConnectionColumn to the target
EntityType property which is written to the Identifier attribute.
Example
Conf/SCIMCyberArk/CyberArk Connector.xml
...
<EntityTypeMapping Identifier="CyberArk_User" Connector="CyberArk" ConnectionTable="SCIMCyberArkExport_Users" > <Property Identifier="CyberArk_id" ConnectionColumn="id" IsPrimaryKey="true" /> <Property Identifier="userName" ConnectionColumn="userName" /> <Property Identifier="active" ConnectionColumn="active" /> <Property Identifier="givenName" ConnectionColumn="name:givenName" /> <Property Identifier="middleName" ConnectionColumn="name:middleName" /> <Property Identifier="familyName" ConnectionColumn="name:familyName" /> <Property Identifier="emails" ConnectionColumn="emails:value" IsMultiValuedProperty="true" /> <Property Identifier="phoneNumbers" ConnectionColumn="phoneNumbers:value" IsMultiValuedProperty="true" /> <Property Identifier="title" ConnectionColumn="title" /> <Property Identifier="profileUrl" ConnectionColumn="profileUrl" /> <Property Identifier="ldapDirectory" ConnectionColumn="ldapDirectory" /> <Property Identifier="ldapFullDN" ConnectionColumn="ldapFullDN" /> <Property Identifier="source" ConnectionColumn="source" ScimSchema="urn:ietf:params:scim:schemas:pam:1.0:LinkedObject"/> <Property Identifier="dn" ConnectionColumn="nativeIdentifier" ScimSchema="urn:ietf:params:scim:schemas:pam:1.0:LinkedObject" /> </EntityTypeMapping>...
As a result, after synchronization, the UR_Resource table will be updated from the CSV source
files data.
Let's take the example of a new CyberArk_User which has never been synchronized. The UR_Resource
table receives a new line for which the 6th column (userName) is filled in with the userName
column from the C:/identitymanagerDemo/Temp/ExportOutput/CyberArk_Users.csv file.
Write the entity association mapping
The EntityAssociationMapping element maps navigation properties, used in EntityAssociation.
An EntityAssociationMapping element refers to an EntityAssociation written to the Identifier xml attribute. Then, just as the EntityTypeMapping element, it maps columns values from a CSV source file to an EntityType property.
Example
The following example describes the actual user/group associations between CyberArk_User and
CyberArk_Group. These associations are exported from the CyberArk system into the
C:/identitymanagerDemo/Temp/ExportOutput/CyberArk_members_Groups.csv file. Each line of the file
associates a value (property CyberArk_id from CyberArk_Group) and a MemberId (property
CyberArk_id from CyberArk_User).
| value | MemberId |
|---|---|
| 1 | 100 |
| 1 | 101 |
| 2 | 102 |
| 2 | 103 |
| 3 | 104 |
The following
EntityAssociationMapping
describes the mapping for the CyberArk_Group_Members EntityAssociation:
Conf/SCIMCyberArk/CyberArk Connector.xml
...
<EntityAssociation Identifier="CyberArk_Group_Members" DisplayName_L1="Group Members" IsProperty1Collection="true" Property1="CyberArk_Group:Users" IsProperty2Collection="true" Property2="CyberArk_User:groups" /><EntityAssociationMapping Identifier="CyberArk_Group_Members" Column1="value" EntityPropertyMapping1="CyberArk_Group:CyberArk_id" Column2="MemberId" EntityPropertyMapping2="CyberArk_User:CyberArk_id" Connector="CyberArk" ConnectionTable="SCIMCyberArkExport_members_Groups" />...
Here are a few explanations:
Users/CyberArk_Group
The Users property in the CyberArk_Group entity:
- is written to the Property1 attribute of the
CyberArk_Group_MembersEntityAssociation element. - is filled in by values from the
MemberIdcolumn (written to the Column2 attribute of theCyberArk_Group_MembersEntityAssociationMapping element) in theC:/identitymanagerDemo/Temp/ExportOutput/CyberArk_members_Groups.csvfile.
These values identify resources of type CyberArk_User by their CyberArk_id property (written to
the EntityPropertyMapping2 attribute of the
EntityAssociationMapping
element.
Groups/CyberArk_User
The Groups property in the CyberArk_User entity:
- is written to the Property2 attribute of the
CyberArk_Group_MembersEntityAssociation element). - is filled in by values from the value column (written to the Column1 attribute of the
CyberArk_Group_MembersEntityAssociationMapping element) in theC:/identitymanagerDemo/Temp/ExportOutput/CyberArk_members_Groups.csvfile.
These values identify resources of type CyberArk_Group by their CyberArk_id property (written to
the EntityPropertyMapping1 attribute of the
EntityAssociationMapping
element).
Display
This step focuses on configuring a nice display for the synchronized list of resources in the UI.
Navigation
A MenuItem can be added to include a link to the resources list in the left menu in the UI home screen.
Parent menu item
It strongly recommended to gather synchronized resources menu items under parent menu items. This is
usually declared in the configuration root folder Nav.xml file.
Example
Conf/Nav.xml
...
<MenuItem Identifier="Nav_Connectors" DisplayName_L1="Connectors" DisplayName_L2="Connecteurs" ParentMenuItem="Nav" />...
Child menu item
It is strongly recommended to use a new CyberArk Nav.xml file in the SCIMCyberArk connector's
folder in order to add the CyberArk SCIM objects menu item.
Example
Conf/SCIMCyberArk/CyberArk Nav.xml
...
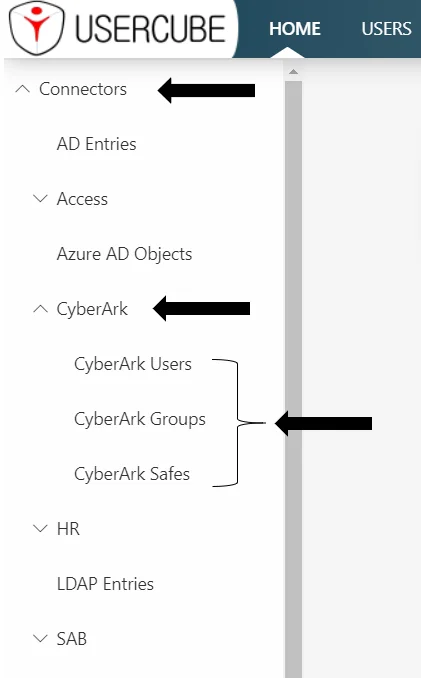
<MenuItem Identifier="Nav_Connectors_CyberArk" DisplayName_L1="CyberArk" DisplayName_L2="CyberArk" ParentMenuItem="Nav_Connectors"> <MenuItem Identifier="Nav_Connectors_CyberArk_User" DisplayName_L1="CyberArk Users" DisplayName_L2="Comptes CyberArk" EntityType="CyberArk_User" /> <MenuItem Identifier="Nav_Connectors_CyberArk_Group" DisplayName_L1="CyberArk Groups" DisplayName_L2="Groupes CyberArk" EntityType="CyberArk_Group" /> <MenuItem Identifier="Nav_Connectors_CyberArk_Container" DisplayName_L1="CyberArk Safes" DisplayName_L2="Safes CyberArk" EntityType="CyberArk_Container" /></MenuItem>...
Adds a new menu item under the Nav_Connectors menu item declared in the root Nav.xml file. This
new menu item gives access to the list of synchronized CyberArk SCIM objects.
Configuration
It is strongly recommended that the display configuration be written to a new CyberArk UI.xml file
in the SCIMCyberArk connector's folder.
Display entity type
The DisplayEntityType describes how a single resource should be displayed.
Example
Conf/SCIMCyberArk/CyberArk UI.xml
...
<DisplayEntityType Identifier="CyberArk_User"> <Property OutputType="BasicCollection" Identifier="groups" /> <Property OutputType="BasicCollection" Identifier="containers" /></DisplayEntityType>...
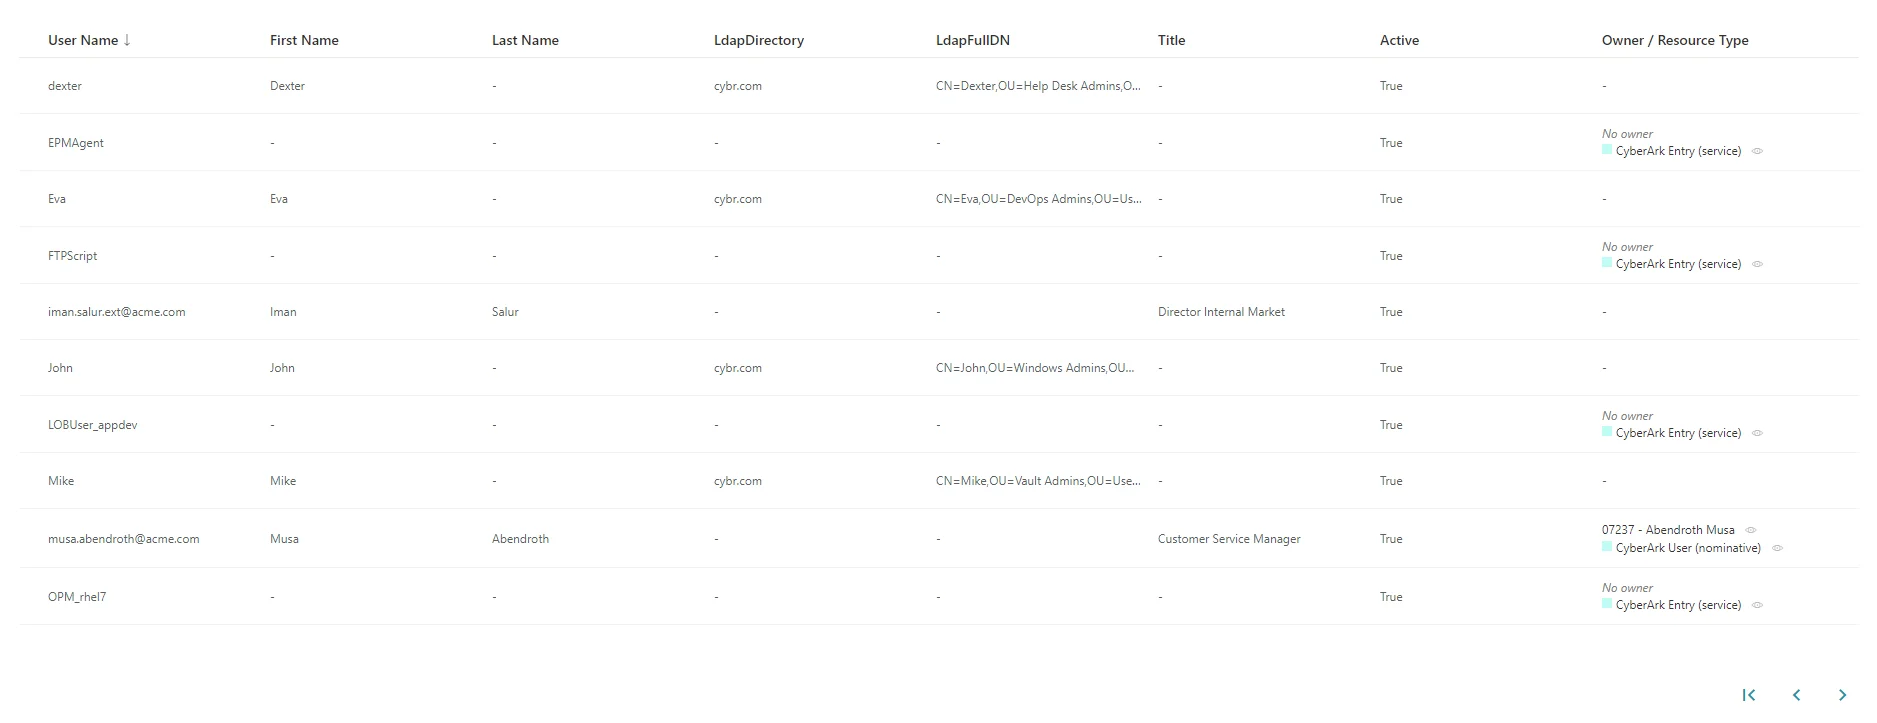
This configuration configures that display for christian.adam@acme.com:
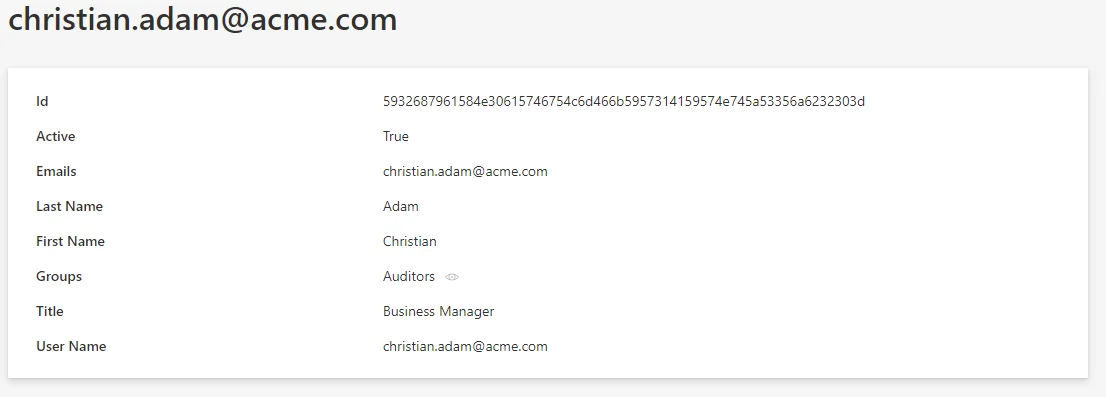
The scalar properties don't need to be configured: they are automatically displayed. The only
information that the
DisplayEntityType
adds here, is that the property BasicCollection is a navigation property. An eye icon will be
displayed to take you directly to the matching page.
Display table
The DisplayTable elements describe how a list of resources should be displayed.
The DisplayTable contains a list of DisplayTableColumn elements that identify which properties should be included in the list display.
Example
Conf/SCIMCyberArk/CyberArk UI.xml
...
<DisplayTable Identifier="CyberArk_User" EntityType="CyberArk_User" DisplayTableDesignElement="resourcetable" IsEntityTypeDefault="true"> <Column DefaultSortPriority="1" DisplayBinding="userName" IsDisplayInSummaryView="true" IsResizable="true" IsSortable="true" CanBeFiltered="true" ColumnSize="2" /> <Column DisplayBinding="givenName" IsDisplayInSummaryView="true" IsResizable="true" IsSortable="true" CanBeFiltered="true" ColumnSize="2" /> <Column DisplayBinding="familyName" IsDisplayInSummaryView="true" IsResizable="true" IsSortable="true" CanBeFiltered="true" ColumnSize="2" /> <Column DisplayBinding="ldapDirectory" IsDisplayInSummaryView="true" IsResizable="true" IsSortable="true" CanBeFiltered="true" ColumnSize="2" /> <Column DisplayBinding="ldapFullDN" IsDisplayInSummaryView="true" IsResizable="true" IsSortable="true" CanBeFiltered="true" ColumnSize="2" /> <Column DisplayBinding="title" IsDisplayInSummaryView="true" IsResizable="true" IsSortable="true" CanBeFiltered="true" ColumnSize="2" /> <Column DisplayBinding="active" IsDisplayInSummaryView="true" IsResizable="true" IsSortable="true" CanBeFiltered="true" ColumnSize="2" /></DisplayTable>...
configures the following list display:
Internal display name
An InternalDisplayName can also be declared as an
EntityPropertyExpression.
The InternalDisplayName is used in several UI screens to identify a resource for the user.
With no custom InternalDisplayName, a default value is used (instead of the first property of the
identity) containing the string "name". If no such property is found, the first declared property
of the entity type is used.
Example
Conf/SCIMCyberArk/CyberArk UI.xml
...
<EntityPropertyExpression Identifier="CyberArk_User_InternalDisplayName" Expression="C#:resource:return resource.userPrincipalName ?? resource.mail ?? resource.displayName ?? resource.Id.ToString();" EntityType="CyberArk_User" Property="InternalDisplayName" />...
adds the InternalDisplayName to the CyberArk_User entity type to be used by the UI.
Permissions
This step focuses on setting up permissions for Usercube's end-users granting them access to the connector.
The AccessControlRule and AccessControlEntry elements define permissions for end-user profiles to read and write the connector's data (such as resources of a given entity type). It used by the UI when displaying data such as resources and available roles.
It is strongly recommended that permissions be written to a new file. For example, the administrator
profile permissions can be written to the CyberArk Profile Administrator.xml file.
Example
The following example sets permissions for the Administrator profile.
It entitles an administrator to display CyberArk SCIM resource and role categories from the UI.
Conf/MicrosoftEntraID/MicrosoftEntraID Profile Administrator.xml
...
<AccessControlRule Profile="Administrator" EntityType="ResourceType" Identifier="Administrator_ResourceTypeSelector_resourceType_CyberArk" DisplayName_L1="Administrator_ResourceTypeSelector_resourceType_CyberArk"> <Entry Permission="/Custom/Resources/CyberArk_User/View" CanExecute="true" /> <Entry Permission="/Custom/Resources/CyberArk_Group/View" CanExecute="true" /> <Entry Permission="/Custom/Resources/CyberArk_Container/View" CanExecute="true" /></AccessControlRule><AccessControlRule Profile="Administrator" EntityType="Category" Identifier="Administrator_ResourceTypeSelector_category_CyberArk" DisplayName_L1="Administrator_ResourceTypeSelector_category_CyberArk"> <Entry Permission="/Custom/Resources/CyberArk_User/View" CanExecute="true" /> <Entry Permission="/Custom/Resources/CyberArk_Group/View" CanExecute="true" /> <Entry Permission="/Custom/Resources/CyberArk_Container/View" CanExecute="true" /></AccessControlRule>...
Jobs
Construction
This step focuses on writing a Complete Synchronization job.
It is strongly recommended to write Jobs associated with the CyberArk connector to the
Conf/SCIMCyberArk/SCIM CyberArk Jobs.xml file.
Components
All the job steps can be found in the
CreateConnectorSynchroComplete scaffolding.
Example
Conf/SCIMCyberArk/SCIM CyberArk Jobs.xml
...
<CreateConnectorSynchroComplete Connector="CyberArk" DisplayName_L1="01: CyberArk - Synchronization Complete (scaffolding)" JobIdentifier="CyberArk_Synchronize_Complete_Scaffolding"> <OpenIdIdentifier Identifier="Job"/></CreateConnectorSynchroComplete>...
This job will be executed on CyberArk's connector agent.
Notice the Identifier attribute with the value Job in the OpenIdIdentifier tag. It refers to
the ClientId written to the
appsettings.agent
technical configuration. The Tasks will authenticate with the profile associated with this
ClientId in the <OpenIdClient> xml configuration element.
Incremental synchronization can be configured with the following scaffolding.
Permissions
The execution of a Job entails execution of Tasks, reading/writing to the Database and sending files over to the Server. These operations are protected by an authorization mechanism.
To complete a Job, the Agent, via the Usercube-Invoke-Job tool, uses:
- a
Profile
associated with the Job itself to read/write:
UJ_JobsandUJ_Taskstables in a list of tasksUJ_JobInstancestables in the progress report
- a Profile for each Task, to read/write
UJ_TaskInstancestables (Progress Report) and perform other operations such as sending export files over to the Server.
Each Profile must be assigned the right permissions for the associated Job or Task to perform.
Every request from Agent to Server within the execution of a Job needs to be authenticated with an Open Id Connect ClientId/Secret pair, linked to a Profile.
Create a profile
Here, we focus on creating one profile, used by the Job and every Task of the Job.
Conf/Profile AgentJob.xml
...
<Profile Identifier="AgentSynchro" DisplayName_L1="Agent Synchro" />...
As the Principle of Least Privilege states, NETWRIX strongly recommends that you create a Profile to be used during the Synchronization jobs which will be different from the one used during the Provisioning job. This contributes to separating access rights. The same principle applied even more rigorously would make Usercube create one profile per Task. It isn't necessary as most Synchronization tasks require the same permissions.
Grant synchronization access rights to the profile
For an Agent to launch server-side Tasks from the Job via the Usercube-Invoke-Job tool, the profile linked to these tasks and used by the tool should be authorized to execute said tasks.
Server-side Tasks for a simple Synchronization job usually are:
- Prepare-Synchronization
- Synchronization
Required permissions are:
View Tasks
/Jobs/Task/Query
Progress Report
/Jobs/JobInstance/Query/Jobs/JobInstance/Update/Jobs/TaskInstance/Query/Jobs/TaskInstance/update
Synchronization and Prepare-Synchronization
/Connectors/Connector/Query/Connectors/SynchronizeSession
Granting access can be done via the Synchronization AccessControlRules scaffolding and the JobViewAccessControlRules scaffolding.
The following examples (or similar) should be written to Conf/Profile AgentSychro.xml.
This example entitles the administrator profile to run any synchronization job:
Conf/Profile AgentSychro.xml
...
<SynchronizationAccessControlRules Profile="AgentSynchro"/><JobViewAccessControlRules Profile="AgentSynchro"/>...
Grant end-users permissions to run jobs from the UI
In addition, for end-users to be able to launch a job from the UI, they must be assigned a profile with the following access rights:
/Jobs/RunJob/Launch
This can be done via the JobExecutionAccessControlRules scaffolding.
Example
Conf/Profile AgentSychro.xml
...
<JobExecutionAccessControlRules Profile="AgentProfileForSynchro"/>...
Declare usable ClientId/Secret pairs in the configuration
An Agent's
Profile
is associated with a ClientId/Secret pair used by the Agent to authenticate to the Server.
Usable ClientId/Secret pairs are written to the database from the xml configuration using the
<OpenIdClient> xml element.
It is strongly recommended that you write the <OpenIdClient> xml element to a new or existing
OpenIdClients.xml file in the configuration root folder.
The ClientId/Secret pair hence created must be associated with the profile created or updated in
the previous step, via the Profile attribute.
Example
The following example creates a ClientId/Secret pair to be used by the Agent to authenticate to
the Server and complete Jobs. The secret is hashed with the
Usercube-New-OpenIDSecret
tool.
Conf/OpenIdClients.xml
...
<OpenIdClient Identifier="Job" HashedSecret="K7gNU3sdo+Op8wNhqoVWhr5v6s1xYv72ol/pe/Unols=" DisplayName_L1="ClientId for Jobs" DisplayName_L2="ClientId pour les jobs" Profile="Administrator" />
...
Set up the Agent to use ClientId/Secret pairs
The ClientId/Secret pairs that the Agent may use are written to the Agent's
appsettings.agent
technical configuration set.
The ClientId of such ClientId/Secret pairs can then be used as a value in a Task
OpenIdClient attribute.
Pairs written in the OpenIdClient section may be used by Tasks.
The Job itself uses the DefaultOpenIdClient value.
This example sets the "Job/secret" pair to be used by tasks and jobs:
appsettings.agent.json
{
...
"OpenId":{
"OpenIdClients": {
"Job": "secret"
},
"DefaultOpenIdClient": "Job"
}
}
Job launch
Scheduling the job execution can rely either on Usercube's scheduler or an external scheduler.
With Usercube's scheduler
Use the Job
CronTabExpression
attribute.
This example uses Usercube's scheduler to execute the
CyberArk_Synchronize_Complete_Manuallyjob every fifteen minutes:Conf/SCIMCyberArk/SCIM CyberArk Jobs.xml
<Job Identifier="CyberArk_Synchronize_Complete_Manually" CronTabExpression="*/15 * * * *" DisplayName_L1="01: CyberArk - Synchronization Complete (manually)" DisplayName_L2="00: CyberArk - Synchronisation Complete (manuelle)" Agent="Local"> ...
</Job>
For more details about checking Crontab expressions, see the crontab.guru website.
With an external scheduler
An external scheduler would rely on the Usercube-Invoke-Job tool.
Example
The following command can be scheduled. It executes the CyberArk_Synchronize_Complete_Manually
using the "Job/secret" authentication pair to connect to the Usercube Server at
http://identitymanager.contoso.com.
./identitymanager-Invoke-Job.exe -j "CyberArk_Synchronize_Complete_Manually" --api-secret secret --api-client-id Job --api-url "http://identitymanager.contoso.com"
Validation
Deploy configuration
The configuration is written to the database using the Deploy Configuration tool.
Test
The Synchronization job should be found in the UI, under the Job Execution menu, with the name input in the Job's DisplayName_Li attribute.
From there, it can be launched and debugged (if needed).
After execution, CyberArk SCIM Objects resources should be in the UR_Resources table of the SQL
Server database.
Provision Salesforce Users' Profiles via SCIM
This guide shows how to provision a user's account profile in a Salesforce system with the SCIM connector.
Prerequisites
This guide supposes that you already have a working synchronization for Salesforce users' accounts, entitlements and links between accounts and entitlements.
Context
In Salesforce, both profiles and permission sets are in the Entitlements entity, whereas they
are not managed the same way: a user account must have a profile and only one, while it can have
zero to several permission sets.
This implies a difference of treatment based on the entitlement's type.
Configuration
In order to handle this special case, Usercube expects, for now, a very precise configuration. A generic configuration element will come soon to be able to customize and apply this special treatment in other cases.
For now, for your EntityType representing Salesforce's Entitlements entity type, you need to
have an entity property with exactly type as identifier:
<Property Identifier="type" DisplayName_L1="Type" TargetColumnIndex="13" Type="String" />
And to map it in the Entitlements entity type mapping:
<Property Identifier="type" ConnectionColumn="type" />
That is all you need to do. With the next synchronization, all the entitlements will have their
type and then the special treatment can be done for those with the Profile type when
provisioning users' entitlements.
Set up SharePoint's Export and Synchronization
This guide shows how to set up a SharePoint connector to extract data from your SharePoint instance into CSV source files that will be fed to the Synchronization task and to your Usercube resource repository. It will focus on registering Usercube within the target SharePoint, configuring the connector, and building the job to perform a regularly scheduled synchronization.
Prerequisites
External system configuration
This step is designed to grant Usercube a service account to authenticate with the target SharePoint sites. It includes the following substeps:
- Create a service account for Usercube in your Microsoft Entra ID (formerly Microsoft Azure AD).
- Go the SharePoint sites which need to be scanned.
- Log in using the organization credentials.
- Go to the Members List in the right corner.
- Click on the Add members button.
- Enter the name of the Usercube service account or its email address.
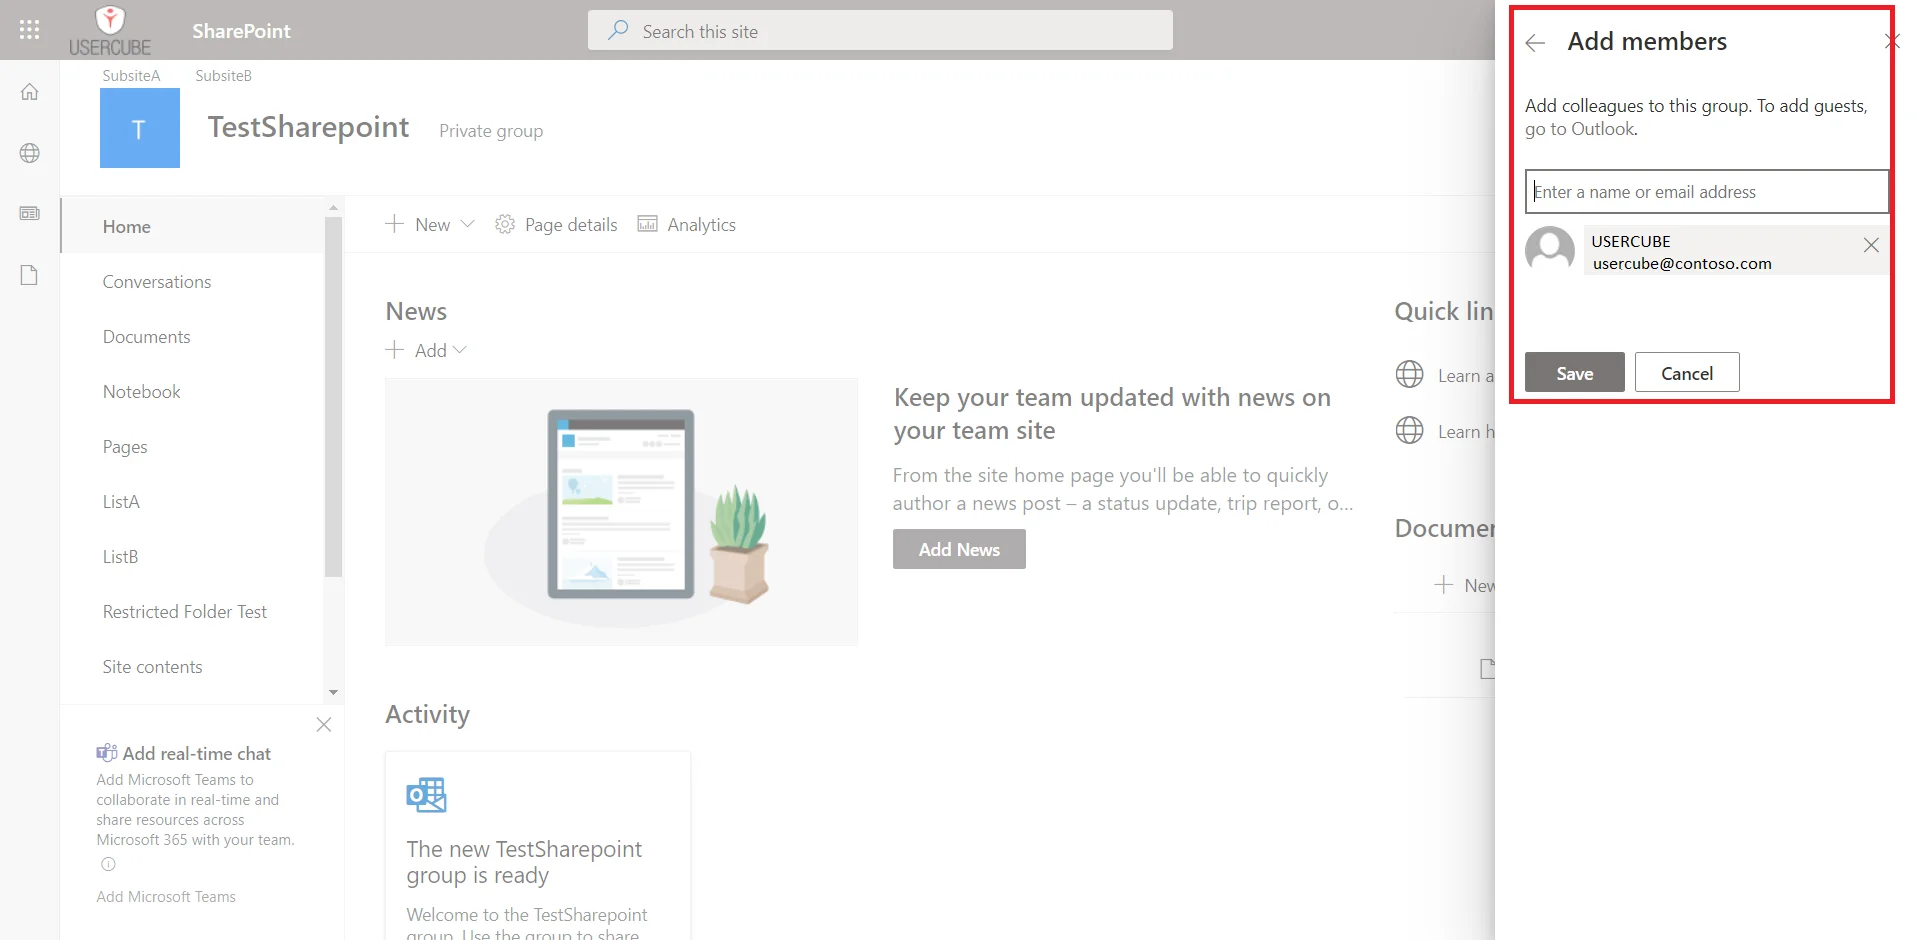
The service account is now a member of the site. However, to scan the site, the service account needs to be owner of the site.
- Go to the Members List in the right corner.
- Under the name of the Usercube service account, click on the arrow.
- Choose Owner.
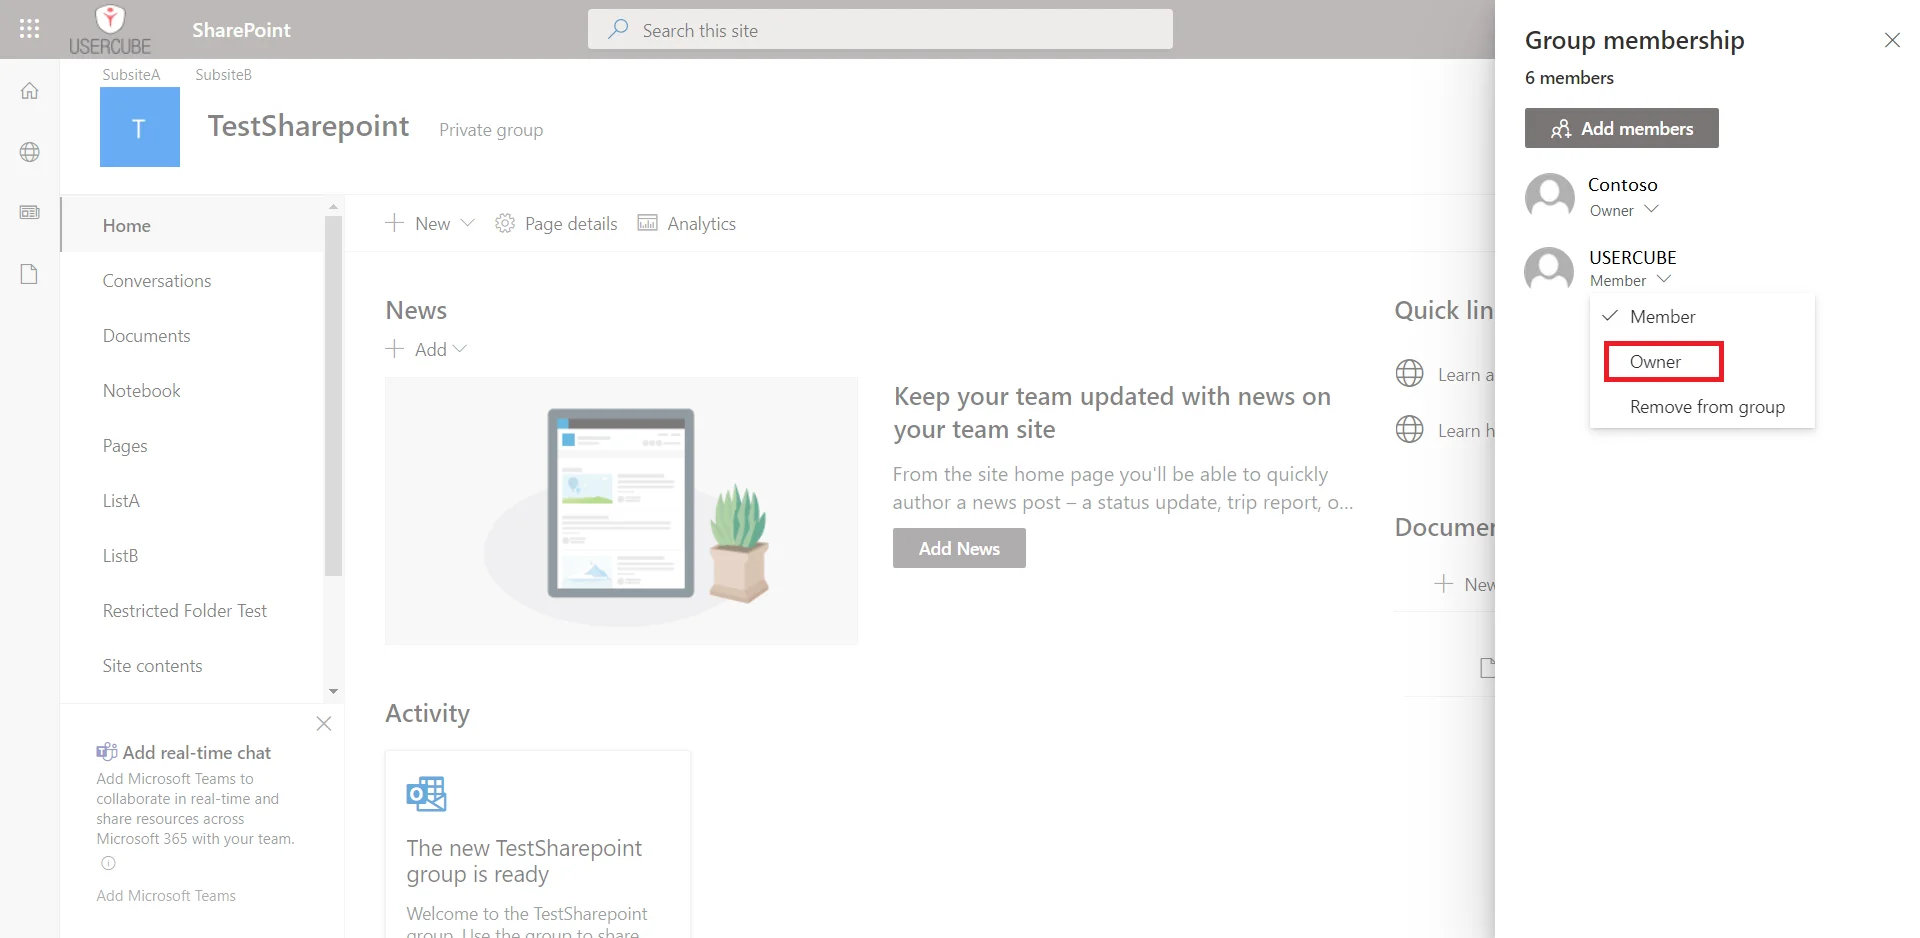
Usercube configuration
This step sets up the Usercube Agent in order to use the SharePoint connector and access the SharePoint data.
This guide focuses on the Configuration Files method. Remember that settings can also be input through Environment Variables.
Connect to the SharePoint instance
In this Connections section, add one new subsection that will contain the credentials for the
target SharePoint.
This example connects via the
SharePointExportContosoconnection to the Contoso SharePoint site:
appsettings.agent.json

{ ... "Connections": { ... "SharePointExportContoso": { ... } } }
Input credentials
In the newly created subsection, fill in:
- The Server attribute with the address of the root SharePoint site to scan.
- The Login attribute with the login of the service account created.
- The Password attribute with the password of the service account created.
For example:
appsettings.agent.json

{ ... "Connections": { ... "SharePointExportContoso": { "Server":
"https://contoso.sharepoint.com/", "Login": "usercube.service@contoso.com", "Password":
"19f23f48379d50a9a50b8c" } } }
For pedagogical reasons, this guide focuses on the simplest way to set up the export, but it's not the most secure. Hence it is strongly recommended that you protect credentials using Azure Key Vault or Cyber Ark in a production environment. NETWRIX recommends completing this guide once, testing the configuration, and only then, switching to a more secure way of storing credentials.
Set up export files
The export generates CSV source files that will be fed to the Synchronization task.
The target path for these files can be set up using the following settings:
appsetings.agent > Connections > SharePointExportContoso > OutputDirappsetings.agent > Connections > SharePointExportContoso > FileNamePrefix
Example
    appsettings.agent.json

{ ... "Connections": { ... "SharePointExportContoso": { "Server": "https://contoso.sharepoint.com/",
"Login": "usercube.service@contoso.com", "Password": "19f23f48379d50a9a50b8c" } } }
SharePoint sites
Different kinds of SharePoint sites exist. We will describe here the different cases that the integration team might encounter and how to handle them.
Root site with subsites
A root site has a URL like https://contoso.sharepoint.com and can have subsites. For example, the subsite Finance has a URL like https://contoso.sharepoint.com/Finance. Subsites can also have subsites.
To scan the root site and the subsite tree, the root site must be specified in the Server attribute.
Retrieved users can be assigned to/removed from all groups found, but cannot be created. To create a user account, you need to create it in the associated Microsoft Entra ID: it will automatically create a SharePoint user account.
Multiple sites
A SharePoint can also have other sites which are not subsites of the root site. For example, the site ProjectTeam has a URL like https://contoso.sharepoint.com/sites/ProjectTeam.
These sites can't be scanned from the root site by using the Server attribute.
To scan these sites, you have to export their URL from SharePoint in a CSV file and use the CsvUrls attribute in the settings.
Example
    appsettings.agent.json
{
...
"Connections": {
...
"SharePointExportContoso": {
"Server": "https://contoso.sharepoint.com/",
"Login": "usercube.service@contoso.com",
"Password": "19f23f48379d50a9a50b8c"
"CsvUrls": "C:/identitymanager/Temp/ExportOutput/SP_otherSites.csv�URL�,"
}
}
}
In this example, C:/identitymanager/Temp/ExportOutput/SP_otherSites.csv is the path of the exported CSV
file, URL is the column name of the URLs, and , is the separator used in the file. The character
� is used to separate the three data items.
The CSV file containing the URLS can be generated with two methods:
- Go to
https://contoso-admin.sharepoint.comof your SharePoint site, in the menu Sites > Active sites and click on the Export button above the table. - Use a script with the SharePointOnlinePowerShell commands, specifically Get-SPOSite.
These sites are not synchronized with the root site. Users present in a site are not necessarily present in the others. You can only assign users to a SharePoint group, on condition that they are already members of this site. You can't use the SharePoint connector to make a user a member of this kind of site. Depending on the system you are working on, you could achieve this by using the associated Microsoft Entra ID or the system generating these SharePoint sites (for example, Microsoft Teams can create an associated SharePoint site for each Teams Group).
Build the Connector
Declare a connector
To be used for export and fulfill tasks, a connector has to be declared in the applicative configuration and linked to an Agent.
It is strongly recommended that the applicative configuration be stored in the
working directoryConf
folder as a set of xml files organized by connector.
-
In the
Conffolder, create aSharePointdirectory. -
In the
SharePointdirectory, create aSharePoint Connector.xmlfile.This file should contain the declaration of the connector and the associated Entity Model.
-
Use the
<Connector>element to declare the connector with the following attributes:- Identifier identifies this connector in the
applicative configuration.
It is strongly recommended to use a meaningful name such as
SharePoint. If several connections to several SharePoint targets are possible, only one SharePoint Connector per Agent is used. - DisplayName_Li, i ? [1..16] are used in the UI.
- Agent is the identifier of the Agent that runs this connector's export task. The Agent's
identifier can be found in the agent's
appsettings.agentconfiguration set > OpenId > AgentIdentifier setting attribute.
- Identifier identifies this connector in the
applicative configuration.
It is strongly recommended to use a meaningful name such as
-
Don't forget the
<?xml>and<ConfigurationFile>elements (see example below).
This example declares the
SharePointconnector on theLocalagent:
Conf/SharePoint/SharePoint Connector.xml

<?xml version="1.0" encoding="utf-8"?><ConfigurationFile xmlns:xsi="http://www.w3.org/2001/XMLSchema-instance" xmlns:xsd="http://www.w3.org/2001/XMLSchema" xmlns="urn:schemas-usercube-com:configuration"> ...

<Connector Identifier="SharePoint" DisplayName_L1="SharePoint" Agent="Local"/> <Connection Identifier="SharePointExportContoso" Connector="SharePoint" DisplayName_L1="SharePoint" Package="Usercube.SharePoint@0000001" /> ...

</ConfigurationFile>
Build the entity model
The exported data to be written to the resource repository must be aligned with the Entity Model.
The Entity Model should match as closely as possible the structure of the SharePoint data relevant for Usercube. It is designed by analyzing the SharePoint data structure, and describing said data with Entity Types and Entity Associations.
Eventually, it is up to the integration team to design the Entity Model that best serves the Role Model needs. It will be refined iteratively throughout the project phase.
A good starting point for the Entity Model is to mirror the shape of the exported SharePoint objects. This guide provides a few examples that can serve this purpose.
Write the entity model
The Entity Model
for the SharePoint connector is written in the
applicative configuration.
It is strongly recommended to write the connector to the newly created
Conf/SharePoint/SharePoint Connector.xml file.
Write entity types
Declaring an
Entity Type is
achieved with the <EntityType> tag and the following attributes:
- Identifier is the entity type's name. It must be unique among the entity types. It is strongly
recommended to prefix this name with the connector's name. An example for SharePoint is
SharePoint_directoryObject. - DisplayName_Li, i ? [1..16] are used in the UI to identify this
Entity Type for
the end-user. DisplayName_L1 is the name of the entity type in language number one. If this
language is English, a good example of value is
SharePoint - Object.
Example
    Conf/SharePoint/SharePoint Connector.xml

... <EntityType Identifier="SharePoint_Entity" DisplayName_L1="SharePoint_Entity"></EntityType>...
The SharePoint object attributes are modeled by Entity Properties, with the <Property> tags declared as children of the <EntityType>.
Remember that there are several kinds of properties: scalar and navigation. Scalar properties can be defined to represent scalar attributes such as city, country or companyName. Navigation Properties represent associations such as group memberships.
The main attributes of the <Property> tag are the following:
- Identifier identifies the property with a mandatory unique name. It must be unique among the entity properties for this entity type.
- DisplayName_Li, i ? [1..16] are used in the UI.
- Type defines the type of the property. A Scalar property type is chosen among
String,Bytes,Int16,Int32,Int64,DateTime,Bool,Guid,Double,Binary,Byte, andOption. The navigation property type isForeignKey. - TargetColumnIndex defines in which column of the resource table the property is stored. See more details about
TargetColumnIndex.
Example
    Conf/SharePoint/SharePoint Connector.xml
...
<EntityType Identifier="SharePoint_Entity" DisplayName_L1="SharePoint - Entity"> <Property Identifier="Collection" DisplayName_L1="Collection" TargetColumnIndex="9" Type="String" /> <Property Identifier="EntityId" DisplayName_L1="Id" IsKey="true" TargetColumnIndex="0" Type="String" /> <Property Identifier="SharePointId" DisplayName_L1="SharePointId" TargetColumnIndex="10" Type="Int64" /> <Property Identifier="Name" DisplayName_L1="Name" TargetColumnIndex="1" Type="String" /> <Property Identifier="Description" DisplayName_L1="Description" TargetColumnIndex="8" Type="String" /> <Property Identifier="PrincipalType" DisplayName_L1="PrincipalType" TargetColumnIndex="2" Type="String" /> <Property Identifier="Email" DisplayName_L1="Email" TargetColumnIndex="7" Type="String" /> <Property Identifier="IsEmailAuthenticationGuestUser" DisplayName_L1="IsEmailAuthenticationGuestUser" TargetColumnIndex="3" Type="String" /> <Property Identifier="IsSiteAdmin" DisplayName_L1="IsSiteAdmin" TargetColumnIndex="4" Type="String" /> <Property Identifier="IsShareByEmailGuestUser" DisplayName_L1="IsShareByEmailGuestUser" TargetColumnIndex="5" Type="String" /> <Property Identifier="Member" DisplayName_L1="Group Members" Type="ForeignKey" /> <Property Identifier="Group" DisplayName_L1="Groups" Type="ForeignKey" /> <Property Identifier="RoleAssignment" DisplayName_L1="Role Assignement" Type="ForeignKey" /> </EntityType> <EntityType Identifier="SharePoint_Role" DisplayName_L1="SharePoint - Role"> <Property Identifier="Collection" DisplayName_L1="Collection" TargetColumnIndex="3" Type="String" /> <Property Identifier="RoleId" DisplayName_L1="Id" IsKey="true" TargetColumnIndex="5" Type="String" /> <Property Identifier="Name" DisplayName_L1="Name" TargetColumnIndex="4" Type="String" /> <Property Identifier="Description" DisplayName_L1="Description" TargetColumnIndex="1" Type="String" /> <Property Identifier="Permissions" DisplayName_L1="Permissions list" TargetColumnIndex="2" Type="String" /> <Property Identifier="RoleAssignment" DisplayName_L1="Role Assignement" Type="ForeignKey" /> </EntityType> <EntityType Identifier="SharePoint_Object" DisplayName_L1="SharePoint - Securable Object"> <Property Identifier="Key" DisplayName_L1="Key" IsKey="true" TargetColumnIndex="1" Type="String" /> <Property Identifier="Collection" DisplayName_L1="Collection" TargetColumnIndex="3" Type="String" /> <Property Identifier="Level" DisplayName_L1="Level" TargetColumnIndex="4" Type="String" /> <Property Identifier="Label" DisplayName_L1="Label" TargetColumnIndex="2" Type="String" /> <Property Identifier="ParentKey" DisplayName_L1="Parent" TargetColumnIndex="129" Type="ForeignKey" /> <Property Identifier="Objects" DisplayName_L1="Children" Type="ForeignKey" /> <Property Identifier="ScanStatus" DisplayName_L1="ScanStatus" TargetColumnIndex="5" Type="String" /> <Property Identifier="HasUniqueRoleAssignments" DisplayName_L1="HasUniqueRoleAssignments" TargetColumnIndex="6" Type="String" /> <Property Identifier="RoleAssignment" DisplayName_L1="Role Assignement" Type="ForeignKey" /> <Property Identifier="Inheritance" DisplayName_L1="Inherits entitlements from" Type="ForeignKey" TargetColumnIndex="128" /> <Property Identifier="GiveRights" DisplayName_L1="Gives entitlements to" Type="ForeignKey" /> </EntityType> <EntityType Identifier="SharePoint_RoleAssignment" DisplayName_L1="SharePoint - Role Assignement"> <Property Identifier="Collection" DisplayName_L1="Collection" TargetColumnIndex="3" Type="String" /> <Property Identifier="Key" DisplayName_L1="Key" IsKey="true" TargetColumnIndex="5" Type="String" /> <Property Identifier="Entity" DisplayName_L1="Entity" Type="ForeignKey" TargetColumnIndex="128" /> <Property Identifier="Role" DisplayName_L1="Role" Type="ForeignKey" TargetColumnIndex="129" /> <Property Identifier="Object" DisplayName_L1="Object" Type="ForeignKey" TargetColumnIndex="130" /> </EntityType> ...
In this example, we have created four entity types, each one corresponding to a notion in SharePoint.
Write entity associations
Entity Types are associated through their navigation properties with Entity Association elements.
Example
    Conf/SharePoint/SharePoint Connector.xml

...
<EntityAssociation Identifier="SharePoint_Object_Parent" DisplayName_L1="Parent object" IsProperty1Collection="true" Property1="SharePoint_Object:Objects" Property2="SharePoint_Object:ParentKey" />
<EntityAssociation Identifier="SharePoint_Group_Entity_Id" DisplayName_L1="Entity_Id" IsProperty1Collection="true" IsProperty2Collection="true" Property1="SharePoint_Entity:Member" Property2="SharePoint_Entity:Group" />
<EntityAssociation Identifier="SharePoint_Inheritance_Object" DisplayName_L1="Inheritance_Object" IsProperty1Collection="true" IsProperty2Collection="false" Property1="SharePoint_Object:GiveRights" Property2="SharePoint_Object:Inheritance" />
<EntityAssociation Identifier="SharePoint_Entity_RoleAssignment" DisplayName_L1="SharePoint_RoleAssignment" IsProperty1Collection="false" IsProperty2Collection="true" Property1="SharePoint_RoleAssignment:Entity" Property2="SharePoint_Entity:RoleAssignment"/>
<EntityAssociation Identifier="SharePoint_Role_RoleAssignment" DisplayName_L1="SharePoint_RoleAssignment" IsProperty1Collection="false" IsProperty2Collection="true" Property1="SharePoint_RoleAssignment:Role" Property2="SharePoint_Role:RoleAssignment" />
<EntityAssociation Identifier="SharePoint_Object_RoleAssignment" DisplayName_L1="SharePoint_RoleAssignment" IsProperty1Collection="false" IsProperty2Collection="true" Property1="SharePoint_RoleAssignment:Object" Property2="SharePoint_Object:RoleAssignment" />
...
The exact nature of the IDs are described by the associated EntityAssociationMapping.
Notice the format of the Property1 and Property2 xml attributes: the name of the entity type is followed by : and the name of an entity property. It is a binding describing in one expression, the target entity type and property.
Create mapping
The entity type must be mapped property by property to the exported attributes of SharePoint objects (namely, the columns of the CSV source files generated by the export).
The EntityTypeMapping, EntityAssociationMapping, and EntityPropertyMapping elements serve this purpose.
Entity type mapping
The EntityTypeMapping element maps the scalar properties from the CSV source file to an entity type.
The CSV source file path is written to the ConnectionTable xml attribute. The target entity type name is written to the Identifier xml attribute.
    Conf/SharePoint/SharePoint Connector.xml
...
<EntityTypeMapping Identifier="SharePointObject" Connector="SharePoint" ConnectionTable="SharePointExportContoso_Entity"> ...
</EntityTypeMapping> ...
To do so, the entity type mapping element uses the
EntityPropertyMapping
element with the <Property> tag. This maps the CSV column from ConnectionColumn to the target
EntityType property which is written to the Identifier attribute.
Example
    Conf/SharePoint/SharePoint Connector.xml

...
<EntityTypeMapping Identifier="SharePoint_Entity" Connector="SharePoint" ConnectionTable="SharePointExportContoso_Entity">
<Property Identifier="Collection" ConnectionColumn="Collection" />
<Property Identifier="EntityId" ConnectionColumn="Id" IsPrimaryKey="true" />
<Property Identifier="SharePointId" ConnectionColumn="SharePointId" />
<Property Identifier="Name" ConnectionColumn="Name" />
<Property Identifier="Description" ConnectionColumn="Description" />
<Property Identifier="PrincipalType" ConnectionColumn="PrincipalType" />
<Property Identifier="Email" ConnectionColumn="Email" />
<Property Identifier="IsEmailAuthenticationGuestUser" ConnectionColumn="IsEmailAuthenticationGuestUser" />
<Property Identifier="IsSiteAdmin" ConnectionColumn="IsSiteAdmin" />
<Property Identifier="IsShareByEmailGuestUser" ConnectionColumn="IsShareByEmailGuestUser" />
</EntityTypeMapping>
<EntityTypeMapping Identifier="SharePoint_Role" Connector="SharePoint" ConnectionTable="SharePointExportContoso_Role" >
<Property Identifier="Collection" ConnectionColumn="Collection" />
<Property Identifier="RoleId" ConnectionColumn="Id" IsPrimaryKey="true" />
<Property Identifier="Name" ConnectionColumn="Name" />
<Property Identifier="Description" ConnectionColumn="Description" />
<Property Identifier="Permissions" ConnectionColumn="Permissions" IsMultiValuedProperty="true"/>
</EntityTypeMapping>
<EntityTypeMapping Identifier="SharePoint_Object" Connector="SharePoint" ConnectionTable="SharePointExportContoso_SecurableObject" >
<Property Identifier="Key" ConnectionColumn="Key" IsPrimaryKey="true"/>
<Property Identifier="Collection" ConnectionColumn="Collection" />
<Property Identifier="Level" ConnectionColumn="Level" />
<Property Identifier="Label" ConnectionColumn="Label" />
<Property Identifier="ScanStatus" ConnectionColumn="ScanStatus" />
<Property Identifier="HasUniqueRoleAssignments" ConnectionColumn="HasUniqueRoleAssignments" />
</EntityTypeMapping>
<EntityTypeMapping Identifier="SharePoint_RoleAssignment" Connector="SharePoint" ConnectionTable="SharePointExportContoso_RoleAssignment" >
<Property Identifier="Key" ConnectionColumn="Key" IsPrimaryKey="true"/>
<Property Identifier="Collection" ConnectionColumn="Collection" /> </EntityTypeMapping> ...
As a result, after synchronization, the UR_Resource table will be updated from the CSV source file data.
Entity association mapping
The EntityAssociationMapping element maps the navigation properties used in EntityAssociation.
An EntityAssociationMapping element refers to an EntityAssociation written to the Identifier xml attribute. Then, like EntityTypeMapping, it maps column values from a CSV source file to an EntityType property.
Example
    Conf/SharePoint/SharePoint Connector.xml
...
<EntityAssociationMapping Identifier="SharePoint_Object_Parent" Column1="ParentKey" Column2="Key" Connector="SharePoint" ConnectionTable="SharePointExportContoso_SecurableObject" EntityPropertyMapping1="SharePoint_Object:Key" EntityPropertyMapping2="SharePoint_Object:Key" /> <EntityAssociationMapping Identifier="SharePoint_Group_Entity_Id" Column1="Group_Id" Column2="Entity_Id" Connector="SharePoint" ConnectionTable="SharePointExportContoso_GroupMember" EntityPropertyMapping1="SharePoint_Entity:EntityId" EntityPropertyMapping2="SharePoint_Entity:EntityId" /> <EntityAssociationMapping Identifier="SharePoint_Inheritance_Object" Column1="Inheritance_Key" Column2="SecurableObject_Key" Connector="SharePoint" ConnectionTable="SharePointExportContoso_SecurableObjectRightInheritance" EntityPropertyMapping1="SharePoint_Object:Key" EntityPropertyMapping2="SharePoint_Object:Key" /> <EntityAssociationMapping Identifier="SharePoint_Entity_RoleAssignment" Column1="Key" Column2="Entity_Id" Connector="SharePoint" ConnectionTable="SharePointExportContoso_RoleAssignment" EntityPropertyMapping1="SharePoint_RoleAssignment:Key" EntityPropertyMapping2="SharePoint_Entity:EntityId" /> <EntityAssociationMapping Identifier="SharePoint_Role_RoleAssignment" Column1="Key" Column2="Role_Id" Connector="SharePoint" ConnectionTable="SharePointExportContoso_RoleAssignment" EntityPropertyMapping1="SharePoint_RoleAssignment:Key" EntityPropertyMapping2="SharePoint_Role:RoleId" /> <EntityAssociationMapping Identifier="SharePoint_Object_RoleAssignment" Column1="Key" Column2="SecurableObject_Key" Connector="SharePoint" ConnectionTable="SharePointExportContoso_RoleAssignment" EntityPropertyMapping1="SharePoint_RoleAssignment:Key" EntityPropertyMapping2="SharePoint_Object:Key" /> ...
Display
This step focuses on configuring a nice display for the synchronized list of resources in the UI.
Nav
A MenuItem can be added to include a link to the resources list in the left menu on the UI home screen.
Parent menu item
It is strongly recommended that you gather synchronized resources menu items under parent menu
items. This is usually declared in the Nav.xml file in the configuration root folder.
Example
    Conf/Nav.xml

...

<MenuItem Identifier="Nav_Connectors" DisplayName_L1="Connectors" DisplayName_L2="Connecteurs" ParentMenuItem="Nav" />...
Child menu item
It is strongly recommended to use a new SharePoint Nav.xml file in the SharePoint connector's folder to add the SharePoint objects menu item.
Example
    Conf/SharePoint/SharePoint Nav.xml
...
<MenuItem Identifier="Nav_Connectors_SharePoint_Entity" DisplayName_L1="SharePoint Entities" DisplayName_L2="Entit�s Sharepoint" EntityType="SharePoint_Entity" ParentMenuItem="Nav_Connectors" />...
This example adds a new menu item under the Nav_Connectors menu item declared in the root
Nav.xml file. This new menu item gives access to the list of synchronized SharePoint entities.
Display
It is strongly recommended that the display configuration be written to a new SharePoint UI.xml
file in the SharePoint connector's folder.
Display entity type
The DisplayEntityType describes how a single resource should be displayed.
Example
    Conf/SharePoint/SharePoint UI.xml

... <DisplayEntityType Identifier="SharePoint_Entity">
<Property OutputType="BasicCollection" Identifier="Member" />
<Property OutputType="BasicCollection" Identifier="Group" />
<Property OutputType="BasicCollection" Identifier="RoleAssignment" /></DisplayEntityType><DisplayEntityType Identifier="SharePoint_Role">
<Property OutputType="BasicCollection" Identifier="RoleAssignment" /></DisplayEntityType><DisplayEntityType Identifier="SharePoint_Object">
<Property OutputType="BasicCollection" Identifier="ParentKey" />
<Property OutputType="BasicCollection" Identifier="Objects" />
<Property OutputType="BasicCollection" Identifier="RoleAssignment" />
<Property OutputType="BasicCollection" Identifier="Inheritance" />
<Property OutputType="BasicCollection" Identifier="GiveRights" /></DisplayEntityType><DisplayEntityType Identifier="SharePoint_RoleAssignment">
<Property OutputType="BasicCollection" Identifier="Entity" />
<Property OutputType="BasicCollection" Identifier="Role" />
<Property OutputType="BasicCollection" Identifier="Object" /></DisplayEntityType>...
The scalar properties require no configuration: they are automatically displayed. The only information that the DisplayEntityType adds here, is that the property BasicCollection is a navigation property. An eye icon will be displayed to take you directly to the matching page.
Display table
DisplayTable elements describe how a list of resources should be displayed.
The DisplayTable contains a list of DisplayTableColumn elements that identify which properties should be included in the list display.
Example
    Conf/SharePoint/SharePoint UI.xml
...
<DisplayTable Identifier="SharePoint_Entity" EntityType="SharePoint_Entity" DisplayTableDesignElement="resourcetable" IsEntityTypeDefault="true"> <Column DefaultSortPriority="1" DisplayBinding="Name" IsDisplayInSummaryView="true" IsResizable="true" IsSortable="true" CanBeFiltered="true" ColumnSize="4" /> <Column DisplayBinding="Email" IsDisplayInSummaryView="true" IsResizable="true" IsSortable="true" CanBeFiltered="true" ColumnSize="2" /> <Column DisplayBinding="PrincipalType" IsDisplayInSummaryView="true" IsResizable="true" IsSortable="true" CanBeFiltered="true" ColumnSize="2" /></DisplayTable>...
Internal display name
An InternalDisplayName can also be declared as an
EntityPropertyExpression.
The InternalDisplayName is used in several UI screens to identify a resource for the user.
With no custom InternalDisplayName, a default value is used (instead of the first property of the
identity) containing the string "name". If no such property is found, the first declared property
of the entity type is used.
Example
    Conf/SharePoint/SharePoint Connector.xml

...
<EntityPropertyExpression Identifier="SharePointObject_Entity_InternalDisplayName" Expression="C#:resource:return resource.Name ?? resource.Email ?? resource.Id.ToString();" EntityType="SharePoint_Entity" Property="InternalDisplayName" />
<EntityPropertyExpression Identifier="SharePointObject_Role_InternalDisplayName" Expression="C#:resource:return resource.Name ?? resource.RoleId.ToString();" EntityType="SharePoint_Role" Property="InternalDisplayName" />
<EntityPropertyExpression Identifier="SharePointObject_Object_InternalDisplayName" Expression="C#:resource:return resource.Label ?? resource.Key.ToString();" EntityType="SharePoint_Object" Property="InternalDisplayName" />
<EntityPropertyExpression Identifier="SharePointObject_RoleAssignment_InternalDisplayName"
Expression="C#:resource:return resource.Role.Name + " - " + resource.Entity.Name + " - " +
resource.Object.Label ?? resource.Key.ToString();" EntityType="SharePoint_RoleAssignment"
Property="InternalDisplayName" /> ...
This example adds the InternalDisplayName to the SharePoint_Entity, SharePoint_Role, SharePoint_Object and SharePoint_RoleAssignment entity types to be used by the UI.
Permissions
This step focuses on setting up permissions for Usercube's end-users granting them access to the connector.
The AccessControlRule and AccessControlEntry elements define permissions for end-user profiles to read and write the connector's data (such as resources of a given entity type). It is used by the UI when displaying data such as resources and available roles.
It is strongly recommended that permissions be written to a new file. For example, the administrator profile permissions can be written to the SharePoint Profile Administrator.xml file.
Example
    Conf/SharePoint/SharePoint Profile Administrator.xml
...
<AccessControlRule Profile="Administrator" EntityType="ResourceType" Identifier="Administrator_ResourceTypeSelector_resourceType_SharePoint" DisplayName_L1="Administrator_ResourceTypeSelector_resourceType_SharePoint"> <Entry Permission="/Custom/Resources/SharePoint_Entity/View" CanExecute="true" /> <Entry Permission="/Custom/Resources/SharePoint_Entity/ResetPassword" CanExecute="true" /> </AccessControlRule> <AccessControlRule Profile="Administrator" EntityType="Category" Identifier="Administrator_ResourceTypeSelector_category_SharePoint" DisplayName_L1="Administrator_ResourceTypeSelector_category_SharePoint"> <Entry Permission="/Custom/Resources/SharePoint_Entity/View" CanExecute="true" /></AccessControlRule>...
This example sets permissions for the Administrator profile.
It entitles an administrator to display SharePoint_Entity resource and role categories from the
UI.
Jobs
Construction
It is strongly recommended to write Jobs associated with the SharePoint connector to the
Conf/SharePoint/SharePoint Jobs.xml file.
A job is declared with the <Job> xml element. It contains Tasks that perform the main steps and
other related operations.
Example
    Conf/SharePoint/SharePoint Jobs.xml

...
<Job Identifier="SharePoint_Synchronization_Delta" DisplayName_L1="10: SharePoint- Synchronization (delta)" DisplayName_L2="10: SharePoint - Synchronisation (delta)" Agent="Local">
... </Job>...
Notice the Agent attribute that contains the name of the Agent which executes the Job. This attribute is mandatory for a Job containing Tasks executed agent-side, even if a unique local Agent exists.
Components
The Synchronization job includes three steps:
- Export
- Prepare-Synchro
- Synchro
These three steps are all contained in a scaffolding which allows the generation of the Incremental Synchronization configuration.
Example
    Conf/SharePoint/SharePoint Jobs.xml
...
<CreateConnectorSynchroIncremental Connector="SharePoint" DisplayName_L1="SharePoint Synchronization (delta)" DisplayName_L2="Synchronisation SharePoint (delta)"> <OpenIdIdentifier Identifier="Job"/> </CreateConnectorSynchroIncremental>...
Permissions
The execution of a Job entails execution of Tasks, reading/writing to the Database and sending files over to the Server. These operations are protected by an authorization mechanism.
To complete a Job, the Agent, via the Usercube-Invoke-Job tool, uses:
- a
Profile
associated with the Job itself, to read/write:
UJ_JobsandUJ_Taskstables in a list of tasksUJ_JobInstancestables in the progress report
- a Profile for each Task, to read/write
UJ_TaskInstancestables (Progress Report) and perform other operations such as sending export files over to the Server.
Each Profile must be assigned the right permissions for the associated Job or Task to perform.
Every request from Agent to Server within the execution of a Job needs to be authenticated with an Open Id Connect ClientId/Secret pair, linked to a Profile.
Create a profile
Here, we focus on creating one profile, used by the Job and every Task of the Job.
    Conf/Profile AgentJob.xml

... <Profile Identifier="AgentSynchro" DisplayName_L1="Agent Synchro" />...
As the Principle of Least Privilege states, NETWRIX strongly recommends that you create a Profile to be used during the Synchronization jobs which will be different from the one used during the Provisioning job. This contributes to separating access rights. The same principle applied even more rigorously would make Usercube create one profile per Task. It isn't necessary as most Synchronization tasks require the same permissions.
Grant synchronization access rights to the profile
For an Agent to launch server-side Tasks from the Job via the Usercube-Invoke-Job tool, the profile linked to these tasks and used by the tool should be authorized to execute said tasks.
Server-side Tasks for a simple Synchronization job usually are:
- Prepare-Synchronization
- Synchronization
Required permissions are:
View Tasks
/Jobs/Task/Query
Progress Report
/Jobs/JobInstance/Query/Jobs/JobInstance/Update/Jobs/TaskInstance/Query/Jobs/TaskInstance/Update
Synchronization and Prepare-Synchronization
/Connectors/Connector/Query/Connectors/SynchronizeSession
Granting access can be done via the Synchronization AccessControlRules scaffolding and the JobViewAccessControlRules scaffolding.
The following examples should be written to Conf/Profile AgentSychro.xml.
Example
The following example entitles the administrator to run any Synchronization job:
Grant end-users permissions to run jobs from the UI
In addition, for end-users to be able to launch a job from the UI, they must be assigned a profile with the following access rights:
/Jobs/RunJob/Launch
This can be done via the JobExecutionAccessControlRules scaffolding.
Example
Declare usable ClientId/Secret pairs in the configuration
An Agent's Profile is associated with a ClientId/Secret pair used by the Agent to authenticate to the Server.
Usable ClientId/Secret pairs are written to the database from the xml configuration using the <OpenIdClient> xml element.
It is strongly recommended to write the <OpenIdClient> xml element to a new or existing OpenIdClients.xml file in the configuration root folder.
The ClientId/Secret pair hence created must be associated with the profile created or updated in the previous step, via the Profile attribute.
Example
The following example creates a ClientId/Secret pair to be used by the Agent to authenticate to the Server and complete Jobs. The secret is hashed with the Usercube-New-OpenIDSecret tool.
    Conf/OpenIdClients.xml
...
<OpenIdClient Identifier="Job" HashedSecret="K7gNU3sdo+Op8wNhqoVWhr5v6s1xYv72ol/pe/Unols=" DisplayName_L1="ClientId for Jobs" DisplayName_L2="ClientId pour les jobs" Profile="Administrator" />
...
    Conf/OpenIdClients.xml

...
<OpenIdClient Identifier="Job" HashedSecret="K7gNU3sdo+Op8wNhqoVWhr5v6s1xYv72ol/pe/Unols=" DisplayName_L1="ClientId for Jobs" DisplayName_L2="ClientId pour les jobs" Profile="Administrator" />
...
Set up the Agent to use ClientId/Secret pairs
The ClientId/Secret pairs that the Agent may use are written to the Agent's appsettings.agent technical configuration set.
The ClientId of such ClientId/Secret pairs can then be used as a value in a Task OpenIdClient attribute.
Pairs written in the OpenIdClient section may be used by Tasks.
The Job itself uses the DefaultOpenIdClient value.
This example sets the "Job/secret" pair to be used by tasks and jobs:
appsettings.agent.json
{
...
"OpenId":{
"OpenIdClients": {
"Job": "secret"
},
"DefaultOpenIdClient": "Job"
}
}
Job launch
Scheduling the job execution can rely either on Usercube's scheduler or an external scheduler.
With Usercube's scheduler
Use the Job CronTabExpression attribute.
This example uses Usercube's scheduler to execute the
SharePoint_Synchronization_Deltajob every fifteen minutes:
Conf/SharePoint/SharePoint Jobs.xml
<Job Identifier="SharePoint_Synchronization_Delta" CronTabExpression="*/15 * * * *quot; DisplayName_L1="10: SharePoint - Synchronization (delta)" DisplayName_L2="10: SharePoint - Synchronisation (delta)" Agent="Local"> ...
</Job>
For more details about checking Crontab expressions, see the crontab.guru website.
With an external scheduler
An external scheduler would rely on the Usercube-Invoke-Job tool.
Example
The following command can be scheduled. It executes the SharePoint_Synchronization_Delta job using the "Job/Secret" authentication pair to connect to the Usercube Server at http://identitymanager.contoso.com.
./identitymanager-Invoke-Job.exe -j "SharePoint_Synchronization_Delta" --api-secret secret --api-client-id Job --api-url "http://identitymanager.contoso.com"
Validation
Deploy configuration
The configuration is written to the database using the Deploy Configuration tool.
Test
The Synchronization job should be found in the UI, under the Job Execution menu, with the name input in the Job's DisplayName_Li attribute.
From there, it can be launched and debugged (if needed).
After execution, SharePoint Objects resources should be in the UR_Resources table of the SQL
Server database.
Write a PowerShell Script for Provisioning
This guide shows how to write a PowerShell script used by the PowerShellProv connector.
Structure of a PowerShell Script
The goal of the script is to append, for each provisioning order, a line in a CSV file.
Let's consider the following ResourceType:
...
<ResourceType Identifier="PowerShellCsv_User_NominativeUser" DisplayName_L1="PowerShell CSV User (nominative)" DisplayName_L2="Utilisateur PowerShell CSV (nominatif)" Policy="Default" TargetEntityType="PowerShellCsv_User" Category="PowerShellCsv" SourceEntityType="Directory_User" RemoveOrphans="true" AllowAdd="true" AllowRemove="true"> <ScalarRule Property="identifier" Binding="EmployeeId"/> <ScalarRule Property="firstName" Binding="FirstName"/> <ScalarRule Property="lastName" Binding="LastName"/></ResourceType>...
The end of the CSV file must look like:
command;identifier;firstName;lastName
...
insert;007;James;Bond
...
Define the common part of every script
The goal of the common part is to get all required variables needed by the script.
Two parameters are required at the top of the script:
param(
  [Parameter(Mandatory = $true)][string]$resultsFilePath,
  [Parameter(Mandatory = $true)][string]$ordersPath
)
resultsFilePathis the agent-side path of the result file containing the summary of the executed and errored orders.ordersPathis the agent-side folder path containing the JSON provisioning orders.
It is important for these settings to be defined at the top of the script and keep these names
because they are filled by the Fulfill-PowerShell connector.
The Fulfill-CSV.ps1 script must be placed in the script folder of Usercube containing the
Environment.ps1 script. Thanks to this, environment variables (such as $runtimePath) are loaded
and can be used in the script:
. (Join-Path -Path $PSScriptRoot -ChildPath "Environment.ps1")
. (Join-Path -Path $runtimePath -ChildPath "Usercube-Visit-Orders.ps1")
Define the specific function
A function which is called for each provisioning order must be defined.
Define the header
The header is always the same. Only the name of the function can change:
function Fulfill-CSV {
  param ([parameter(Mandatory = $true)] $order)
The previous parameter $order is an object corresponding to the following provisioning order
(JSON):
{
    "ProvisioningOrdersList": [
        {
            "AssignedResourceTypeId": "3930001",
            "ChangeType": "Added",
            "WorkflowInstanceId": "81",
            "Owner": {
                "Id": "21511",
                "InternalDisplayName": "007 - Bond James",
                "Identifier": "007",
                "EmployeeId": "007",
                "PhotoTag": -3065,
                "MainFirstName": "James",
                "MainLastName": "Bond",
                ...
            },
            "ResourceType": {
                "Id": "-41",
                "SourceEntityType": {
                    "Id": "51",
                    "Identifier": "Directory_User"
                },
                "TargetEntityType": {
                    "Id": "70",
                    "Identifier": "PowerShellCsv_User"
                },
                "Identifier": "PowerShellCsv_User_NominativeUser"
            },
            "Changes": {
                "identifier": "007",
                "firstName": "James",
                "lastName": "Bond"
            }
        }
    ]
}
There can be more sections and attributes.
Define mandatory parameters
The ChangeType parameter (Added, Deleted or Modified) is always mandatory and must be
checked.
Depending on the function requirements, other parameters should be checked. For example, the function below always needs an identifier to work properly, therefore you should check its presence.
  $changeType = $order.ChangeType
  # if the change type is not recognized, we throw an error
  if ($changeType -ne 'Added' -and $changeType -ne 'Deleted' -and $changeType -ne 'Modified') {
    $artId = $order.AssignedResourceTypeId
    throw "Order ChangeType: $changeType not recognized in AssignedResourceTypeId: '$artId'"
  }

  # if the section is Changes, we want to create/update the identifier
  $identifier = $order.Changes.identifier
  if(!$identifier){
    # if the section is Resources, we want to keep the same identifier
    $identifier = $order.Resource.identifier
    if(!$identifier){
      throw "identifier is the primary key and must not be null."
    }
  }
Define order processing
This is the last part of the function:
- Parameters from the provisioning order are stored in variables.
- A specific treatment is applied if
ChangeTypeisAdded,DeletedorModified.
  # firstName and lastName are the two other properties of the ResourceType
  $firstName = $order.Changes.firstName
  $lastName = $order.Changes.lastName

  # change type defines what is written in the 'command' column
  if ($changeType -eq 'Added') {
    $command = "Insert"
  }
  elseif ($changeType -eq 'Deleted') {
    $command = "Delete"
  }
  elseif ($changeType -eq 'Modified') {
    $command = "Update"
  }

  # CSV columns are command, identifier, firstName and lastName
  $script:powershellResults += New-Object -TypeName psobject -Property @{Command = "$command"; identifier = "$identifier"; firstName = "$firstName"; lastName = "$lastName" }
}
Define how to send logs to Usercube
The three methods to log in Usercube are:
- Write-Host: writes Information in the log.
- Throw: raises an exception (which stops the script), and writes the Error in the log (the provisioning order will be errored too).
- Write-Error: writes Error in the log (the provisioning order will be errored too). It is not recommended because the script continues its execution.
Now that the function has been defined, the main code of the script can be written.
Write the main code of the script
Read the options parameter from the standard input
The
options parameter
isn't mandatory in the JSON file. If it isn't provided, don't perform this step.
# Just to show how to read the options in the script
$options = [System.Console]::ReadLine()
$options = ConvertFrom-Json $options
$options.Message # -> Hello
Rest of the main script
In general, this part contains the code to connect to the external system and executes the
Usercube-Visit-Orders script.
# The goal of the script is to write the users in the following CSV file
$powershellResultFilePath = Join-Path -Path "$demoPath" -ChildPath "Temp/ExportOutput/powershellcsv_users.csv"

# powershellResults has a larger scope and is used in the last line of the Fulfill-CSV function
$powershellResults = @()

# Usercube-Visit-Orders is provided by Usercube, it must not be modified
# It loops on the provisioning orders and calls Fulfill-CSV on each of them
Usercube-Visit-Orders $resultsFilePath $ordersPath Fulfill-CSV

# We write the results in $powershellResultFilePath
if ($powershellResults.Length -gt 0){
  $powershellResults | ConvertTo-Csv -Delimiter ";" -NoTypeInformation | & (Join-Path -Path "$runtimePath" -ChildPath "Usercube-Encrypt-File.exe") -o $powershellResultFilePath
}
Never modify Usercube-Visit-Orders.ps1.
Synthesis
Skeleton
To sum up the previous part, the script can be written as follows:
# Common part

# Specific function
  # Header of the function
  # Check mandatory parameters
  # Order processing (treatment for Added, Deleted or Modified)

# Main script
  # Read standard input (Optional)
  # Rest of the main script (Connection, Usercube-Visit-Order...)
Full script
The full script is as follows:
# Common part

param(
  [Parameter(Mandatory = $true)][string]$resultsFilePath,
  [Parameter(Mandatory = $true)][string]$ordersPath
)

. (Join-Path -Path $PSScriptRoot -ChildPath "Environment.ps1")
. (Join-Path -Path $runtimePath -ChildPath "Usercube-Visit-Orders.ps1")

# Specific function

function Fulfill-CSV {
  param ([parameter(Mandatory = $true)] $order)

  $changeType = $order.ChangeType
  # if the change type is not recognized, we throw an error
  if ($changeType -ne 'Added' -and $changeType -ne 'Deleted' -and $changeType -ne 'Modified') {
    $artId = $order.AssignedResourceTypeId
    throw "Order ChangeType: $changeType not recognized in AssignedResourceTypeId: '$artId'"
  }

  # if the section is Changes, we want to create/update the identifier
  $identifier = $order.Changes.identifier
  if(!$identifier){
    # if the section is Resources, we want to keep the same identifier
    $identifier = $order.Resource.identifier
    if(!$identifier){
      throw "identifier is the primary key and must not be null."
    }
  }

  # firstName and lastName are the two other properties of the ResourceType
  $firstName = $order.Changes.firstName
  $lastName = $order.Changes.lastName

  # change type defines what is written in the 'command' column
  if ($changeType -eq 'Added') {
    $command = "Insert"
  }
  elseif ($changeType -eq 'Deleted') {
    $command = "Delete"
  }
  elseif ($changeType -eq 'Modified') {
    $command = "Update"
  }

  # CSV columns are command, identifier, firstName and lastName
  $script:powershellResults += New-Object -TypeName psobject -Property @{Command = "$command"; identifier = "$identifier"; firstName = "$firstName"; lastName = "$lastName" }
}

# Main script

# Just to show how to read the options in the script
$options = [System.Console]::ReadLine()
$options = ConvertFrom-Json $options
$options.Message # -> Hello

# The goal of the script is to write the users in the following CSV file
$powershellResultFilePath = Join-Path -Path "$demoPath" -ChildPath "Temp/ExportOutput/powershellcsv_users.csv"

# powershellResults has a larger scope and is used in the last line of the Fulfill-CSV function
$powershellResults = @()

# Usercube-Visit-Orders is provided by Usercube, it must not be modified
# It loops on the provisioning orders and calls Fulfill-CSV on each of them
Usercube-Visit-Orders $resultsFilePath $ordersPath Fulfill-CSV

# We write the results in $powershellResultFilePath
if ($powershellResults.Length -gt 0){
  $powershellResults | ConvertTo-Csv -Delimiter ";" -NoTypeInformation | & (Join-Path -Path "$runtimePath" -ChildPath "Usercube-Encrypt-File.exe") -o $powershellResultFilePath
}
Write a Robot Framework Script
This guide shows how to write a Robot Framework script that will be used by Fulfill-RobotFramework.
Structure of a Robot Framework Script
Build the skeleton
A Robot Framework script is divided into four main parts:
- Settings: contains the instructions to import library or external resource files.
- Variables: contains the global variables shared by all the functions in the script.
- Keywords: contains all the functions defined by the user.
- Test Cases: contains the functions which will be run when the script is launched.
Example
*** Settings ***
Library Telnet

*** Variables ***
${IPADDRESS} 192.168.1.22

*** Keywords ***
Open Telnet Connection
    Open Connection ${IPADDRESS} prompt=$

*** Test Cases ***
Run Provisioning
    Open Telnet Connection
Let's analyze the four parts of this example:
- Settings: we import here the Telnet library to use the functions defined in it.
- Variables: we define the variable
IPADDRESSto use it later. - Keywords: we define a custom function called
Open Telnet Connection. It will use a function defined in the Telnet library (calledOpen Connection) and the variableIPADDRESSwhich has been defined before in theVariablessection. - Test Cases: we define here the main function which we choose to call
Run Provisioning(it can be named anything), and which will be run when launching the script. It will use the functionOpen Telnet Connection.
Robot Framework needs two spaces between two different instructions to parse them correctly.
For example, Open Connection consists of only one instruction. Only one space is thus needed
between the two words. But, Open Connection ${IPADDRESS} consists of two instructions, the
function and the parameter. Two spaces are then required to separate Connection from
${IPADDRESS}.
To read your script more easily, you could also use the pipe character (|) between instructions,
like this: Open Connection | ${IPADDRESS}.
For more details, see Robot Framework Libraries.
Define specific functions
To use a Robot Framework script for provisioning external systems with Usercube, the following elements are required in the script:
- The import of a resource file written by Usercube called
UsercubeRobotFramework.resource. - The definition of three functions which will be called by Usercube to perform three required
actions:
ExecuteAdd,ExecuteDeleteandExecuteModify. These functions are where you will write the actions to perform on the external system. - The use of one function to start the provisioning called
Launch Provisioning.
Never modify the resource file UsercubeRobotFramework.resource.
Example
The resource file defined at the beginning of the script is located in Usercube's Runtime folder.
Therefore, you will have to change the path accordingly.
*** Settings ***
Resource C:/identitymanagerContoso/Runtime/identitymanagerRobotFramework.resource

*** Keywords ***
ExecuteAdd
    [Arguments] ${order}
    ...

ExecuteDelete
    [Arguments] ${order}
    ...

ExecuteModify
    [Arguments] ${order}
    ...

...

*** Test Cases ***
Run Provisioning
    ...
    Launch Provisioning
    ...
The parameter ${order} is mandatory only for the three functions: ExecuteAdd, ExecuteDelete
and ExecuteModify. It is an object corresponding to the following sample provisioning order
(JSON):
{
    "AssignedResourceTypeId": "3930001",
    "ChangeType": "Added",
    "WorkflowInstanceId": "81",
    "Owner": {
        "Id": "21511",
        "InternalDisplayName": "007 - Bond James",
        "Identifier": "007",
        "EmployeeId": "007",
        "PhotoTag": -3065,
        "MainFirstName": "James",
        "MainLastName": "Bond",
        ...
    },
    "ResourceType": {
        "Id": "-41",
        "SourceEntityType": {
            "Id": "51",
            "Identifier": "Directory_User"
        },
        "TargetEntityType": {
            "Id": "70",
            "Identifier": "RobotFramework_User"
        },
        "Identifier": "RobotFramework_User_NominativeUser"
    },
    "Changes": {
        "identifier": "007",
        "firstName": "James",
        "lastName": "Bond"
    }
}
The elements of ${order}can be accessed like this: ${order['Changes']['identifier']}.
For more details about the handling of Robot Framework objects, see the Robot Framework User Guide.
Usercube Keywords
| Keyword | Details |
| -------------------------- | ---------------------------------------------------------------------------------------------------------------------------------------------------------------------------------------------------------------------------------------------------------------------------------------------------------------------------------------------------------------------------------------------------------------------------------------------------------------------------------------------------------------------------------------------------------------------------------------------------------------------------------------------------------------------------------------------------------------------------------------------- | ----- | ------- |
| Catch Keyword | Arguments Keyword: Keyword *args Description Launches Keyword with the given arguments *args if the keyword launched by Try Keyword failed. If Try Keyword was not called, this keyword will not do anything. Catch Keyword should always be called right after Try Keyword. Example Try to connect to Usercube.com. If the connection fails, restart the browser and try to connect to Usercube.com: Connect to URL Try Keyword Go To Usercube.com Catch Keyword Restart Browser At URL Usercube.com |
| Generate Password | Description Generates a password based on the password reset settings associated to the resource type mapping being provisioned Send Password Notification should always be called after Generate Password, preferably right after the password is used. If Send Password Notification is not called before the provisioning of the resource is over, it will automatically be called. If multiple passwords should be generated, Send Password Notification should be called after each password generation. Returns Password: string |
| Get Secure Data | Arguments Attribute: string Erase Data: boolean Description Retrieves the secured option Attribute from the connector configuration. If Erase Data is set to true, the secured option is deleted once it is read. Example Get Login option and erase it: Get Secure Data | Login | True |
| Launch Provisioning | Description Launches the provisioning defined by the provisioning orders. This keyword is required for any provisioning to happen. |
| Log Debug | Arguments Message: string Description Logs Message at the Debug log level. Example Log a keyword failure message: Log Debug The keyword has failed |
| Log Error | Arguments Message: string Description Logs Message at the Error log level. Example Log a keyword failure message: Log Error The keyword has failed |
| Send Password Notification | Description Sends a notification containing the last password generated. If Generate Password is called and Send Password Notification is not called before the provisioning of the resource is over, Send Password Notification will automatically be called. |
| Try Keyword | Arguments Keyword: Keyword *args Description Launches Keyword with the given arguments *args, and ignores its errors. If Keyword fails, the keyword sent to Catch Keyword will run. Try Keyword should always be called right before Catch Keyword. Example Try to connect to Usercube.com. If the connection fails, restart the browser and try to connect to Usercube.com: Connect to URL Try Keyword Go To Usercube.com Catch Keyword Restart Browser At URL Usercube.com |
Error handling
Consider a web application that contains user information. Suppose a user is missing from the web application. When the script attempts to reach the user's information page, it will reach an error page, and fail. The next user's provisioning starts, but the web browser is still on the error page, so the script keeps failing.
In this example, if a user's provisioning fails, each subsequent provisioning will fail. This failure issue can be solved with the error handling custom keywords.
Consider the following example using the Robot Framework Selenium library:
Open Usercube Website
    Open Browser
    Connect To Usercube
    [Teardown] Close Browser

Restart Browser
    [Arguments] ${url}
    Log Debug An error has occured, restarting the browser
    Close Browser
    Open Browser ${url}

Connect To Usercube
    Try Keyword Go To Usercube.com
    Catch Keyword Restart Browser Usercube.com
    Page Should Contain Usercube
In this example, the keyword Open Usercube Website opens a browser, then calls
Connect To Usercube. To ensure that the browser is closed regardless of the script's success, the
Close Browser keyword is used in a teardown. A keyword in a teardown is always executed regardless
of what happens in the script or in the teardown.
The Restart Browser keyword logs a debug message before restarting the browser to help debug the
script. The Connect To Usercube tries to use the Go To keyword to connect to the Usercube.com
web page. As Go To is used with Try Keyword, if the execution fails, Restart Browser is called
by Catch Keyword. This means that if the browser fails to load Usercube.com, the browser
restarts. Last, Connect To Usercube verifies that the page contains the word Usercube.
Error Handling for ExecuteAdd, ExecuteDelete, and ExecuteModify
The ExecuteAdd, ExecuteDelete, and ExecuteModify methods are harder to interact with. First,
it is not possible to get their execution status within the script. Second, if the execution failed,
it should be kept as a failure in order to log the failure.
To simplify error handling, consider the following structure:
Execute Add
    [Arguments] ${order}
    Try Keyword Add User ${order}
    Catch Keyword Restart Program And Fail Add User failed.

Add User
    [Arguments] ${order}
    Click New User
    Fill In Information ${order}
    Click Add User

Restart Program And Fail
    [Arguments] ${failmessage}
    Close Program
    Start Program
    Fail ${failmessage}
In this example, ExecuteAdd does not call the custom keywords to add a new user directly, and only
calls Add User instead. This means that it is possible to call Add User from the Try Keyword
keyword. If Add User fails, then Execute Add fails. Therefore it is possible to catch a failure
with this structure.
Note that Restart Program And Fail fails. This failure is necessary as the provisioning order
would be counted as a success otherwise.
Testing a RobotFramework script
In order to write a RobotFramework script, we need to test that it works. It is possible to test the script by running a fulfillment job from the Usercube interface. While this kind of test proves that everything works as expected, it can take a long time. There is a faster method to check that the script runs.
Suppose the RobotFramework script's path is RobotFramework/script.robot.
We need the following elements :
- A provisioning order, in folder
RobotFrameworkScript/Order. The provisioning order can be encrypted or unencrypted. The script will write the encrypted results toRobotFrameworkScript/Order/results.csv. - The path to the
Runtimefolder. In our example, we will consider this path asC:/identitymanagerDemo/Runtime.
The RobotFramework/script.robot script may be run from the command prompt.
cd RobotFramework

robot --variable ORDERPATH:./Order --variable RUNTIMEPATH:C:/identitymanagerDemo/Runtime --variable RESULTPATH:./Order/results.csv ./script.robot
This command will generate an output file, a log file, and a report file in the RobotFramework
folder. This command will also write information to the command prompt.
For most testing cases, we only care about the command prompt information and the log file, written
at RobotFramework/log.html. The other outputs can be removed.
cd RobotFramework

robot --loglevel NONE --report NONE --variable ORDERPATH:./Order --variable RUNTIMEPATH:C:/identitymanagerDemo/Runtime --variable RESULTPATH:./Order/results.csv ./script.robot
Get Secure Data and Generate Password
Most keywords are not different when a script is launched manually. The keywords Get Secure Data
and Generate Password are exceptions.
Get Secure Data: This keyword expects the Robot Framework process to receive a json list of attributes in the stdin stream. This can be provided manually by writing the data in the command prompt. As an example, if the script requires aLoginandPasswordattribute :{"Login":"login","Password":"password"}Generate Password: This keyword expects a file that contains the password reset settings associated to the provisioned resource type mapping. The easiest way to enable theGenerate Passwordkeyword is as follow:- Launch the Robot Framework fulfillment through the Usercube web application with a blank script.
- Copy the
PasswordResetSettingsfolder generated in the most recent subfolder ofWork/FulfillRobotFramework. - Paste the folder in the same folder as the provisioning order.
Use Case: Write a Script to Fulfill a CSV File
The goal of the script is to append, for each provisioning order, a line in a CSV file located on an external system which we will access through a Telnet connection.
Let's consider the following ResourceType:
...
<ResourceType Identifier="RobotFramework_User_NominativeUser" DisplayName_L1="Robot Framework User (nominative)" Policy="Default" TargetEntityType="RobotFramework_User" Category="RobotFramework" SourceEntityType="Directory_User" ApprovalWorkflowType="One"> <ScalarRule Property="identifier" Binding="EmployeeId"/> <ScalarRule Property="firstName" Binding="FirstName"/> <ScalarRule Property="lastName" Binding="LastName"/></ResourceType>...
The end of the CSV file must look like:
command;identifier;firstName;lastName
...
Insert;007;James;Bond
...
Define settings
In every Robot Framework script, we need to import the resource file
UsercubeRobotFramework.resource. In this example, we also need to import the Telnet library to use
its functions.
*** Settings ***
Resource C:/identitymanagerContoso/Runtime/identitymanagerRobotFramework.resource
Library Telnet
Define variables
To connect to the external system through Telnet, we need an IP address corresponding to the
external system. We will store the IP address in the global variable ${IPADDRESS}. We also use the
global variable ${CSVFILEPATH} to define the CSV file where the data will be written in the
external system.
*** Variables ***
${CSVFILEPATH} /home/contoso/robotframework_users.csv
${IPADDRESS} 192.168.1.22
Define custom keywords
We define all the custom functions which we will use to provision the external system:
Delete CSV File: removes a possible pre-existing CSV file.Write In CSV: executes a command to write the line in the CSV file in the external system.Write Data: formats the line to write in the CSV and callsWrite In CSVto write it.Write Header: defines the header to write in the CSV and callsWrite Datato write it.Open Telnet Connection: opens the Telnet connection to the external system using the login and the password defined in the Options attribute inappsettings.agent.json, as well as the IP address defined in theVariablessection.
*** Keywords ***
Delete CSV File
    Execute Command rm ${CSVFILEPATH}

Write In CSV
    [Arguments] ${line}
    Execute Command echo ${line} >> ${CSVFILEPATH}

Write Data
    [Arguments] ${command} ${identifier} ${firstName} ${lastName}
    Write In CSV '"${command}","${identifier}","${firstName}","${lastName}"'

Write Header
    Write Data Command identifier firstName lastName

Open Telnet Connection
    Open Connection ${IPADDRESS} prompt=$
    Read Until login
    ${LOGIN}= Get Secure Data Login False
    Write ${LOGIN}
    Read Until Password
    ${PASSWORD}= Get Secure Data Password True
    Write ${PASSWORD}
The method Get Secure Data will retrieve the value of the attributes filled in
Options
in appsettings.agent.json. This is the method strongly recommended by Usercube. However, you could
also enter the value directly into the script (example: ${LOGIN}= UserName). This may be easier
for initial testing purposes.
Define mandatory keywords
To be able to provision the external system, we need the three required functions: ExecuteAdd,
ExecuteDelete and ExecuteModify. These methods are called by the connector depending on the
action to perform on the external system.
*** Keywords ***
ExecuteAdd
    [Arguments] ${order}
    Write Data Insert ${order['Changes']['identifier']} ${order['Changes']['firstName']} ${order['Changes']['lastName']}

ExecuteDelete
    [Arguments] ${order}
    Write Data Delete ${order['Changes']['identifier']} ${order['Changes']['firstName']} ${order['Changes']['lastName']}

ExecuteModify
    [Arguments] ${order}
    Write Data Update ${order['Changes']['identifier']} ${order['Changes']['firstName']} ${order['Changes']['lastName']}
Here, for each action, we use the function Write Data defined in the previous section to write the
changes to the CSV file with a corresponding word Insert, Delete or Update.
Define test cases
The function launched by the Robot Framework script will be written in the section Test Cases and
will be called Run Provisioning.
*** Test Cases ***
Run Provisioning
    Open Telnet Connection
    Delete CSV File
    Write Header
    Launch Provisioning
    Close All Connections
In our test case, we will perform the following operations in Run Provisioning:
- Open the Telnet connection with the external system.
- Remove a possible pre-existing CSV file.
- Write the header to the new CSV file.
- Launch the Usercube provisioning. The method
Launch Provisioningis mandatory when using the Robot Framework connector. - Close the Telnet connection with the external system.
Read the full script
The full script is as follows:
*** Settings ***
Resource C:/identitymanagerContoso/Runtime/identitymanagerRobotFramework.resource
Library Telnet

*** Variables ***
${CSVFILEPATH} /home/contoso/robotframework_users.csv
${IPADDRESS} 192.168.1.22

*** Keywords ***
ExecuteAdd
    [Arguments] ${order}
    Write Data Insert ${order['Changes']['identifier']} ${order['Changes']['firstName']} ${order['Changes']['lastName']}

ExecuteDelete
    [Arguments] ${order}
    Write Data Delete ${order['Changes']['identifier']} ${order['Changes']['firstName']} ${order['Changes']['lastName']}

ExecuteModify
    [Arguments] ${order}
    Write Data Update ${order['Changes']['identifier']} ${order['Changes']['firstName']} ${order['Changes']['lastName']}

Delete CSV File
    Execute Command rm ${CSVFILEPATH}

Write In CSV
    [Arguments] ${line}
    Execute Command echo ${line} >> ${CSVFILEPATH}

Write Data
    [Arguments] ${command} ${identifier} ${firstName} ${lastName}
    Write In CSV '"${command}","${identifier}","${firstName}","${lastName}"'

Write Header
    Write Data Command identifier firstName lastName

Open Telnet Connection
    Open Connection ${IPADDRESS} prompt=$
    Read Until login
    ${LOGIN}= Get Secure Data Login False
    Write ${LOGIN}
    Read Until Password
    ${PASSWORD}= Get Secure Data Password True
    Write ${PASSWORD}

*** Test Cases ***
Run Provisioning
    Open Telnet Connection
    Delete CSV File
    Write Header
    Launch Provisioning
    Close All Connections
Write a PowerShell Script for Synchronization
This guide shows how to write a PowerShell script used by the PowerShellSync connector.
The documentation is not yet available for this page and will be completed in the near future.
Write a Template for a Ticket Connector
This guide shows how to write a template that will be used by a Ticket connector to complete the title and the description of the ticket. The information which will be written in the ticket will come from the generated provisioning order and from literal strings written in the template.
Attributes provided by Usercube
| Name | Details |
|---|---|
| Username | Type String Description Is the name of the user for which the ticket is created. |
| ResourceType | Type String Description Is the identifier or the resource type. |
| UsercubeProfileLink | Type String Description Is the link allowing to access the user profile. |
| AddedLinkedEntities | Type List Description Is the list of links to add in the system. |
| RemovedLinkedEntities | Type List Description Is the list of links to remove in the system. |
| DisplayAdd | Type Boolean Description True if there are any links to add. |
| DisplayRemove | Type Boolean Description True if there are any links to remove. |
| Entity | Type Dictionary Description Is the list of values to assign to the resource. |
| ProvisioningOrder.ChangeType | Type String Description Corresponds to the action of the provisioning order (Added, Deleted, Modified). |
| ProvisioningOrder.Changes | Type Dictionary Description Is the list of changes. |
| ProvisioningOrder.Resource | Type Dictionary Description Is the current state of the resource. |
| ProvisioningOrder.Owner | Type Dictionary Description Is the owner of the resource. |
Operations
The template uses the Mustache syntax. Several operations are already provided, but you can find more on this page.
Usercube also provides a way of using conditions with Mustache for the following operations:
>: superior to<: inferior to==: equal to!=: different from
Example
{{#each ProvisioningOrder.Changes}}
    {{#ifCond this '==' 'INTERNAL'}}
        This account is for an internal employee.
    {{else}}
        This account is for an external employee.
    {{/ifCond}}
{{/each}}
This template goes through all the changes provided by the provisioning order. If any one of them meets the condition for an internal employee, we display the internal employee message. Several messages can be shown if several changes meet the condition.
Template example
Please create a resource "{{ResourceType}}" for user {{Username}}.

For more information on the user, see: {{UsercubeProfileLink}}

{{#ifCond ProvisioningOrder.ChangeType '==' 'Deleted'}}
  To delete the account, please contact the IT team.
{{/ifCond}}

{{#each ProvisioningOrder.Changes}}
  This is a change: {{this}}
{{/each}}

The resource must have the following values:
{{#Entity.GetEnumerator}}
	- {{Key}}: {{Value}}
{{/Entity.GetEnumerator}}

{{#DisplayAdd}}
Add the following links:
{{/DisplayAdd}}
{{#AddedLinkedEntities}}
	- {{Name}}
{{#Values.GetEnumerator}}
		- {{Value}}: {{Key}}
{{/Values.GetEnumerator}}
{{/AddedLinkedEntities}}