Assignment Dates
Entitlements can be assigned to users manually or automatically, but not on any time period. See the Entitlement Assignment topic for additional information.
For Manual Assignments
During the manual assignment of an entitlement, i.e. role or resource type, to a user, the start and end dates of the entitlement must follow simple rules:
- the start date cannot be earlier than the earliest start date in all records of the user;
- the end date cannot be later than the latest end date in all records of the user.
This means that requesting an entitlement without any start/end dates will actually assign the entitlement from the records' earliest start date to the latest end date.
An entitlement cannot be requested with a start date earlier than today's date. But when requesting a role with an end date later than the records' latest end date, then the role will be assigned with its end date equal to the records' latest end date.
For Automatic Assignments
The start and end dates of any automatic assignment are based on the dates from the Context Rule defined for the identities.
Entitlement Assignment
Assigning entitlements means giving users specific permissions, or access rights, etc.
Overview
As Identity Manager relies on a role-based assignment policy, entitlement assignment is simply role assignment. See the Role Model topic for additional information.
So once a user is assigned a role, Identity Manager must make the right changes in the managed system(s) to actually enable the corresponding permission. The values to be changed in the managed systems are specified in provisioning orders.
Hence, an entitlement assignment is both the result of the execution of a provisioning order, and the enablement of an access right.
Automatic vs. Manual
Within Identity Manager, assignments can be created automatically, or can result from manual requests.
Automatic assignments are created by Identity Manager when evaluating the policy, i.e. when computing expected assignments based on existing users and the policy's roles and rules. See the Evaluate Policy topic for additional information. Automatic assignments can:
- Result directly from the application of assignment rules on identities. See the Assignment Policy topic for additional information.
- Be inferred and cascading from another assignment.
Manual assignments and degradations are on the other hand, need to be requested individually through the UI.
Assignments' Approval Workflow
Some entitlements require the approval of one or several knowledgeable users before actually being assigned. This is standard procedure in many security-concerned organizations.
NOTE: This is configurable through the role's or resource type's approval workflow type. See the Single Role topic for additional information.
Each step of the approval workflow is associated with a workflow state, so that all assignments can be tracked and it is clear what step they are at.
The same approval workflow is used for requests to add or remove roles.
For example, Ms. Jackson requests for Mr. Smith the single role Server Room Access which has a two-step approval workflow:
- At the end of the workflow, the assigned role has the workflow state Requested.
- Once the assignment is processed, the workflow state switches to Pending Approval 1/2.
- Once a reviewer approves the assignment, the state switches to Pending Approval 2/2 (and if the reviewer declined the assignment, the state would switch to Declined).
- Once a second reviewer approves the assignment, the stat switches to Approved and the assignment is finally effective.
Provisioning state
In addition to the workflow state that represents an assignment's progress in the approval workflow, any assignment also has a provisioning state to represent its progress in its lifetime from creation in the database to provisioning to the managed system and to its eventual deletion.
NOTE: Contrary to the workflow state that concerns all assignments, the provisioning state is only about the assignments that need provisioning.
For example, roles exist only in Identity Manager and not in the managed systems, so assigned roles do not have a provisioning state, unlike assigned resource types, scalars and navigation, etc.
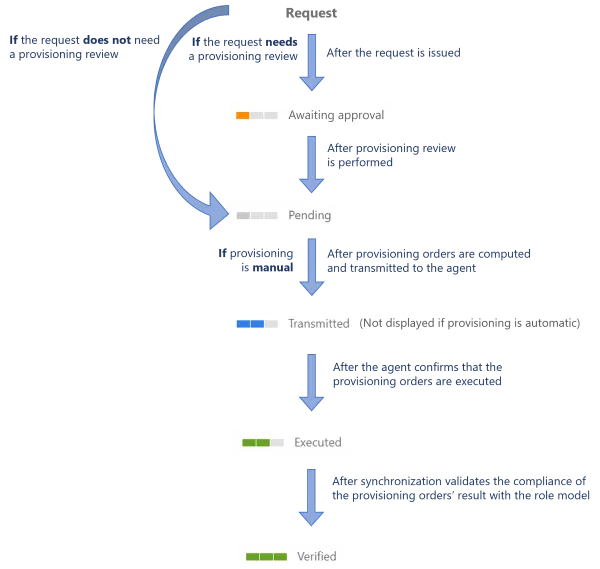
The schema sums up the usual progress of an assignment's provisioning state.
For example, once Mr. Smith's role has completed the approval steps, we expect the provisioning of a navigation property:
- It is not yet ready for provisioning because we decided to add a provisioning review by a knowledgeable user because it is a sensitive permission, so the assigned resource navigation has the Awaiting Approval provisioning state.
- Once a reviewer approves the assignment, the provisioning state switches to Pending.
- Once provisioning orders are computed and transmitted to the agent, the state switches to Transmitted.
- Once the agent confirms that the related order is executed, the state switches to Executed.
- Once synchronization validates the consistency of the provisioned value with the policy, the state finally switches to Verified.
Assignments whose provisioning orders are blocked because they are Awaiting Approval are to be reviewed on the Provisioning Review screen.
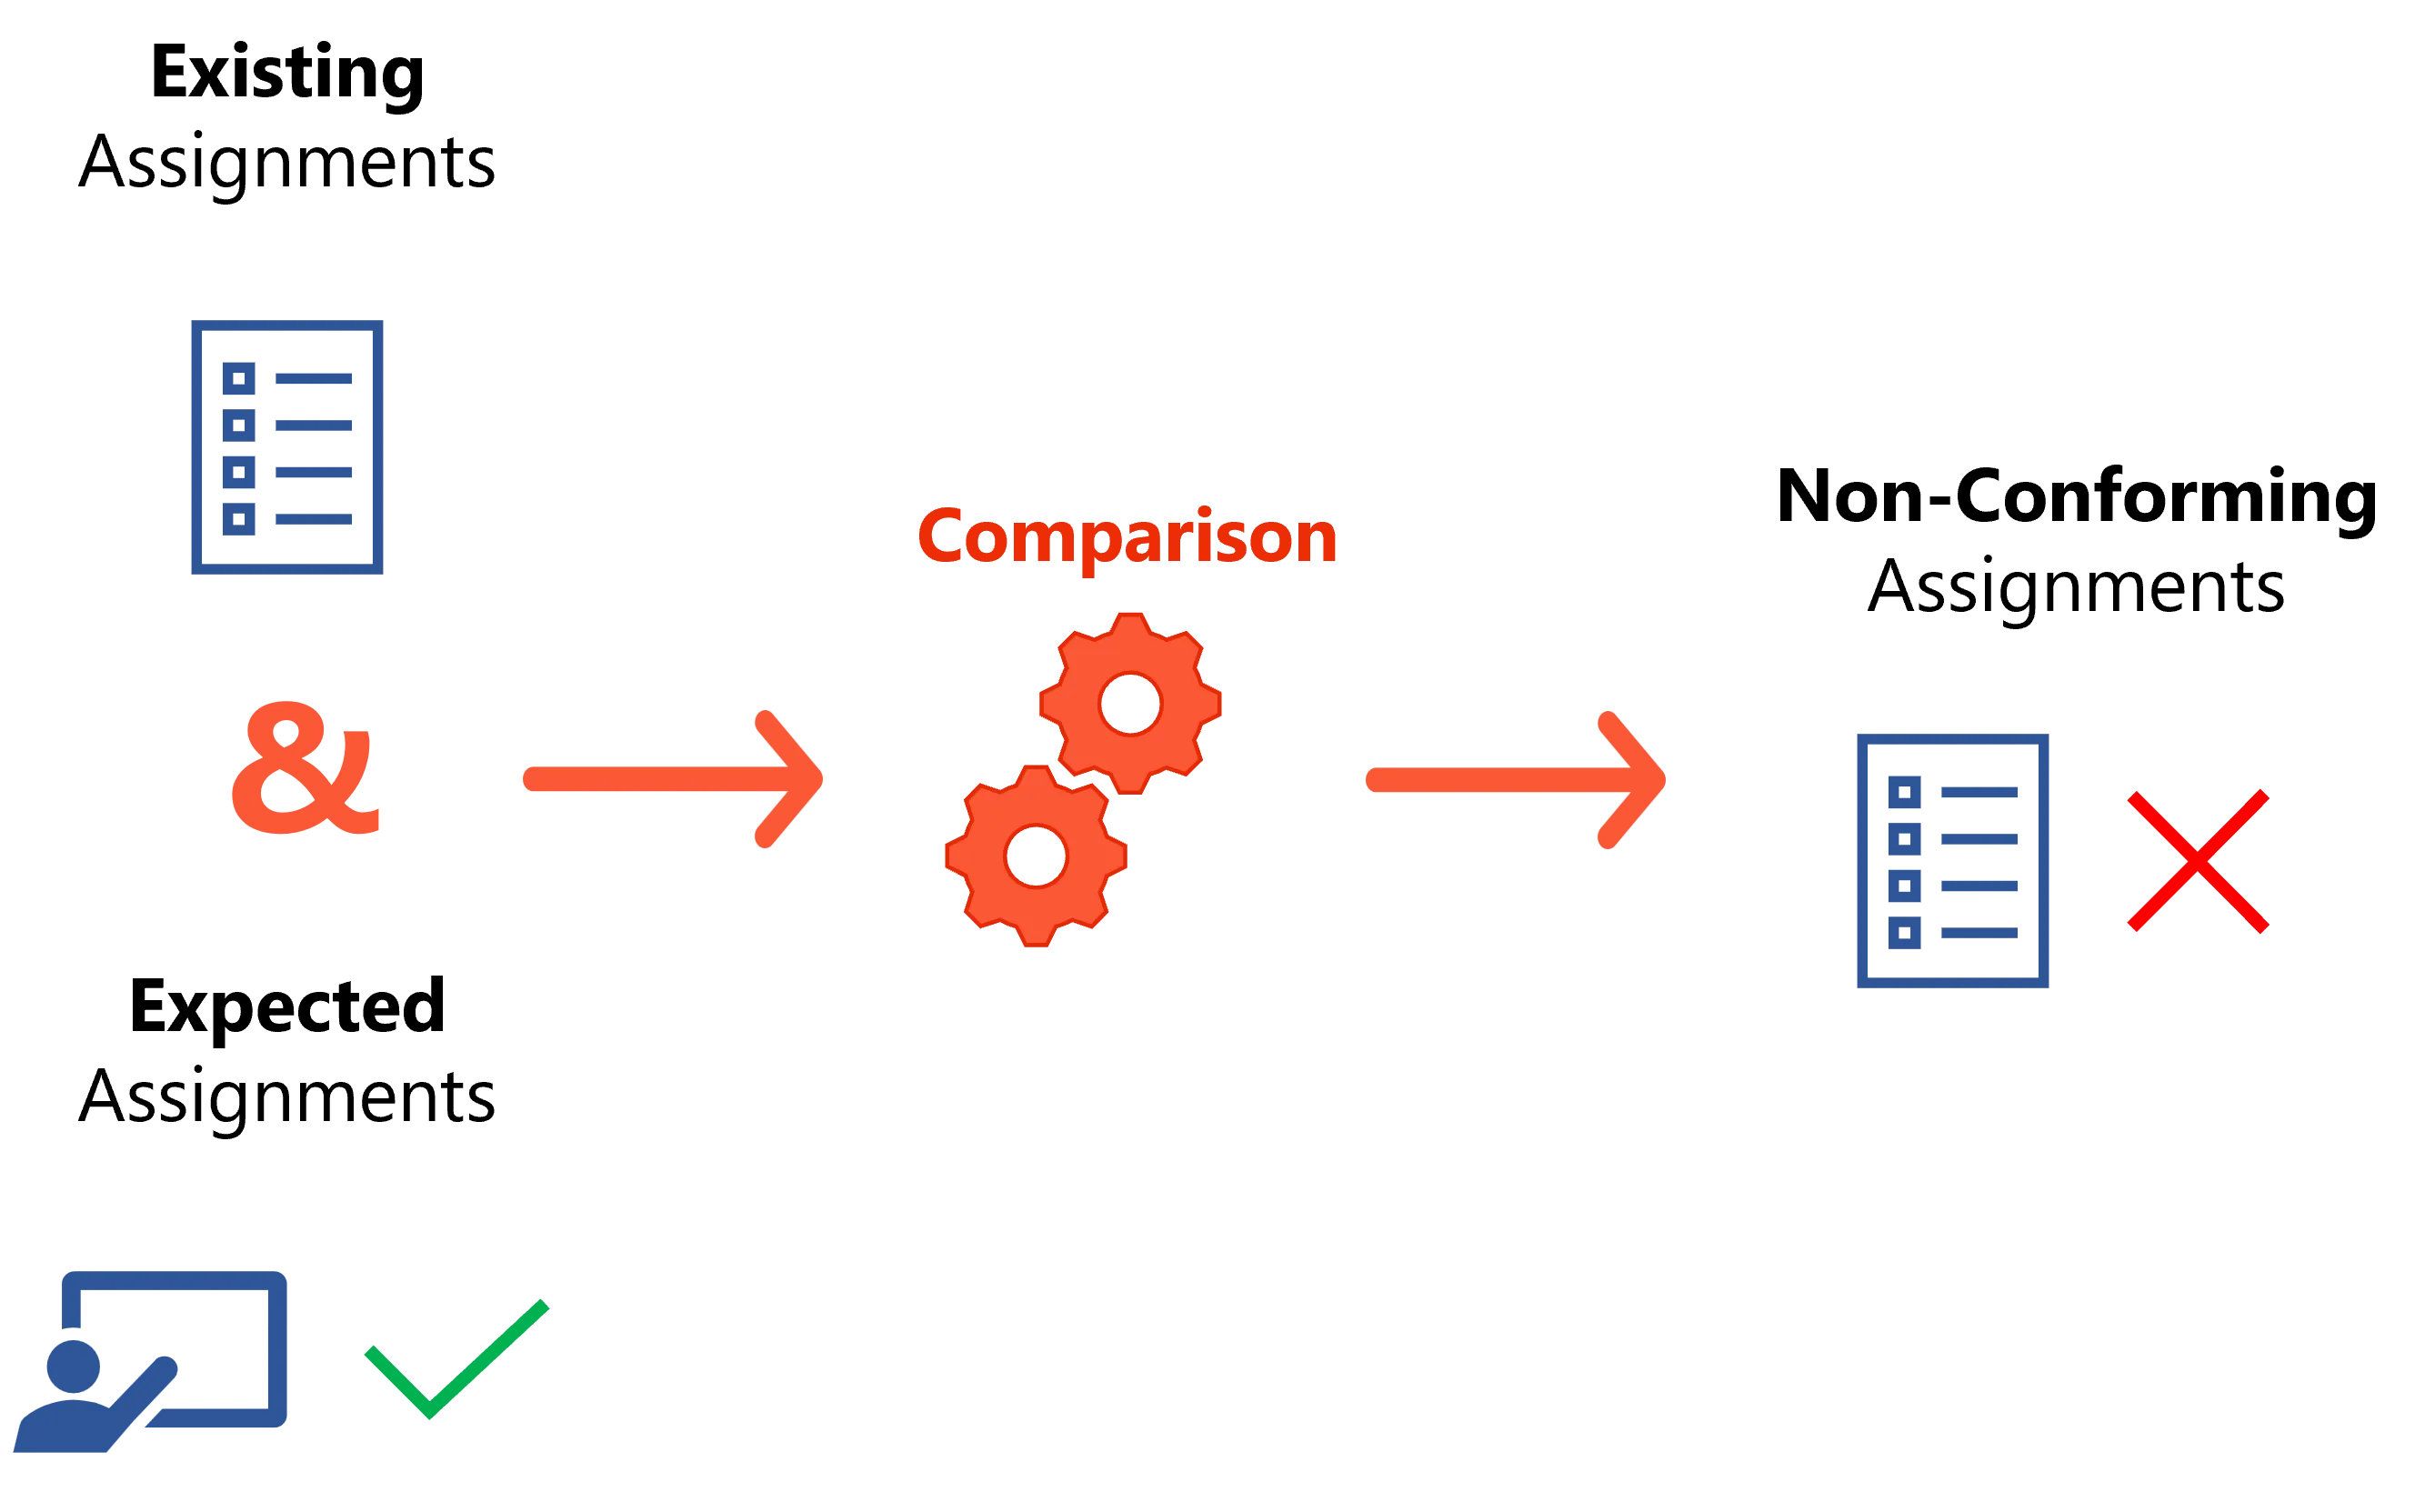
Non-Conforming Assignments
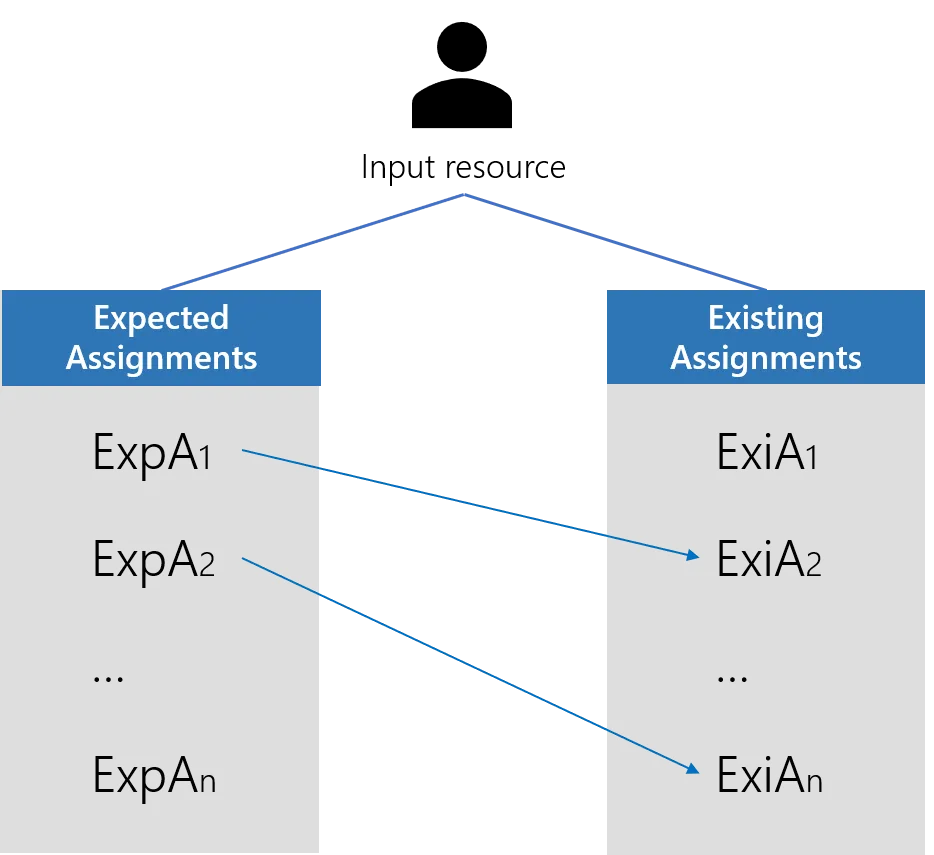
Once a policy is configured with all its rules and roles, Identity Manager can combine it with user information in order to determine the expected assignments, i.e. the list of all assignments that comply with the policy.
On the other hand, via synchronization Identity Manager can read the existing assignments, i.e. the list of all assignments that actually exist in the managed systems.
Technically speaking, Identity Manager creates entitlements in the managed systems, and "translates" them into role model language. In other words, Identity Manager create assignments based on the entitlements found in the systems.
A simple comparison between these two lists defines the non-conforming assignments, i.e. the list of all assignments that do not comply with the policy.
A non-conforming assignment must be reviewed in Identity Manager by a knowledgeable user, and is therefore:
- Removed if Identity Manager correctly spotted it and the owner should indeed not possess this permission;
- Kept as an exception if the configured rules do not apply to this particular case.
NOTE: Non-conforming assignments are to be reviewed on the Role Reconciliation and/or Resource Reconciliation screens. See the Evaluate Policy topic for additional information.
Non-conforming assignments can still be split into two categories:
- Pre-existing when they are found during the very first synchronization because they existed before Identity Manager's implementation;
- Simply non-conforming when they are found later.
For example, consider a (navigation) rule stating that the QuickBooks Level 1 Access role entitles its owner to the Active Directory QuickBooks group membership, that enables them to access the organization accounting balance information through QuickBooks.
Now, let's say synchronization finds the Active Directory QuickBooks group membership for Mr. Smith's Active Directory account. The trouble is, Mr. Smith digital identity has not bee assigned the QuickBooks Access role: this is an inconsistency.
In order to fix the inconsistency, Identity Manager creates the assignment of this role to Mr. Smith to be reviewed by a knowledgeable user who can determine whether the assignment is legitimate or results from a mistake.
Review automation
Identity Manager provides automation rules to automate the review of non-conforming assignments by automatically approving/declining assignments that were pending approval for some time, if this behavior is desired. See the Automate the Review of Non-conforming Assignments topic for additional information.
For example, the single role Server Room Access is requested for Mr. Smith, with a two-step approval workflow. Ms. Jackson is supposed to review it, and then Mr. Jones. If Ms. Jackson takes too long, an automation can approve it, or most likely decline it, automatically. This way, the approval process ends and will need to be restarted at a later date if the need is genuine.
Resource Type Assignments
Resource types are not as intuitive as roles because they are more complex and subtle. Assigning a resource type materializes:
- The creation of a resource, usually an account, in the managed system;
- The creation of scalar and navigation properties for this new resource;
- The categorization of the created resource, which means both the correlation of the resource to an owner, and the classification of the resource into a specific type with specific rules between owner and owned resources. See the Categorize Resources topic for additional information.
Reconciliation
Just like any other assignment, a resource type assignment can be non-confirming when the resource's existence or its values do not comply with the policy.
For example, a SAP account is found for a user who should not have one according to the role model's rules.
NOTE: An account can also be an orphan when it is found in the managed system, but no owner could be correlated.
Consolidated states
A resource type assignment also has consolidated workflow and provisioning states to represent the progress of the resource's scalar and navigation assignments.
Same as previously, the consolidated provisioning state represents the provisioning progress of the resource type assignment together with its nested scalar/navigation assignments.
The consolidated workflow state represents the provisioning progress of the resource type assignment together with its nested scalar/navigation assignments, and it is described by the following values:
-
ConsolidatedWorkflowReviewState represents the progress in the approval workflow for a manual assignment;
NOTE: Except for very technical use cases, resource types should not be requested manually, they should only be inferred by a role and thus assigned automatically.
-
ConsolidatedWorkflowBlockedState indicates whether one or more of the nested scalars/navigations are blocked;
-
ConsolidatedWorkflowFoundState indicates whether one or more of the nested scalars/navigations are stated as non-conforming or pre-existing.
Conforming Assignments
The Compute Role Model Task is able to compute, for a given identity, the appropriate assignments.
If you are interested in a detailed description of the actual Compute Role Model task algorithm, please refer to the Reference documentation. This article focuses more on the design decisions and the underlying philosophy of the process.
Overview
This is how Identity Manager solves the identity lifecycle issue.
FAQ: During onboarding, moving, offboarding, how can we make sure that an identity has the appropriate assignments?
What are the appropriate assignments?
They are a trade-off between having enough assignments to work efficiently but not too many as to pose a security threat.
Choosing the appropriate assignments is a science as much as an art. Identity Manager helps formalize decision rules to make them more efficient. But talking about assignments and their provisioning requires the appropriate language.
Roles
FAQ: What does assigning an entitlement means?
In a target application, it is granting an account membership for a group, changing a person's clearance level, adding an authorized account to the access control list of a resource, etc.
Performing an assignment requires a great deal of knowledge about the inner mechanisms of the target authorization mechanism. That makes talking about entitlement even more complicated. Am I talking about a group, a resource's access control list, a clearance level?
Identity Manager here aims at:
- Making every assignment decision more intentional.
- Making automation of those assignment decisions possible.
For these goals, Identity Manager hides this complexity behind an ubiquitous language, using a widely known model: RBAC. In the end, talking about entitlements is talking about roles. No more multiple obscure authorization mechanisms.
This makes thinking about entitlements within Identity Manager easy. The provisioning issues stay out of the way, and all the energy can be focused on designing the perfect assignment policy.
The appropriate model also helps formalizing rules that can be used for automation.
Dimensions
Assignment decisions for a user are always made based on the user's needs and legitimacy.
FAQ: Are employees working on tasks that need this assignment? Are they senior enough to have that responsibility?
The basis for an assignment decision can be seen as a set of "identity attributes" that represent the place of the employee in the organization.
We can formalize these "identity attributes", on which informal assignment decisions are made, by translating them into dimensions. Identity Manager's dimensions are exactly that: key criteria, on which assignment decisions are based.
Just as roles, dimensions are a fundamental piece of the puzzle. Choosing dimensions forces users to sit down and really think about what really motivates assignment decisions in the organization. It is going to help with automation but it is also going to help come up with better decision rules, and hence improve the overall security of the organization. Assignment rules naturally flow from dimensions and roles.
Rules
FAQ: Do all employees working on a given task have the entitlements they need?
Roles and dimensions are the basis for a language that enables users to formalize, in a very explicit way, the assignment policy: who should get what entitlement. Dimensions are criteria for decisions and roles are the result of a decision. We are now only missing the rules that map criteria to roles.
Those are the assignment rules: single role rules and composite role rules.
Writing the assignment policy actually becomes very easy. Once dimensions and roles are identified, assignment rules become obvious.
The last difficulty is provisioning those assignments.
Provisioning
FAQ: Is the data from the target application complying with the rules created earlier?
Translating roles into provisioning orders is finding out how the target application should be changed to satisfy the assignments. This is where the technical complexity that was hidden by the role, should be written. Authorization mechanisms map so well to RBAC that provisioning mechanisms naturally flow from the roles.
Provisioning mechanisms all follow this pattern:
- Start with the identity.
- Find the resource in the target application that should be updated to satisfy the assignment requirement. It is often an account. That's the correlation.
- Compute the value of the data that should be updated in the target resource. That's provisioning rules.
One last point to consider is that provisioning rules and correlation sometimes depend on the type of resource we are handling. Authorization mechanisms often discriminate between resources, depending on their relevance for security. We might need specific provisioning rules to enforce this difference.
The resource type materializes the classification of resources of the same application into categories relevant from a security point of view. As a bonus, classifying resources help with governance.
The Role Model
FAQ: What is the role model in a nutshell?
Dimensions, roles, assignment rules, resource type, provisioning rules.
You start with dimensions. From there, roles are deduced from assignment rules. They are translated to provisioning orders, following scalar rules and correlation rules and resource types.
When There Are No Rules
If you're not comfortable yet with writing rules that automatically assign roles, you can skip dimensions and start this whole process from roles.
You can assign roles manually to users and still benefit from hiding the provisioning complexity inside roles, and have a good basis for writing down your assignment policy.
Evaluate Policy
Evaluate Policy is the core algorithm of the assignment policy. See the Assignment Policy topic for additional information.
The algorithm is applied by the server to a resource. It has the following responsibilities:
- Enforcing the assignment rules: the algorithm outputs a list of expected assignments for the input resource
- Evaluating risks
- Managing assignment lifecycle: updating provisioning states
- Purging expired assignments
See the Risk Management topic for additional information.
Overview

The main responsibility of the Evaluate Policy is to compute, for every fed resource, the set of assignments of entitlements that comply with the assignment policy.
That set is composed of roles that should be assigned to the resource and of scalar and navigation assignments that should exist for that resource as an owner. The latter are in fact values of target resource properties to fulfill from that resource fed in the algorithm. Those assignments are referred to as the expected assignments. Manual assignments and derogations are included as well, as they become rules within the assignment policy.
Evaluate Policy also identifies the existing assignments. They represent the actual assignments read (or more accurately, deduced) from the managed systems' resources.
Finally, the differences between the existing assignments and the expected assignments are computed. As a result, a set of non-conforming assignments is revealed, to be fixed by provisioning or validated as derogations.
Later, provisioning orders are edited, validated by a knowledgeable user and sent to the agent for connectors to fulfill and fix the differences.
Evaluate Policy is executed by the task Usercube-Compute-RoleModel, usually included in a
regularly scheduled provisioning job.
See the Connectors, Compute Role Model Task , and Jobs topics for additional information.
The Algorithm Steps
Step 1 – Select resources from the resource repository, all the relevant properties for every resource.
This includes:
- Attribute values of the resource itself;
- Attribute values of the resources pointed to by a navigation property from the current resource;
- All existing assignments for these resources and their properties such as provisioning state and workflow state;
- Every property of the source resource, if the resource is a target in an owner/target relationship;
- Every property of the target resource, if the resource is an owner in an owner/target relationship;
Extracting and computing, in an acceptable amount of time, such a load of data is no trivial matter.
The number of resources to consider is of the order of 100 000 entries for a system managing 10 000 identities among 4 managed systems.
To improve execution time, two optimizations are used:
- Identity Manager uses
batching to
perform the database request. The
SELECTquery is divided into sets of smaller queries called batches. The size of a batch is configurable in the Identity Manager-Compute-RoleModel, with theBatchSelectSizeattribute. - Identity Manager only selects resources for which a new assignment computation is needed. They are resources updated during the last incremental synchronization, and resources that depend on them. They are identified by the dirty flag, set during incremental synchronization. See the Upward Data Synchronization topic for additional information.
NOTE: For very few edge cases, dependencies between resource values can be difficult to identify
within Identity Manager. An example involves entity property expressions using
LINQ syntax. See
the Entity Type topic for
additional information. A second- or third-order binding used in such an expression actually defines
a dependency. But Identity Manager does not account for it, because of performance-reliability
trade-offs. That means a resource R1, using such an expression to compute one of its properties
values from another resource R2 property value, might not be updated even if R2 has been updated
by incremental synchronization. This too can be fixed by using complete synchronization once a day.
Step 2 – Compute expected assignments
The second step is building the expected assignment list by applying the assignment rules to the input resource.
This step builds a list, from scratch, of every expected assignment, both role assignments and assignments issued from provisioning rules.
The list contains:
- Automatic assignments, inferred from context-based rules
- Automatic assignments, inferred from other assignments, according to role-based rules
- Manual assignments previously created and derogations previously validated
- Assignments updated by an automation rule. See the Automation Rule topic for additional information.
To build the list, the algorithm first goes through composite role rules, single role rules, resource type rules, navigation rules, and applies them in that order. See the Composite Role Rule, Single Role Rule, and Resource Type topics for additional information. This takes care of automatic assignments. Every step influences the following one: single roles can be inferred from composite roles that have just been assigned by a reviewer or an automation rule for example.
Then, manual assignments and derogations are added to the expected assignments list. They are extracted from the database, where they were saved after being added from the UI or validated through the UI, and are considered part of the role model. Manual assignments are identified by the Approved workflow state. Derogations are identified by the Found and Historic workflow states.
Role assignments as derogations are displayed to the end-user for confirmation in the Role Reconciliation screen. As long as they are not denied, they are considered a part of the role model and will not be considered as a non-conforming difference to be fixed by provisioning. They are deduced from actual resources and resource values found in the managed system, that do not comply with the assignment rules, and are displayed in the Resource Reconciliation screen.
Let's detail the rule enforcement mechanisms.
Match context rules
Dimensions are really the basis of an assignment process. See the Entitlement Management topic for additional information.
Before starting, a context rule is applied, giving for the input resource:
- The dimension values
- The time period validity of every assignment computed during this Evaluate Policy iteration

Computing expected role assignments
Role assignments, on the other hand, are the outcome of the assignment process. See the Entitlement Management topic for additional information.
Role assignments are the output of composite role rules and single role rules enforcement. The outcome of those rules, as assigned composite roles and assigned single roles, is conditioned by the input resource's context. They are the image of the status of trust and privilege granted to a resource-identity.
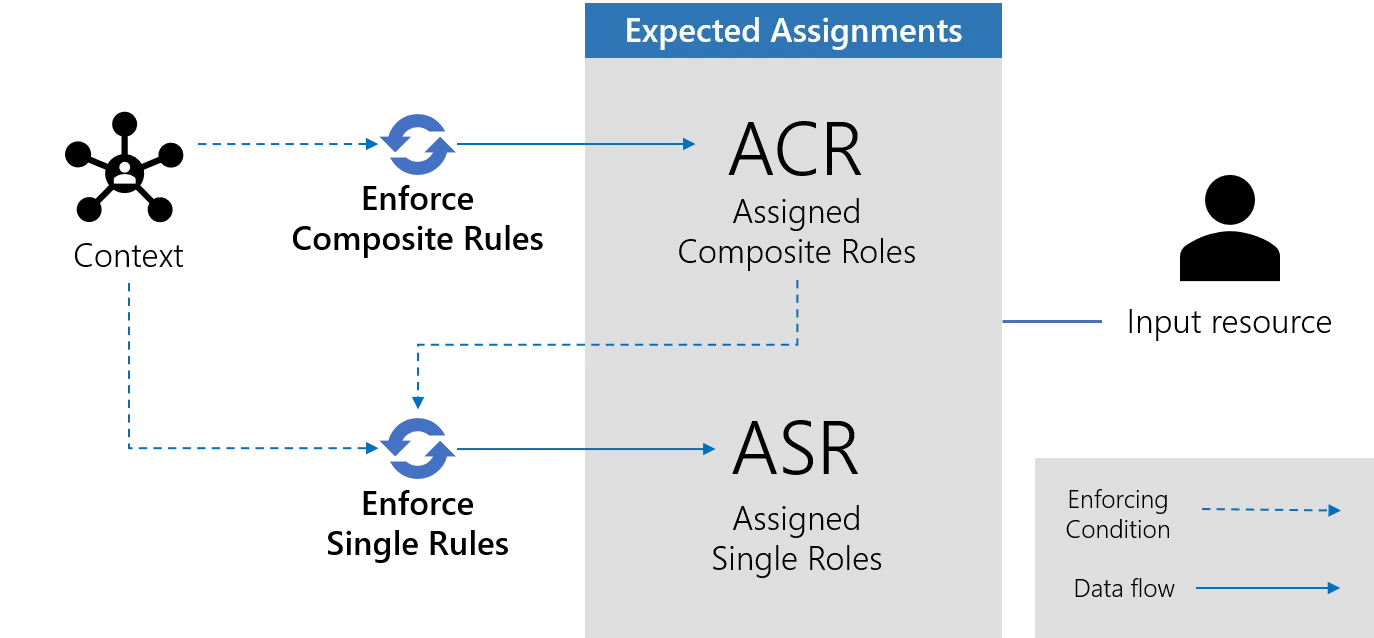
Enforcing composite role rules
The first rules that are enforced are the composite role rules. See the Composite Role Ruletopic for additional information.
For every selected resource, this step enforces composite role rules. That means assigning a
specific composite role to the input resource, based on its context's dimension values. This new
assignment is materialized into a new object called an assigned composite role, stored in the
UP_AssignedCompositeRoles table. The resource becomes the owner of the assigned composite role.
Manual and derogatory assignments of composite roles found in the database are also added to the expected assignments list.
Then automation rules are enforced on assigned composite roles. See the Automation Rule topic for additional information.
NOTE: Enforcing automation rules on an assignment means to find, for each assignment, the matching automation rule, looking at the last review or the creation date, comparing it to the time defined in the rule and, if needed, apply the rule decision that may approve or decline the assignment.
Enforcing single role rules
Then, single role rules are enforced. That means assigning a specific single role to the input resource based on its context and existing assigned composite roles, i.e. the composite roles currently assigned to the resource. Both assigned composite roles freshly created by enforcing composite role rules and those already in the database are taken into account. In the former case, single roles created are said to be inferred.
This is materialized into a new object called an assigned single role, stored in the UP_AssignedSingleRoles table. The resource becomes the owner of the assigned single role.
Manual and derogatory assignments found in the database of single roles are also added to the expected assignments list.
Then automation rules are enforced on assigned single roles.
Expected provisioning assignments
Fulfillment is just the consequence of the role assignment process. See the Entitlement Management topic for additional information.
Provisioning-orders-to-be are the output of resource type rules, navigation rules and scalar rules. The outcome of those rules, as assigned resource types, assigned resource navigation, and assigned resource scalar is conditioned by the input resource assigned roles, issued during the first expected role assignments computation or even earlier. They are the exact image of technical provisioning orders that are to be executed by the agent, after being validated by a knowledgeable user. See the Resource Type topic for additional information.
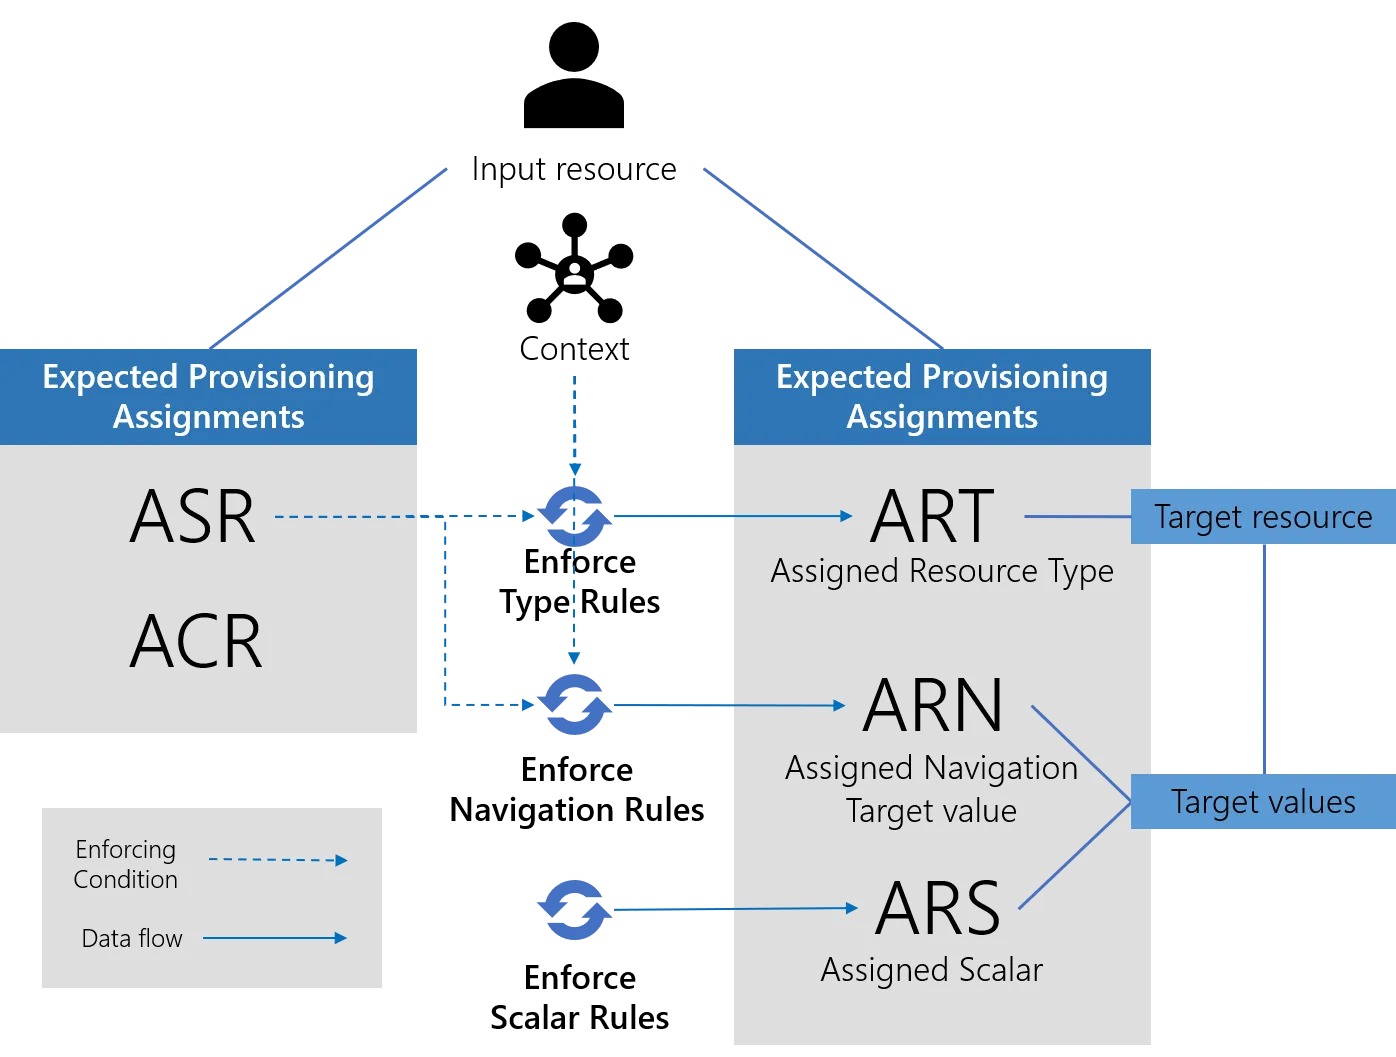
Enforcing resource type rules
Resource type rules are enforced. This means creating and adding assigned resource types to the expected assignments list. This means enforcing the need for a resource of that type to be created in the managed systems, with the input resource as its owner.
Then automation rules are enforced on assigned resource types.
A further step will correlate, to find the actual target resource if it exists. If not, it will eventually become a provisioning order to create such a resource.
This can be seen as assigning a target resource to an owner. It's still important to note that the act of assigning a resource to an owner almost always is the consequence of a role assignment. Use cases for which a single, isolated resource, is "assigned" (i.e. created with specific values) is rare and is more of a solution to a specific technical problem.
Enforcing navigation rules
Finally, navigation rules are enforced. They aim to complete the information about the resource to be created because of the assigned resource types. If the type rule is the what, this is the how.
For every assigned resource type, associated navigation rules are enforced.
Navigation rules are conditioned on the resource's assigned single roles. If a specific single role is found as assigned to the owner resource of the assigned resource type (i.e. the input resource of the algorithm), an assigned resource navigation is created in the UP_AssignedResourceNavigation table, with the resource as its owner. The assigned resource navigation will eventually translate into a provisioning order.
The assigned resource navigation is hence the consequence, in the form of a provisioning-order-to-be, of assigning a role to a resource.
This means also no assigned resource type, no navigation assignment. Resource type rules are a prerequisite for the associated navigation rules to be enforced.
Enforcing scalar rules
Finally, the scalar rules associated with the target's resource type are enforced and become assigned resource scalars that will also result in a provisioning order.
For every assigned resource type, associated scalar rules are enforced.
They also aim to complete the information about the resource to be created because of the assigned resource types.
Found manual assignments and derogation of resource types with their associated navigation and scalar assignments are added as well.
Step 3 – Match existing assignments with expected assignments
The expected assignments list is now built.
For every expected/computed assigned resource type, assigned single role and assigned composite role, the algorithm finds the matching existing assignment, from the list of assignments.
The existing list of assignments in the current database is composed of:
- Assignments computed by the last Evaluate Policy;
- Assignments created by the classification task, including
FoundandHistoricones issued from the analysis of the resource values from the managed system.
The result is a list of expected assignments that have a counterpart in the list of existing assignments.
Step 4 – Assignments cleansing / purge
Some assignments are given an expiration date at creation (see the first step, context rules enforcement). This is the step where expired assignments are removed from the expected assignments list.
They will not be deleted, but historized. The validTo column of the UP_Assigned* is updated.
Others have been manually denied via the provisioning review screen, or must be canceled because of rules or resource value changes. Those are deleted too.
The result is a list of really existing assignments, without the expired, canceled or explicitly unwanted ones for any reason.
Step 5 – Correlation

Resource correlation rules are enforced: for every expected assigned resource type, the algorithm looks for a target resource that correlates the owner, which is the input resource.
If found, that correlated resource becomes the target of the assigned resource type. If not, a provisioning order of creation is written.
A word about correlation. Correlation is achieved by using resource correlation rules. Each rule applies to a resource type. It defines for the source entity type a quantity computed from its attributes. It does the same for the target entity types. Those quantities are called correlation keys. For a given assigned resource type, the correlation algorithm tries to match the owner correlation key with all available resources of entity type target. If one is found equal, the matching resource becomes target of said assigned resource type. For every resource, correlation keys are computed by a regularly scheduled task and stored in the database.
Step 6 – Handle assignment lifecycle
Expected assigned resource scalars and assigned resource navigations matching existing counterparts are found.
For every assigned resource type, assigned resource scalar and assigned resource navigation, the provisioning state is updated according to the correlated target resource values, the matching existing assignment state and the provisioning state transition algorithm.
For expected assignments that have a matching existing counterpart, the correlated target resource values are analyzed. If they match the expected resource values, that means that the last provisioning order has been indeed well executed. The provisioning state of the associated assignment is switched to Applied. Same goes for the role assignments from which those scalar and navigation assignments originated.
For expected assignments that do not have a matching existing counterpart, they receive their Pending or Blocked provisioning state.
Blocked assignments are submitted for validation in the provisioning review screen. Blocked assigned resource types are associated with a confidence level that describes the level of confidence of the correlation between source and target. The confidence level is a configuration of the resource correlation rules.
The workflow state is also analyzed; assignments with Approved (or Cancellation) have been approved (or denied) and can now be provisioned.
| Workflow state | Description |
|---|---|
| 0—None | Used for Identity Manager's internal computation |
| 1—Non-conforming | The assignment is not supported by a rule. |
| 2—Requested - Missing Parameters | The assignment has been requested via a workflow, but does not specify at least one required parameter for the role. |
| 3—Pre-existing | The assignment is not supported by a rule, and it existed before the production launch. |
| 4—Requested | The assignment is requested via a workflow, but not yet added. NOTE: Usually displayed in workflows' summaries.  |
| 5—Calculated - Missing Parameters | The assignment was done by a rule which does not specify at least one required parameter for the role.  |
| 8—Pending Approval | The assignment must be reviewed manually by a knowledgeable user. |
| 9—Pending Approval 1 of 2 | The assignment is pending the first approval on a two-step workflow. |
| 10—Pending Approval 2 of 2 | The assignment is pending the second approval on a two-step workflow. |
| 11—Pending Approval 1 of 3 | The assignment is pending the first approval on a three-step workflow. |
| 12—Pending Approval 2 of 3 | The assignment is pending the second approval on a three-step workflow. |
| 13—Pending Approval 3 of 3 | The assignment is pending the third approval on a three-step workflow. |
| 16—Approved | The assignment has completed all approval steps. |
| 17—Declined | The assignment is explicitly declined during one of the approval steps. |
| 20—Cancellation | The assignment is inferred by a role that was declined. |
Step 7 – Delta
The existing and expected assignment lists are compared and yield a third list of differences, i.e. non conforming values in the managed systems that need to be fixed.
That list will eventually become provisioning orders that will be sent to the agent for fulfillment.
What constitutes a difference?
Expected resource and their values not matching the existing resource and their value, for an
existing assignment with an Applied or Executed provisioning state.
If the existing assignment is not yet Applied the agent might still be preparing the provisioning.
A resource value that does not comply with the role model, but is in the fixing process (meaning an
assignment with a provisioning state of Pending or Sent) will not come up in the UI.
Step 8 – Saving the result
At this point, Evaluate Policy has computed expected assignments for the resource, by applying rules and purging expired assignments.
Expected assignments are:
- Assigned composite roles and assigned single roles, representing roles assigned to the resource
- Assigned resource scalars and assigned resource navigations, representing scalar and navigation properties to fulfill to a target resource from that source resource, the ownership relationship between source and target being materialized by an assigned resource type.
Expected assigned are written to the database, they will be the basis for the next step: fixing differences. The writing is optimized by using bulk insert methods.
To enhance the writing performances, it's not actual assigned* that are written, but updates from the existing ones, using the delta computed at step 7.
For fine-grained assignments such as assigned resource scalars and assigned resource navigations, Identity Manager stores the policy value i.e. the value computed by Evaluate Policy (not yet fulfilled) and the current value i.e. the value currently held by the target resource in the managed systems.
From there, it is possible to retrieve the differences between existing and expected assignments for that resource, at any time.
Remember, the goal of building a set of assignments is twofold:
- Building a catalog of existing assignments as assigned roles for non-technical users to consult.
- Fulfill target values from source resources so as the managed systems comply with the role model.
The catalog of existing assignments is now available: they are assigned* with an Applied provisioning state. Non technical-users can read assigned single roles and assigned composite roles. Technical users will be more interested in assigned resource scalars and assigned resource navigations.
Fulfilling target values from source resources is going to take the form of provisioning orders, computed from assigned resource scalars and navigations in the Pending or Blocked state.
Fixing Differences
The engine has computed a list of expected assignments. The difference with the managed system state, as a list of resource values that infer differences in role assignments, can be fixed by provisioning the expected assignments to the managed systems.
Some provisioning orders have to be reviewed by a knowledgeable user. Those are provisioning orders computed from assigned* with a Blocked provisioning state. The UI provides screens to perform review and validation.
Every provisioning order is to fix a difference that has been caused by a change in the source resource values or in its target resources.
Let's see in details what kind of differences Identity Manager deals with, and what kind of change in the managed systems triggers them.
The workflow state of an assignment helps identify the nature of a difference between that assignment and the managed systems.
UI overview
Differences are displayed in the following screens:
- Provisioning Review displays
Blocked(nonFound, nonHistoric) assigned resource types, assigned resource navigations and assigned resource scalars. They must be reviewed by a knowledgeable technical end-user. They are assignments mirroring legit provisioning orders recently computed by the Evaluate Policy. - Resource Reconciliation displays
FoundandHistoricassigned resource types, assigned resource navigations and assigned resource scalars. This is where non-conforming resource values or non-authorized accounts (i.e. a resource that should not exist at all) in the form of provisioning assignments are displayed. These assignments mirror, at the resource value level, derogations still not explicitly refused by a knowledgeable end-user. This is where an end-user can find provisioning assignments that would render legit the non-confirming values and non-authorized accounts found in the managed systems. - Role Reconciliation displays
FoundandHistoricassigned single roles and assigned composite roles. They are role assignments that mirror derogations, at the role level, still not explicitly refused by a knowledgeable end-user. This is where an end-user can find roles assignments that would render legit the non-confirming values and non-authorized accounts found in the managed systems. - Redundant Assignments displays
Approvedassigned roles and assigned resource types tagged as eligible to be turned intoCalculated.
Remember, Role Review is a little bit different as it displays manually requested assignments waiting for manual approval.
A target value to update
A target resource scalar value is different from the scalar value obtained by applying scalar rules to the source resource.
This could be caused by a change in the target value directly from within the managed system, before or after Identity Manager has been plugged in. For example, a target Active Directory account Email value has been changed.
The corresponding assigned* would be awarded a workflow state Historic or Found given the difference is about a change in the target made outside/before Identity Manager and found by synchronization.
As Identity Manager does not overwrite managed systems values without confirmation from a knowledgeable user, the found non-conforming value will be displayed in the Resource Reconciliation screen, with the suggestion for update. The non-conforming value can either be kept, and become an exception and overwritten with the rules-issued value.
This could also be caused by a change in the source resource, by a previous fulfillment of Identity Manager, or directly from within the managed system. For example, the HR system has updated the Name of an employee. Synchronization has detected the change in value, and reapplied rules. And now, the target Active Directory account name has to be updated.
The corresponding assigned* would be awarded a workflow state PolicyApproved given the difference is about a change in the source that caused the need for a change in the target because of the applications of the rules.
This case yields a provisioning order, that could be blocked, and hence displayed in the Provisioning Review screen for validation in the form of a resource update provisioning order.
A target resource to create
A target resource is missing. Applying navigation rules to a source resource yielded the need for a specific target resource that has not been found by synchronization.
This could be caused by a missing resource in a managed system even before Identity Manager was plugged-in or the deletion of such a resource in the managed system afterward. For example, a nominative Active Directory account has not been created yet for that existing identity.
The corresponding assigned* would be awarded a workflow state Historic or Found given the difference is about a change or an omission in the target outside/before Identity Manager and found by synchronization.
This case yields a provisioning order, that could be blocked, and hence displayed in the Provisioning Review screen for validation in the form of a missing resource provisioning order.
This could also be caused by a change in the source resource, by a previous fulfillment of Identity Manager, or directly from within the managed system. For example, the HR system has updated the Job Title of an employee. Synchronization has detected it, and reapplied rules, and now, this identity has to be awarded a new Active Directory account with higher privileges.
Or it could be caused by the manual assignment of a new Role from within Identity Manager to an existing identity that would grant that identity with a new account and hence a target resource to create.
The corresponding assigned* would be awarded a workflow state PolicyApproved given the difference
is about a change in the source that caused the need to create a new target because of the
applications of the rules.
Those cases yield a provisioning order, that could be blocked, and hence displayed in the Provisioning Review screen for validation in the form of a resource creation provisioning order.
A target resource to delete
An extra target resource has been found by synchronization, it's been correlated with our source resource, but no navigation rules applied to the source resource yielded the need for its existence.
This could be caused by an extra resource created directly from within a managed system, or the change of a rule that makes some existing resources moot. For example, an administration Active Directory account has been created directly from the managed system and granted to an identity who, according to the rules, is not entitled to it.
As Identity Manager does not overwrite managed systems values without confirmation from a knowledgeable user, the found non-authorized account will be displayed in the Resource Reconciliation screen, with the suggestion for deletion. The non-authorized account can either be kept, and become an exception and or be deleted to comply with the rules.
The corresponding assigned* would be awarded a workflow state Historic or Found given the
difference is about an extra target added outside/before Identity Manager and found by
synchronization.
This could also be cause by a change in the source resource, by a previous fulfillment of Identity
Manager, or directly from within the managed system. For example, the HR system has updated the
Job Title of an employee. Synchronization has detected it, and reapplied rules, and now, this
identity has to be awarded a new Active Directory account with lower privileges, the old one must be
deleted.
Or it could be caused by explicitly denying a Role to an existing identity from within Identity Manager which would ripple through and forbid this account from existing.
The corresponding assigned* would be awarded a workflow state PolicyApproved given the difference
is about a change in the source that caused the need to deletion a target because of the
applications of the rules.
This case yields a provisioning order, that could be blocked, and hence displayed in the Provisioning Review screen for validation in the form of a resource deletion provisioning order.
Provisioning orders are still fairly technical to read. Non compliant-roles, inferred from non-compliant resources in the managed systems, are also displayed in the Role Reconciliation screen to be kept or deleted by less technical users.
Fulfilling
Fulfilling assignments is the role of connectors. Provisioning orders are written and sent to the
agent via the Usercube-Generate-ProvisioningOrders task is added to every provisioning job.
Existing Assignments
The Compute Role Model Task can deduce from synchronized data a list of assignments for every identity.
Overview
One of the main responsibilities of the Compute Role Model task is to translate data from the realm of the managed systems (such as accounts or groups) into the realm of roles.
The process results in a list of existing assignments, expressed as assigned roles, for every identity.
This is Identity Manager's first computation when deployed in an organization: assessing the current state of the managed system in order to suggest fixes.
The main process can be summed up as:
- Finding the owner
Oof a resourceRby applying correlation rules. - Deducing roles by applying provisioning rules (such as navigation or scalar) "in reverse". In
this step, Identity Manager tries to find the role that would have yielded a provisioning order
for resource
R, if assigned to identityO.
The following use cases can be encountered.
Use Case 1: One Group, One Role
This first use case involves a common role model situation: one single role represents one entitlement, for example an Active Directory group.
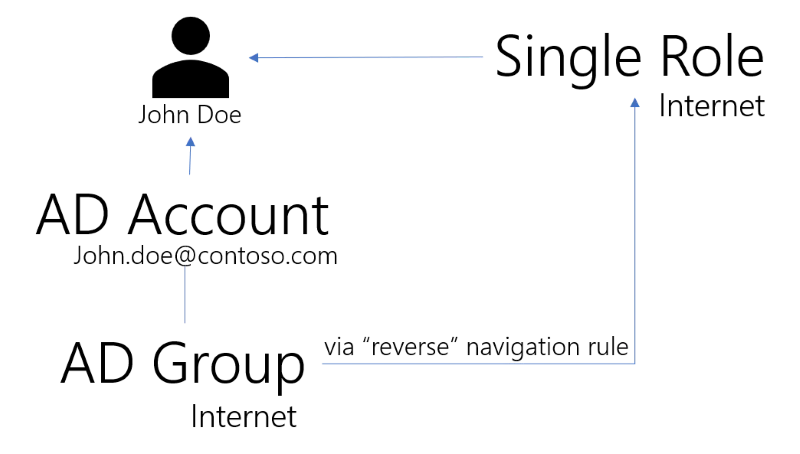
Let's study this use case with an example: a single role Internet is linked to an Active Directory
group Internet through a navigation rule N.

We are going to consider here an identity named John Doe, and his Active Directory account john.doe@contoso.com.
The most straightforward way to think about this role model is to consider the direct flow. This would happen if John Doe's account wasn't a member of the Internet group.
- Identity Manager performs the first synchronization, and correlates the nominative Active Directory account john.doe@contoso.com to John Doe.
- This account is not a member of the AD group Internet.
- A manager assigns the role to John Doe's identity using Identity Manager's UI.
- The Compute Role Model task applies the navigation rule
N. - A provisioning order for John Doe's Active Directory account becoming a member of the group Internet is issued.
This is a typical onboarding scenario for John Doe that happens to start a new job within the organization after Identity Manager was deployed.
Now, let's consider what happens for John Doe, if he started his job within the company before Identity Manager was ever deployed.
The initial situation is an identity, John Doe, and a "lonely" Active Directory account, john.doe@contoso.com.
This time, Identity Manager performs the "deduction" flow.
Identity Manager performs the first synchronization and tries to correlate accounts with identities. This results in finding out that John Doe is the owner of the Active Directory account john.doe@contoso.com. The synchronization also shows that the john.doe@contoso.com account is a member of the Internet Active Directory group.
The situation in Identity Manager database at this point is the following.

Integrators have defined the Internet single role and linked it to the Internet AD group through
the navigation rule N.
Now, the Compute Role Model task "studies" the role model: the only rule that assigns the Internet
Active Directory group is the navigation rule N. By following the rule in reverse, Identity
Manager deduces that the role Internet should de facto be assigned to John Doe, so that the
rules be consistent with the data found in the Active Directory.
The role is now listed under John Doe's assignment list (permissions) in Identity Manager.
Use Case 2: Several Groups, One Role
This second use case involves another common role model situation: one single role represents two or more entitlements. The single role is used here to package several Active Directory group assignments, for example, assignments which are always granted together to perform certain tasks.
For example, let Sales manager be a single role linked to the Active Directory groups operations
and sales through two navigation rules N1 and N2.
The "direct" flow here means that if John Doe is assigned the Sales manager role, Identity Manager fulfills the operations and sales group memberships for John Doe's Active Directory account.
Now, let's consider the reverse flow. If John Doe already had membership for the operations and
sales group before Identity Manager was deployed, the AD Synchronization will detect it. By
applying N1 and N2 in reverse, Identity Manager deduces that John Doe must have the Sales
manager single role.
His trusted advisor, Mary Webster, isn't a member of the operations group. She is only a member of
the sales group. Identity Manager applies N1 in reverse, but there is only one Single Role
(Sales manager) that grants the sales group membership. The only way for Mary to be granted the
sales group membership from the role model point-of-view is to have been granted the Sales
manager role. For Identity Manager, it is as if Mary had been assigned this role, but is missing
the operations group. That is exactly how it is materialized: the identity for Mary in Identity
Manager will be assigned the Sales manager role, and a missing group membership will come up in
the provisioning review screen.
If the IGA administrator doesn't want Mary to be granted the Sales manager role and hence the operations group, another role must be created, that only grants the sales group but not the operations group.
Use Case 3: Several Groups, Several Roles
The third use case is a less common one, but can still be a little confusing.
Let's take two roles B and C.
Bgrants membership to two groups:AD1andAD2.CgrantsAD2andAD3.
This time, if only AD2 is found for a given user, no deduction can be made.
Generate Contexts
A context is a set of dimension-value pairs computed using the Context Rule or the combination of a context rule and the Record Section if record sections are configured.
A context is used to compute the role assignments for an identity by verifying that the dimension-value pairs meet the role criteria.
Basic Context Generation
When using only a context rule without a record section, the context generation is straightforward: a set of dimension-value pairs is created by computing the value of the Context Rule on the context rule.
For example, the following context rule defines guests' contexts based on their start date, end date, and company.
<ContextRule Identifier="ContextRuleForGuest" DisplayName_L1="ContextRuleForGuest" Policy="Default" ResourcesStartBinding="Directory_Guest:StartDate" ResourcesEndBinding="Directory_Guest:EndDate" SourceEntityType="Directory_Guest" BA="Directory_Guest:Company" />
Identity Context Generation
As described in the Identity Management, identities are complex to model. Records were introduced to tackle this complexity by allowing multiple positions for the same identity.
Record Section go further by modeling the relationship between positions. Indeed with record sections, it is possible to define:
- what are the shared properties between all positions?
- what are the properties unique to each position?
- what happens when there is a time gap between two positions, should the previous be extended or should the future position be used to fill the gap?
- what happens when a position property value is not defined?
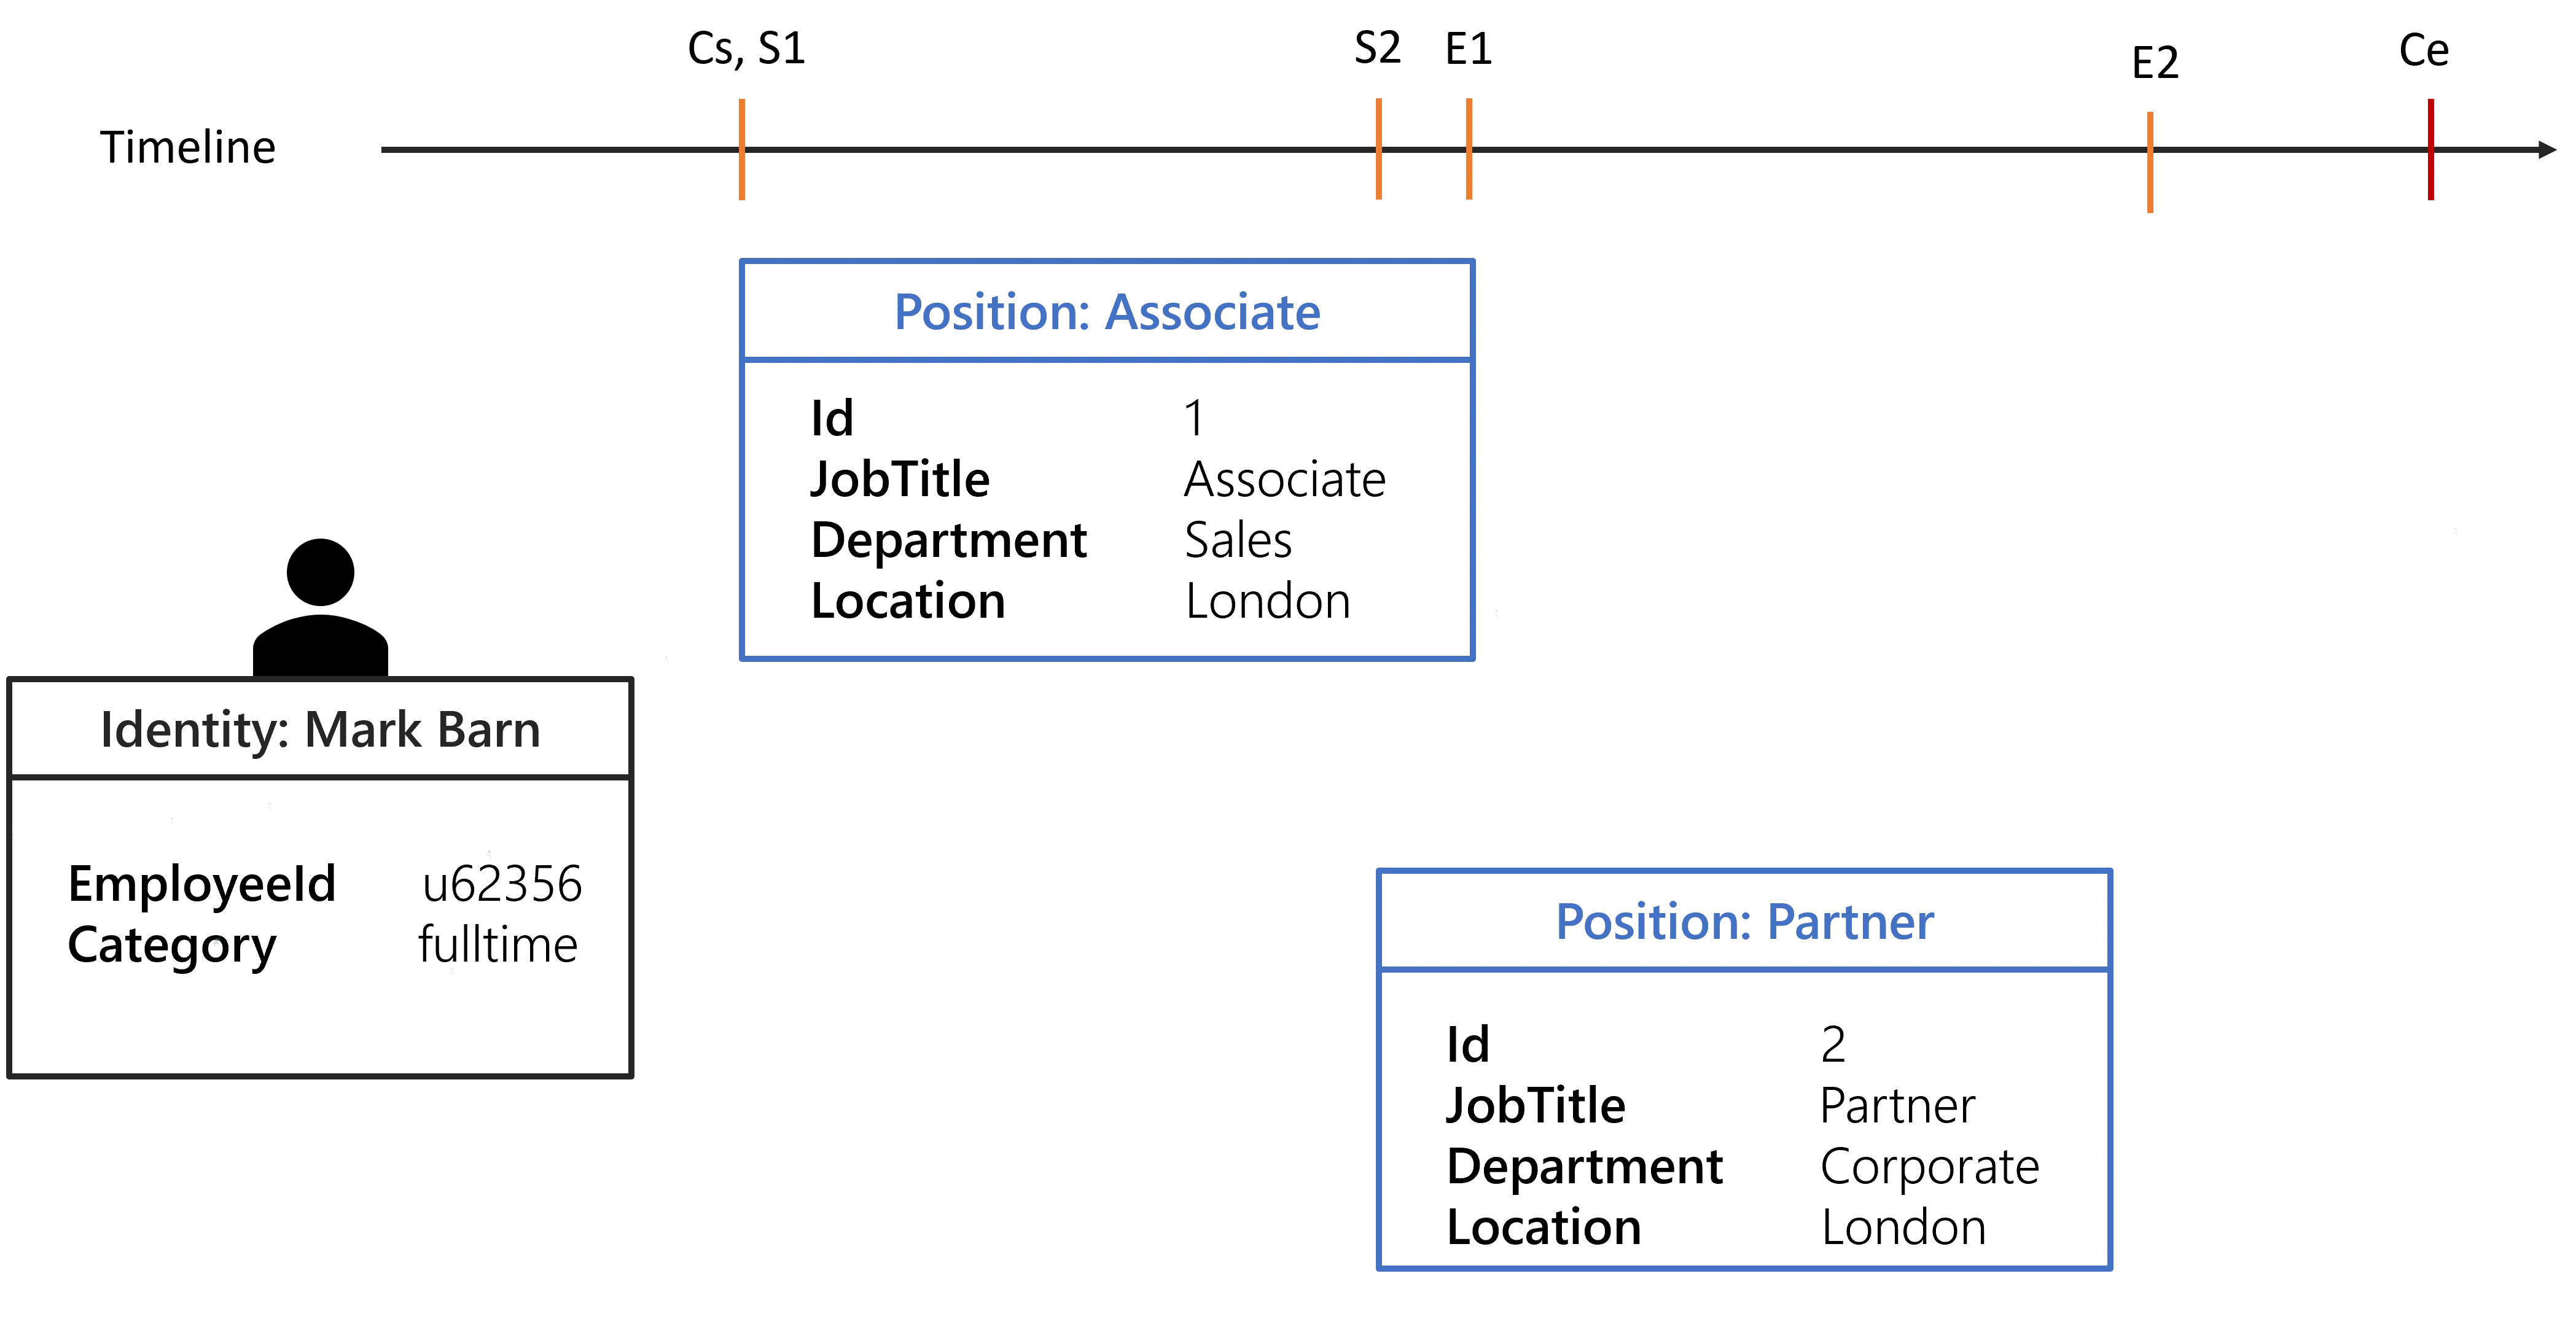
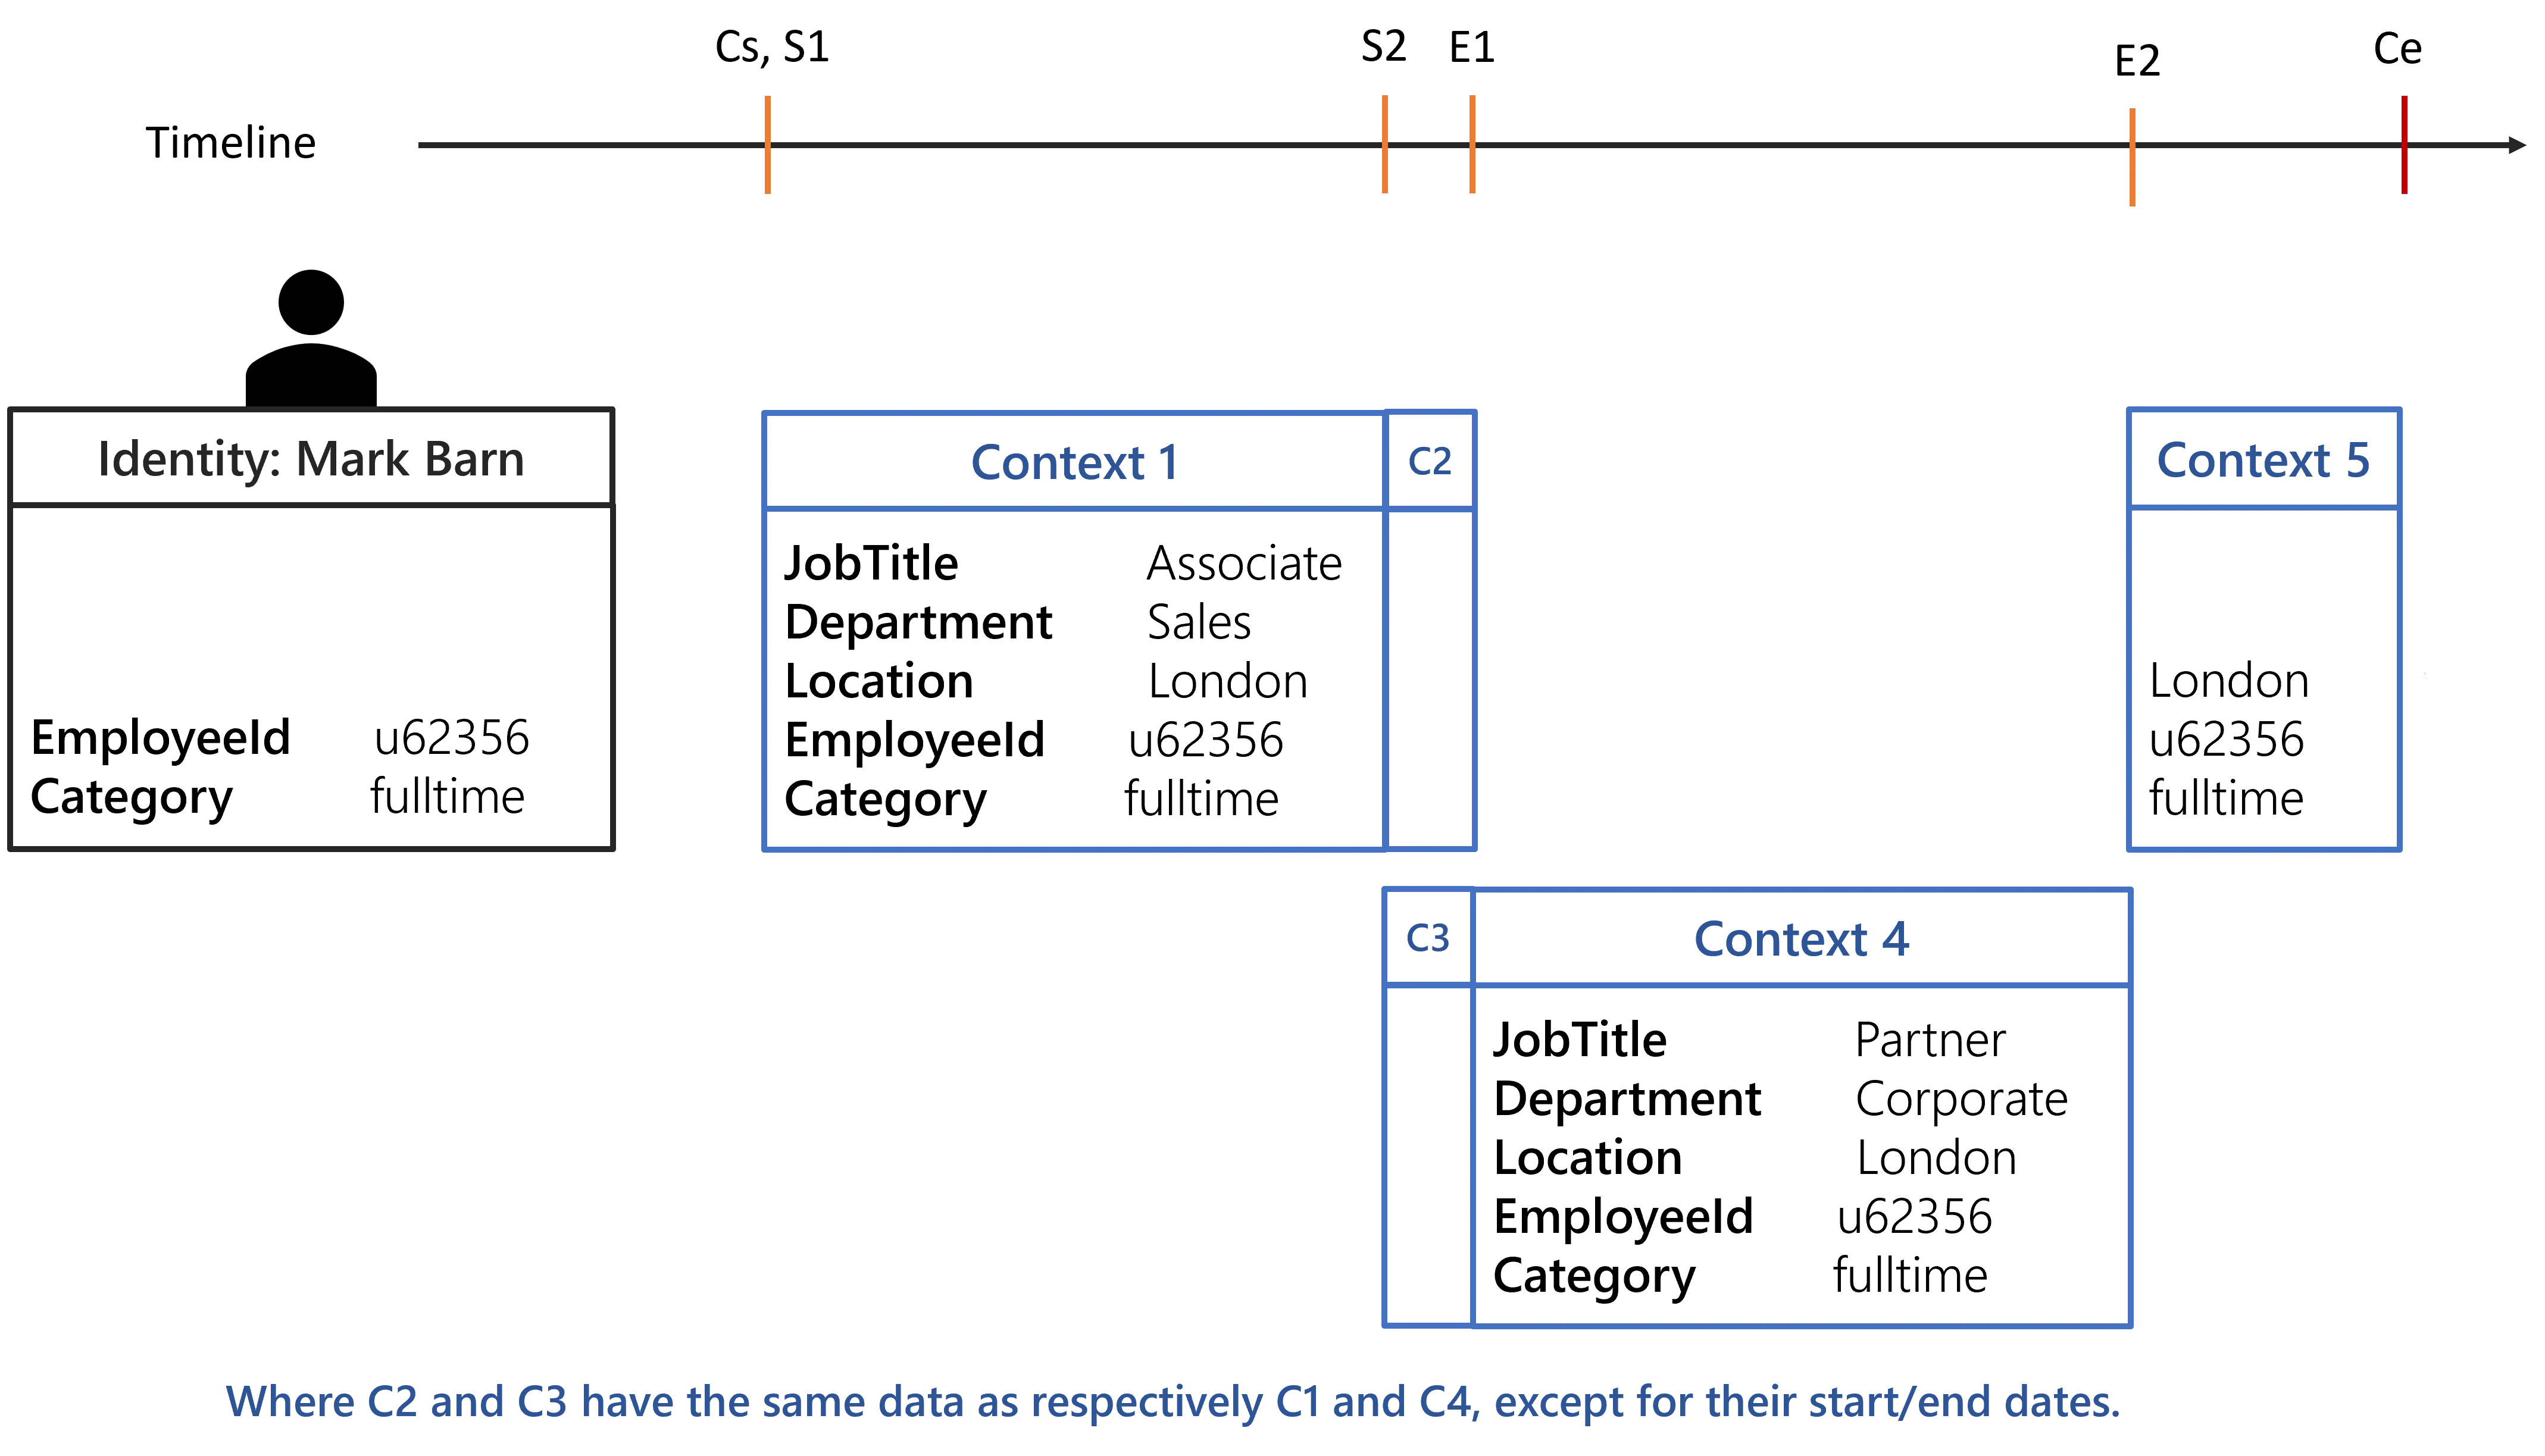
Before illustrating how the record sections can be configured to handle most cases of position management, here is the background situation for the examples that follow:
- A position is defined by a
JobTitle, aLocation, and aDepartment, all other properties belong to the identity and are shared between all positions. - Dimensions are
Category,JobTitle,Location, andDepartment. - Each position will have an
Id. Sxrepresents the start date of the position, and x is theIdof the position.Exrepresents the end date of the position, and x is theIdof the position.Csrepresents the contract start date.Cerepresents the contract end date.
The following configuration shows the context rule that will be used for the examples.
<ContextRule Identifier="ContextRuleUserToRecord" DisplayName_L1="ContextRuleUserToRecord" Policy="Default" ResourcesBinding="Records" ResourcesStartBinding="StartDate" ResourcesEndBinding="EndDate" B0="Directory_UserRecord:Department" B1="Directory_UserRecord:JobTitle" B2="Directory_UserRecord:Location" B3="Directory_UserRecord.Category" SourceEntityType="Directory_User" />
The context rule start/end dates bindings and expressions won't have any effect on the computation, they are overridden by the record sections dates properties.
Configuration of basic record sections
Default section:
<RecordSection Identifier="Directory_UserRecord_Default" DisplayName_L1="Contract Properties" SourceEntityType="Directory_User" ResourceEntityType="Directory_UserRecord" StartProperty="ContractStartDate" EndProperty="ContractEndDate">
</RecordSection>

Position record section:
<RecordSection Identifier="Directory_UserRecord_Position" DisplayName_L1="Position Properties" SourceEntityType="Directory_User" ResourceEntityType="Directory_UserRecord" StartProperty="StartDate" EndProperty="EndDate">    <Property Property="Department" ExtensionKind="None" />    <Property Property="Location" ExtensionKind="None" />    <Property Property="JobTitle" ExtensionKind="None" /></RecordSection>
The configuration above binds the position to the contract end date, meaning that a position without
an end date will take the end date of the contract. The properties of the position record section
cannot be propagated, meaning if a position does not have a Location it cannot take the Location
of the previous or future position.
The following image shows the positions of Mark Barn in a defined timeline.
With the given configuration and the identity of Mark Barn, the following contexts are generated:
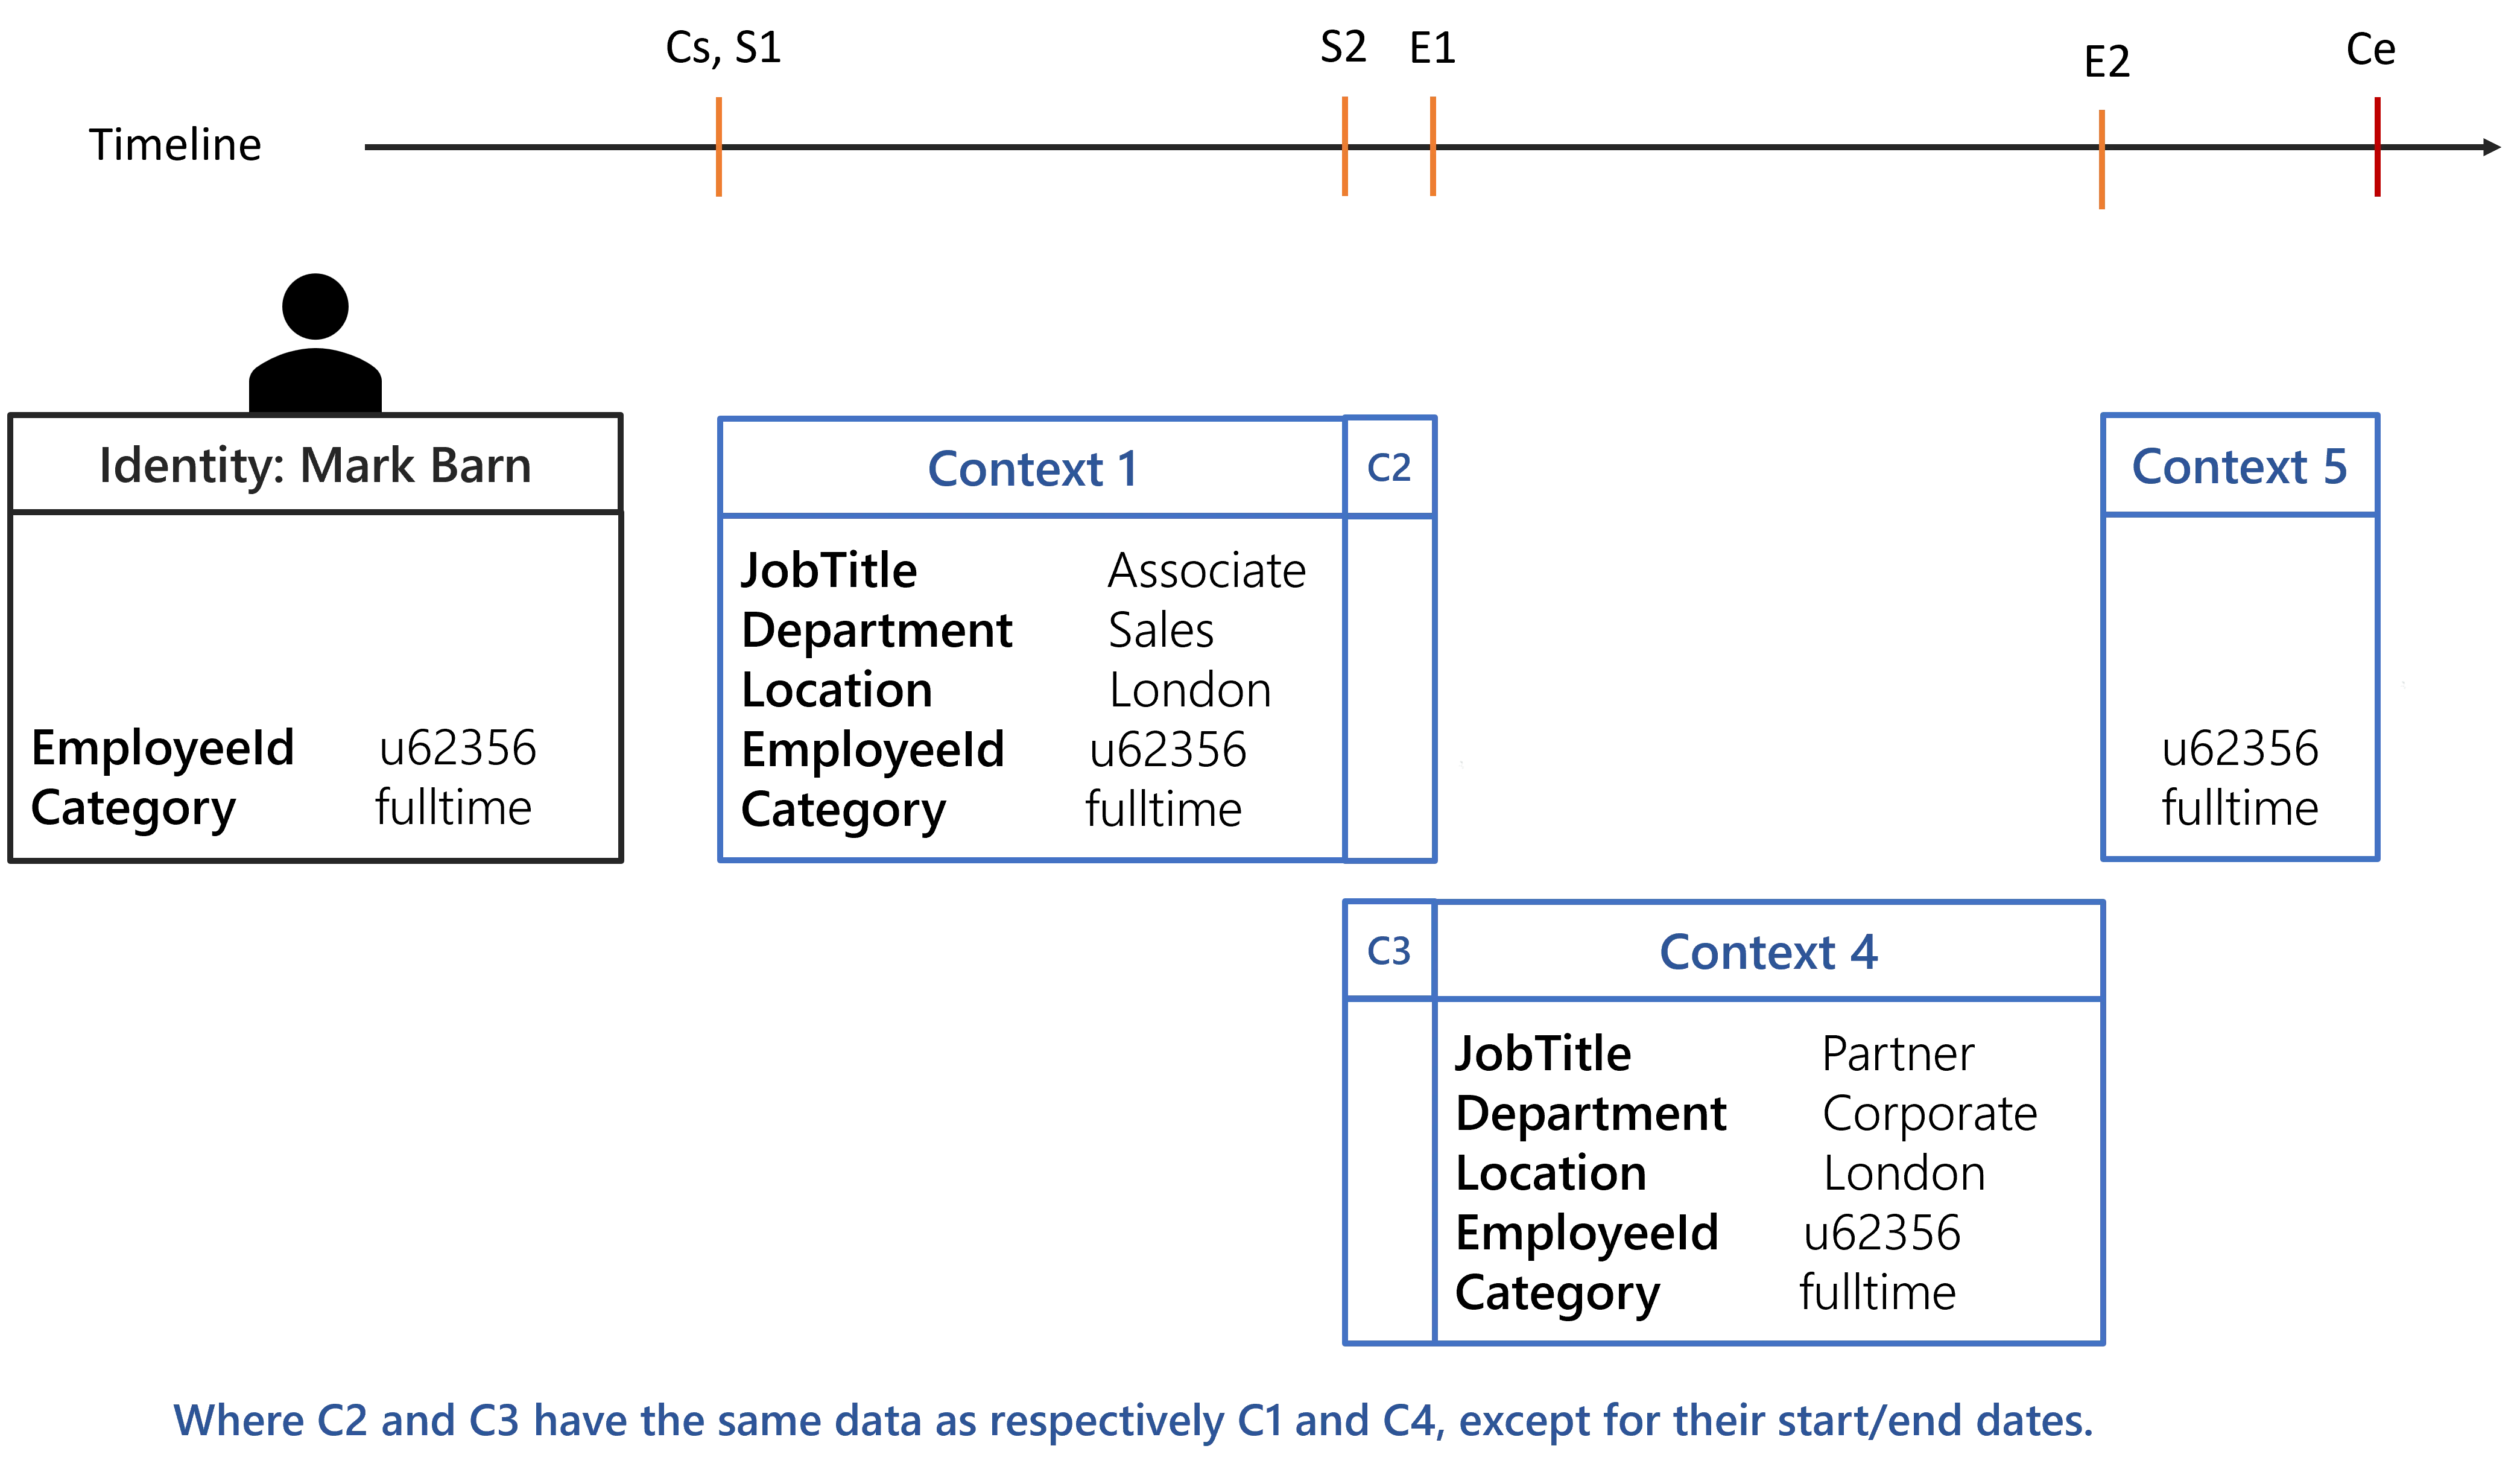
Each computed context will be used to create a set of dimension-value pairs, thus having 3 sets for the Evaluate Policy algorithm.
Any rules targeting identities with a fulltime Category will be assigned to Mark Barn from Cs to Ce.
Any rules targeting identities working in London will be assigned to Mark Barn from S1 to
E2.
Any rules targeting all identities will be assigned to Mark Barn from Cs to E2 because from
E2 to Ce there isn't any position. This behavior can be overridden by specifying
ExtensionKind="None" on the Directory_UserRecord_Position section.
Configuration of a position extension
Extension of a property
The record sections can help extend some position property value when for some time the identity
does not have a position. For example, let's say that an identity can have multiple positions but
they must be in the same Location. So it is safe to configure the record sections to copy the
Location from a position if:
- the identity does not have a position for some time;
- for a position, the
Locationis not defined.
Here is the configuration needed to apply this policy.
Default section:
<RecordSection Identifier="Directory_UserRecord_Default" DisplayName_L1="Contract Properties" SourceEntityType="Directory_User" ResourceEntityType="Directory_UserRecord" StartProperty="ContractStartDate" EndProperty="ContractEndDate">
</RecordSection>

Position record section:
<RecordSection Identifier="Directory_UserRecord_Position" DisplayName_L1="Position Properties" SourceEntityType="Directory_User" ResourceEntityType="Directory_UserRecord" StartProperty="StartDate" EndProperty="EndDate">    <Property Property="Department" ExtensionKind="None" />
    <Property Property="Location" />
    <Property Property="JobTitle" ExtensionKind="None" /></RecordSection>
The ExtensionKind="None" was removed for the Location property.
Using the identity of Mark Barn the computed contexts should be as followed:
Any rules targeting identities working in London will be assigned to Mark Barn from Cs to
Ce.
Extension of a whole position
The property value copy can be leveraged to extend a chosen position
when for some time the identity does not have one. The following configuration and the identity of
Phoebe Buffay will be used to showcase a position extension. It is done by removing the
ExtensionKind="None" of the position properties.
Default section:
<RecordSection Identifier="Directory_UserRecord_Default" DisplayName_L1="Contract Properties" SourceEntityType="Directory_User" ResourceEntityType="Directory_UserRecord" StartProperty="ContractStartDate" EndProperty="ContractEndDate">
</RecordSection>

Position record section:
<RecordSection Identifier="Directory_UserRecord_Position" DisplayName_L1="Position Properties" SourceEntityType="Directory_User" ResourceEntityType="Directory_UserRecord" StartProperty="StartDate" EndProperty="EndDate">
    <Property Property="Department" />    <Property Property="Location" />    <Property Property="JobTitle" />
</RecordSection>
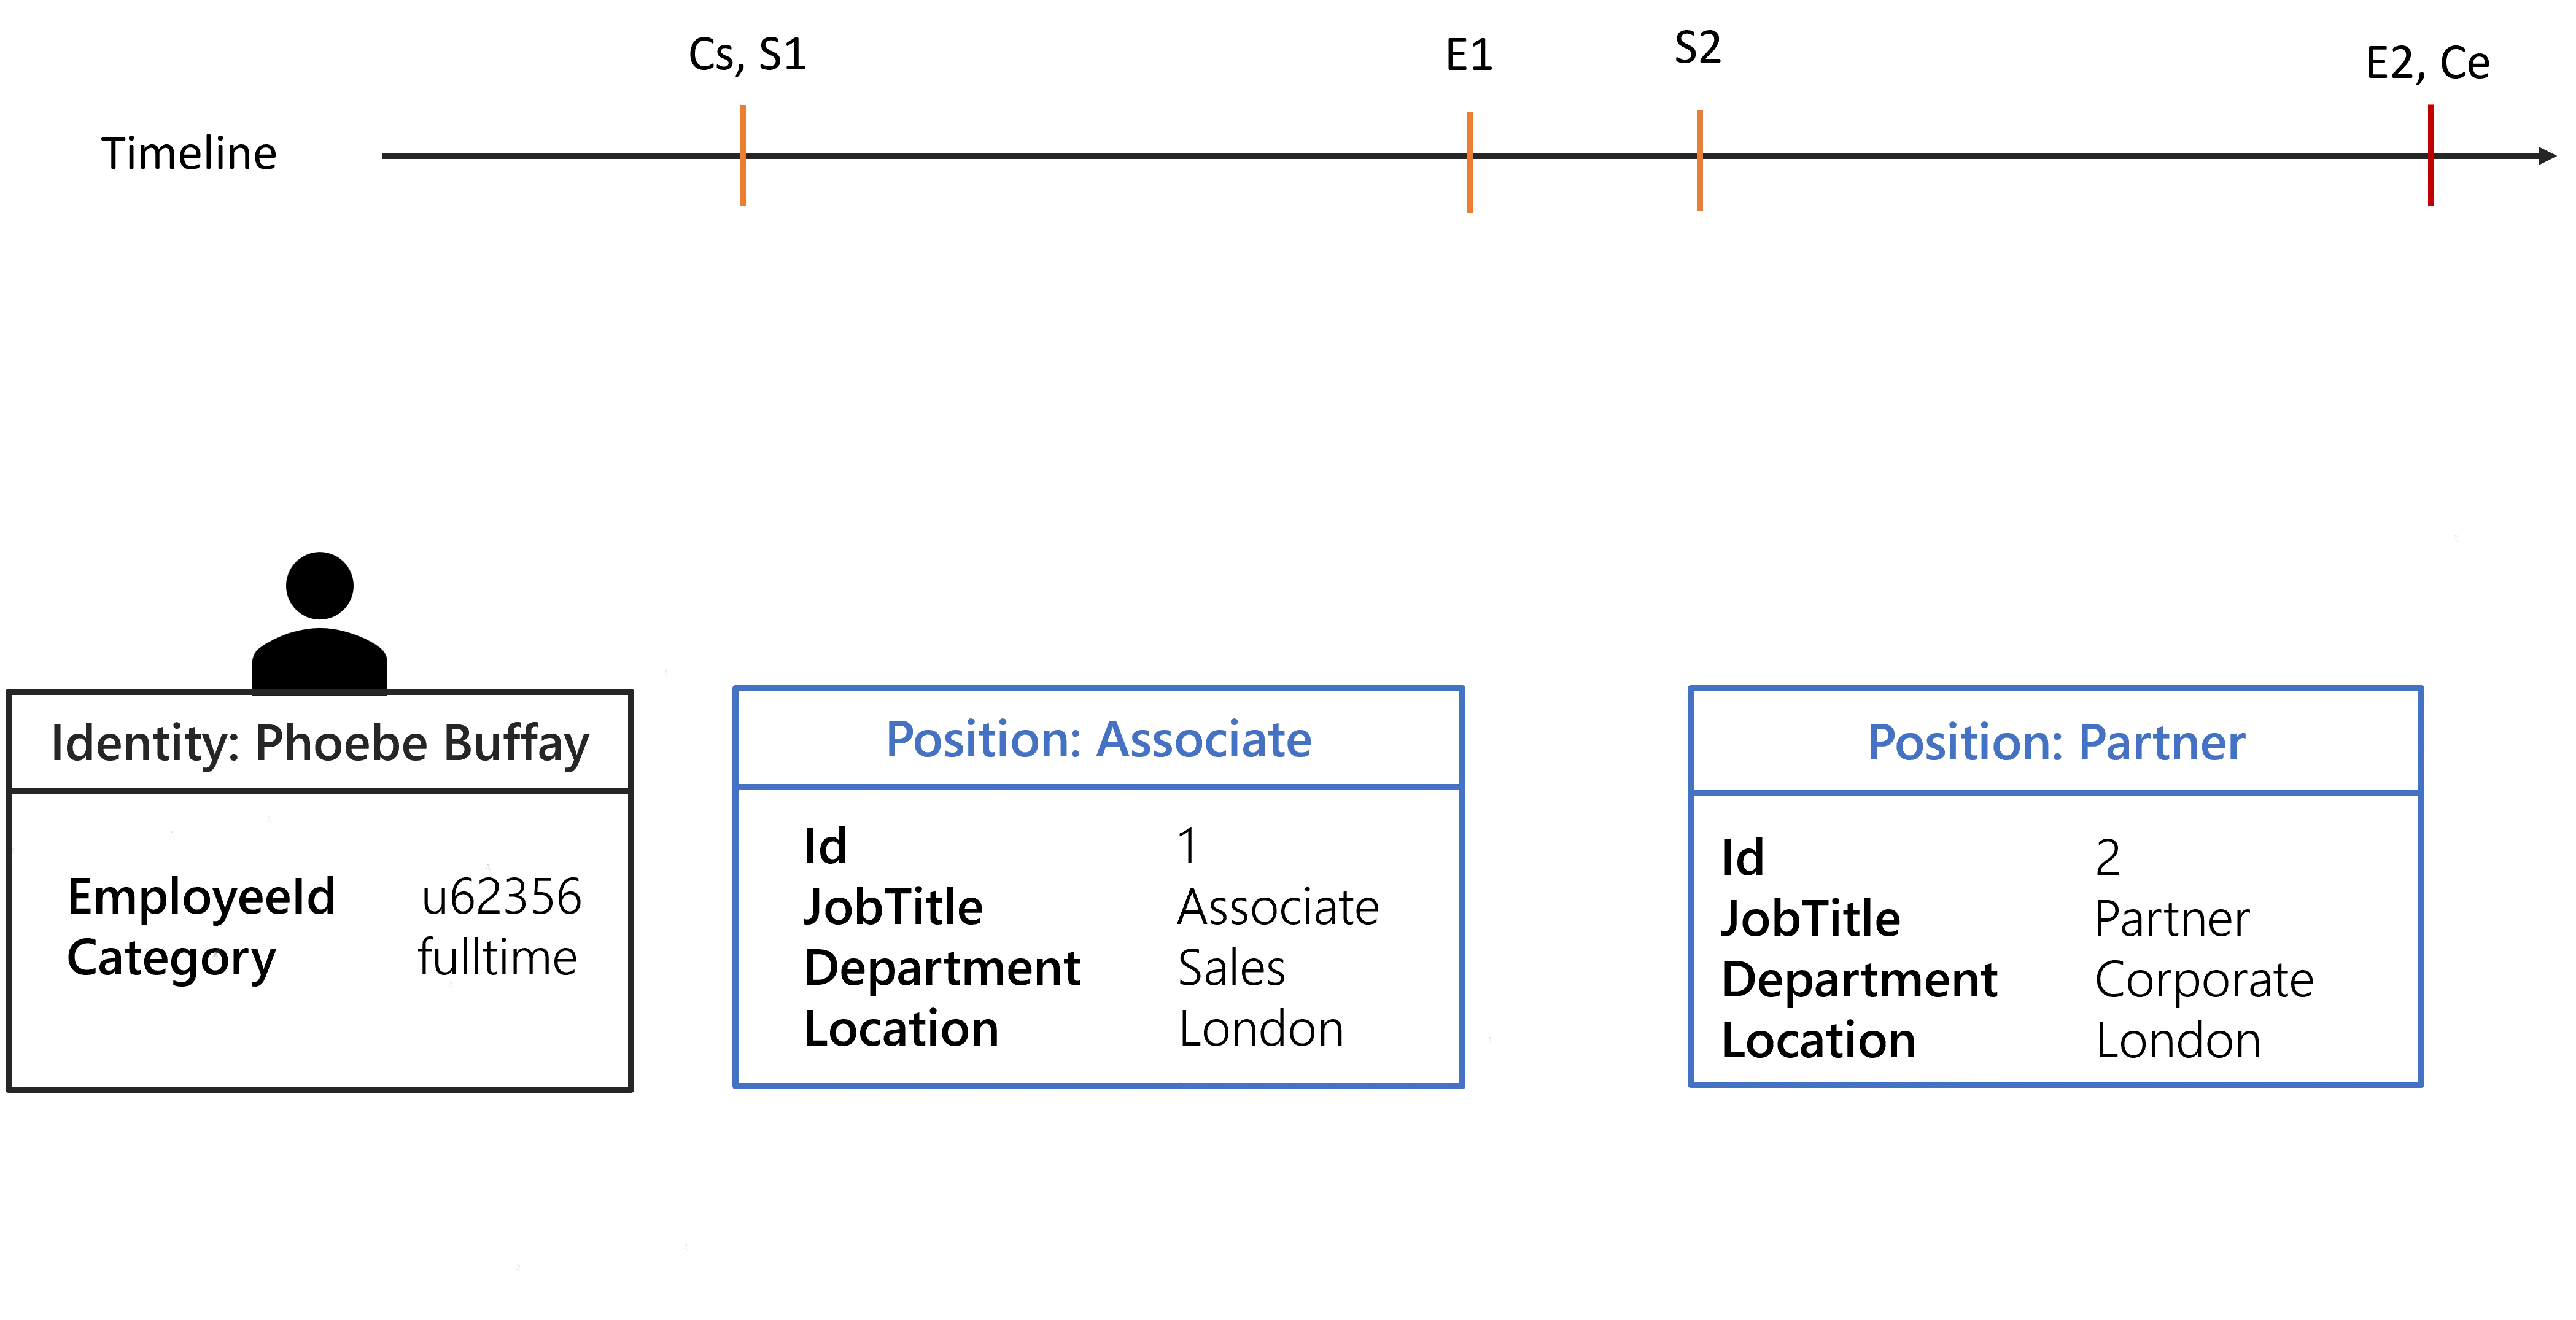
Two contexts will be generated.
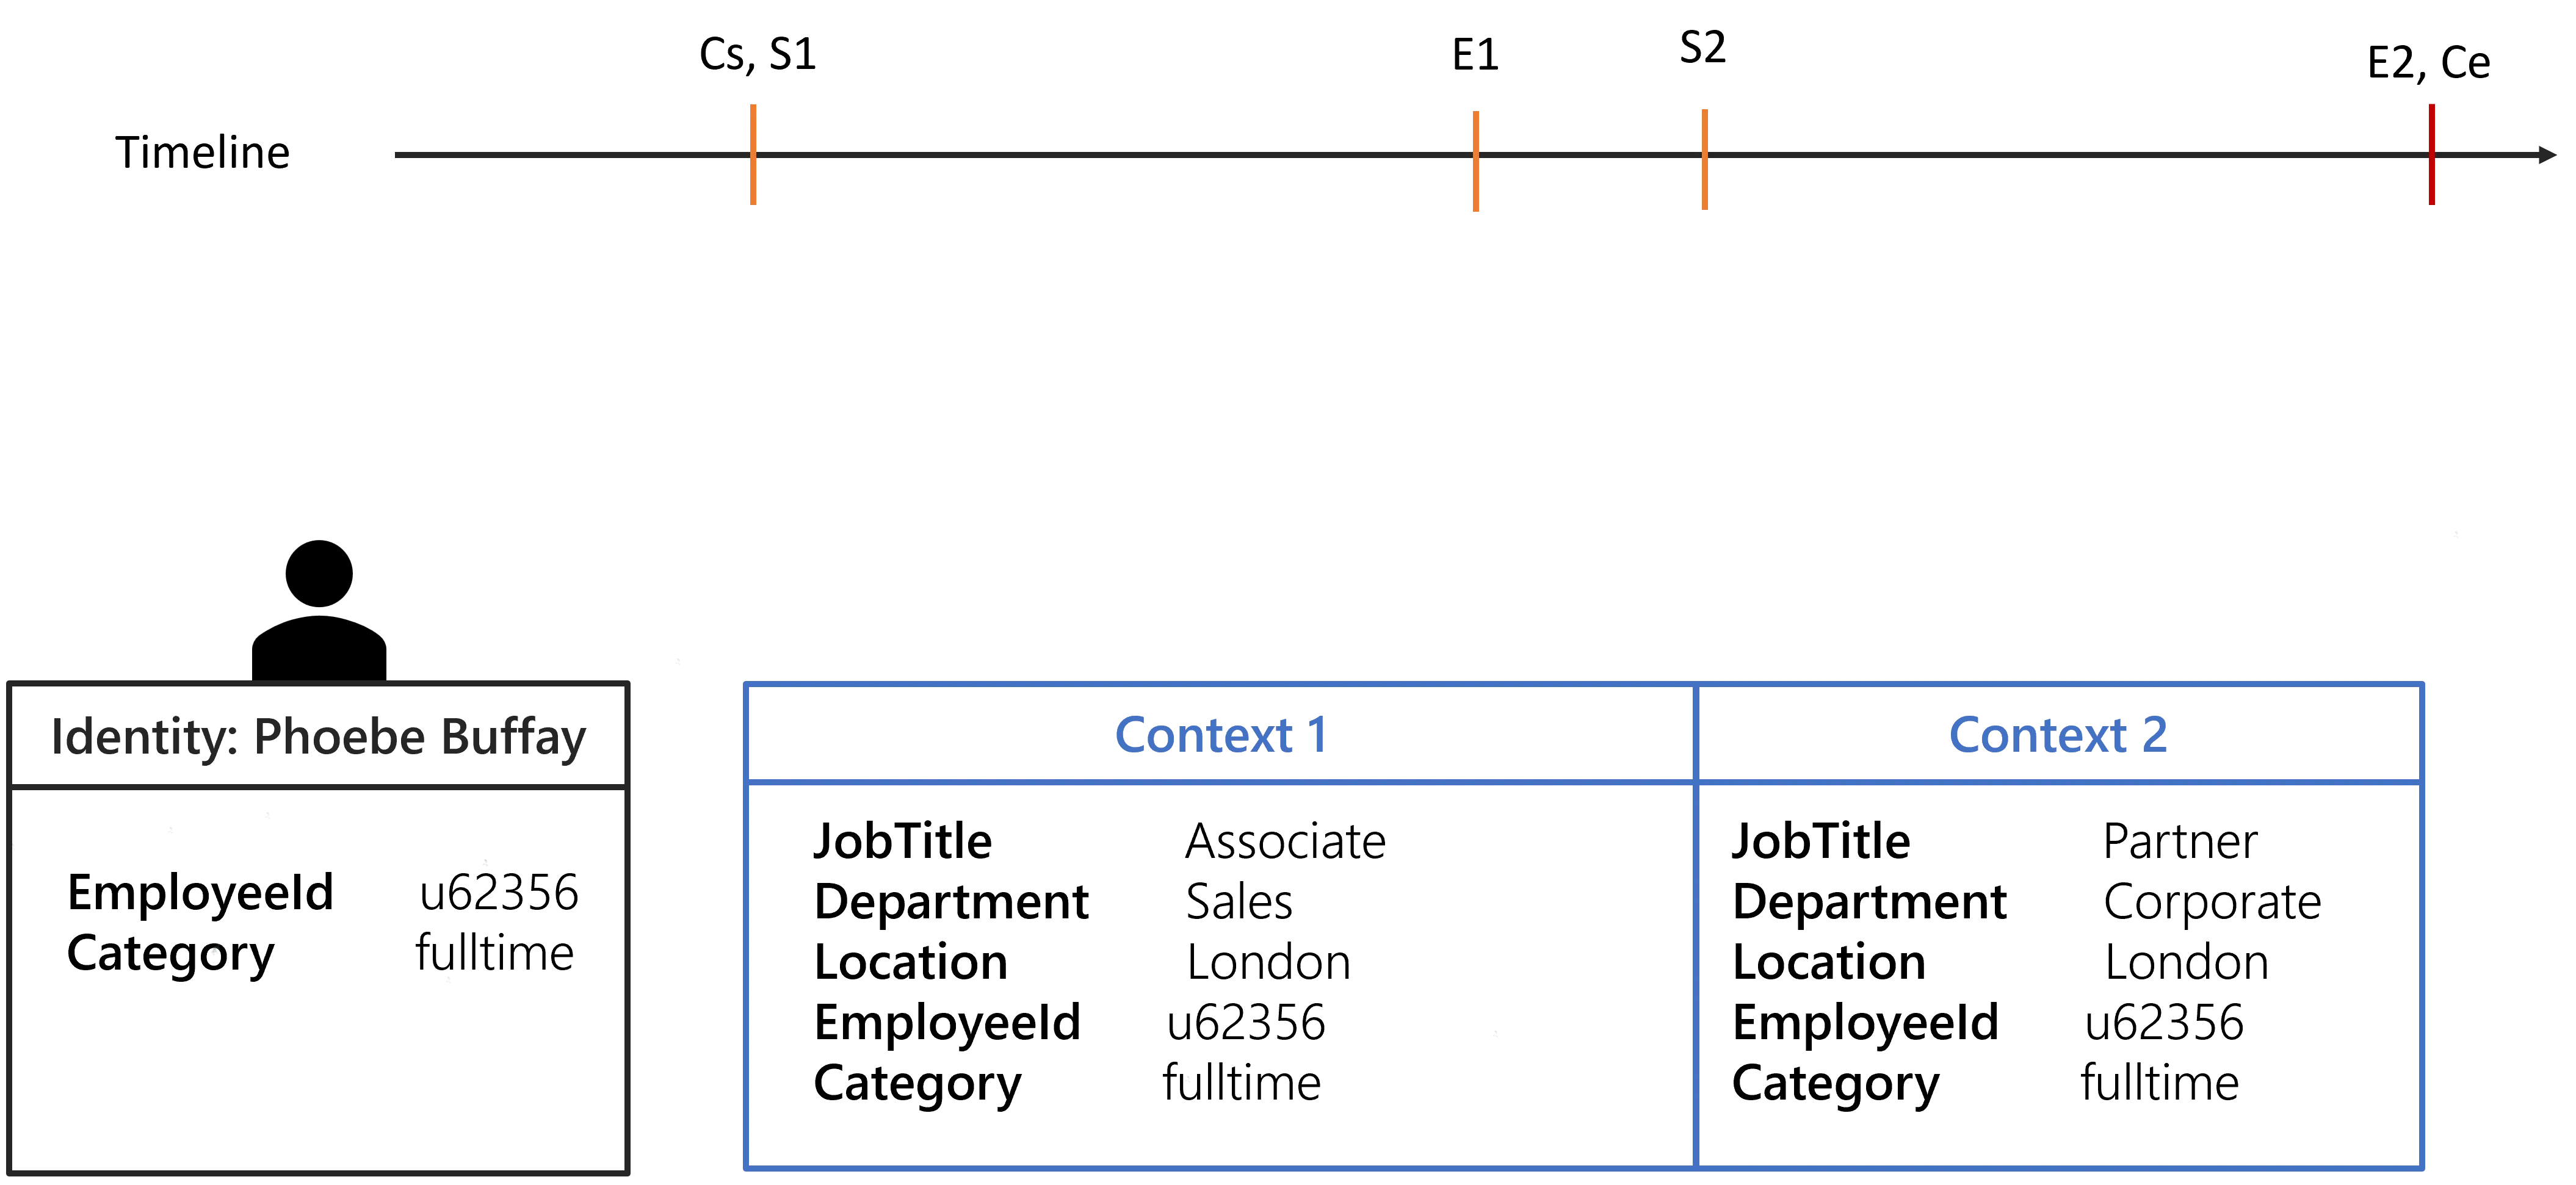
By default, the previous position is extended when there is a gap. If there isn't any previous position then the next position will be anticipated.
The choice of the position to extend can be configured by leveraging the SortKeyExpression in the
position Record Section .
Configure Indirect Permissions
The following how-to assumes that you have already read the topic on Indirect Permissions .
Configure Indirect Permissions in an Active Directory
Configure an indirect resource rule
Configuring an Indirect Resource Rule in the Identity Manager Configuration is the only step needed to set up Indirect Permissions and can be done by answering the following questions:
- What is the target Entity Type? There are multiple multiple Entity Types but for this example we
will choose
AD User (nominative). Another rule can be written if you want to handle Indirect Permissions forAD User (administration). - Which permissions can be obtained transitively in the Active Directory? Users get permissions by
being members of a group. The property is
memberOf. - Do we want to look for correspondences in another system? Here, we do not want to. This also means
that
Correspondence,CorrespondenceMembershipProperty, andEntitlementwill remain blank.
Finally, if we compile all this information and using the naming of the standard Identity Manager Demo, we get the following Indirect Resource Rule:
<IndirectResourceRule
    ResourceType="AD_Entry_NominativeUser"    Property="memberOf"    />
After adding this rule to the Configuration, do not forget to deploy the configuration.
Set up a test user
The aim of this section is to give you a step-by-step guide for setting up a test user. It will also cover what is displayed in Identity Manager. In this example, we will assign a Test Group A directly to the test user and the Test Group A will also be a member of the Test Group B. This way, the test user will also have an indirect assignment to the Test Group B. We will also create the corresponding roles.

A running Active Directory instance is required to reproduce these steps yourself.
Edit the Active Directory
Create two groups in your Active Directory, TestGroupA and TestGroupB. Then add TestGroupA as a member of TestGroupB. Finally add a test user as a member of TestGroupA. The test user can be any existing user in the AD that is known by Identity Manager.
Prepare Identity Manager
Since we have manually edited the Active Directory, we first need to run an AD synchronization job.
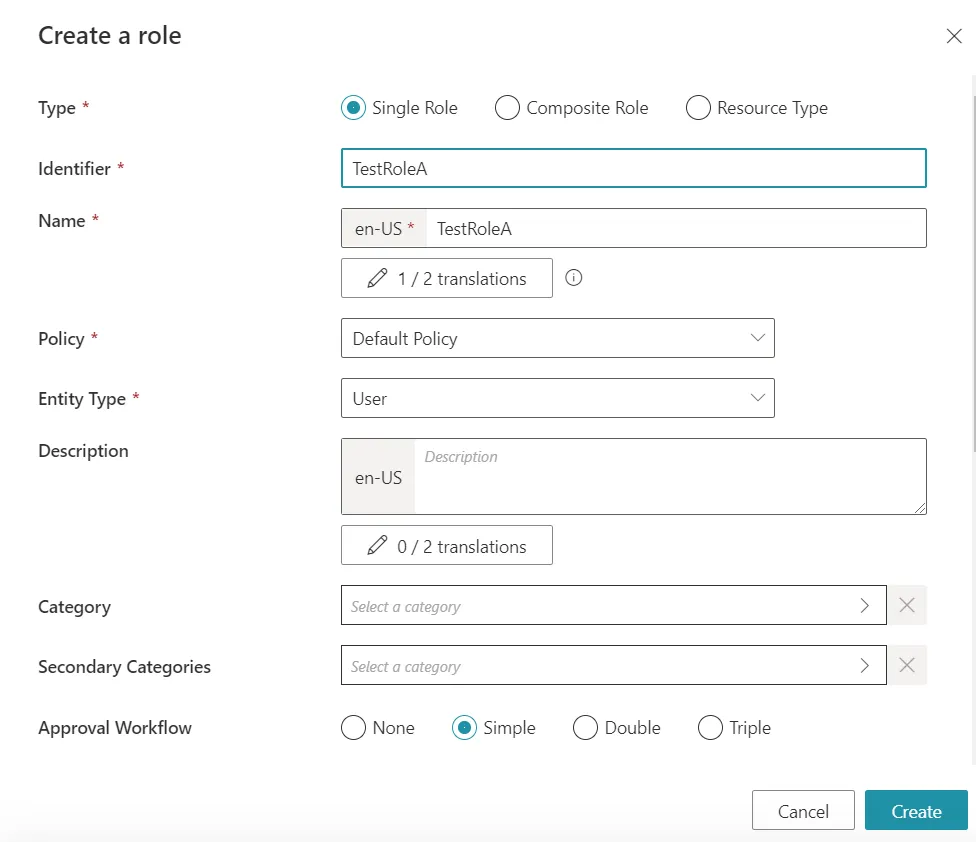
Then we create one Single Role for each group in the Active Directory. We will name them TestRoleA and TestRoleB for Directory > User, :
We will also create a test Composite Role to showcase indirect Composite Roles. We will name it TestCRoleAB:
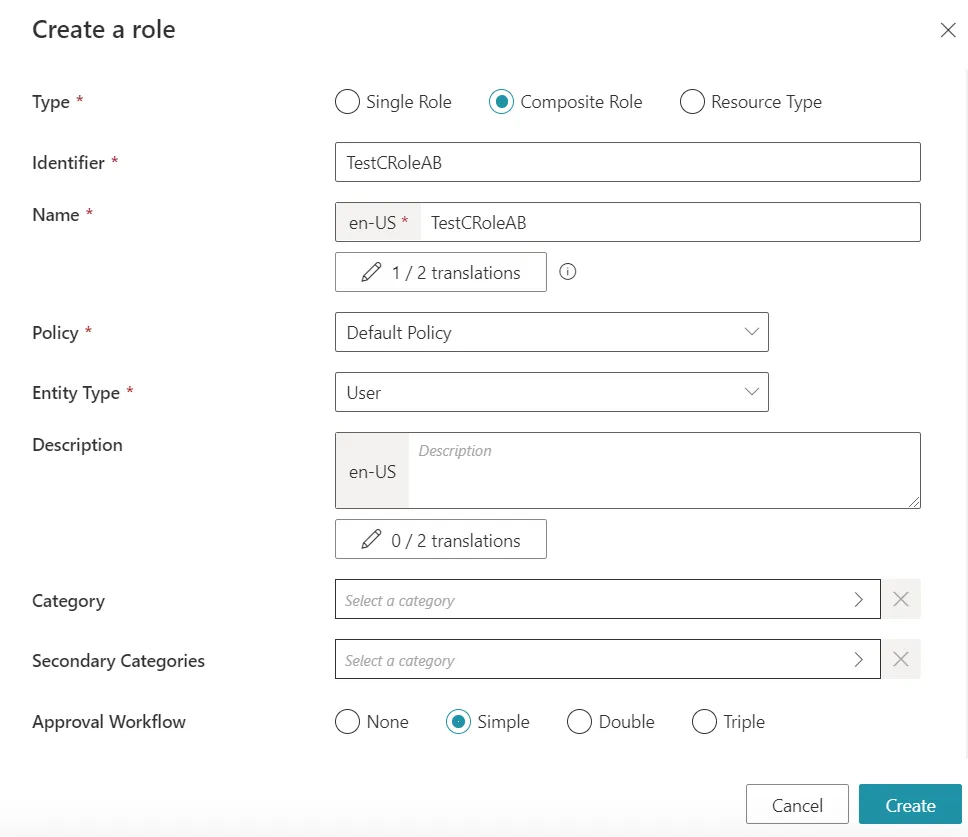
Then we will also need to add some rules. We first need to add one Navigation Rule for each group to link them with their respective Single Role:
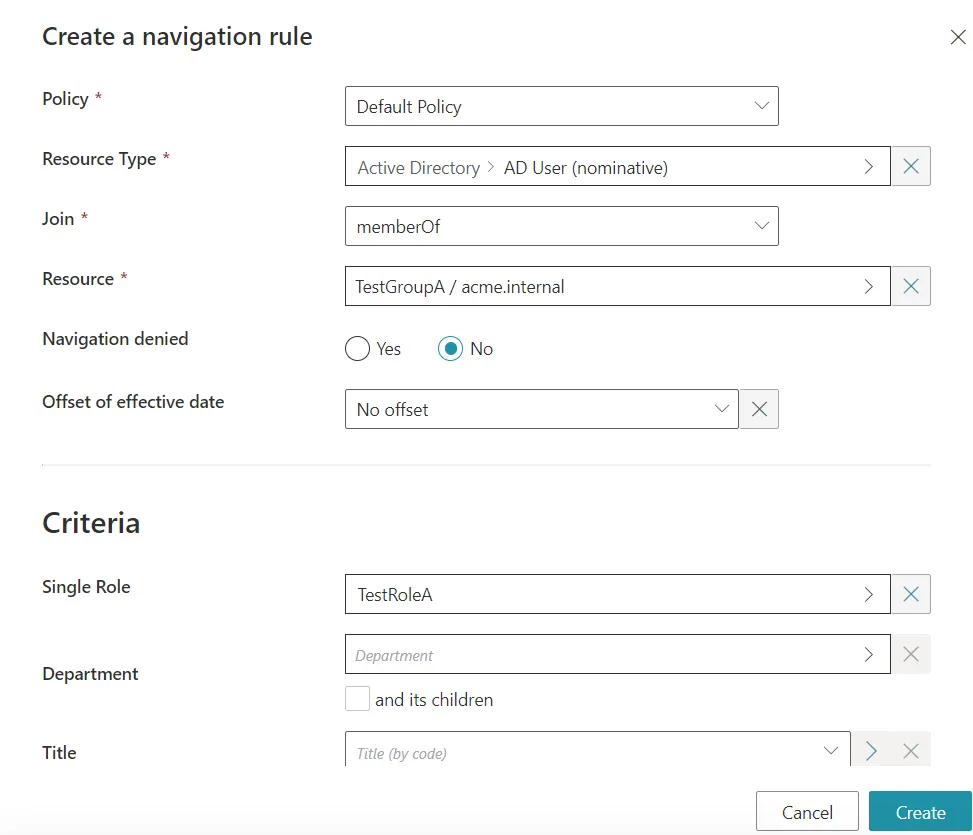
And finally, we need to add Single Role Rules to link our two previously created Single Roles to the new Composite Role:
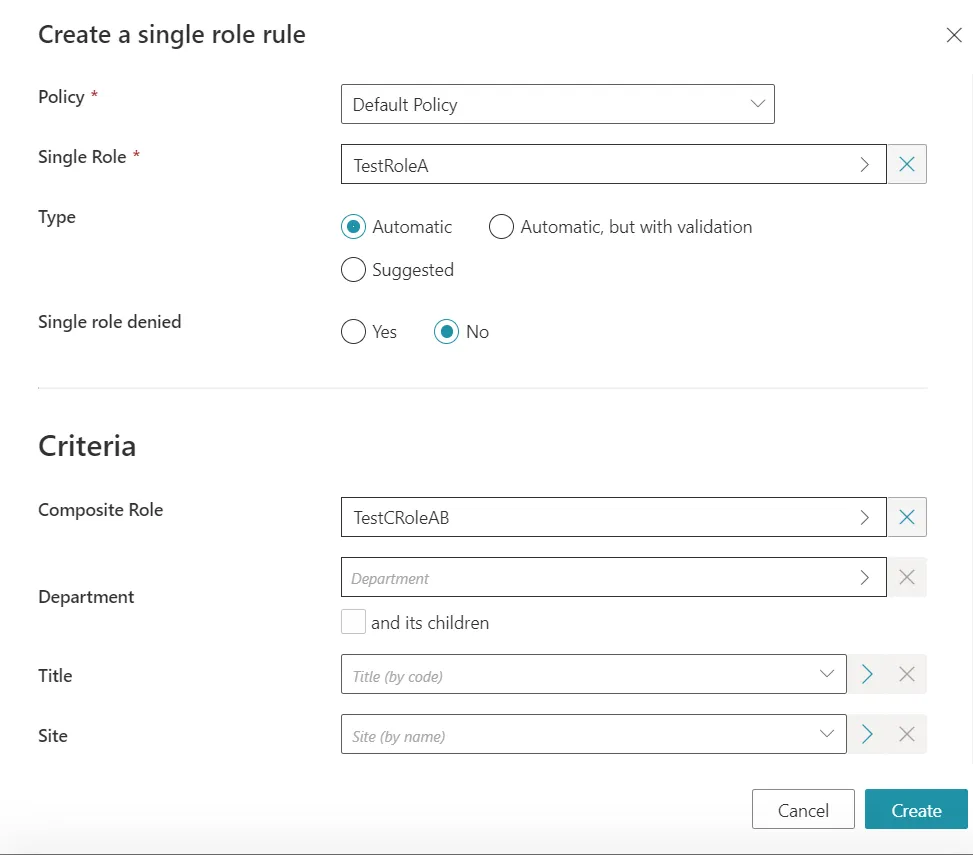
Even if two rules of a kind are needed, only one is pictured. Do not forget the other one.
Indirect permission display
After running a Compute Role Model Task , Indirect Permissions should now appear for your test user.
The next screenshots were taken after adding the direct assignment directly inside the Active Directory. As such, the direct permission is also flagged as Non-conforming.
If you first go on the View permissions tab of your test user, the only new role that appears in the Simplified view is the indirect Composite Role TestCRoleAB:

To display Indirect Permissions, you need to switch over to the Advanced view. TestRoleA and TestRoleB should then appear:
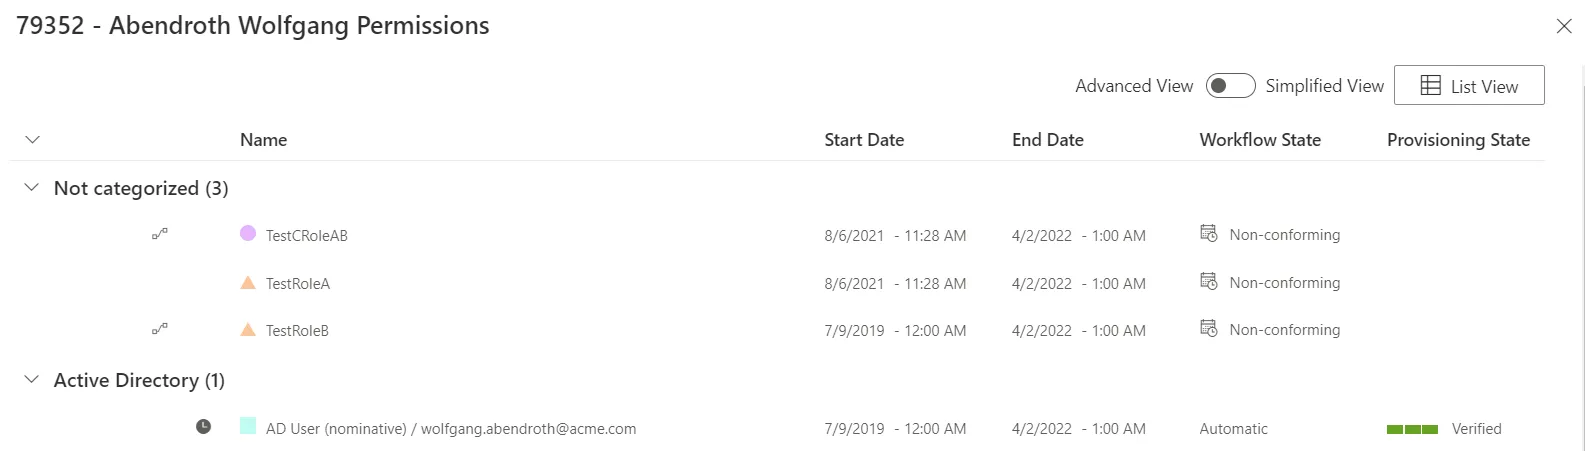
You can also directly display the Assigned Resource Navigations by clicking on AD User (nominative). The memberOf properties will appear in the list:

Configure Indirect Permissions in an Microsoft Entra ID
We can follow the same steps to configure this new rule:
- What is the target Entity Type?
Once again, we will configure a rule for nominative users. The Entity Type is
AzureAD_DirectoryObject_NominativeUser. - Which permissions can be obtained transitively in the Microsoft Entra ID (formerly Microsoft Azure AD)?
Users get permissions by being members of a group. The property is
memberOf. - Do we want to look for correspondences in another system?
Here, we do not want to (it is possible, but it is not the aim of this How-To).
This also means that
Correspondence,CorrespondenceMembershipProperty, andEntitlementwill remain blank.
Finally, if we compile all this information and using the naming of the standard Identity Manager Demo, we get the following Indirect Resource Rule:
<IndirectResourceRule
    ResourceType="AzureAD_DirectoryObject_NominativeUser"    Property="memberOf"    />
Configure Indirect Permissions in SharePoint using Correspondences from an Microsoft Entra ID
We can follow the same steps to configure this new rule, but this time we will showcase the correspondence feature:
- What is the target Entity Type? We first start in the Microsoft Entra ID. Once again, we will
configure a rule for nominative users. The Entity Type is
AzureAD_DirectoryObject_NominativeUser. - Which permissions can be obtained transitively in the Microsoft Entra ID? Users get permissions by
being members of a group. The property is
memberOf. - Do we want to look for correspondences in another system? Yes, we want to find correspondences in
SharePoint. A correspondence can be found using the
SharePointObjectproperty. - Which permissions can be obtained transitively in SharePoint? Once again, users get permissions
based on which groups they are a member of. The property capturing this notion for SharePoint
entities is
Group - Is being member of a group in SharePoint the type of permissions that we want to capture? While
this can be computed, we are rather interested in compiling which SharePoint objects a user can
view/change/etc. We obtain this information using the
Entitlementproperty.
Finally, if we compile all this information and use the naming convention of the standard Identity Manager Demo, we get the following Indirect Resource Rule:
<IndirectResourceRule
    ResourceType="AzureAD_DirectoryObject_NominativeUser"    Property="memberOf"    Correspondence="SharePointObject"    CorrespondenceMembershipProperty="Group"    Entitlement="Entitlement"    />
This rule will also compute indirect permissions for the Microsoft Entra ID.
Infer Single Roles with a Composite Role
This guide shows how to assign several single roles via the assignment of one composite role.
It is possible to infer SingleRoles with Composite Role. The SingleRole can only be inferred by the CompositeRole if both the CompositeRole and SingleRole rules are verified.
Create a Dimension
The restriction of resource allocations is done from a filter. To do this, it is necessary to create Dimension to define which EntityTypes the filters will apply to.
For the different examples of restrictions, the filters will be based on the EntityType "Organization" and "Title".
<Dimension Identifier="Organization0" DisplayName_L1="Department" DisplayName_L2="Departement" EntityType="Directory_Organization" ColumnMapping="0" IsHierarchical="true" ParentProperty="Parent" /> <Dimension Identifier="Title0" DisplayName_L1="Title" DisplayName_L2="Fonction" EntityType="Directory_Title" ColumnMapping="1" />
Create a Composite Role
A CompositeRole is created in the same way as a SingleRole.
<CompositeRole Identifier="FCT0711" DisplayName_L1="Developer" DisplayName_L2="Developpeur" ApprovalWorkflowType="Two" EntityType="Directory_User" Policy="Default" />
Assign the Composite Role Based on the Dimension
This step is optional for our simple purpose of inferring single roles with a composite role. The composite role can be linked to a dimension, but it does not have to.
The CompositeRoleRule can be limited with the use of dimensions.
<CompositeRoleRule Role="FCT0720" D1="FCT0720" Policy="Default" />
Assign Single Roles Based on the Composite Role
The link between a SingleRole and a CompositeRole is made in the SingleRoleRule.
<SingleRoleRule Role="DL-INTERNET-Restricted" CompositeRole="FCT0720" Policy="Default" /> <SingleRoleRule Role="RAS_0_USR-USERS_CONSOLE_DNS" CompositeRole="FCT0720" Policy="Default" /> <SingleRoleRule Role="RAS_0_USR-USERS_DES_SERVEURS_WINDOWS" CompositeRole="FCT0720" Policy="Default" /> <SingleRoleRule Role="RAY_0_GL_MUY10_MESI_ADM" CompositeRole="FCT0720" Policy="Default" /> <SingleRoleRule Role="RAY_0_GL_MUY10_MESI_ADM" CompositeRole="FCT0720" Policy="Default" /> <SingleRoleRule Role="RAY_0_LDAP_ADMINLDSFEDE" CompositeRole="FCT0720" Policy="Default" /> <SingleRoleRule Role="RAY_0_LDAP_READLDSFEDE" CompositeRole="FCT0720" Policy="Default" /> <SingleRoleRule Role="RAY_A_EASY_USER" CompositeRole="FCT0720" Policy="Default" /> <SingleRoleRule Role="RAY_A_LDAP_ADMINLDSCA" CompositeRole="FCT0720" Policy="Default" /> <SingleRoleRule Role="RAY_A_LYNC_W" CompositeRole="FCT0720" Policy="Default" /> <SingleRoleRule Role="RAY_A_XIOU_ OUTLOOK2010_PSTWRITE" CompositeRole="FCT0720" Policy="Default" /> <SingleRoleRule Role="RAY_F_ADMPDTEXT" CompositeRole="FCT0720" Policy="Default" /> <SingleRoleRule Role="RAY_F_ADMPDTFIXE" CompositeRole="FCT0720" Policy="Default" /> <SingleRoleRule Role="RAY_F_ADMPDTPORT" CompositeRole="FCT0720" Policy="Default" /> <SingleRoleRule Role="RAZ_0_APSB_RFICBUR" CompositeRole="FCT0720" Policy="Default" /> <SingleRoleRule Role="RAZ_0_GL_MUP10_BURI_DR" CompositeRole="FCT0720" Policy="Default" /> <SingleRoleRule Role="RAZ_0_GMPL_ADMIN" CompositeRole="FCT0720" Policy="Default" /> <SingleRoleRule Role="RAZ_0_GMPL_ADMINSRV" CompositeRole="FCT0720" Policy="Default" /> <SingleRoleRule Role="RAZ_0_GMPL_GESTPOSTE" CompositeRole="FCT0720" Policy="Default" /> <SingleRoleRule Role="RAZ_0_GMPL_GESTSERVEUR" CompositeRole="FCT0720" Policy="Default" /> <SingleRoleRule Role="RAZ_0_VCSPOWERUSER" CompositeRole="FCT0720" Policy="Default" /> <SingleRoleRule Role="RAZ_A_EXPLOITATION_U" CompositeRole="FCT0720" Policy="Default" /> <SingleRoleRule Role="RAZ_A_DR_V" CompositeRole="FCT0720" Policy="Default" /> <SingleRoleRule Role="RAZ_A_DW_V" CompositeRole="FCT0720" Policy="Default" /> <SingleRoleRule Role="RAZ_A_VCS_ADM" CompositeRole="FCT0720" Policy="Default" /> <SingleRoleRule Role="RAZ_A_VMW_ADM" CompositeRole="FCT0720" Policy="Default" /> <SingleRoleRule Role="RAZ_A_VMW_POW" CompositeRole="FCT0720" Policy="Default" /> <SingleRoleRule Role="SharePoint_IT_Reader" CompositeRole="FCT0720" Policy="Default" />
Restrict the Assignment
This guide shows how to use filters on dimensions and/or roles to restrict the assignment of a role or resource type.
Create a Dimension
The restriction of resource allocations is done from a filter. To do this, it is necessary to create Dimension to define which EntityTypes the filters will apply to.
For the different examples of restrictions, the filters will be based on the EntityType "Organization" and "Title".
<Dimension Identifier="Organization0" DisplayName_L1="Department" DisplayName_L2="Departement" EntityType="Directory_Organization" ColumnMapping="0" IsHierarchical="true" ParentProperty="Parent" /> <Dimension Identifier="Title0" DisplayName_L1="Title" DisplayName_L2="Fonction" EntityType="Directory_Title" ColumnMapping="1" />
Create a Single Role
To be able to filter with the dimensions previously created, it is necessary to first create Single Role which will serve as a restriction to the assignment of ResourceTypes for a given source.
The example below creates a SingleRole for the EntityType Directory_User (source of the ResourceTypes you want to restrict).
<SingleRole Identifier="DL-INTERNET-Restricted" DisplayName_L1="Filtered Internet access" DisplayName_L2="Acces Internet filtre" Category="Internet" ApprovalWorkflowType="One" EntityType="Directory_User" Policy="Default" />
Assign the Role Based on the Dimension
We will define a Single Role Rule on the "Title"; dimension with a given value to restrict the allocation of a resource in only one case.
<SingleRoleRule Role="DL-INTERNET-Restricted" D1="FCT0402" Policy="Default" />
Identity Manager can compute, for a given identity, permissions that are obtained implicitly or indirectly through assignments. The Compute Role Model Task is responsible for this functionality.
Overview
Assigning a role to a user can give them new permissions in a managed system by giving access to a new role or a new group, for example. This assignment is direct as it is entirely explicit. However, the user might also receive some additional permissions that are inherited through the new permission and that are not explicit. For instance in some systems, users can get permissions by being a member of a group but groups can also be members of other groups, and therefore allow for transitive permission acquisitions. These permissions are called indirect. This notion can also be extended when permissions in a managed system also give other permissions in an external system.
Indirect Permissions are automatically computed by the Compute Role Model Task along with standard explicit or direct permissions during a full update. Indirect permissions will not be computed when processing a single user (for instance through "Repair Data (helpdesk)") or during simulations.
Configuration
The computation of Indirect Permissions is based on the configured Indirect Resource Rule . These rules tell Identity Manager how to navigate the managed system and how to recover permissions that a user inherits implicitly. An Indirect Resource Rule is composed of the following properties:
ResourceType—The Resource Type to which the rule will be applied.Property— The Entity Type which corresponds to the user permission in the target system.Correspondence(optional)— The Entity Type that is used to recover the correspondence of a resource from the target system in the external system.CorrespondenceMembershipProperty(optional) — The Entity Type which corresponds to the user permission in an external system.Entitlement(optional) — The Entity Type that can be configured if the permission in the external system needs to be recovered from the discovered resources. For instance one can use this property to recover the entitlements of Sharepoint groups (whileCorrespondenceMembershipPropertywill be used to recover the group membership graph).
If either Correspondence or CorrespondenceMembershipProperty is specified, then the other
property must be specified as well.
If Entitlement is specified, then both Correspondence and CorrespondenceMembershipProperty
also need to be specified.
TargetEntityTypeProperty— The Entity Type which identifies each rule given a resource type.TargetEntityTypeReflexiveProperty— The Entity Type which corresponds to the user permission in the target system.IndirectResourceBinding— The Bindings that is used to recover an assignment from a permission in either system (target or external). It is also used to define the correspondence between resources in both systems.IndirectResourceReflexiveProperty(optional): The Entity Type which corresponds to the user permission in an external system.
Correspondences between resources are necessarily one-sided: the Indirect Permissions computation is started in the managed system and if a correspondence is found, the computation will be continued in the external system. Correspondences won't be checked in the external system.
An example of an Indirect Resource Rule configuration is available in How-To: Configure Indirect Permissions in an Active Directory.
What Can Be an Indirect Permission?
The Compute Role Model Task will create indirect Assigned Resource Navigations for the permissions that it finds, but if and only if these permissions are associated with a Resource Type.
If a Single Role is associated with one of these Resource Navigation Rules, then an indirect Single Role will also be recovered.
Finally, if at least one indirect Single Role is used to recover a Composite Role , then the Composite Role will also be indirect.
What Can Be Done with Indirect Permissions?
Currently, Indirect Permissions are only displayed and found in the users' View Permissions tab in
the Advanced View: Indirect Permissions (except Composite Roles) are hidden in the
Simplified View.
Although Indirect Permissions are marked as Non-conforming, they can be neither approved nor
deleted. They also won't appear in Access certification campaigns.
Indirect Permissions are always indicated by the following icon:
![]()
Disabling the Indirect Permission Computation
In case of emergency, one can disable the computation of indirect permissions by adding the
"DisableIndirectPermissions": true field to the root of the appsettings. While the computation
is disabled, indirect permissions will be frozen in time: any existing one will not be deleted and
any potential new one will not be added.
Non-Conforming Assignments
The Compute Role Model Task is able to detect from synchronized data a list of non-conforming or missing resources/entitlements for every identity. That is one of Identity Manager's most powerful governance features, provided you have a full role model configured.
Build the conforming assignment list
The first step is building the conforming assignment list, as explained in the
Conforming Assignments . This list (list A)
includes the assignments that perfectly comply with the role model/assignment policy.
Build the existing assignment list
The second step is building the existing assignment list (list B), as explained in
the Existing Assignments every synced resource can be
translated into a role assignment following the assignment rules "in reverse".
Compare both lists
We can now compare both lists to find out if the managed systems really comply with the decided upon assignment policy.
For every assignment from list B representing resources from the synced data:
- There is a rule path from the identity attribute to the resource provisioning order in the role
model. The assignment was expected, it can be found in list
A. - There is no rule path from the identity attribute to the resource provisioning order in the role
model. The assignment was unexpected, it is not in list
Aor it is in listAbut not with exactly the same property values.
The "unexpected" (or non-conforming) assignments can be for example orphan accounts. Sometimes, the account itself should indeed exist according to the rules, but its attribute values are "unexpected", contradicting scalar rules.
Non-conforming accounts are presented in the reconciliation screens: from the role point-of-view in the role reconciliation screen and from the resource point-of-view in the resource reconciliation screen.
They need human confirmation to be either kept or destroyed.
For every assignment from list A representing expected assignments:
- There is an exact match in list
B. The managed system complies with the assignment policy for this resource. - There is no match in list
B: the managed system doesn't comply with the assignment policy. The resource is missing (the account is missing).
Missing accounts are presented in the provisioning review for validation before provisioning.
Identity Manager will never delete data without having a user's confirmation first. That is the reason why these variations from the ideal aren't fixed automatically but submitted for review.
Some users might wonder how they can perform governance if they don't have automated rules. Certification can help. By reviewing (even manually) the entitlement landscape, non-conforming account proliferation can be contained.
This feature is the final touch of the sync-fulfill-verify loop that makes Identity Manager so efficient. It is exactly like a closed-loop control system with a feedback loop: perturbations, in the form of modifications in a managed system that don't go through Identity Manager first, trigger a reaction. This reaction uses the role model to suggest a fix. This is the only way for the state of the entitlement landscape to tend towards the ideal standards described by the rules.
Automate Role Assignments
How to manually build rules to automate the assignment of roles to identities. See the Create Roles in the Role Catalog topic for additional information.
Overview
Single role rules and composite role rules are assignment rules. Assignment rules are designed to automatically assign respectively single roles and composite roles (based on specific criteria) to identities. One rule must be created for every role to assign. See the Create Roles in the Role Catalog topic for additional information.
Participants and Artifacts
For a given managed system, integrators may need the help of the application owner who knows the application's users, entitlements and data model.
| Input | Output |
|---|---|
| Role Catalog (required) | Role assignment rules |
See the Create Roles in the Role Catalog topic for additional information.
Create a Role Assignment Rule
Create a role assignment rule by proceeding as follows:
- Access the rules page by clicking on Access Rules on the home page in the Configuration section.

- In the dropdown menu at the top left, choose the source entity type for the future scalar rule.

- Click on the Composite Roles or Single Roles tab and on the addition button at the top right corner.
![]()
- Fill in the fields.
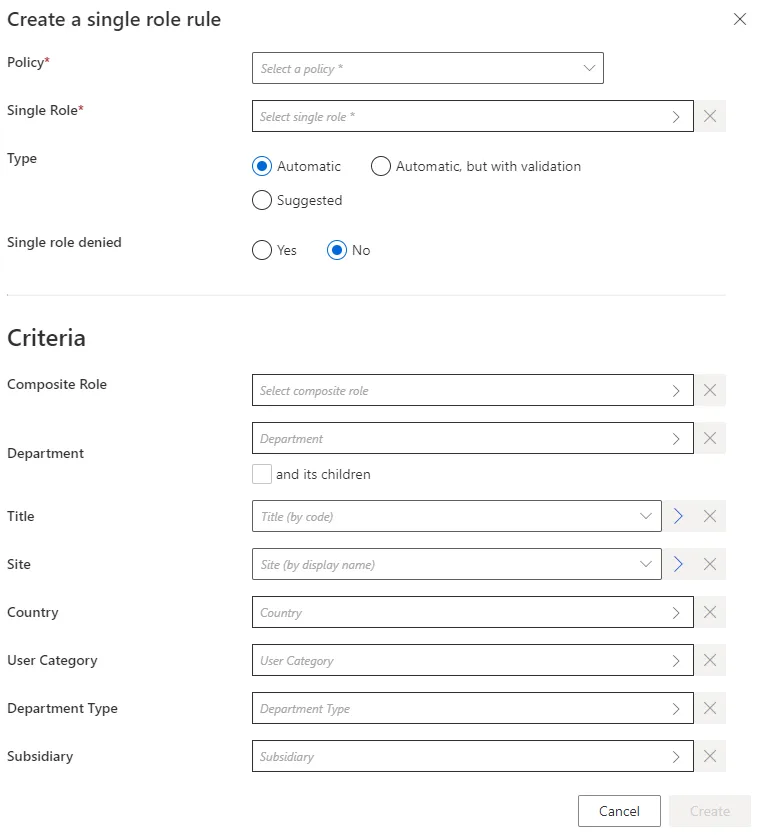
-
Single Role: single role to be automatically assigned in a single role rule.Composite Rolefor a composite role rule. -
Type: assignment type that can be:Suggestedso that the role is listed among suggested permissions in the permission basket of users matching the criteria during an entitlement request, suggested assignments must be selected manually to be requested; orAutomaticso that the role is automatically assigned to users matching the criteria; orAutomatic but with validationso that the role is listed in the permission basket of new workers, these assignments can still be modified.The rule's type can be
Suggestedonly if the related role is allowed to be requested manually. -
Single role denied: option that forbids the assignment instead of applying it. -
Criteria: conditions that, if met, trigger the single role automatic assignment.
Role assignment rules can be based on identity dimensions. Moreover, single role rules can be based on composite roles.
- Click on Create and see a line added on the rules page.
Impact of Modifications
Any modification in a role assignment rule is taken into account when the next Compute Role Model Task runs to compute new assignments. Therefore, if a given rule's criterion is modified, then all corresponding assignments are computed again. If a role was assigned automatically to an identity by a role assignment rule, and if this assignment doesn't comply with the new version of the rule, then the corresponding role is automatically removed.
A modification in a role assignment rule can trigger the removal of a role only on the Identity Manager side. There are several barriers to cross before said role is removed from the managed system.
For example, consider a single role rule that assigns the single role
Business role: electronic bankingto all users in theToursdepartment. Let's say that we replaceTourswithOrleans. Then, after the next launch of the complete job, all users in theOrleansdepartment get said role, while the users in theToursdepartment are deprived of said role.
Perform a Simulation is available in order to anticipate the changes induced by a creation/modification/deletion in role assignment rules.
Assignment rules can sometimes give to users an entitlement that they had already received manually. Hence, new assignment rules can imply redundancies between the entitlements assigned manually and approved, and those calculated by a rule and assigned automatically.
Netwrix Identity Manager (formerly Usercube) recommends removing redundant assignments after any assignment rule is created or updated.
Verify Rule Creation
In order to verify the process, start by checking the rule's details on the Access Rules page. Then, you can:
- Select a test user in the directory, accessible from the home page.

- Create a role assignment rule for a role that said user doesn't already have, and based on criteria which the selected user satisfies.
- Trigger the computation of the role model through the complete job on the Job Execution page in the Administration section.

- See the new permission in the user's View Permissions tab.
