Proxy Server
Identity Manager server or agent can be configured to go through a proxy server to access internal or external web resources.
Introduction
A Identity Manager agent often needs to access internal or external systems using the HTTP protocol. It may easily be configured to use a proxy server through which all or part of the HTTP traffic will be routed.
Proxy Related Environment Variables
The proxy configuration is based on a set of standard dotnet environment variables:
HTTPS_PROXY: the proxy server used on HTTPS requests.NO_PROXY: a comma-separated list of hostnames that should be excluded from proxying.
The dotnet environment does not rely on the OS-wide proxy configuration. It is mandatory to use the above-mentioned environment variables to configure the proxy.
HTTPS_PROXY
The HTTPS_PROXY environment variable may be the hostname or IP address, optionally followed by a
colon and port number, or it may be an http URL, optionally including a username and password for
Proxy Server authentication.
The URL must start with http, not https, and cannot include any text after the hostname, IP,
or port.
This example shows various ways to properly configure a proxy server using Powershell:
# A hostname with port (recommended syntax)
$env:HTTPS_PROXY="proxy.contoso.com:6060"
# A hostname without port
$env:HTTPS_PROXY="proxy.contoso.com"
# An IP address with port
$env:HTTPS_PROXY="10.65.1.1:6060"
# A URL with port:
# Warning: Even if we want to route HTTPS traffic, we MUST give a URL with http scheme.
# Warning: Do not add trailing slash.
$env:HTTPS_PROXY="http://proxy.contoso.com:6060"
We recommend using the <hostname>:<port> syntax since it is not misleading. We discourage using
the http://<hostname>:<port> syntax since it is not intuitive to indicate the http scheme to
route https traffic. However, if you decide to use this syntax, do not forget to include a comment
stating that http scheme is mandatory at the configuration level, even if it will not be used at
runtime.
Do not do
This example shows the wrong ways to initialize the HTTPS_PROXY environment variable. The
environment variable will be silently ignored and the traffic will not be routed through the
proxy.
# WRONG: A URL with https scheme
$env:HTTPS_PROXY="https://proxy.contoso.com:6060"
# WRONG: A URL with text after the port number
$env:HTTPS_PROXY="http://proxy.contoso.com:6060/"
# WRONG: A URL with text after the hostname
$env:HTTPS_PROXY="http://proxy.contoso.com/"
Authenticated proxy
When the proxy server needs the user to be authenticated, the HTTPS_PROXY environment variable can
include the username and password as follows:
# A URL to authenticate to the proxy with login=mylogin and password=mypassword
$env:HTTPS_PROXY="http://mylogin:mypassword@proxy.contoso.com:6060"
NO_PROXY
The NO_PROXY environment variable is a comma-separated list of hostnames that should be excluded
from proxying. To exclude all subdomains ("wildcard" exclusion), domains in the NO_PROXY list need
to be prefixed with a dot (.), which is standard, but not particularly well documented. Do not
use the star (*) prefix !!!
This example shows various ways to exclude domains from proxying:
# Exclude only www.google.com:
# www.google.com: will not go through the proxy
# maps.google.com: will go through the proxy
$env:NO_PROXY="www.google.com"
# Exclude only www.google.com and www.microsoft.com:
$env:NO_PROXY="www.google.com,www.microsoft.com"
# Exclude all google.com and all microsoft.com subdomains:
# Do not prepend the domain name with a '*'
# www.google.com: will not go through the proxy
# maps.google.com: will not go through the proxy
# www.microsoft.com: will not go through the proxy
$env:NO_PROXY=".google.com,.microsoft.com"
Do not do
This example shows the wrong ways to initialize the NO_PROXY environment variable.
# WRONG: starting with '*' to indicate a wildcard exclusion
# Only the domain exactly named *.contoso.com will be excluded from proxying,
# which means there is no exclusion configured.
$env:NO_PROXY="*.contoso.com"
Where to Define Proxy Environment Variables
The proxy configuration is based on a set of standard dotnet environment variables, they can be defined in various places according to the practices in place in your organization:
- At OS level
- At user level: for the user running the Identity Manager server or agent
- At IIS level: in the application
web.configfile
Note that when creating an environment variable in IIS web.config file, all child processes
created by the IIS application will inherit from this environment variables. For example, while
running the Identity Manager agent all tasks started by the agent will inherit the proxy environment
variables.
This example shows how to configure the proxy in the IIS web.config file:
<configuration>  <system.webServer>    <aspNetCore processPath="dotnet" arguments="./identitymanager-Server.dll" stdoutLogEnabled="false" stdoutLogFile="../Temp/stdout-server.log" hostingModel="inprocess">      <environmentVariables>
        <environmentVariable name="HTTPS_PROXY" value="proxy.contoso.com:6060"/>        <environmentVariable name="NO_PROXY" value=".google.com"/>
      </environmentVariables>...
    </aspNetCore>  </system.webServer></configuration>
Testing the Proxy Configuration
To test the proxy configuration for the dotnet environment, it is advised to use Powershell 5 or Powershell Core.
In the following examples, you may adapt the proxy hostname/port and the URL to test.
Using Powershell 5
To test that a Identity Manager agent using a proxy server can reach the Identity Manager server: Go
to the <USERCUBE_HOME>/Runtime directory.
$env:HTTPS_PROXY="proxy.contoso.com"
./identitymanager-Invoke-Job.exe --api-url https://contoso.usercube.com/ --api-client-id Job --api-secret secret -j UnknownJob

# Given the credentials are valid, you should get an exception as follows:
# ---> System.Exception: Job: UnknownJob is not found
# This exception shows that the server has been reached and that the job identifier is not known.
# The proxy is properly configured !!!
Do not use Invoke-WebRequest or Test-NetConnection to test the proxy configuration. In
Powershell 5, these tools are using a different network stack from dotnet environment and are using
the OS-wide proxy settings. They will ignore the HTTPS_PROXY environment variable
Using Powershell Core
Powershell Core is based on the same network stack as dotnet environment. The proxy configuration can be tested using the Invoke-WebRequest and Test-NetConnection tools. If tests are successful using Invoke-WebRequest, they will be successful too if the same environment variables are provided to the Identity Manager server or agent.
Powershell Core will only take the HTTPS_PROXY environment variable into account if it was created
before the Powershell Core process was started.
# Create the environment variable in this Powershell Core process.
# This variable will not alter the proxy configuration of this process.
$env:HTTPS_PROXY="proxy.contoso.com"
# Start a child Powershell Core process which will inherit from the HTTPS_PROXY environment variable.
# This variable will alter the proxy configuration of this child process.
pwsh
Invoke-WebRequest https://contoso.usercube.com/
# The result should display an HTTP 200 response from the Usercube server.

# Go back to the parent Powershell parent process.
exit
Known errors when proxy is not properly configured
When the proxy environment variables does not match the expected format, they will be silently ignored.
- If
HTTPS_PROXYis ignored, the network stack will try to directly access public URL's without going through the proxy. - If
NO_PROXYis ignored, the internal traffic will be routed through the proxy.
When testing the proxy configuration, if you get one of the following error message:
No such host is known.H�te inconnu
It means that the HTTPS_PROXY is not set or does not match the expected format. The HTTP client
tries to directly resolve the public hostname instead of resolving the proxy hostname.
Review the HTTPS_PROXY value, check that it does not:
- use the
httpsscheme - include trailing slashes or characters after the hostname:port
Reference Documentation
- HttpClient.DefaultProxy: reference for environment variables.
- NO_PROXY: unofficial documentation for wildcard domain exclusion
Application Settings
This section describes the settings available in the server's appsettings.json file, located in the server's working directory or in environment variables.
JSON files can contain any additional information that you might find useful. See the example below.
For example, in order to store the agent's address, we can add:
Code attributes enclosed with <> need to be replaced with a custom value before entering the
script in the command line.
appsettings.json
"<UsercubeAgent>": {
  "Url": "<http://localhost:1234>"
}
As Identity Manager does not know any object named Identity ManagerAgent, its content will be ignored, but it can still be used to store information for human use.
The appsettings set allows the following attributes and sections:
| Name | Type | Description |
|---|---|---|
| ApplicationUri required | String | URI of the server to use in log messages, to communicate with the server in tasks, to allow certain redirect URIs. It must be the same as the agent's appsettings.json's ApplicationUri. Example: Code attributes enclosed with <> need to be replaced with a custom value before entering the script in the command line. appsettings.json { ... "ApplicationUri": "usercubeserver.contoso.com:5000" } |
| EncryptionCertificate required | EncryptionCertificate | Settings to configure the encryption of specific files. |
| License | String | License key of the server. Example: Code attributes enclosed with <> need to be replaced with a custom value before entering the script in the command line. appsettings.json { ... "License": "{"LicensedTo":"<Demo>","ValidTo":"<20120905>","IdentityQuota":"<10000>","Signature":"<...>"}" } |
| Agents optional | Agent List | List of agents' settings used to work on several environments. See the Architecture topic for additional information. This way, each Agent's URI/URL is configured without altering the database. Example: Code attributes enclosed with <> need to be replaced with a custom value before entering the script in the command line. appsettings.json { ... "Agents": { ... "Local": { "Uri": "http://localhost:5010" }, ... } } |
| AppDisplay optional | AppDisplay | Settings to override the application display XML configuration. See the App Display Setting topic for additional information. It is useful to change the application's theme and name without redeploying the whole configuration. |
| ApplicationInsights optional | ApplicationInsights | Settings to plug to and configure the App Insights monitoring tool. |
| DataProtection optional | DataProtection | Settings to configure the encryption used for the authentication cookies and the anti-forgery tokens. The data protection can be configured to share the keys between several instances of Identity Manager's server, for example when deployed in a cluster where the servers do not have the same machine id. |
| DefaultPageSize optional | UInt | Default number of items returned when using squeries, if none specified in PageSize or in squery limit. |
| HstsPreload optionalAttribute default value: false | Boolean | Sets the preload parameter of the Strict-Transport-Security header. Preload is not part of the RFC specification, but is supported by web browsers to preload HSTS sites on fresh install. Example: Code attributes enclosed with <> need to be replaced with a custom value before entering the script in the command line. <pre class="json"><code><em>appsettings.json</em><br/><br/>{<br> ...<br> "HstsPreload": true<br>}</code></pre> |
| InstallationDirectoryPath default value: Usercube-Server.exe | String | Path of the installation directory. It is used to read other configuration files. Example: Code attributes enclosed with <> need to be replaced with a custom value before entering the script in the command line. appsettings.json { ... "InstallationDirectoryPath": "C://UsercubeContoso/Runtime" } |
| MailSettings optional | String | Settings to configure the email service. |
| MaxActors default value: 20 maximum value: 50 | UInt | The maximum number of recipients who will be notified of the Workflow changes and can take action. If the number of recipients is exceeding the MaxRecipients value, then the actors will have the task assigned to them but they will not receive an email notification. In order for all actors to receive an email notification the MaxRecipients should be increased as well. |
| MaxPageSize optionalAttribute | UInt | It represents the maximum number of items returned when using squeries. |
| NotUseAgent default value: false | Boolean | True to disable the use of the agent. See the Architecture topic for additional information. Example: Code attributes enclosed with <> need to be replaced with a custom value before entering the script in the command line. appsettings.json { ... "<NotUseAgent>": true } |
| OpenIdClients optional | OpenIdClient List | List of hashed secrets used to override the plain-text secrets from the OpenIdClient XML configuration. See the OpenIdClient topic for additional information. This way, Identity Manager stores only hashed secrets, for security purposes. Each environment must have its own secret, distinct from the others. Example: Code attributes enclosed with <> need to be replaced with a custom value before entering the script in the command line. appsettings.json { ... "OpenIdClients": { ... "Job": { "<HashedSecret>": "K7gNU3sdo+OL0wNhqoVWhr3g6s1xYv72ol/pe/Unols" }, ... } } |
| PowerBISettings optional | PowerBISettings | Settings to configure the API used by Power BI to access Identity Manager data. |
| Serilog optional | Serilog | Settings to configure the logging service, complying to the Logger properties and structure. See the Monitoring topic for additional information. Example: Code attributes enclosed with <> need to be replaced with a custom value before entering the script in the command line. appsettings.json { ... "Serilog": { ... "WriteTo": [ "Console" ], ... "MinimumLevel": { ... "Override": { ... "Usercube": "Information" ... } ... } ... } } |
| Swagger optional | Swagger | By enabling Swagger you can visualize and interact with the API's resources without having any of the implementation logic in place. It is automatically generated from Identity Manager's API, with the visual documentation making it easy for back-end implementation and client-side consumption. |
| TempFolderPath default value: ../Temp | String | Path to the temporary folder which contains: - ExportOutput: directory storing data exported from connectors. - JobLogs: directory storing task instance logs. - Reports: directory storing generated reports. - Packages: directory storing the downloaded package logos. - PolicySimulations: directory storing the files generated by policy simulations. - ProvisioningCache.txt: file storing the clustered provisioning cache. When enabled, this file can be used to coordinate the API cache among clusters. - CorrelationCache.txt - RiskCache.txt - ExpressionCache.txt - scheduler.lock - connector.txt - container.reset.txt: file acting as a reset command for Identity Manager's server, i.e. any change to this file triggers the reset service, thus reloading all the services instantiated by the server. This path can be overridden by ResetSettings > FilepathResetService. - Mails: directory storing the email messages. This path can be overridden by ResetSettings > PickupDirectory. - Deployment These elements can be removed, but make sure to restart the server after doing so. Example: Code attributes enclosed with <> need to be replaced with a custom value before entering the script in the command line. appsettings.json { ... "<TempFolderPath": "../Temp>" } |
| WorkFolderPath default value: ../Work | String | Path of the work folder which contains: - Collect: directory storing the CSV source files exported by connectors. - ProvisioningOrders: directory storing the orders generated by the server. - FulfillPowerShell: PowerShell provisioner's working directory. - FulfillRobotFramework: Robot Framework's provisioner working directory. - ExportCookies: directory storing the cookies used for incremental export. - Synchronization: directory storing the agent's data collection results. - Upload: directory storing the uploaded media like uploaded pictures, before they are inserted into the database. - appsettings.connection.json These elements must not be removed, because doing so may disrupt Identity Manager's execution after restarting. Example: Code attributes enclosed with <> need to be replaced with a custom value before entering the script in the command line. appsettings.json { ... "<WorkFolderPath": "../Work>" } |
Swagger
Swagger is set using the attribute below.
| Name | Type | Description |
|---|---|---|
| Enabled required | Boolean | True to enable Swagger. Example: appsettings.json { ... "Swagger": { ... "Enabled": false ... }, } NOTE: We recommend setting this to false for production environments. |
Encryption Certificate
This information can be set one of two ways:
- As a Public Key Cryptography Standards (PKCS) #12 archive (also called Personal Information Exchange file or .pfx file) stored in the Agent's host file system. The archive contains both the public key certificate and the private key.
- As a certificate from a Windows' certificate store identified by SubjectDistinguishedName or by Thumbprint. The Windows certificate also contains both the public key certificate and the private key.
- Remember, Netwrix recommends using Windows' certificate store. A subject name can identify multiple certificates in the same Certificate Store since the Subject Name needs not to be unique. If there are multiple certificates identified by the subject name given in the appsettings, Identity Manager will use the first one. However it is not possible to say exactly which certificate will be loaded first. The thumprint is unique among the certificates so it can help with for the certificate identification.
As a PFX file
For example:
Code attributes enclosed with <> need to be replaced with a custom value before entering the
script in the command line.
{
    ...
    "EncryptionCertificate": {
        "File": "<C:/UsercubeAgentContoso/contoso.pfx>",
        "Password": "<oarjr6r9f00>"
      }
  }
The archive is set using the following attributes:
| Name | Type | Description |
|---|---|---|
| File required | String | PKCS #12 archive path on the host file system. |
| Password optional | String | PKCS #12 archive password. |
Storing a .pfx file password in plain text in a production environment is strongly discouraged. It should always be encrypted using the Usercube-Protect-CertificatePassword tool. See the Usercube-Protect-CertificatePassword topic for additional information.
The archive is set using the following attributes:
| Name | Type | Description |
|---|---|---|
| File required | String | PKCS #12 archive path on the host file system. |
| Password optional | String | PKCS #12 archive password. Storing a .pfx file's password in plain text in a production environment is strongly discouraged. It should always be encrypted using the Usercube-Protect-CertificatePassword.exe tool. See the Usercube-Protect-CertificatePassword topic for additional information. |
As a Certificate in the Windows Store
For example:
Code attributes enclosed with <> need to be replaced with a custom value before entering the
script in the command line.
  {
    ...
    "EncryptionCertificate": {
          "DistinguishedName":"<UsercubeContoso>",
          "StoreLocation": "<LocalMachine>",
          "StoreName": "<AuthRoot>"
      }
  }
The Windows certificate is set using these attributes:
| Name | Type | Description |
|---|---|---|
| DistinguishedName optional | String | SubjectDistinguishedName of the store certificate. It is required when Thumbprint is not specified. |
| Thumbprint optional | String | Thumbprint of the store certificate. It is required when DistinguishedName is not specified. |
| StoreLocation required | String | Location of the relevant Windows certificate store: LocalMachine or CurrentUser. |
| StoreName required | String | Name of the relevant Windows certificate store. |
Using Azure Key Vault
If the certificate is saved in Azure Key Vault, we must define the certificate identifier and the Vault connection. See the Azure Key Vault topic for additional information.
Code attributes enclosed with <> need to be replaced with a custom value before entering the
script in the command line.
"<EncryptionCertificate>": {
    "CertificateAzureKeyVault": "<CertificateIdentifier>"
}
Disabling file encryption
The encryption of specific files can be disabled via the following attribute:
| Name | Type | Description |
|---|---|---|
| EncryptFile default value: true | Boolean | True to encrypt specific files such as logs or temporary files. Example: Code attributes enclosed with <> need to be replaced with a custom value before entering the script in the command line. appsettings.json { ... "EncryptionCertificate": { ... "EncryptFile": false ... } } |
Mail Settings
For example:
Code attributes enclosed with <> need to be replaced with a custom value before entering the
script in the command line.
appsettings.json
{
  ...
  "MailSettings": {
    "FromAddress": "<no-reply@acme.com>",
    "PickupDirectory": "<C:/UsercubeDemo/Temp/Mails>",
    "UseSpecifiedPickupDirectory": true,
    "UseDefaultCredentials": false,
    "SecureSocketOption": "<StartTlsWhenAvailable>"
  }
}
The mail settings details are:
| Name | Type | Description |
|---|---|---|
| FromAddress required | String | Email address used as sender for Identity Manager's emails. |
| AllowedDomains optional | String | List of allowed domains, separated by <;>. |
| CatchAllAddress optional | String | Email address to be used as catchAll. |
| CatchAllCCAddress optional | String | Email address to be used as CC catchAll. |
| Enabled default value: true | Boolean | True to activate Identity Manager's email services. |
| EnableSsl default value: false | Boolean | DEPRECATED: EnableSsl won't be supported in the future. Please specify a SecureSocketOption instead. To keep the same behavior as EnableSsl: True, use the setting SecureSocketOption: StartTls. True to encrypt communication with the SMTP server. To be used only when UseSpecifiedPickupDirectory is set to false. |
| MaxRecipients default value: 20 | String | The maximum number of recipients visible in the "To", "CC" and "BCC" fields. Any additional recipient will be deleted automatically. |
| SecureSocketOption default value: Auto | String | Specifies the encryption strategy to connect to the SMTP server. If set, this takes priority over EnableSsl. None: No SSL or TLS encryption should be used. Auto: Allow the mail service to decide which SSL or TLS options to use (default). If the server does not support SSL or TLS, then the connection will not be encrypted. SslOnConnect: The connection should use SSL or TLS encryption immediately. StartTls: Elevates the connection to use TLS encryption immediately after reading the greeting and capabilities of the server. If the server does not support the STARTTLS extension, then the connection will fail and a NotSupportedException will be thrown. StartTlsWhenAvailable: Elevates the connection to use TLS encryption immediately after reading the greeting and capabilities of the server, but only if the server supports the STARTTLS extension. To be used only when UseSpecifiedPickupDirectory is set to false. |
| Host optional | String | Name or IP address of the host used for SMTP transactions. It is required when UseSpecifiedPickupDirectory is set to false. |
| Password optional | String | Password to be used with the user name as credentials. |
| PickupDirectory optional | String | Path of the folder where Identity Manager will save the email messages. It is useful and required when UseSpecifiedPickupDirectory is set to true. |
| Port optional | String | Port used for SMTP transactions. It is required when Host is defined. |
| UseDefaultCredentials default value: false | Boolean | True to use in requests the default credentials instead of those from UserName and Password here. |
| UserName optional | String | User name to be used with the user name as credentials. |
| UseSpecifiedPickupDirectory default value: false | Boolean | True to save email messages to the folder specified in PickupDirectory instead of sending them to their recipients through the host specified in Host. Required when Host is not defined. |
Application Insights
For example:
Code attributes enclosed with <> need to be replaced with a custom value before entering the
script in the command line.
appsettings.json
{
  ...
  "ApplicationInsights": {
    "InstrumentationKey": "<AppInsights instance's key>"
  }
}
The application insights details are:
| Name | Type | Description |
|---|---|---|
| InstrumentationKey default value: null | String | Key linked to the AppInsights instance to which the server's logs, requests, dependencies and performance are to be sent. See the Microsoft Create an Application Insights resource article for information on creating an instrumentation key. |
NOTE: The logs sent to AppInsights are configured through the Logger properties. See the Monitoring topic for additional information.
PowerBI Settings
For example:
Code attributes enclosed with <> need to be replaced with a custom value before entering the
script in the command line.
appsettings.json
{
  "PowerBISettings": {
    "PageSize": 500
  }}
The PowerBI Settings details are:
| Name | Type | Description |
|---|---|---|
| PageSize default value: 1000 | Int32 | Size of the page containing the data returned by the API. |
Data Protection
For example:
Code attributes enclosed with <> need to be replaced with a custom value before entering the
script in the command line.
appsettings.json
{
  "DataProtection": {
    "KeysPath": "</home/DataProtection>",
    "X509KeyFilePath": "<../Usercube.pfx>",
    "X509KeyFilePassword": "<secret>"
  },
}
The Data Protection details are:
| Name | Type | Description |
|---|---|---|
| KeysPath default value: ../Work/DataProtection | String | Path of the location where the keys' descriptions are stored. |
| X509KeyFilePath optional | String | Path of the custom certificate used to protect the keys. |
| X509KeyFilePassword optional | String | Password of the custom certificate used to protect the keys. |
App Display
For example:
Code attributes enclosed with <> need to be replaced with a custom value before entering the
script in the command line.
appsettings.json
{
  ...
  "AppDisplay": {
    "PrimaryColor": "<#01CDE9>",
    "SecondaryColor": "<#EA6E1A>",
    "BannerColor": "<#EA6E1A>",
    "BannerTextColor": "<#ffffff>",
    "ApplicationNamePrefix": "<QA - >",
    "ApplicationName": "<USERCUBE>"
  },
  ...
}
The App Display details are:
| Name | Type | Description |
|---|---|---|
| ApplicationName optional | String | Name of the application, visible on the application's tabs. |
| ApplicationNamePrefix optional | String | Prefix to be displayed before the application name. |
| BannerColor optional | String | HEX code of the color for the banner, i.e. the header displaying logo and navigation bar. |
| BannerTextColor optional | String | HEX code of the color for the banner's text. |
| PrimaryColor optional | String | HEX code of the color for the highlighted buttons. |
| SecondaryColor optional | String | HEX code of the color for the background of the authentication screen. |
See the App Display Setting topic for additional information.
Various XML Settings
This section describes Identity Manager's Settings available in the applicative configuration. Those are mandatory.
ConfigurationVersion
This setting is used to track the current configuration version.
<ConfigurationVersionSetting Version="5.0.0" Description="Demo Usercube" />
- Version defines the configuration version.
- Description describes this version in detail.
- Misc misc.
AppDisplay
This setting is used to customize the application display.
<AppDisplaySetting PrimaryColor="#009597" SecondaryColor="#00553F" ApplicationName="Usercube" LogoFile="Images/logo.webp" FaviconFile="Images/favicon.ico" />
- PrimaryColor defines the primary color.
- SecondaryColor defines the secondary color.
- BannerColor defines the banner (header displaying logo and navigation bar) color.
- BannerTextColor defines the banner text color.
- ApplicationName defines the application name.
- LogoFile defines the logo path. Concerning the logo, for an ideal result, the following ratio should be used: 5:1.
- LogoMimeType defines the logo mime type.
- FaviconFile defines the favicon path.
- FaviconMimeType defines the favicon mime type.
- FullNameSeparator defines the full name separator (default value is
�). - DisableProvisioningCounters disables the counters related to the provisioning screens (Role
Review, Provisioning Review, Role Reconciliation, Resource Reconciliation and
Manual Provisioning - default value is
false).
CustomLinks
This setting enables the configuration of custom links that let the user navigate to a custom static HTML page. Only two CustomLinkSetting can be configured.
The example below defines two custom links accessible through the URLs "your-Identity Manager-domain/LegalNotice" and "your-Identity Manager-domain/TermsOfService", each showing the content of the corresponding HTML file depending on the currently selected language.
<CustomLink1Setting Url="/LegalNotice" Path_L1="LegalNotice_en.html" Path_L2="LegalNotice_fr.html" /> <CustomLink2Setting Url="/TermsOfService" Path_L1="TermsOfService_en.html" Path_L2="TermsOfService_fr.html" />
- Url_(required)_ defines the url address from which to access the custom page.
- PathL1(required)_ defines the path (from the configuration root) to the HTML file to be
rendered depending on the currently selected language in the user interface (
Path_L1toPath_L16are available). OnlyPath_L1is required. While navigating to a custom link, if no HTML path was defined for the current language, thenPath_L1is taken as default.
To be displayed correctly, images should be embedded in the HTML files as Base64 images using the
src attribute like this : <img src="data:image/png;base64,iVBORw0...=" />. You can easily
convert your images using this Base64 Image Encoder.
To navigate to the custom links from the user interface, NETWRIX recommends configuring a MenuItem
with a URI value matching the custom link URL. The following example defines two menu items,
accessible from the user account tab in the top right corner of the interface, that allows the user
to navigate to the defined URI addresses.
<MenuItem Identifier="UserMenu_CustomLink1" DisplayName_L1="Legal Notice" DisplayName_L2="Mentions l�gales" IconCode="List" URI="/LegalNotice" ParentMenuItem="UserMenu" /> <MenuItem Identifier="UserMenu_CustomLink2" DisplayName_L1="Terms of Service" DisplayName_L2="Conditions d'utilisation" IconCode="List" URI="/TermsOfService" ParentMenuItem="UserMenu" />

DashboardItemNumber
Some sections on the dashboard contain multiple links. These links are quick links with counters to the review page filtered by entity type. The links are sorted by entity type priority.
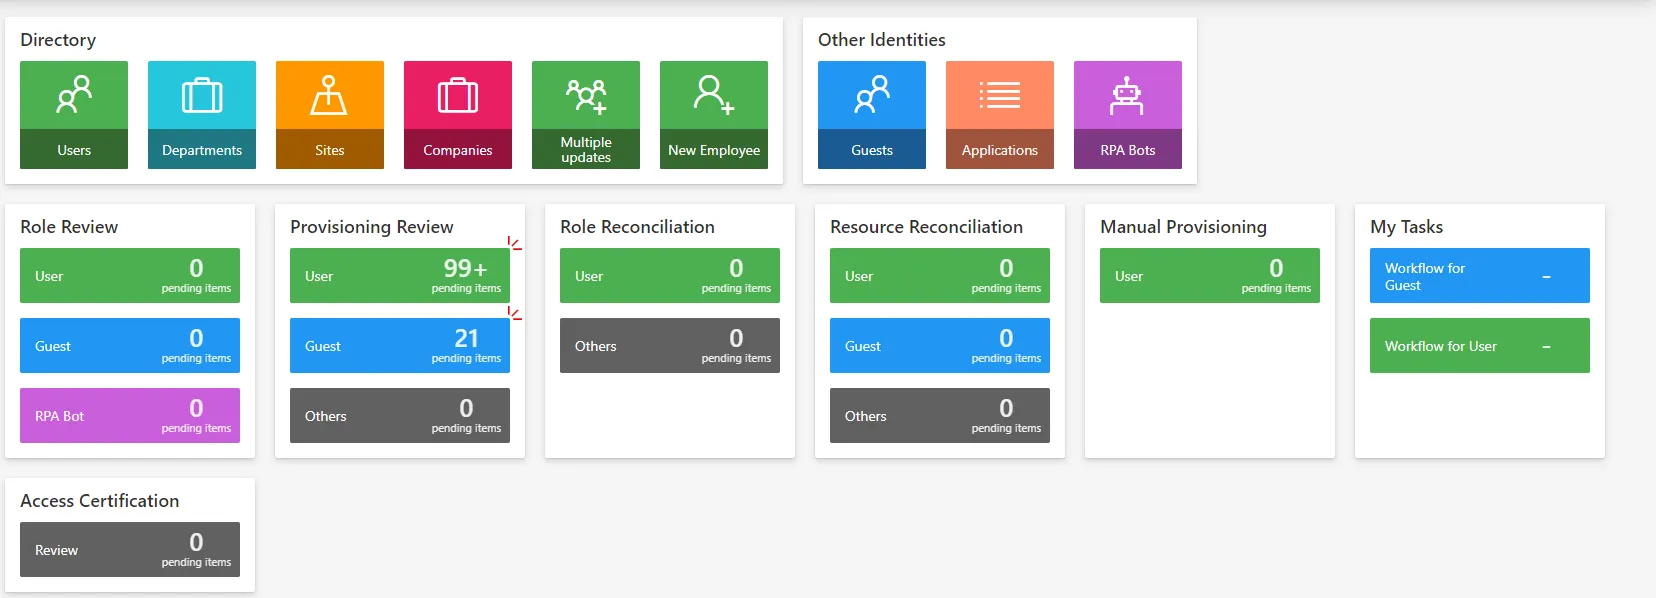
By default, 3 links are displayed. If more than 3 entity type links exist, a link "Others" is displayed with the concatenation of remaining counters.
This setting is used to customize the number of links to displayed on each section.
The max number of links to display is 5.
<DashboardItemNumberSetting RoleReviewSection="2" ProvisioningReviewSection="5" RoleReconciliationSection="2" ResourceReconciliationSection="2" MyTasksSection="4" ManualProvisioningSection="2" />
- RoleReviewSection defines the number of links to display in the "Role Review" section.
- ProvisioningReviewSection defines the number of links to display in the "Provisioning Review" section.
- RoleReconciliationSection defines the number of links to display in the "Role Reconciliation" section.
- ResourceReconciliationSection defines the number of links to display in the "Resource Reconciliation" section.
- ManualProvisioningSection defines the number of links to display in the "Manual Provisioning" section.
- MyTasksSection defines the number of links to display in the "My Tasks" section.
SelectUserByIdentityQueryHandler
This attribute matches an end-user with a resource from the unified resource repository.
Authorization mechanisms within Identity Manager rely on assigning a Profiles to an identity-resource that stands for the end-user digital identity.
To that end, and end-user authentication credentials are linked to such an identity-resource using the following pattern:
- Authentication credentials are retrieved;
- Authentication credentials are trimmed using the AfterToken and/or BeforeToken attributes;
- The trimmed result is matched against the ResourceIdentityProperty of resources with an EntityType OwnerEntityType;
- The matching resource found is used to find a profile and authorization for that digital identity.
Attributes
-
ResourceIdentityProperty is the identity-resource property supposed to match the authentication login used by the end-user.
-
OwnerEntityType is the entity type of the resources used to store digital identities within Identity Manager.
-
BeforeToken_(optional)_ defines the first character used to trim the authentication login.
-
AfterToken_(optional)_ defines the second character used to trim the authentication login.
The trimmed result is the content of the authentication login between AfterToken and BeforeToken. If BeforeToken is empty, trimmed result is everything after AfterToken. If AfterToken is empty, trimmed result is everything before BeforeToken.
-
ResourceDisplayNameProperty is the property used for displaying login data at the top right of the application.
-
OwnerPhotoTagProperty defines the photo property for Identity Manager users.
Example
The following example links the authentication credentials of an end-user to its matching resource of EntityType Directory_User.
In this example, authentication has been set up using
End-User Authentication. In that case,
the login used by the end-user is in the form DOMAIN/userName.
The AfterToken attribute parses the DOMAIN/userName string into userName.
The parsed result userName is compared with AD_Entry:sAMAccountName property value of
Directory_User resources.
The matching Directory_User resource is the resource that stands for the end-user identity within Identity Manager.
<SelectUserByIdentityQueryHandlerSetting
    ResourceIdentityProperty="AD_Entry:sAMAccountName"
    ResourceDisplayNameProperty="AD_Entry:displayName"
    OwnerPhotoTagProperty="Directory_User:PhotoTag"
    OwnerEntityType="Directory_User"
    AfterToken="\"/>
SelectPersonasByFilterQueryHander
This setting is used to filter the entity type used by authentication mechanism.
<SelectPersonasByFilterQueryHanderSetting ResourceDisplayNameProperty="AD_Entry:displayName" PersonTypeFilterProperty="AD_Entry:objectCategory" PersonTypeFilter="Person" />
- ResourceDisplayNameProperty represents the display property.
- OwnerPhotoTagProperty defines the photo tag property.
- PersonTypeFilterProperty defines the filter property.
- PersonTypeFilter defines the filter value.
- MailProperty defines the mail property.
SelectAllPerformedByAssociationQueryHandler
This setting enables task delegation to a group of people.
<SelectAllPerformedByAssociationQueryHandlerSetting RootEntityType="AD_Entry" Binding="member" />
- RootEntityType indicates the entity type on which the delegation is applied.
- Binding defines the binding used to get the list of identities to delegate to.
NB: In order for delegation to work, users that are part of the delegate group must have at least one assigned profile
Scheduling CleanDataBase
If the default value for the Task CleanDataBase needs to be overridden, define this setting:
<SchedulingCleanDataBaseSetting Timeout="2" CronTabExpression="* */2 * * *"/>
Timeout: Defines the maximum time a Job or Task can wait after the last run.CronTabExpression: Define the cron to launch the CleanDatabase Job.
7. Password Generation Setting
It is possible to override some aspects of the password generation (used in password reset features) using the following setting:
<PasswordGenerationSetting AllowedSymbolChars="*@!^-_" />
AllowedSymbolChars: A string containing the list of symbol chars to be used in the generated password. The default value is :!;.,?()[]-_&%$+{}@