Google Workspace
This connector exports and fulfills users and groups from/to a Google Workspace instance.
This page is about Google Workspace .

Overview
Google Workspace provides a set of softwares and products developed by Google. The Google Workspace connector exports and fulfills users and groups from/to a Google Workspace instance. It exports user-group memberships too.
Prerequisites
Implementing this connector requires:
-
reading first the appsettings.agentdocumentation;
-
a service account impersonating the following permission scopes: https://www.googleapis.com/auth/admin.directory. user and https://www.googleapis.com/auth/admin.directory.group.
See Google's documentation Google's documentation to create the service account with the right impersonation.
Remember, Google's documentation describes this procedure as optional, while the Google Workspace connector requires it.
Export
This connector extracts users, groups and user-group memberships from a Google Workspace instance, and write the output to CSV files.
Configuration
This process is configured through a
Connection in the UI and/or
the XML configuration, and in the appsettings.agent.json > Connections section:
appsettings.agent.json
{
  ...
  "Connections": {
    ...
    "<ConnectionIdentifier>": {
      ...
    }
  }
}
The identifier of the connection and thus the name of the subsection must:
- be unique.
- not begin with a digit.
- not contain
<,>,:,",/,\,|,?,*and_.
For example:
appsettings.agent.json
{
    ...
    "Connections": {
        ...
        "GoogleExportFulfillment": {
            "CredentialsFilePath": "C:/UsercubeDemo/GoogleCredentials.json",
            "User": "B29607@acme.internal",
            "PageSize": "100"
        }
    }
}
Setting attributes
| Name | Details |
|---|---|
| CredentialsFilePath required | Type String Description Path of Google Workspace's JSON credentials file. See Google's documentation to create these credentials. |
| User required | Type String Description Email address of the service account mentioned in the prerequisites section. |
| --- | --- |
| PageSize default value: 50 | Type Int32 Description Number of items, i.e. users and/or groups and/or memberships, retrievable from Google Workspace by each API call (from 1 to 500). |
Output details
This connector is meant to generate to the Connection folder the following CSV files:
GoogleExportFulfillment_Users.csvandGoogleExportFulfillment_Groups.csvwhose headers come from the entity type mapping'sConnectionColumnand from the entity association mappings' columns which are not members columns;GoogleExportFulfillment_Members.csvwith the following columns:- value: ID of the group;
- MemberId: ID of the group member.
If the connection column describes a sub-property, then the name should have the following pattern:
{property}:{sub-property}. The character ":" should not be used in other situations.
For example:
<EntityType Identifier="GOOGLE_Entry" DisplayName_L1="GOOGLE - Entry" DisplayName_L2="GOOGLE - Entree"> <Property Identifier="AgreedToTerms" DisplayName_L1="AgreedToTerms" Type="String" /> <Property Identifier="FamilyName" DisplayName_L1="FamilyName" Type="String" /></EntityType><EntityTypeMapping Identifier="GOOGLE_Entry" Connector="GOOGLE" ConnectionTable="GOOGLE_Users"> <Property Identifier="AgreedToTerms" ConnectionColumn="AgreedToTerms" /> <Property Identifier="FamilyName" ConnectionColumn="Name:FamilyName" /></EntityTypeMapping>Note that we have here
AgreedToTermswhich is a single property, andFamilyNamewhich is a sub-property ofName, hence the nameName:FamilyNameas theConnectionColumn.
Fulfill
This connector can write to Google Workspace to create, update, and/or delete users and user-group memberships.
Configuration
Same as for export, fulfill is configured through connections.
For example:
appsettings.agent.json
{
    ...
    "Connections": {
        ...
        "GoogleExportFulfillment": {
            "CredentialsFilePath": "C:/UsercubeDemo/GoogleCredentials.json",
            "User": "B29607@acme.internal"
        }
    }
}
Setting attributes
| Name | Details |
|---|---|
| CredentialsFilePath required | Type String Description Path of Google Workspace's JSON credentials file. See Google's documentation to create these credentials. |
| User required | Type String Description Email address of the service account mentioned in the prerequisites section. |
Authentication
Password reset
This connector does not reset passwords.
Credential protection
This connector has no credential attributes, and therefore does not use RSA Encryption , nor a CyberArk's AAM Credential Providers Vault.
Still, data protection can be ensured through an Azure Key Vault safe.
Okta
This connector exports and fulfills entries from/to Okta application.

Overview
Okta is an access management solution that provides SSO and federation capabilities for single sign-on, multi-factor authentication, and API access management. Okta's platform is widely used by organizations to protect accesses for digital identities in an increasingly complex and interconnected digital world.
Prerequisites
Implementing this connector requires:
- Reading first the appsettings documentation
- An Okta Token with specific permissions on the target instance
See the appsettings.agent topic for additional information.
Configuration
To configure the Okta connector it is necessary to:
Step 1 – Create a new user for Netwrix Identity Manager (formerly Usercube).
In order to do so you must connect to the Okta administration console
https://myexample-admin.okta.com and create a new Netwrix Identity Manager (formerly Usercube)
user.
NOTE: For some Okta deployments it is possible to create a service account or to Manage an Okta user account as a service account.
Step 2 – Assign administrator role and permissions to the Netwrix Identity Manager (formerly Usercube) user.
Step 3 – Generate a Token for the Netwrix Identity Manager (formerly Usercube) user.
See the Okta documentation for additional information.
Export
This connector exports a list of users, groups, applications with their attributes specified in the connector's configuration, to CSV files.
Configuration
This process is configured through a connection in the UI and/or the XML configuration, and in the appsettings.agent.json > Connections section.
Code attributes enclosed with <> need to be replaced with a custom value before entering the
script in the command line.
appsettings.agent.json
{
  ...
  "Connections": {
    ...
    "<ConnectionIdentifier>": {
      ...
    }
  }
}
The identifier of the connection and thus the name of the subsection must:
- Be unique
- Not begin with a digit
- Not contain <, >, :, ", /, , |, ?, * and _.
For example:
Code attributes enclosed with <> need to be replaced with a custom value before entering the
script in the command line.
appsettings.agent.json
{
    "Connections": {
        ...
        "OktaExportFulfillment": {
            "Server": " https://<YourCompany>.okta.com",
            "ApiKey": "<GeneratedUserToken>",
        }
    }
}
Setting attributes
| Name | Type | Description |
|---|---|---|
| Server required | String | URI of the data system. |
| ApiKey required | String | User token value. |
Output details
This connector can create, delete and update users, groups and applications, and is meant to generate the following to the ExportOutput folder :
- A CSV file, named <connectionIdentifier>_users.csv, with one column for each property either having a ConnectionColumn or which is used in an entity association;
- A CSV file, named <connectionIdentifier>_groups.csv, with one column for each property either having a ConnectionColumn or which is used in an entity association;
- A CSV file, named <connectionIdentifier>_apps.csv, with one column for each property either having a ConnectionColumn or which is used in an entity association;
- A CSV file, named <connectionIdentifier>_groupsapps.csv, with one column for each property either having a ConnectionColumn or which is used in an entity association;
- A CSV file, named <connectionIdentifier>_groupsusers.csv, with one column for each property either having a ConnectionColumn or which is used in an entity association;
For example, with the following entity type mapping for users:
Code attributes enclosed with <> need to be replaced with a custom value before entering the
script in the command line.
<EntityType Identifier="User" DisplayName_L1="User">
    <Property Identifier="Groups" DisplayName_L1="Groups" Type="ForeignKey" />
    <Property Identifier="OktaSyncPrpov_users_id" DisplayName_L1="id" IsKey="true" TargetColumnIndex="6" Type="String" />
    <Property Identifier="UserType" DisplayName_L1="User Type" TargetColumnIndex="128" Type="ForeignKey" />
    <Property Identifier="activated" DisplayName_L1="activated" TargetColumnIndex="4" Type="String" />
    <Property Identifier="created" DisplayName_L1="created" TargetColumnIndex="5" Type="String" />
    <Property Identifier="lastLogin" DisplayName_L1="lastLogin" TargetColumnIndex="7" Type="String" />
    <Property Identifier="lastUpdated" DisplayName_L1="lastUpdated" TargetColumnIndex="8" Type="String" />
    <Property Identifier="passwordChanged" DisplayName_L1="passwordChanged" TargetColumnIndex="9" Type="String" />
    <Property Identifier="profile_city" DisplayName_L1="City" TargetColumnIndex="10" Type="String" />
    <Property Identifier="profile_costCenter" DisplayName_L1="Cost center" TargetColumnIndex="11" Type="String" />
    <Property Identifier="profile_countryCode" DisplayName_L1="Country code" TargetColumnIndex="12" Type="String" />
    <Property Identifier="profile_department" DisplayName_L1="Department" TargetColumnIndex="13" Type="String" />
    <Property Identifier="profile_displayName" DisplayName_L1="Display name" TargetColumnIndex="14" Type="String" />
...
</EntityType>
  <EntityTypeMapping Identifier="User" ConnectionTable="OktaExportFulfillment_users" Connector="Okta">
    <Property Identifier="OktaExportFulfillment_users_id" ConnectionColumn="id" IsPrimaryKey="true" IsUniqueKey="true" />
    <Property Identifier="activated" ConnectionColumn="activated" />
    <Property Identifier="created" ConnectionColumn="created" />
    <Property Identifier="lastLogin" ConnectionColumn="lastLogin" />
    <Property Identifier="lastUpdated" ConnectionColumn="lastUpdated" />
    <Property Identifier="passwordChanged" ConnectionColumn="passwordChanged" />
    <Property Identifier="profile_city" ConnectionColumn="profile.city" />
    <Property Identifier="profile_costCenter" ConnectionColumn="profile.costCenter" />
    <Property Identifier="profile_countryCode" ConnectionColumn="profile.countryCode" />
    <Property Identifier="profile_department" ConnectionColumn="profile.department" />
    <Property Identifier="profile_displayName" ConnectionColumn="profile.displayName" />
  </EntityTypeMapping>
And the following entity type mapping for groups:
Code attributes enclosed with <> need to be replaced with a custom value before entering the
script in the command line.
  <EntityType Identifier="Group" DisplayName_L1="Group">
    <Property Identifier="Applications" DisplayName_L1="Applications" Type="ForeignKey" />
    <Property Identifier="OktaSyncPrpov_groups_id" DisplayName_L1="id" IsKey="true" TargetColumnIndex="5" Type="String" />
    <Property Identifier="Users" DisplayName_L1="Users" Type="ForeignKey" />
    <Property Identifier="created" DisplayName_L1="created" TargetColumnIndex="4" Type="String" />
    <Property Identifier="lastMemberShipUpdated" DisplayName_L1="lastMemberShipUpdated" TargetColumnIndex="6" Type="String" />
    <Property Identifier="lastUpdated" DisplayName_L1="lastUpdated" TargetColumnIndex="7" Type="String" />
    <Property Identifier="profile_description" DisplayName_L1="Description" TargetColumnIndex="8" Type="String" />
    <Property Identifier="profile_name" DisplayName_L1="Name" TargetColumnIndex="9" Type="String" />
    <Property Identifier="type" DisplayName_L1="type" TargetColumnIndex="10" Type="String" />
  </EntityType>
  <EntityTypeMapping Identifier="Group" ConnectionTable="OktaExportFulfillment_groups" Connector="Okta">
    <Property Identifier="OktaExportFulfillment_groups_id" ConnectionColumn="id" IsPrimaryKey="true" IsUniqueKey="true" />
    <Property Identifier="created" ConnectionColumn="created" />
    <Property Identifier="lastMemberShipUpdated" ConnectionColumn="lastMemberShipUpdated" />
    <Property Identifier="lastUpdated" ConnectionColumn="lastUpdated" />
    <Property Identifier="profile_description" ConnectionColumn="profile.description" />
    <Property Identifier="profile_name" ConnectionColumn="profile.name" />
    <Property Identifier="type" ConnectionColumn="type" />
  </EntityTypeMapping>
And the following entity type mapping for applications:
Code attributes enclosed with <> need to be replaced with a custom value before entering the
script in the command line.
 <EntityType Identifier="Application" DisplayName_L1="Application">
    <Property Identifier="Groups" DisplayName_L1="Groups" Type="ForeignKey" />
    <Property Identifier="OktaSyncPrpov_apps_id" DisplayName_L1="id" IsKey="true" TargetColumnIndex="5" Type="String" />
    <Property Identifier="created" DisplayName_L1="created" TargetColumnIndex="4" Type="String" />
    <Property Identifier="label" DisplayName_L1="label" TargetColumnIndex="6" Type="String" />
    <Property Identifier="lastUpdated" DisplayName_L1="lastUpdated" TargetColumnIndex="7" Type="String" />
    <Property Identifier="name" DisplayName_L1="name" TargetColumnIndex="8" Type="String" />
    <Property Identifier="status" DisplayName_L1="status" TargetColumnIndex="9" Type="String" />
  </EntityType>
  <EntityTypeMapping Identifier="Application" ConnectionTable="OktaExportFulfillment_apps" Connector="Okta">
    <Property Identifier="OktaExportFulfillment_apps_id" ConnectionColumn="id" IsPrimaryKey="true" IsUniqueKey="true" />
    <Property Identifier="created" ConnectionColumn="created" />
    <Property Identifier="label" ConnectionColumn="label" />
    <Property Identifier="lastUpdated" ConnectionColumn="lastUpdated" />
    <Property Identifier="name" ConnectionColumn="name" />
    <Property Identifier="status" ConnectionColumn="status" />
  </EntityTypeMapping>
Then we will have C:/UsercubeContoso/Sources/OktaExportFulfillment_users.csv as follows:
id, status, created, activated, statusChanged, lastLogin, lastUpdated, passwordChanged, type.id, profile.city, profile.costCenter, profile.countryCode, profile.department, profile.displayName
And C:/UsercubeContoso/Sources/OktaExportFulfillment_groups.csv as follows:
id, created, lastUpdated, lastMemberShipUpdated, type, profile.description, profile.name
And C:/UsercubeContoso/Sources/OktaExportFulfillment_apps.csv as follows:
id, created, lastUpdated, status, name, label
Fulfill
The Okta connector writes to Okta to create, update and delete entries, initiated manually through the UI or automatically by enforcing the policy. See the Evaluate Policy topic for additional information.
Configuration
Same as for export, fulfill is configured through connections.
For example:
Code attributes enclosed with <> need to be replaced with a custom value before entering the
script in the command line.
appsettings.agent.json
{
    "Connections": {
        ...
        "OktaExportFulfillment": {
            "Server": " https://<YourCompany>.okta.com",
            "ApiKey": "<GeneratedUserToken>",
        }
    }
}
Password reset
The password reset settings configuration is described in the appsettings.agent.json file. See the appsettings.agent topic for additional information.
Credential protection
Data protection can be ensured through:
- Connection , configured in the appsettings.encrypted.agent.json file
- An Connection
- A Connection Vault able to store Okta Login, Password, Account and Server.
Workday
This connector exports users and groups from a Workday instance.
This page is about Workday .

Prerequisites
Implementing this connector requires:
-
using Workday Web Services (WWS) Directory v34.2 or later;
For example, the Human Resources Web Service contains operations that expose Workday Human Capital Management Business Services data, including Employee, Contingent Worker and Organization information.
-
access to the Web Services that are to be used;
-
the XPath syntax to configure and select the attributes to export.
Export
This connector exports any entity available in WWS.
Configuration
This process is configured through a
Connection in the UI and/or
the XML configuration, and in the appsettings.agent.json > Connections section:
appsettings.agent.json
{
  ...
  "Connections": {
    ...
    "<ConnectionIdentifier>": {
      ...
    }
  }
}
The identifier of the connection and thus the name of the subsection must:
- be unique.
- not begin with a digit.
- not contain
<,>,:,",/,\,|,?,*and_.
The following example connects Identity Manager to Workday and exports
Worker_IDandUser_IDfrom the entity Workers returned in Get_Workers_Response:appsettings.agent.json
{
...
"Connections": {
...
"WorkdayExport": {
"InputFilePath": "C:/UsercubeContoso/Temp/bodies.json",
"Login": "USERCUBE@contoso",
"Password": "contoso1996",
"Server": "https://workday.com/ccx/service/contoso"
}
}
}
Setting attributes
| Name | Details |
|---|---|
| InputFilePath required | Type String Description Path of the JSON file defining which entities and attributes are to be exported. See more details below. |
| Login required | Type String Description Login used to authenticate to Workday. |
| Password required | Type String Description Password used to authenticate to Workday. |
| Server required | Type String Description URL of the targeted Workday instance. Syntax:https://####.workday.com/ccx/service/tenantName (without the Web Service part). |
InputFilePath
The file specified in InputFilePath must have a specific structure, with a section for each entity
to be exported.
For example:
bodies.json
{
  "Requests": [
    {
      "XmlBody": "<soapenv:Body> <bsvc:Get_Workers_Request> </bsvc:Get_Workers_Request> </soapenv:Body>",
      "EntityName": "workers",
      "IncrementalTag": "Transaction_Log_Criteria_Data",
      "WebService": "Human_Resources/v34.2"
    }
  ]
}
| Name | Details |
|---|---|
| XmlBody required | Type String Description Request to send to the Web Service. Syntax: "XmlBody": "<soapenv:Body> <bsvc:Get_Entity_1_Request> ... </bsvc:Get_Entity_1_Request> </soapenv:Body>" - the request body must begin with <soapenv:Body> and end with </soapenv:Body>; - inside the body, the entity request must use the namespace bsvc; - the body must fit on a single line. Tip: write the body in a separate XML file and use TextFixer to remove line breaks. Tip:see an example. |
| XPaths optional | Type String Pair List Description One or several key-value pairs, where: - the key is the attribute name that will be the column name in the output CSV file; - the value is the XPath used in the response to get the attribute value. Info: useless most of the time because the information is provided by entity type mappings and entity association mappings. Still useful when using the exe directly. Note: Netwrix Identity Manager (formerly Usercube)recommends using an XPath to the property WID, because it helps logs (in Trace mode) find entities with multi-valued properties. Syntax: "XPaths": { "Attribute_1_Name": "XPath 1", ... "Attribute_N_Name": "XPath N" } |
| EntityName required | Type String Description Name of the entity, which conditions the name of the output file. |
| IncrementalTag optional | Type String Description XML tag associated with the incremental request. Note: in the xml request, <bsvc:IncrementalTag> must be the parent of <bsvc:Transaction_Date_Range_Data> which is the parent of <bsvc:Updated_From> and <bsvc:Updated_Through>. Note: when not specified, this entity is always exported in complete mode. Warning: the IncrementalTag part must not be added manually in XmlBody because the connector adds it automatically when exporting in incremental mode. |
| WebService required | Type String Description Name and version of the Web Service. |
Output details
This connector is meant to generate to the Connection folder:
-
one CSV file for each entity, named
<connectionIdentifier>_<entityName>.csv, with the following columns:- Command: used for Prepare Synchronization Task ;
- one column for each XPath found in the
Entity Type Mapping '
connection columns and
Entity Association Mapping '
columns.
See Workday's documentation to compute XPaths.```
connectionIdentifier_entityName.csv
Command,Key_XPath_1,Key_XPath_2,...,Key_XPath_N Add,value1,value2,...,valueN
-
a cookie file named
workday_<connectionIdentifier>_cookie.bin, containing the time of the last export in order to perform an incremental export.Most exports can be run in complete mode, where the CSV files will contain all entries, or in incremental mode, where CSV files will contain only the entries which have been modified since the last synchronization.
A task can use the
IgnoreCookieFileboolean property, and a command line (with an executable) can use the option--ignore-cookies.
For example, with the following configuration:
<EntityTypeMapping Identifier="Workday_Worker" Connector="Workday" ConnectionTable="WorkdayExport_workers"> <Property Identifier="Worker_ID" ConnectionColumn="bsvc:Worker_Data/bsvc:Worker_ID" IsUniqueKey="true" /> <Property Identifier="User_ID" ConnectionColumn="bsvc:Worker_Data/bsvc:User_ID" IsUniqueKey="true" /></EntityTypeMapping>We choose to export only the entity
workers, so the output is generated toWorkdayExport_workers.csvin the directory Connection .The CSV file will include three columns:
Command;bsvc:Worker_Data/bsvc:Worker_IDandbsvc:Worker_Data/bsvc:User_ID.
Authentication
Credential protection
Data protection can be ensured through:
- Connection , configured in
the
appsettings.encrypted.agent.jsonfile; - An Connection safe;
| Attribute | Naming Convention for the Key in Azure Key Vault |
|---|---|
| InputFilePath | Connections--<identifier>--InputFilePath |
| Login | Connections--<identifier>--Login |
| Password | Connections--<identifier>--Password |
| Server | Connections--<identifier>--Server |
- A
Connection
able to store Workday's
Login,PasswordandServer.
Protected attributes are stored inside a safe in CyberArk, into an account whose identifier can be
retrieved by Identity Manager from appsettings.cyberark.agent.json.
For example:
appsettings.cyberark.agent.json
{
  ...
  "Connections": {
    ...
    "WorkdayExport": {
        "Login": "WorkdayExport_Account",
        "Password": "WorkdayExport_Account"
    }
  }
}
Configure Okta
This guide shows how to configure the OIDC to set up the authentication to Identity Manager.
Create the Application
On the Okta dashboard:
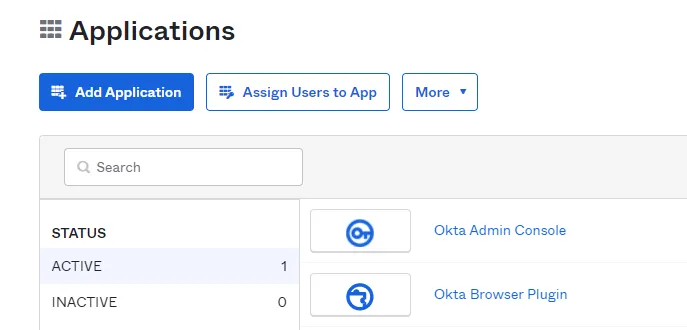
Step 1 – Select the Applications section and click on the Add Application button.
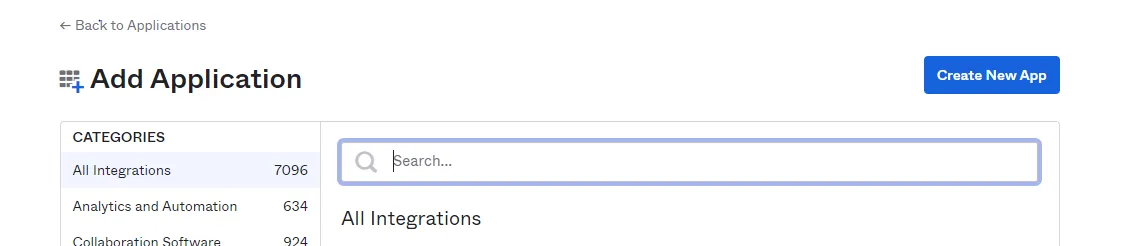
Step 2 – Then click on the Create New App button.
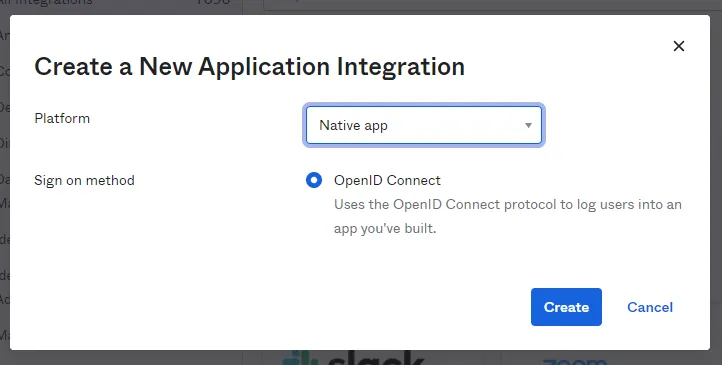
Step 3 – Select the platform Native app. The only sign-on method is the OpenID Connect. Click on Create.
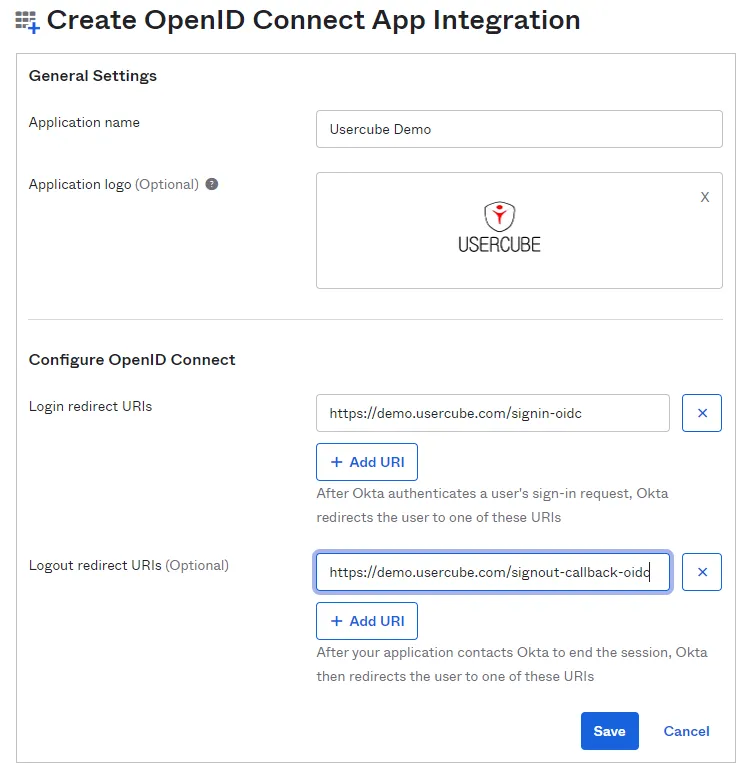
Step 4 – In General Settings, name your Application. You can also add a logo.
Step 5 – In the Configure OpenID Connect section, enter the connection redirection URL in
the part: Login redirect URLs. To find out this URL, just take the URL of the Identity Manager
application and add /signin-oidc. The Identity Manager disconnection redirection URL is also
necessary. To construct it, take Identity Manager's URL again and, at the end, add
/signout-callback-oidc.
NOTE: The Logout redirect URLs section is marked as optional but it is mandatory for Identity Manager.
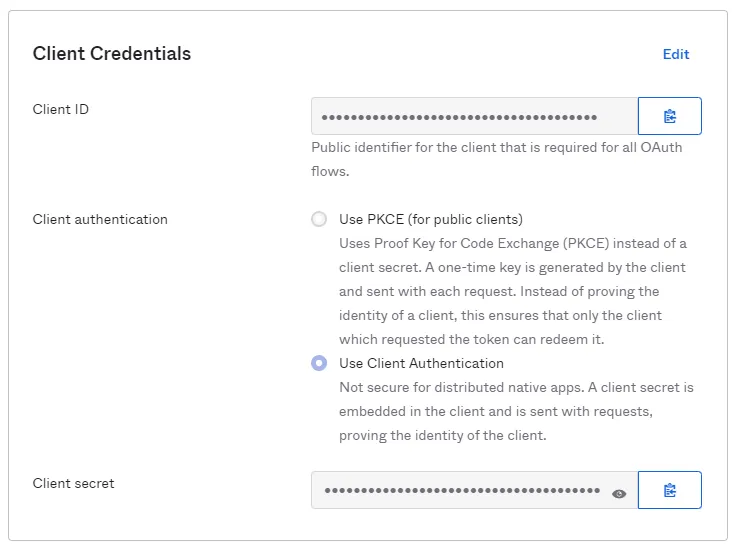
Configure the Client Credentials
The client secret in Identity Manager is required for the OIDC connection. You must therefore configure this OIDC connection option in the application. In the Application Dashboard, click on Edit in the Client Credentials section. Select the option Use Client Authentication and save the changes.
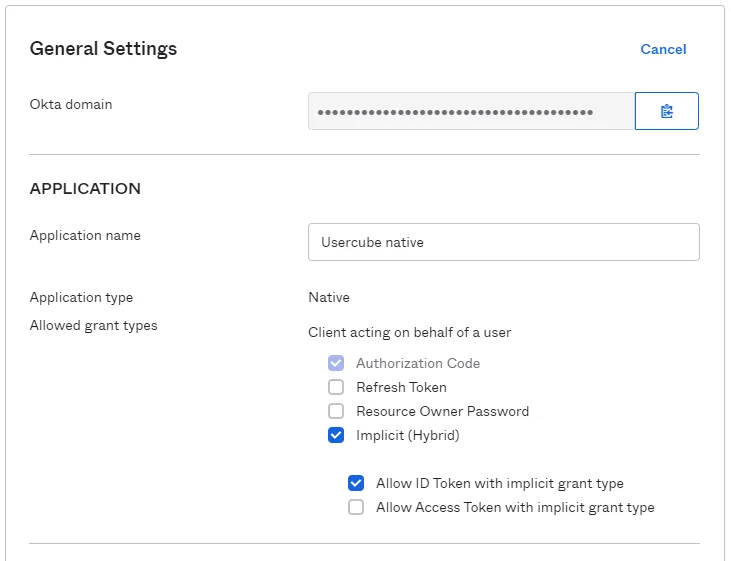
Configure the Application Settings
In the Application section, check the box Implicit (Hybrid) so that the connection with Identity Manager can operate correctly. Allow ID Token with implicit grant type is optional.
Configure the appsettings.json
To successfully configure the OpenId protocol, you can refer to the dedicated section in the detailed guide. See the End-User Authentication for additional information.
Below is an illustrative example of how to set up your appsettings.json file.
Code attributes enclosed with <> need to be replaced with a custom value before entering the
script in the command line.
appsettings.json
                {
                ...
                "OpenId": {
                "Enabled": true,
                "Okta": {
                "AuthenticationScheme": "Okta Authentication",
                "Authority": "https://your-domain.okta.com/oauth2/default",
                "ClientId": "Your Client ID",
                "ClientSecret": "Your Client Secret",
                "DisplayName": "Okta Display Name",
                "NameClaimType": "https://schemas.xmlsoap.org/ws/2005/05/identity/claims/upn",
                "SaveToken": true
                }
                }
                }