Configure Global Settings
This topic covers the customization in the application Settings.
Overview
The Settings interface provides information and management options for the application.
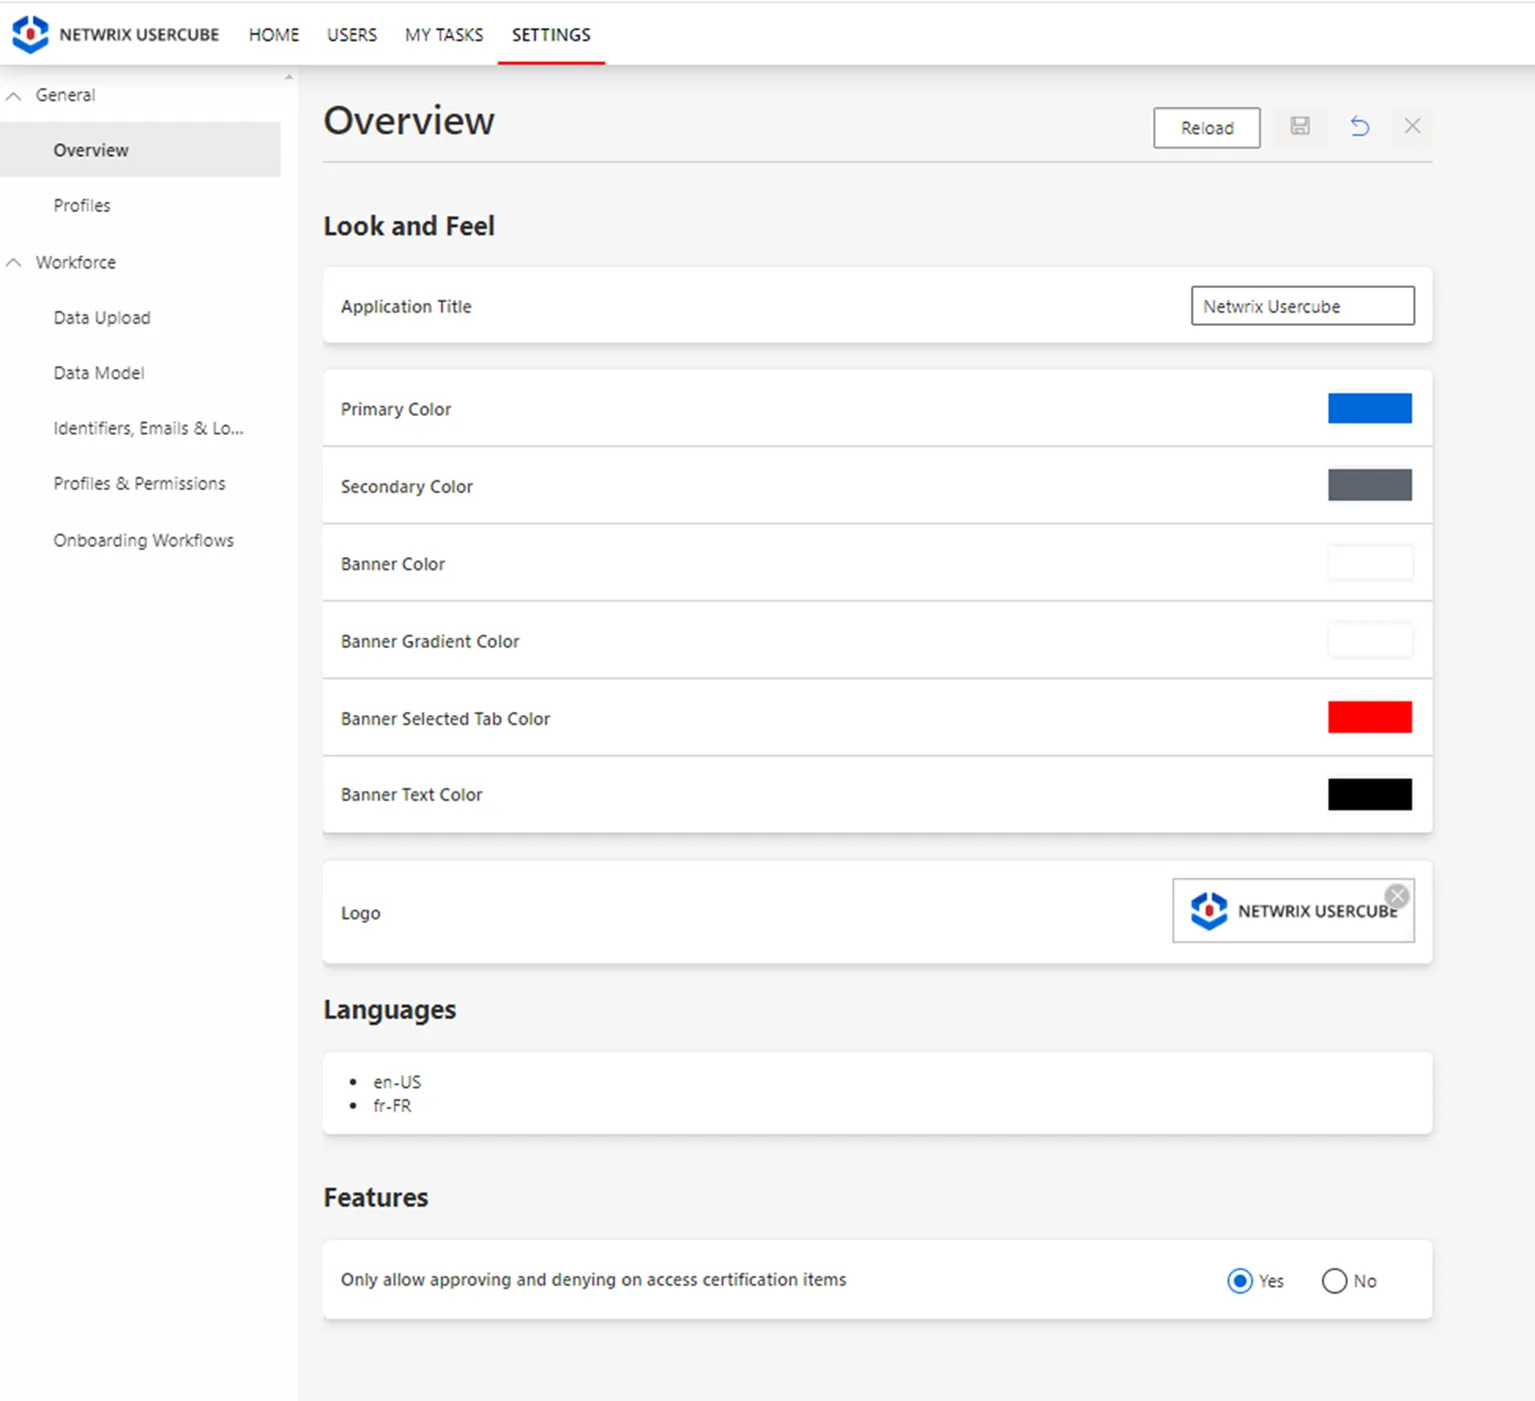
Look and Feel
The Look and Feel section allows you to customize the application to your preferences.
The customization includes the following:
- Application Titleas the name of the application visible on the tabs
- The Primary Color, Secondary Color, Banner Color, Banner Gradient Color, Banner Selected Tab Color, and Banner Text Color
- The Logo to be displayed in the top left corner;
Languages
It presents the languages in which the application can be displayed. In the above example you have English-United States and French-France.
See the Languages topic for additional information.
Features
The feature Only allow approving and refusing on access certifications items gives the administrator the option to limit the user's option to either Approve or Deny the Access Certification items while making the More button unavailable.
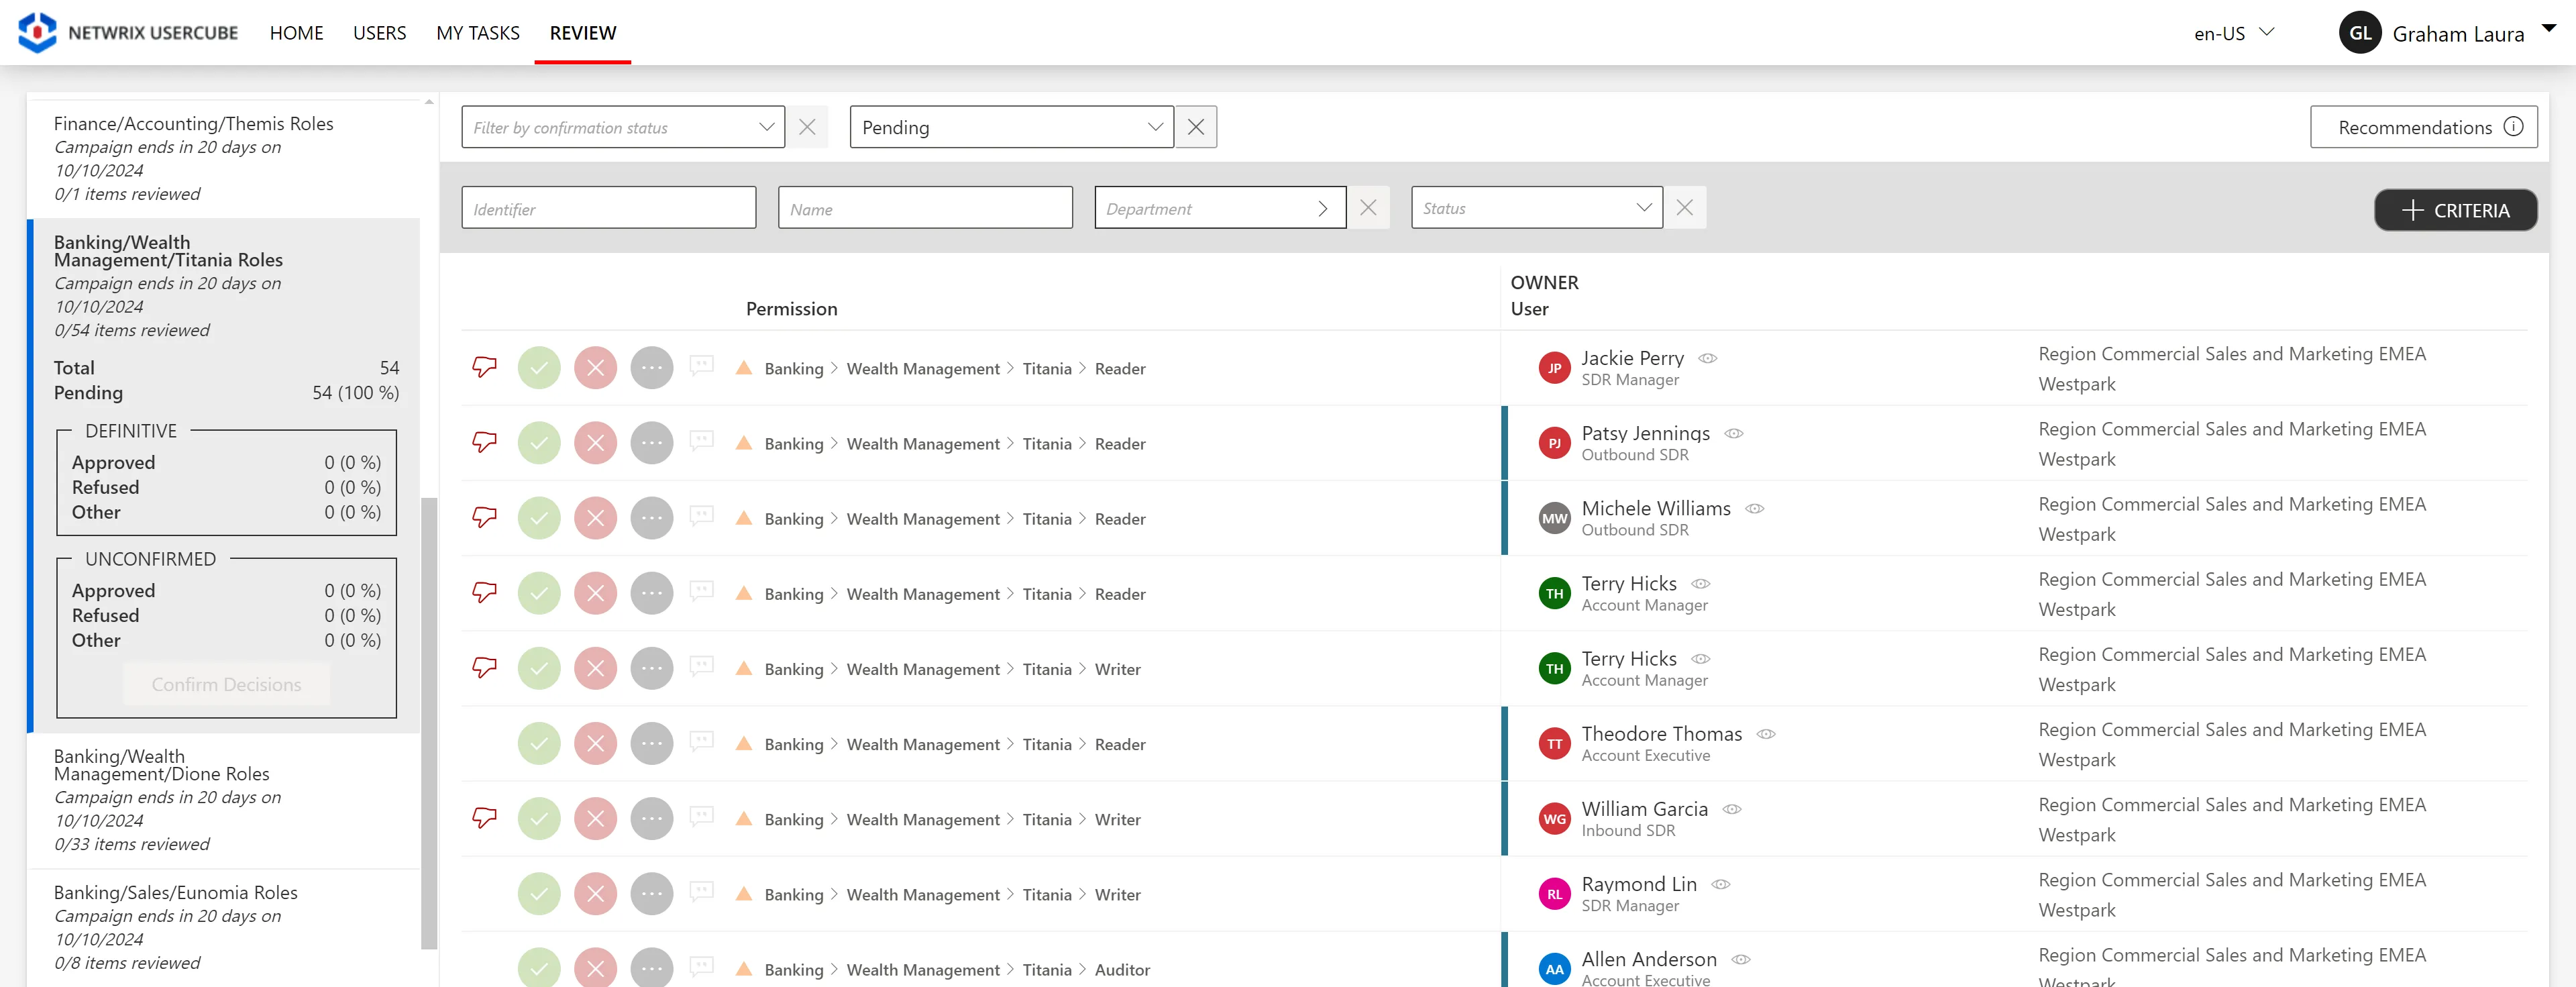
If the feature Only allow approving and denying on access certification items is set to No the following will be visible on the certification screen:
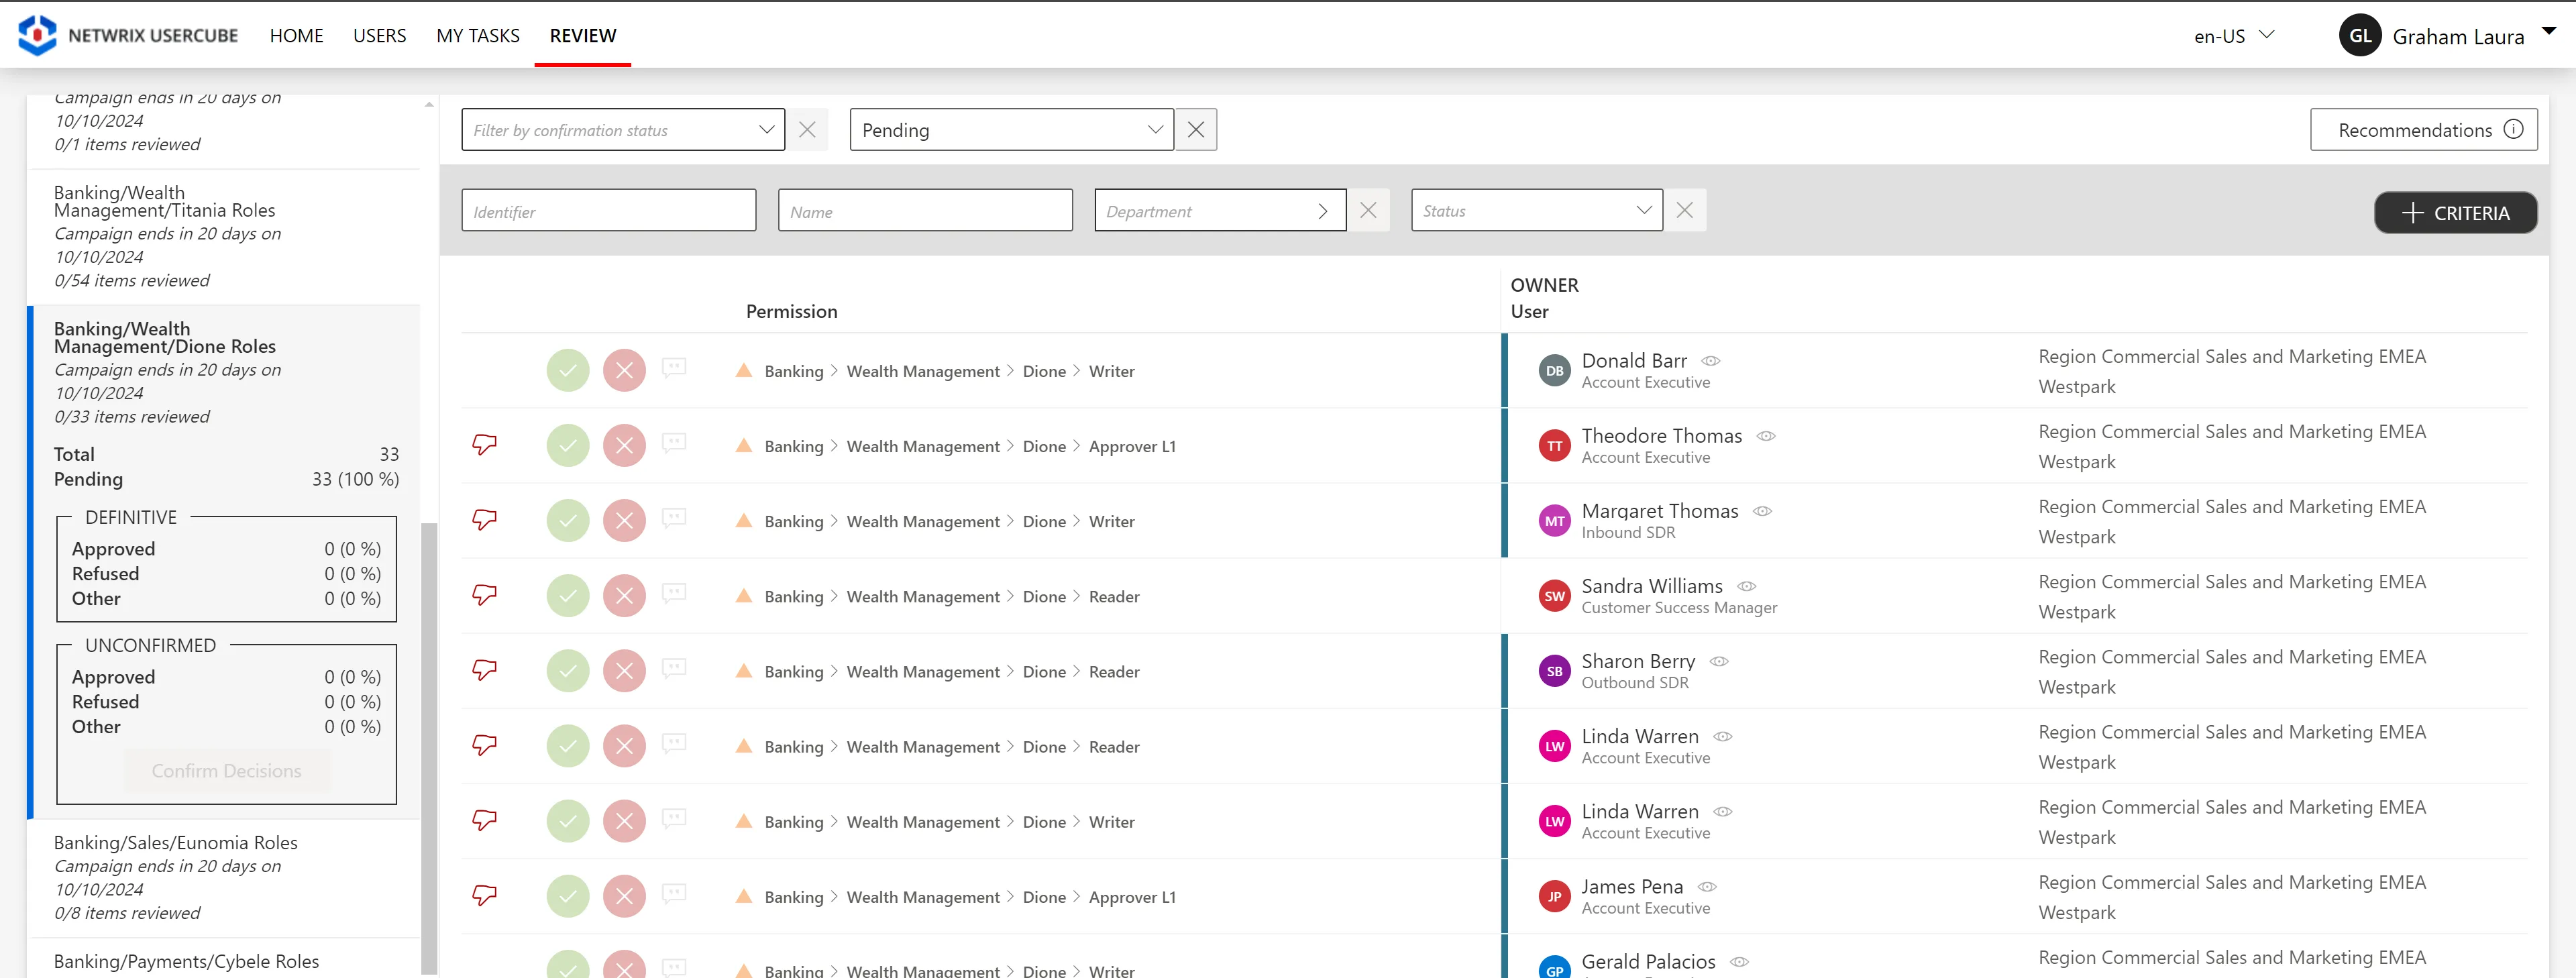
If the feature Only allow approving and denying on access certification items is set to Yes the following will be visible on the certification screen:
This is how the user's experience can be customized directly from the UI.
Configure Onboarding Workflows
How to adjust the validation process and homonym detection of onboarding Workflows.
Overview
Onboarding workflows are the processes that users follow in order to add in Identity Manager a new user, as a new employee has arrived in the company.
The most common situation consists in having two onboarding workflows: one for employees and one for contractors. The Workforce Core Solution module provides these two workflows.
Usually, using one of these workflows means:
- filling a form containing the new user's information, such as their name, first name, contract type, job title, etc;
- if needed, sending the request of user creation for review by a knowledgeable user.
See how to Update an Individual Identity in Identity Manager.
User Creation Review
Identity Manager provides the review step as optional, for its necessity depends on the situation.
To perform the review of a user creation, one should have the right permissions.
When a review is needed, a notification appears on the MY TASKS tab at the top.
The reviewer can then complete the creation request and finally approve it.
Homonym Detection
User creation often benefits from a homonym detection that checks if the resource already exists in the system, preventing duplicates.
Identity Manager provides a homonym detection, whose parameters can be adjusted.
See the Workflows topic for additional information.
Participants and Artifacts
Integrators must have the knowledge of the organization strategy towards the expected validation process and homonym detection during users' onboarding.
| Input | Output |
|---|---|
| Identity repository (required) | Adjusted Onboarding Workflows |
See the Create the Workforce Repository topic for additional information.
Configure Onboarding Workflows
Configure onboarding workflows by proceeding as follows:
-
On the home page, click on Settings in the Configuration section, then on Workforce > Onboarding Workflows in the left menu.
-
For each workflow, choose whether a review step is required.
Netwrix Identity Manager (formerly Usercube) recommends enabling the review for the onboarding of employees, and disabling the review for contractors.
From experience, in most use cases, the onboarding of new workers is done by their managers, and HR people review the creation of employees and not contractors. It also happens that HR people are in full charge of employees, in which case they do the onboarding and don't need a review.
-
Configure the homonym detection.

Netwrix Identity Manager (formerly Usercube) recommends enabling the birth name comparison to detect user duplicates due to name changes, when the GDPR supports it.
The other parameters for homonym detection should be enabled/disabled according to your needs.
-
Click on Save at the top of the page.
Verify Workflow Configuration
Validate the process by proceeding as follows:
-
Access the user directory from the home page.
-
Execute the workflows for a new employee and a new contractor.
-
Make sure that the homonym detection works in accordance with the specified options.
For example, if the inversion comparison is enabled between the first and last names:

-
Make sure that the potential validation steps are in accordance with the specified options.
Next Steps
Once onboarding workflows are configured, integrators can start configuring a connector.
User Interface
See how-to customize Identity Manager's User Interface.
Customize Forms
This guide shows how to define a custom way to display the input fields to be filled in a given workflow.
See the Form topic for additional information.
Create a View Template for Entities Using Scaffoldings
Two scaffoldings generate the view, the display table and the rights to access the entity's resources.
- View Template : Creates the display table, the default view and access rights to the entity.
- View Template Adaptable : Creates the entity view (designElement = ResourceTable), the report and the rights for a given profile.
These scaffoldings are not enough to access resources. You must add a menu item to define the navigation in the view in the user interface.
Create an Entity View
To create the entity view, you must manipulate a Form.
The view form doesn't give access to the view in the interface or the rights to access the interface.
The following elements must be in place:
To create the view, you can manipulate one or more forms. The example below shows how to create a view from several different forms. This will allow you to reuse some forms in workflows.
    <Form Identifier="View_Referentiel_Guest_PersonnalData_Base" EntityType="Referentiel_Guest"> <Control DisplayName_L1="Perosnnal Data" OutputType="LayoutFieldset"> <Control DisplayName_L1="Complete Name" OutputType="LayoutRowset"> <Control Binding="LastName" IsRequired="true"/> <Control Binding="FirstName" IsRequired="true"/> </Control> <Control Binding="Mail" ColumnSize="8" IsRequired="true"/> <Control Binding="PhoneNumber" ColumnSize="8" /> </Control> </Form> <Form Identifier="View_Referentiel_Guest_AdditionalData_Base" EntityType="Referentiel_Guest"> <Control DisplayName_L1="Additional information" OutputType="LayoutFieldset"> <Control Binding="Contact" /> <Control Binding="StartDate" /> <Control Binding="EndDate" /> </Control> </Form> <Form Identifier="View_Referentiel_Guest_Base" EntityType="Referentiel_Guest" FormType="ResourceViewEntity" Menu="View_Referentiel_Guest"
        IsDefaultViewForm="true"> <Control OutputType="TransformImport" EmbeddedForm="View_Referentiel_Guest_PersonnalData_Base" /> <Control OutputType="TransformImport" EmbeddedForm="View_Referentiel_Guest_AdditionalData_Base" /> </Form>
It is also possible to create only one form that contains all the information:
<Form Identifier="View_Directory_Guest" EntityType="Directory_Guest" FormType="ResourceViewEntity" Menu="View_Directory_Guest" IsDefaultViewForm="true"> <Control DisplayName_L1="Personal Data" DisplayName_L2="Informations personnelles" OutputType="LayoutFieldset"> <Control DisplayName_L1="Full Name" DisplayName_L2="Nom complet" OutputType="LayoutRowset"> <Control Binding="LastName" /> <Control Binding="FirstName" /> </Control> <Control Binding="Mail" ColumnSize="8" /> <Control Binding="PhoneNumber" ColumnSize="8" /> </Control> <Control DisplayName_L1="Additional Data" DisplayName_L2="Informations compl�mentaires" OutputType="LayoutFieldset"> <Control Binding="Contact" /> <Control Binding="Company" /> <Control Binding="StartDate" /> <Control Binding="EndDate" /> <Control Binding="Comments" /> </Control> </Form>
Create an Entity View Using Records
Some entities may have entity records. To view the entity in question with all the records attached to it, it is necessary to fill in forms that will load the record data as well as forms for the parent entity.
The view form doesn't give access to the view in the interface or the rights to access it.
The following elements must be in place:
In the example below, the view form will display all records. To change the filter on the record display, you must change the Form.
    <Form Identifier="Referentiel_UserRecord_View" EntityType="Referentiel_UserRecord"> <Control DisplayName_L1="Personal Data" OutputType="LayoutFieldset"> <Control Binding="LastName" IsReadOnly="true"/> <Control Binding="FirstName" IsReadOnly="true"/> </Control> <Control DisplayName_L1="Country" OutputType="LayoutFieldset"> <Control Binding="Country" IsReadOnly="true"/> </Control> <Control DisplayName_L1="Contract" OutputType="LayoutFieldset"> <Control Binding="Supervisor" IsReadOnly="true" /> <Control Binding="Category" IsReadOnly="true"/> <Control Binding="ContractStartDate" IsReadOnly="true"/> <Control Binding="ContractEndDate" IsReadOnly="true"/> </Control> </Form> <Form Identifier="Referentiel_UserRecord_ViewPosition" EntityType="Referentiel_UserRecord"> <Control DisplayName_L1="Poste" OutputType="LayoutFieldset"> <Control Binding="Site" /> <Control Binding="Service" /> <Control Binding="StartDate" /> <Control Binding="EndDate" /> </Control> </Form> <Form Identifier="Referentiel_User_ViewManagement" EntityType="Referentiel_User"> <Control DisplayName_L1="Management" OutputType="LayoutFieldset"> <Control Binding="Guests" /> <Control Binding="ManagedPeople" /> </Control> </Form> <Form Identifier="Referentiel_User_View" EntityType="Referentiel_User" FormType="ResourceViewRecordEntity"
      Menu="Menu_Referentiel_User" RecordProperty="Referentiel_User:Records" IsDefaultViewForm="true"
      RecordStartProperty="Referentiel_UserRecord:StartDate" RecordEndProperty="Referentiel_UserRecord:EndDate" RecordFilter="All" > <Control OutputType="TransformImport" EmbeddedForm="Referentiel_User_ViewManagement" /> <Control OutputType="TransformImport" EmbeddedForm="Referentiel_UserRecord_View" /> <Control OutputType="TransformImport" EmbeddedForm="Referentiel_UserRecord_ViewPosition" /> </Form>
The record filter not only changes the display options of the record, but also changes the display of the rights associated with this record.
Create Menu Items
After creating a workflow as for the EntityTypes, is mandatory to create the MenuItems to create the Navigation to this Workflow.
Create menu items for a workflow in a resource entity list
To add a link to an entity's workflow displayed under the search bar on the visualization page of the entity's resource list you need to create a menu containing the different workflows and put a link to the entity's searchBar as below.
The first MenuItem is the main action displayed on the right.
The other MenuItems are displayed from left to right.
<SearchBar EntityType="Directory_User" Menu="Menu_Search_Directory_User" SearchBarDesignElement="Inline"> <Criterion Binding1="MainRecord.EmployeeId" PlaceHolderText_L1="Employee Id" PlaceHolderText_L2="Matricule" InputType="Auto" ColumnSize="2" /> <Criterion Binding1="MainRecord.LastName" InputType="Auto" ColumnSize="2" /> <Criterion Binding1="MainRecord.FirstName" InputType="Auto" ColumnSize="2" /> <Criterion Binding1="MainRecord.Organization" PlaceHolderText_L1="Department" PlaceHolderText_L2="D�partement" InputType="Auto" ColumnSize="2" /> <Criterion Binding1="PresenceState" InputType="ComboboxMultiSelection" ColumnSize="2" DefaultValue="-101;-102" Operator="Equal" /> <Criterion Binding1="MainRecord.Location" PlaceHolderText_L1="Site" PlaceHolderText_L2="Site" InputType="Auto" ColumnSize="2" IsVisibleInAdvancedView="true" /> <Criterion Binding1="MainRecord.Company" PlaceHolderText_L1="Company" PlaceHolderText_L2="Soci�t�" InputType="Auto" ColumnSize="2" IsVisibleInAdvancedView="true" /> <Criterion Binding1="MainRecord.Title" PlaceHolderText_L1="Title" PlaceHolderText_L2="Fonction" InputType="Auto" ColumnSize="2" IsVisibleInAdvancedView="true" /> <Criterion Binding1="MainRecord.EmployeeType.Category" PlaceHolderText_L1="User Type" PlaceHolderText_L2="Cat�gorie de collaborateur" InputType="Auto" ColumnSize="2" IsVisibleInAdvancedView="true" /> </SearchBar> <MenuItem Identifier="Menu_Search_Directory_User" DisplayName_L1="Menu"> <MenuItem Identifier="Menu_Search_Directory_User_StartInternal" DisplayName_L1="New Employee" DisplayName_L2="Entr�e d'un interne" IconCode="AddFriend" Workflow="Directory_User_StartInternal" /> <MenuItem Identifier="Menu_Search_Directory_User_StartExternal" DisplayName_L1="New Contractor" DisplayName_L2="Entr�e d'un externe" IconCode="AddFriend" Workflow="Directory_User_StartExternal" /> <MenuItem Identifier="Menu_Search_Directory_User_AdvancedStartInternal" DisplayName_L1="New Multi-Positions User" DisplayName_L2="Entr�e multipostes" IconCode="AddFriend" Workflow="Directory_User_AdvancedStartInternal" /> <MenuItem Identifier="Menu_Search_Directory_User_Helpdesk_Start" DisplayName_L1="New User (helpdesk)" DisplayName_L2="Entr�e (support)" IconCode="AddFriend" Workflow="Helpdesk_Directory_User_Start" /> </MenuItem>
This XML element gives the following result:

Create menu items for a workflow in a resource view
In the resource view it is also possible to create links to different workflows.
These workflows will manipulate the selected resource in the view.
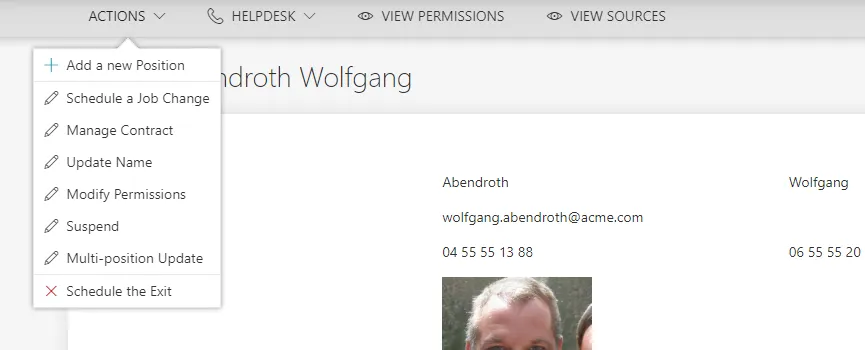
<ResourceViewRecordEntityForm Identifier="Directory_User_View" EntityType="Directory_User" Menu="Menu_Directory_User" RecordProperty="Directory_User:Records" RecordStartProperty="Directory_UserRecord:ContractStartDate" RecordEndProperty="Directory_UserRecord:ContractEndDate" RecordFilter="All" IsDefaultViewForm="true"> <MainControl OutputType="LayoutContainer"></MainControl> <RecordControl OutputType="TransformImport" EmbeddedForm="Directory_UserRecord_View" /> <RecordItemControl OutputType="TransformImport" EmbeddedForm="Directory_UserRecord_ViewPosition" /> <RecordUniqueItemControl OutputType="TransformImport" EmbeddedForm="Directory_UserRecord_ViewPosition" /> </ResourceViewRecordEntityForm> <MenuItem Identifier="Menu_Directory_User" DisplayName_L1="Menu"> <MenuItem Identifier="Menu_Directory_User_Changes" DisplayName_L1="Actions" DisplayName_L2="Actions"> <MenuItem Identifier="Menu_Directory_User_Changes_Add" DisplayName_L1="Section"> <MenuItem Identifier="Menu_Directory_User_Changes_AddRecord" DisplayName_L1="Add a new Position" DisplayName_L2="Ajouter un poste" IconCode="Add" Workflow="Directory_User_AddRecord" /> <MenuItem Identifier="Menu_Directory_User_Changes_AddContract" DisplayName_L1="Add a new Contract" DisplayName_L2="Ajouter un contrat" IconCode="Add" Workflow="Directory_User_AddContract" /> </MenuItem> <MenuItem Identifier="Menu_Directory_User_Changes_Update" DisplayName_L1="Section"> <MenuItem Identifier="Menu_Directory_User_Changes_ChangePosition" DisplayName_L1="Schedule a Job Change" DisplayName_L2="Mouvement � date" IconCode="Edit" Workflow="Directory_User_ChangePosition" /> <MenuItem Identifier="Menu_Directory_User_Changes_ManageContract" DisplayName_L1="Manage Contract" DisplayName_L2="Gestion du contrat" IconCode="Edit" Workflow="Directory_User_ManageContract" /> <MenuItem Identifier="Menu_Directory_User_Changes_ChangeName" DisplayName_L1="Update Name" DisplayName_L2="Changer le nom" IconCode="Edit" Workflow="Directory_User_ChangeName" /> <MenuItem Identifier="Menu_Directory_User_Changes_ResourcesUpdate" DisplayName_L1="Modify Permissions" DisplayName_L2="Demander des droits" IconCode="Edit" Workflow="Directory_User_ResourcesUpdate" /> <MenuItem Identifier="Menu_Directory_User_Changes_Suspend" DisplayName_L1="Suspend" DisplayName_L2="Suspendre" IconCode="Edit" Workflow="Directory_User_Suspend" /> <MenuItem Identifier="Menu_Directory_User_AdvancedUpdate" DisplayName_L1="Multi-position Update" DisplayName_L2="Modification multipostes" IconCode="Edit" Workflow="Directory_User_AdvancedUpdate" /> </MenuItem> <MenuItem Identifier="Menu_Directory_User_Changes_Directory_User_End" DisplayName_L1="Schedule the Exit" DisplayName_L2="Planifier le d�part" IconCode="Cancel" Workflow="Directory_User_End" /> </MenuItem> <MenuItem Identifier="Menu_Directory_User_Helpdesk" DisplayName_L1="Helpdesk" DisplayName_L2="Support" IconCode="Phone"> <MenuItem Identifier="Menu_Directory_User_Helpdesk_Update" DisplayName_L1="Section"> <MenuItem Identifier="Menu_Directory_User_Helpdesk_FixRecord" DisplayName_L1="Repair Data (helpdesk)" DisplayName_L2="Corriger des donn�es (support)" IconCode="Edit" Workflow="Helpdesk_Directory_User_FixRecord" /> </MenuItem> <MenuItem Identifier="Menu_Directory_User_Helpdesk_Delete" DisplayName_L1="Section"> <MenuItem Identifier="Menu_Directory_User_Helpdesk_Directory_User_Delete" DisplayName_L1="Delete User (helpdesk)" DisplayName_L2="Supprimer (support)" IconCode="Cancel" Workflow="Helpdesk_Directory_User_Delete" /> </MenuItem> </MenuItem> </MenuItem>
This XML element gives the following result:
Customize Display Tables
This part shows how to define a custom way to display entity types' data.
Table
This display table with DisplayTableDesignElement set to table will display the list of resources as a simple table filled with several columns.
Code attributes enclosed with <> need to be replaced with a custom value before entering the
script in the command line.
<DisplayTable Identifier="Referentiel_Guest" DisplayTableDesignElement="table" EntityType="Referentiel_Guest" IsEntityTypeDefault="true"> <Column CanBeFiltered="true" DisplayBinding="Referentiel_Guest:Login" IsDisplayInSummaryView="true" IsResizable="true" IsSortable="true" /> <Column CanBeFiltered="true" DefaultSortPriority="0" DisplayBinding="Referentiel_Guest:LastName" IsDisplayInSummaryView="true" IsResizable="true" IsSortable="true" /> <Column CanBeFiltered="true" DisplayBinding="Referentiel_Guest:FirstName" IsDisplayInSummaryView="true" IsResizable="true" IsSortable="true" /> <Column CanBeFiltered="false" DisplayBinding="Referentiel_Guest:PhoneNumber" DisplayName_L1="Telephone" IsDisplayInSummaryView="true" IsResizable="true" IsSortable="true" /> </DisplayTable>
Here is the visualization of this display table on the interface:

Ergonomically, it is recommended to hide the search symbol in a column header (in a list displayed
like a table) if a criterion linked to this column is already displayed in a search bar. This avoids
filter duplication. Thus, the <CanBeFiltered> property can be deleted in the <Column> argument.
Resource Table
The property DisplayTableDesignElement set to resourcetable allows you to create a table similar to the display table with DisplayTableDesignElement set to table but adds a column containing the owner of the resource.
Code attributes enclosed with <> need to be replaced with a custom value before entering the
script in the command line.
<DisplayTable Identifier="AD_Entry" EntityType="AD_Entry" DisplayTableDesignElement="resourcetable" IsEntityTypeDefault="true"> <Column DefaultSortPriority="1" DisplayBinding="dn" IsDisplayInSummaryView="true" IsResizable="true" IsSortable="true" CanBeFiltered="true" ColumnSize="4" /> <Column DisplayBinding="userPrincipalName" IsDisplayInSummaryView="true" IsResizable="true" IsSortable="true" CanBeFiltered="true" ColumnSize="2" /> <Column DisplayBinding="userAccountControl" IsDisplayInSummaryView="true" IsResizable="true" IsSortable="true" CanBeFiltered="true" ColumnSize="1" /> <Column DisplayBinding="rdn" IsDisplayInSummaryView="true" IsResizable="true" IsSortable="true" CanBeFiltered="true" ColumnSize="2" /> <Column DisplayBinding="displayName" IsDisplayInSummaryView="true" IsResizable="true" IsSortable="true" CanBeFiltered="true" ColumnSize="2" /> <Column DisplayBinding="objectCategory" IsDisplayInSummaryView="true" IsResizable="true" IsSortable="true" CanBeFiltered="true" ColumnSize="2" /> </DisplayTable>
Here is the visualization of this resource table on the interface:

Display Table with Tiles
.
Instead of creating a table, it is possible to create tiles to give another rendering of the user
interface. It is therefore necessary to create the different tiles first. After creating the tiles,
they must be imported into the display table with <DisplayTableDesignElement> set to <list>.
Display tables with other values of <DisplayTableDesignElement> cannot display tiles.
See the Tile topic for additional information.
Remember, if the display table uses tiles, then you can't use bindings.
Code attributes enclosed with <> need to be replaced with a custom value before entering the
script in the command line.
<Tile Identifier="Directory_User_Tile1" DisplayName_L1="User: first/last name" DisplayName_L2="Collaborateur : nom, prenom" EntityType="Directory_User" TileDesignElement="picture-text"> <Item Binding="MainRecord.FirstName" LineDisplayOrderIndicator="1" LineNumber="2" /> <Item Binding="MainRecord.LastName" LineDisplayOrderIndicator="2" LineNumber="2" /> <Item Binding="MainRecord.Title.DisplayName" LineNumber="3" /> <Item Binding="Id" LineNumber="5" /> <Item Binding="PhotoTag" LineNumber="6" /> </Tile> <Tile Identifier="Directory_User_Tile2" DisplayName_L1="User: dep/loc" DisplayName_L2="Collaborateur : orga/site" EntityType="Directory_User" TileDesignElement="inline data-icon"> <Item Binding="MainRecord.Organization.DisplayName" LineNumber="1" /> <Item Binding="MainRecord.Location.DisplayName" LineNumber="2" /> </Tile> <Tile Identifier="Directory_User_Tile3" DisplayName_L1="User: contact" DisplayName_L2="Collaborateur : contact" EntityType="Directory_User" TileDesignElement="inline data-icon"> <Item Binding="MainRecord.PhoneNumber" LineNumber="1" /> <Item Binding="MainRecord.MobileNumber" LineNumber="2" /> </Tile> <DisplayTable Identifier="Directory_User" EntityType="Directory_User" DisplayTableDesignElement="list" IsEntityTypeDefault="true"> <Column DefaultSortPriority="1" ColumnSize="6" IsDisplayInSummaryView="true" SortBinding="MainRecord.LastName" Tile="Directory_User_Tile1" /> <Column ColumnSize="3" IsDisplayInSummaryView="true" Tile="Directory_User_Tile2" /> <Column ColumnSize="3" Tile="Directory_User_Tile3" /> </DisplayTable>
Here is the visualization of this display table on the interface:
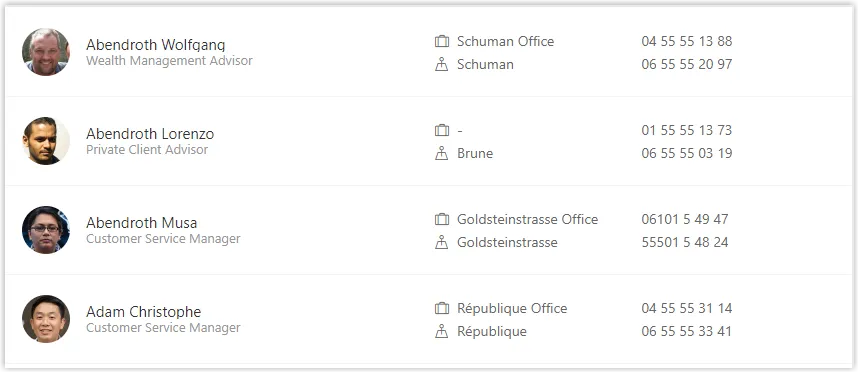
See the Display Table topic for additional information.
Customize Search Bars
This guide shows how to define a custom way to search from a list of a given entity type's properties.
See the Search Bar topic for additional information.
Default Search Bar
To search on a resource list for an entity, you must enter a SearchBar tag for the given entity.
<SearchBar EntityType="Directory_User" Menu="Menu_Search_Directory_User" SearchBarDesignElement="Inline"> <Criterion Binding1="MainRecord.EmployeeId" PlaceHolderText_L1="Employee Id" PlaceHolderText_L2="Matricule" InputType="Auto" ColumnSize="2" /> <Criterion Binding1="MainRecord.LastName" InputType="Auto" ColumnSize="2" /> <Criterion Binding1="MainRecord.FirstName" InputType="Auto" ColumnSize="2" /> <Criterion Binding1="MainRecord.Organization" PlaceHolderText_L1="Department" PlaceHolderText_L2="D�partement" InputType="Auto" ColumnSize="2" /> <Criterion Binding1="PresenceState" InputType="ComboboxMultiSelection" ColumnSize="2" /> <Criterion Binding1="MainRecord.Location" PlaceHolderText_L1="Site" PlaceHolderText_L2="Site" InputType="Auto" ColumnSize="2" IsVisibleInAdvancedView="true" /> <Criterion Binding1="MainRecord.Company" PlaceHolderText_L1="Company" PlaceHolderText_L2="Soci�t�" InputType="Auto" ColumnSize="2" IsVisibleInAdvancedView="true" /> <Criterion Binding1="MainRecord.Title" PlaceHolderText_L1="Title" PlaceHolderText_L2="Fonction" InputType="Auto" ColumnSize="2" IsVisibleInAdvancedView="true" /> <Criterion Binding1="MainRecord.EmployeeType.Category" PlaceHolderText_L1="User Type" PlaceHolderText_L2="Cat�gorie de collaborateur" InputType="Auto" ColumnSize="2" IsVisibleInAdvancedView="true" /> </SearchBar>
Here is the visualization of this searchbar on the interface:
Ergonomically, it is recommended to hide the search symbol in a column header (in a list displayed
like a table) if a criterion linked to this column is already displayed in a searchbar. This avoids
filter duplication. Thus, the <CanBeFiltered> property can be deleted in the <Column> argument
in the display table.
Create Default Filters
To add a default filter, you must add both of the following properties to a criterion:
- DefaultValue
- Operator
<Criterion Binding1="PresenceState" InputType="ComboboxMultiSelection" ColumnSize="2" DefaultValue="-101;-102" Operator="Equal" />
Here is the visualization of this criterion on the interface:
Search Bar Menu
Each menu item is a link to an entity's workflow displayed under the search bar on the visualization page of the entity's resource list.
See the Create Menu Items topic for additional information
Workflows
In software business, a Workflow is a series of specific actions taken by specific people to accomplish specific tasks. For Identity Manager, workflows are models of business workflows, processes or procedures.
Overview
Workflows model business processes and update data within Identity Manager, they handle managed systems only indirectly through Identity Manager. They are engaged in order to complete a task, assigning rights for instance. It is a way of getting work done, a series of steps that are required to be completed sequentially. Most of the time, Identity Manager's workflows are made for:
- manual entitlement requests = request / send notification(s) / approve / assign entitlement.
- addition/update/deletion of resources (used in practice for identities) = create / give basic entitlements / review / apply changes.
Workflows are very configurable objects with many available options. However, the most efficient way to use workflows in IGA is to keep them simple. Identity Manager's demo workflows constitute effective examples.
A workflow is made of several elements:
- a series of activities that constitutes the workflow;
- a form that collects input data;
- permissions required to realize the workflow's activities;
- menu items that make the workflow and its activities accessible;
- aspects that allow specific actions to be performed;
- a summary (optional) of the workflow's results;
- a homonym detection (optional) that prevents duplicates in resources;
- a display table (optional) that replaces Identity Manager's default table displaying the data of the created/modified resource.
Technical principles
- A workflow is linked to
one Entity Type and concerns only
resources from said entity type. For example, a workflow can be linked to
Directory_UserorDirectory_Departmentaccording to the workflow's purpose, but not both together. - The aim of a workflow is to get input data (either a form or just an approval) from users involved in the workflow, then build a change set, and finally apply said change set to the relevant resource.
- Starting a workflow means starting its first activity.
Activities
A workflow is made of successive activities, each of which is assigned an Activity Templatesthat defines how transitions occur from a workflow step to another.
Activities never run in parallel in a workflow. Each activity can start once the previous one reached its final state.
Forms
Workflows use Form to collect input data through the UI.
A form is a set of fields, configured with controls. A control can define a field to fill, a fields set, call an existing form, etc. depending on its output type. To be displayed in the UI, and potentially filled by a given user with the appropriate data, a form must have a type.
Forms without a type can be created in order to be called in other forms with a type. It can be useful to structure your forms, and to avoid rewriting a part of form that is needed in most forms for example.
Form types
Identity Manager provides a few form types. Each form type implies the necessity of specific controls as child elements with specific purposes.
The following table presents the required child controls required for each form type applicable to a workflow's input form:
- M for
MainControl(required) groups resource data apart from record data; - Su for
SummaryControl(optional when no/mono record) sums up resource data, mostly computed properties, after the workflow's execution; - R for
RecordControl(required when handling records) groups the record data shared with all records; - RUI for
RecordUniqueItemControl(recommended when handling records) groups the record data specific to each record individually; - RSUI for
RecordSlaveUniqueItemControl(optional when updating multi records) appoints an existing record to be the base of the fields' pre-filling, before the update of the record data shared with all records; - RS for
RecordSlaveControl(recommended when updating multi records) appoints an existing record to be the base of the fields' pre-filling, before the update of the record data specific to each record individually; - RSu for
RecordSummaryControl(optional when handling mono record) sums up record data, mostly computed properties, after the workflow's execution.
| Form Type | M | Su | R | RUI | RSUI | RS | RSu |
|---|---|---|---|---|---|---|---|
| WorkflowCreateEntity Form | Req. | Opt. | |||||
| WorkflowEditEntity Form | Req. | Opt. | |||||
| WorkflowUpdateRecordEntity Form | Req. | Opt. | Req. | Reco. | Opt. | ||
| WorkflowAddRecordEntity Form | Req. | Opt. | Req. | Reco. | Opt. | ||
| WorkflowAddAndEndRecordEntity Form | Req. | Opt. | Req. | Reco. | Opt. | ||
| WorkflowCreateRecordEntity Form | Req. | Opt. | Req. | Opt. | |||
| WorkflowCreateSeveralRecordEntity Form | Req. | Req. | Reco. | ||||
| WorkflowUpdateSeveralRecordEntity Form | Req. | Req. | Reco. | Reco. | Opt. | ||
| WorkflowUpdateRecordEntities Form | Req. | Opt. | Req. | Reco. | Opt. |
Permissions
For each workflow, some permissions must be assigned to specific Profile so that said profiles are entitled to realize the workflow's actions.
While assigning the specific permissions of a workflow, it is necessary to assign the involved profiles a few essential rights via the Workflow Access Control Rules scaffolding.
A workflow needs a permission for each of all its activity states involving user interaction. This
means that, for example, the activities following the templates Persist and
Persist Only Resources do not require any permission. This also means that, in the example of the
Action template, a workflow would need permissions for the states ActionPending, Aborted and
Purged (because deletion requires an authorization), but not for the state Executed that does
not involve user interaction or special authorization. See the
Activity Templates topic for additional information.
All these permissions can be shared and distributed among several profiles, according to the purpose of the workflow.
Identity Manager's permissions are assigned through
Access Control Rule and
follow the naming rule:
/Custom/workflows/{workflow_identifier}/{activity_identifier}/{activityTemplateState_shortIdentifier}.
For example:
Permission="/Custom/Workflows/Directory_User_StartInternal/Request/ActionPending"gives the right to act from the stateActionPending(so save, execute, etc.), inside a previously created activityRequest, inside the workflowDirectory_User_StartInternal.
A permission specifying the activity without the activity state gives the permissions for all activity states in this activity.
For example: Permission="/Custom/Workflows/Directory_User_StartInternal/Request"
Caution: this way of writing permissions is unsafe in case of a modification in the activity. So
use it only for a "super admin" kind of profile if you are certain you want to give all rights.
Menu Items
Menu Item make workflows accessible from the UI.
Identity Manager's UI is configured so that workflows are accesible from:
- the list of users accessible from the Directory section on the home page;
- the view page of a given user. In this case, the workflows manipulate the selected user.
Aspects
An Aspects definition allows an action to be performed at a specific point in a workflow. Identity Manager provides a few Aspects templates that give the opportunity to delegate administration, to notify people of a request's progress and to compute special values like unique logins or email addresses.
Summaries (Optional)
A summary can be displayed at the end of a workflow to sum up the collected information. The
displayed data is configured through the SummaryControl or RecordSummaryControl introduced
previously. A summary is particularly useful for workflows that compute properties like the
EmployeeId or the email address. Thus calculated fields can be displayed after the workflow's
execution.
Homonym Detections (Optional)
A homonym search checks if a resource already exists in the system before creating/modifying it, preventing duplicates. It is configured through a Homonym Entity Link.
See the Configure a Homonym Detectiontopic for additional information.
Display Tables (Optional)
Identity Manager provides a default display table to show the created/modified resource's data, but you can configure your own.
See the Display Table topic for additional informatrion.
Workflow Homonym
In this section we configure the homonym detection that checks if a resource already exists in the system, preventing duplicates.
Process
- Create a homonym entity link, either with a default filter or customized filters
- Create a display table to display the homonym result (optional)
- Define the part of the workflow form where homonyms must be checked
Create a Homonym Entity Link
A Homonym Entity Link defines a new homonym detection to be performed in a workflow form. It can be defined in different ways.
With a default filter
<HomonymEntityLink FormEntityType="Directory_UserRecord" Identifier="Directory_UserRecord_Homonym" />
When no filter is defined for the homonym entity link, the detection for homonyms is performed according to the homonym control form. See section below.
With customized filters
Homonym Entity Link filters allow to define customized filters for a homonym detection.
Simple filter
<HomonymEntityLink FormEntityType="Directory_UserRecord" Identifier="Directory_UserRecord_Homonym"> <Filter
        Property1="LastName"
        Property2="FirstName"
    /></HomonymEntityLink>
Here, since the default operator is Equal, the detection for homonyms is performed by comparing
the values of the LastName and FirstName properties with an exact spelling.
NB: This example matches the default filter that would be computed based on the homonym control example in the section below.
Filters on several entities
A homonym entity link can contain filters on the properties from several distinct entity types.
The following example searches for homonyms among usual workers (from
Directory_UserRecord) but also the guests (fromDirectory_Guest):
<HomonymEntityLink FormEntityType="Directory_UserRecord" Identifier="Directory_UserRecord"> <Filter
Property1="LastName"
Property2="FirstName"
/>
<Filter
Property1="LastName" ComparisonProperty1="Directory_Guest:LastName"
Property2="FirstName" ComparisonProperty2="Directory_Guest:FirstName"
/>
</HomonymEntityLink>
In this case, a display table is required for the additional entity.
Flexible filter
A filter can be defined to compare the values in an approximate way.
- A flexible operator must be used, such as
FlexibleEqual,FlexibleStartWith, etc. - A flexible expression must be defined on the comparison property.
-
When the input detection value is retrieved directly from the property value
<HomonymEntityLink FormEntityType="Directory_UserRecord" Identifier="Directory_UserRecord_Homonym"> <Filter
        Property1="LastName" ComparisonProperty1="PhoneticLastName" Operator1="FlexibleEqual"
        Property2="FirstName" ComparisonProperty2="PhoneticFirstName" Operator2="FlexibleEqual"
    /></HomonymEntityLink>
Here, Property1 is set, so the detection for homonyms is performed by comparing the LastName
value, entered by the user in the workflow form, with the phonetic value of existing resources
stored as the PhoneticLastName property in the database.
Before performing the comparison, the flexible expression of the comparison property is applied to the input value.
-
When the input detection value is deducted
<HomonymEntityLink FormEntityType="Directory_UserRecord" Identifier="Directory_UserRecord_Homonym"> <Filter
        ComparisonProperty1="PhoneticFirstLastName" Operator1="FlexibleEqual"
    /> <Filter
        ComparisonProperty1="PhoneticFirstLastName" Operator1="FlexibleEqual" Expression1="C#:record:(record.LastName + ' ' + record.FirstName).Appproximate()"
    /></HomonymEntityLink>
Here:
- In the first filter,
Property1andExpression1are not set, so the detection value is computed by applying the expression defined forComparisonProperty1from the input values, eg.(record.FirstName + ' ' + record.LastName).Appproximate(). - In the second filter,
Expression1is set, so the detection value is computed by applying theExpression1from the input values. This filter allows checking the homonyms on the reversed full name (to manage the case where the user reverses the first and last name for example).
The detection for homonyms is performed by comparing the detection values computed based on each filter with the values stored in the database and retrieves all resources that match any of the filters.
Filter on a language property
If a filter is set on a language property, the detection for homonyms is performed on the property associated to the main language.
<HomonymEntityLink FormEntityType="Directory_Organization" Identifier="Directory_Organization_Homonym"> <Filter Property1="Name" /></HomonymEntityLink>
Here, the Name property is a neutral property associated with two localized properties Name_en
and Name_fr.
If English is the main language, the detection for homonyms is performed on the Name_en value.
Create a Display Table (optional)
A Display Table is used to define how a list of the same entity type should be displayed.
By default, the homonyms are displayed using the default display table of the related entity type.
To display homonyms in a different way than the default, a specific display table must be created
where the HomonymEntityLink attribute is the identifier of the homonym entity link created above.
<DisplayTable Identifier="Directory_UserRecord_Homonym" EntityType="Directory_UserRecord" DisplayTableDesignElement="table" HomonymEntityLink="Directory_UserRecord">
    <Column DefaultSortPriority="1" DisplayBinding="LastName" IsDisplayInSummaryView="true" IsResizable="true" ColumnSize="1" /> <Column DisplayBinding="FirstName" IsDisplayInSummaryView="true" IsResizable="true" ColumnSize="1" /> <Column DisplayBinding="Login" IsDisplayInSummaryView="true" IsResizable="true" IsSortable="true" CanBeFiltered="true" ColumnSize="2" /> <Column DisplayBinding="Mail" IsDisplayInSummaryView="true" IsResizable="true" IsSortable="true" CanBeFiltered="true" ColumnSize="2" /> <Column DisplayBinding="BirthDate" IsDisplayInSummaryView="true" IsResizable="true" IsSortable="true" CanBeFiltered="true" ColumnSize="4" /></DisplayTable>
Define the Homonym Control in the Workflow Form
The Form where the homonyms are to be checked must contain a layout fieldset control where:
- the
HomonymEntityLinkattribute is the identifier of the homonym entity link created above. - the properties to check (defined in the homonym filters) are represented in the control bindings.
- the bindings are all represented in the homonym filters.
When the homonym entity link has no filter set and therefore the filter is calculated automatically,
the homonym control form must only contain up to 5 controls where Binding attribute is defined.
Indeed, a filter can only be defined on up to 5 properties, see filter definition in
Homonym Entity Link .
<Form Identifier="Workflow_Directory_User_AdvancedStartInternal_Base" EntityType="Directory_UserRecord"> <Control DisplayName_L1="Personal Data" DisplayName_L2="Informations personnelles" OutputType="LayoutFieldset" HomonymEntityLink="Directory_UserRecord">
        <Control DisplayName_L1="Full Name" DisplayName_L2="Nom complet" OutputType="LayoutRowset"> <Control Binding="LastName" IsRequired="true" /> <Control Binding="FirstName" IsRequired="true" /> </Control> </Control></Form>
If a filter is declared with a ComparisonProperty attribute (and so without a Property), then
the properties used in the Expression (whether defined in the filter or elsewhere in the
configuration) to compute the ComparisonProperty must also be represented in the control bindings.
In the example below, the properties used in the Expression1 attribute that must be represented in
the control bindings are LastName and FirstName.
<HomonymEntityLink FormEntityType="Directory_UserRecord" Identifier="Directory_UserRecord_Homonym"> <Filter
        ComparisonProperty1="PhoneticFirstLastName" Operator1="FlexibleEqual" Expression1="C#:record:(record.LastName + ' ' + record.FirstName).Appproximate()"
    /></HomonymEntityLink>
How To Create a Workflow
This guide shows how to create a Workflow through the XML configuration.
Process
- Declare a new Workflow with given activities following Identity Manager's activity templates.
- Configure the input Form with the right output type according to the purpose of the workflow.
- Assign the adequate permissions via an Access Control Rule.
- Add Menu Item .
- Add Aspects, according to the purpose of the workflow.
- Add optional elements if needed: Workflows; a Configure a Homonym Detection ; a Customize Display Tablesdifferent from Identity Manager's default one.
Examples
You can also find configuration examples for several types of workflow:
-
For Resource Creation (Mono Record)
How to create a workflow to create a new resource with a unique record.
-
For Resource Creation (Multi Records)
How to create a workflow to create a new resource with several records.
-
For Resource Update (No Record)
How to create a workflow to update an existing simple resource, i.e. to update, within a given existing resource, properties that do not involve records.
-
For Resource Update (Mono Record)
How to create a workflow to schedule the replacement of the unique record of an existing resource with a new one.
-
For Resource Update (Multi Records)
Create a workflow to update an existing resource through its several records.
-
How to configure the homonym search that checks if a resource already exists in the system, preventing duplicates.
For Resource Update (Mono Record)
This section guides you through the procedure for the creation of a workflow to schedule the replacement of the unique record of an existing resource with a new one.
Declare a Workflow
This Workflow is made of two activities:
Action With Refine: sends the resource's record update request with a possibility of delegation.Persist: saves the collected data and triggers provisioning.
See the Activity Templates topic for additional information.
The example below creates a workflow to update only the user's name.
<Workflow Identifier="Directory_User_ChangeName" DisplayName_L1="User - Update Name" VariablesType="Workflow_Directory_User"> <Activity Identifier="Request" DisplayName_L1="Request" Template="ActionWithRefine" /> <Activity Identifier="Persist" DisplayName_L1="Commit" Template="Persist" /> </Workflow>
For now, our workflow works with an immediate validation and an immediate effect.
Create Forms
The XML configuration below represents the creation of a Form that defines the elements to display in the workflow.
Here we just have the full name field to update the corresponding attributes for a given user:
<Form Identifier="Workflow_Directory_User_ChangeName_Base" EntityType="Workflow_Directory_User"> <Control DisplayName_L1="Full Name" OutputType="LayoutRowset" EntityType="Directory_UserRecord"> <Control Binding="LastName" /> <Control Binding="FirstName" /> </Control></Form>
Link the Forms to the Workflow
After creating a workflow with given activities, it is necessary to create the form to be displayed
when launching the workflow. It has the type corresponding to a (unique) record's replacement, i.e.
WorkflowAddAndEndRecordEntityForm and it must specify the workflow's context (the entity type of
the involved resources, the main property, the activity when the form is called, etc):
<WorkflowAddAndEndRecordEntityForm Identifier="Workflow_Directory_User_ChangeName" EntityType="Workflow_Directory_User" MainProperty="Workflow_Directory_User:Directory_User" RecordProperty="Directory_User:Records" WorkflowRequestType="Self" Activity="Directory_User_ChangeName:Request" HideRoles="true" FormTitle_L1="Change Name"></WorkflowAddAndEndRecordEntityForm>
A WorkflowAddAndEndRecordEntityForm requires the following child elements:
MainControlthat defines user's data;
<WorkflowAddAndEndRecordEntityForm Identifier="Workflow_Directory_User_ChangeName_Base" EntityType="Workflow_Directory_User" MainProperty="Workflow_Directory_User:Directory_User" RecordProperty="Directory_User:Records" WorkflowRequestType="Self" Activity="Directory_User_ChangeName:Request" HideRoles="true" FormTitle_L1="Change Name">
  <MainControl OutputType="LayoutContainer"/>
</WorkflowAddAndEndRecordEntityForm>
The MainControl attribute is here an empty container, because it is a mandatory attribute that is
not involved in the changes of this workflow.
RecordControlthat defines record data, and call the form created previously.
<WorkflowAddAndEndRecordEntityForm Identifier="Workflow_Directory_User_ChangeName" EntityType="Workflow_Directory_User" MainProperty="Workflow_Directory_User:Directory_User" RecordProperty="Directory_User:Records" WorkflowRequestType="Self" Activity="Directory_User_ChangeName:Request" HideRoles="true" FormTitle_L1="Change Name" > <MainControl OutputType="LayoutContainer"/>
  <RecordControl OutputType="TransformImport" EmbeddedForm="Workflow_Directory_User_ChangeName_Base" />
</WorkflowAddAndEndRecordEntityForm>

End of transition sets the date for the change of records scheduled by this form.
Assign the Right Permissions
Some profiles must get specific permissions so that the workflow is visible and usable by the right users. Read about Workflow s permissions.
Below is an example of an access control rule where the Administrator profile gets the permissions
for the whole update request from the previously created workflow:
<AccessControlRule Profile="Administrator" EntityType="Workflow_Directory_User" Identifier="Administrator_Workflows_Directory_User_*" DisplayName_L1="Administrator_Workflows_Directory_User_*"> <Entry Permission="/Custom/Workflows/Directory_User_ChangeName/Request/ActionPending" CanExecute="true" /> <Entry Permission="/Custom/Workflows/Directory_User_ChangeName/Request/RefinePending" CanExecute="true" /> <Entry Permission="/Custom/Workflows/Directory_User_ChangeName/Request/Aborted" CanExecute="true" /> <Entry Permission="/Custom/Workflows/Directory_User_ChangeName/Request/Purged" CanExecute="true" /></AccessControlRule>
Create Menu Items in the UI
Menu Item must be defined to make the workflow accessible in the UI.
Updating an existing resource, this workflow manages one given resource at a time. Hence an interesting location for this workflow could be the individual view page of users.

To create a menu item here for the new workflow, you can add the following XML configuration to the existing menu items list:
<MenuItem Identifier="Menu_Directory_User" DisplayName_L1="Menu"> <MenuItem Identifier="Menu_Directory_User_Changes" DisplayName_L1="Actions"> <MenuItem Identifier="Menu_Directory_User_Changes_Update" DisplayName_L1="Section"> ...
      <MenuItem Identifier="Menu_Directory_User_Changes_ChangeName" DisplayName_L1="Update Name" IconCode="Edit" Workflow="Directory_User_ChangeName" />
    </MenuItem> </MenuItem></MenuItem>
Add Aspects
For each workflow, it is possible to add aspects according to the workflow's purpose.
Homonym Detection (Optional)
To perform a homonymy check on a workflow and thus prevent user duplicates, see the Configure a Homonym Detection topic for additional information.
When using records, the homonym detection displays the list of records and not just the list of users.
Customize the Display Table (Optional)
To configure a display table different from the default one provided by Identity Manager, see the Customize Display Tables topic for additional information.
For Resource Creation (Multi Records)
This section guides you through the procedure for the creation of a workflow to create a new resource with several records.
Declare a Workflow
This Workflow is made of four activities:
Action With Refine: sends the creation request with a possibility of delegation.Persist Only Resources: saves the collected data to the repository without triggering provisioning.Review With Feedback: reviews the creation request with the possibility of getting feedback from another user.Persist: saves the collected data and triggers provisioning.
See the Activity Templates topic for additional information.
The example below creates a workflow to create a new helpdesk worker, with the possibility to create several records at once for said worker.
<Workflow Identifier="Helpdesk_Directory_User_New" DisplayName_L1="User - New Employee (multi record)" VariablesType="Workflow_Directory_User"> <Activity Identifier="Request" DisplayName_L1="Request" Template="ActionWithRefine" /> <Activity Identifier="PersistDraft" DisplayName_L1="Draft Creation" Template="PersistOnlyResources" /> <Activity Identifier="Review" DisplayName_L1="Review" Template="ReviewWithFeedback" /> <Activity Identifier="Persist" DisplayName_L1="Commit" Template="Persist" /></Workflow>
Create Forms
The XML configuration below represents the creation of a Form that defines the elements to display in the workflow.
Here we create three structured forms, all to be called in our final workflow form.
First form for the user's identification data:
<Form Identifier="Workflow_Helpdesk_Directory_User_Base" EntityType="Directory_User"> <Control DisplayName_L1="User Information" OutputType="LayoutFieldset"> <Control Binding="Identifier" /> <Control Binding="EmployeeId" /> <Control Binding="IsDraft" /> </Control></Form>

Second form for the user's data shared with all records:
<Form Identifier="Workflow_Helpdesk_Directory_UserRecord_Shared" EntityType="Directory_UserRecord">

  Section for user's personal data, here their name and phone numbers:
  <Control DisplayName_L1="Personal Data" OutputType="LayoutFieldset"> <Control DisplayName_L1="Full Name" OutputType="LayoutRowset"> <Control Binding="LastName" IsRequired="true" /> <Control Binding="FirstName" IsRequired="true" /> </Control> <Control DisplayName_L1="Phone Numbers" OutputType="LayoutRowset"> <Control Binding="PhoneNumber" /> <Control Binding="MobileNumber" /> </Control> </Control>

  Section for user's contract data, here their contract's type, start and end dates:
  <Control DisplayName_L1="Contract" OutputType="LayoutFieldset"> <Control Binding="UserType" IsRequired="true" /> <Control Binding="ContractStartDate" IsRequired="true" /> <Control Binding="ContractEndDate" InputType="Date" AddedMinutes="1440" /> </Control></Form>

Third form for the user's data specific to each record individually, so here position information:
<Form Identifier="Workflow_Helpdesk_Directory_UserRecord_Unique" EntityType="Directory_UserRecord"> <Control DisplayName_L1="Position" OutputType="LayoutFieldset"> <Control Binding="Title" /> <Control Binding="Organization" /> <Control Binding="Site" /> <Control Binding="StartDate"/> <Control Binding="EndDate" InputType="Date" AddedMinutes="1440" /> </Control></Form>
Link the Forms to the Workflow
After creating a workflow with given activities, it is necessary to create the form to be displayed
when launching the workflow. It has the type corresponding to a resource's creation with several
records, i.e. WorkflowCreateSeveralRecordEntityForm and it must specify the workflow's context
(the entity type of the involved resources, the main property, the activity when the form is called,
etc):
<WorkflowCreateSeveralRecordsEntityForm Identifier="Workflow_Helpdesk_Directory_User_New" EntityType="Workflow_Directory_User" MainProperty="Workflow_Directory_User:Directory_User" RecordProperty="Directory_User:Records" RecordTable="Directory_UserRecord_Helpdesk" WorkflowRequestType="Helpdesk" Activity="Helpdesk_Directory_User_New:Request" FormTitle_L1="New User (helpdesk)"/>
A WorkflowCreateSeveralRecordEntityForm requires the following child elements:
MainControlthat defines the user's data that never changes so identification data, and calls the firstform created previously;
<WorkflowCreateSeveralRecordsEntityForm Identifier="Workflow_Helpdesk_Directory_User_New" EntityType="Workflow_Directory_User" MainProperty="Workflow_Directory_User:Directory_User" RecordProperty="Directory_User:Records" RecordTable="Directory_UserRecord_Helpdesk" WorkflowRequestType="Helpdesk" Activity="Helpdesk_Directory_User_New:Request" FormTitle_L1="New User (helpdesk)">
  <MainControl OutputType="TransformImport" EmbeddedForm="Workflow_Helpdesk_Directory_User_Base"/>
</WorkflowCreateSeveralRecordsEntityForm>
RecordControlthat defines the record data shared with all records, and calls the secondform created previously;
<WorkflowCreateSeveralRecordsEntityForm Identifier="Workflow_Helpdesk_Directory_User_New" EntityType="Workflow_Directory_User" MainProperty="Workflow_Directory_User:Directory_User" RecordProperty="Directory_User:Records" RecordTable="Directory_UserRecord_Helpdesk" WorkflowRequestType="Helpdesk" Activity="Helpdesk_Directory_User_New:Request" FormTitle_L1="New User (helpdesk)"> <MainControl OutputType="TransformImport" EmbeddedForm="Workflow_Helpdesk_Directory_User_Base"/>
  <RecordControl OutputType="TransformImport" EmbeddedForm="Workflow_Helpdesk_Directory_UserRecord_Shared"/>
</WorkflowCreateSeveralRecordsEntityForm>
In a situation where users can have several positions but also several contracts, then contract data
would be part of the form called by RecordUniqueItemControl instead of RecordControl.
In a situation where positions, contracts and personal data are all configured as records because we
want to be able to anticipate changes for example, then there would not be any data shared by all
records. Then RecordControl would be empty. See the
Position Change via Records
topic for additional information.
<WorkflowCreateSeveralRecordsEntityForm ... > ...
<RecordControl OutputType="LayoutContainer"> <Control OutputType="LayoutContainer" /> </RecordControl>
...
</WorkflowCreateSeveralRecordsEntityForm>
RecordUniqueItemControl(optional but recommended) that defines the record data specific to each record individually, and calls the thirdform created previously.
<WorkflowCreateSeveralRecordsEntityForm Identifier="Workflow_Helpdesk_Directory_User_New" EntityType="Workflow_Directory_User" MainProperty="Workflow_Directory_User:Directory_User" RecordProperty="Directory_User:Records" RecordTable="Directory_UserRecord_Helpdesk" WorkflowRequestType="Helpdesk" Activity="Helpdesk_Directory_User_New:Request" FormTitle_L1="New User (helpdesk)"> <MainControl OutputType="TransformImport" EmbeddedForm="Workflow_Helpdesk_Directory_User_Base"/> <RecordControl OutputType="TransformImport" EmbeddedForm="Workflow_Helpdesk_Directory_UserRecord_Shared"/>
  <RecordUniqueItemControl OutputType="TransformImport" EmbeddedForm="Workflow_Helpdesk_Directory_UserRecord_Unique"/>
</WorkflowCreateSeveralRecordsEntityForm>
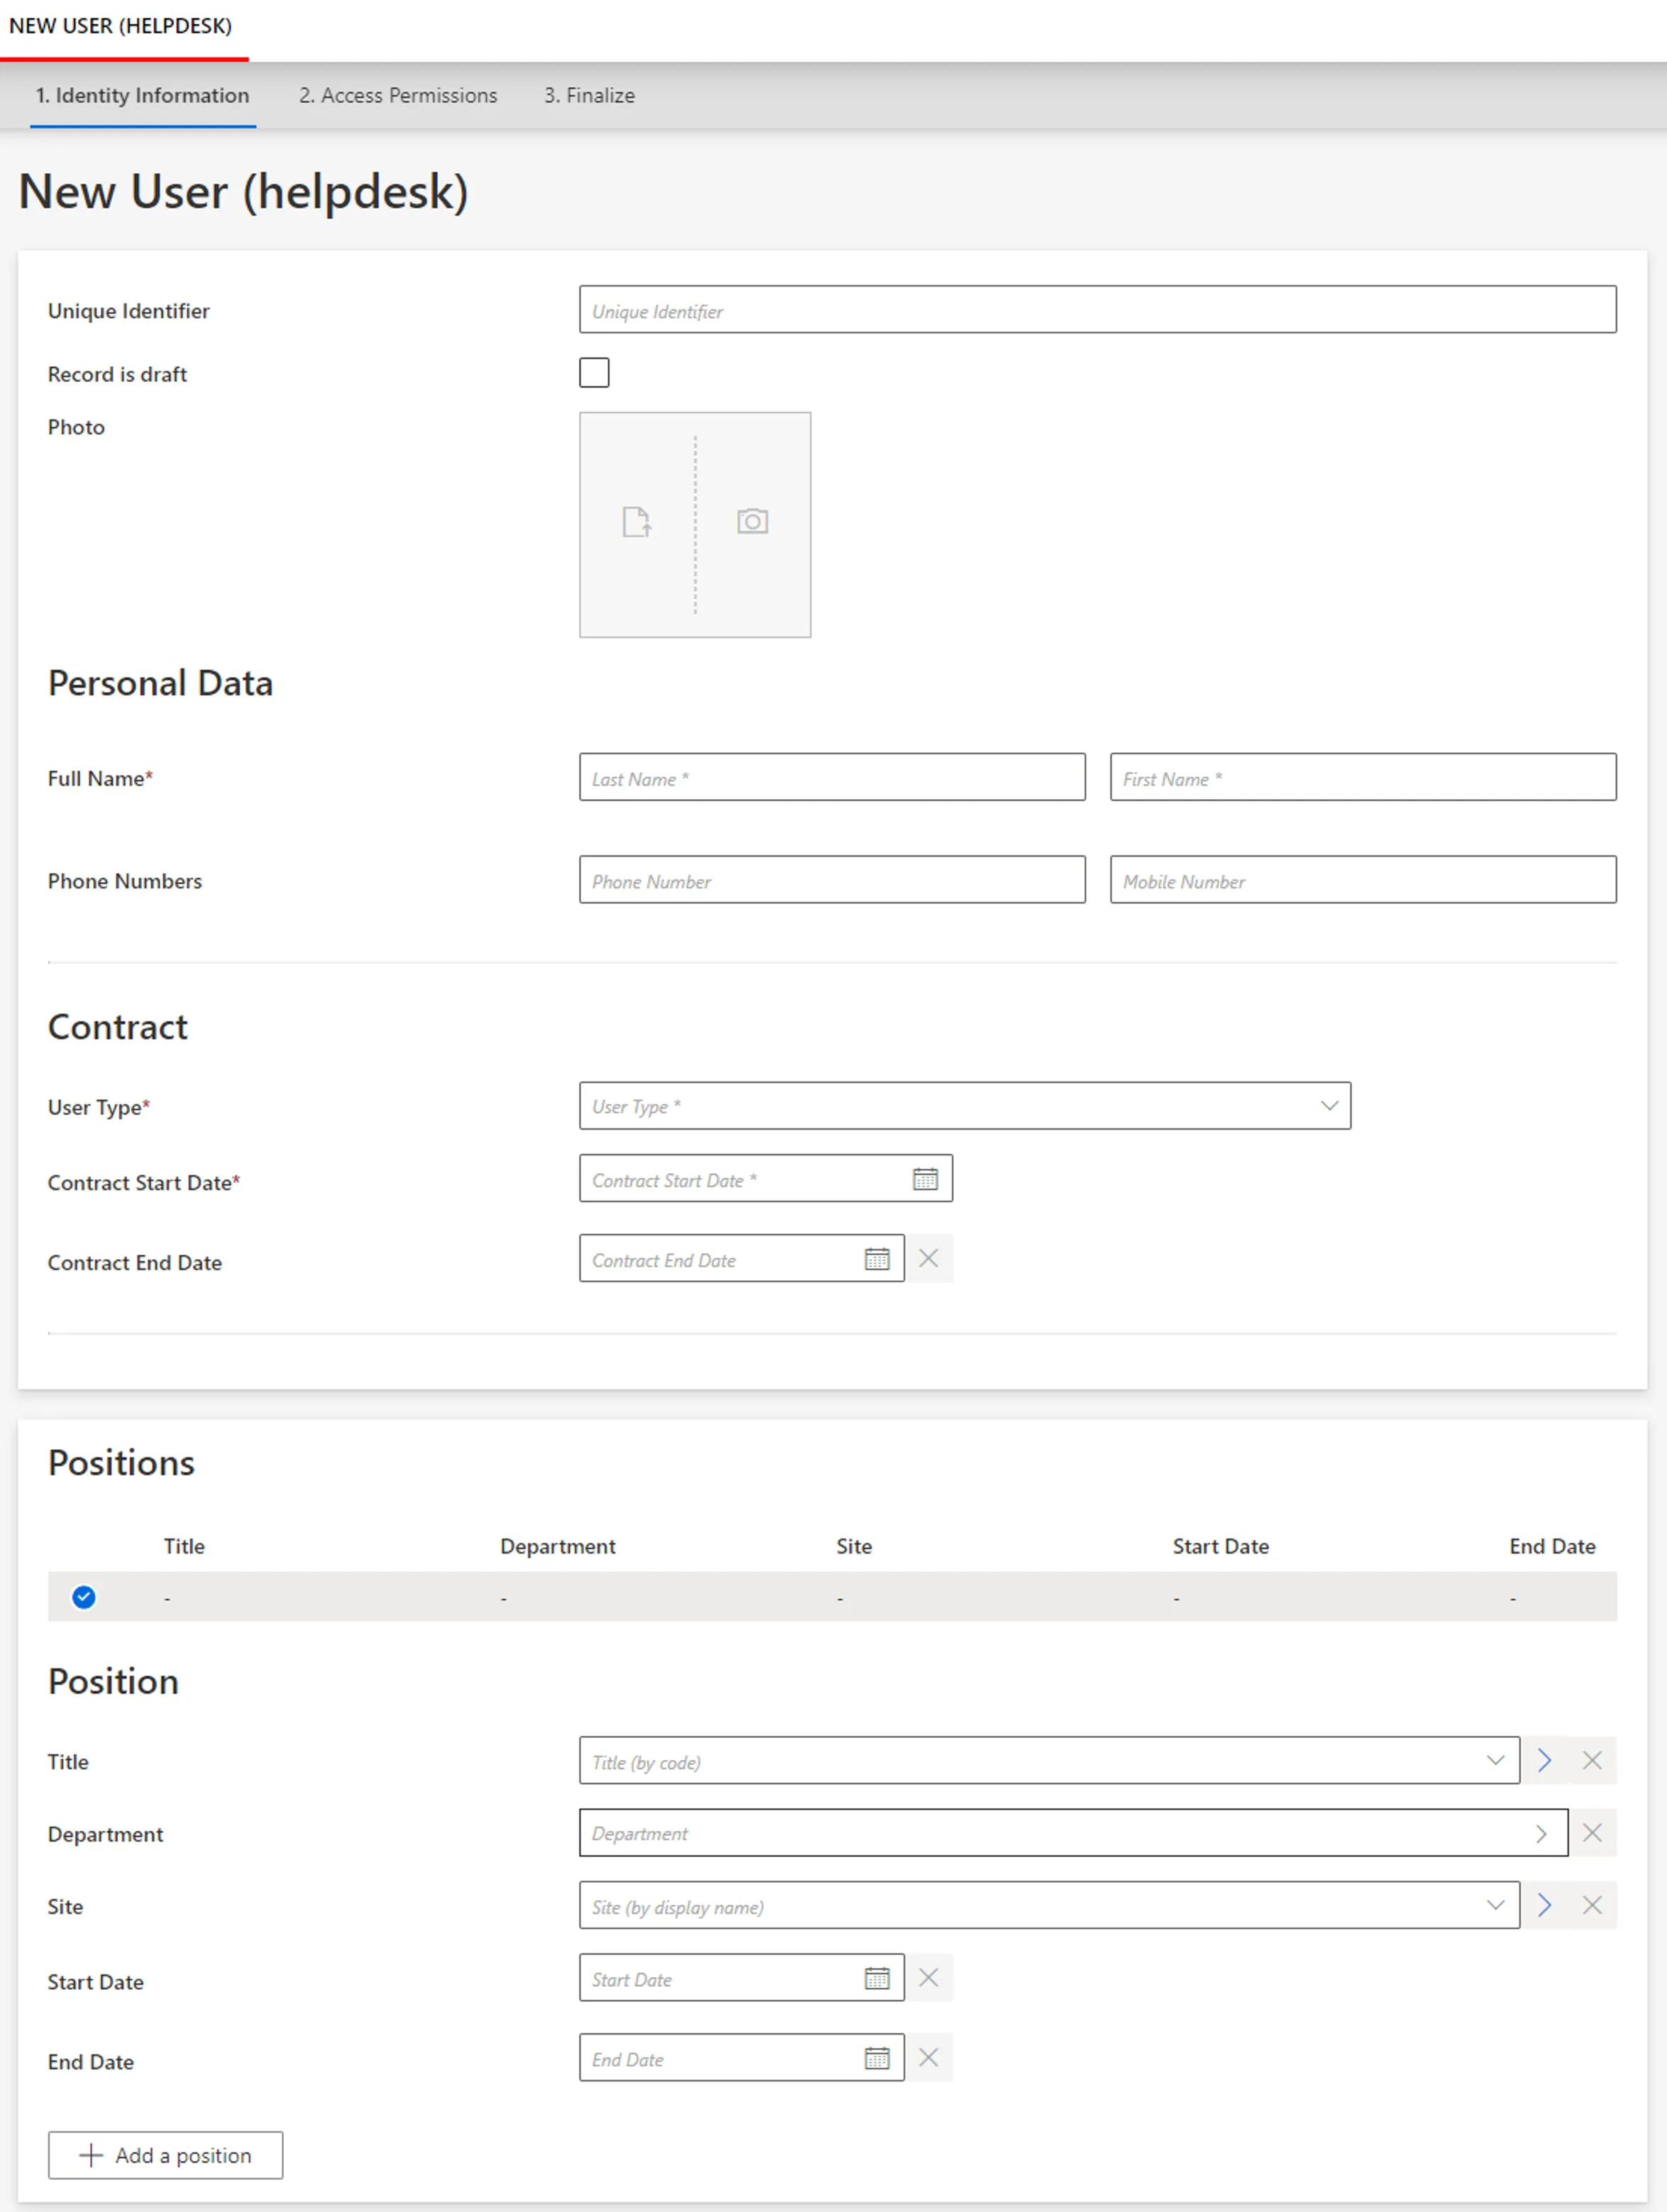
Assign the Right Permissions
Some profiles must get specific permissions so that the workflow is visible and usable by the right users. Read about Workflow s permissions.
Below is an example of an access control rule where the Administrator profile gets the permissions
for the whole creation request and review from the previously created workflow:
<AccessControlRule Profile="Administrator" EntityType="Workflow_Directory_User" Identifier="Administrator_Workflows_Helpdesk_Directory_User_New*" DisplayName_L1="Administrator_Workflows_Helpdesk_Directory_User_New*">

  Permissions for the Request activity:
  <Entry Permission="/Custom/Workflows/Helpdesk_Directory_User_New/Request/ActionPending" CanExecute="true" /> <Entry Permission="/Custom/Workflows/Helpdesk_Directory_User_New/Request/Aborted" CanExecute="true" /> <Entry Permission="/Custom/Workflows/Helpdesk_Directory_User_New/Request/Purged" CanExecute="true" />

  Permissions for the Review activity:
  <Entry Permission="/Custom/Workflows/Helpdesk_Directory_User_New/Review/ReviewPending" CanExecute="true" /> <Entry Permission="/Custom/Workflows/Helpdesk_Directory_User_New/Review/RefinePending" CanExecute="true" /> <Entry Permission="/Custom/Workflows/Helpdesk_Directory_User_New/Review/Aborted" CanExecute="true" /> <Entry Permission="/Custom/Workflows/Helpdesk_Directory_User_New/Review/Purged" CanExecute="true" /></AccessControlRule>
Create Menu Items in the UI
Menu Item must be defined to make the workflow accessible in the UI.
Creating a new resource, an interesting location for this workflow could be the users list page.

To create a menu item here for the new workflow, you can add the following XML configuration to the existing menu items list:
<MenuItem Identifier="Menu_Search_Directory_User" DisplayName_L1="Menu"> ...
  <MenuItem Identifier="Menu_Search_Directory_User_Helpdesk_New" DisplayName_L1="New User (helpdesk)" IconCode="AddFriend" Workflow="Helpdesk_Directory_User_New" />
</MenuItem Identifier="Menu_Search_Directory_User" DisplayName_L1="Menu">
Add Aspects
For each workflow, it is possible to add aspects according to the workflow's purpose.
Homonym Detection (Optional)
To perform a homonymy check on a workflow and thus prevent user duplicates see the Configure a Homonym Detection topic for additional information.
When using records, the homonym detection displays the list of records and not just the list of users.
Below is an example where a homonym entity link, based on the user's name, is called in the workflow form:
Homonym detection:
<HomonymEntityLink Identifier="Homonym_Directory_UserRecord" FormEntityType="Directory_UserRecord">
  <Filter
    Property1="FirstName"
    Property2="LastName"
  /> <Filter
    Property1="FirstName" ComparisonProperty1="LastName"
    Property2="LastName" ComparisonProperty2="FirstName"
  /> <Filter
    Property1="FirstName"
    Property2="LastName" ComparisonProperty2="BirthName"
  /></HomonymEntityLink>

Partial form for user data:
...
<Control DisplayName_L1="Personal Data" DisplayName_L2="Informations personnelles" OutputType="LayoutFieldset" HomonymEntityLink="Homonym_Directory_UserRecord"> <Control DisplayName_L1="Full Name" DisplayName_L2="Nom complet" OutputType="LayoutRowset"> <Control Binding="LastName" IsRequired="true" /> <Control Binding="FirstName" IsRequired="true" /> </Control></Control>...

Customize the Display Table (Optional)
To configure a display table different from the default one provided by Identity Manager, see the Customize Display Tables topic for additional information.
Below is an example of a display table for our situation:
<DisplayTable Identifier="Directory_UserRecord_SeveralRecords" EntityType="Directory_UserRecord" DisplayTableDesignElement="table"> <Column DisplayBinding="Title.InternalDisplayName" DisplayName_L1="Title" IsDisplayInSummaryView="true" ColumnSize="1" /> <Column DisplayBinding="Organization.InternalDisplayName" DisplayName_L1="Department" IsDisplayInSummaryView="true" ColumnSize="1" /> <Column DisplayBinding="Location.InternalDisplayName" DisplayName_L1="Site" IsDisplayInSummaryView="true" ColumnSize="1" /> <Column DisplayBinding="StartDate" DisplayName_L1="Start Date" IsDisplayInSummaryView="true" ColumnSize="1" /> <Column DisplayBinding="EndDate" DisplayName_L1="End Date" IsDisplayInSummaryView="true" ColumnSize="1" /></DisplayTable>
For Resource Creation (Mono Record)
This section guides you through the procedure for the creation of a Workflow to create a new resource with a unique record.
Declare a Workflow
This Workflow is made of four activities:
Action With Refine: sends the creation request with a possibility of delegation.Persist Only Resources: saves the collected data to the repository without triggering provisioning.Review With Feedback: reviews the creation request with the possibility of getting feedback from another user.Persist: saves the collected data and triggers provisioning.
See the Activity Templates topic for additional information.
The example below creates a workflow to create a new worker.
<Workflow Identifier="Directory_User_NewInternal" DisplayName_L1="User - New Employee" VariablesType="Workflow_Directory_User"> <Activity Identifier="Request" DisplayName_L1="Request" Template="ActionWithRefine" /> <Activity Identifier="PersistDraft" DisplayName_L1="Draft Creation" Template="PersistOnlyResources" /> <Activity Identifier="Review" DisplayName_L1="Review" Template="ReviewWithFeedback" /> <Activity Identifier="Persist" DisplayName_L1="Commit" Template="Persist" /></Workflow>
Create Forms
The XML configuration below represents the creation of a Form that defines the elements to display in the workflow.
Here we create two structured forms: the preliminary one is called inside the main one, and the main one is to be called in our final workflow form.
Preliminary form for user data:
<Form Identifier="Workflow_Directory_User_NewInternal_PersonalData" EntityType="Directory_UserRecord"> <Control DisplayName_L1="Personal Data" OutputType="LayoutFieldset"> <Control DisplayName_L1="Full Name" OutputType="LayoutRowset"> <Control Binding="LastName" IsRequired="true" /> <Control Binding="FirstName" IsRequired="true" /> </Control> <Control DisplayName_L1="Phone Numbers" OutputType="LayoutRowset"> <Control Binding="PhoneNumber" /> <Control Binding="MobileNumber" /> </Control> <Control DisplayName_L1="Photo" OutputType="LayoutRowset"> <Control Binding="User.Photo" InputType="Image" /> </Control> </Control>

Preliminary form for user's contract data:
<Form Identifier="Workflow_Directory_UserRecord_NewInternal_Contract" EntityType="Directory_UserRecord"> <Control DisplayName_L1="Contract" OutputType="LayoutFieldset"> <Control Binding="UserType" IsRequired="true" /> <Control Binding="ContractStartDate" IsRequired="true" /> <Control Binding="ContractEndDate" InputType="Date" AddedMinutes="1440" /> </Control></Form>

Preliminary form for user's position data:
<Form Identifier="Workflow_Directory_UserRecord_NewInternal_Position" EntityType="Directory_UserRecord"> <Control DisplayName_L1="Position" OutputType="LayoutFieldset"> <Control Binding="Title" /> <Control Binding="Organization" /> <Control Binding="Site" /> <Control Binding="PositionStartDate" /> <Control Binding="PositionEndDate" /> </Control></Form>

Main form for all data:
<Form Identifier="Workflow_Directory_User_NewInternal" EntityType="Directory_UserRecord">
  Section calling the preliminary form for user data:
  <Control OutputType="TransformImport" EmbeddedForm="Workflow_Directory_User_NewInternal_PersonalData" />
  Section calling the preliminary form for contract data:
  <Control OutputType="TransformImport" EmbeddedForm="Workflow_Directory_UserRecord_NewInternal_Contract" />
  Section calling the preliminary form for position data:
  <Control OutputType="TransformImport" EmbeddedForm="Workflow_Directory_UserRecord_NewInternal_Position" /></Form>
Link the Forms to the Workflow
After creating a workflow with given activities, it is necessary to create the form to be displayed
when launching the workflow. It has the type corresponding to a resource's creation with one record,
i.e. WorkflowCreateRecordEntityForm and it must specify the workflow's context (the entity type of
the involved resources, the main property, the activity when the form is called, etc):
<WorkflowCreateRecordEntityForm Identifier="Workflow_Directory_User_NewInternal" EntityType="Workflow_Directory_User" MainProperty="Workflow_Directory_User:Directory_User" RecordProperty="Directory_User:Records" WorkflowRequestType="Self" Activity="Directory_User_NewInternal:Request" FormTitle_L1="New Employee"/>
A WorkflowCreateRecordEntityForm requires the following child elements:
MainControlthat defines user's data;
<WorkflowCreateRecordEntityForm Identifier="Workflow_Directory_User_NewInternal" EntityType="Workflow_Directory_User" MainProperty="Workflow_Directory_User:Directory_User" RecordProperty="Directory_User:Records" WorkflowRequestType="Self" Activity="Directory_User_NewInternal:Request" FormTitle_L1="New Employee"/>
  <MainControl OutputType="LayoutContainer"></MainControl>
</WorkflowCreateRecordEntityForm>
The MainControl attribute is here an empty container because we configure all personal data,
contracts and positions as records to be able to anticipate changes for example. The line with the
empty MainControl is not mandatory. See the
Position Change via Records topic
for additional information.
RecordControlthat defines record data, and calls the form created previously. See the For Resource Creation (Mono Record) topic for additional information.
<WorkflowCreateRecordEntityForm Identifier="Workflow_Directory_User_NewInternal" EntityType="Workflow_Directory_User" MainProperty="Workflow_Directory_User:Directory_User" RecordProperty="Directory_User:Records" WorkflowRequestType="Self" Activity="Directory_User_NewInternal:Request" FormTitle_L1="New Employee"> <MainControl OutputType="LayoutContainer" />
  <RecordControl OutputType="TransformImport" EmbeddedForm="Workflow_Directory_User_NewInternal" />
</WorkflowCreateRecordEntityForm>
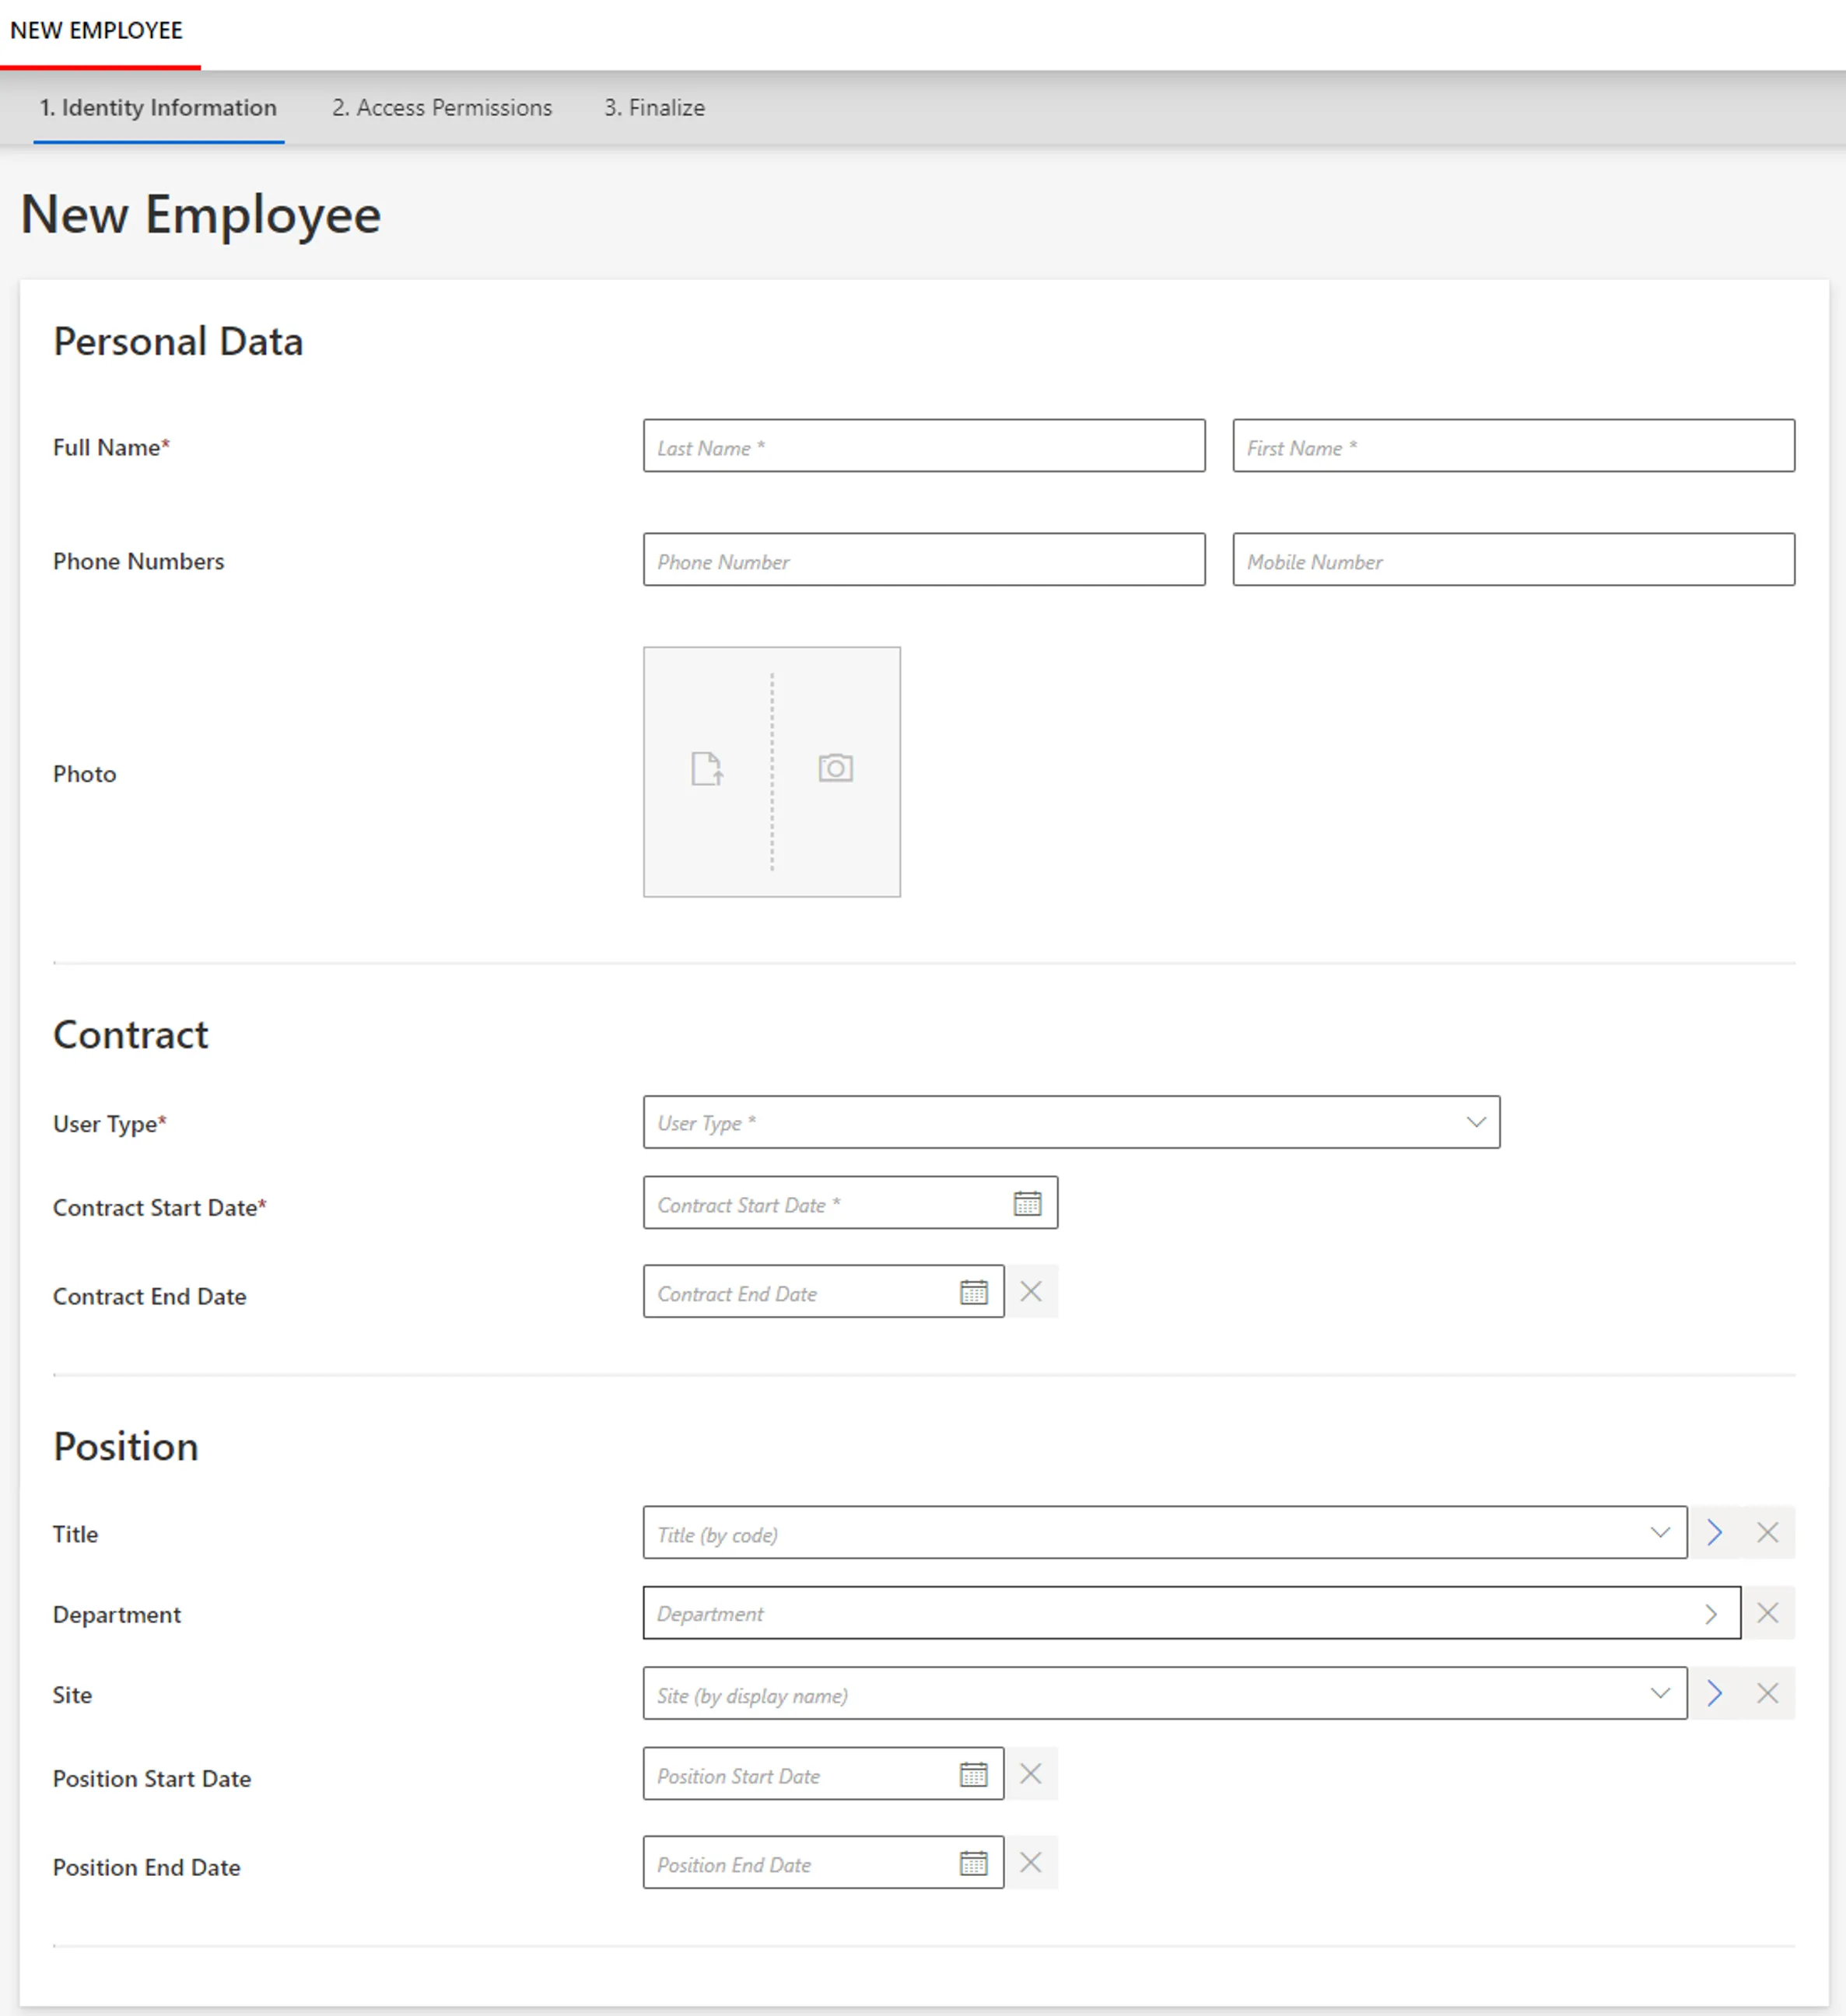
Add a summary (Optional)
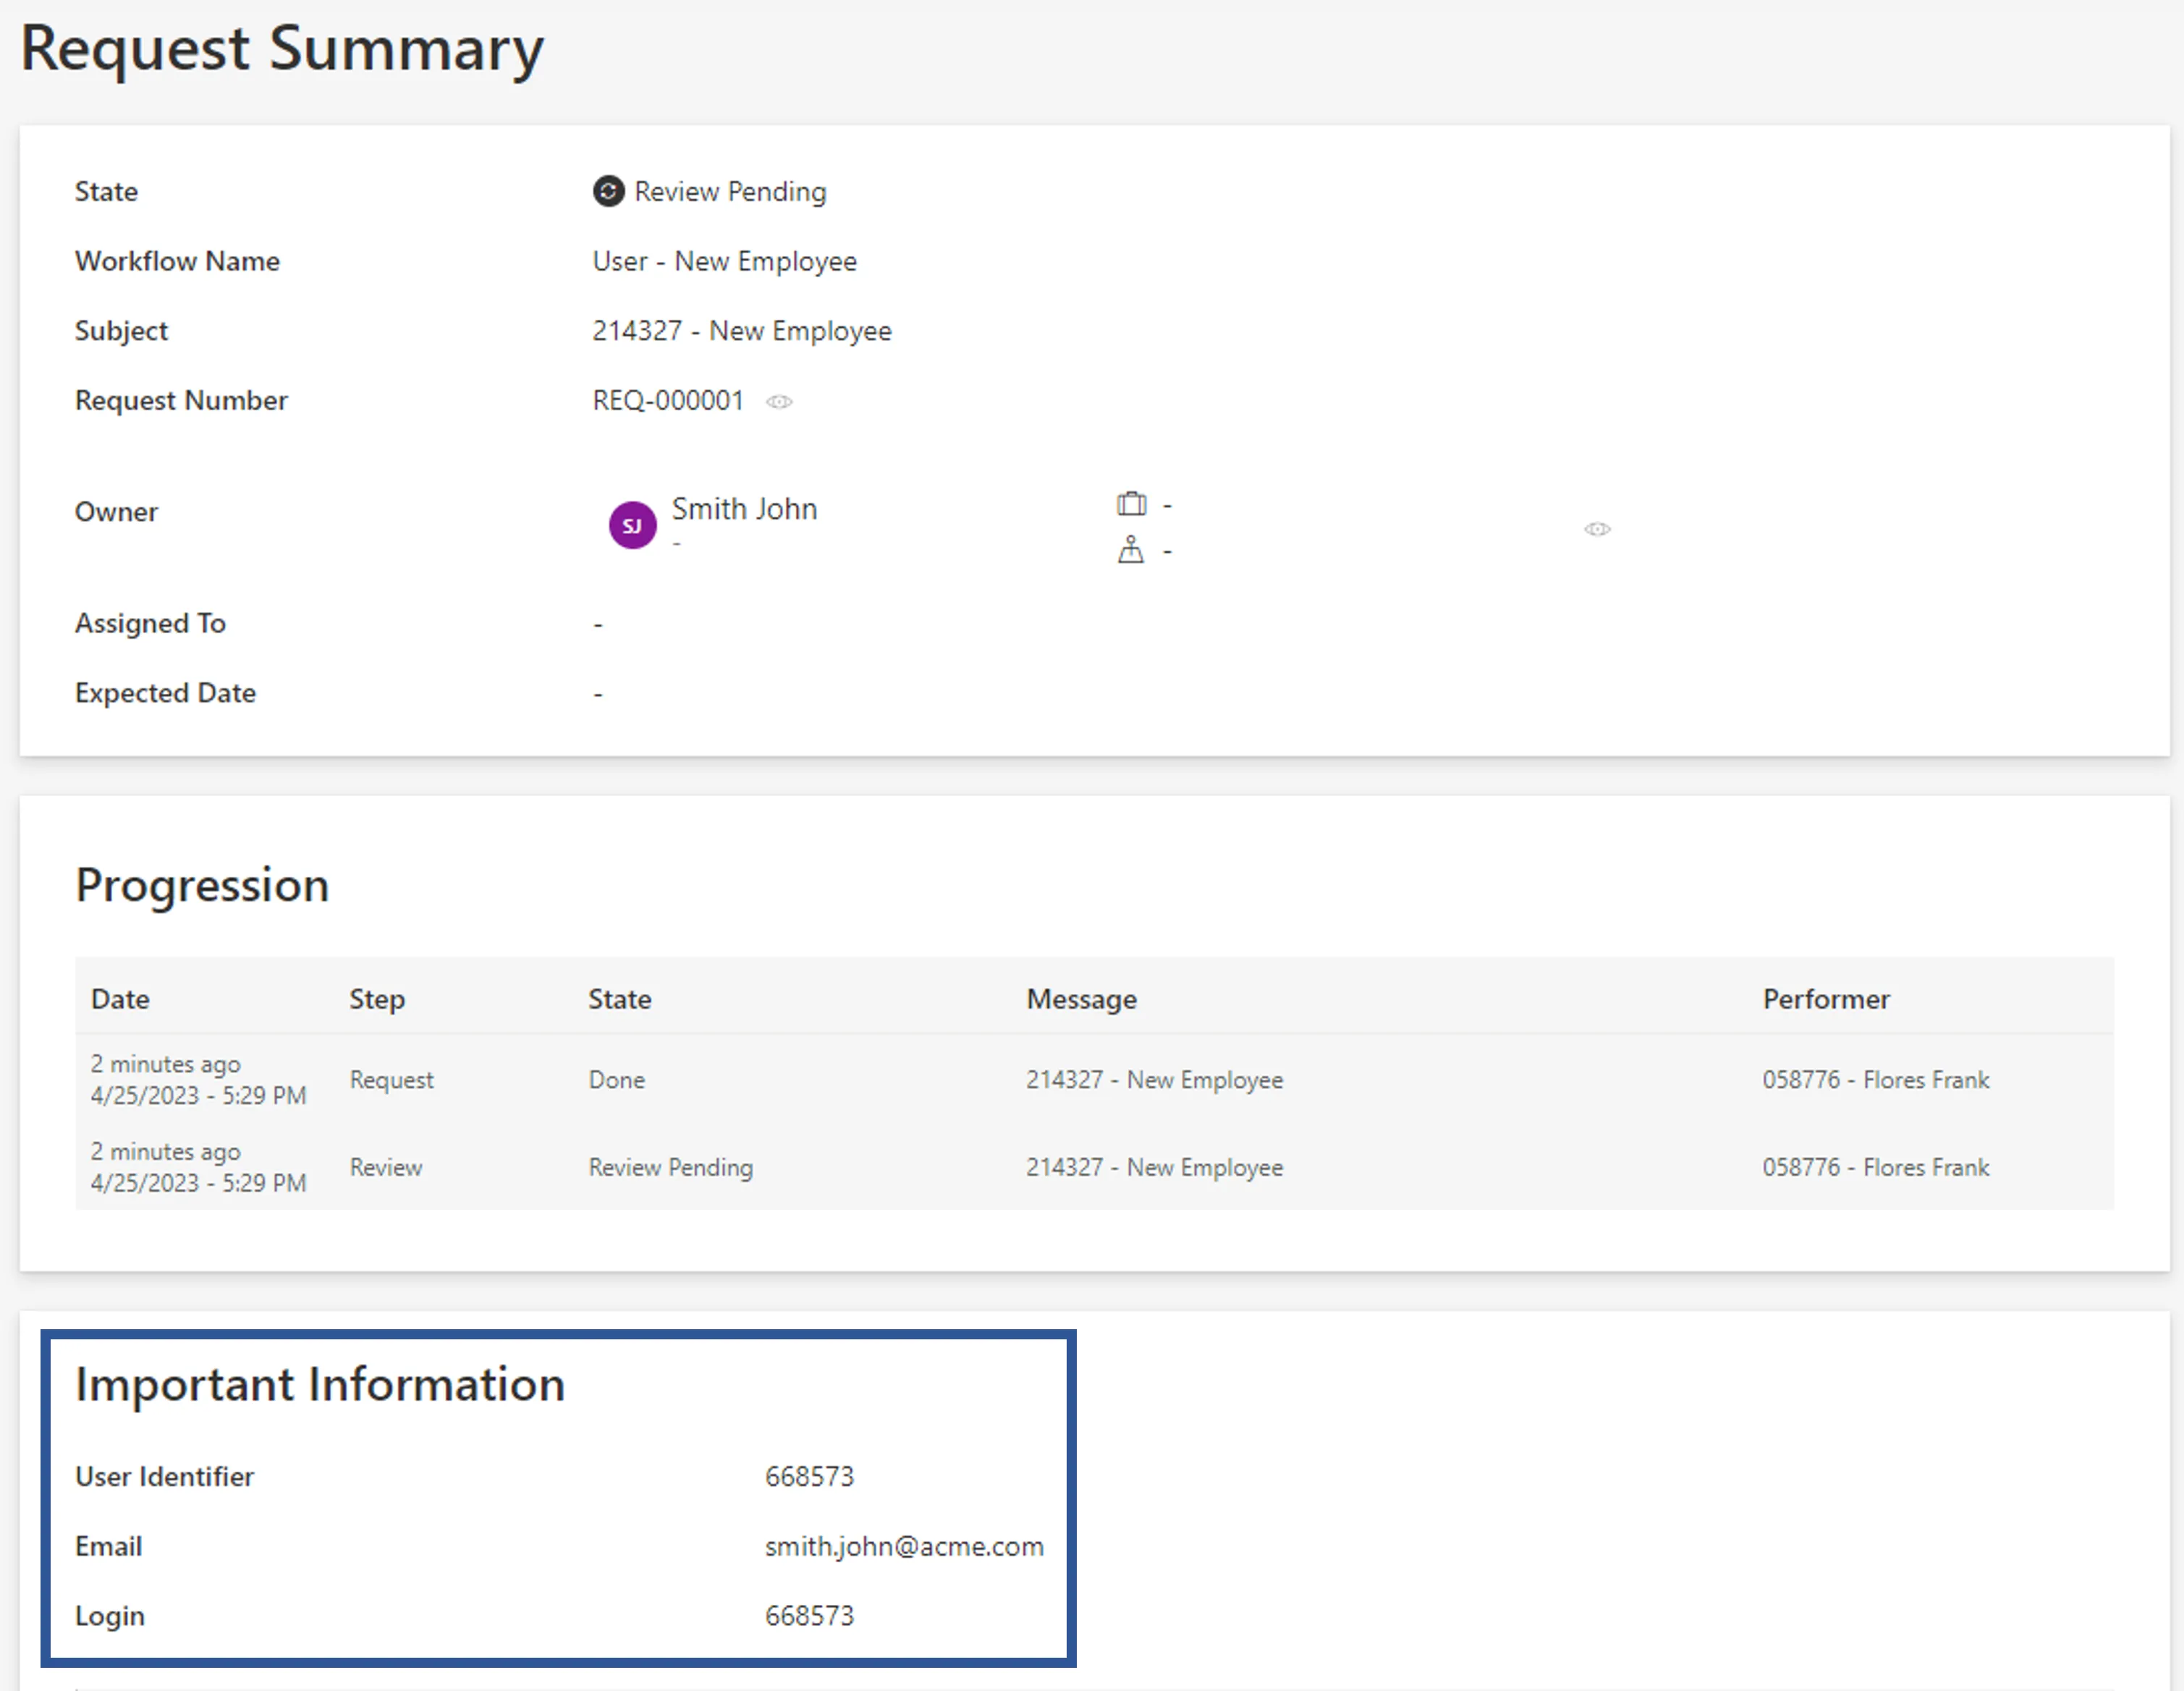
Another child element RecordSummaryControl can be added to insert a summary part, i.e. the form
used after the workflow execution to show some values, most of the time those affected by the
workflow, typically the properties editable in the workflow or generated properties. So in our
situation, it displays the EmployeeId and Mail attributes that the workflow just computed:
Summary form:
<Form Identifier="Workflow_Directory_User_New_Summary" EntityType="Directory_UserRecord"> <Control DisplayName_L1="Important Information" OutputType="LayoutFieldset"> <Control Binding="UserIdentifier" /> <Control Binding="Email" /> <Control Binding="Login" /> </Control></Form><WorkflowCreateRecordEntityForm Identifier="Workflow_Directory_User_NewInternal" EntityType="Workflow_Directory_User" MainProperty="Workflow_Directory_User:Directory_User" RecordProperty="Directory_User:Records" WorkflowRequestType="Self" Activity="Directory_User_NewInternal:Request" FormTitle_L1="New Employee"> <RecordControl OutputType="TransformImport" EmbeddedForm="Workflow_Directory_User_NewInternal_Base" />
  <RecordSummaryControl OutputType="TransformImport" EmbeddedForm="Workflow_Directory_User_New_Summary">
</WorkflowCreateRecordEntityForm>
Assign the Right Permissions
Some profiles must get specific permissions so that the workflow is visible and usable by the right users. See the Workflows topic for additional information.
Below is an example of an access control rule where the Administrator profile gets the permissions
for the whole creation request and review from the previously created workflow:
<AccessControlRule Profile="Administrator" EntityType="Workflow_Directory_User" Identifier="Administrator_Workflows_Directory_User_Internal*" DisplayName_L1="Administrator_Workflows_Directory_User_Internal*">

  Permissions for the Request activity:
  <Entry Permission="/Custom/Workflows/Directory_User_NewInternal/Request/ActionPending" CanExecute="true" /> <Entry Permission="/Custom/Workflows/Directory_User_NewInternal/Request/Aborted" CanExecute="true" /> <Entry Permission="/Custom/Workflows/Directory_User_NewInternal/Request/Purged" CanExecute="true" />

  Permissions for the Review activity:
  <Entry Permission="/Custom/Workflows/Directory_User_NewInternal/Review/ReviewPending" CanExecute="true" /> <Entry Permission="/Custom/Workflows/Directory_User_NewInternal/Review/RefinePending" CanExecute="true" /> <Entry Permission="/Custom/Workflows/Directory_User_NewInternal/Review/Aborted" CanExecute="true" /> <Entry Permission="/Custom/Workflows/Directory_User_NewInternal/Review/Purged" CanExecute="true" /></AccessControlRule>
Create Menu Items in the UI
Menu Item must be defined to make the workflow accessible in the UI.
Creating a new resource, an interesting location for this workflow could be the users list page.

To create a menu item here for the new workflow, you can add the following XML configuration to the existing menu items list:
<MenuItem Identifier="Menu_Search_Directory_User" DisplayName_L1="Menu"> ...
  <MenuItem Identifier="Menu_Search_Directory_User_NewInternal" DisplayName_L1="New Employee" IconCode="AddFriend" Workflow="Directory_User_NewInternal" /></MenuItem Identifier="Menu_Search_Directory_User" DisplayName_L1="Menu">
Add Aspects
For each workflow, it is possible to add aspects according to the workflow's purpose.
Homonym Detection (Optional)
To perform a homonymy check on a workflow and thus prevent user duplicates see the Configure a Homonym Detection topic for additional information.
When using records, the homonym detection displays the list of records and not just the list of users.
Below is an example where a homonym entity link, based on the user's name, is called in the workflow form:
Homonym detection:
<HomonymEntityLink Identifier="Homonym_Directory_UserRecord" FormEntityType="Directory_UserRecord">
  <Filter
    Property1="FirstName"
    Property2="LastName"
  /> <Filter
    Property1="FirstName" ComparisonProperty1="LastName"
    Property2="LastName" ComparisonProperty2="FirstName"
  /> <Filter
    Property1="FirstName"
    Property2="LastName" ComparisonProperty2="BirthName"
  /></HomonymEntityLink>

Partial form for user data:
...
<Control DisplayName_L1="Personal Data" DisplayName_L2="Informations personnelles" OutputType="LayoutFieldset" HomonymEntityLink="Homonym_Directory_UserRecord"> <Control DisplayName_L1="Full Name" DisplayName_L2="Nom complet" OutputType="LayoutRowset"> <Control Binding="LastName" IsRequired="true" /> <Control Binding="FirstName" IsRequired="true" /> </Control></Control>...

Customize the Display Table (Optional)
To configure a display table different from the default one provided by Identity Manager, see the Customize Display Tables topic for additional information.
For Resource Update (No Record)
This section guides you through the procedure for the creation of a workflow to update a simple resource, i.e. to update, within a given resource, properties that do not involve records.
Declare a Workflow
This Workflow is made of two activities:
Action With Refine: sends the resource's update request with a possibility of delegation.Persist: saves the collected data and triggers provisioning.
See the Activity Templates topic for additional information.
The example below creates a workflow to update only the user's IsDraft attribute.
<Workflow Identifier="Directory_User_ChangeIsDraft" DisplayName_L1="User - Update IsDraft" VariablesType="Workflow_Directory_User"> <Activity Identifier="Request" DisplayName_L1="Request" Template="ActionWithRefine" /> <Activity Identifier="Persist" DisplayName_L1="Commit" Template="Persist" /></Workflow>
Create Forms
The XML configuration below represents the creation of a Form that defines the elements to display in the workflow.
Here we just have one field called IsDraft to update the corresponding boolean attribute for a
given user:
<Form Identifier="Workflow_Directory_User_ChangeIsDraft_Base" EntityType="Workflow_Directory_User"> <Control DisplayName_L1="IsDraft" OutputType="LayoutRowset" EntityType="Directory_User"> <Control Binding="IsDraft" /> </Control></Form>
Link the Forms to the Workflow
After creating a workflow with given activities, it is necessary to create the form to be displayed
when launching the workflow. It has the type corresponding to a resource's update, i.e.
WorkflowEditEntityForm and it must specify the workflow's context (the entity type of the involved
resources, the main property, the activity when the form is called, etc):
<WorkflowEditEntityForm Identifier="Workflow_Directory_User_ChangeIsDraft" EntityType="Workflow_Directory_User" MainProperty="Workflow_Directory_User:Directory_User" WorkflowRequestType="Self" Activity="Directory_User_ChangeIsDraft:Request" HideRoles="true" FormTitle_L1="Change IsDraft"/>
A WorkflowEditEntityForm requires one child element MainControl that defines the actual content
of the workflow's form and calls the form created previously:
<WorkflowEditEntityForm Identifier="Workflow_Directory_User_ChangeIsDraft" EntityType="Workflow_Directory_User" MainProperty="Workflow_Directory_User:Directory_User" WorkflowRequestType="Self" Activity="Directory_User_ChangeIsDraft:Request" HideRoles="true" FormTitle_L1="Change IsDraft">
  <MainControl OutputType="TransformImport" EmbeddedForm="Workflow_Directory_User_ChangeIsDraft_Base" />
</WorkflowEditEntityForm>
Add a summary (Optional)
Another child element SummaryControl can be added to insert a summary part, i.e. the form used
after the workflow execution to show some values, most of the time those affected by the workflow,
typically the properties editable in the workflow or generated properties. So in our situation, it
displays the IsDraft attribute that the user just changed:
<WorkflowEditEntityForm Identifier="Workflow_Directory_User_ChangeIsDraft" EntityType="Workflow_Directory_User" MainProperty="Workflow_Directory_User:Directory_User" WorkflowRequestType="Self" Activity="Directory_User_ChangeIsDraft:Request" HideRoles="true" FormTitle_L1="Change IsDraft"> <MainControl OutputType="TransformImport" EmbeddedForm="Workflow_Directory_User_ChangeIsDraft_Base" />
  <SummaryControl OutputType="LayoutContainer" EntityType="Directory_User"> <Control Binding="IsDraft" /> </SummaryControl>
</WorkflowEditEntityForm>
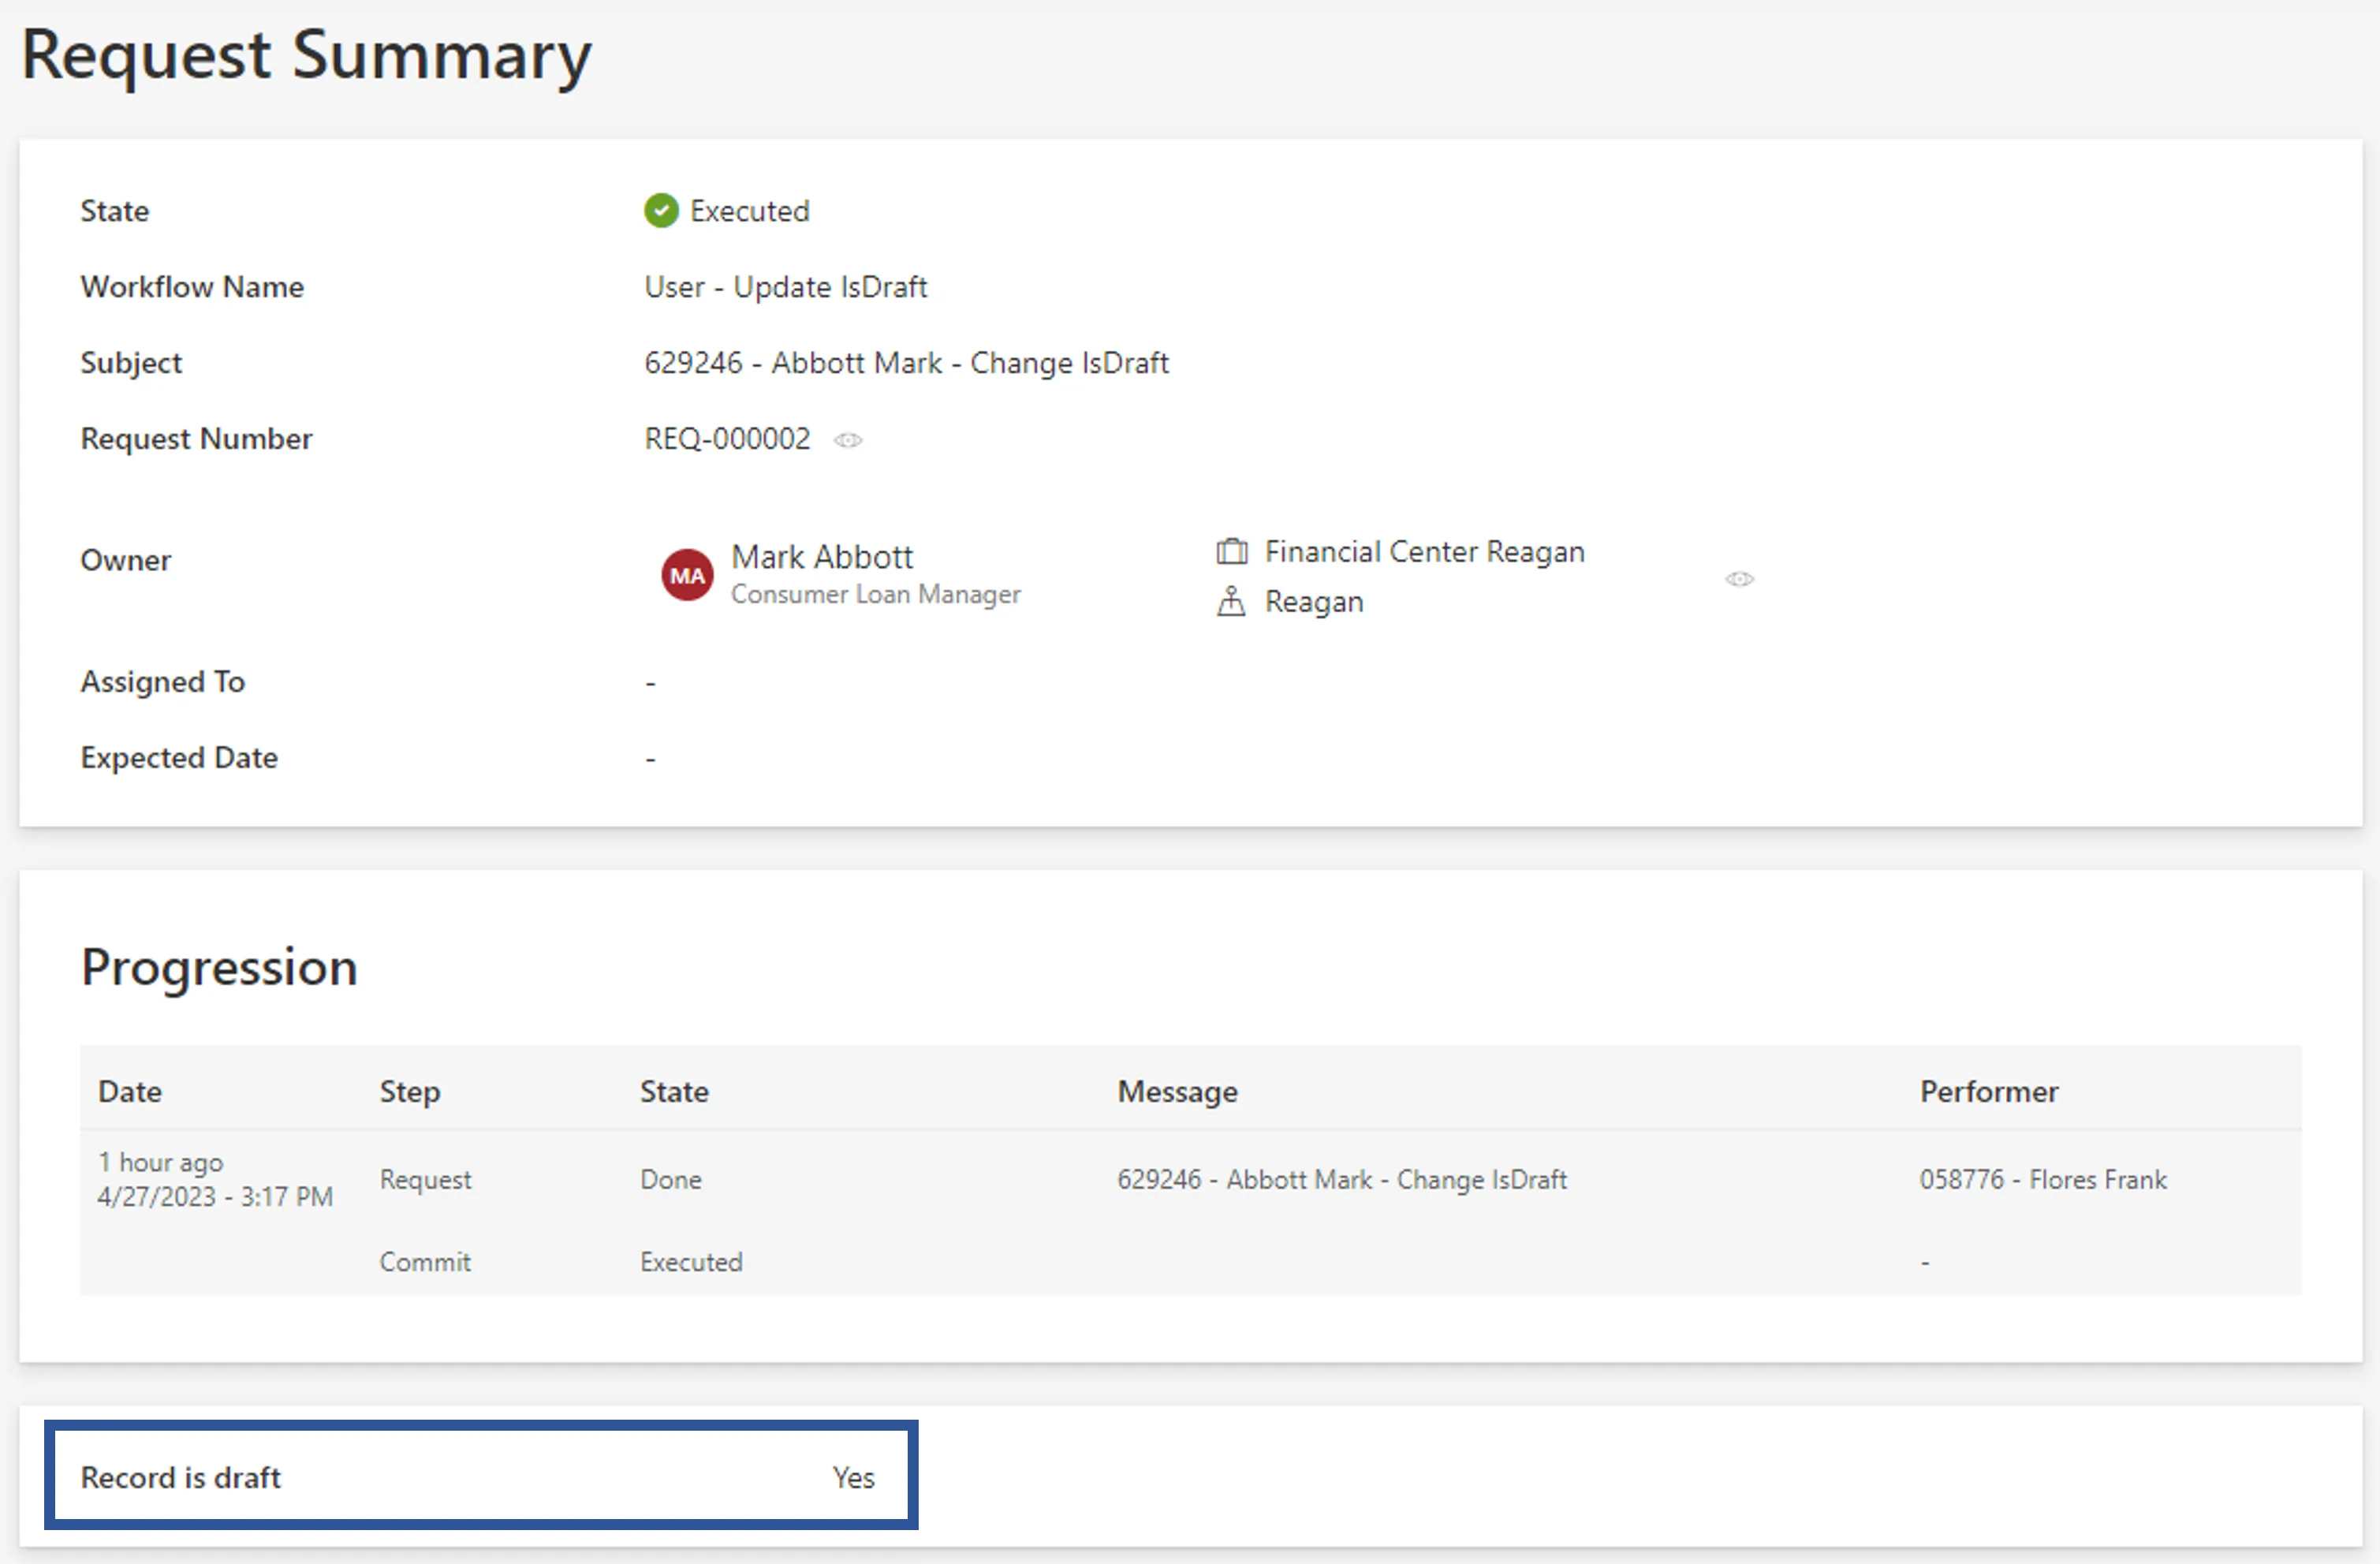
Assign the Right Permissions
Some profiles must get specific permissions so that the workflow is visible and usable by the right users. Read about the Workflow permissions.
Below is an example of an access control rule where the Administrator profile gets the permissions
for the whole update request from the previously created workflow:
<AccessControlRule Profile="Administrator" EntityType="Workflow_Directory_User" Identifier="Administrator_Workflows_Directory_User_Internal*" DisplayName_L1="Administrator_Workflows_Directory_User_Internal*"> <Entry Permission="/Custom/Workflows/Directory_User_ChangeIsDraft/Request/ActionPending" CanExecute="true" /> <Entry Permission="/Custom/Workflows/Directory_User_ChangeIsDraft/Request/RefinePending" CanExecute="true" /> <Entry Permission="/Custom/Workflows/Directory_User_ChangeIsDraft/Request/Aborted" CanExecute="true" /> <Entry Permission="/Custom/Workflows/Directory_User_ChangeIsDraft/Request/Purged" CanExecute="true" /></AccessControlRule>
Create Menu Items in the UI
Menu Item must be defined to make the workflow accessible in the UI.
Updating an existing resource, this workflow manages one given resource at a time. Hence an interesting location for this workflow could be the individual view page of users.

To create a menu item here for the new workflow, you can add the following XML configuration to the existing menu items list:
<MenuItem Identifier="Menu_Directory_User" DisplayName_L1="Menu"> <MenuItem Identifier="Menu_Directory_User_Changes" DisplayName_L1="Actions"> <MenuItem Identifier="Menu_Directory_User_Changes_Update" DisplayName_L1="Section"> ...
      <MenuItem Identifier="Menu_Directory_User_Changes_ChangeIsDraft" DisplayName_L1="Change IsDraft" IconCode="Edit" Workflow="Directory_User_ChangeIsDraft" />
    </MenuItem> </MenuItem></MenuItem>
Add Aspects
For each workflow, it is possible to add aspects according to the workflow's purpose.
Customize the Display Table (Optional)
To configure a display table different from the default one provided by Identity Manager, see the Customize Display Tables topic for additional information.
Configure a Homonym Detection
In this section we configure the homonym search that checks if a resource already exists in the system, preventing duplicates.
Process
- Create a homonym entity link, either with a default filter or customized filters
- Create a display table to display the homonym result (optional)
- Define the part of the workflow form where homonyms must be checked
Create a Homonym Entity Link
A Homonym Entity Link defines a new homonym search to be performed in a workflow form. It can be defined in different ways.
With a default filter
<HomonymEntityLink FormEntityType="Directory_UserRecord" Identifier="Directory_UserRecord_Homonym" />
When no filter is defined for the homonym entity link, the search for homonyms is performed according to the homonym control form. See the Configure a Homonym Detection topic for additional information.
With customized filters
Homonym Entity Link filters allow to define customized filters for a homonym search.
Simple filter
<HomonymEntityLink FormEntityType="Directory_UserRecord" Identifier="Directory_UserRecord_Homonym"> <Filter
        Property1="LastName"
        Property2="FirstName"
    /></HomonymEntityLink>
Here, since the default operator is Equal, the search for homonyms is performed by comparing the
values of the LastName and FirstName properties with an exact spelling.
NB: This example matches the default filter that would be computed based on the homonym control example in the section below.
Flexible filter
A filter can be defined to compare the values in an approximate way.
- A flexible operator must be used, such as
FlexibleEqual,FlexibleStartWith, etc. - A flexible expression must be defined on the comparison property.
-
When the input search value is retrieved directly from the property value
<HomonymEntityLink FormEntityType="Directory_UserRecord" Identifier="Directory_UserRecord_Homonym"> <Filter
        Property1="LastName" ComparisonProperty1="PhoneticLastName" Operator1="FlexibleEqual"
        Property2="FirstName" ComparisonProperty2="PhoneticFirstName" Operator2="FlexibleEqual"
    /></HomonymEntityLink>
Here, Property1 is set, so the search for homonyms is performed by comparing the LastName value,
entered by the user in the workflow form, with the phonetic value of existing resources stored as
the PhoneticLastName property in the database.
Before performing the comparison, the flexible expression of the comparison property is applied to the input value.
-
When the input search value is deducted
<HomonymEntityLink FormEntityType="Directory_UserRecord" Identifier="Directory_UserRecord_Homonym"> <Filter
        ComparisonProperty1="PhoneticFirstLastName" Operator1="FlexibleEqual"
    /> <Filter
        ComparisonProperty1="PhoneticFirstLastName" Operator1="FlexibleEqual" Expression1="C#:record:(record.LastName + ' ' + record.FirstName).Appproximate()"
    /></HomonymEntityLink>
Here:
- In the first filter,
Property1andExpression1are not set, so the search value is computed by applying the expression defined forComparisonProperty1from the input values, eg.(record.FirstName + ' ' + record.LastName).Appproximate(). - In the second filter,
Expression1is set, so the search value is computed by applying theExpression1from the input values. This filter allows checking the homonyms on the reversed full name (to manage the case where the user reverses the first and last name for example).
The search for homonyms is performed by comparing the search values computed based on each filter with the values stored in the database and retrieves all resources that match any of the filters.
Filter on a language property
If a filter is set on a language property, the search for homonyms is performed on the property associated to the main language.
<HomonymEntityLink FormEntityType="Directory_Organization" Identifier="Directory_Organization_Homonym"> <Filter Property1="Name" /></HomonymEntityLink>
Here, the Name property is a neutral property associated with two localized properties Name_en
and Name_fr.
If English is the main language, the search for homonyms is performed on the Name_en value.
Create a Display Table (optional)
A Display Table is used to define how a list of the same entity type should be displayed.
By default, the homonyms are displayed using the default display table of the related entity type.
To display homonyms in a different way than the default, a specific display table must be created
where the HomonymEntityLink attribute is the identifier of the homonym entity link created above.
<DisplayTable Identifier="Directory_UserRecord_Homonym" EntityType="Directory_UserRecord" DisplayTableDesignElement="table" HomonymEntityLink="Directory_UserRecord">
    <Column DefaultSortPriority="1" DisplayBinding="LastName" IsDisplayInSummaryView="true" IsResizable="true" ColumnSize="1" /> <Column DisplayBinding="FirstName" IsDisplayInSummaryView="true" IsResizable="true" ColumnSize="1" /> <Column DisplayBinding="Login" IsDisplayInSummaryView="true" IsResizable="true" IsSortable="true" CanBeFiltered="true" ColumnSize="2" /> <Column DisplayBinding="Mail" IsDisplayInSummaryView="true" IsResizable="true" IsSortable="true" CanBeFiltered="true" ColumnSize="2" /> <Column DisplayBinding="BirthDate" IsDisplayInSummaryView="true" IsResizable="true" IsSortable="true" CanBeFiltered="true" ColumnSize="4" /></DisplayTable>
See the Customize Display Tables for additional information.
Define the Homonym Control in the Workflow Form
The Form where the homonyms are to be checked must contain a layout fieldset control where:
- the properties to check are represented;
- the
HomonymEntityLinkattribute is the identifier of the homonym entity link created above.
When the homonym entity link has no filter set and therefore the filter is calculated automatically,
the homonym control form must only contain up to 5 controls where Binding attribute is defined.
Indeed, a filter can only be defined on up to 5 properties.
<Form Identifier="Workflow_Directory_User_AdvancedStartInternal_Base" EntityType="Directory_UserRecord"> <Control DisplayName_L1="Personal Data" DisplayName_L2="Informations personnelles" OutputType="LayoutFieldset" HomonymEntityLink="Directory_UserRecord">
        <Control DisplayName_L1="Full Name" DisplayName_L2="Nom complet" OutputType="LayoutRowset"> <Control Binding="LastName" IsRequired="true" /> <Control Binding="FirstName" IsRequired="true" /> </Control> </Control></Form>
For Resource Update (Multi Records)
This section guides you through the procedure for the creation of a workflow to update an existing resource through its several records.
Declare a Workflow
This Workflow is made of three activities:
Action With Refine: sends the resource's records update request with a possibility of delegation.Review With Feedback: reviews the update request with the possibility of getting feedback from another user.Persist: saves the collected data and triggers provisioning.
See the Activity Templates topic for additional information.
The example below creates a workflow to update the records of an existing user:
<Workflow Identifier="Directory_User_UpdateSeveralRecords" DisplayName_L1="User - Manage positions" VariablesType="Workflow_Directory_User"> <Activity Identifier="Request" DisplayName_L1="Request" Template="ActionWithRefine" /> <Activity Identifier="Review" DisplayName_L1="Review" Template="ReviewWithFeedback" /> <Activity Identifier="Persist" DisplayName_L1="Commit" Template="Persist" /></Workflow>
Create Forms
The XML configuration below represents the creation of a Form that defines the elements to display in the workflow.
Here we create three structured forms, all to be called in our final workflow form:
First form for the user's record data, shared with all records:
<Form Identifier="Directory_User_UpdateSeveralRecords_Shared" EntityType="Directory_UserRecord"> <Control DisplayName_L1="Contract" OutputType="LayoutFieldset"> <Control Binding="ContractStartDate" /> <Control Binding="ContractEndDate" AddedMinutes="1440" /> </Control></Form>

Second form for the user's record data, specific to each record individually:
<Form Identifier="Directory_User_UpdateSeveralRecords_Base" EntityType="Workflow_Directory_User"> <Control OutputType="LayoutContainer" EntityType="Directory_UserRecord"> <Control DisplayName_L1="Position" OutputType="LayoutFieldset"> <Control Binding="Title" IsRequired="true" /> <Control Binding="Department" /> <Control Binding="Site" DefaultValueBinding="Department.Manager.MainRecord.Site" /> <Control Binding="StartDate" /> <Control Binding="EndDate" /> </Control> </Control></Form>
Link the Forms to the Workflow
After creating a workflow with given activities, it is necessary to create the form to be displayed
when launching the workflow. It has the type corresponding to a resource's update with several
records, i.e. WorkflowUpdateSeveralRecordEntityForm and it must specify the workflow's context
(the entity type of the involved resources, the main property, the activity when the form is called,
etc):
<WorkflowUpdateSeveralRecordsEntityForm RecordFilter="CurrentAndFuture" Identifier="Directory_User_UpdateSeveralRecords" EntityType="Workflow_Directory_User" MainProperty="Workflow_Directory_User:Directory_User" RecordProperty="Directory_User:Records" WorkflowRequestType="Self" Activity="Directory_User_UpdateSeveralRecords:Request" FormTitle_L1="Manage positions" RecordTable="Directory_User_UpdateSeveralRecords"></WorkflowUpdateSeveralRecordsEntityForm>
WorkflowUpdateSeveralRecordEntityForm displays a date picker for the end of transition, to
schedule the record replacement.
A WorkflowUpdateSeveralRecordEntityForm requires the following child elements:
MainControlthat defines user's data;
<WorkflowUpdateSeveralRecordsEntityForm RecordFilter="CurrentAndFuture" Identifier="Directory_User_UpdateSeveralRecords" EntityType="Workflow_Directory_User" MainProperty="Workflow_Directory_User:Directory_User" RecordProperty="Directory_User:Records" WorkflowRequestType="Self" Activity="Directory_User_UpdateSeveralRecords:Request" FormTitle_L1="Manage positions" RecordTable="Directory_User_UpdateSeveralRecords">
  <MainControl OutputType="LayoutContainer" />
</WorkflowUpdateSeveralRecordsEntityForm>
The MainControl attribute is here an empty container, because it is a mandatory attribute that is
not involved in the changes of this workflow.
RecordControlthat defines the record data shared with all records and calls the firstform created previously;
<WorkflowUpdateSeveralRecordsEntityForm RecordFilter="CurrentAndFuture" Identifier="Directory_User_UpdateSeveralRecords" EntityType="Workflow_Directory_User" MainProperty="Workflow_Directory_User:Directory_User" RecordProperty="Directory_User:Records" WorkflowRequestType="Self" Activity="Directory_User_UpdateSeveralRecords:Request" FormTitle_L1="Manage positions" RecordTable="Directory_User_UpdateSeveralRecords"> <MainControl OutputType="LayoutContainer"/>
  <RecordControl OutputType="TransformImport" EmbeddedForm="Directory_User_UpdateSeveralRecords_Shared" />
</WorkflowUpdateSeveralRecordsEntityForm>
RecordUniqueItemControlthat defines the record data specific to each record individually, and calls the secondform created previously;
<WorkflowUpdateSeveralRecordsEntityForm RecordFilter="CurrentAndFuture" Identifier="Directory_User_UpdateSeveralRecords" EntityType="Workflow_Directory_User" MainProperty="Workflow_Directory_User:Directory_User" RecordProperty="Directory_User:Records" WorkflowRequestType="Self" Activity="Directory_User_UpdateSeveralRecords:Request" FormTitle_L1="Manage positions" RecordTable="Directory_User_UpdateSeveralRecords"> <MainControl OutputType="LayoutContainer"/> <RecordControl OutputType="TransformImport" EmbeddedForm="Directory_User_UpdateSeveralRecords_Shared"/>
  <RecordUniqueItemControl OutputType="TransformImport" EmbeddedForm="Directory_User_UpdateSeveralRecords_Base" />
</WorkflowUpdateSeveralRecordsEntityForm>
RecordSlaveControlthat copies an existing record to be the base, i.e. pre-fill the fields, for the update of record data specific to each record individually. Thus it calls the same form asRecordUniqueItemControl.
<WorkflowUpdateSeveralRecordsEntityForm RecordFilter="CurrentAndFuture" Identifier="Directory_User_UpdateSeveralRecords" EntityType="Workflow_Directory_User" MainProperty="Workflow_Directory_User:Directory_User" RecordProperty="Directory_User:Records" WorkflowRequestType="Self" Activity="Directory_User_UpdateSeveralRecords:Request" FormTitle_L1="Manage positions" RecordTable="Directory_User_UpdateSeveralRecords"> <MainControl OutputType="LayoutContainer"/> <RecordControl OutputType="TransformImport" EmbeddedForm="Directory_User_UpdateSeveralRecords_Shared"/> <RecordUniqueItemControl OutputType="TransformImport" EmbeddedForm="Directory_User_UpdateSeveralRecords_Base" />
  <RecordSlaveControl OutputType="TransformImport" EmbeddedForm="Directory_User_UpdateSeveralRecords_Base" />
</WorkflowUpdateSeveralRecordsEntityForm>
RecordSlaveUniqueItemControlthat copies an existing record to be the base, i.e. pre-fill the fields, for the update of record data shared with all records. Thus it calls the same form asRecordControl.
<WorkflowUpdateSeveralRecordsEntityForm RecordFilter="CurrentAndFuture" Identifier="Directory_User_UpdateSeveralRecords" EntityType="Workflow_Directory_User" MainProperty="Workflow_Directory_User:Directory_User" RecordProperty="Directory_User:Records" WorkflowRequestType="Self" Activity="Directory_User_UpdateSeveralRecords:Request" FormTitle_L1="Manage positions" RecordTable="Directory_User_UpdateSeveralRecords"> <MainControl OutputType="LayoutContainer"/> <RecordControl OutputType="TransformImport" EmbeddedForm="Directory_User_UpdateSeveralRecords_Shared"/> <RecordUniqueItemControl OutputType="TransformImport" EmbeddedForm="Directory_User_UpdateSeveralRecords_Base" /> <RecordSlaveControl OutputType="TransformImport" EmbeddedForm="Directory_User_UpdateSeveralRecords_Base" />
  <RecordSlaveUniqueItemControl OutputType="TransformImport" EmbeddedForm="Directory_User_UpdateSeveralRecords_Shared" />
</WorkflowUpdateSeveralRecordsEntityForm>
The RecordSlaveControl attribute calls here the same form as RecordUniqueControl, because it
copies part of the main record to pre-fill the fields of RecordUniqueControl.
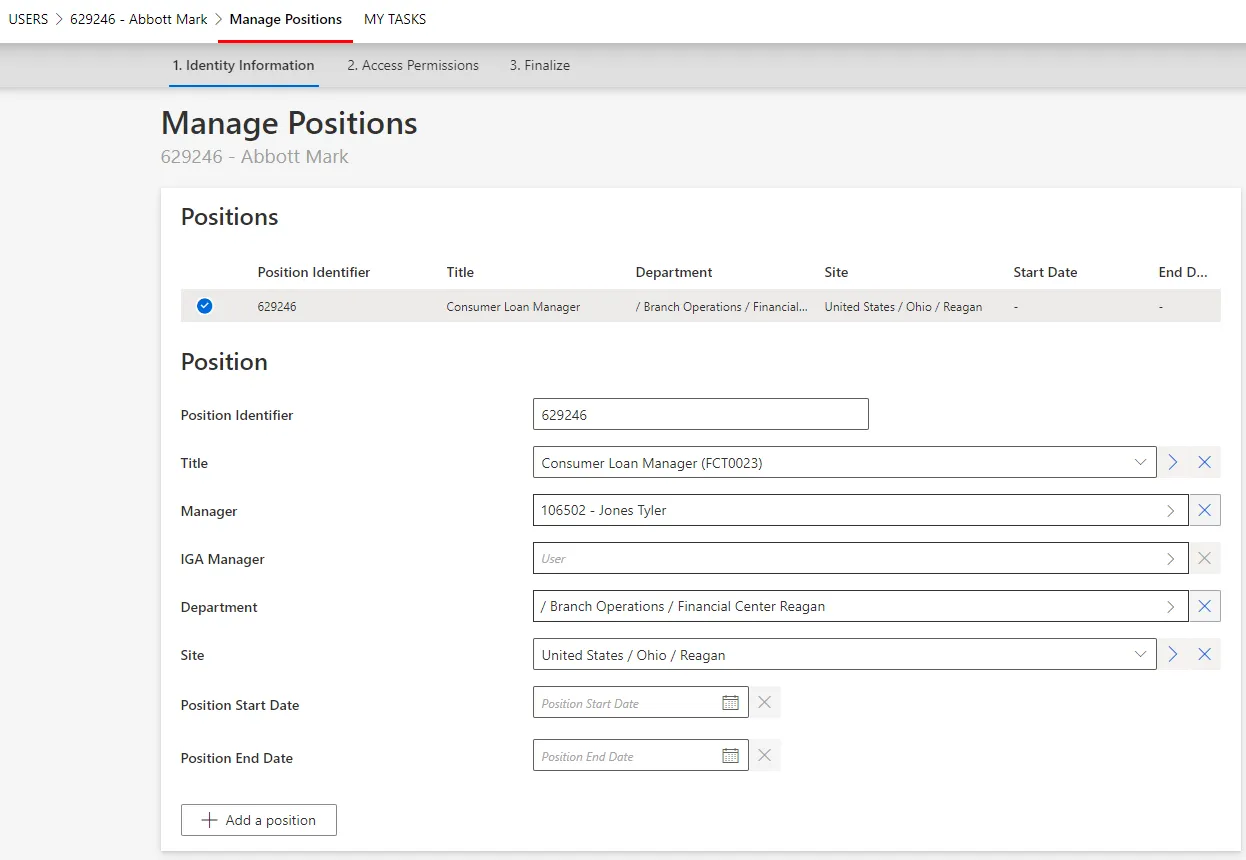
Assign the Right Permissions
Some profiles must get specific permissions so that the workflow is visible and usable by the right users. Read about Workflow s permissions.
Below is an example of an access control rule where the Administrator profile gets the permissions
for the whole update request from the previously created workflow:
<AccessControlRule Profile="Administrator" EntityType="Workflow_Directory_User" Identifier="Administrator_Workflows_Directory_User_*" DisplayName_L1="Administrator_Workflows_Directory_User_*"> <Entry Permission="/Custom/Workflows/Directory_User_UpdateSeveralRecords/Request/ActionPending" CanExecute="true" /> <Entry Permission="/Custom/Workflows/Directory_User_UpdateSeveralRecords/Request/RefinePending" CanExecute="true" /> <Entry Permission="/Custom/Workflows/Directory_User_UpdateSeveralRecords/Request/Aborted" CanExecute="true" /> <Entry Permission="/Custom/Workflows/Directory_User_UpdateSeveralRecords/Request/Purged" CanExecute="true" /> <Entry Permission="/Custom/Workflows/Directory_User_UpdateSeveralRecords/Review/ReviewPending" CanExecute="true" /> <Entry Permission="/Custom/Workflows/Directory_User_UpdateSeveralRecords/Review/RefinePending" CanExecute="true" /> <Entry Permission="/Custom/Workflows/Directory_User_UpdateSeveralRecords/Review/Aborted" CanExecute="true" /> <Entry Permission="/Custom/Workflows/Directory_User_UpdateSeveralRecords/Review/Purged" CanExecute="true" /></AccessControlRule>
Create Menu Items in the UI
Menu Item must be defined to make the workflow accessible in the UI.
Updating an existing resource, this workflow manages one given resource at a time. Hence an interesting location for this workflow could be the individual view page of users.

To create a menu item here for the new workflow, you can add the following XML configuration to the existing menu items list:
<MenuItem Identifier="Menu_Directory_User" DisplayName_L1="Menu"> <MenuItem Identifier="Menu_Directory_User_Changes" DisplayName_L1="Actions"> <MenuItem Identifier="Menu_Directory_User_Changes_Update" DisplayName_L1="Section"> ...
      <MenuItem Identifier="Menu_Directory_User_Changes_ManagePositions" DisplayName_L1="Manage Positions" IconCode="Edit" Workflow="Directory_User_UpdateSeveralRecords" />
    </MenuItem> </MenuItem></MenuItem>
Add Aspects
For each workflow, it is possible to add aspects according to the workflow's purpose.
Homonym Detection (Optional)
To perform a homonymy check on a workflow and thus prevent user duplicates,see the Configure a Homonym Detection topic for additional information.
When using records, the homonym detection displays the list of records and not just the list of users.
Customize the Display Table (Optional)
To configure a display table different from the default one provided by Identity Manager, see the Customize Display Tables topic for additional information.
Activity Templates
This section describes the activities that constitute and model a Workflow . Each activity is assigned a template, made of states and transitions.
Overview
Going through an activity means going through states and transitions.

By default, Identity Manager's workflow engine implements the following activity templates:
ActionAction With RefineReviewReview With FeedbackContinue WithPersistPersist OnlyResources
Activity Templates
Action
Awaits user modifications without another user's intervention.

ActionWithRefine
Awaits user modifications with the possibility to delegate the action to another user.
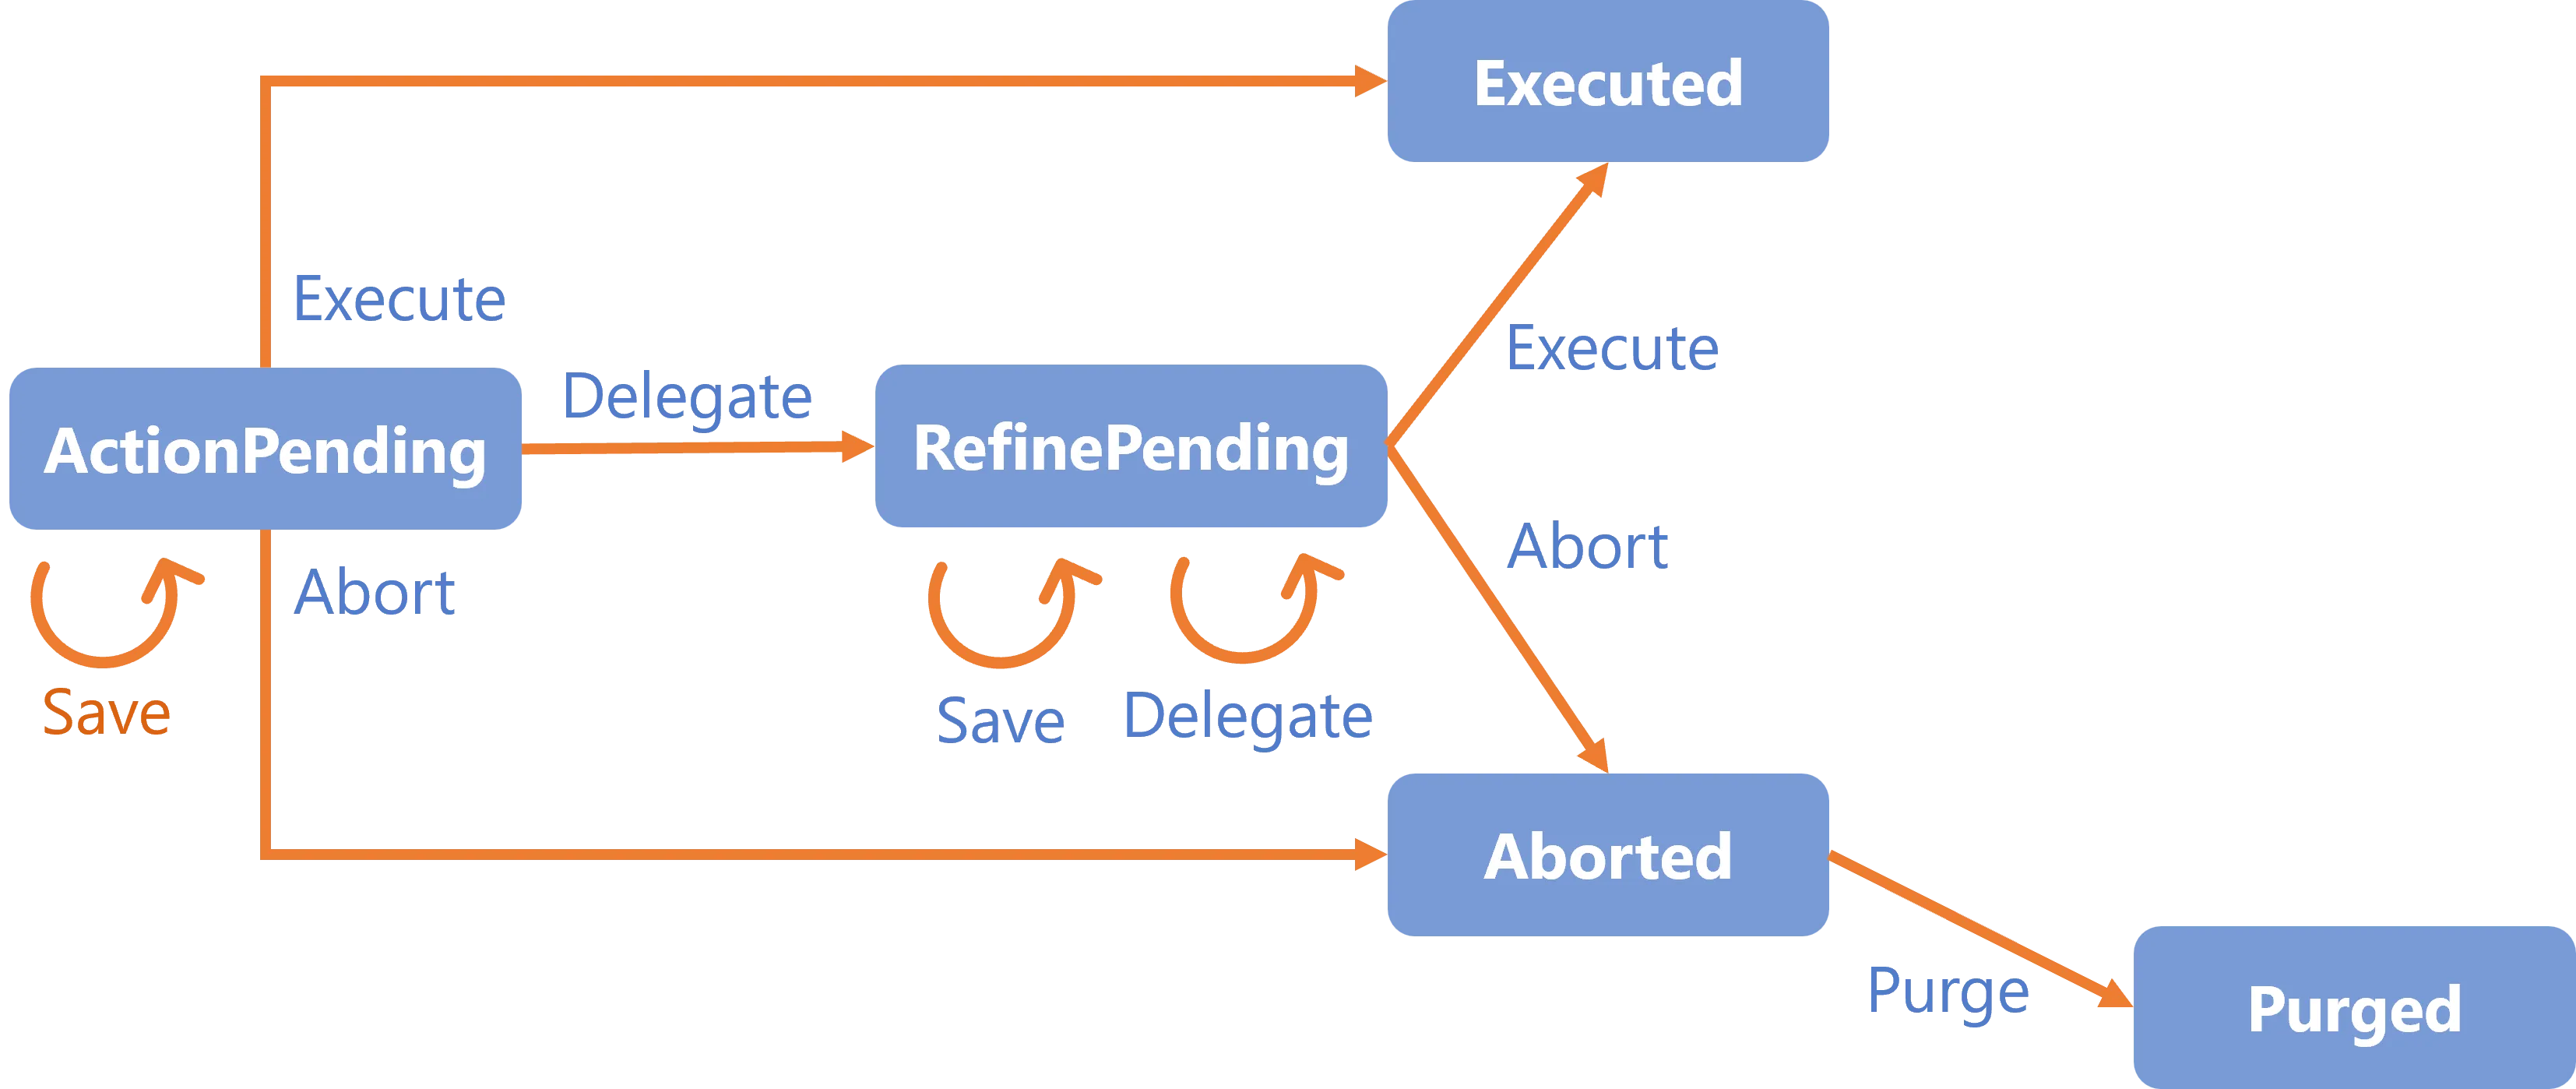
The ActionWithRefine activity can be translated into the following form:
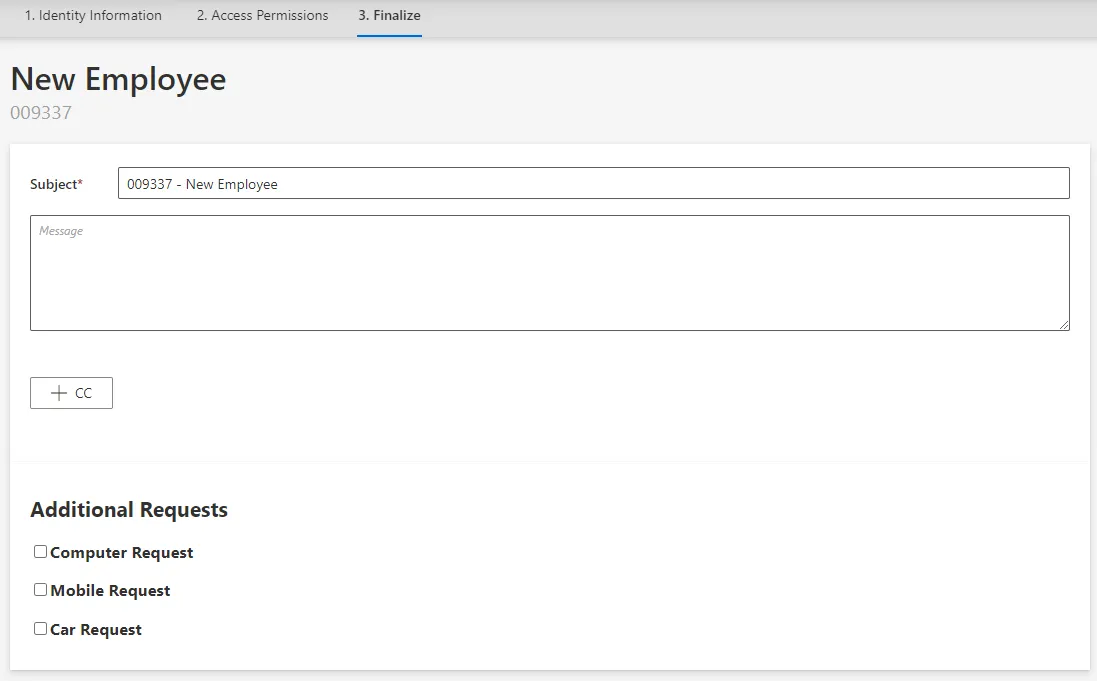
Review
Awaits user approval without another user's intervention.
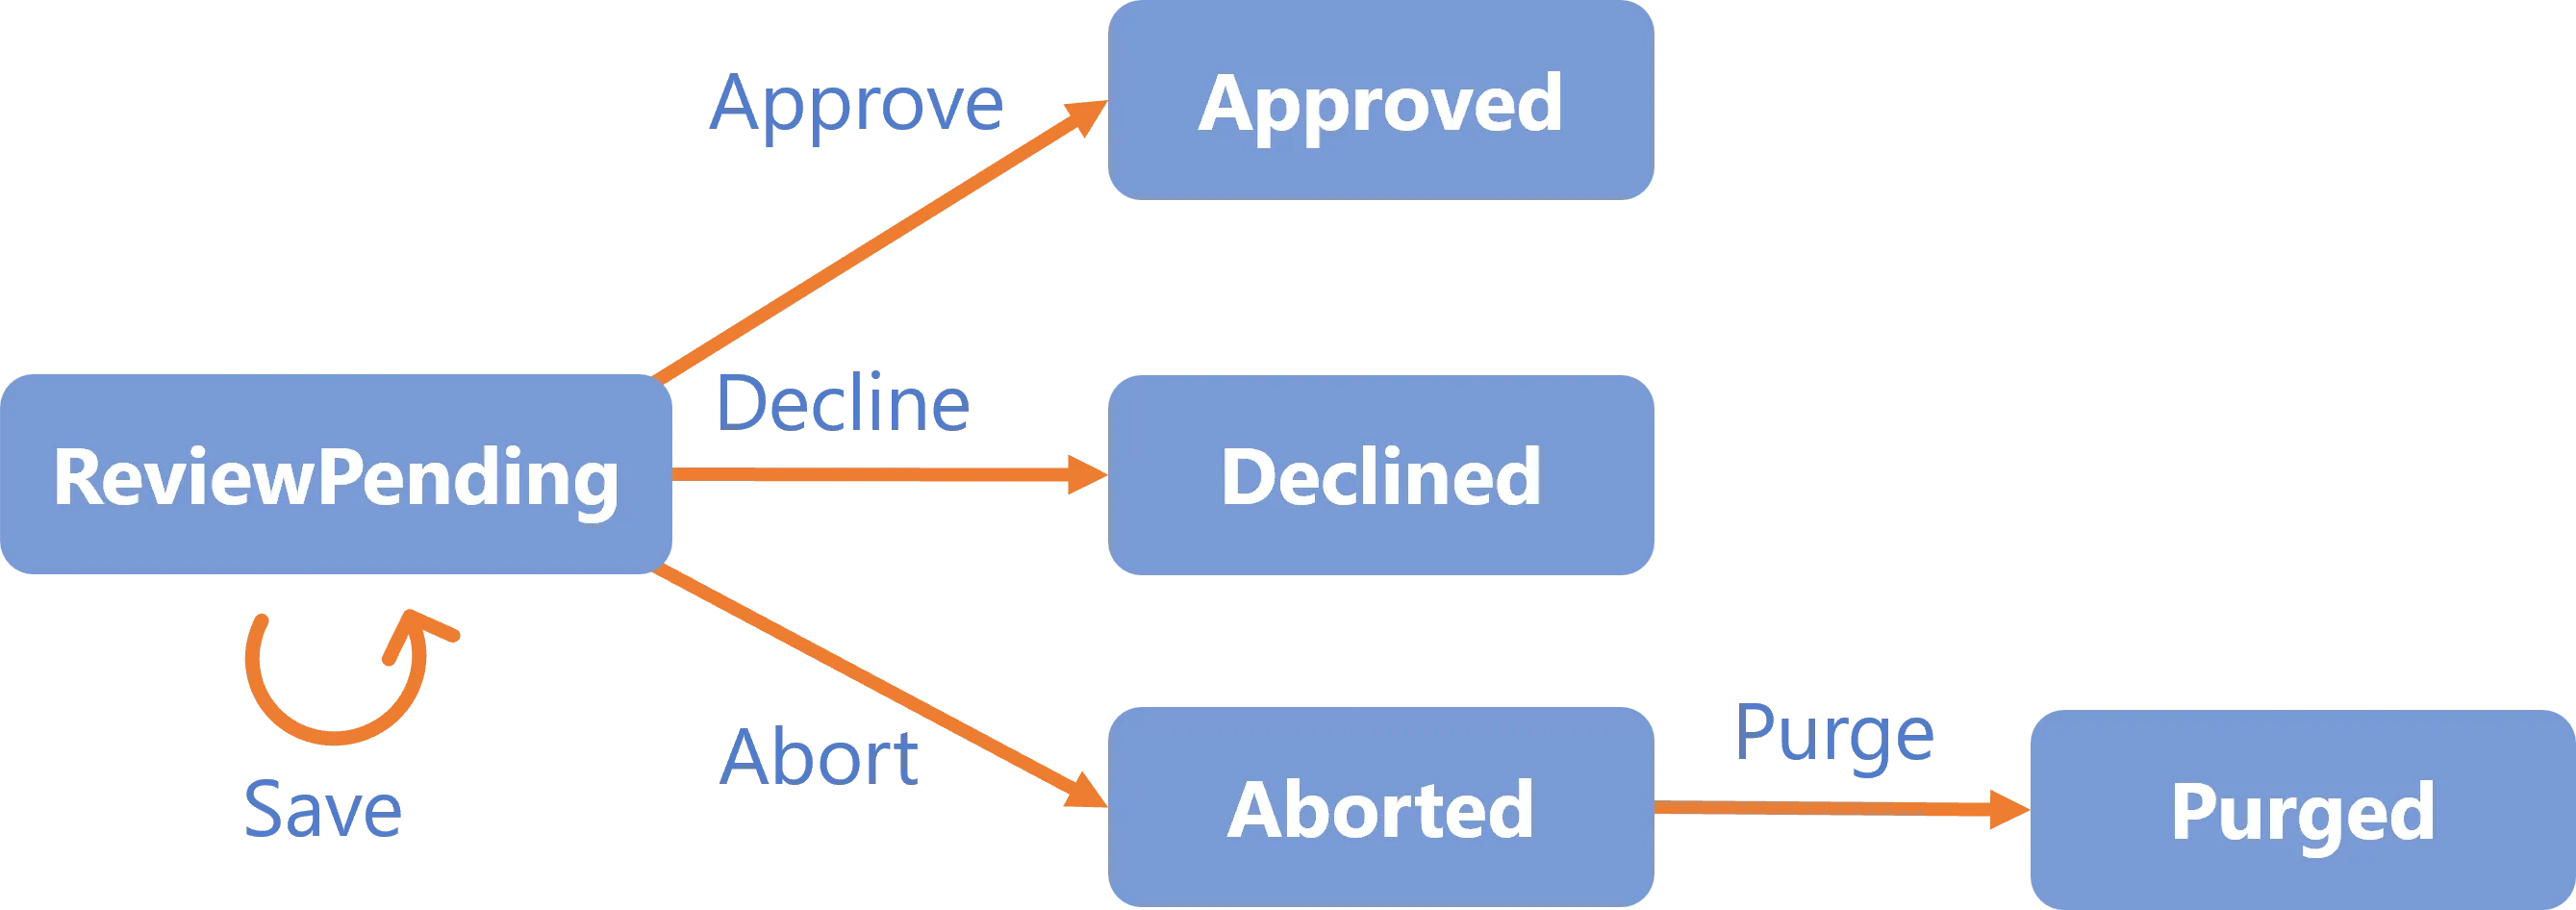
ReviewWithFeedback
Awaits user approval with the possiblity of getting feedback from another user before taking the action.
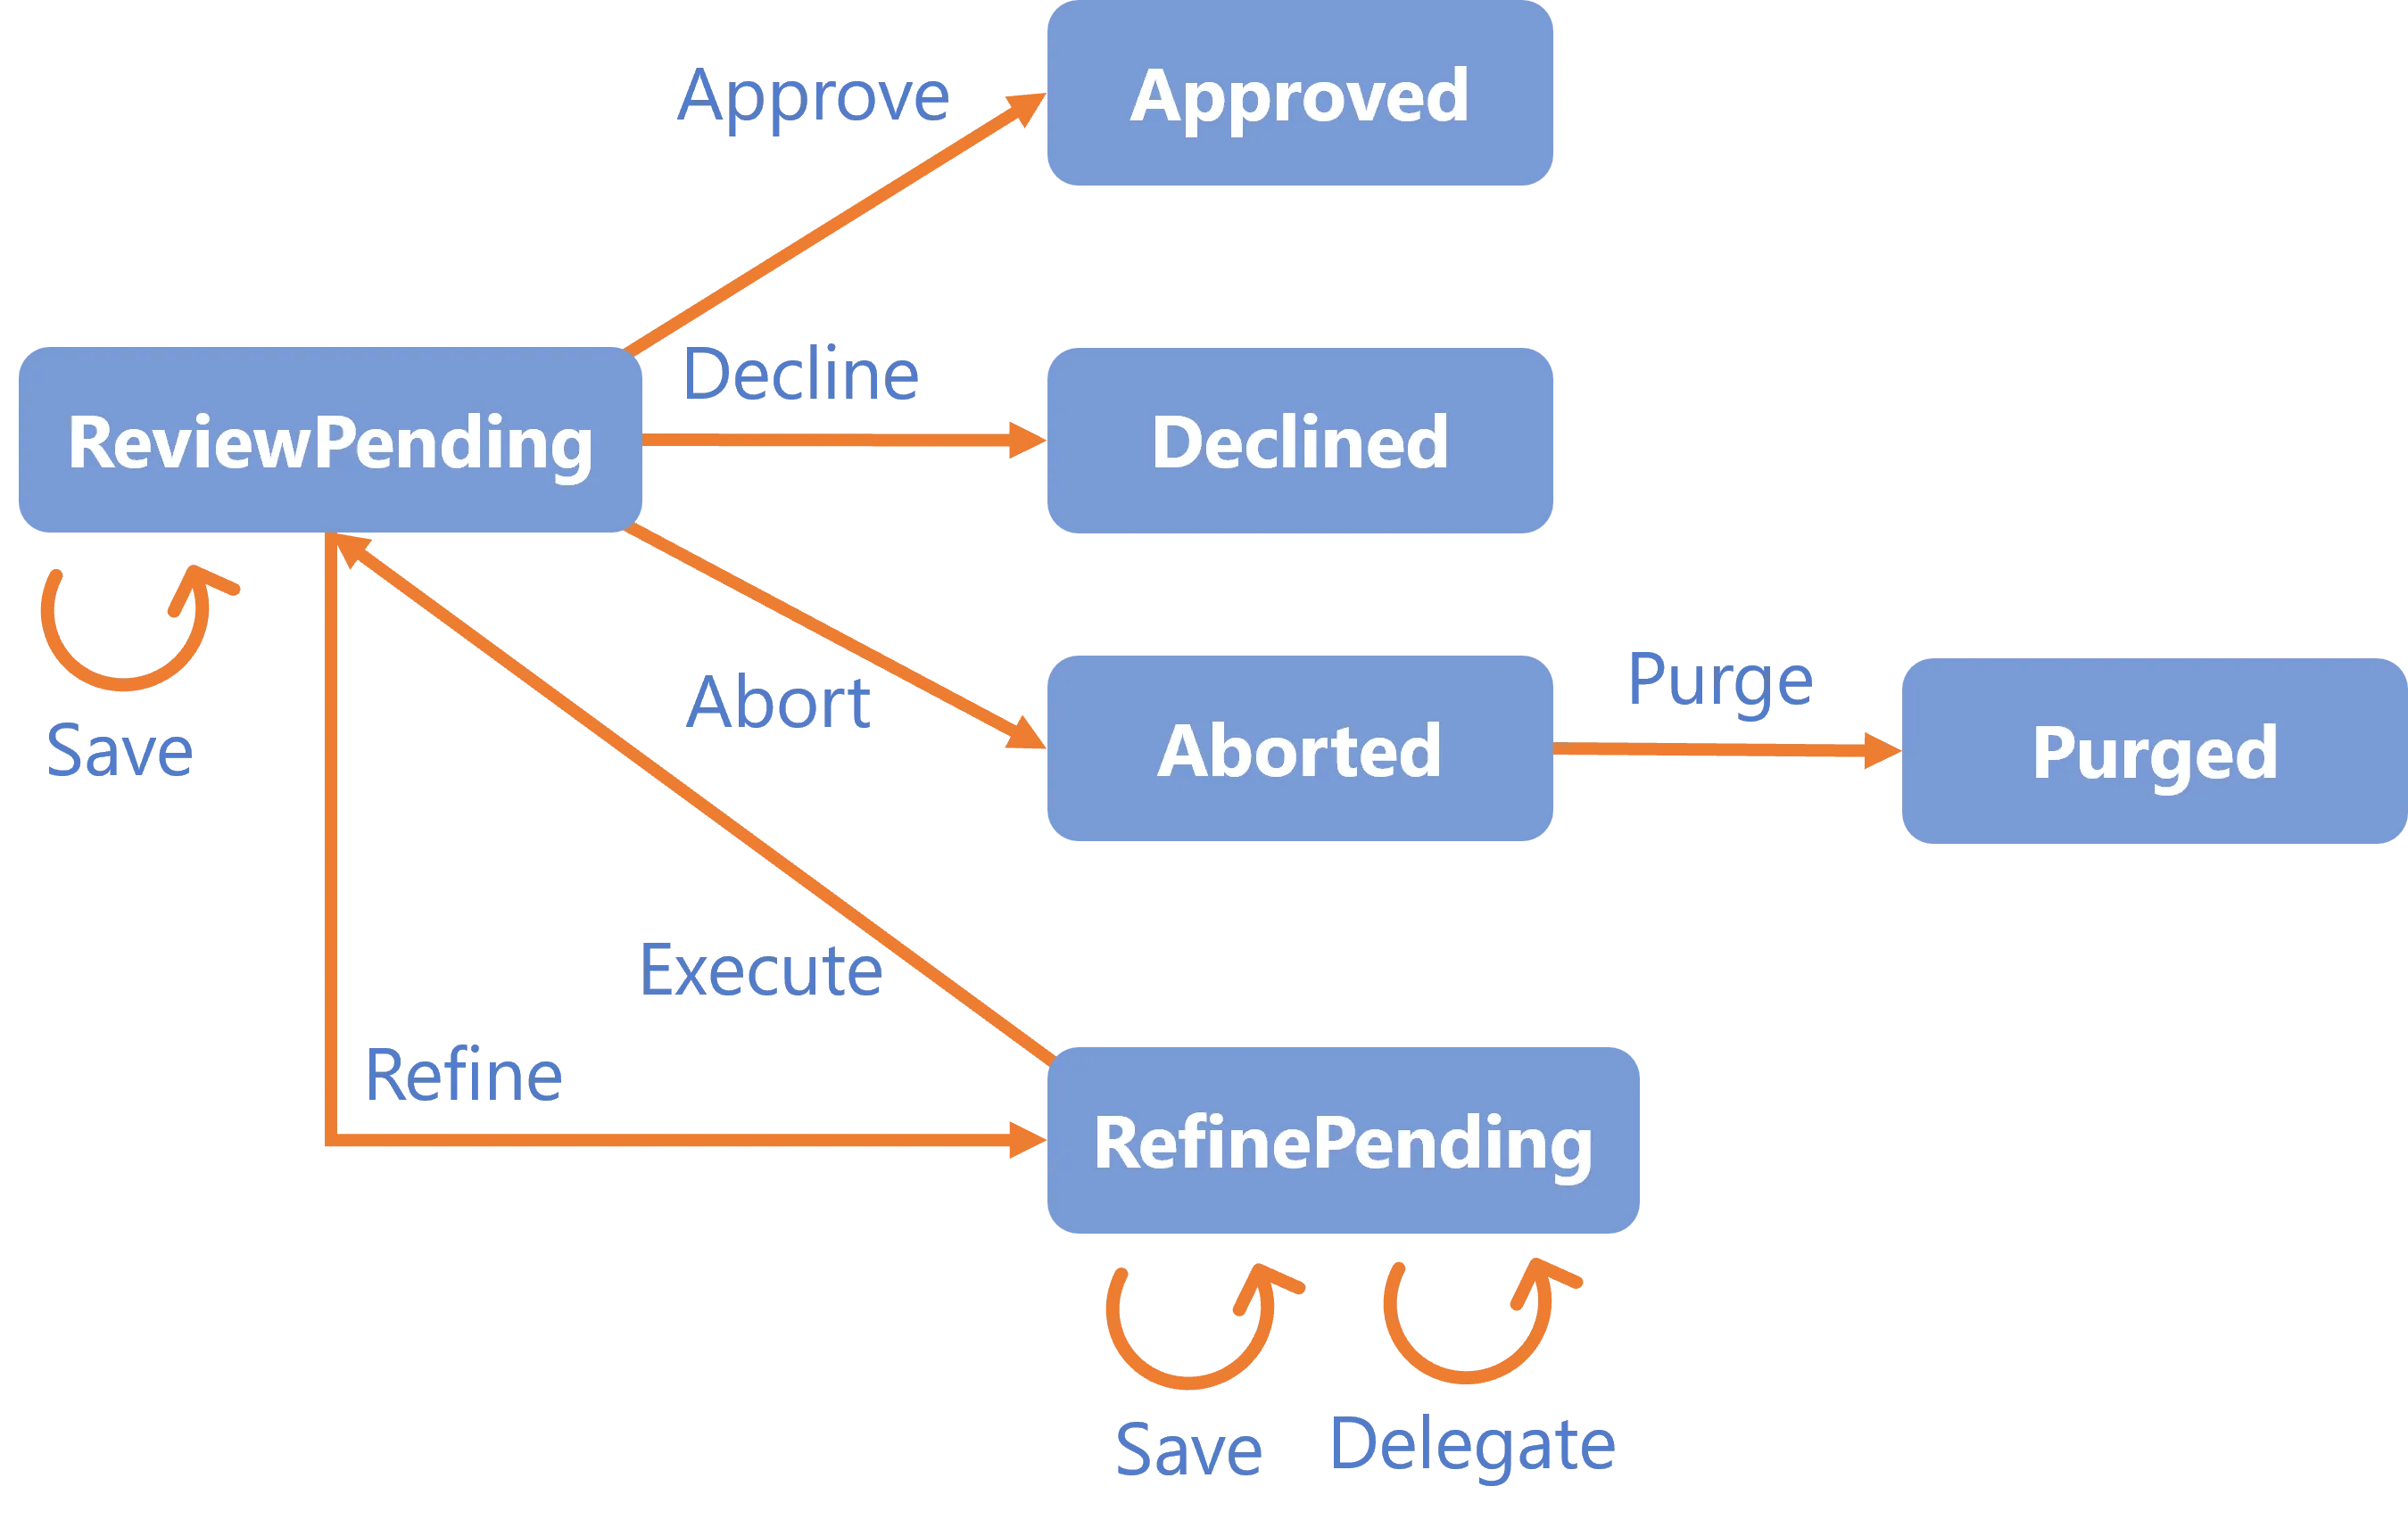
The ReviewWithFeedback activity can be translated into the following form:
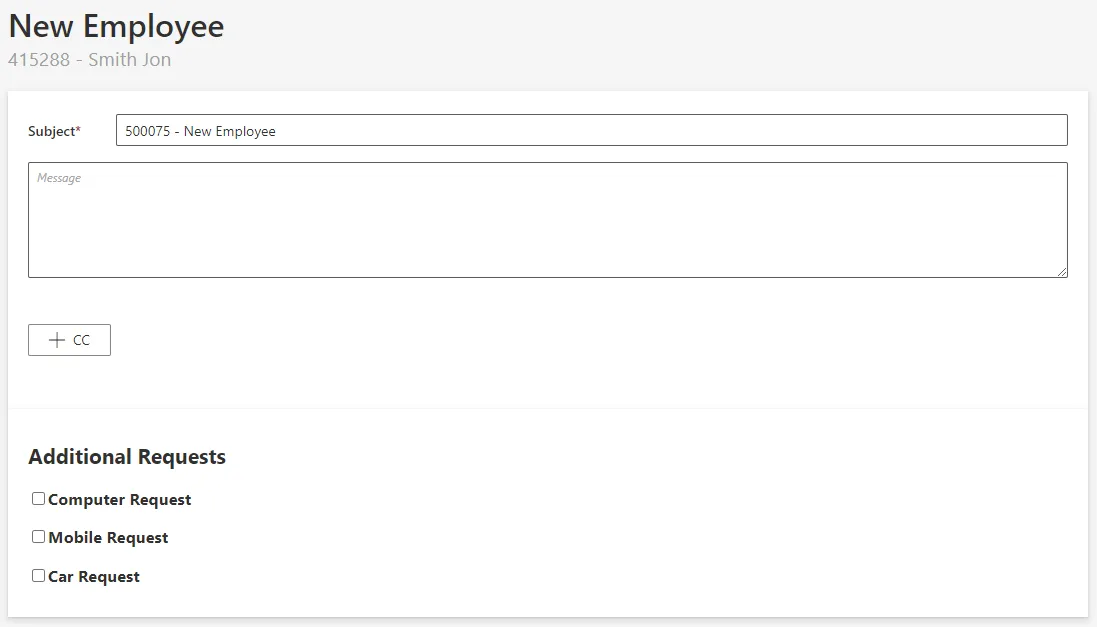
Persist
Saves the workflow's collected data to the repository and triggers dependent processes (i.e.
computation of the role model and provisioning). This activity has only the transition
Persist-Invoked-Invoke and the state Persist-Invoked. It has no user interaction, and hence no
need for permissions.
PersistOnlyResources
Saves the workflow's collected data to the repository without triggering the dependent processes
(i.e. computation of the role model and provisioning). This activity has only the transition
PersistOnlyResources-Invoked-Invoke and the state PersistOnlyResources-Invoked. It has no user
interaction, and hence no need for permissions.
For example,
PersistOnlyResourcescan be used in a workflow to add a new user, as we first create a user sheet but without any account, etc.
States
By default, Identity Manager's workflow engine implements the following state templates:
Action-ActionPendingAction-ExecutedAction-AbortedAction-PurgedActionWithRefine-ActionPendingActionWithRefine-ExecutedActionWithRefine-RefinePendingActionWithRefine-AbortedActionWithRefine-PurgedReview-ReviewPendingReview-DeclinedReview-ApprovedReview-AbortedReview-PurgedReviewWithFeedback-ReviewPendingReviewWithFeedback-ApprovedReviewWithFeedback-DeclinedReviewWithFeedback-RefinePendingReviewWithFeedback-AbortedReviewWithFeedback-PurgedContinueWith-InvokedPersist-InvokedPersistOnlyResources-Invoked
Transitions
By default, Identity Manager's workflow engine implements the following transition templates:
Action-ActionPending-SaveAction-ActionPending-ExecuteAction-ActionPending-AbortAction-Aborted-PurgeActionWithRefine-ActionPending-SaveActionWithRefine-ActionPending-ExecuteActionWithRefine-ActionPending-DelegateActionWithRefine-ActionPending-AbortActionWithRefine-RefinePending-SaveActionWithRefine-RefinePending-DelegateActionWithRefine-RefinePending-ExecuteActionWithRefine-RefinePending-AbortActionWithRefine-Aborted-PurgeReview-ReviewPending-SaveReview-ReviewPending-ApproveReview-ReviewPending-DeclineReview-ReviewPending-AbortReview-Aborted-PurgeReviewWithFeedback-ReviewPending-SaveReviewWithFeedback-ReviewPending-ApproveReviewWithFeedback-ReviewPending-DeclineReviewWithFeedback-ReviewPending-RefineReviewWithFeedback-ReviewPending-AbortReviewWithFeedback-Aborted-PurgeReviewWithFeedback-RefinePending-SaveReviewWithFeedback-RefinePending-DelegateReviewWithFeedback-RefinePending-ExecuteContinueWith-Invoked-InvokePersist-Invoked-InvokePersistOnlyResources-Invoked-Invoke
Workflow Uses
An Identity Manager Workflow is the sequence of processes that a company has established to manage identities across the organization. Workflows makes an approval business process more efficient by managing and tracking all of the human tasks involved with the process and by providing a record of the process after it is completed.
The identity management Workflow can be broken into four key areas:
1. Onboarding
The initial creation of the user. This can occur manually within the identity management system or it could be triggered from an HR system. Here is the xml configuration to create the user onboarding Workflow in Identity Manager :
<Workflow Identifier="User_Onboarding" DisplayName_L1="User - New Employee" VariablesType="Workflow_User"> <Activity Identifier="Request" DisplayName_L1="Request" Template="ActionWithRefine" /> <Activity Identifier="PersistDraft" DisplayName_L1="Draft Creation" Template="PersistOnlyResources" /> <Activity Identifier="Review" DisplayName_L1="Review" Template="ReviewWithFeedback" /> <Activity Identifier="Persist" DisplayName_L1="Commit" Template="Persist" /></Workflow>
The "User_Onboarding" Workflow is composed of the following activities:
- "Request" to initialize the creation of an user in Identity Manager.
- "PersistDraft" to save a preliminary version of the user object.
- "Review" to validate or not the requested item.
- "Persist" to take into account the requested item.
2. User Modifications
After the initial setup of access, there are ongoing changes. Those changes can center in on a user's rights. These rights may need to be expanded or contracted. The user's information may need to be modified. Here is an example to create the user change name Workflow in Identity Manager :
<Workflow Identifier="User_ChangeName" DisplayName_L1="Collaborateur - Changement du nom" VariablesType="Workflow_User"> <Activity Identifier="Request" DisplayName_L1="Request" Template="ActionWithRefine" /> <Activity Identifier="Persist" DisplayName_L1="Commit" Template="Persist" /></Workflow>
3. IT Resource Modifications
The other area of on-going changes is the addition and removal of various IT resources. These resources can include devices, applications, and networks. Here is the xml configuration to create the resource modifications Workflow in Identity Manager :
<Workflow Identifier="User_ResourcesUpdate" DisplayName_L1="Collaborateur - Gerer les droits" VariablesType="Workflow_Directory_User"> <Activity Identifier="Request" DisplayName_L1="Request" Template="ActionWithRefine" /> <Activity Identifier="Persist" DisplayName_L1="Commit" Template="Persist" /></Workflow>
4. Offboarding
The end of the identity lifecycle is the offboarding of a user. Credentials are terminated and the user's account access is terminated everywhere. Here is the xml configuration to create the user offboarding Workflow in Identity Manager:
<Workflow Identifier="User_Offboarding" DisplayName_L1="Depart d'un collaborateur" VariablesType="Workflow_User"> <Activity Identifier="Request" DisplayName_L1="Request" Template="ActionWithRefine" /> <Activity Identifier="Persist" DisplayName_L1="Commit" Template="Persist" /></Workflow>