Configuration Details
This part gathers information about connector configuration.
Netwrix Identity Manager (formerly Usercube) recommends creating and configuring a connector via the UI. See the Connect to a Managed System topic for additional information.
Categorize Resources
How to correlate managed systems' resources with identities, classifying resources into Create a Resource Type .
Overview
Managing resources can quickly become chaotic when the number of resources increases significantly. You will need to manage orphaned (without an owner) and unused accounts through resource reviews, and make sure that all accounts follow their owner's lifecycle. To do so, resources can be categorized, which for our purposes means two things. They are:
- correlated with their owners, so that accounts follow the corresponding identity's lifecycle.
For example, if a user leaves the company, then their account is deactivated accordingly.
- classified according to their intents, in other words you need to specify resources' functions or
goals within the managed system, especially in terms of security;
For example, a basic user account (low-privileged) and an administrator account (high-privileged) have different intents. These two distinct account types are handled in different ways security-wise, and they represent different entitlements with different security measures applied.
Categorization is designed to help resource managers to easily identify a resource's owner and purpose.
For example, when Identity Manager spots an orphaned account, resource managers must be able to determine whether the account should have an owner, or if it is a service/technical account and thus does not need an owner.
Technical principles
Technically, Identity Manager uses the notion of resource types to categorize resources. A resource type is, in fact, a way to gather similar resources under one meaningful name, because they have the same intent.
Our example above would use a resource type
AD User (administration)to group all AD administrator accounts, andAD User (nominative)to group all AD basic user accounts.
Thus, a resource type is a name that informs users about the intent of a resource. As stated above, it serves to implement our two elements of categorization. This happens with two distinct sets of rules, one for correlation, and the other for classification.
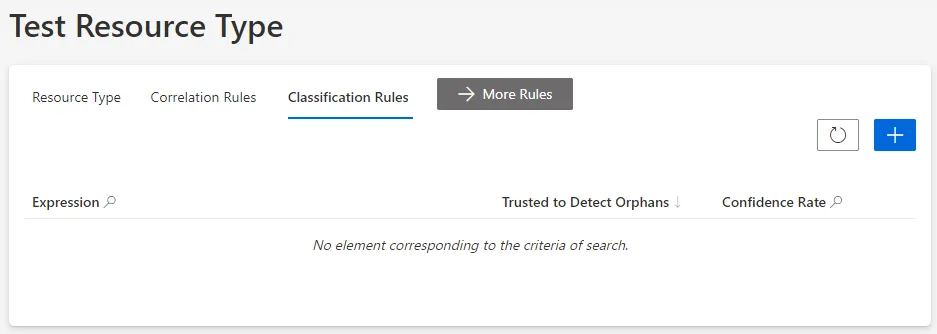
Classification is a process that simply aims to assign a resource type to specific resources. A specific resource can only be assigned a single resource type. See the Entitlement Management topic for additional information.
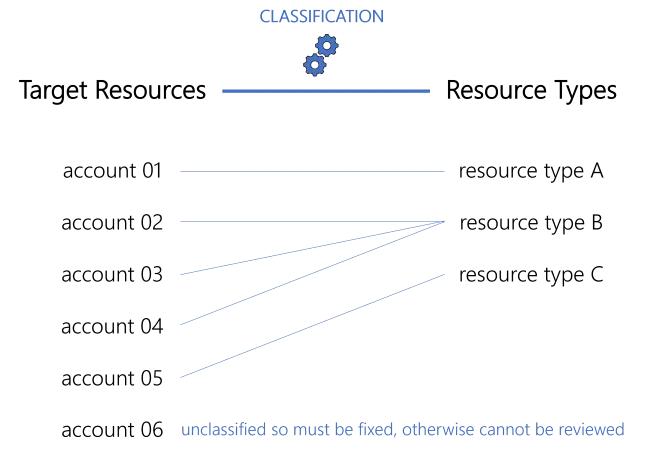
Any resource that is unclassified will not be available for review.
Correlation is a process that aims to establish an ownership relationship between two resources. In most cases, an identity resource that becomes the owner of an account resource. See the Entitlement Management topic for additional information.

While an owner can possess several resources, a resource can have only one owner.
Some resources are orphaned (without an owner) for good reasons. For example service/technical accounts are often used by applications to access data held in Identity Manager or other managed systems and don't belong to a specific user.
As stated previously, both classification and correlation work through sets of rules.
For basic users, we have in Identity Manager:
For basic users, we have in the AD:
Thus our example could induce the following rules: | Classification Rules | Correlation Rules | | --- | --- | | all accounts from OU=Users | 1. mail (from AD) = user's email franck.antoine@acme.com = franck.antoine@acme.com 2. displayName = user's last name + user's first name Antoine Franck = Antoine + Franck |


For administrators, we have in Identity Manager:
For administrators, we have in the AD:
Thus our example could induce the following rules: | Classification Rules | Correlation Rules | | --- | --- | | all accounts from OU=Administrators | 1. sAMAccountName = "A" + user's employee id A28022 = A + 28022 2. displayName = "ADM" + user's last name + user's first name ADM Colin Jean = ADM + Colin + Jean |


Sometimes you may not know if your rules are always going to apply. Therefore, each rule expresses a certain level of confidence. Identity Manager will establish a priority order between rules based on the confidence rate, and will also act differently depending on whether the confidence rate is above or below 100%. See the Correlate Resources topic for additional information.
A resource type can have zero correlation rules, since accounts can be without owners. But a resource type with neither correlation nor classification rules serves no purpose.
Correlation triggers classification: a matching correlation rule for a given resource type will perform both actions of categorization: both correlating a resource with its owner, and classifying the resource at the same time.
See below this note.
Hence, integrators should start with correlation rules, and then write classification rules for any remaining uncorrelated resources.
In the same way, Identity Manager will apply correlation rules before classification rules.

Now that you have created resource types and their correlation/classification rules, you have created the first elements for your role model. See the Entitlement Management topic for additional information. The role model contains all the roles and rules which drive the entitlement assignment logic inside Identity Manager.
A role model is made up of Policy which contain roles, rules and resource types. Most often the default policy is enough. However, in more complex situations, additional policies can be created to separate groups of roles, rules and resource types. See the Create a Policy topic for additional information.
Participants and Artifacts
For a given managed system, integrators may need the help of the application owner who knows the application's users, entitlements and data model.
| Input | Output |
|---|---|
| Create the Workforce Repository (required) Create a Resource Type (required) Synchronize Data (required) | Categorized resources Correlated accounts Orphaned account list |
Categorize Resources
Categorize resources by proceeding as follows:
- Create at least one Create a Resource Type ;
- Create the appropriate Correlate Resources ;
- Create the appropriate Classify Resources for accounts that do not have an owner.
Netwrix Identity Manager (formerly Usercube) recommends creating/modifying/deleting correlation and classification rules using Perform a Simulation in order to previsualize changes.
Next Steps
Once accounts are categorized, integrators can start to Create a Provisioning Rule .
Categorization also enables the Review Orphaned and Unused Accounts.
Classify Resources
How to define Resource Classification Rule in order to classify remaining uncorrelated resources, assigning them resource types. See the Create a Resource Type topic for additional information.
Overview
Classification purpose
Classification is the process of putting on an existing resource a label called resource type, to show its intent and/or purpose within the managed system. See the Entitlement Management topic for additional information.
Every resource type can be assigned a set of classification rules.
About the confidence rate
As the aim here is to classify uncorrelated resources in a given managed system, classification rules are going to rely on the patterns in resources' attributes, such as naming conventions.
Sometimes, the managed system doesn't use rigorous rules and thus data quality isn't enough to allow the creation of a single infallible correlation/classification rule for all resources. Hence, you may need to create several correlation/classification rules.
Each rule is configured with a confidence rate to express its reliability, according to data quality and sensitivity.
In our case, correlation/classification can be based on a first rule applicable to quality data resources with a high confidence rate, and a second rule applicable to resources with a lower data quality. This second rule is going to have a lower confidence rate, thus a lower priority, because the strategy is to apply the first rule as much as possible. But the second rule is essential in case the first one doesn't apply, though it cannot be trusted as much as the first rule.
Hence correlation/classification rules are configured with a confidence rate:
- from 100 to 150% to correlate resources automatically without a manual validation;
- from 0 to 99% to impose that a resource manager reviews the correlation/classification.
Identity Manager considers the rules in descending order of confidence rate. The first matching rule is applied.
In other words:
- if there is at least one matching rule with a confidence rate above 100%, then the one with the highest rate is applied;
- if there isn't and there is at least one matching rule with a confidence rate below 100%, then the one with the highest rate is suggested.
There is no predefined priority order between two rules with the same confidence rate.
Focus on reviews
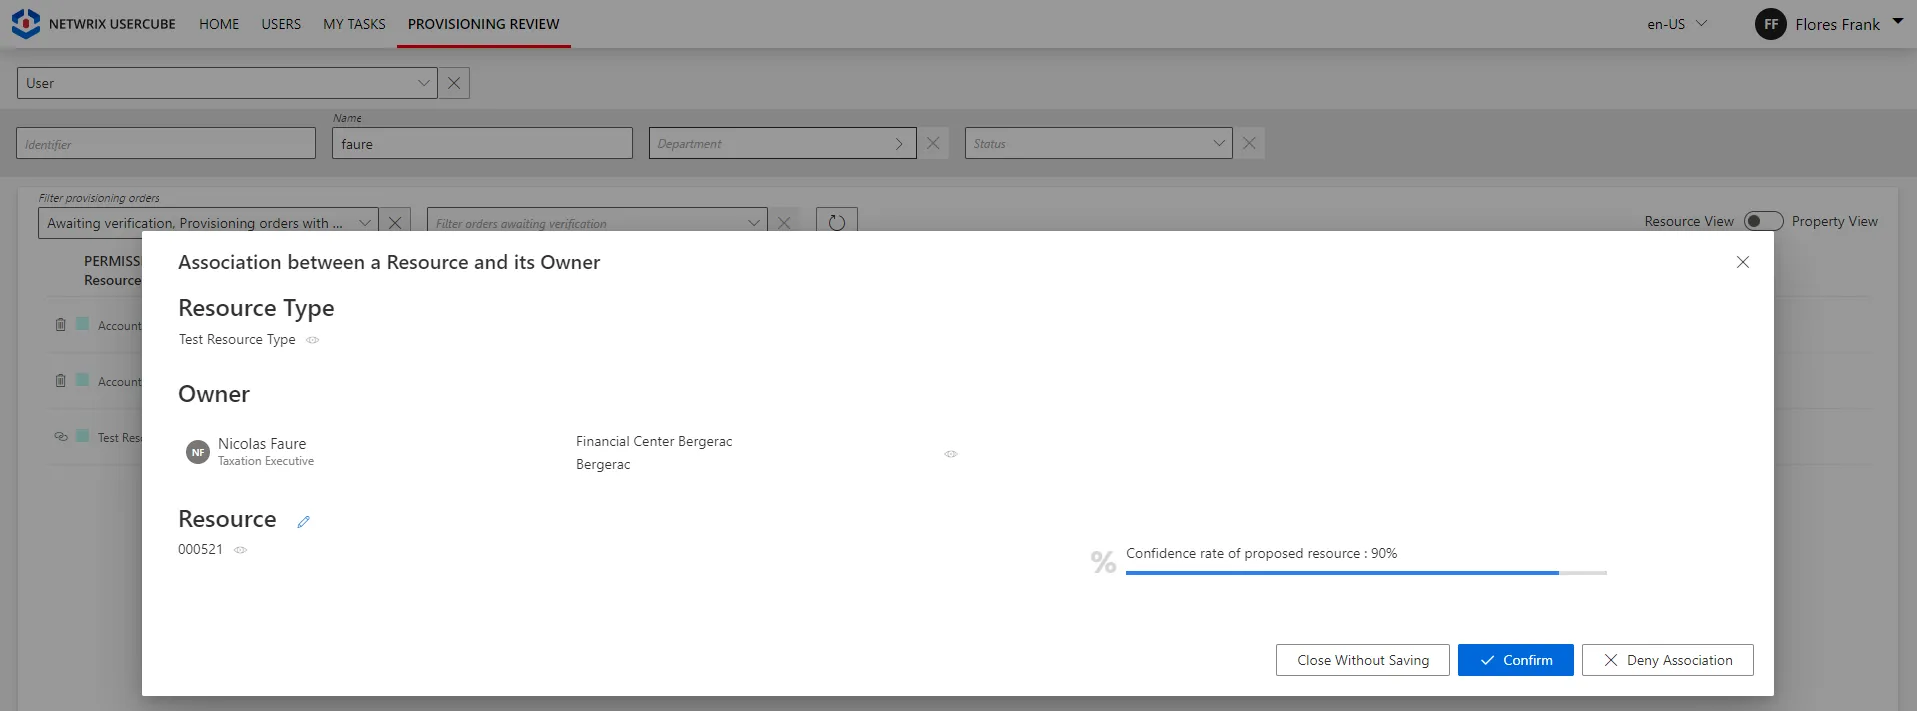
When the confidence rate is below 100%, correlation and classification reviews are to be done:
-
on the Provisioning Review page when the owned resource is allowed by the role model, i.e. requested manually or assigned automatically by a resource type rule;
-
on the Resource Reconciliation page when the owned resource is not allowed by the role model, i.e. not requested manually nor assigned by a resource type rule. For example, the creation of a correlation rule without a resource type rule triggers unauthorized accounts on the Resource Reconciliation page.
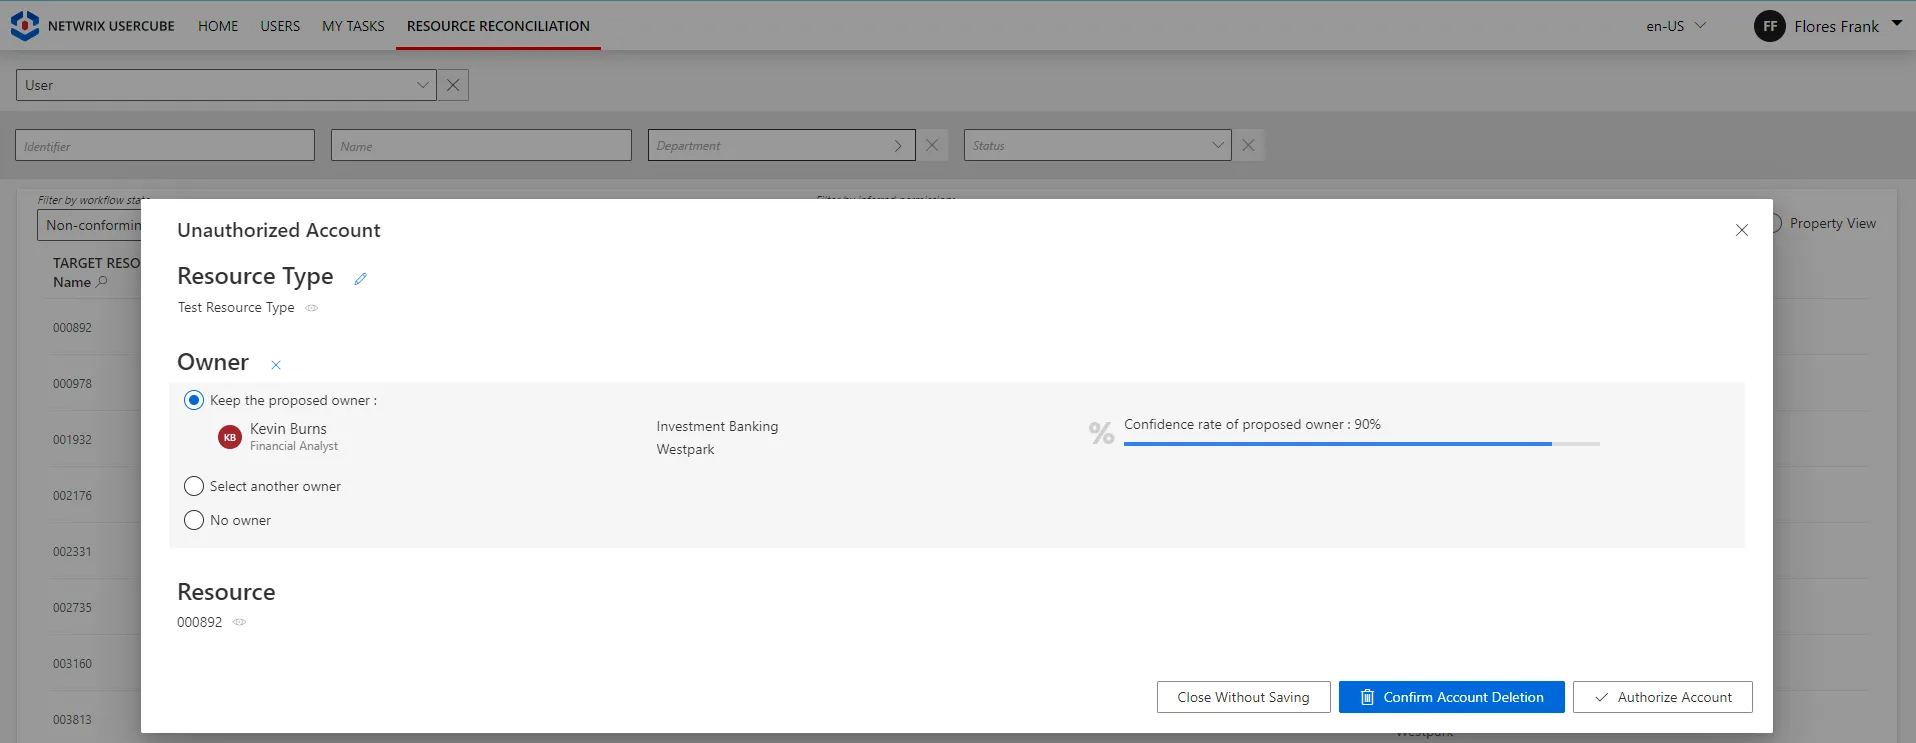
Broadly speaking, the Resource Reconciliation page displays non-conforming assignments/values (gaps), i.e. resources and property values from the managed systems that are not allowed by a rule in Identity Manager. The Provisioning Review page displays the resource and property changes whose workflows require a manual approval.
Classification rule example
Classification rules are commonly based on logins or organizational units. Account types are usually
assigned specific strings to be easily recognized, such as for example adm for administrator
accounts. They can also include the employee identifier which includes specific digits according to
the account type.
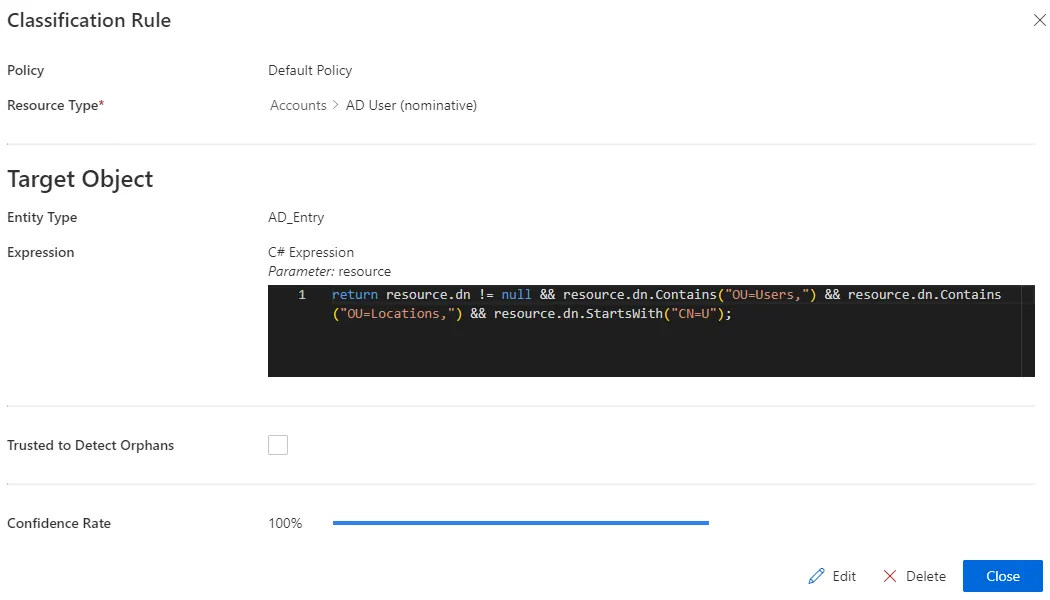
Consider an organization that places basic users in organizational units Users and Locations
with a CN starting with U. This means that a basic user should have a dn attribute different
from zero, containing OU=Users and OU=Locations, and starting with CN=U. Then, a
classification rule could take as a target expression:
return resource.dn != null && resource.dn.Contains("OU=Users,") && resource.dn.Contains("OU=Locations,") && resource.dn.StartsWith("CN=U");
Participants and Artifacts
For a given managed system, integrators may need the help of the application owner who knows the application users, entitlements and data model.
| Input | Output |
|---|---|
| Create a Resource Type (required) Synchronize Data (required) Correlate Resources (recommended) | Classification rules |
Create a Classification Rule
The principle of a classification rule is to use the expression of the target object, to assign (or not), the resource type to said object.
Fill a resource type with a classification rule by proceeding as follows:
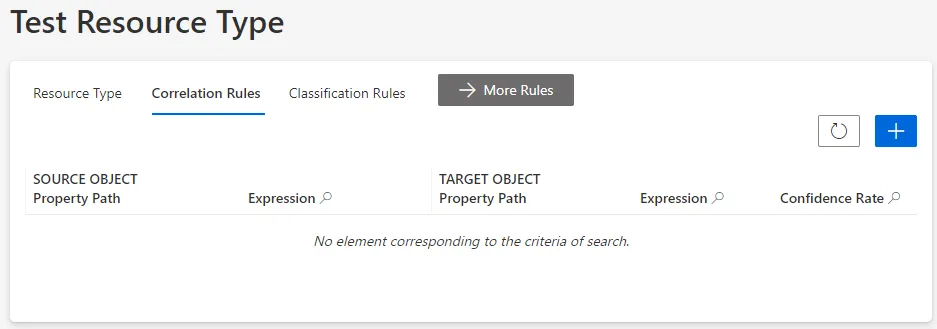
-
On the relevant resource type's page, click on Classification Rules and the addition icon.
Classification rules can also be created through the Access Rules screen (accessible from the home page, in the Configuration section), clicking on the Classifications tab and the addition button at the top right corner.


-
Fill in the fields.
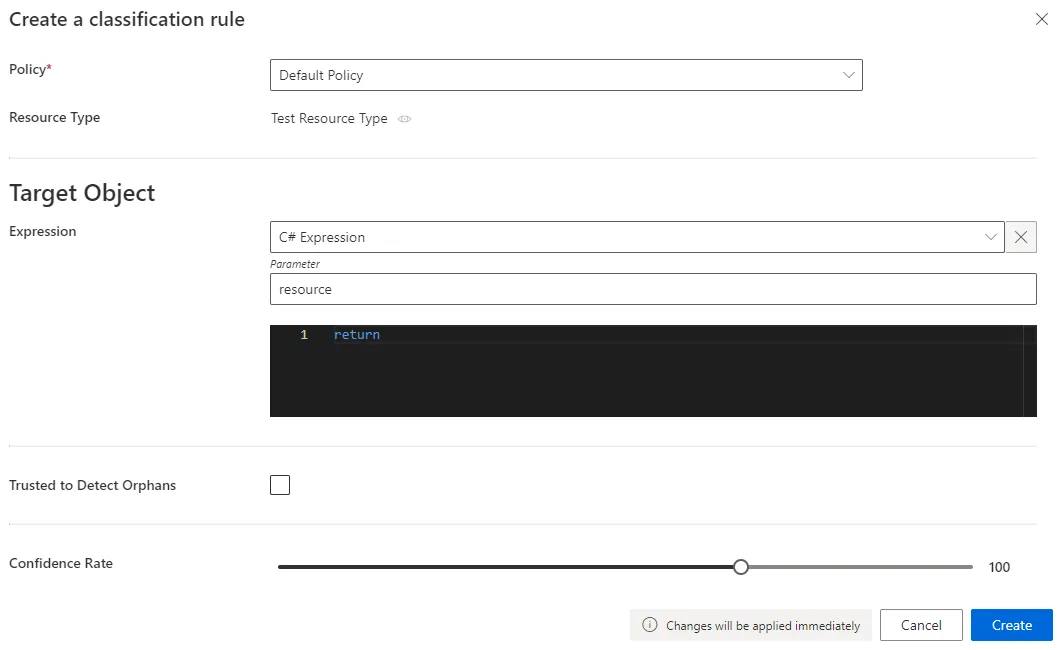
- Target Object >
Expression: C# expression based on the resource that needs to be classified. Confidence Rate: rate expressing the rule's reliability, and its priority order..Our overview example would look like:
- Target Object >
-
Click on Create and see a line added on the rules page.
-
On the connector dashboard and in the Resource Types frame, click on Jobs > Classify Resource Types to apply the new classification rules.

Impact of Modifications
An action (addition/modification/deletion) on a classification rule doesn't trigger a new computation of classification for the resources that are already categorized, i.e. both classified and correlated. The new version of said classification rule will be applied only to new resources along with the existing resources whose correlation and/or classification was not yet reviewed (as unauthorized accounts on the Resource Reconciliation screen).
Thus only non-conforming resources (unauthorized accounts on the Resource Reconciliation screen) can have their correlation and classification re-computed.
Even without selecting an owner, reviewing unauthorized accounts on the Resource Reconciliation screen "blocks" correlation and classification "as is". Neither will be re-computed.
This also means that only non-conforming resources (displayed on the Resource Reconciliation screen) can have their classification questioned and re-computed.
Simulations are available in order to anticipate the changes induced by a creation/modification/deletion in classification rules. See the Perform a Simulation topic for additional information.
Any modification in classification rules is taken into account via the classification job: on the connector dashboard and in the Resource Types frame, click on Jobs > Classify Resource Types.
Verify Classification
In order to verify the process, analyze samples and check that all objects are classified, and well classified. To do so, click on the target entity type(s) affected by your rule(s) in the left menu of the home page.

The entity type's page can be configured via XML to customize all displayed columns and available filters, especially the Uncategorized filter that spots unclassified resources, and the Owner / Resource Type column that shows the resource type assigned to each resource.
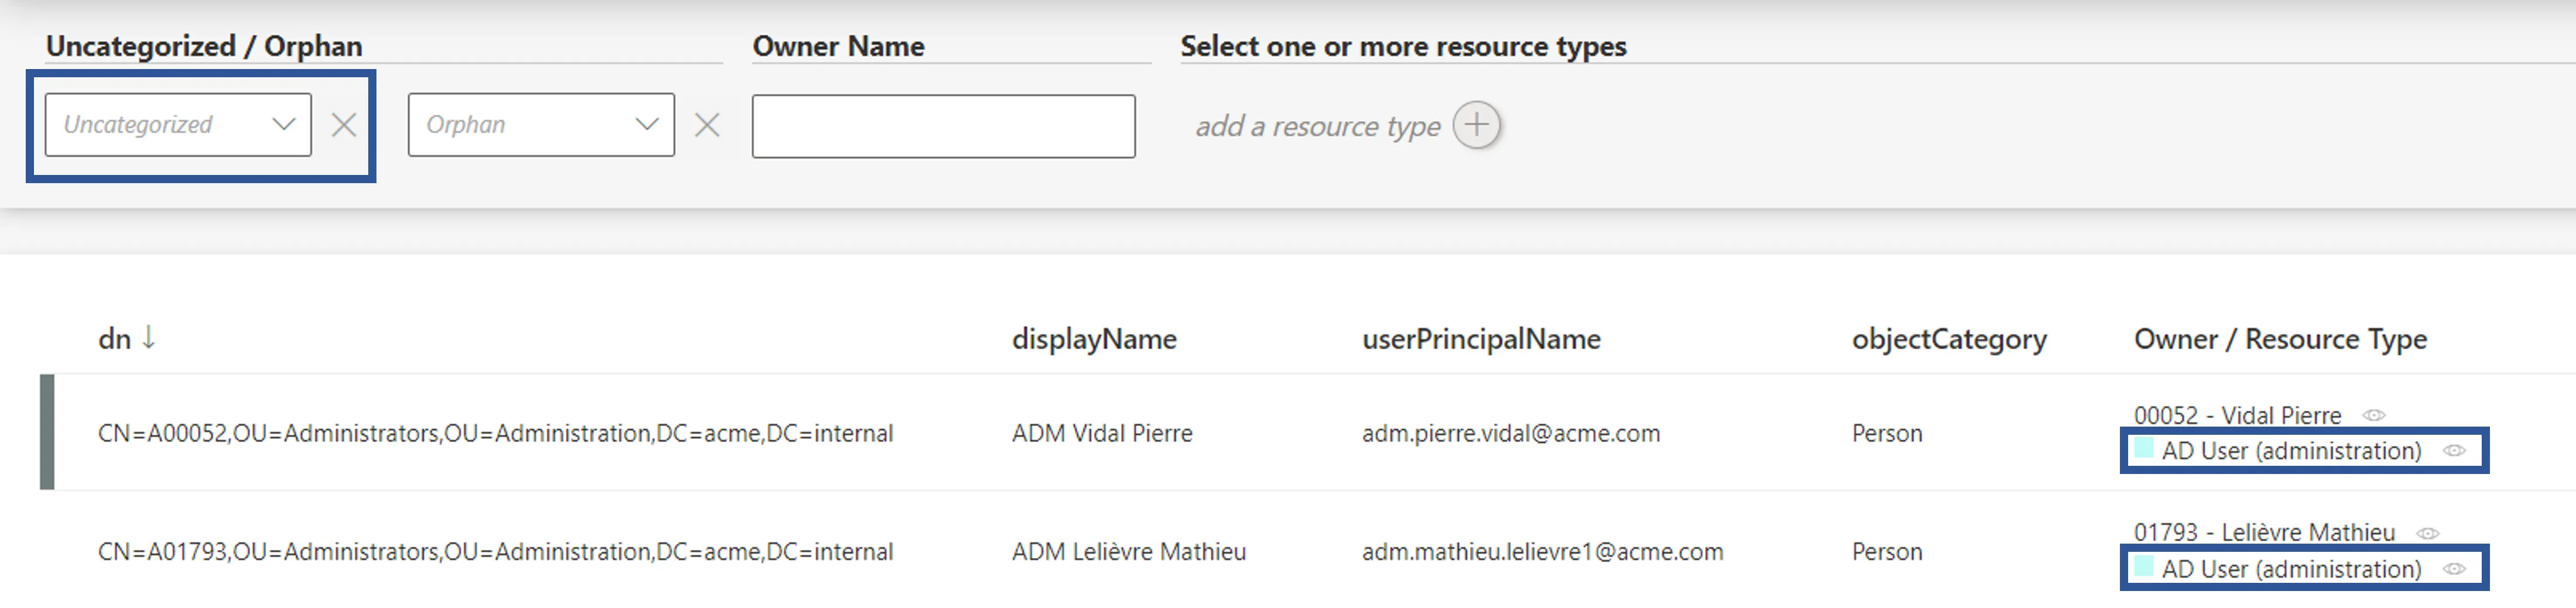
Therefore, check that all resources show here a resource type. Moreover, a knowledgeable person must analyze a few samples to ensure that resources are classified in the right resource type.
Troubleshooting
If a resource is not classified (or not correctly), then:

- If the resource is correlated, check whether the corresponding correlation rule is in the right resource type.
- If the resource is not correlated, check the validity of the classification rules.
- Check the resource's data quality.
Create a Resource Type
How to create the container for future correlation and classification rules inside a given managed system.
Overview
A Resource Type is created to highlight differences in intent between resources. It materializes the organization's profiles. In a given managed system, different types of resources have different security needs.
For example, can usually be found:
- nominative accounts for basic user accounts with low privileges;
- administrator accounts for accounts with higher privileges, on several administration entitlements levels;
- generic accounts, i.e. shared by a group of users (often for testing use);
- old in opposition to new accounts because of potentially evolving naming conventions;
- service accounts owned by applications instead of users.
In practice, a specific resource type is created for a given resource when there are differences in:
- the owner type (for example worker, partner, customer, application, robot, etc.);
- the required set of classification and/or correlation rules; See the Classify Resources , and Correlate Resources topics for additional information.
- the approval circuit for a resource's modification or assignment, i.e. the number of required approvals, validators, etc.;
- the type of provisioning (manual or automatic). See the Provision topic for additional information.
Source vs. target resource
Resource types are the vessel for ownership relationships. They involve the definition of source and target objects chosen from among the properties of existing entity types. The source (usually identities) is the owner of the target (usually resources from your managed systems, such as a nominative AD account). This relationship is the basis for correlation as much as for future provisioning. See the Create an Entity Type, Correlate Resources , andProvision topics for additional information.
See the Entitlement Management topic for additional information.
Participants and Artifacts
For a given managed system, integrators may need the help of the application owner who knows the application users, entitlements and data model.
| Input | Output |
|---|---|
| Identity repository (optional) Target connector (required) Synchronized data (optional) | Resource type |
See the Create the Workforce Repository Connect to a Managed System , and Synchronize Data topics for additional information.
Create a Resource Type
A new resource type requires an existing entity type. See the Create an Entity Type topic for additional information.
Create a resource type by proceeding as follows:
-
On the relevant connector page, click on the addition button in the Resource Types frame.
Resource types can also be created through the Access Roles screen (accessible from the home page, in the Configuration section), using the + New button and selecting
Resource Typein the first field calledType.
-
Fill in the fields.
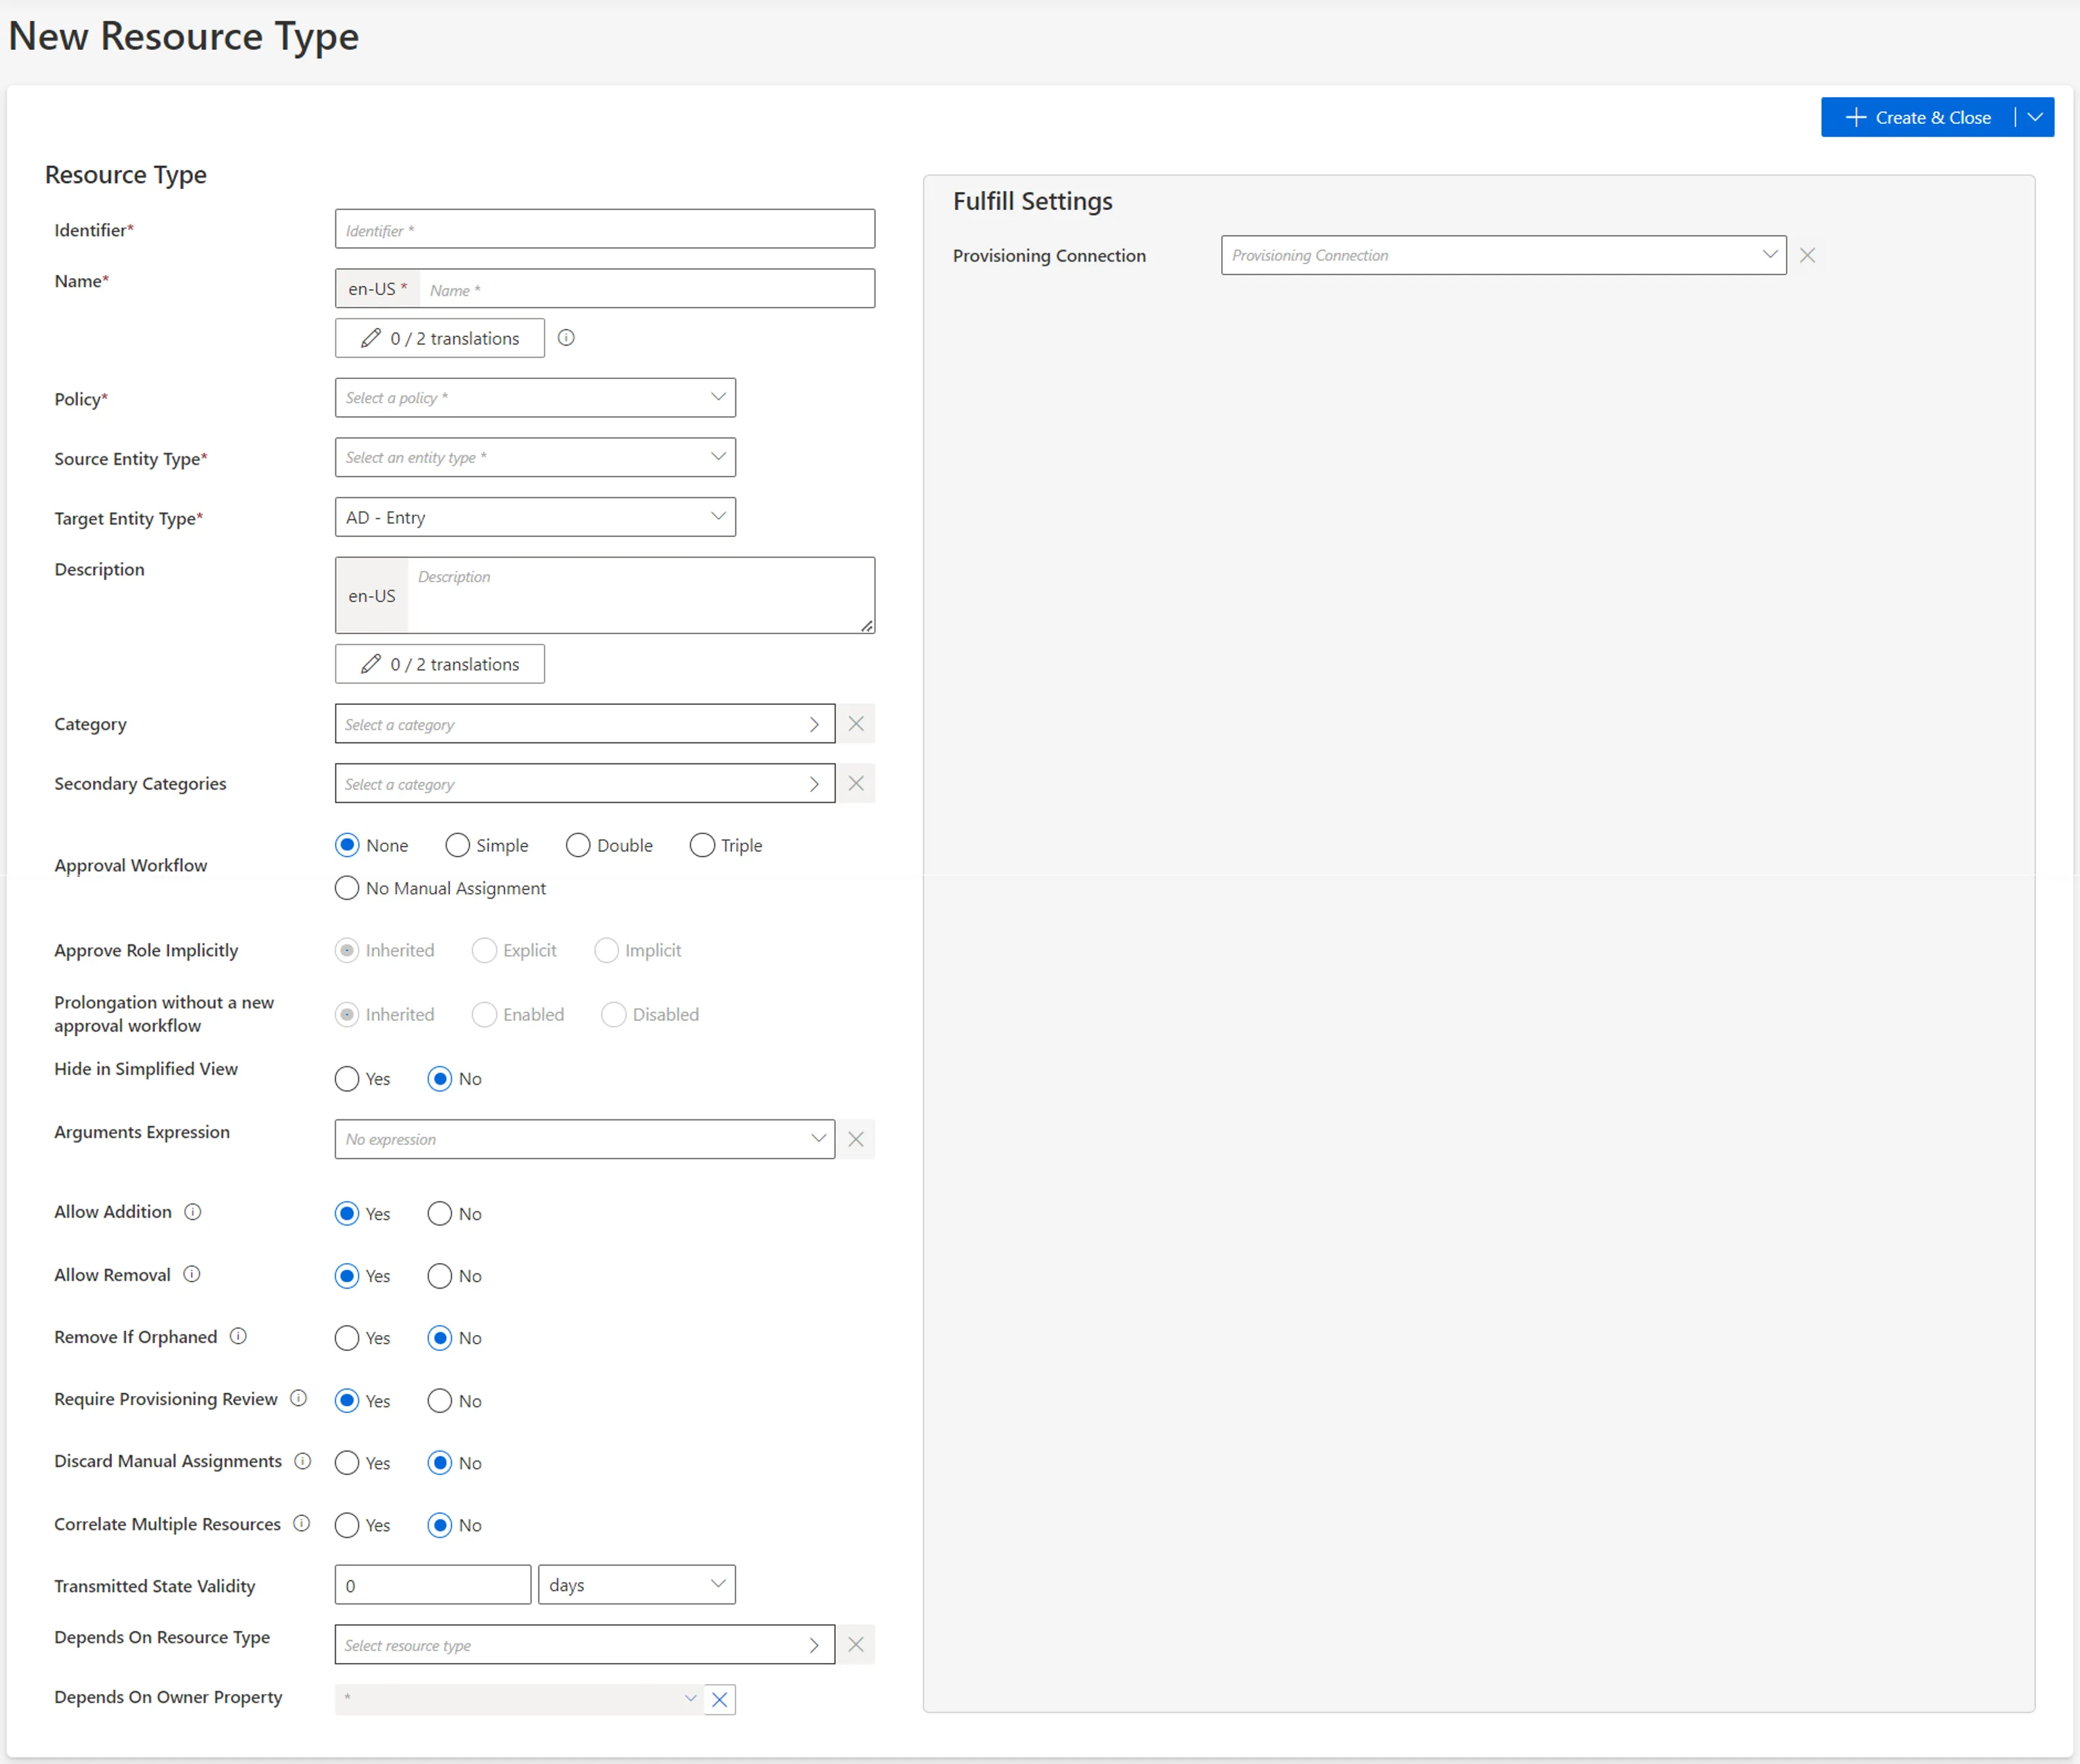
-
Identifier: must be unique among resource types, without any whitespace, and be C#-compatible. See Microsoft lexical structure. -
Name: will be displayed in the UI to identify the resource type. -
Policy: policy in which the resource type exists. -
Source Entity Type: entity type (from any existing connector) used to fill the target entity type. -
Target Entity Type: entity type (part of the connector) to be filled with the source entity type. -
Category: category assigned to the resource type. It can be chosen from among the existing categories or created directly from the categories list by clicking on the + Category button. -
Approval Workflow: represents the number of validations required to assign a resource from this type to an identity. -
Approve Role Implicitly: relevant only for workflows with at least a simple approval process.Implicitmode bypasses the approval step(s) if the person who issues the role request is also the role officer.Explicitrefuses said bypass.Inheritedfollows the policy decision to approve role implicitly or not. See the Create a Policy topic for additional information. -
Prolongation without a new approval workflow: enables the resource type to have its assignment's end date postponed without any validation.Inheritedfollows the policy decision to enable this option or not. See the Create a Policy topic for additional information. -
Hide in Simplified View: hides the role from the users' Simplified View in View Permissions dialog. This setting does not apply to roles which are either inferred or have workflow states which require manual action. -
Arguments Expression: when using a connection for automatic provisioning, C# expression used to compute a dictionary of strings in order to compute the arguments of provisioning orders, such as the identifier of the workflow to launch within Identity Manager, or the identifier of the user's record to copy. See the Provision topic for additional information. -
Allow Addition: enables Identity Manager to automatically create new resources in the managed system when their owners are given the right entitlements. Otherwise, resource managers must create resources manually directly in the managed system.Consider a role
SAPwhich assigns an SAP account to a user. Consider also that SAP accounts are configured withAllow Additiondisabled. In this case, if we give the roleSAPto a user, then said user doesn't automatically receive an SAP account. The relevant resource manager must create an account for said user in the SAP application. -
Allow Removal: enables Identity Manager to automatically deprovision resources in the managed system when their owners are deprived of the right entitlements. Otherwise, Identity Manager is able to delete resources in the managed system only with a manual approval on the Resource Reconciliation screen.Consider a role
SAPwhich assigns an SAP account to a user. Consider also that SAP accounts are configured withAllow Removaldisabled. Finally, consider a given user who has the roleSAPand the corresponding SAP account. In this case, if we deprive said user from the roleSAP, then the SAP account isn't automatically deleted. Identity Manager displays this assignment as non-conforming on the Resource Reconciliation page, and the relevant resource manager must confirm the account deletion.Allow Addition / Allow Removal:
These options set to
Noare interesting especially in testing mode when the role model isn't entirely reliable yet. -
Remove If Orphaned: enables Identity Manager to automatically deprovision resources when their owner is deleted. Otherwise, said resources are displayed on the Resource Reconciliation screen. Can be activated only ifAllow Removalis activated too. -
Require Provisioning Review: forces an additional mandatory review of all provisioning orders for the resource type (on the Review Provisioning screen).Consider AD accounts. While nominative accounts can be provisioned without specific precautions (option set to
No), administrator accounts sometimes require an additional review (option set toYes).This option can be bypassed when computing the role model by clicking on the Compute Role Model, no provisioning review job in the Resource Type frame on the connector's overview page.
-
Discard Manual Assignments: allows the provisioning of a new value computed by a provisioning rule for a property, based on a change in the source data, no matter the property's current workflow state.Set to
No, any manual change of a property's value made directly in the target system will be "protected" (only after the change is approved in Identity Manager in Resource Reconciliation). It means that a future change in the source data will not trigger the provisioning of the new value. Instead, Identity Manager will keep the value of the manual change, and state the value asQuestioned.Consider an HR system (source) whose data isn't often synchronized into Identity Manager. Let's say that a user marries and changes their name. In this case, the value in Identity Manager needs to be updated (via workflows) so that all managed systems are updated too with the new name. However,
Discard Manual Assignmentsshould be enabled because the HR system should still be the authoritative source in case of another change. -
Correlate Multiple Resources: enables Identity Manager to link a single owner to several existing target objects from this resource type.Consider records, representing users' positions in the resource type
User Record (from HR). In some organizations, one user can have several records at once, or have several records that overlap, and these records can be created either via Identity Manager's workflows or via the upload of an HR file. Thus, on the one hand it is complex to anticipate the number of records created for an identity, on the other hand there shouldn't be records without an owner. In other words, when creating a new record via a workflow, we want the record to be linked to the right user, whether or not a record is already linked to the user's HR sheet. Therefore, the correlation of multiple resources (of the same resource type) to a single owner should be permitted. -
Transmitted State Validity: The period in minutes during which fulfillment orders can stay in Transmitted/Executed state. When the time is exceeded the orders are set in error state. -
Depends On Resource Type: potential resource type (other than the one presently created) which must be provisioned for a given identity before this resource type can be created for said identity.This option can be used so that a user must have an AD account before they can own an Exchange account, because the Exchange account needs the AD account's address.
-
Depends On Owner Property: potential properties which must be filled for a given identity before this resource type can be created for said identity.This option can be used so that a user must have a ServiceNow identifier before they can own an AD administrator account, because the AD administrator account needs this random identifier computed by ServiceNow in order to be able to perform manual provisioning in ServiceNow.
-
-
Fill the Fulfill Settings arguments according to the selected package.
Integrators need to know the required provisioning connection, especially whether the connection is about manual or automated provisioning. Automatic provisioning means that Identity Manager writes in the managed system. Manual provisioning means that Identity Manager isn't allowed to write directly inside the managed system, and thus it creates tickets so that resource managers perform the needed changes.
-
Click on + Create & Close > Create.
Verify Resource Type Creation
In order to verify the process, check that the resource type has been added with the right options to the list on the Access Roles page, accessible from the home page in the Administration section.

Correlate Resources
How to define the Resource Correlation Rule to match up resources across systems, usually accounts with their owner.
Overview
Correlation purpose
Correlation is the process of establishing an ownership relationship between a source resource (usually an identity) and a target resource (usually an account). It is the basis of the link between an identity and their fine-grained entitlements. See the Entitlement Management topic for additional information.
Every resource type can be assigned a set of correlation rules.
Correlation rules must be created with caution as an error in the correlated attributes may result in the unwanted assignment of a given account to an existing user.
Correlation should be based on immutable attributes, for example codes that don't change during the resource's lifecycle rather than display names that can vary in time. This method prevents integrators from losing the history of the changes made to a resource after a correction.
In addition to display names, counter-examples for correlation properties are: positions; marital names; locations, etc.
About the confidence rate
As the aim here is to correlate all resources in a given resource type, correlation rules are going to rely on the patterns in resources' attributes, such as naming conventions.
Sometimes, the managed system doesn't use rigorous rules and thus data quality isn't enough to allow the creation of a single infallible correlation/classification rule for all resources. Hence, you may need to create several correlation/classification rules.
Each rule is configured with a confidence rate to express its reliability, according to data quality and sensitivity.
In our case, correlation/classification can be based on a first rule applicable to quality data resources with a high confidence rate, and a second rule applicable to resources with a lower data quality. This second rule is going to have a lower confidence rate, thus a lower priority, because the strategy is to apply the first rule as much as possible. But the second rule is essential in case the first one doesn't apply, though it cannot be trusted as much as the first rule.
Hence correlation/classification rules are configured with a confidence rate:
- from 100 to 150% to correlate resources automatically without a manual validation;
- from 0 to 99% to impose that a resource manager reviews the correlation/classification.
Identity Manager considers the rules in descending order of confidence rate. The first matching rule is applied.
In other words:
- if there is at least one matching rule with a confidence rate above 100%, then the one with the highest rate is applied;
- if there isn't and there is at least one matching rule with a confidence rate below 100%, then the one with the highest rate is suggested.
There is no predefined priority order between two rules with the same confidence rate.
Focus on reviews
When the confidence rate is below 100%, correlation and classification reviews are to be done:
-
on the Provisioning Review page when the owned resource is allowed by the role model, i.e. requested manually or assigned automatically by a resource type rule;
-
on the Resource Reconciliation page when the owned resource is not allowed by the role model, i.e. not requested manually nor assigned by a resource type rule. For example, the creation of a correlation rule without a resource type rule triggers unauthorized accounts on the Resource Reconciliation page.
Broadly speaking, the Resource Reconciliation page displays non-conforming assignments/values (gaps), i.e. resources and property values from the managed systems that are not allowed by a rule in Identity Manager. The Provisioning Review page displays the resource and property changes whose workflows require a manual approval.
Correlation rule examples
Consider AD accounts (target) and their owners (source). A classic example is to try and correlate identities and AD accounts based on the first name and last name. We can write a correlation rule that states that, for a given identity, Identity Manager looks for all AD accounts that bear the same first name and the same last name. All AD accounts that match this description are said to be correlated to the identity. The identity becomes the owner of the accounts.
A set of correlation rules for a resource type could be:
- a rule with 100% confidence on login + name + first name;
- a rule with 90% confidence on login only.
Usual rules can also be made, for example, on:
- name + first name using phonetics to avoid typos;
- first name + name + entry date if the entry date is known in the source systems;
- email address;
- Windows login.
Correlation rules don't have to compare equivalent properties from Identity Manager and from the
managed system. A rule can compare for example users' Login from Identity Manager with their
sAMAccountName from the AD, even using C# expressions if needed.
Participants and Artifacts
For a given managed system, integrators may need the help of the application owner who knows the application users, entitlements and data model.
| Input | Output |
|---|---|
| Identity repository ( (required) Resource types (required) Synchronize Data (required) | Correlation rules |
See the Create the Workforce Repository and Create a Resource Type topics for additional information.
Create a Correlation Rule
The principle of a correlation rule is to compare the expressions of the source and target objects.
Fill a resource type with a correlation rule by proceeding as follows:
-
On the relevant resource type's page, click on Correlation Rules and + New.
Correlation rules can also be created through the Access Rules screen (accessible from the home page, in the Configuration section), clicking on the Correlations tab and the addition button at the top right corner.
-
Fill in the fields.
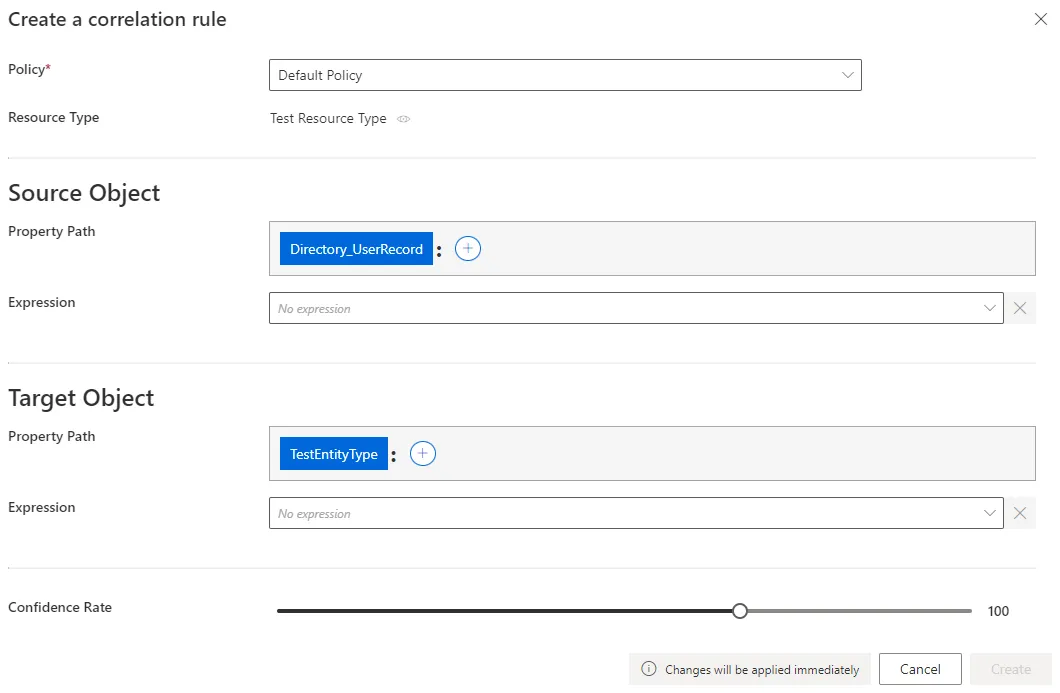
- Source Object: at least one property from the source system that is going to be linked to a given target object. Can be defined by a property path and/or an Expressions.
- Target Object: one property from the managed system that is going to be linked to a given source object. Can be defined by a property path and/or an Expressions.
Confidence Rate: rate expressing the rule's reliability, and its priority order.In this example, a person via their login and name, is the owner of a nominative AD account via its
sAMAccountNameattribute and display name: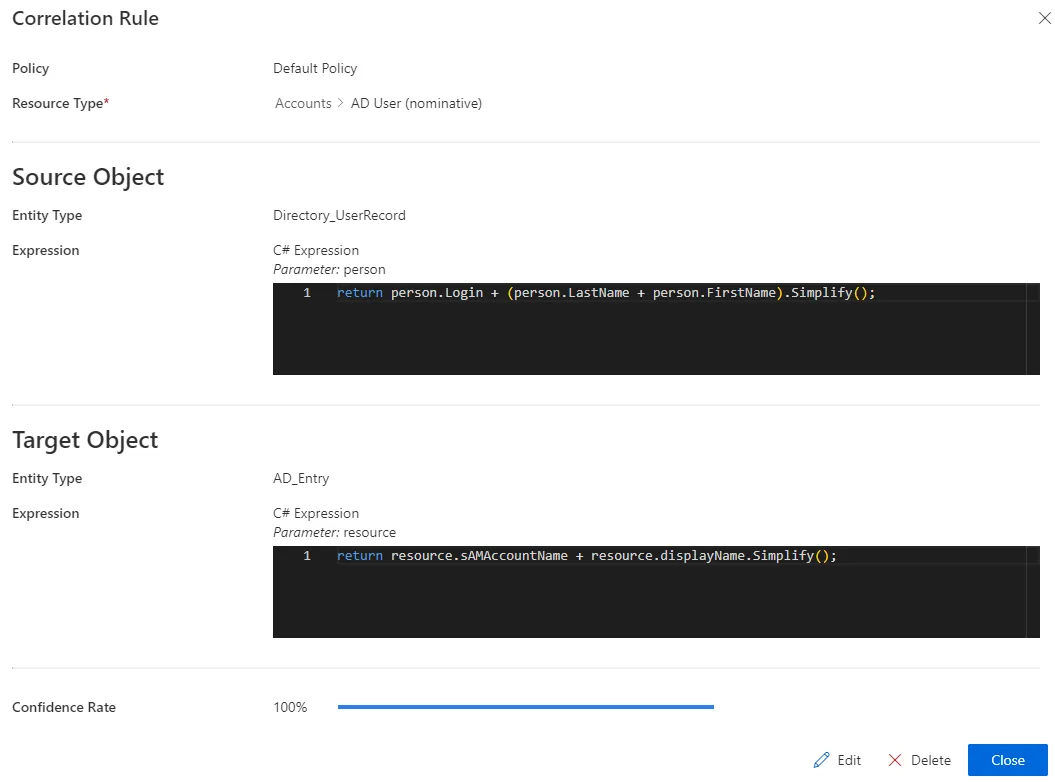
-
Click on Create and see a line added on the rules page.
-
On the connector dashboard and in the Resource Types frame, click on Jobs > Prepare Correlation Keys to compute the expressions used in the new correlation rule(s), and click on Jobs > Compute Role Model to apply all correlation rules.
Impact of Modifications
An action (addition/modification/deletion) on a correlation rule doesn't trigger a new computation of correlation for the resources that are already correlated. The new version of said correlation rule will be applied only to new resources, along with the existing resources whose correlation was not yet reviewed (as unauthorized accounts on the Resource Reconciliation screen).
Thus only non-conforming resources (unauthorized accounts on the Resource Reconciliation screen) can have their correlation and classification re-computed.
Even without selecting an owner, reviewing unauthorized accounts on the Resource Reconciliation screen "blocks" correlation and classification "as is". Neither will be re-computed.
Simulations are available in order to anticipate the changes induced by a creation/modification/deletion in correlation rules. See the Perform a Simulation topic for additional information.
Any modification in correlation rules is taken into account via the following jobs: on the connector dashboard and in the Resource Types frame, click on Jobs > Prepare Correlation Keys, and then on Jobs > Compute Role Model.
Verify Correlation
In order to verify the process, check the list of Review Orphaned and Unused Accounts and analyze them to look for patterns revealing correlation issues. To do so, click on the target entity type(s) affected by your rule(s) in the left menu of the home page.
The entity type's page can be configured via XML to customize all displayed columns and available filters, especially the Orphan filter that spots resources without an owner, and the Owner / Resource Type column that shows the owner assigned to each resource.
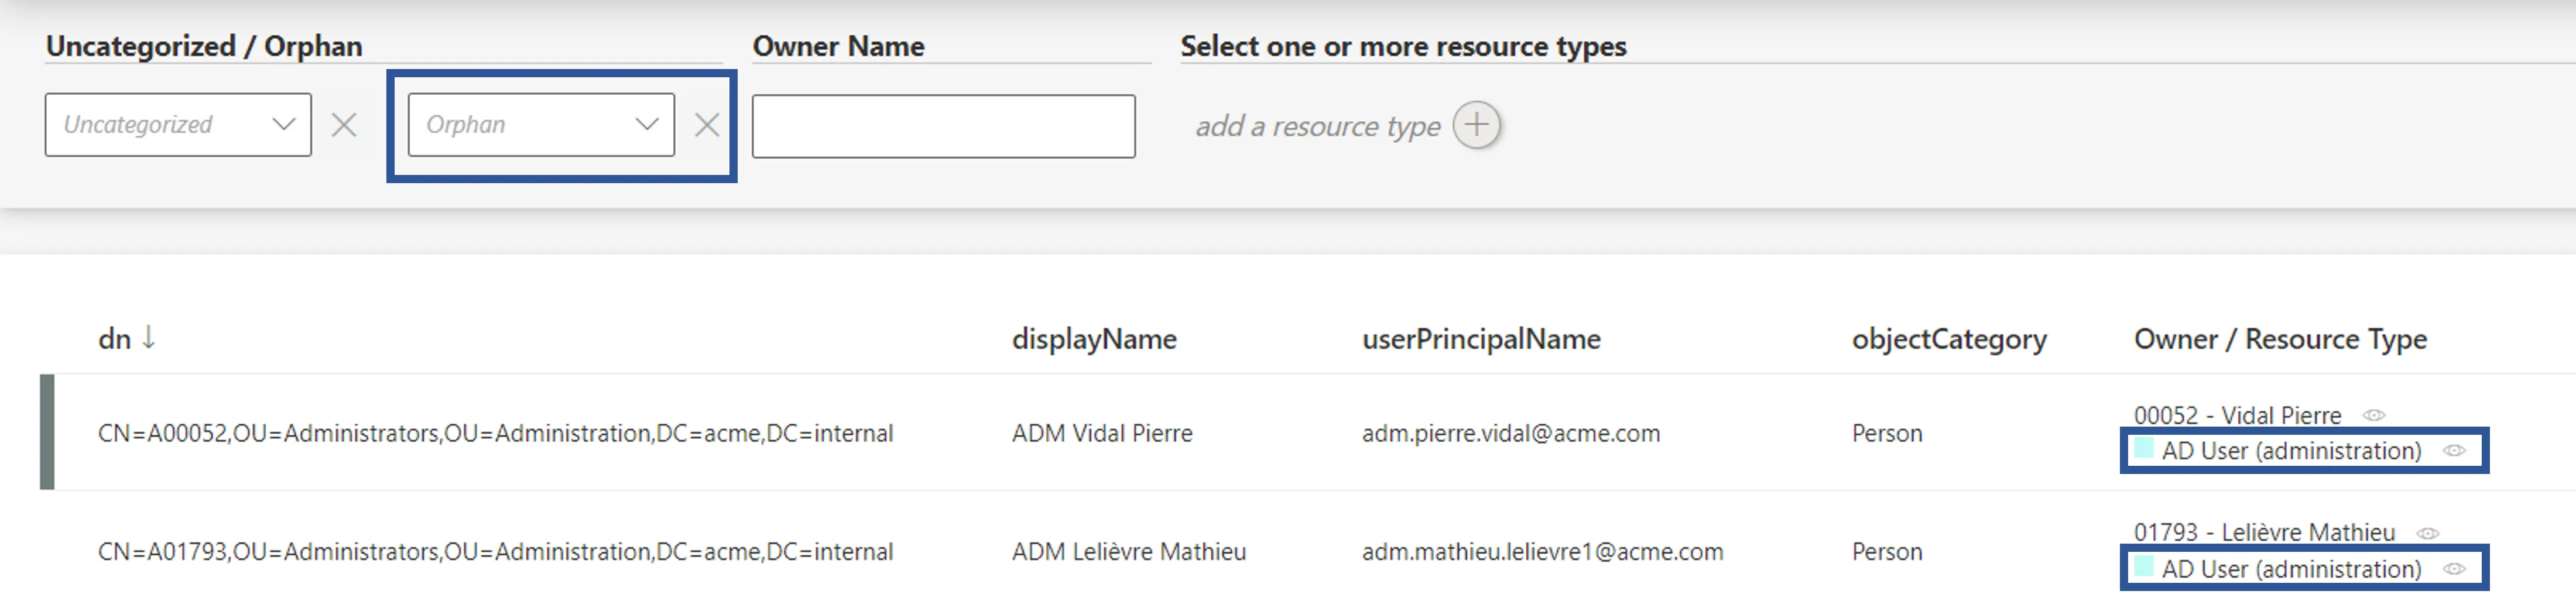
A knowledgeable person must analyze a few samples to ensure that resources' owners can all be justified, meaning that orphaned accounts are supposed to be so, and that correlated resources are matched with the right owner.
Another possibility of correlation validation is to compare the number of AD accounts to the number of users. However, keep in mind that several accounts are sometimes assigned to a single user.
Troubleshooting
If a resource is not correlated (or not correctly), then:

- Check the validity of correlation rules.
- Check the resource's data quality.
Model the Data
How to choose the appropriate model for a connector's data.
Overview
In this part, you work outside Identity Manager to define the model that is going to be used in the next steps to represent a managed system's resources and entitlements inside Identity Manager, as a connector.
This page is no technical procedure, but rather a guide aiming to give a global view on connectors (with their components and their purpose), in order to help integrators choose the most appropriate way to model the managed system in the form of a connector later inside Identity Manager.
The aim is to think about said managed system in order to specify:
- what data you need to import into Identity Manager;
- how you are going to organize this data together, and model it as a connector inside Identity Manager.
Useful data
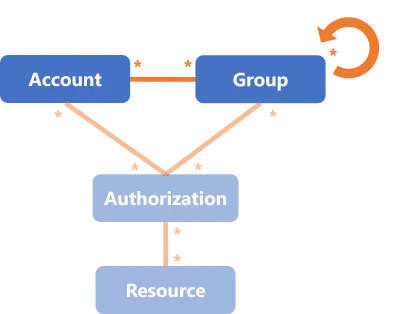
Modeling the connector is a matter of identifying what data you want to get into Identity Manager. You should not retrieve all the data from the managed system, but only two kinds of useful data:
- data that represents how the authorization system works in the managed system, i.e. data that composes entitlements and their assignments;
- data that you want to watch and/or control and/or fulfill.
The model must take both into account. So both kinds of data must be extracted from the managed system.
Let's take an example. An Active Directory manages authorization through group membership (using the user-group paradigm).
So first we need to retrieve both groups and accounts, in order to manage the AD's assignments of entitlements for our users (in the AD language: manage their accounts and group memberships).
Secondly, we want to control attributes such as the name or e-mail of the account, and ensure they are consistent with the correlated identity. Thus these attributes are the second kind of information that we want to retrieve.
Data models
Fortunately, you won't have to design your connector model from scratch. NETWRIX has done a little work ahead, and you are presented here with four model templates that have proven to work so far. Experience shows that most managed systems can be shaped using one or a mix of the following:
- the User model is the most simple model for a connector, where a user is directly associated with a list of entitlements;
- the User-Group model represents typical Role-Based Access Control mechanisms, where the ability to perform an action is granted through accounts' membership to a specific group (also called role or profile according to the system);
- the Account-Profile-Transaction model represents a system, where the ability to perform an action is granted through the assignment of fine-grained entitlements (called transactions) which are packaged into profiles;
- the Star model represents a system, where the ability to perform an action is granted through the assignment of entitlements which are based on at least two variable parameters.
Each template presents a few objects and the relationships between them. To become the model of the actual managed system, these objects must be renamed and their attributes defined according to the reality of said managed system.
This sheet guides you through choosing the right model template for your connector. The actual technical implementation of the model will be tackled in the last part of the connector configuration: Create an Entity Type.
Connector model and roles:
The design of a model must take into account what is really going on inside the managed system in terms of entitlements, and be flexible enough to express it as roles in the context of the role model. The role model is the universal RBAC/ABAC language used by Identity Manager to express all entitlements.
You don't have to worry about this "role" part right now. It is going to be tackled during single role catalog creation. At this point, you will take a look at the way roles are defined and linked to resources to represent entitlements. But the work starts here, by modeling the resources that exist in the managed system. Some of those resources, such as Active Directory groups, include interesting information about entitlements.
Right now, you can see the connector's model as a precise description of the shape of the technical resources and entitlements of the managed system. And, you can see roles as the higher-order universal language in which entitlements and their assignments are expressed in Identity Manager for all managed systems.
Connector model and provisioning:
After defining the useful data that you need to model a given system, you also have to decide what data you need Identity Manager to write to the managed system. Identity Manager writing to an external system is called provisioning.
Participants and Artifacts
For a given managed system, integrators may need the help of the application owner who knows the purpose of the application.
| Input | Output |
|---|---|
| - | Connector model |
Define the Connector Model
Define your connector model by proceeding as follows:
-
Use the advice and examples given about each model template to find the template that most closely matches your use case.
-
Adapt the template to the reality of your managed system by renaming and adjusting the model's objects.
-
Define your useful data, and thus the attributes of each object according to the reality of the data in your managed system.
-
Ensure that all objects have at least one attribute that can serve as a key to be uniquely identified within Identity Manager. You will get more details about keys during entity type creation.
-
Ensure the following guidelines' enforcement:
Keep it simple
The model must stay as simple as possible. Embed just enough information.
Keep it readable for most users
The model must be easy to understand. For this, adopt a business approach, i.e. make the model user-friendly and close to real activities. This functional approach is essential to the efficiency of data flows (synchronization/provisioning loop). Keep in mind that the aim is to define a model close to the reality of the system.
Keep it open to changes
The model is going to change and evolve during the life of the application, to account for new needs or changes. This must be considered too in the initial model to make future changes less painful.
Find at the bottom a procedure example about modeling the Active Directory.
Model Templates
All templates are detailed with examples and schemas with the following key:
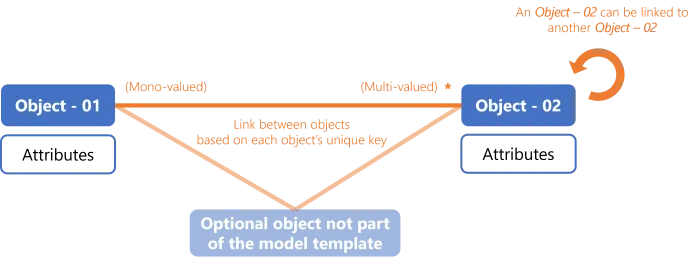
During the technical modeling inside Identity Manager, these objects will become entity types, their attributes will become scalar properties, the links between them will become navigation properties.
User
Authorization mechanisms
The User template is the most simple model for a connector, and used to represent a user directly associated with a list of entitlements.
Users are represented by the accounts they own, and entitlements are represented by resources.
Permissions can be managed:
- by resource, with a list of authorized accounts for each resource;
- by account, with a list of authorized resources for each account.
Model

Thus you need to create one entity type to represent either accounts or other resources.
Each entity type needs to be shaped with properties, chosen according to the data useful for entitlement assignment.
The only sensitive and required properties are the keys and the property holding entitlements. It means that:
- if entitlements are managed by resource, then the entity type representing resources must have an attribute (scalar property) containing the list of authorized accounts;
- if entitlements are managed by account, then the entity type representing accounts must have an attribute (scalar property) containing the list of authorized resources.
Recommendation: categorize accounts in types
Some of the managed systems following this model offer predefined types of accounts, with a
pre-packaged set of authorizations (such as the basic user with read/write permissions on
non-sensitive resources, or the admin with higher privileges).
Account types make modeling easier, as they bring another level of information about the entitlements they contain. So we can embed more useful information in the model, thanks to an attribute that represents the account type.
In further steps, you will be able to define one resource type per account type and map each one to a role for assignment and provisioning.
Example - Canteen badges
Canteen badges are a simple system handled with the User model. Indeed users can simply have among their attributes the access authorization for a given building and a given time. Or also, instead of creating an entity type for users, we can create an entity type for the badges. They would have in their attributes their respective access location and time, and an attribute listing authorized users.

Example - Mailboxes
Mailboxes constitute a complex system, but IGA purposes require little information (only accounts) so this system can too be handled with the User model, either through users and their entitlement lists, or through mailbox entitlements and their lists of authorized users.

User-Group
Authorization mechanisms
The User-Group template is better suited to represent typical Role-Based Access Control authorization mechanisms, where a user is authorized to perform an action according to their account's membership to a specific group. Instead of groups, some systems talk about roles or profiles: users are authorized to perform an action through a given role or profile which they are assigned, instead of a group membership. It is all the same idea, and the User-Group template is perfect for them too.
Groups can also be categorized and grouped into larger groups.
Users are represented by the accounts they own.
Model

Thus you need to create one entity type to represent groups (or roles or profiles) and one for accounts.
Each entity type needs to be shaped with properties, chosen according to the data useful for entitlement assignment.
The only sensitive and required properties are those constituting the link between both entity types, i.e. the navigation properties representing the group membership.
Recommendation: categorize accounts in types
Many of the managed systems following this model, just like the User model, distinguish between several types of accounts.
In further steps, you will be able to define one resource type per account type and map each one to a role for assignment and provisioning.
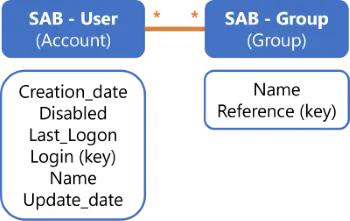
Example - SAB
The SAB system handles authorizations using users and groups. A user is authorized to perform an action according to their group membership.
We define two entity types SAB - User and SAB - Group. We fill them with a few attributes useful
to manage entitlements in the SAB application. Finally, we add a navigation property in both entity
types in order to link User with Group with an "n-to-n" relationship.
Example - RACF
The RACF connector is used to manage critical entitlements on the mainframe. RACF is a complex system, but IGA purposes only require information about accounts and groups, as entitlements are given by group membership. Thus the system can be simplified to be managed by Identity Manager following the User-Group model.
For RACF, Identity Manager provisions only the link between accounts and groups.
Example - TSS
The TSS connector is similar to RACF in its use, but manages fine-grained entitlements at a higher level than RACF. TSS is at least as complex as RACF, and its connector follows a similar simplification as RACF's.
Identity Manager manages users (with their accounts) and groups called here profiles. Both users and profiles are grouped into departments, themselves grouped into partitions. Entitlements are called authorizations, and are linked to users through group (profile) membership.

For TSS, Identity Manager provisions only the link between users and profiles.
Identity Manager receives a write access for users and profiles, only a read access for the rest of the model. It is interesting to keep the whole model for query goals such as listing a given user's entitlements.
Recommendation: categorize accounts in types
Many of the managed systems following this model, just like the User model, distinguish between several types of accounts.
In further steps, you will be able to define one resource type per account type and map each one to a role for assignment and provisioning.
Roles: During the Create Roles in the Role Catalog step for this connector you can build roles based on the group-membership system represented by users and profiles. Thus you will create navigation rules to represent the link between users and profiles.
Example - SDGE
The SDGE connector is used not to manage people but positions, so the application screens depend on the user's position. In other words, Identity Manager is going to manage users' entitlements in SDGE through their positions.
The object User or Account from the template, which contains users' accounts, is called here
Worker.
The object Group from the template is called here Position (grouped into organizations,
themselves grouped into organization types). It contains the way an entitlement is given, here
through a given position and wallet.
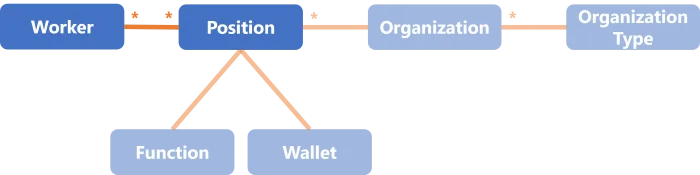
For SDGE, Identity Manager provisions only workers and the link between workers and positions.
Account-Profile-Transaction
Authorization mechanisms
The Account-Profile-Transaction model is better suited to represent a system, with the following basic characteristics:
- To be able to perform an action or read a piece of data, a user must be granted one or several transactions. Transactions represent fine-grained entitlements. They can be associated to a type and conditions that restrict their use, such as a maximum per day or a context of validity.
- Transactions are not assigned directly to an account, but are packaged into profiles, which are then assigned to accounts, which are owned by users.
- Profiles can sometimes be classified into categories representing the sensitivity of the
transactions they contain.
For example, profile categories can be
Privilege Profilesfor high privilege transactions on sensitive data, andTechnical Profilesfor technical transactions related to system administration.
Model

Thus you need to create one entity type to represent accounts, one for profiles, and one for transactions.
Each entity type needs to be shaped with properties, chosen according to the data useful for entitlement assignment.
The only sensitive and required properties are those constituting the link between entity types,
i.e. the navigation properties representing the packaging of transactions into profiles on the one
hand, and the assignment of profiles to accounts on the other hand. You can potentially add a
navigation property in the Profile entity type in order to categorize profiles within larger
profiles.
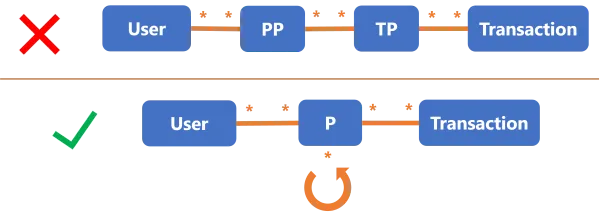
Instead of creating as many Profile objects as there are categories of profile, NETWRIX recommends
shaping the Profile object with a category attribute. Indeed, a multiple-object model
complexifies the addition of new profiles in the future. And as new profiles can be created in the
future though, then you must plan for it.
For example, instead of modeling two artificial types of profiles called PP for "Privilege
Profile" and TP for "Technical Profile", prefer a single object P that represents all profiles
using a specific attribute to differenciate technical from privilege profiles. This way, the model
sticks to the real capacity of the technical tool and all use-cases are considered.
See the schema below this note.
Transactions are not mandatory in a model. Most of the time, the profile packages are predefined once and for all, or are the responsibility of the application owner. Then Identity Manager doesn't need to manage the specific transactions for a profile directly inside the managed system. You can hence avoid modeling transactions altogether. In this case, you fall back on the User-Group model with a twist: if profile categories are relevant in the system's authorization mechanism, then you must take them into account.
Example - TSS
The TSS connector is actually a mix of the User-Group and Account-Profile-Transaction models. The User-Group part is explained above.

Transactions are called here authorizations.
For TSS, Identity Manager provisions only the link between users and profiles. Transactions (and the rest of the model) are only readable.
Star
Authorization mechanisms
The Star model is better suited to represent a system, where the ability to perform an action is granted through the assignment of entitlements, based on several variable parameters, most often the combination of a profile and at least one user data criteria.
For example, you might want to give certain entitlements only to users who have an administrator profile and work in Marseilles.
As the parameter combination is not predetermined, the whole system can become highly complex with the addition of data criteria.
Users are represented by the accounts they own.
Comparison with other models: while the User-Group model grants an entitlement via a group membership, the Star model grants said entitlement via a special authorization linking the right criteria altogether (i.e. the right profile and other user parameters).
Model

Thus you need to create one entity type to represent accounts, one for each criterion, and another one to represent the object linking acounts to criteria.
Each entity type needs to be shaped with properties, chosen according to the data useful for entitlement assignment.
The difficulty of this model is to map everything to roles in the role model. In Identity Manager's role model, one assignment is always one role. But in this case, in the managed system, an assignment is a tuple of things.
To map the tuple of things on a role, we have several choices:
- Create a role per possible combination of tuple of things. This can quickly get out of hand as far as the number of created roles is concerned.
- Use parametrized roles. The number of roles will be contained, but it is a little more complicated to configure.
The flexibility generated by parameters is particularly interesting for roles that incorporate entitlements in a more complex way than application roles. If the information contained in a role is complicated to deduce, then parameters can bring some clarity in the configuration. The objective is always to minimize the number of distinct roles, and the number of roles that are assigned to one given identity.
Example
Consider an application which manages entitlement assignment with different rules, according to users' profiles, attachment areas and sites. Our example shows 4 profiles, 4 attachment areas and 3 sites. So a user may be assigned a given entitlement for a given profile, attachment area and site.
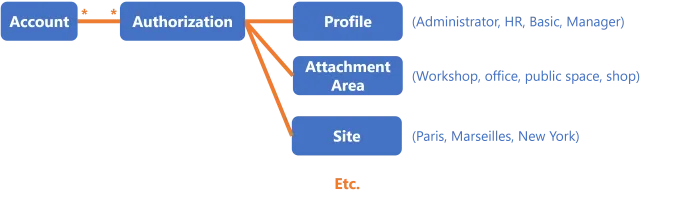
For this connector, Identity Manager provisions only the links between accounts and linking objects, and the links between linking objects and each criterion.
Concerning roles, integrators have two options:
- either create a specific role for
Profile_iwithAttachmentArea_jandSite_kfor all available profiles, attachment areas and sites, which makes a total of 48 roles (for a quite simple example); - or create a single role with parameters for profiles, attachment areas and sites.
Procedure Example
Step 1: choose the connector model.
Let's say we are modeling an Active Directory, which handles authorization through the group memberships of accounts. In other words, to assign an entitlement to an identity, we make the AD account of said identity member of the corresponding AD group. That is exactly what the User-Group template is designed to handle. See the Model the Data topic for additional information.
Step 2: adapt the model to your reality.
We start by renaming the Account object as AD_User and the Group object as AD_Group.

Step 3: define useful data close to your reality.
We shape these objects with the following attributes:
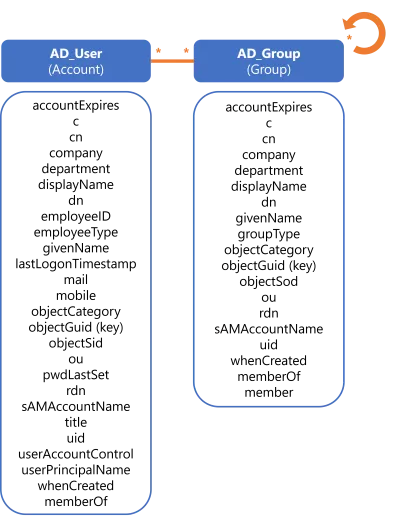
Step 4: ensure that all objects have unique keys.
Indeed we defined objectGuid as a key for both accounts and groups.
Step 5: ensure the guidelines' enforcement.
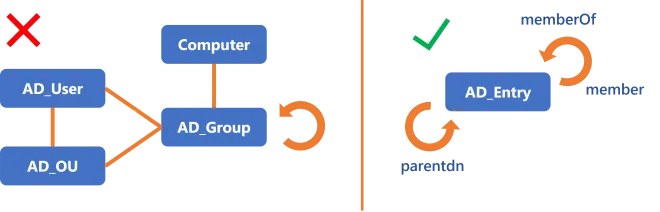
We could content ourselves with this model. The main benefit of this model is to closely mimic the reality of the AD authorization mechanism. But we'd like to go a bit further, applying a "keep it open to changes" approach.
Observe the similarities between AD_User and AD_Group. There are many attributes repeating
between the two entity types.
We can simplify: prefer a single object AD_Entry that can represent both users and groups. The
difference between the two types of object will be made clear via specific properties like
objectCategory, member and memberOf.
Beyond avoiding repetition, this makes the model easily adaptable if new elements pop up.
For example, we could want to include computers or organizational units in the model in the future. Instead of creating two new additional objects
AD_ComputerandAD_OU, the existing objectAD_Entrycan represent them both at no additional modeling cost. Even though we could addAD_ComputerandAD_OUwithout merging groups with entries, designingAD_Entrywith all these attributes provides the means to add objects without creating new entity types.