SCIM
This connector exports and fulfills entities from/to a SCIM compliant application.
This page is about:
- Custom/SCIM
- CRM/Salesforce
- Messaging/Slack
- PAM/CyberArk

![]()


Overview
Simple Cloud Identity Management (SCIM) is a Request for Comments (RFC) standard. It describes a REST API with specific endpoints to get and set data in a web application for IGA purposes. It allows an identity provider to manage the web application's accounts. For more details about SCIM and RFC, see the IETF document.
NOTE: Similarly to the Salesforce REST-based API, SCIM for Salesforce enables reading and
writing attributes, but writes to a smaller subset. For example, the following properties are
manageable by the Salesforce REST-based API but not SCIM: PermissionSetGroup,
PermissionSetLicense, UserPermissionsKnowledgeUser, UserPermissionsInteractionUser,
UserPermissionsSupportUser, CallCenterId, SenderEmail.
See the Salesforce's documentation for additional information.
Prerequisites
Implementing this connector requires the web application that you want to synchronize to implement SCIM Version 2.0 or later.
The implementation of the Salesforce connector requires the completion of the following steps:
- Connect the application
- Enable OAuth authentication
- Reset the user token
- Configure the Salesforce connection
Connect the application
To connect to the Salesforce application do the following:
Step 1 – Log into Salesforce using an admin account.
Step 2 – Go to Advanced Setup.
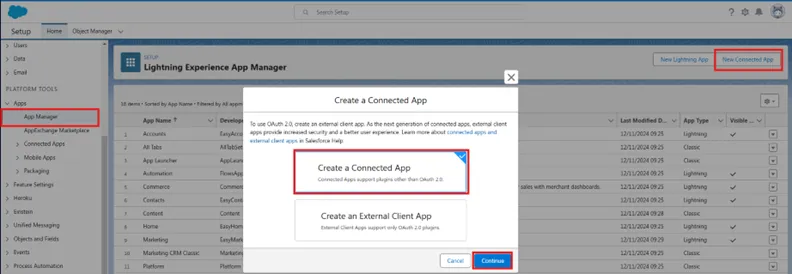
Step 3 – Go to App Manager and Create a Connected App.
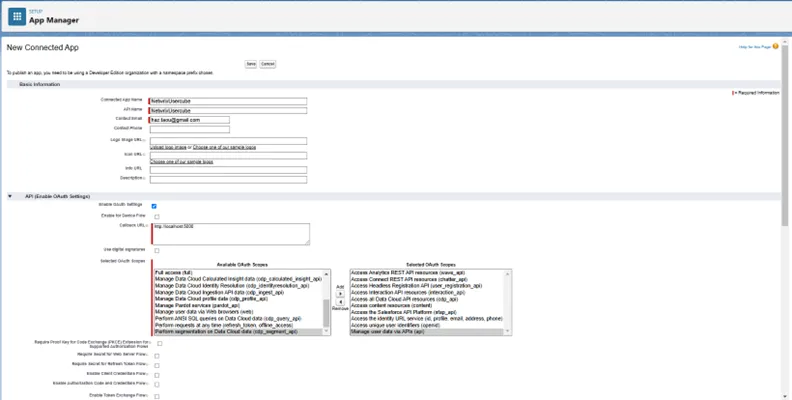
Step 4 – Fill in the details of the application: Application Name, API Name, Contact Email, select Enable OAuth Settings, and complete the mandatory information as callback URL and OAuth Scopes.
Step 5 – Save the Application.

Step 6 – Go to Manage Connected Apps and click on the newly created application.
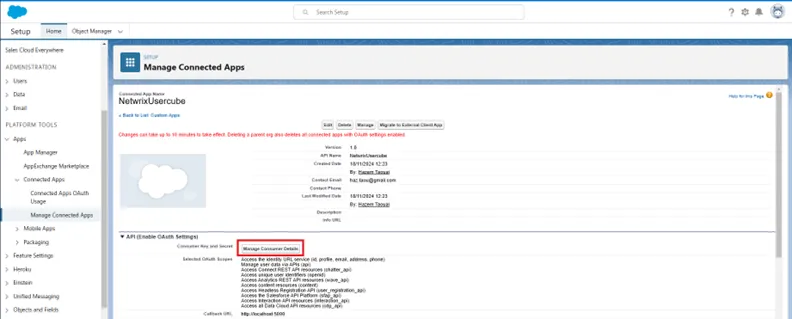
Step 7 – Click on Manage Consumer Details.
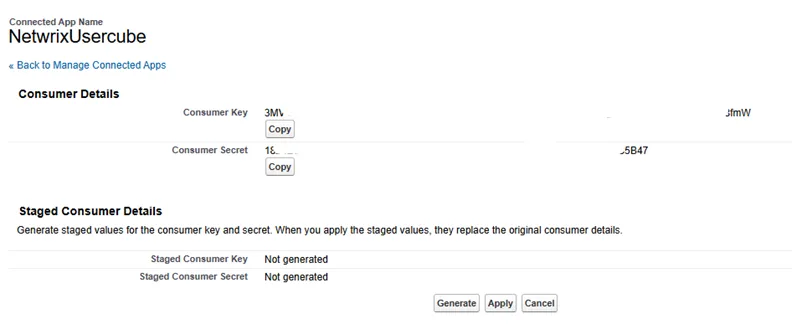
Step 8 – Copy the Consumer Key and Consumer Secret in your Keypass.
Enable OAuth authentication
To enable the OAuth authentication do the following:
Step 1 – Log into Salesforce using an admin account.
Step 2 – Go to Advanced Setup.
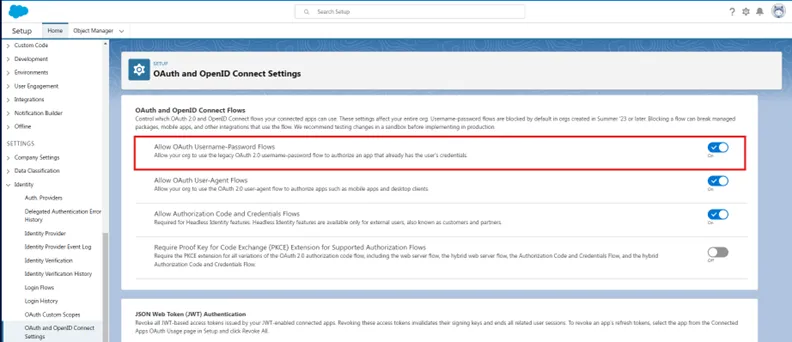
Step 3 – Go to OAuth and OpenID Connect Settings in the Identity drop-down menu, enable the option to Allow OAuth Username-Password Flows.
Reset the user token
To reset the user token do the following:
Step 1 – Log into Salesforce using an admin account.
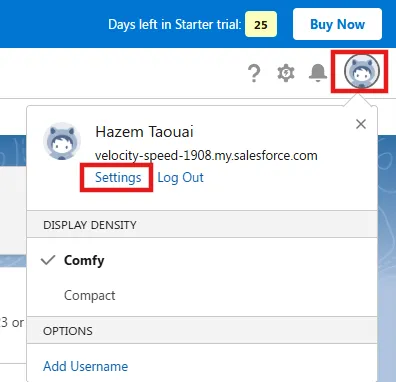
Step 2 – Click on Settings under the profile details.
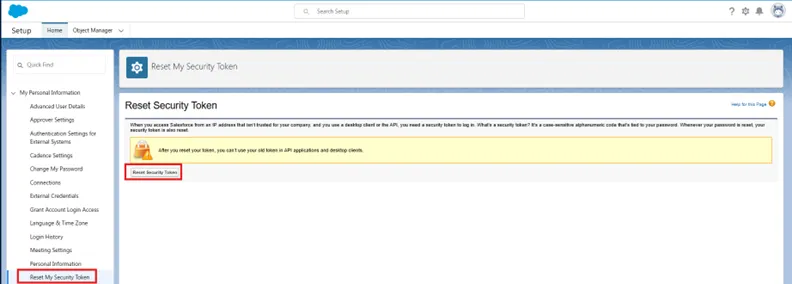
Step 3 – Click on Reset My Security Token.

Step 4 – An email containing the new token will be sent.
Configure the Salesforce connection
To configure the Salesforce connection do the following:
Step 1 – Log into Identity Manager using an admin account.

Step 2 – Create a new Salesforce connector.
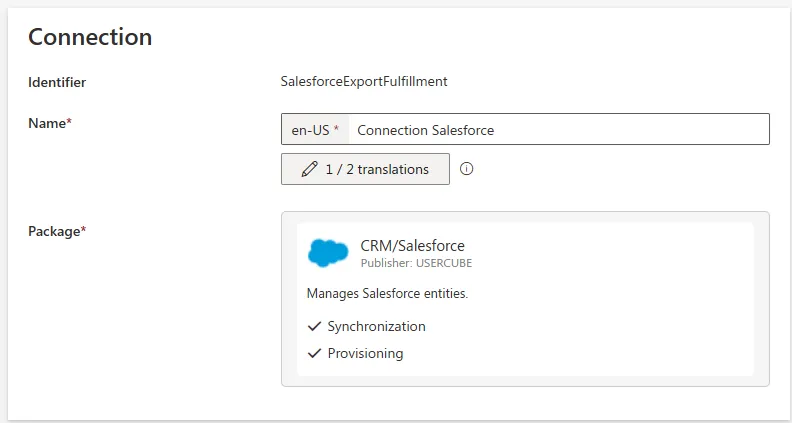
Step 3 – Add a new Salesforce connection.
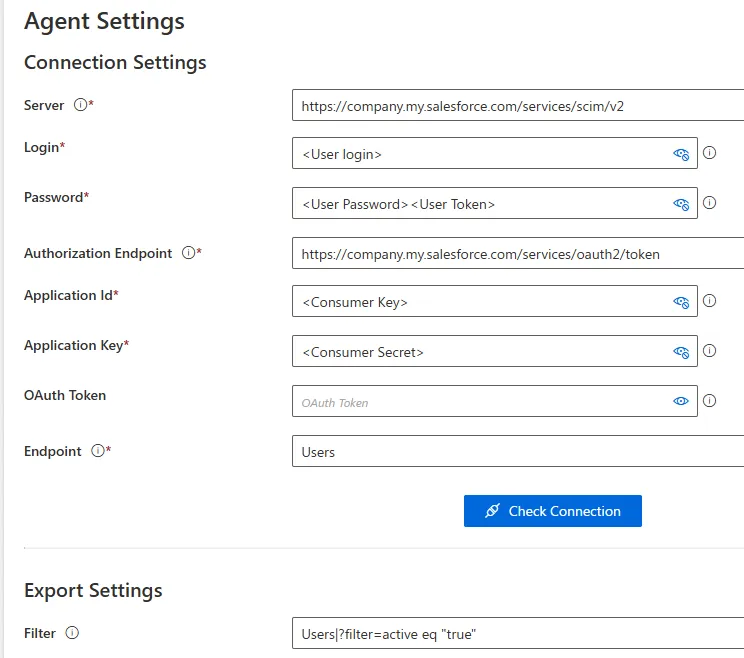
Step 4 – Fill the fields in the Connection Settings and choose the Filter.
The configuration of the Salesforce connector is completed.
Configuration
This process is configured through a connection in the UI and/or the XML configuration, and in the
appsettings.agent.json > Connections section.
See the Connection topic for
additional information.
Code attributes enclosed with <> need to be replaced with a custom value before entering the
script in the command line.
appsettings.agent.json
{
  ...
  "Connections": {
    ...
    "<ConnectionIdentifier>": {
      ...
    }
  }
}
Remember, the identifier of the connection and thus the name of the subsection must:
- Be unique
- Not begin with a digit
- Not contain
<,>,:,/,\,|,?,*, and_.
The following example gets information via SCIM on a web application whose URL base is
https://example.for.doc.com:
Code attributes enclosed with <> need to be replaced with a custom value before entering the
script in the command line.
appsettings.agent.json
{
  ...
  "Connections": {
    ...
    "SCIMExport": {
        "ApplicationId": "<applicationIdExample>",
        "Server": "<https://example.for.doc.com/services/scim>",
        "ApplicationKey": "<KEY>",
        "Login": "<login>",
        "Password": "<password>",
        "Filter": "<Users|?filter=active eq \"true\">"
    }
  }
}
Here we use an account's credentials (login and password) with our application's credentials (ApplicationId and ApplicationKey).
The filter ?filter=active eq \"true\" retrieves active Users from the external system.
Setting attributes
| Name | Type | Description |
|---|---|---|
| Filter optional | String | Filters applied in the SCIM request retrieving the entities. You should write the filters as you would write them in the URL (including the "?"). For more details on the syntax, see the RFC document. Syntax:EntityNameInSCIM1|scimFilter1*EntityNameInSCIM2|scimFilter2*EntityNameInSCIM3|scimFilter3 |
| OAuth2Url optional | String | URL which get tokens for the requests. The system can usually find this information, but sometimes the system gets it wrong, like Salesforce for example. |
| PageSize default value: 200 | String | Maximum number of elements returned by one request. |
| Server required | String | URL of the SCIM endpoints of your application, excluding /v2. |
| ApplicationId optional | String | Login of the application or of the application's Id provider. |
| Login optional | String | Login of the account. |
| OAuthToken optional | String | Generated OAuth token to connect to the application. |
| Password optional | String | Password of the account. |
| ScimSyntax default value: RFC | String | Type of SCIM implementation: RFC - used for the systems that follow SCIM's rules; Salesforce - required when this connector targets Salesforce; CyberArk - required when this connector targets CyberArk. |
The credential attributes (ApplicationId, ApplicationKey, Login and Password) are used to obtain a token from the application for our requests.
Output details
This connector is meant to generate to the ExportOutput folder the following CSV files:
- One file for each SCIM entity, coming from entity type mappings's connection tables, named
<connectionIdentifier>_<entity>.csv, with one column for each property having a ConnectionColumn and each property without it but used in an entity association; - One file for each membership, coming from entity association mappings's connection tables,
named
<connectionIdentifier>_members_<entity>.csv, with the following columns:- Value — ID of the group
- MemberId — ID of the group member
- One file for each entity named Containers such as CyberArk's privileged data, named
<connectionIdentifier>_privilegedData_Containers.csv.
See the Application Settings and Entity Type Mapping topics for additional information.
For the connector to work properly, the connection tables must follow the naming conventions too:
<identifier>_<entity> for entities and <identifier>_members_<entity> for links.
If the connection column describes a sub-property, then the name should have the following pattern:
{property}:{sub-property}. The character ":" should not be used in other situations.
For example, if we want to retrieve information about Users, Groups and Groups' members, we should have the following configuration:
Code attributes enclosed with <> need to be replaced with a custom value before entering the
script in the command line.
<EntityTypeMapping Identifier="Salesforce_User" Connector="Salesforce" ConnectionTable="SCIMExport_Users"> <Property Identifier="SF_id" ConnectionColumn="id" IsPrimaryKey="true" /> <Property Identifier="givenName" ConnectionColumn="name:givenName" /> <Property Identifier="emails" ConnectionColumn="emails:value" /></EntityTypeMapping><EntityTypeMapping Identifier="Salesforce_Group" Connector="Salesforce" ConnectionTable="SCIMExport_Groups"> <Property Identifier="SF_id" ConnectionColumn="id" IsPrimaryKey="true" /> <Property Identifier="display" ConnectionColumn="displayName" /></EntityTypeMapping><EntityAssociationMapping Identifier="Salesforce_Group_Members" Column1="value" EntityPropertyMapping1="Salesforce_Group:SF_id" Column2="MemberId" EntityPropertyMapping2="Salesforce_User:SF_id" Connector="Salesforce" ConnectionTable="SCIMExport_members_Groups" />
We would have SCIMExport_Users.csv with the column headers id, name:givenName and emails:value,
SCIMExport_Groups.csv with the column headers id and displayName, and
SCIMExport_members_Groups.csv with the column headers value and MemberId.
Each column contains the value of the corresponding attribute. SCIM attributes are described in the RFC document.
Limitations
The incremental mode only works for User entities and not for the others like Groups or Roles. It means that entities like Groups or Roles are always handled with the complete mode.
Fulfill
This connector writes to the managed web application to create, update, and/or delete users with their attributes and group memberships, but no group or other entities.
Configuration
Same as for export, fulfill is configured through connections.
The following example writes information to SCIM on a web application whose URL base is
https://example.for.doc.com.Code attributes enclosed with
<>need to be replaced with a custom value before entering the script in the command line.appsettings.agent.json
{
...
"Connections": {
...
"SCIMFulfillment": {
"ApplicationId": "<applicationIdExample>",
"Server": "<https://example.for.doc.com/services/scim>",
"ApplicationKey": "<KEY>",
"Login": "<login>",
"Password": "<password>",
"ServiceSupportBulk": true,
"BulkMaxOperation": 10
}
}
}Here we use an account's credentials (login and password) with our application's credentials (ApplicationId and ApplicationKey).
We specify that bulk requests are supported with a maximum of 10 operations per request.
Setting attributes
| Name | Type | Description |
|---|---|---|
| BulkMaxOperation optional | Int32 | Maximum number of operations which can be sent in one bulk request. |
| ServiceSupportBulk optional | Boolean | True to allow bulk requests. depends on the web application's SCIM implementation. See the RFC document for additional information. |
| Server required | String | URL of the SCIM endpoints of your application, excluding /v2. |
| ApplicationId optional | String | Login of the application or of the application's Id provider. |
| ApplicationKey optional | String | Password of the application or of the application's Id provider. |
| Login optional | String | Login of the account. |
| OAuthToken optional | String | Generated OAuth token to connect to the application. |
| Password optional | String | Password of the account. |
| ScimSyntax default value: RFC | String | Type of SCIM implementation: RFC - used for the systems that follow SCIM's rules; Salesforce - required when this connector targets Salesforce; CyberArk - required when this connector targets CyberArk. |
The credential attributes (ApplicationId, ApplicationKey, Login, and Password) are used to obtain a token from the application for our requests.
Password reset
This connector does not reset passwords.
Credential protection
Data protection can be ensured through:
- RSA encryption, configured in the
appsettings.encrypted.agent.jsonfile - An Azure Key Vault safe
| Attribute | Naming Convention for the Key in Azure Key Vault |
|---|---|
| ApplicationId | Connections--<identifier>--ApplicationId |
| ApplicationKey | Connections--<identifier>--ApplicationKey |
| BulkMaxOperation | Connections--<identifier>--BulkMaxOperation |
| Login | Connections--<identifier>--Login |
| Password | Connections--<identifier>--Password |
| ServiceSupportBulk | Connections--<identifier>--ServiceSupportBulk |
| Server | Connections--<identifier>--Server |
- A CyberArk Vault able to store Active Directory's Login, Password, and Server.
See the RSA Encryption , Azure Key Vault, and CyberArk's AAM Credential Providers topics for additional information.
Protected attributes are stored inside a safe in CyberArk, into an account whose identifier can be
retrieved by Identity Manager from appsettings.cyberark.agent.json.
For example:
Code attributes enclosed with <> need to be replaced with a custom value before entering the
script in the command line.
appsettings.cyberark.agent.json
{
  ...
  "Connections": {
    ...
    "SAPExportFulfillment": {
        "Login": "SAPExportFulfillment_CyberArkKey",
        "Password": "SAPExportFulfillment_CyberArkKey",
        "Server": "SAPExportFulfillment_CyberArkKey"
    }
  }
}