Interact with a Web Page via Robot Framework
This guide explains how to write a Robot Framework script that interacts with a web based external system.
Example: Interacting with a web-based application
Consider an external system that is accessible through a web interface, and that does not offer an API. In this situation, we can either interact manually with the external system , or with a Robot Framework connection.
Prerequisites
This guide will focus only on how to interact with a web-based application. The guide on how to write a Robot Framework script explains the basics of Robot Framework. The basic prerequisites can be found on the Robot Framework connector page. See the Write a Robot Framework Script and Robot Framework topics for additional information.
The prerequisites are explained in detail at the Robot Framework selenium pypi page.
The requirements specific to the Robot Framework Selenium library are as follows:
- Robot Framework selenium library: use
pip install --upgrade robotframework-seleniumlibraryin the command prompt. - A web browser.
- A web driver that corresponds to the web browser and its version. Webdrivers can be found in
the Selenium website.
This web driver should be in your path. To check that the web driver is in your path, use
gcm {webdriver_name}. As an example for Edge, usegcm MicrosoftWebDriver.
The web driver for Edge is called msedgedriver.exe, but the Robot Framework may expect it to be
called MicrosoftWebDriver.exe depending on the python version. Renaming the web driver from
msedgedriver.exe to MicrosoftWebDriver.exe should fix this issue.
If the browser is updated, the web driver should also be updated.
While not strictly required, it is highly reccomended to look at the Robot Framework selenium library documentation.
Selenium basics
Selenium is a web browser automation tool. Selenium can automatically perform scripted actions in a web browser. Selenium is not easy to use on its own, and it is easier to use Selenium via the Robot Framework. However, the basics are still the same.
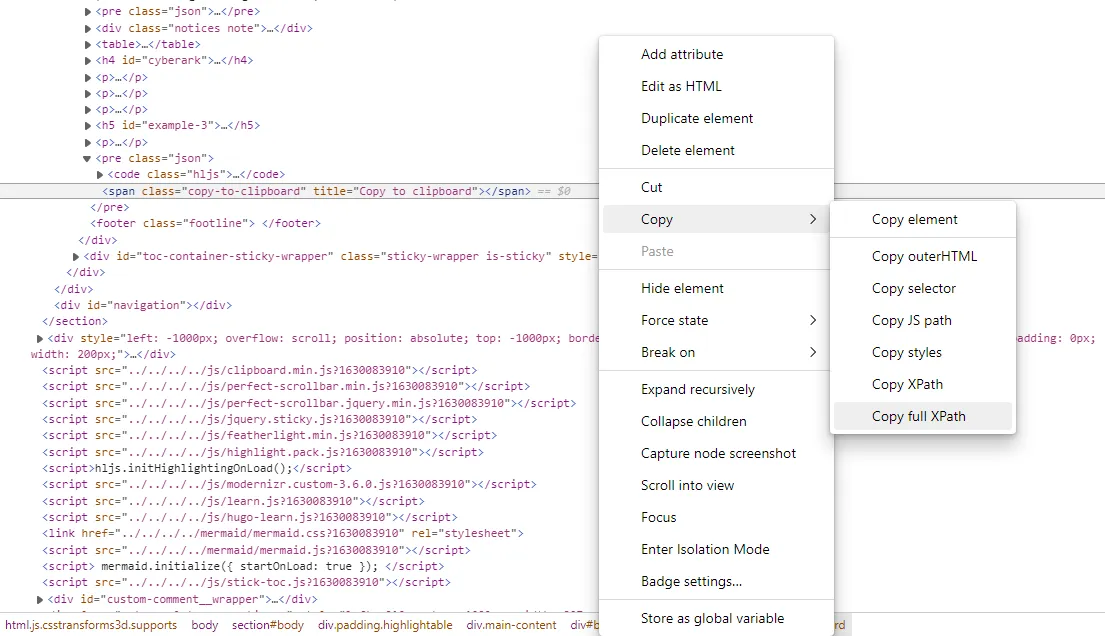
The basic structure of a web page is defined with HTML. It is accessible with the inspect tool, which can be opened by pressing the F12 key on most browsers. For Selenium, we want to find information on specific parts of the page. Inspecting an element can be done by right clicking the element, and clicking Inspect.
Suppose the goal of the script is to copy the content of the code block, and paste it to a file, to
ensure that the file is up to date with the documentation. To do this, the Robot Framework has to
click on the copy to clipboard button with the keyword
Click Element.
Locating elements
As stated in the Robot Framework SeleniumLibrary documentation, the keyword Click Element requires
an element locator. The element locator identifies which element the Robot Framework should click.
To ensure the right element is clicked, the element locator should only match the one element which
should be clicked.
In the HTML, the button has a class class="copy-to-clipboard". The element locator
class:copy-to-clipboard matches the button. However, there are other buttons with the same class
on the page. The easiest way to click the right button is with an XPath element locator.
XPath element locators
Each element on the web page has an XPath, and each XPath uniquely identifies an element. This means that we can always use an XPath locator. To get the XPath of an element, inspect the element, then right click it in the HTML, and click on Copy > Full XPath.
For the copy to clipboard button, the XPath is
/html/body/section/div[2]/div[3]/div[1]/pre[4]/span.
XPaths change as the page is updated. Using a location strategy other than the XPath strategy should reduce the maintenance needs of the script.
Hypertext references and API calls
Some elements have links to other websites or pages of the same website. In the HTML inspection,
these elements are likely to have a href attribute containing the link. Href stands for
hypertext reference. By going directly to the linked URL instead of clicking the link, the script
does not need to specify an element locator for the link.
In some cases, an API can be called simply by going to the right URL. This URL may be used as a
shortcut to avoid having to fill in text fields. The href attributes may show the format of the
API calls.
Use Case: Fulfill groups in a Banking system
The Banking system is a Identity Manager demo application that represents an external system. The Banking system stores basic information on its users such as their names, mail addresses� The most interesting part of the Banking system is the groups functionality, as users can belong to multiple groups, and groups can have multiple users.
The goal of this use case is to extract the existing associations between groups and users from the Banking system into Identity Manager, then provide a way to add users to a group and remove users from a group. To showcase the password generation, the script will generate a password for the provisioned users' accounts.
Connector configuration
As stated in the previous part, the Banking connector is supposed to link the users and their groups. This means that the connector has a user entity type, and a group entity type, with an entity association between them.
The Banking connector has to be able to extract the data, and fulfill the Banking system. The fulfillment of the Banking system can only be done through its web application, which means the Robot Framework Selenium library will be used. The extraction of the data will be performed through an SQL connection.
For simplicity's sake, only the user's Login is kept.
<Connector Identifier="Banking" DisplayName_L1="Banking" Agent="Local"/> <Category Policy="Default" Identifier="Banking" DisplayName_L1="Banking" /> <Connection Connector="Banking" DisplayName_L1="Banking Extract Database" Identifier="BankingExtractDatabase" Package="Usercube.SQL.SQLServer@0000001"/> <Connection Connector="Banking" DisplayName_L1="Banking Fulfillment" Identifier="BankingFulfillment" Package="Usercube.RobotFramework@0000001"/> <EntityType Identifier="Banking_Group" DisplayName_L1="Banking - Group" DisplayName_L2="Banking - Groupe"> <Property Identifier="name" DisplayName_L1="Group Name" IsKey="true" TargetColumnIndex="1" Type="String" /> <Property Identifier="users" DisplayName_L1="Users" Type="ForeignKey" /> </EntityType> <EntityType Identifier="Banking_User" DisplayName_L1="Banking - User" DisplayName_L2="Banking - Utilisateur"> <Property Identifier="login" DisplayName_L1="Login" IsKey="true" TargetColumnIndex="1" Type="String" /> <Property Identifier="groups" DisplayName_L1="Groups" Type="ForeignKey" /> </EntityType> <EntityTypeMapping Identifier="Banking_Group" Connector="Banking" ConnectionTable="BankingExtractDatabase_"dbo"."um_groups""> <Property Identifier="name" ConnectionColumn="name" IsPrimaryKey="true" /> </EntityTypeMapping> <EntityTypeMapping Identifier="Banking_User" Connector="Banking" ConnectionTable="BankingExtractDatabase_"dbo"."um_users""> <Property Identifier="login" ConnectionColumn="login" IsPrimaryKey="true" /> </EntityTypeMapping>
<EntityAssociation Identifier="Banking_Users_Groups" DisplayName_L1="User" IsProperty1Collection="true" IsProperty2Collection="true" Property1="Banking_Group:users" Property2="Banking_User:groups" /> <EntityAssociationMapping Identifier="Banking_Users_Groups" Column1="group" Column2="user" ConnectionTable="BankingExtractDatabase_"dbo"."um_usersgroups"" EntityPropertyMapping1="Banking_Group:name" EntityPropertyMapping2="Banking_User:login" Connector="Banking" /> <ViewTargetResourceTemplate EntityType="Banking_Group" Profile="Administrator" /> <ViewTargetResourceTemplate EntityType="Banking_User" Profile="Administrator" />
The notion of groups in the Banking system is replaced by the notion of single roles in Identity Manager. A user belonging to the accountant group in the Banking system has the accountant single role in Identity Manager. To automate the correspondance, the connector's configuration requires a rule between the group resource and the single role. This can be done with a navigation rule for each single role and corresponding group.
For simplicity's sake, only three roles are kept.
<SingleRole Identifier="BAGR09" DisplayName_L1="Banking role: all transactions" DisplayName_L2="Metiers : op�rations toutes r�gions" Category="Banking" EntityType="Directory_User" Policy="Default" /> <SingleRole Identifier="BAG002" DisplayName_L1="Banking role: agency" DisplayName_L2="M�tiers : agence" Category="Banking" EntityType="Directory_User" Policy="Default" /> <SingleRole Identifier="BAG003" DisplayName_L1="Banking role: employees agency" DisplayName_L2="M�tiers : agence personnel" Category="Banking" EntityType="Directory_User" Policy="Default" /> <ResourceType Identifier="Banking_NominativeUser" DisplayName_L1="Banking User (nominative)" Policy="Default" TargetEntityType="Banking_User" Category="Banking" SourceEntityType="Directory_User" BlockProvisioning="false"> <ScalarRule Property="login" Expression="C#:person:return person.Login;" /> <NavigationRule Property="groups" Resource="Business role: all transactions" SingleRole="BAGR09" /> <NavigationRule Property="groups" Resource="Business role: agency" SingleRole="BAG002" /> <NavigationRule Property="groups" Resource="Business role: employees agency" SingleRole="BAG003" /> </ResourceType> <ResourceTypeMapping Identifier="Banking_NominativeUser" Connection="BankingFulfillment" /> <ResourceCorrelationRule ResourceType="Banking_NominativeUser" TargetBinding="login" Policy="Default" SourceMatchedConfidenceLevel="100" SourceExpression="C#:person:return "U" + person.EmployeeId;" />
Define settings
As with every other Robot Framework script, the resource needs to be imported to launch the provisioning. The SeleniumLibrary also needs to be imported to use its keywords.
*** Settings ***
Resource  C:/identitymanagerDemo/Runtime/identitymanagerRobotFramework.resource
Library  SeleniumLibrary
Define variables
The variables in the Variables section can serve two purposes.
- Values that should be modified easily: The browser and the Banking web application URL change with the provisioning environment.
- Values that are used multiple times: The Banking web application URL is used three times in the script. This avoids editing mistakes that happen when only one of the instances is modified.
*** Variables ***
${BROWSER}  edge
${BANKINGURL}  http://localhost:5011
Define custom keywords
The script defines several custom keywords. As the element locators may not be easily understandable, it is important that the keywords are not long, and have descriptive names.
| Keyword | Details |
|---|---|
| Modify User | Sets a password for the user, then applies the provisioning order. This keyword does everything the Execute Modify keyword should do, so that it can be used for error handling. As the provisioned resource type may not have password reset settings, the password generation could fail, which is why it is called by the Try Keyword keyword. |
| Restart Banking And Fail | Restarts the Banking Application, then fails the keyword execution. This keyword should be used when the Banking application is in an unknown state. |
| Launch Banking App | Launches the Banking web application. To check that the web browser is on the right page, the title of the page is verified with the Title Should Be keyword. |
| Set Password | Generates a password for the provisioned user, sets their Banking password to that password, then sends a notification. This keyword attempts to send the notification as soon as the password is set. First, this ensures that the notification is sent even if the rest of the script would crash. Second, this keeps the password in memory for the least amount of time possible, which reduces security risks. |
| Add Group To User | Selects the group that should be added, and clicks the Save button. This keyword also verifies that the web browser has the expected title. The Click Element At Coordinates keyword is used to reset the state of the page, as selecting the group hides the Save button. |
| Search User And Add Group | Goes to the page to add groups to the right user, and calls Add Group To User. This keyword also verifies that the web page has the expected title. |
| Add Groups | Calls Search User And Add Group for each group in the provisioning order. |
| Add All Groups | Computes the number of groups to add, and if there is at least one, calls Add Groups. The only way to find the number of groups to add is in the Changes > groups_add section of the provisioning order. This section does not exist if there are no groups to add, so the Run Keyword And Ignore Error is called to avoid propagating the error. |
| Remove Group From User | Goes to the URL corresponding to the API call to remove the group from the user. |
| Remove Groups | Calls Remove Group From User for each group in the provisioning order. |
| Remove All Groups | Computes the number of groups to remove, and if there is at least one, calls Remove Groups. The only way to find the number of groups to remove is in the Changes > groups_remove section of the provisioning order. This section does not exist if there are no groups to remove, so the Run Keyword And Ignore Error is called to avoid propagating the error. |
*** Keywords ***
Modify User
    [Arguments]  ${order}
    Try Keyword  Set Password  ${order}
    Catch Keyword  Go To  ${BANKINGURL}/User
    Title Should Be  All Users - Banking System
    Add All Groups  ${order}
    Remove All Groups  ${order}

Restart Banking And Fail
    Close Browser
    Launch Banking App
    Fail  ${Provisioning failed, restarting the browser}

Launch Banking App
    Open Browser  ${BANKINGURL}  ${BROWSER}
    Title Should Be  Home Page - Banking System

Set Password
    [Arguments]  ${order}
    Go To  ${BANKINGURL}/User/SetPassword/${login}
    Title Should Be  Edit ${login} - Banking System
    ${password}=  Generate Password
    Input Text  id:Password  ${password}
    Click Element  xpath:/html/body/div/main/div[1]/div/form/div[2]/input
    Send Password Notification

Add Group To User
    [Arguments]  ${groupName}
    Select From List By Value  name:group  ${groupName}
    Click Element at Coordinates  name:group  250  0
    Click Element  xpath:/html/body/div/main/div[1]/div/form/div[2]/input
    Title Should Be  All Users - Banking System

Search User And Add Group
    [Arguments]  ${login}  ${groupName}
    Go To  ${BANKINGURL}/User/AddGroup/${login}
    Title Should Be  Add Group to ${login} - Banking System
    Add Group To User  ${groupName}

Add Groups
    [Arguments]  ${order}  ${length}
    FOR  ${i}  IN RANGE  ${length}
        Search User And Add Group  ${order['Resource']['login']}  ${order['Changes']['groups_add'][${i}]['name']}
    END

Add All Groups
    [Arguments]  ${order}
    ${status}  ${length}=  Run Keyword And Ignore Error  Get Length  ${order['Changes']['groups_add']}
    Run Keyword If  '${status}' == 'PASS'  Add Groups  ${order}  ${length}

Remove Group From User
    [Arguments]  ${login}  ${groupName}
    Go To  ${BANKINGURL}/User/RemoveGroup/${login}?groupId=${groupName}

Remove Groups
    [Arguments]  ${order}  ${length}
    FOR  ${i}  IN RANGE  ${length}
        Remove Group From User  ${order['Resource']['login']}  ${order['Changes']['groups_remove'][${i}]['name']}
    END

Remove All Groups
    [Arguments]  ${order}
    ${status}  ${length}=  Run Keyword And Ignore Error  Get Length  ${order['Changes']['groups_remove']}
    Run Keyword If  '${status}' == 'PASS'  Remove Groups  ${order}  ${length}
Define mandatory keywords
To be able to provision the system, the script must contain the ExecuteAdd, ExecuteDelete, and
ExecuteModify keyword. As the Banking system is only able to modify existing accounts, only the
Execute Modify keyword is implemented.
To simplify error handling, the Execute Modify keyword only calls the Modify User keyword. As
only a single keyword is needed, it can be called within the Try Keyword keyword. This means that
the error handling can be handled with the Catch Keyword keyword.
*** Keywords ***
ExecuteAdd
    [Arguments]  ${order}
    Log To Console  ExecuteAdd is not implemented

ExecuteDelete
    [Arguments]  ${order}
    Log To Console  ExecuteDelete is not implemented

ExecuteModify
    [Arguments]  ${order}
    Try Keyword  Modify User  ${order}
    Catch Keyword  Restart Banking And Fail
Define test cases
Although the Robot Framework is used for provisioning in Identity Manager, it is most often used for
testing, which is why the Test Cases section defines what should happen when Identity
Manager starts the Robot Framework task. Note that the Launch Provisioning keyword is mandatory
for the provisioning to happen.
As the browser should always be closed after the tests, a teardown is used to ensure that regardless of the script's execution state, the browser is closed.
*** Test Cases ***
Run Provisioning
    Launch Banking App
    Launch Provisioning
    [Teardown]  Close Browser
Read the full script
The full script is as follows:
*** Settings ***
Resource  C:/identitymanagerDemo/Runtime/identitymanagerRobotFramework.resource
Library  SeleniumLibrary

*** Variables ***
${BROWSER}  edge
${BANKINGURL}  http://localhost:5011

*** Keywords ***
ExecuteAdd
    [Arguments]  ${order}
    Log To Console  ExecuteAdd is not implemented

ExecuteDelete
    [Arguments]  ${order}
    Log To Console  ExecuteDelete is not implemented

ExecuteModify
    [Arguments]  ${order}
    Try Keyword  Modify User  ${order}
    Catch Keyword  Restart Banking And Fail

Modify User
    [Arguments]  ${order}
    Try Keyword  Set Password  ${order}
    Catch Keyword  Go To  ${BANKINGURL}/User
    Title Should Be  All Users - Banking System
    Add All Groups  ${order}
    Remove All Groups  ${order}

Restart Banking And Fail
    Close Browser
    Launch Banking App
    Fail  ${Provisioning failed, restarting the browser}

Launch Banking App
    Open Browser  ${BANKINGURL}  ${BROWSER}
    Title Should Be  Home Page - Banking System

Set Password
    [Arguments]  ${order}
    Go To  ${BANKINGURL}/User/SetPassword/${login}
    Title Should Be  Edit ${login} - Banking System
    ${password}=  Generate Password
    Input Text  id:Password  ${password}
    Click Element  xpath:/html/body/div/main/div[1]/div/form/div[2]/input
    Send Password Notification

Add Group To User
    [Arguments]  ${groupName}
    Select From List By Value  name:group  ${groupName}
    Click Element at Coordinates  name:group  250  0
    Click Element  xpath:/html/body/div/main/div[1]/div/form/div[2]/input
    Title Should Be  All Users - Banking System

Search User And Add Group
    [Arguments]  ${login}  ${groupName}
    Go To  ${BANKINGURL}/User/AddGroup/${login}
    Title Should Be  Add Group to ${login} - Banking System
    Add Group To User  ${groupName}

Add Groups
    [Arguments]  ${order}  ${length}
    FOR  ${i}  IN RANGE  ${length}
        Search User And Add Group  ${order['Resource']['login']}  ${order['Changes']['groups_add'][${i}]['name']}
    END

Add All Groups
    [Arguments]  ${order}
    ${status}  ${length}=  Run Keyword And Ignore Error  Get Length  ${order['Changes']['groups_add']}
    Run Keyword If  '${status}' == 'PASS'  Add Groups  ${order}  ${length}

Remove Group From User
    [Arguments]  ${login}  ${groupName}
    Go To  ${BANKINGURL}/User/RemoveGroup/${login}?groupId=${groupName}

Remove Groups
    [Arguments]  ${order}  ${length}
    FOR  ${i}  IN RANGE  ${length}
        Remove Group From User  ${order['Resource']['login']}  ${order['Changes']['groups_remove'][${i}]['name']}
    END

Remove All Groups
    [Arguments]  ${order}
    ${status}  ${length}=  Run Keyword And Ignore Error  Get Length  ${order['Changes']['groups_remove']}
    Run Keyword If  '${status}' == 'PASS'  Remove Groups  ${order}  ${length}

*** Test Cases ***
Run Provisioning
    Launch Banking App
    Launch Provisioning
    [Teardown]  Close Browser