Manage Role Officers
How to manage role officers in order to ensure the approval for entitlement assignments.
The documentation is not yet available for this page and will be completed in the near future.
Create Roles in the Role Catalog
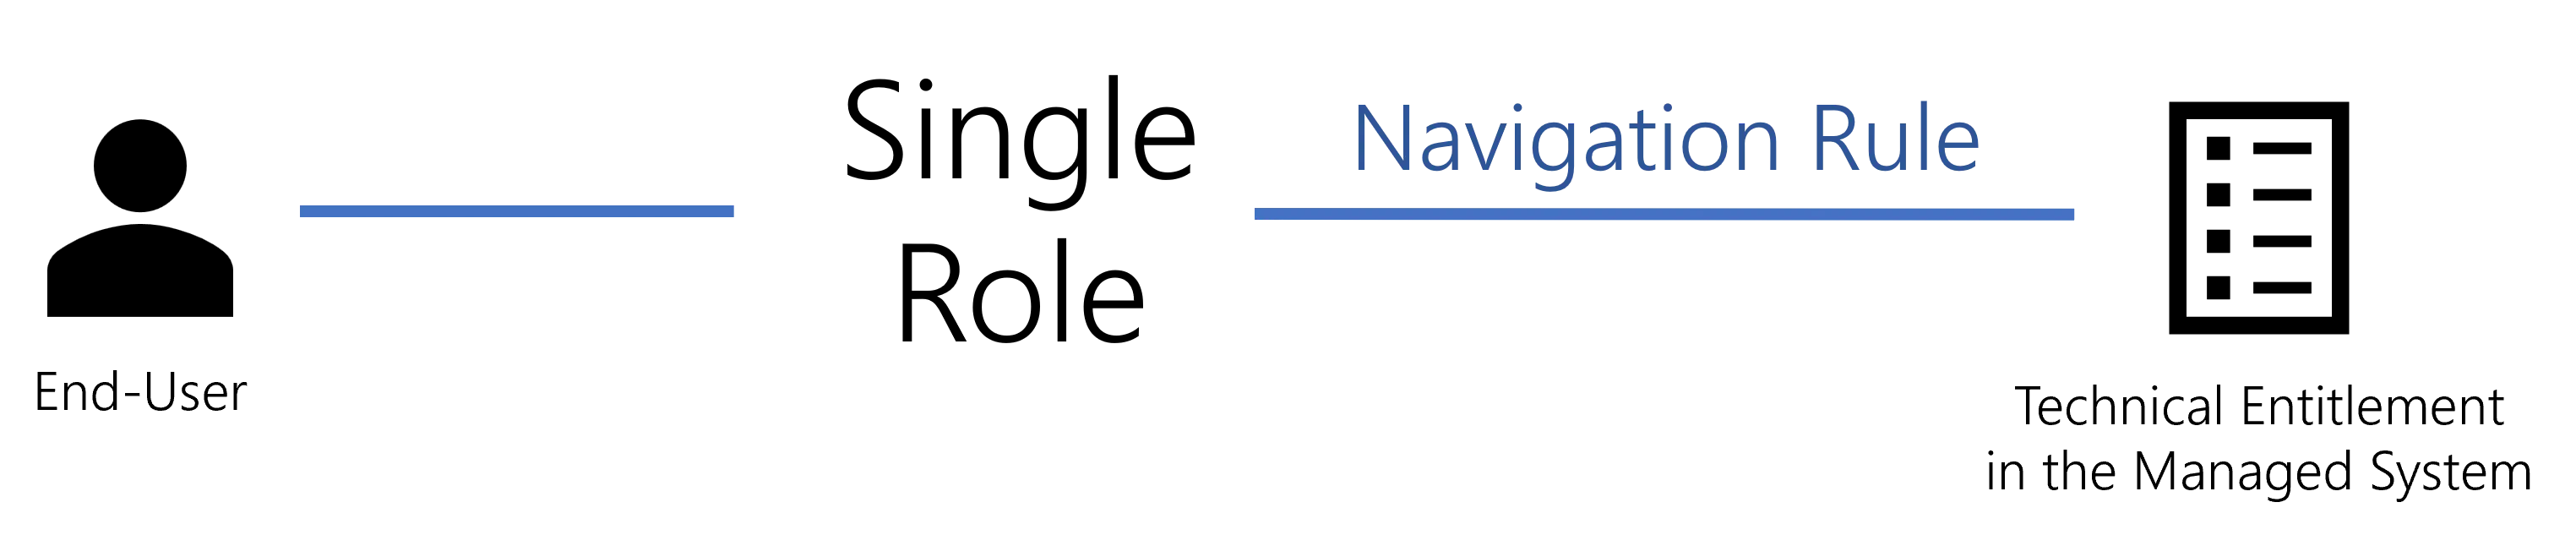
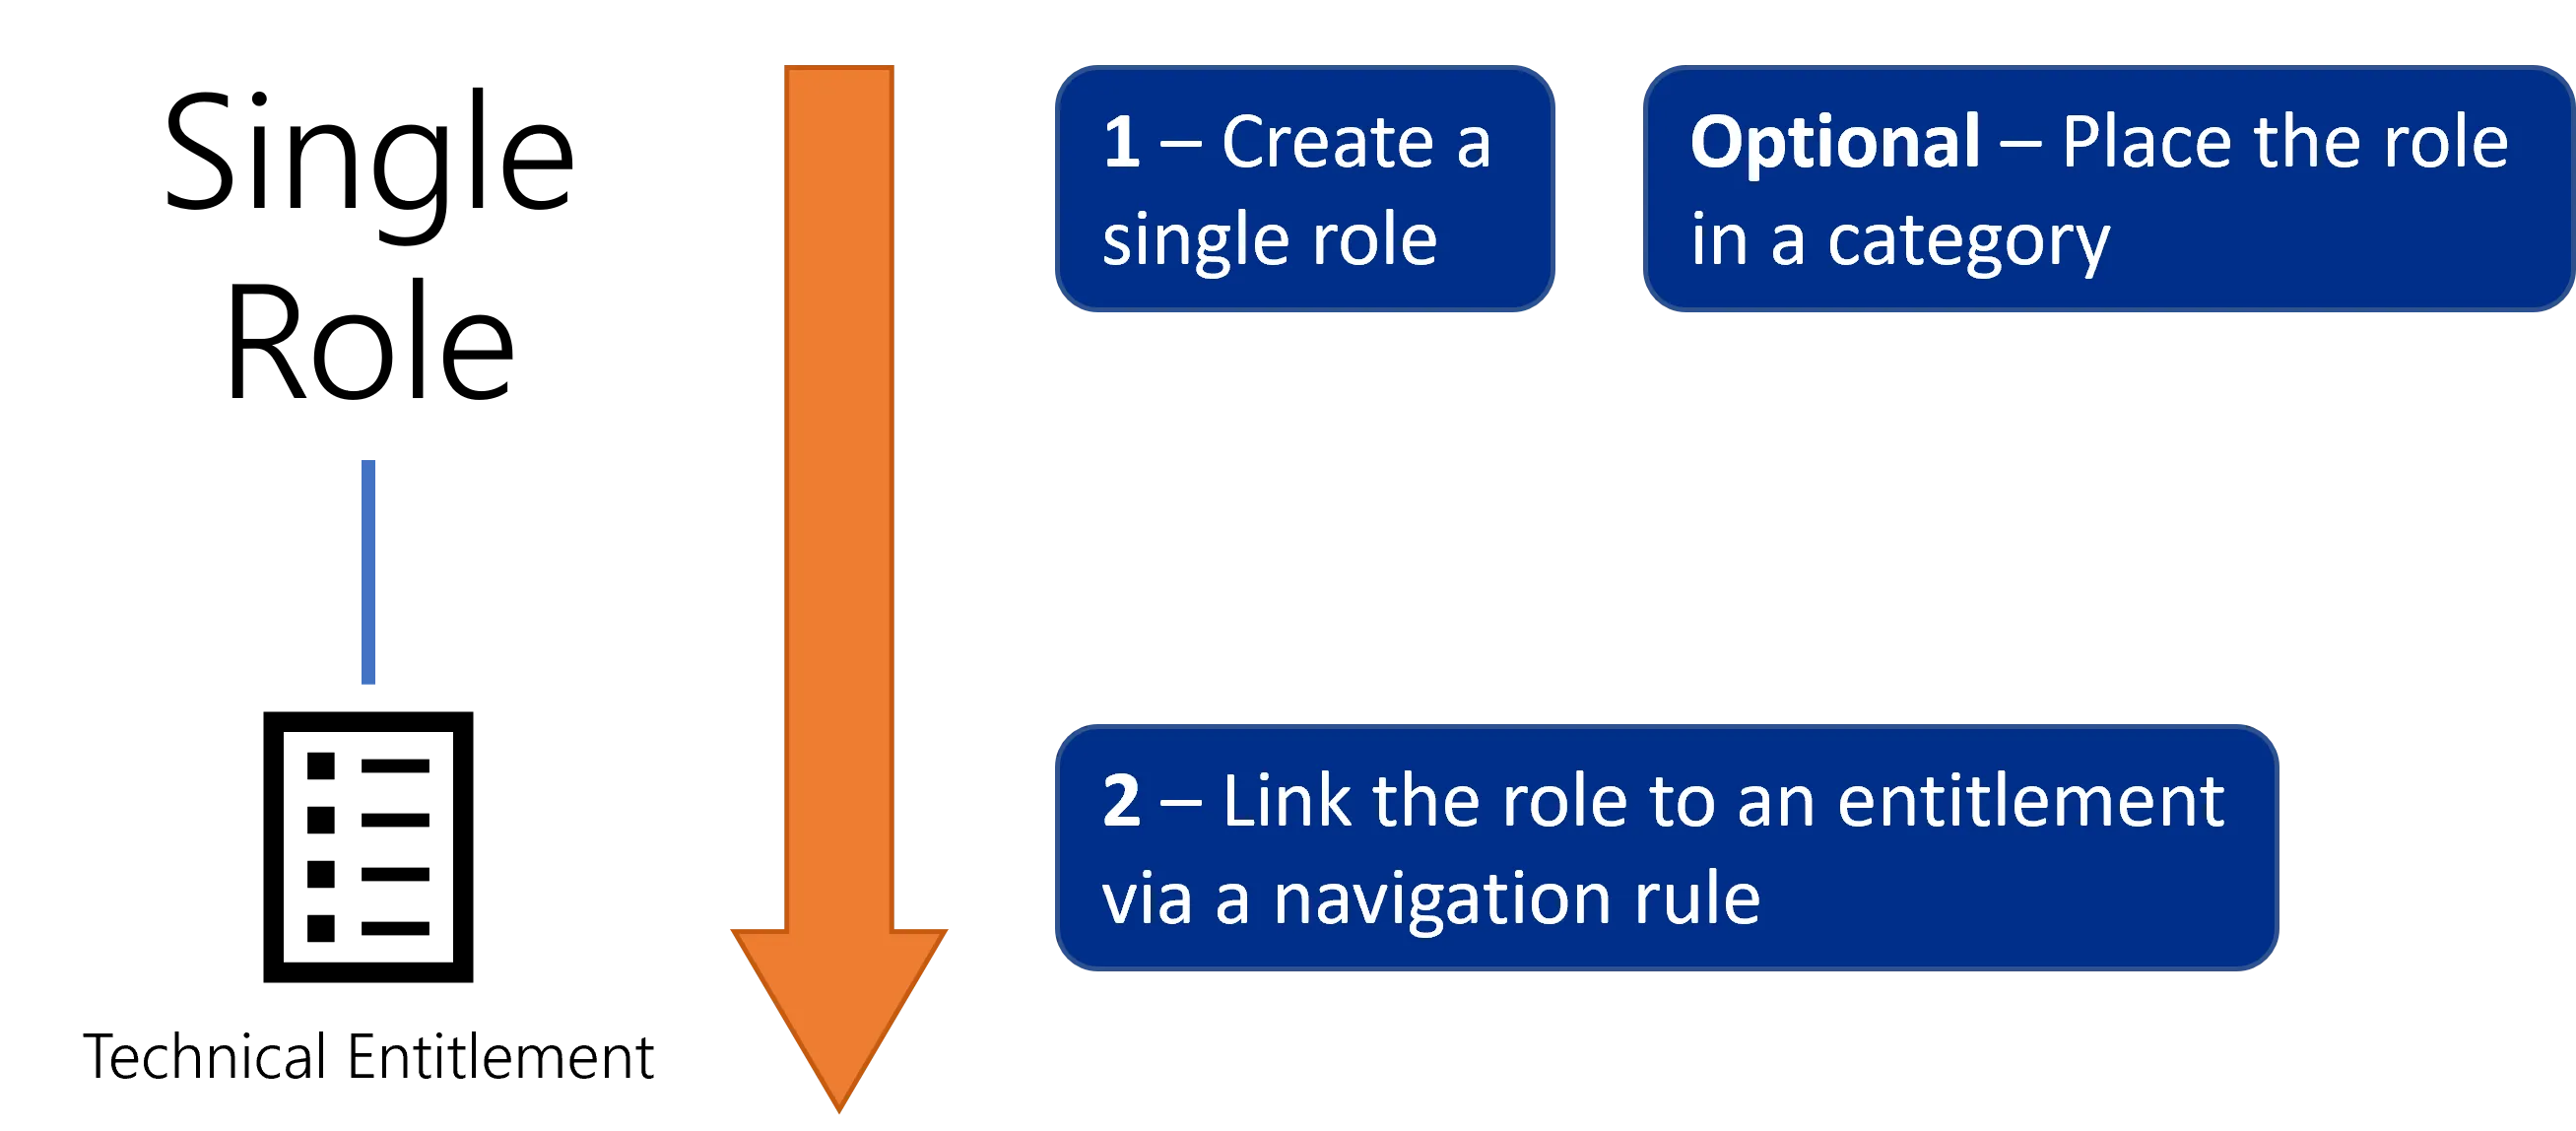
How to define Single Role to model entitlements, and organize them in the role catalog, basis of the role model. See the Entitlement Management topic for additional information.
The creation of the role catalog is a time-consuming part, with an important workload concerning the description of the internal processes for all applications. Actors here need to really understand the useful permissions within managed applications.
Overview
The aim here is to establish and create the exhaustive list of Role Model needed by the organization. Roles are a way to represent entitlements which are assigned to identities, so that said identities are able to work with the managed systems.

In other words, establishing the role catalog aims to list exhaustively and explicitly all the roles in the organization, hiding the technical complexity of entitlements behind the business vision of user-friendly names and categories, in order to:
- assign roles to users, by requesting them manually, or using rules that assign roles automatically based on users' attributes;
- simplify the implementation of Segregation of Duties (SoD);
- simplify the implementation and execution of access certification campaigns.
Roles are not chosen at random as they must correspond to the way entitlements were modeled during connector modeling.
Technical Principles
Identity Manager's roles are all built the same way. Technically speaking:
-
a role is part of a policy which is a subgroup of the role model. See the Entitlement Management topic for additional information.
Let's take the example of the unlimited Internet access, part of the default policy.
-
a role is created to be owned by users represented by a given entity type;
We choose users from
Directory_User. -
roles need to be structured so categories are created to:
- represent groups of roles that follow the same validation process with the same validator(s);
- help users find intuitively the entitlement that they are looking for.
NETWRIX recommends creating one category per application, as this method often fulfills both requirements.
Then single roles can be grouped together through Composite Role for applicative purposes, allowing users to be assigned several entitlements simultaneously. Leave composite roles for later, when the system runs as is and would benefit from an additional layer in the role model.
This role is part of the previously created
Internetcategory. -
a role is created with a given approval workflow according to the entitlement's sensitivity;

We choose to require one manual validation from a knowledgeable user before the Internet role is assigned to a user.
-
to be effective, roles must be linked to actual entitlements in the managed systems. Technically speaking, this means that for each entitlement that you want to assign through a given role, you must create a navigation rule to build said link. A navigation rule is specific to one resource type. See the Categorize Resources topic for additional information.
We link the role to the entitlement named
SG_APP_DL-INTERNET-ALLin the AD, via a navigation rule that assigns this entitlement to thememberOfproperty of AD nominative accounts, for all users having the role.This part is about single roles, dealing with entitlements one-to-one. The idea is to associate one single role with one fine-grained entitlement.

For example, an accountant needs read access to the accounting software, a project manager to their billable hours for their projects on SAP, etc.
When roles are well-defined, one entitlement request must lead to the direct functional entitlement assignment. No more, no less.
Strategy for Role Creation
Role structuring
Functionally speaking, the main benefit of roles is to give entitlements user-friendly names, easily understandable by managers. And to be understandable, roles must be structured.
The strategy for role creation and structuring varies according to the Model the Data established for a given system. Here, we will take as example the common use-case that organizes and categorizes roles by application. Then, the strategy varies whether the system hosts a single application (like SAB or SAP) or several (like the AD or LDAP).
In any case, role creation and maintenance are made easier by entitlements' naming conventions. Thus, no matter the kind of system that you are working with, if the system uses no naming conventions, then you should start by creating some. They will be the basis for role structure in Identity Manager, and will really simplify role creation.
One system for one application
A common and intuitive case is when a system is simply one application. Then, integrators can create one role per entitlement in said application, and one category for the application.
The SAP application is about entitlements only for itself. Then, we create a single role per entitlement in SAP inside a category called
SAP:

One system hosting several applications with existing naming conventions
If a given system is used to manage entitlements for several applications, then building categories becomes more complicated.
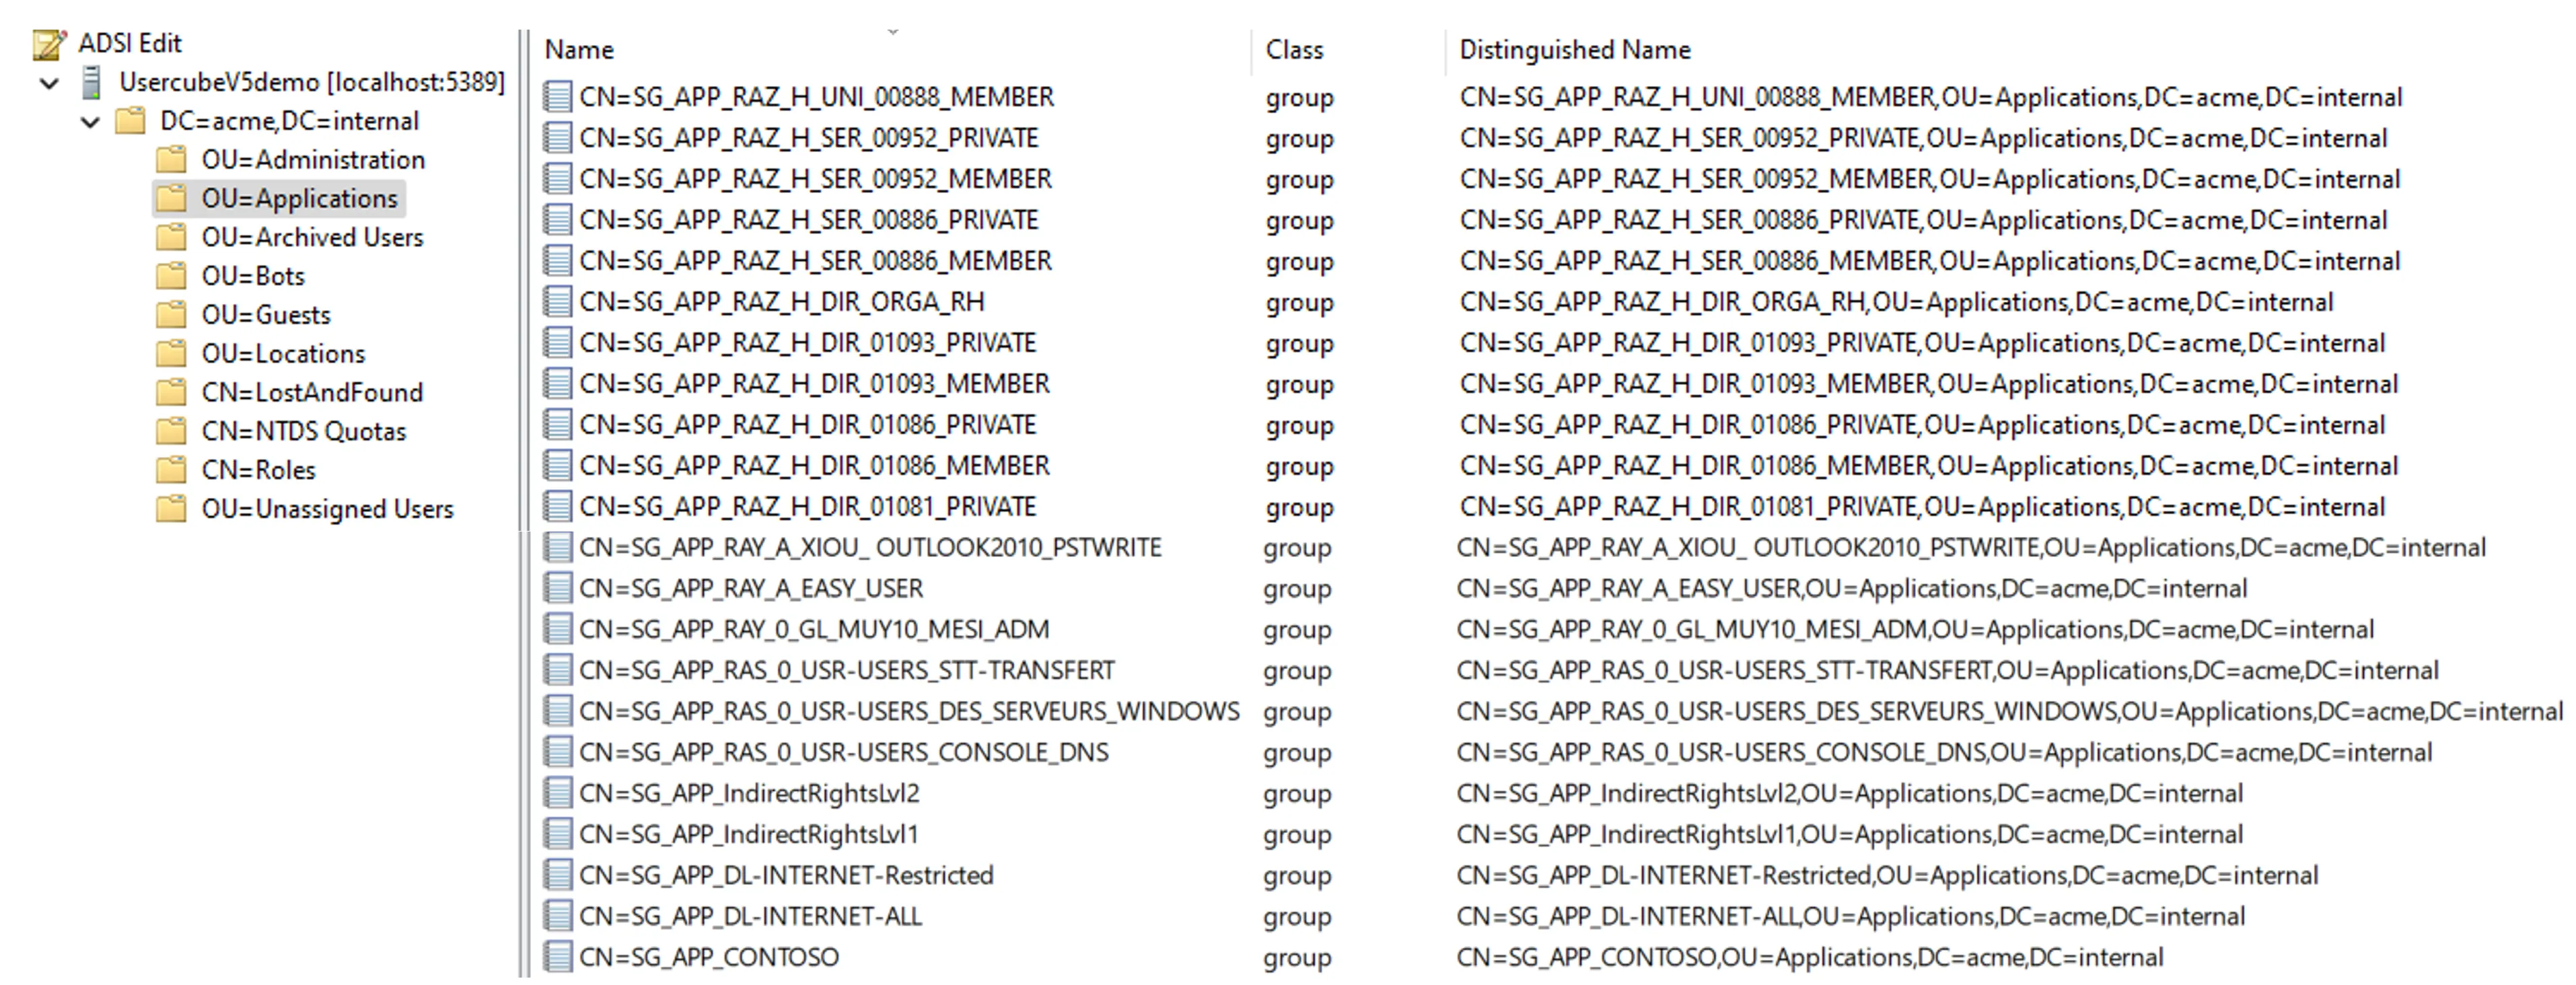
For example, the Active Directory usually hosts many groups used to manage entitlements in several distinct applications.
The goal here is to find a way to clarify the link between each entitlement and the corresponding application.
If the system uses naming conventions for entitlements, then it is possible to deduce the application it corresponds to, from the entitlements' names.
For example, a group is called
SG_APP_banking/digital/haumea/readerin the AD. The membership to this group gives an entitlement. Knowing the organization, integrators understand that this entitlement is about the departmentbanking, the positiondigital, the applicationhaumeaand the access rightreader.
Roles can be created accordingly, with one role per entitlement and a category per application.
One system hosting several applications without existing naming conventions
However, in the case of a connector for several applications, sometimes no information can be deduced from the entitlements' names. It is still necessary to find a way to clarify the link between each entitlement and the corresponding application.
Then, the solution is to add information inside the managed system, creating a specific field or filling an empty field.
For example in the Active Directory, integrators can modify the field called
descriptionto specify the application name (such as Outlook in this example).
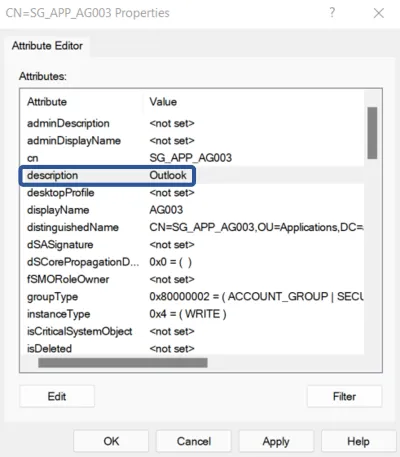
Thus, the needed information is added to the managed system. After the execution of synchronization, said data is accessible inside Identity Manager database and can be used as a naming convention.
In some cases, integrators are not allowed to create/modify fields in the external systems. Then, the information can be added on Identity Manager side only. As the new field doesn't exist in the external systems, it can't be overwritten.
Automation of role creation
The UI provides tools to create single roles manually, working top-down from abstraction (role name) to the technical aspects (navigation rule and technical entitlement). Most projects use thousands of single roles, which makes role creation a long, tedious and repetitive process. See the Create a Role Manually topic for additional information.
Roles can also be created bottom-up via role naming rules. Instead of the previous process, you can use the name of said entitlement in your managed system to create automatically the corresponding single role and rule (and category if it does not already exist). In other words, Identity Manager's naming rules are to be based on your existing naming conventions for entitlements. See the Create Roles in Bulk topic for additional information.
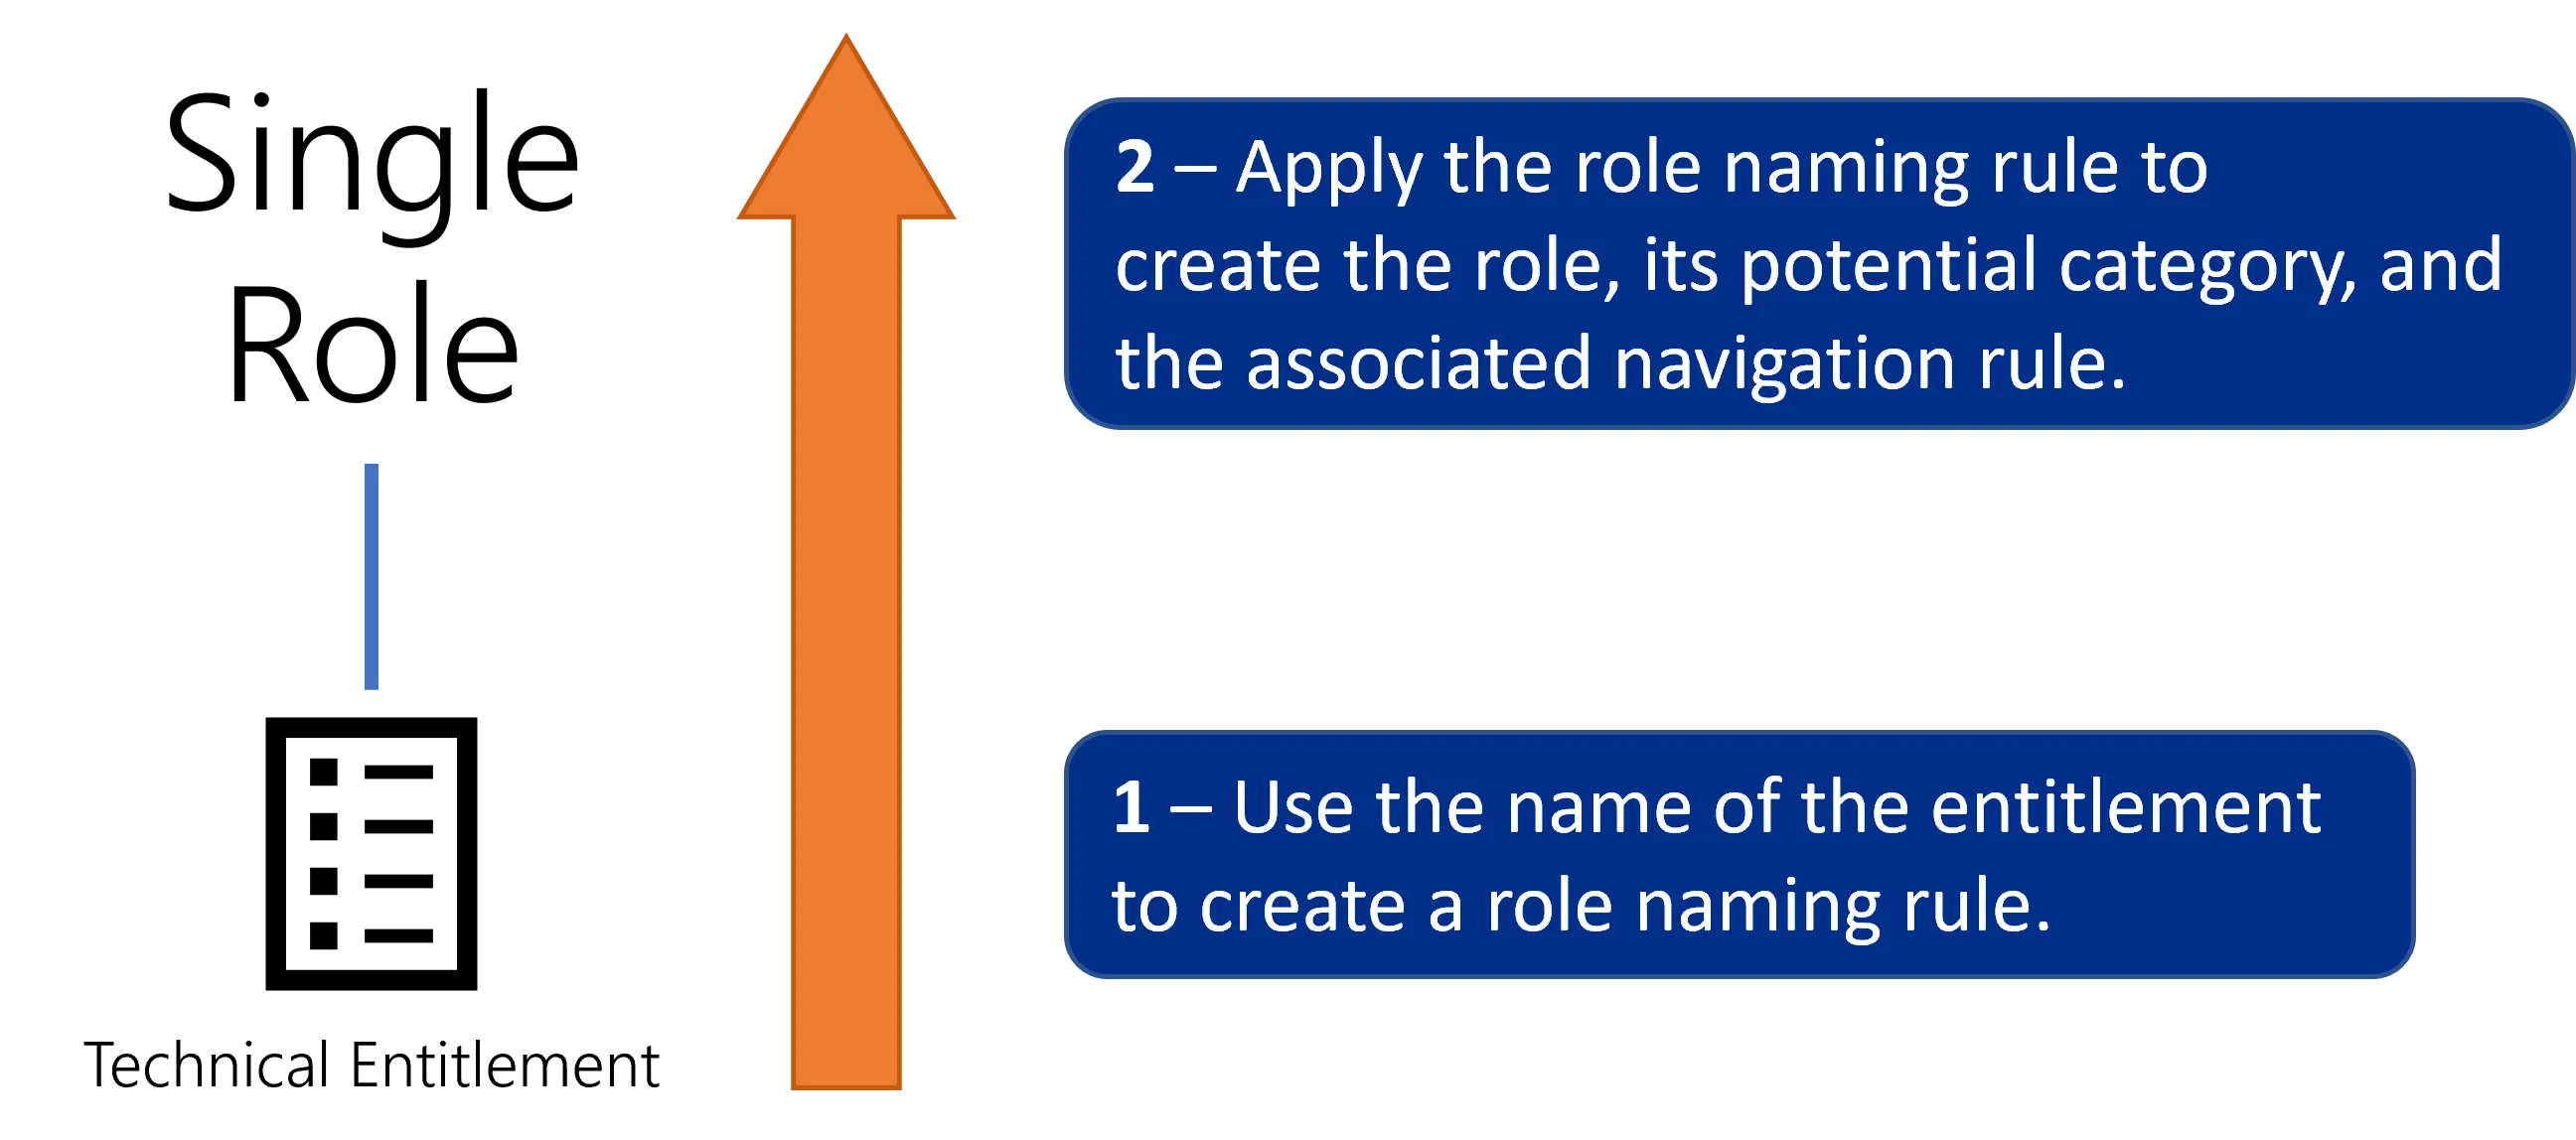
One naming rule can generate many roles, so a few automatic rules can easily and faster create the single role catalog. Naming rules prove particularly useful when you need to add multiple new permissions in your external system. You won't have to create manually the corresponding categories, roles and rules as long as said permissions are created with properties matching the conditions from the rules.
NETWRIX recommends starting the role catalog with as many naming rules as possible before creating roles manually.
Participants and Artifacts
For a given managed system, integrators may need the help of the application owners who know the application's users, entitlements and data model.
| Input | Output |
|---|---|
| Connector's data Model the Data (required) Create a Provisioning Rule (required) Classify Resources (required) | Single role catalog |
Create the Single Role Catalog
Create the single role catalog by proceeding as follows:
- Create as many single roles as possible (with their navigation rules and categories) via the Create Roles in Bulk naming rules.
- Complete the role catalog if needed by creating manually additional Create a Category and single roles with their navigation rules.
- Add Create a Composite Role to the single role catalog only if the project is mature enough. Composite roles are more complex than single roles and they are not mandatory.
Impact of Modifications
Perform a Simulation are available in order to anticipate the changes induced by a creation/modification/deletion in roles and navigation rules.
Next Steps
Once the role catalog is established, integrators can start role officer management.
The role catalog is also a prerequisite for Manage Risks management.
Create a Category
How to structure roles into categories. See the Category topic for additional information.
Overview
A category is usually created to:
- reflect the validation process, i.e. represent groups of roles that follow the same validation process with the same validator(s);
- help users find intuitively the entitlement that they are looking for.
For example, creating one category per application often fulfills both requirements.
There is usually one validator per category.
There can be several category levels. For example, integrators can choose to create one category per
department, then one per position, and finally one per application. They usually gather roles by
application. Here are a few examples of categories: AD, HR , SAP, IT Administration,
Test Environments, etc. Some of these "application categories" are gathered into larger categories
by theme as long as their role owner is identical.
Participants and Artifacts
For a given managed system, integrators may need the help of the application owners who know the application's users, entitlements and data model.
| Input | Output |
|---|---|
| Role Catalog (optional) | Categories |
See the Create Roles in the Role Catalog topic for additional information.
Create a Category
Categories are not mandatory to create roles, but they are highly recommended to organize single roles.
Create a category by proceeding as follows:
-
On the home page in the Configuration section, click on Access Roles to access the roles page.

-
All existing categories are shown in the menus on the left. To create a new category, click on +.

-
Fill in the fields.
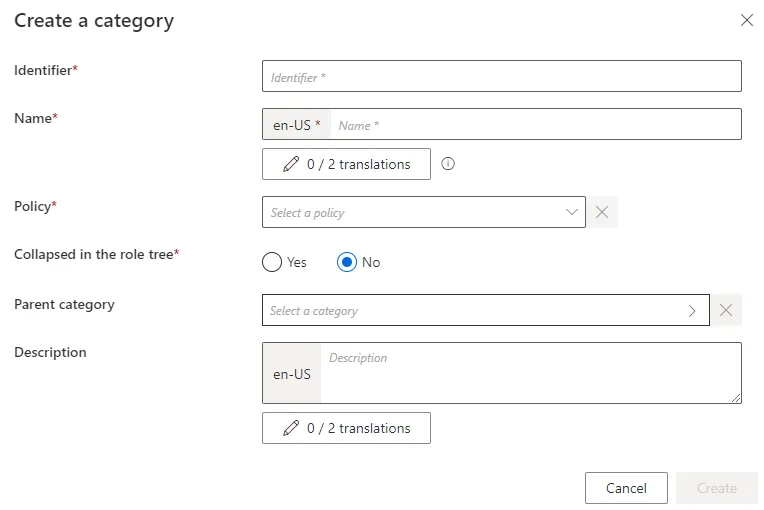
Identifier: must be unique among categories and without any whitespace.Name: will be displayed in the UI to identify the created category.Collapsed in the role tree: option that enables a collapsed view of the category in the role tree.Parent category: optional link to an existing category that would contain the created category.
-
Click on Create and see the category added in the menus.
When creating a category, you must be cautious about the associated validators that are not yet defined.
Verify Category Creation
In order to verify the process, check on the Access Roles screen that the category is created with the right parameters.

Create Roles in Bulk
How to create role naming rules, which create single roles using existing naming conventions from the managed system. See the Role Mapping topic for additional information.
Overview
A role naming rule automatically creates single roles and the corresponding navigation rules based on the name of the corresponding entitlements in the managed system.
Role naming rules replace the tedious process of manual role creation. Instead of creating roles individually with their navigation rules, you can use role naming rules to generate roles in bulk and thus faster create the single role catalog.
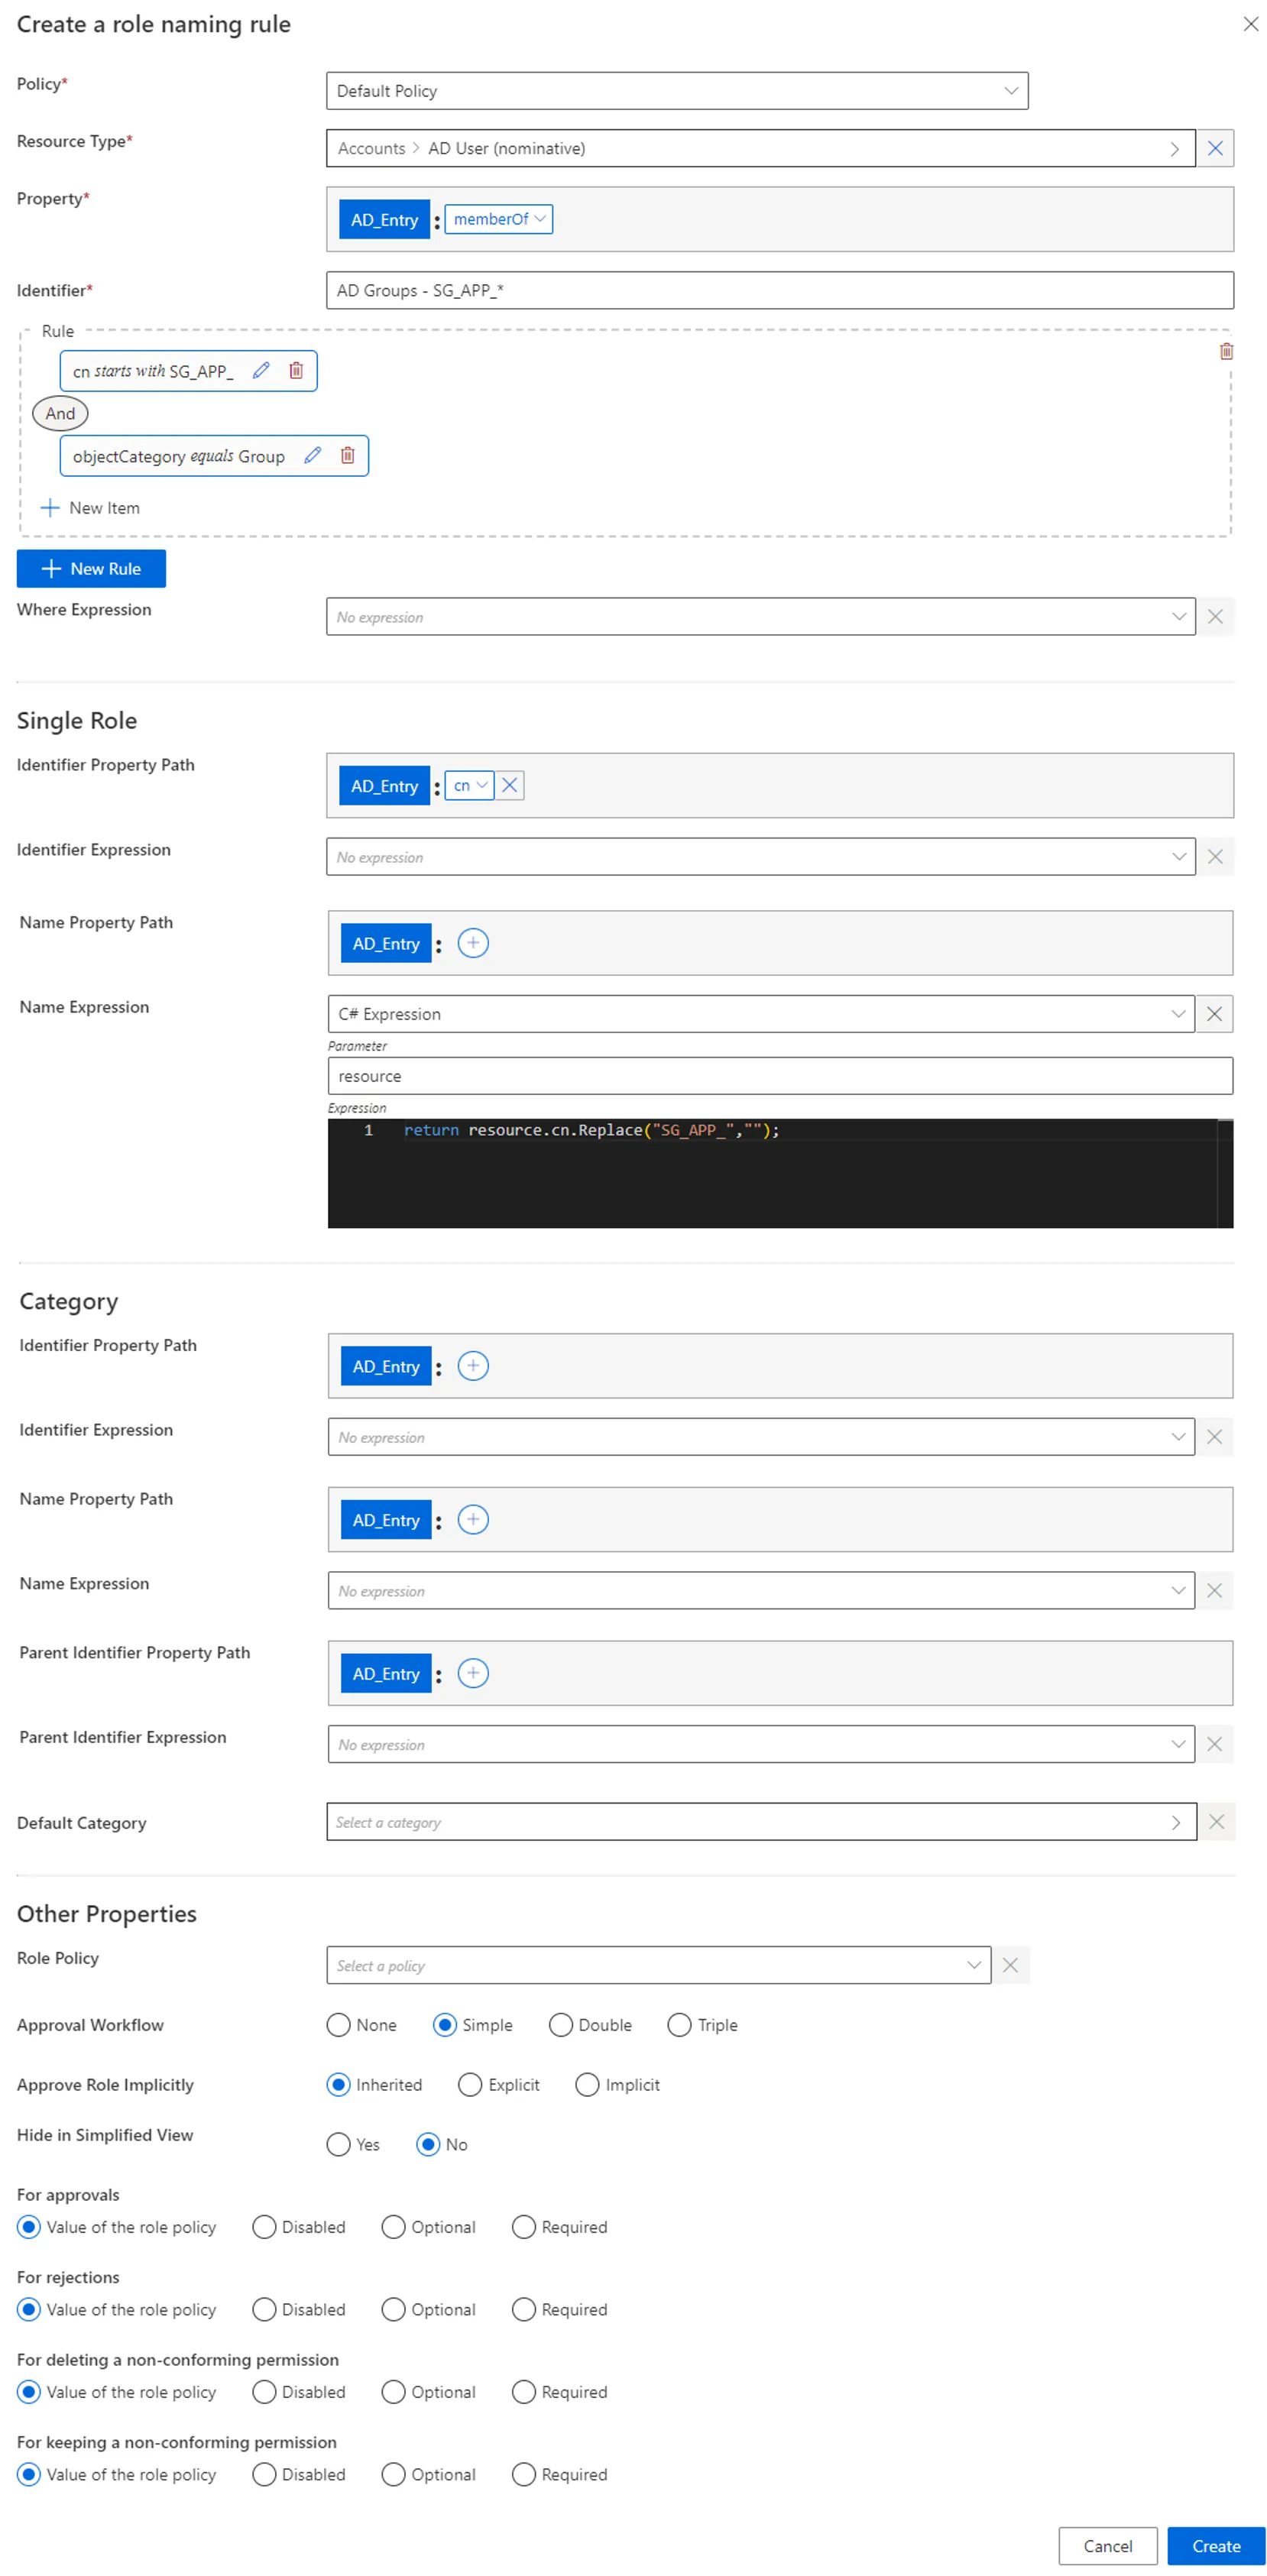
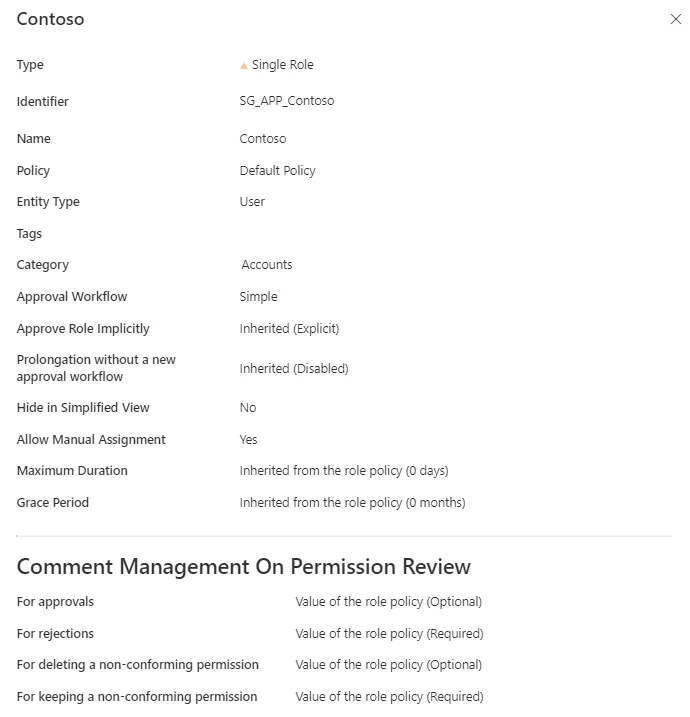
For example, consider a naming convention in our organization that states that AD groups have their cn:
SG_APP_<applicationName>. Then, we can create a naming rule that indicates that for all AD groups starting withSG_APP_, we create a role that gives the adequate user the corresponding group membership, with<applicationName>as a name. For example, we have the application Contoso and the groupSG_APP_Contoso.
Roles created via role naming rules can still be modified later in the UI, if needed.
A role naming rule, for a given resource type, creates roles and rules only for resources which are not yet linked to a role, nor a navigation rule of this resource type. This implies that:
- role naming rules do not overwrite manual changes;
- role naming rules cannot link more than one resource (so one entitlement) to one role.
If a role naming rule is supposed to create a role that already exists, then a corresponding navigation rule is created only if the existing role has the same policy and category as specified in the role naming rule.
Participants and Artifacts
For a given managed system, integrators may need the help of the application owners who know the application's users, entitlements and data model.
| Input | Output |
|---|---|
| Create a Provisioning Rule (required) | Role naming rule Single roles Navigation rules Categories |
Create a Role Naming Rule
Create a role naming rule by proceeding as follows:
-
On the home page, click on Access Rules in the Configuration section.

-
In the dropdown menu at the top left, choose the entity type to which the future naming rule will be applied.

-
Click on the Role Naming Conventions tab and on the addition button at the top right corner.

-
Fill in the fields.
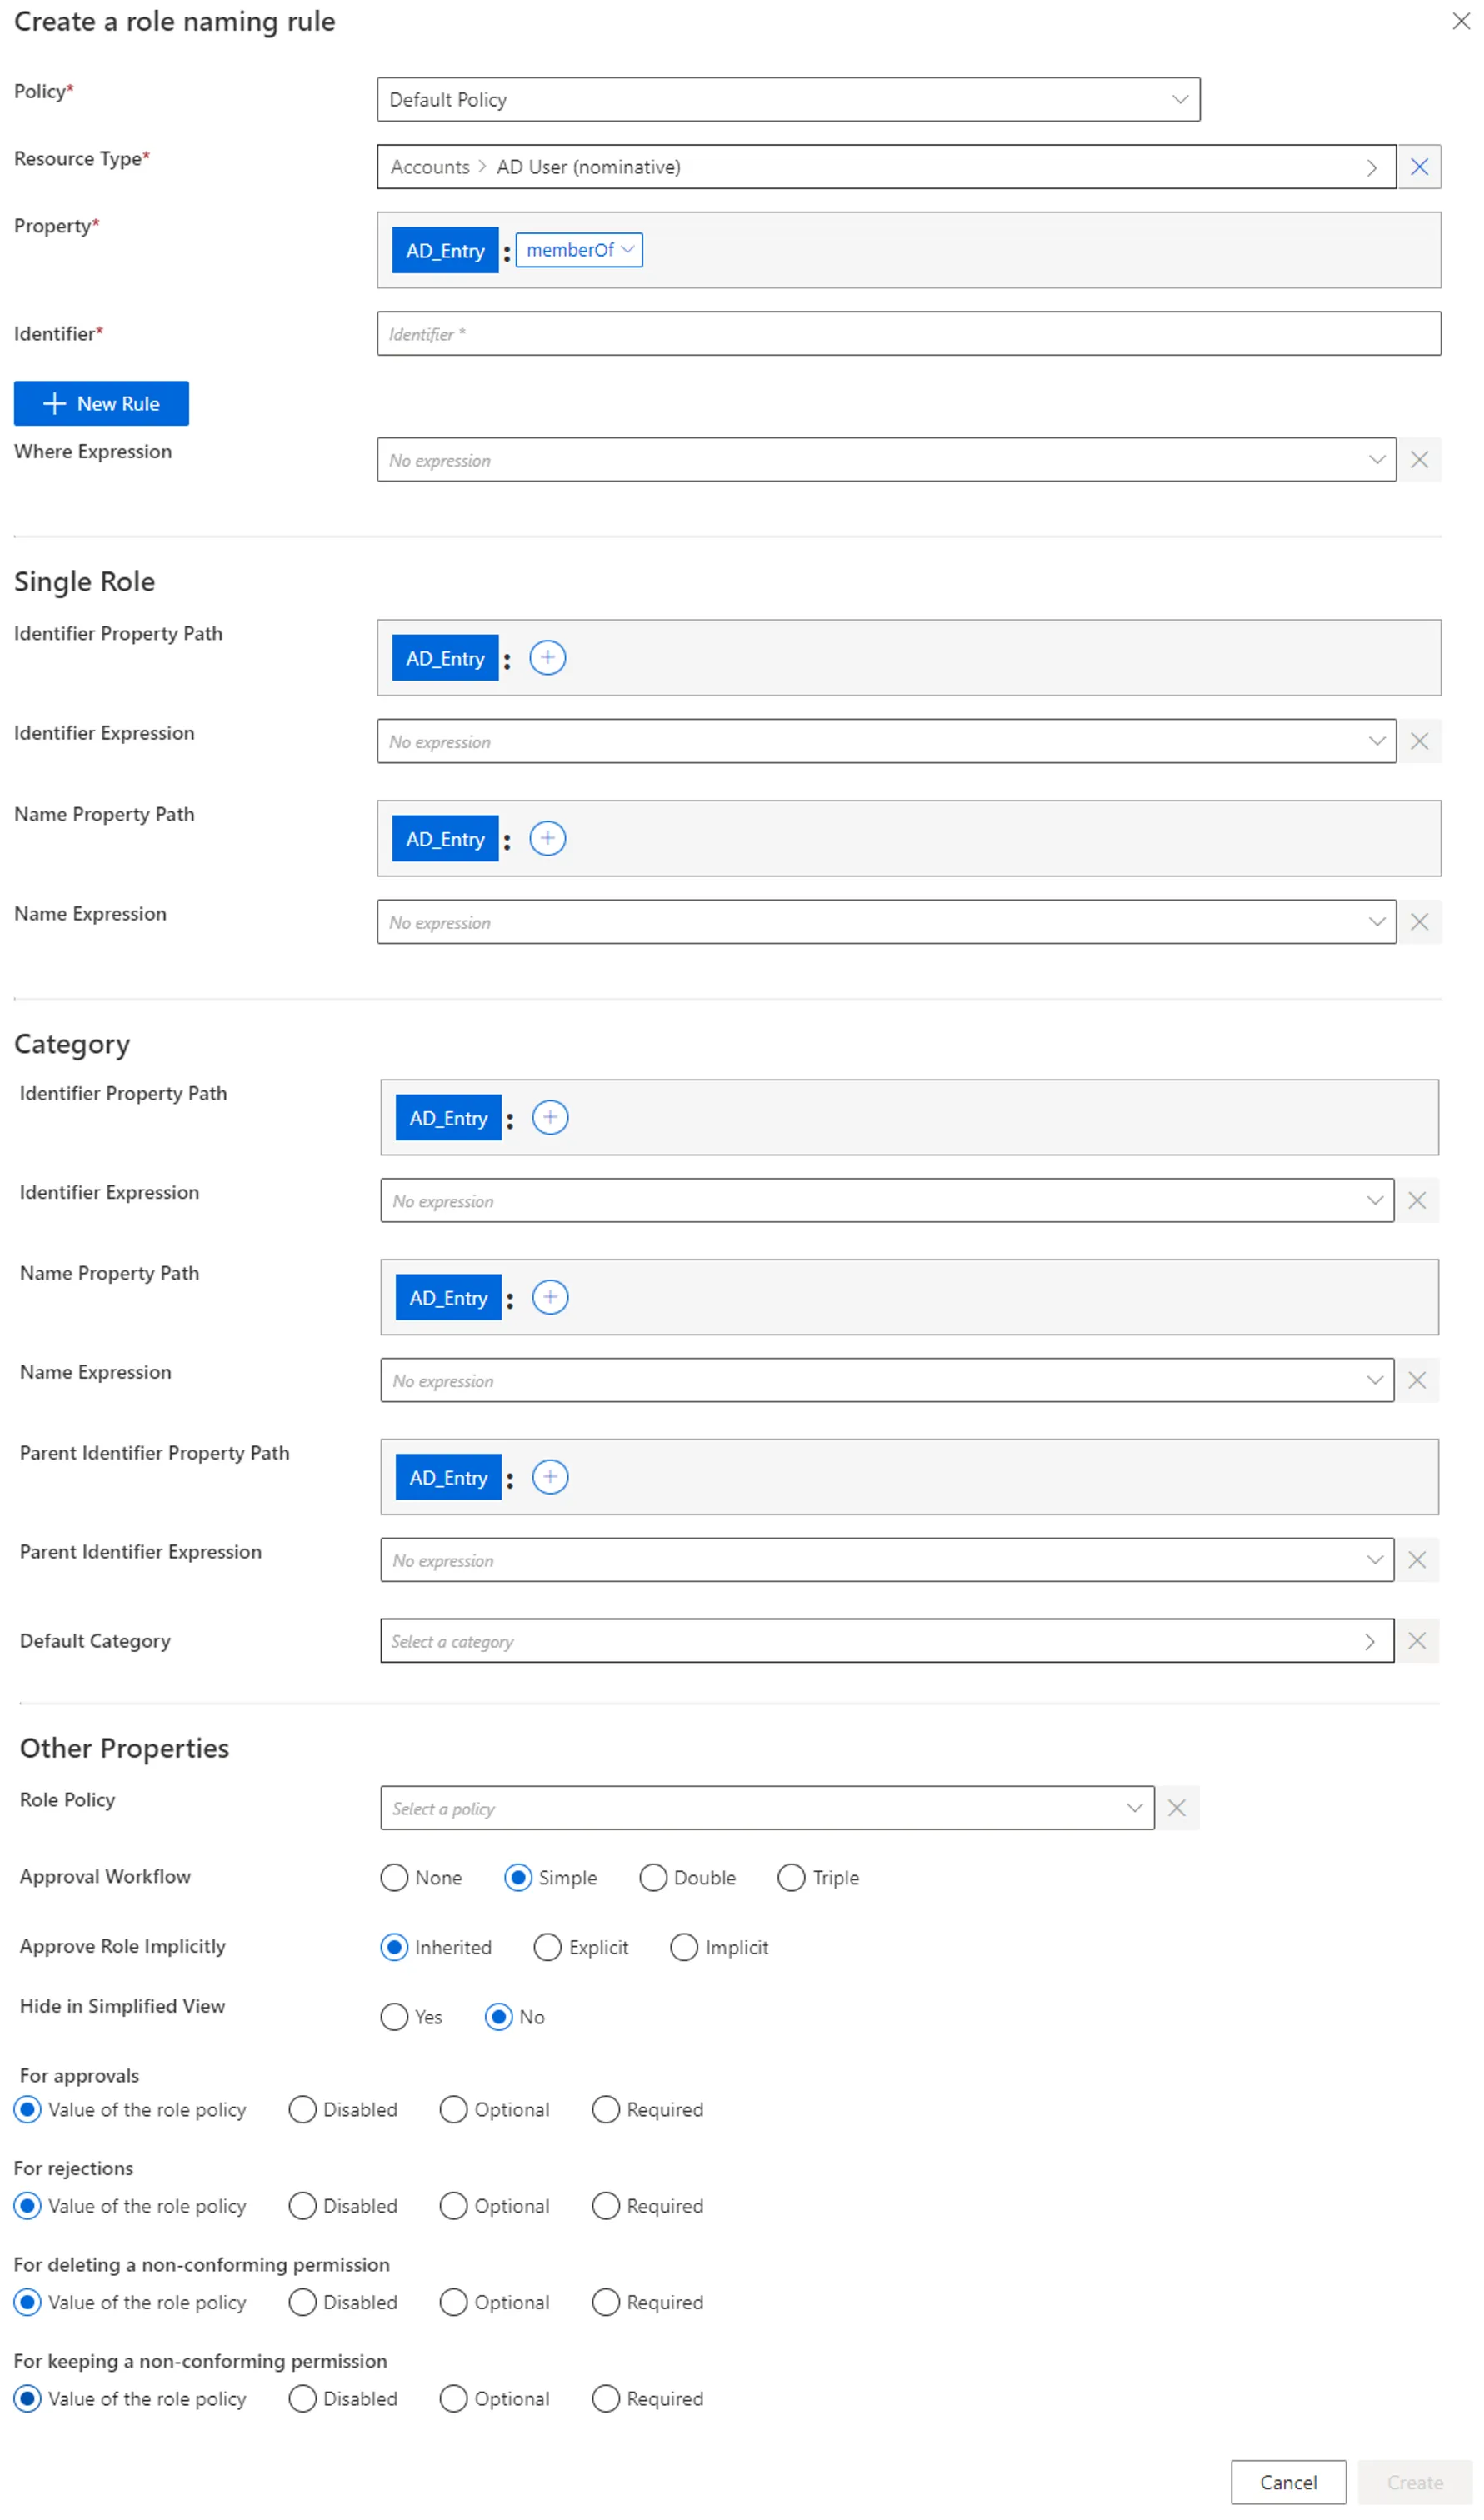
-
Policy: Policy in which the rule exists. -
Property: navigation property which will define the actual entitlement in the future navigation rule. -
Identifier: must be unique among rules and without any whitespace. -
+ New Rule: a naming rule is based on the union of rules, themselves based on the intersection of rule items. A rule item specifies one of the conditions that will trigger the enforcement of the naming rule. See the Role Mapping topic for additional information.
-
Where Expression: C# expression returning a boolean to condition the application of the rule.Netwrix Identity Manager (formerly Usercube) recommends using this option only when the options available in the rule items do not suffice.
-
Single Role: single role(s) to be created. See the Create a Role Manually topic for additional information.
Identifier: must be unique among roles and without any whitespace. If the defined identifier is already used, then neither the role nor the rule is created. Can be defined by a property path and/or Expressions (mandatory).Name: will be displayed in the UI to identify the future single role. Can be defined by a property path and/or an Expressions.
-
Category: the Category for the future role(s).
Identifier: either matches an existing category and selects it, or doesn't match and therefore a new category is created. Can be defined by a property path and/or an expression.Name: will be displayed in the UI to identify the category. Ignored if theIdentifierattribute matches an existing category's identifier. Can be defined by a property path and/or an expression.Parent Identifier: for a potential parent category. Must match an existing category's identifier. Can be defined by a property path and/or an expression.Default Category: category for the future role(s) if the category'sIdentifierattribute isn't filled in or doesn't compute.
-
Role Policy: policy in which the future roles exist. -
Approval Workflow: represents the number of validations required to assign the future role(s). -
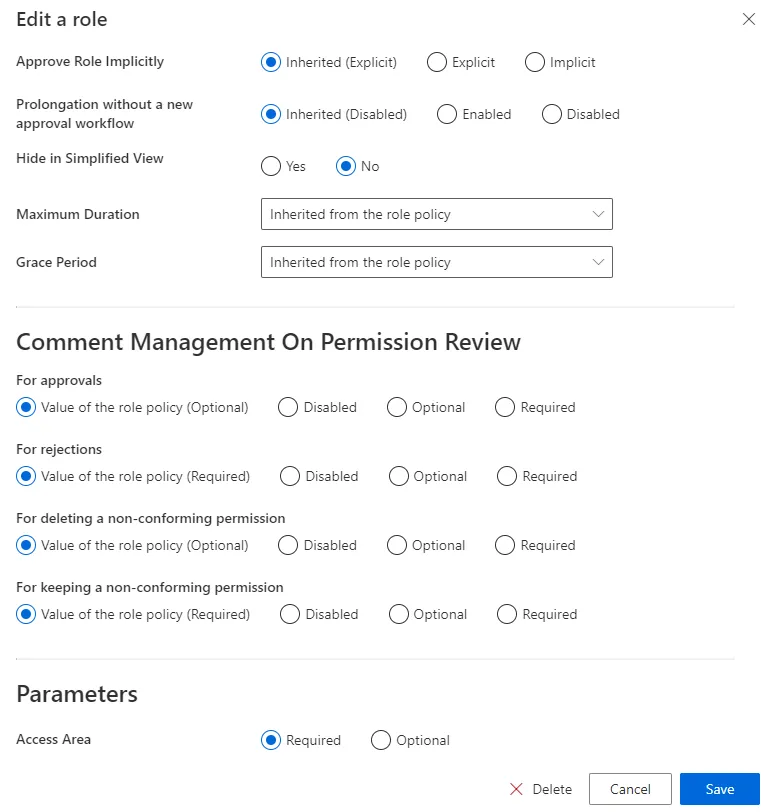
Approve Role Implicitly: needs at least a simple approval workflow.Implicitmode bypasses the approval step(s) if the person who issues the role request is also the role officer.Explicitrefuses said bypass.Inheritedfollows the policy decision to approve roles implicitly or not. -
Hide in Simplified View: hides the role from the users' Simplified View in View Permissions dialog. This setting does not apply to roles which are either inferred or have workflow states which require manual action. -
Comment Management on Permission Review: to change if different from the role policy.Our example would look like:
-
-
Click on Create and see a line added on the rules page.
Impact of Modifications
As naming rules are applied only to resources that aren't already linked to a role or a navigation rule, neither deletion nor modification in a naming rule can affect the previously created roles and rules.
Verify Naming Convention
In order to verify the process:
-
to take the changes into account, on the appropriate connector's overview page click on Jobs > Apply Naming Conventions;

-
check that the correct roles and rules were created.
For roles, click on Access Roles on the home page in the Configuration section.
Select single roles and find the role(s) you created inside the right category and with the right parameters.

Our example would look like:
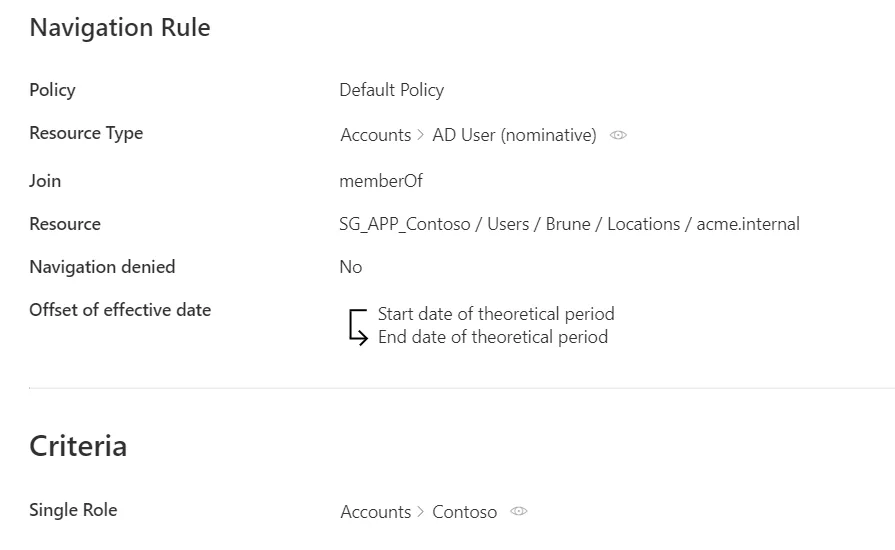
For rules, click on Access Rules on the home page in the Configuration section.
Select navigation rules and find the rule(s) you created with the right parameters.

Our example would look like:
Create a Role Manually
How to create single roles manually.
Overview
A single role is a way to represent an entitlement that is to be assigned to an identity. It brings a layer of abstraction through a user-friendly name, close to the business view. See the Single Role topic for additional information.
To be effective, roles must be linked to actual entitlements in the managed systems. Within Identity Manager, an entitlement assigned to an identity is in fact represented by the value of a given navigation property, in a resource owned by said identity. See the Create an Entity Typetopic for additional information. Thus, each role is linked to one navigation rule per entitlement. See the Resource Type topic for additional information.
NOTE: For example, imagine that we want to grant unlimited Internet access to the administrator
profile of an identity. This entitlement won't be assigned directly to the identity but to its AD
administration account. In our Active Directory, there is a resource called
<DL-INTERNET-Restricted> identified from among AD entries as a group. So we need to add this group
membership to the properties of the identity's AD account, using <DL-INTERNET-Restricted> as a
value of the memberOf property.
Participants and Artifacts
For a given managed system, integrators may need the help of the application owners who know the application's users, entitlements and data model.
| Input | Output |
|---|---|
| Classification (required) | Single roles |
See the Classify Resources topic for additional information.
Create a Single Role
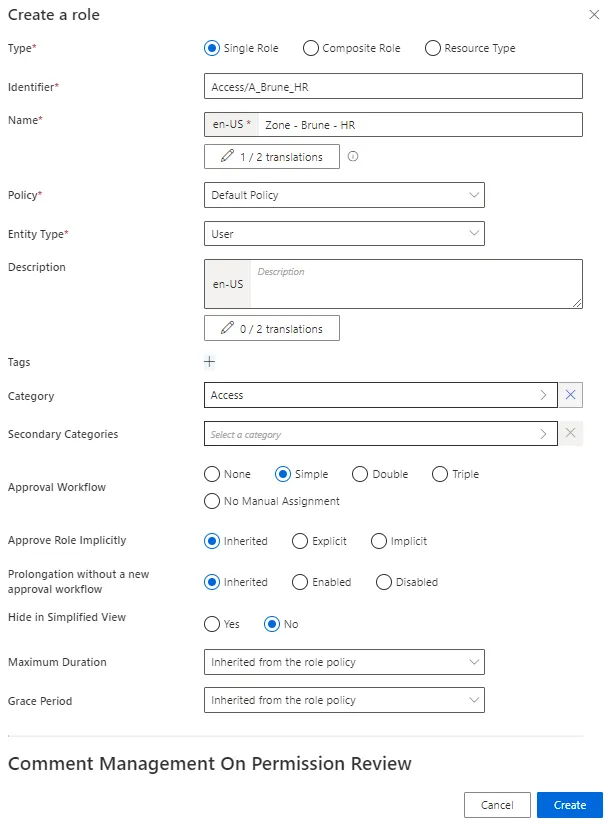
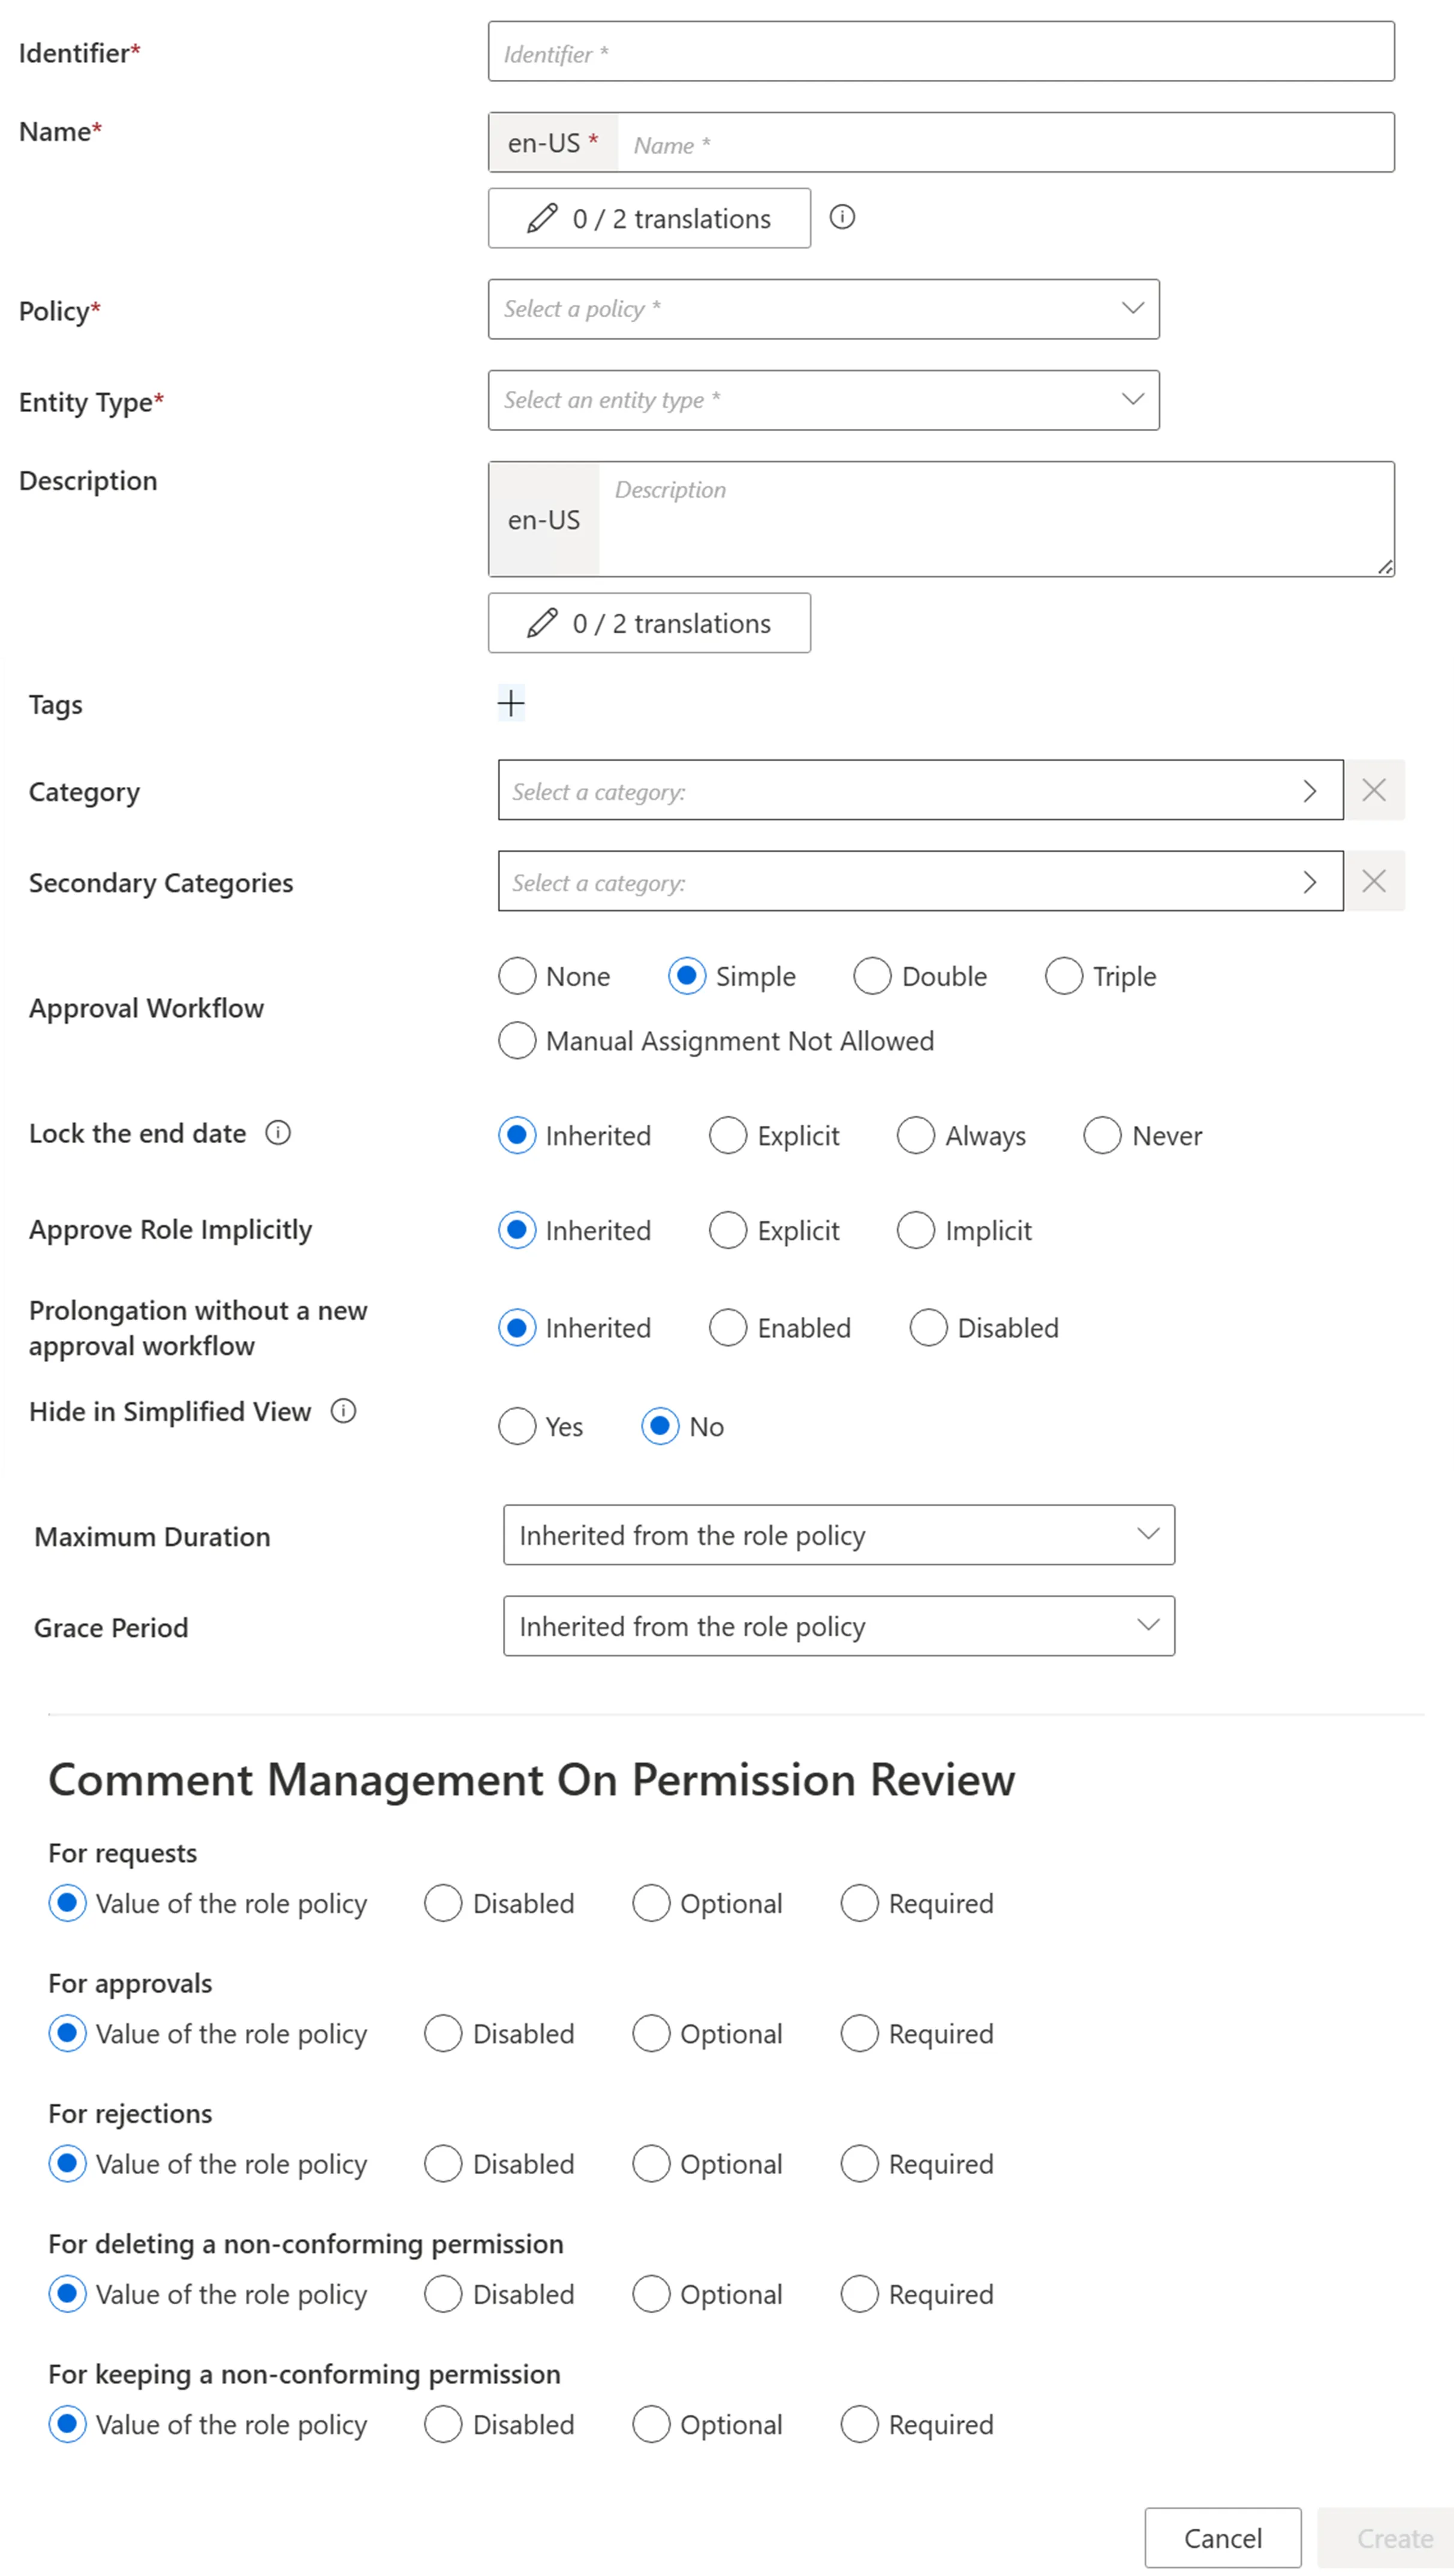
Create a single role by proceeding as follows:
Step 1 – On the home page in the Configuration section, click on Access Roles to access the roles page.
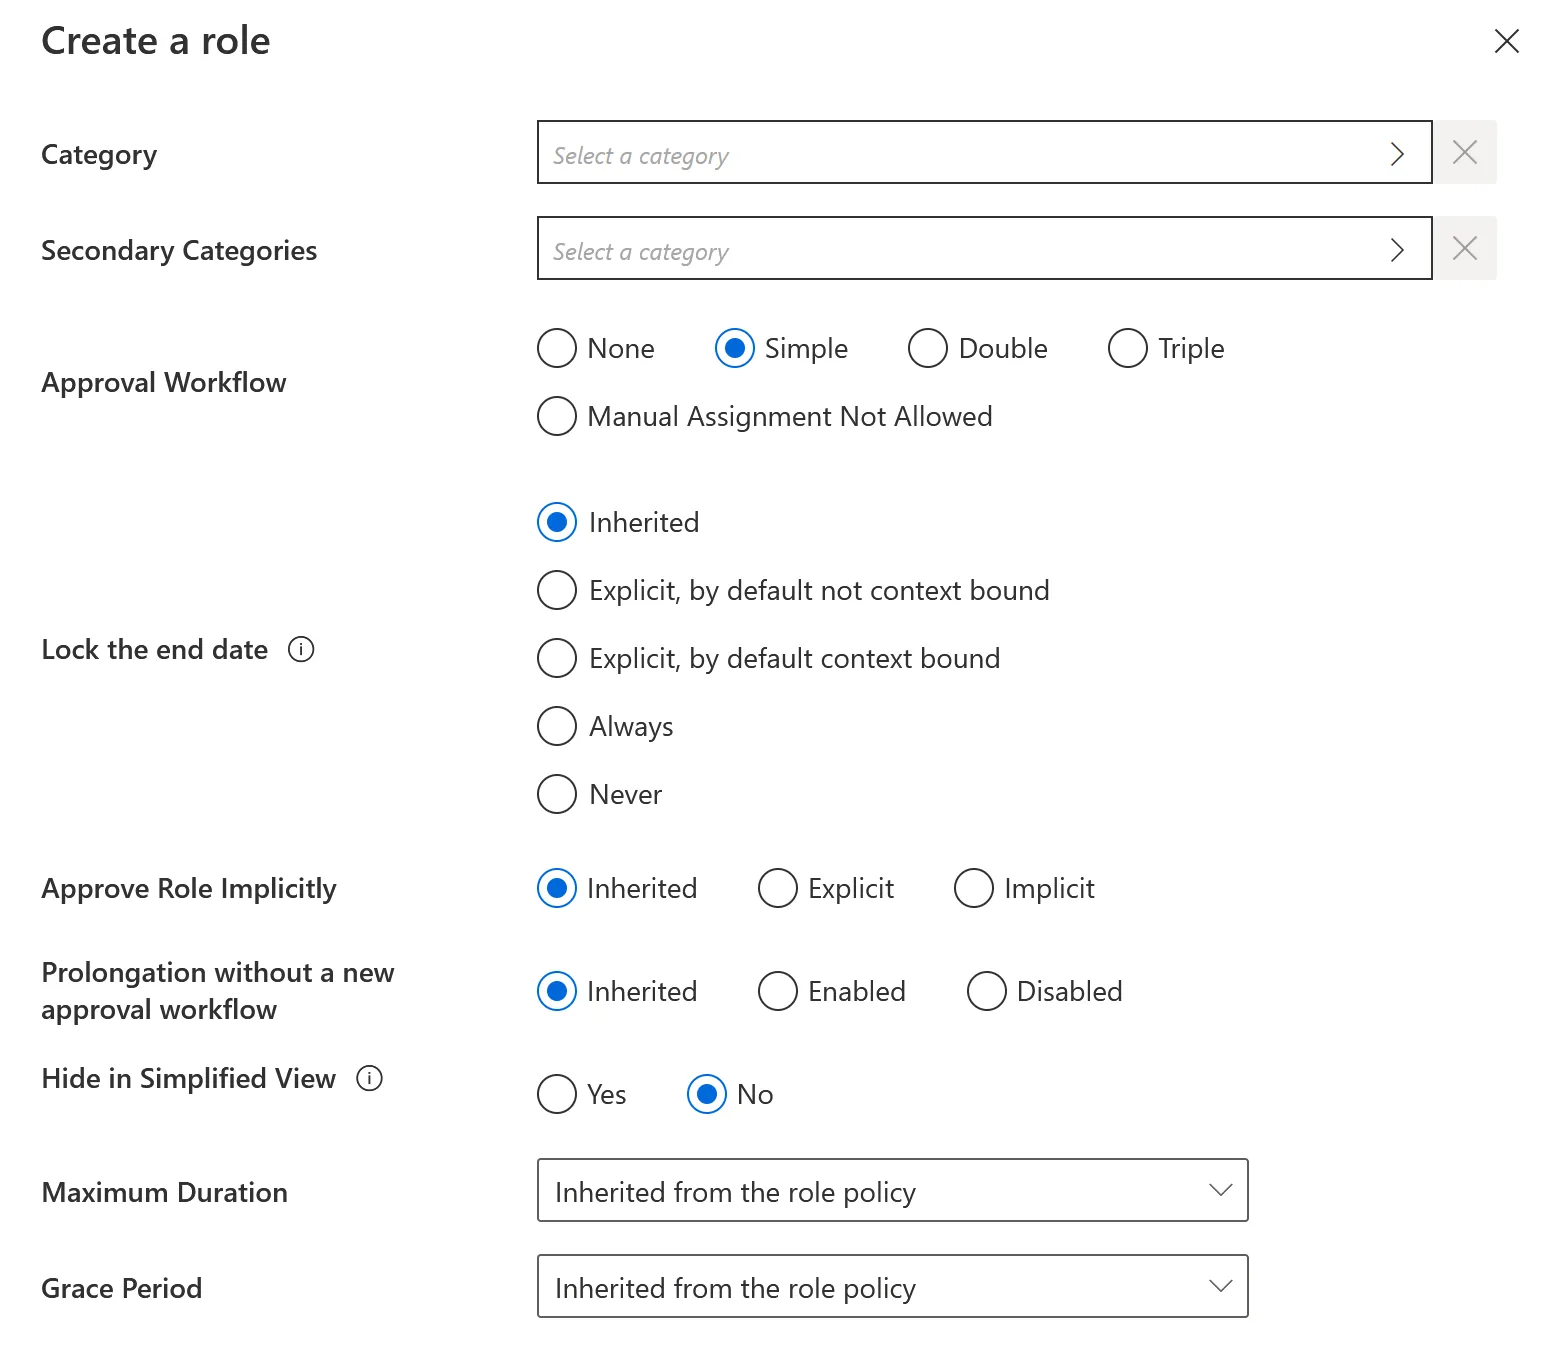
Step 2 – On the roles page, click on the adequate category and create a role by clicking on + New at the top right corner.
Step 3 – Fill in the fields.
-
Identifier: Must be unique among roles and without any whitespace.
-
Name: Will be displayed in the UI to identify the created single role.
-
Policy: Policy in which the role exists.
-
Entity Type: Entity type targeted by the role.
-
Description: Description of the role.
-
Tags: Label(s) that can later be used to filter the target roles of access certification campaigns. See the Schedule a Certification Campaign topic for additional information.
NOTE: Netwrix recommends using role tags when you want to perform an access certification on a set of roles that are from several categories.
-
Category: Category which is to contain the created role.
-
Secondary Categories: Other potential categories which are to contain the created role.
-
Approval Workflow: Represents the number of validations required to assign the created role.
-
Lock the end date: Locks or binds manual permission assignments to the identity's end date (as defined by the context rule).
It has five options:
- Inherited:The policy's setting will be used.
- Explicit, by default not context bound: By default, the assignment's end date will not be context bound in order to encourage the manual entry of an end date.
- Explicit, by default context bound: By default, the assignment's end date will be context bound and therefore locked, but a manual date can be entered.
- Never: The assignment's end date will never be locked and needs to be specified manually.
- Always: The assignment's end date is always locked according to the applicable context rule.
-
Approve Role Implicitly: Needs at least the simple approval workflow. Implicit mode bypasses the approval step(s) if the person who makes the role request is also the role officer. Explicit refuses said bypass. Inherited follows the policy decision to approve roles implicitly or not. See the Create a Policy topic for additional information.
-
Prolongation without a new approval workflow
-
Hide in Simplified View: Hides the role from the users' Simplified View in View Permissions dialog. This setting does not apply to roles which are either inferred or have workflow states which require manual action.
-
Maximum Duration: Duration (in minutes) after which the role will be automatically revoked, if no earlier end date is specified.
NOTE: The maximum duration impacts only the roles which are manually assigned after the maximum duration is set. Pre-assigned roles are not impacted.
- If no duration is set on the role, the maximum duration of the associated policy is applied.
- If the duration is set to 0 on the role, it prevents the associated policy from applying its maximum duration to it.
-
Grace Period: Duration (in minutes) for which a lost automatic single role is prolonged. A review will be required to validate or decline the entitlement prolongation. Inferred entitlements won't be lost unless the end of the grace period is reached or the prolongation is declined.
NOTE: The grace period is only applied if the loss of the entitlement is due to a change in the rules, i.e. rule deletion or criteria changes.
If the grace period is not defined, the value is inherited from the policy.
Step 4 – Click on Create and see a line added on the roles page.
Step 5 – Create at least one navigation rule with the single role as a criterion.
Once you have completed the steps the single role is created.
Create a Navigation Rule
Navigation rules aim to assign given resources to identities based on specific criteria. A navigation rule sets the value of the navigation property on a specific resource, if a given condition is met. It is linked to a parent resource type that sets the target entity type. One rule creates one navigation.
Create a navigation rule by proceeding as follows:
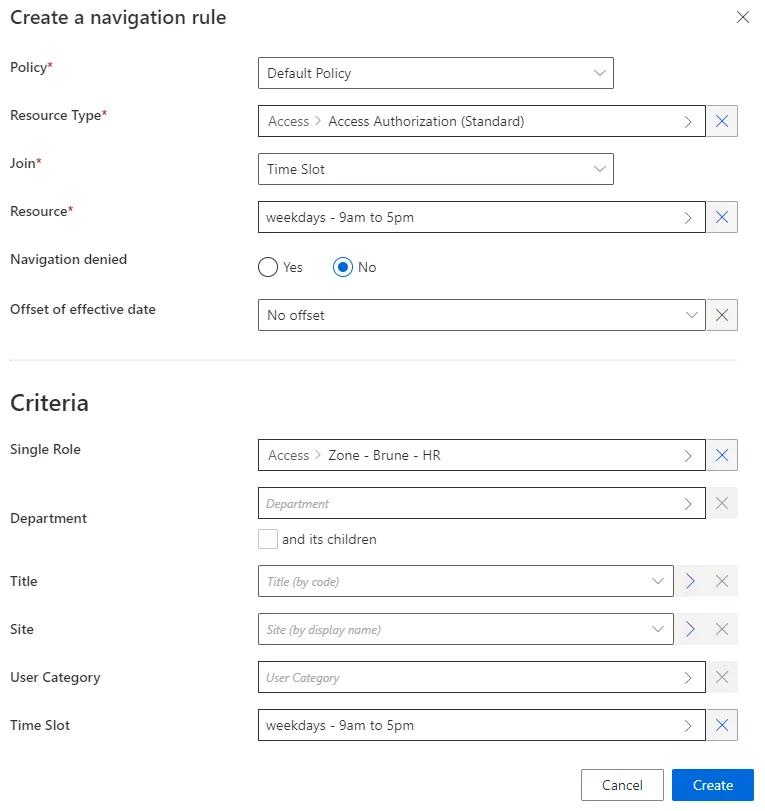
Step 1 – On the home page in the Configuration section, click on Access Rules to access the rules page.
Step 2 – In the drop down menu at the top left, choose the entity type to which the future navigation rule will be applied.
![]()
Step 3 – Click on the Navigations tab and on the addition button at the top right corner.
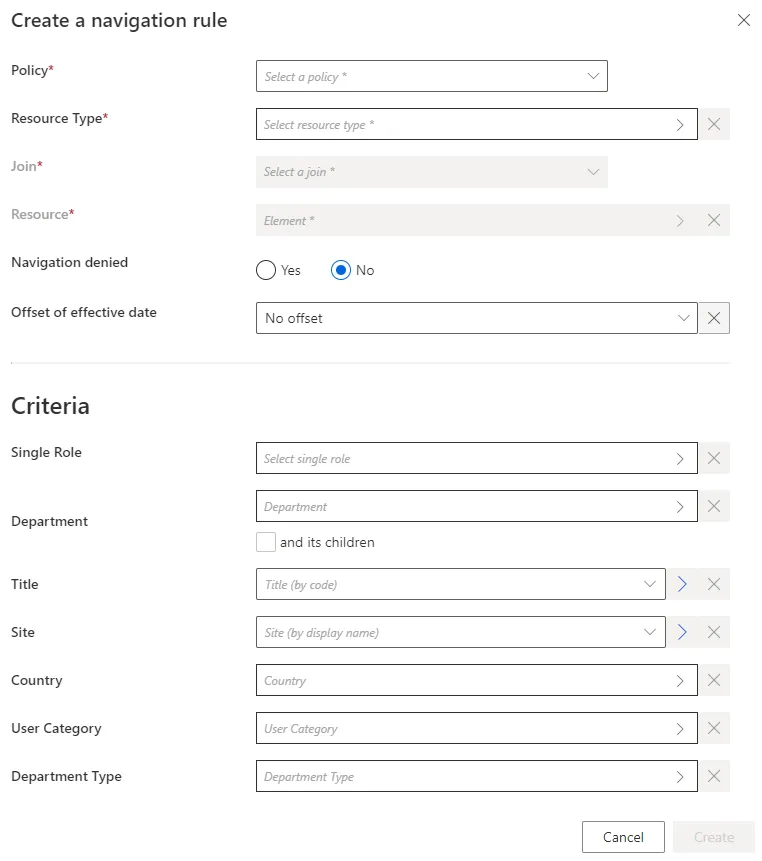
Step 4 – Fill in the fields.
- Join: Target property whose value is impacted by the created rule.
- Resource: Value to be set on the JOIN.
- Navigation denied: Option that forbids the resource assignment.
- Offset of effective date: Time period that defines the actual effective date according to the value's start and/or end date. An offset of effective date can be useful for some attributes. For example, account activation and deactivation can be managed according to the start and/or end dates.
- Criteria: Conditions that, if met, trigger the created navigation.
Step 5 – Click on Create and see a line added on the rules page.
Once you have completed the steps the navigation rule is created.
Impact of Modifications
When deleting a single role, caution must be used when deleting the corresponding navigation rules. Indeed, these rules thus lose their criteria and may be applied to far too many people after that.
Verify Single Role Creation
In order to verify the process, check that the role and rule are created with the right parameters.
Step 1 – For roles, click on Access Roles on the home page in the Configuration section.
Step 2 – Select single roles and find the role you created inside the right category and with the right parameters.
Our example would look like:
Step 3 – For rules, click on Access Rules on the home page in the Configuration section.
Step 4 – Select navigation rules and find the rule(s) you created with the right parameters.
Our example would look like:
The verification of role creation has been completed.
Configure a Parametrized Role
How to reduce the number of roles in the model by configuring roles with parameters.
Overview
The assignment of a role to a user gives them an entitlement, usually a group membership, thanks to a navigation rule. See the Create Roles in the Role Catalog topic for additional information.

To enable the assignment of all existing entitlements, the role model usually contains numerous roles.
For example, the SAP role can be given with slight differences according to the users' subsidiaries:
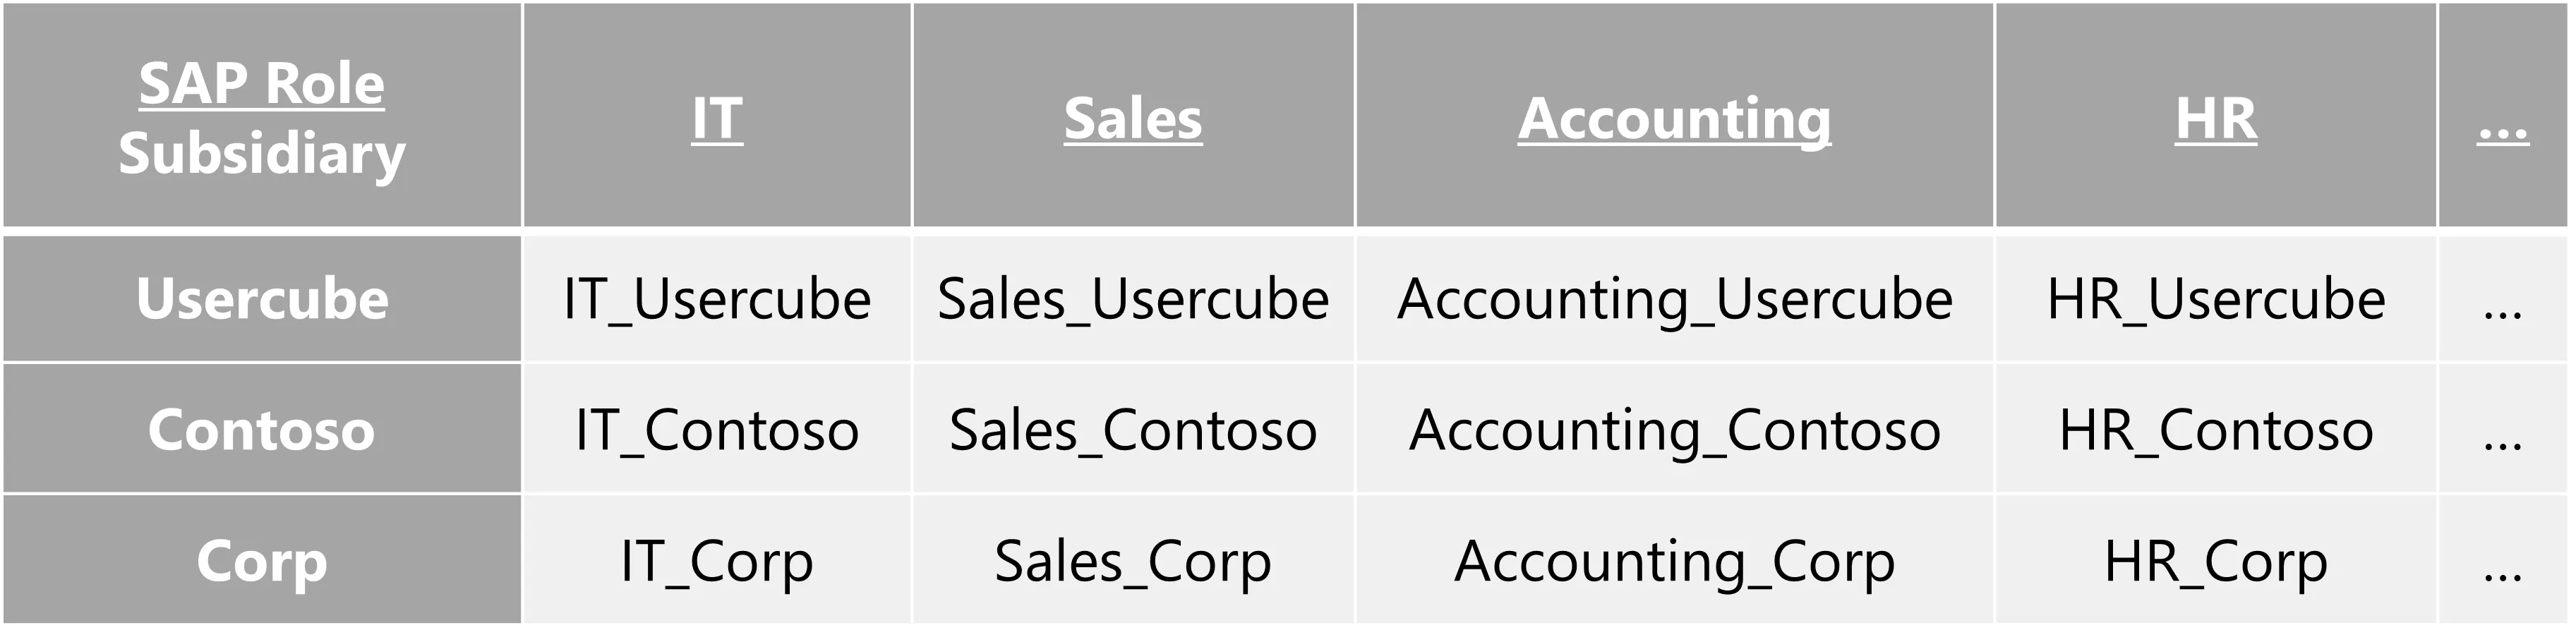
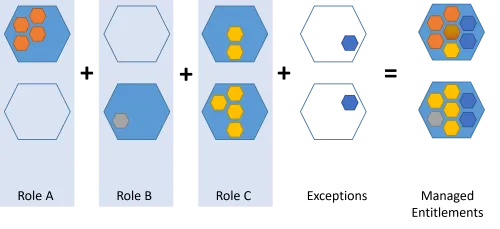
In order to reduce the number of roles, we can configure roles with parameters by inserting a criterion in the navigation rules. Thus, instead of having as many roles as entitlements (left on the schema), we can have way fewer roles (right on the schema).
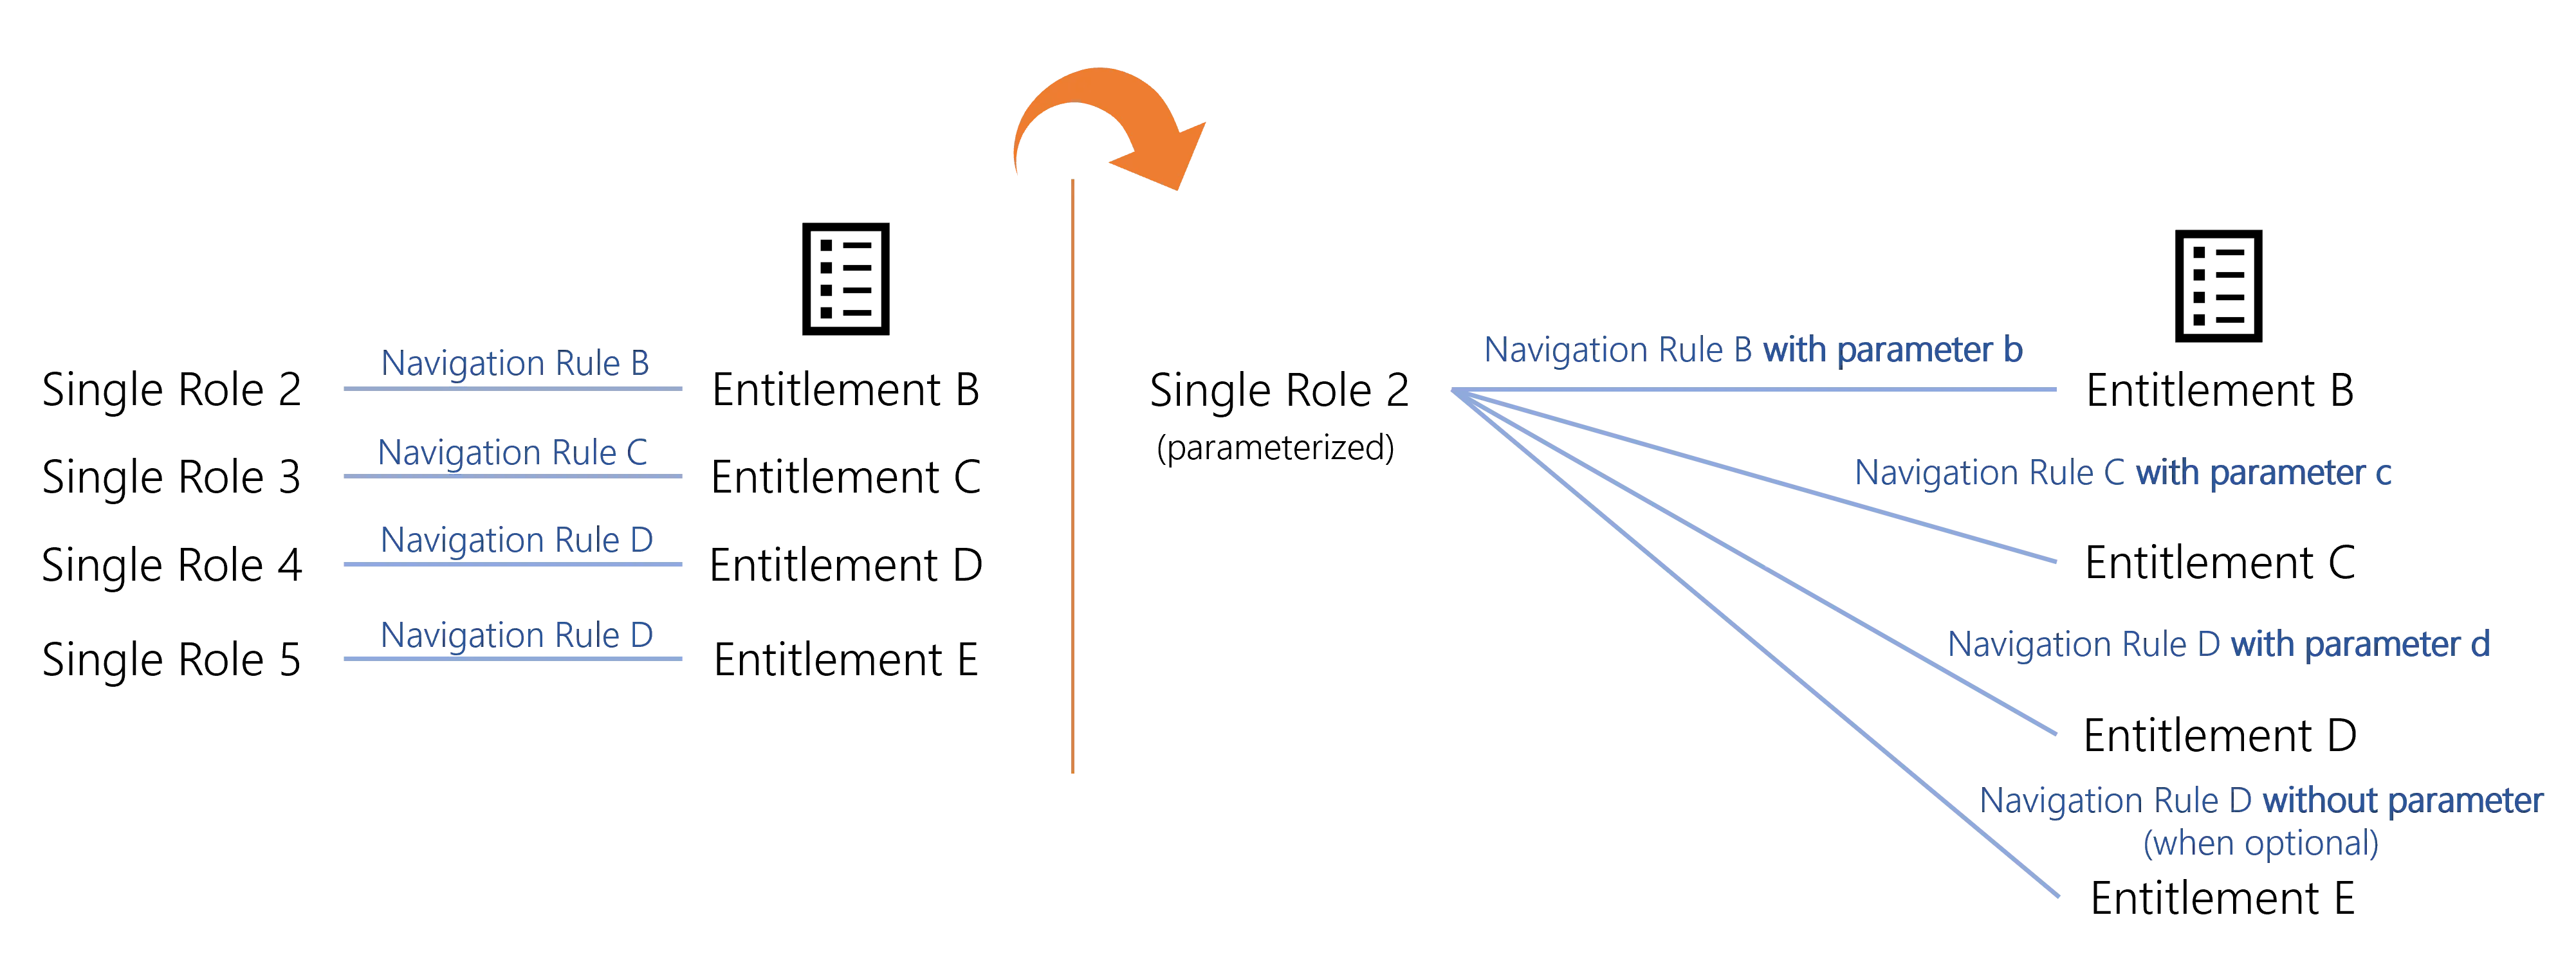
In the previous example, with a parameter on the subsidiary, the number of roles would be divided by three.
By extension, a composite role that assigns a parametrized single role is parametrized too.
This way, when assigning a parametrized role, a pop-up window is displayed where the parameter must be specified.
The same thing goes with type rules instead of navigation rules when we want to assign resource types instead of entitlements.
Configure a Parametrized Role
Configure a parametrized role by proceeding as follows:
Step 1 – Create in XML a dimension corresponding to the parameter that will affect the role. See the Dimension topic for additional information.
For example, let's consider that we have many roles available on three different time slots: 8 hours a day, 12 hours a day, or 24 hours a day. We create a dimension for these time slots.
Code attributes enclosed with <> need to be replaced with a custom value before entering the
script in the command line.
<Dimension Identifier="TimeSlot" DisplayName_L1="Time Slot" EntityType="Access_TimeSlot" ColumnMapping="10" IsExcludedFromRoleMining="true" />
Step 2 – Create a single role. See the Create a Role Manually topic for additional information.
Step 3 – Create one navigation rule linked to the role for each available value of the parameter. See the Create a Role Manually topic for additional information.
Here we have three navigation rules, one for each distinct time slot (dimension A). For example:
NOTE: Make sure that the corresponding dimension is specified in the right DisplayEntityType
in XML to be displayed in the UI.
NOTE: It is important to note that for manually assigned roles, if a new dimension is added to the definition of the role, the assignment's dimension will not be re-calculated, and will therefore not be propagated to calculate automatic assignments. Example Scenario — Role A was created as a composite role with no parameters a long time ago. Role A was later updated to depend on the optional parameter X and a single role rule was created to assign a single role B if a user had Role A and parameter X set to value Y. If a user already manually had the role A, even if its dimension X (for example its department, which could be calculated) was equal to value Y, got its permissions recalculated, that person would not get the role B. Since the modification occurred after the assignment, it is understood as if the role was assigned voluntarily with dimension X unset. However, if a user got role A assigned after the modification, and its dimension X was equal to value Y, then that user would get the role B.
Step 4 – Go back to the roles page to edit the single role from step 2, if needing to set the parameter required.
If you want Identity Manager to provide suggestions to set the parameter's value, then make sure that users' context rule specifies the dimension.
For example, with the Title dimension:
Code attributes enclosed with <> need to be replaced with a custom value before entering the
script in the command line.
<ContextRule Identifier="Directory_User" DisplayName_L1="Directory_User" B0="Directory_UserRecord:Organization" B1="Directory_UserRecord:Title" B2="Directory_UserRecord:Site" B3="Directory_UserRecord:Site.Region.Country" B4="Directory_UserRecord:UserType.Category" ... Policy="Default" SourceEntityType="Directory_User" />
Verify the Parametrized Role
In order to verify the process, request manually the parametrized role for a test user. Some additional pop-ups are displayed to set a value for the role's parameter. See the Request Entitlement Assignment topic for additional information.
In our example:


If the dimension is specified in the users' context rule, then Identity Manager will provide suggestions.

For example, concerning the Title dimension mentioned above.
Create a Composite Role
How to define composite roles in order to create sets of single roles easy to assign. See the Composite Role and Create Roles in the Role Catalog topics for additional information.
Overview
A composite role is a set of single roles that are usually assigned together, because they revolve around the same application, or the same job, etc. Composite roles are aggregates of single roles, they can help organize the role catalog. See the Composite Role topic for additional information.
A composite role is a business role comprehensible by managers. It provides an additional layer of abstraction above existing entitlements and single roles. We can say that if a single role allows a user to perform a task, a composite role allows them to perform a job.
Composite roles and Role Mining
Composite roles can also be created based on the rules provided by Role Mining. Rules link roles to dimensions. See the Perform Role Mining topic for additional information.
The following example shows single roles from A to F. Role Mining suggested the rules on the schema, linking these single roles to the organizations R&D and Project as well as to the functions developer, writer, contractor and project manager. The idea is to use these rules to create composite roles. Here, we clearly have one role for R&D-developer, one for R&D-writer, Project-contractor and Project-project manager. Thus, it is clear here that composite roles add an abstraction layer.

Single role rules link composite roles to single roles: a single role rule states that specific single roles are assigned according to specific criteria, particularly composite roles. See the Single Role Rule and Create Roles in the Role Catalog topics for additional information. Thus, a composite role assignment can imply specific single role assignments.
Participants and Artifacts
For a given managed system, integrators may need the help of the application owners who know the application's users, entitlements and data model.
| Input | Output |
|---|---|
| Role catalog (required) | Composite roles |
See the Create Roles in the Role Catalog topic for additional information.
Create a Composite Role
Create a composite role by proceeding as follows:
Step 1 – On the home page in the Configuration section, click on Access Roles to access the roles page.
Step 2 – On the roles page, click on the adequate category and create a role by clicking on + New at the top right corner.
Step 3 – Fill in the fields.
-
Identifier: must be unique among roles and without any whitespace.
-
Name: will be displayed in the UI to identify the single role.
-
Policy: policy in which the role exists.
-
Entity Type: entity type targeted by the role.
-
Category: category assigned to the role.
-
Secondary Categories: other potential categories assigned to the role.
-
Approval Workflow: represents the number of validations required to assign the role.
-
Lock the end date: locks manual permission at the end date. Has four options:
- Inherited: the policy's setting will be used.
- Explicit: at the time of assignment, the end date can be specified manually or can be locked to the applicable context rule.
- Never: the end date will never be locked and needs to be specified manually.
- Always: the end date is always locked according to the applicable context rule.
-
Approve Role Implicitly: needs at least a simple approval workflow. Implicit mode bypasses the approval step(s) if the person who issues the role request is also the role officer. Explicit refuses said bypass. Inherited follows the policy decision to approve roles implicitly or not.
-
Hide in Simplified View: hides the role from the users' Simplified View in View Permissions dialog. This setting does not apply to roles which are either inferred or have workflow states which require manual action.
-
Comment Management on Permission Review: to change if different from the role policy.
-
Maximum Duration: duration (in minutes) after which the role will be automatically revoked, if no earlier end date is specified. It impacts only the roles which are manually assigned after the maximum duration is set. Pre-assigned roles are not impacted. If no duration is set on the role, the MaxDuration of the associated policy is applied. If the MaxDuration is set to 0 on the role, it prevents the associated policy from applying its MaxDuration to it.
Step 4 – Click on Create and see a line added on the roles page.
Step 5 – Create at least one single role rule with the composite role as a criterion.
Impact of Modifications
When deleting a composite role, caution must be used when deleting the corresponding single role rules. Indeed, these rules thus lose their criteria and may be applied to far too many people after that.
Simulations are available in order to anticipate the changes induced by a creation/modification/deletion in roles and single role rules. See the Perform a Simulation topic for additional information.
Verify Composite Role Creation
In order to verify the process, check that the role and rule are created with the right parameters.
For roles, click on Access Roles on the home page in the Configuration section.
Select composite roles and find the role you created inside the right category and with the right parameters.

For rules, follow the instructions about assignment rules. See the Automate Role Assignments