Role Assignment
Once the role model is established, role assignment can be performed, i.e. missing or non-conforming assignments can be detected in order to give users the appropriate access rights.
Be sure to read first the documentation about the role model. See the Role Model topic for additional information.
Automate Assignments
How to automate entitlement assignment.
Overview
Once you are able to assign manually the right entitlements to the right identities for the right reasons, you realize how tedious and error-prone entitlement assignment is, and you want to automate it.
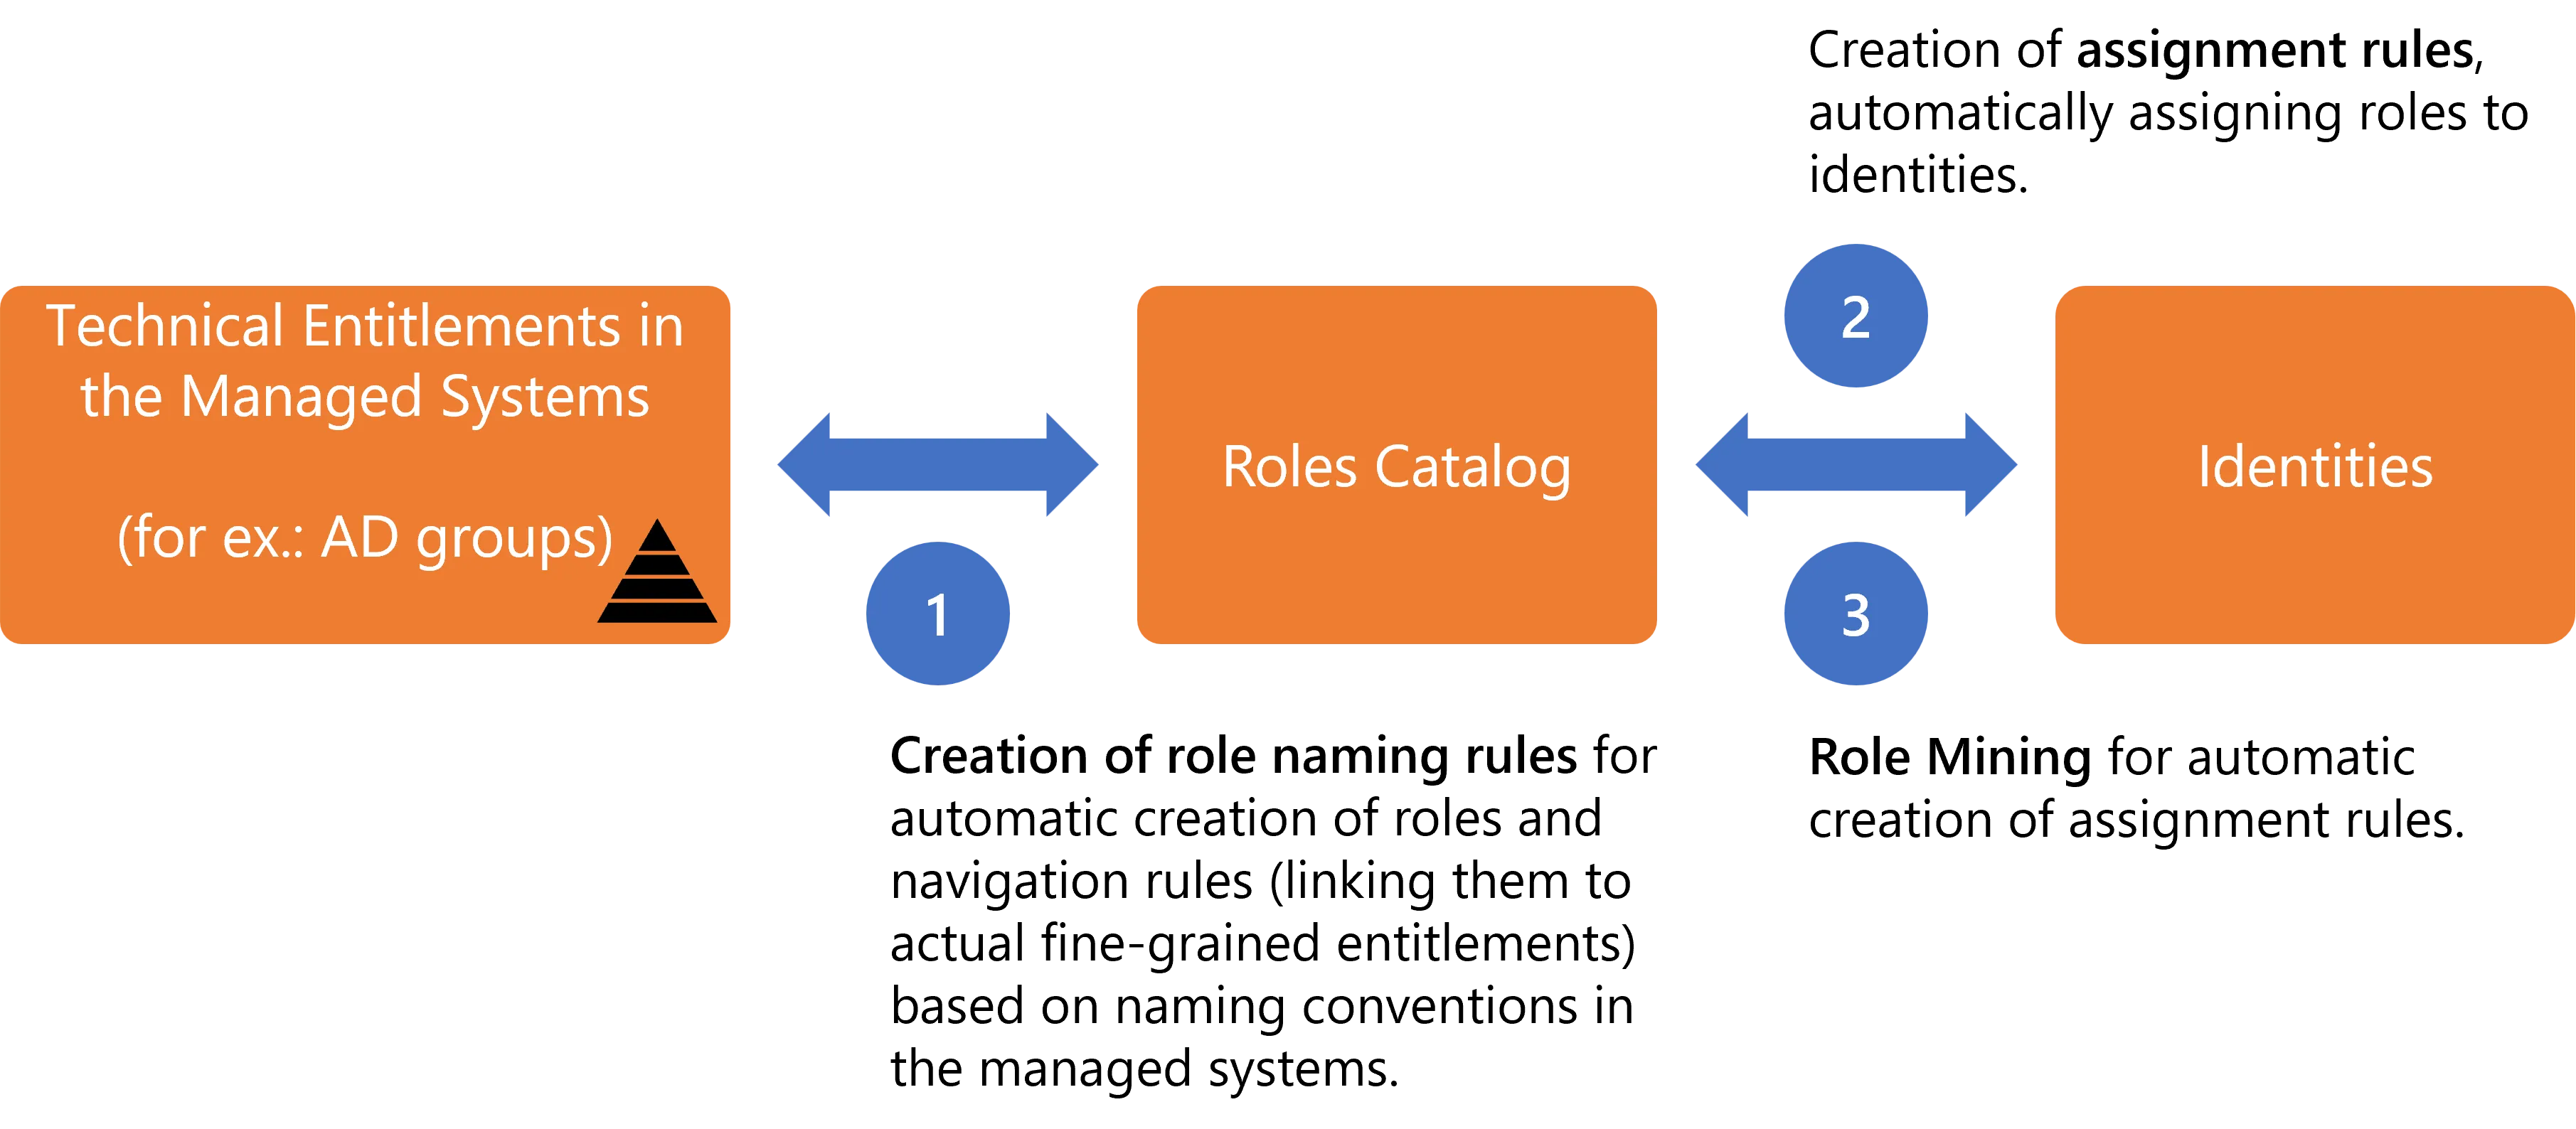
The strategy for the automation of entitlement assignment lies in the automatic making of assignment decisions, based on several automation levels provided by Identity Manager:
- Automation of the creation of the role model, i.e. both roles and navigation rules that represent entitlements in the managed systems, through Create Roles in Bulk based on resources' naming conventions in the managed systems.
- Automation of entitlement assignment through assignment rules, which use identity criteria (called dimensions, like identities' department or work location, etc.) to decide what entitlements to assign automatically to identities. See the Conforming Assignments topic for additional information.
- Automation of the creation of said assignment rules through Perform Role Mining , based on existing data analysis.
Assignment rules can sometimes give to users an entitlement that they had already received manually. Hence, new assignment rules can imply redundancies between the entitlements assigned manually and approved, and those calculated by a rule and assigned automatically.
Netwrix Identity Manager (formerly Usercube) recommends Remove Redundant Assignments after any assignment rule is created or updated.
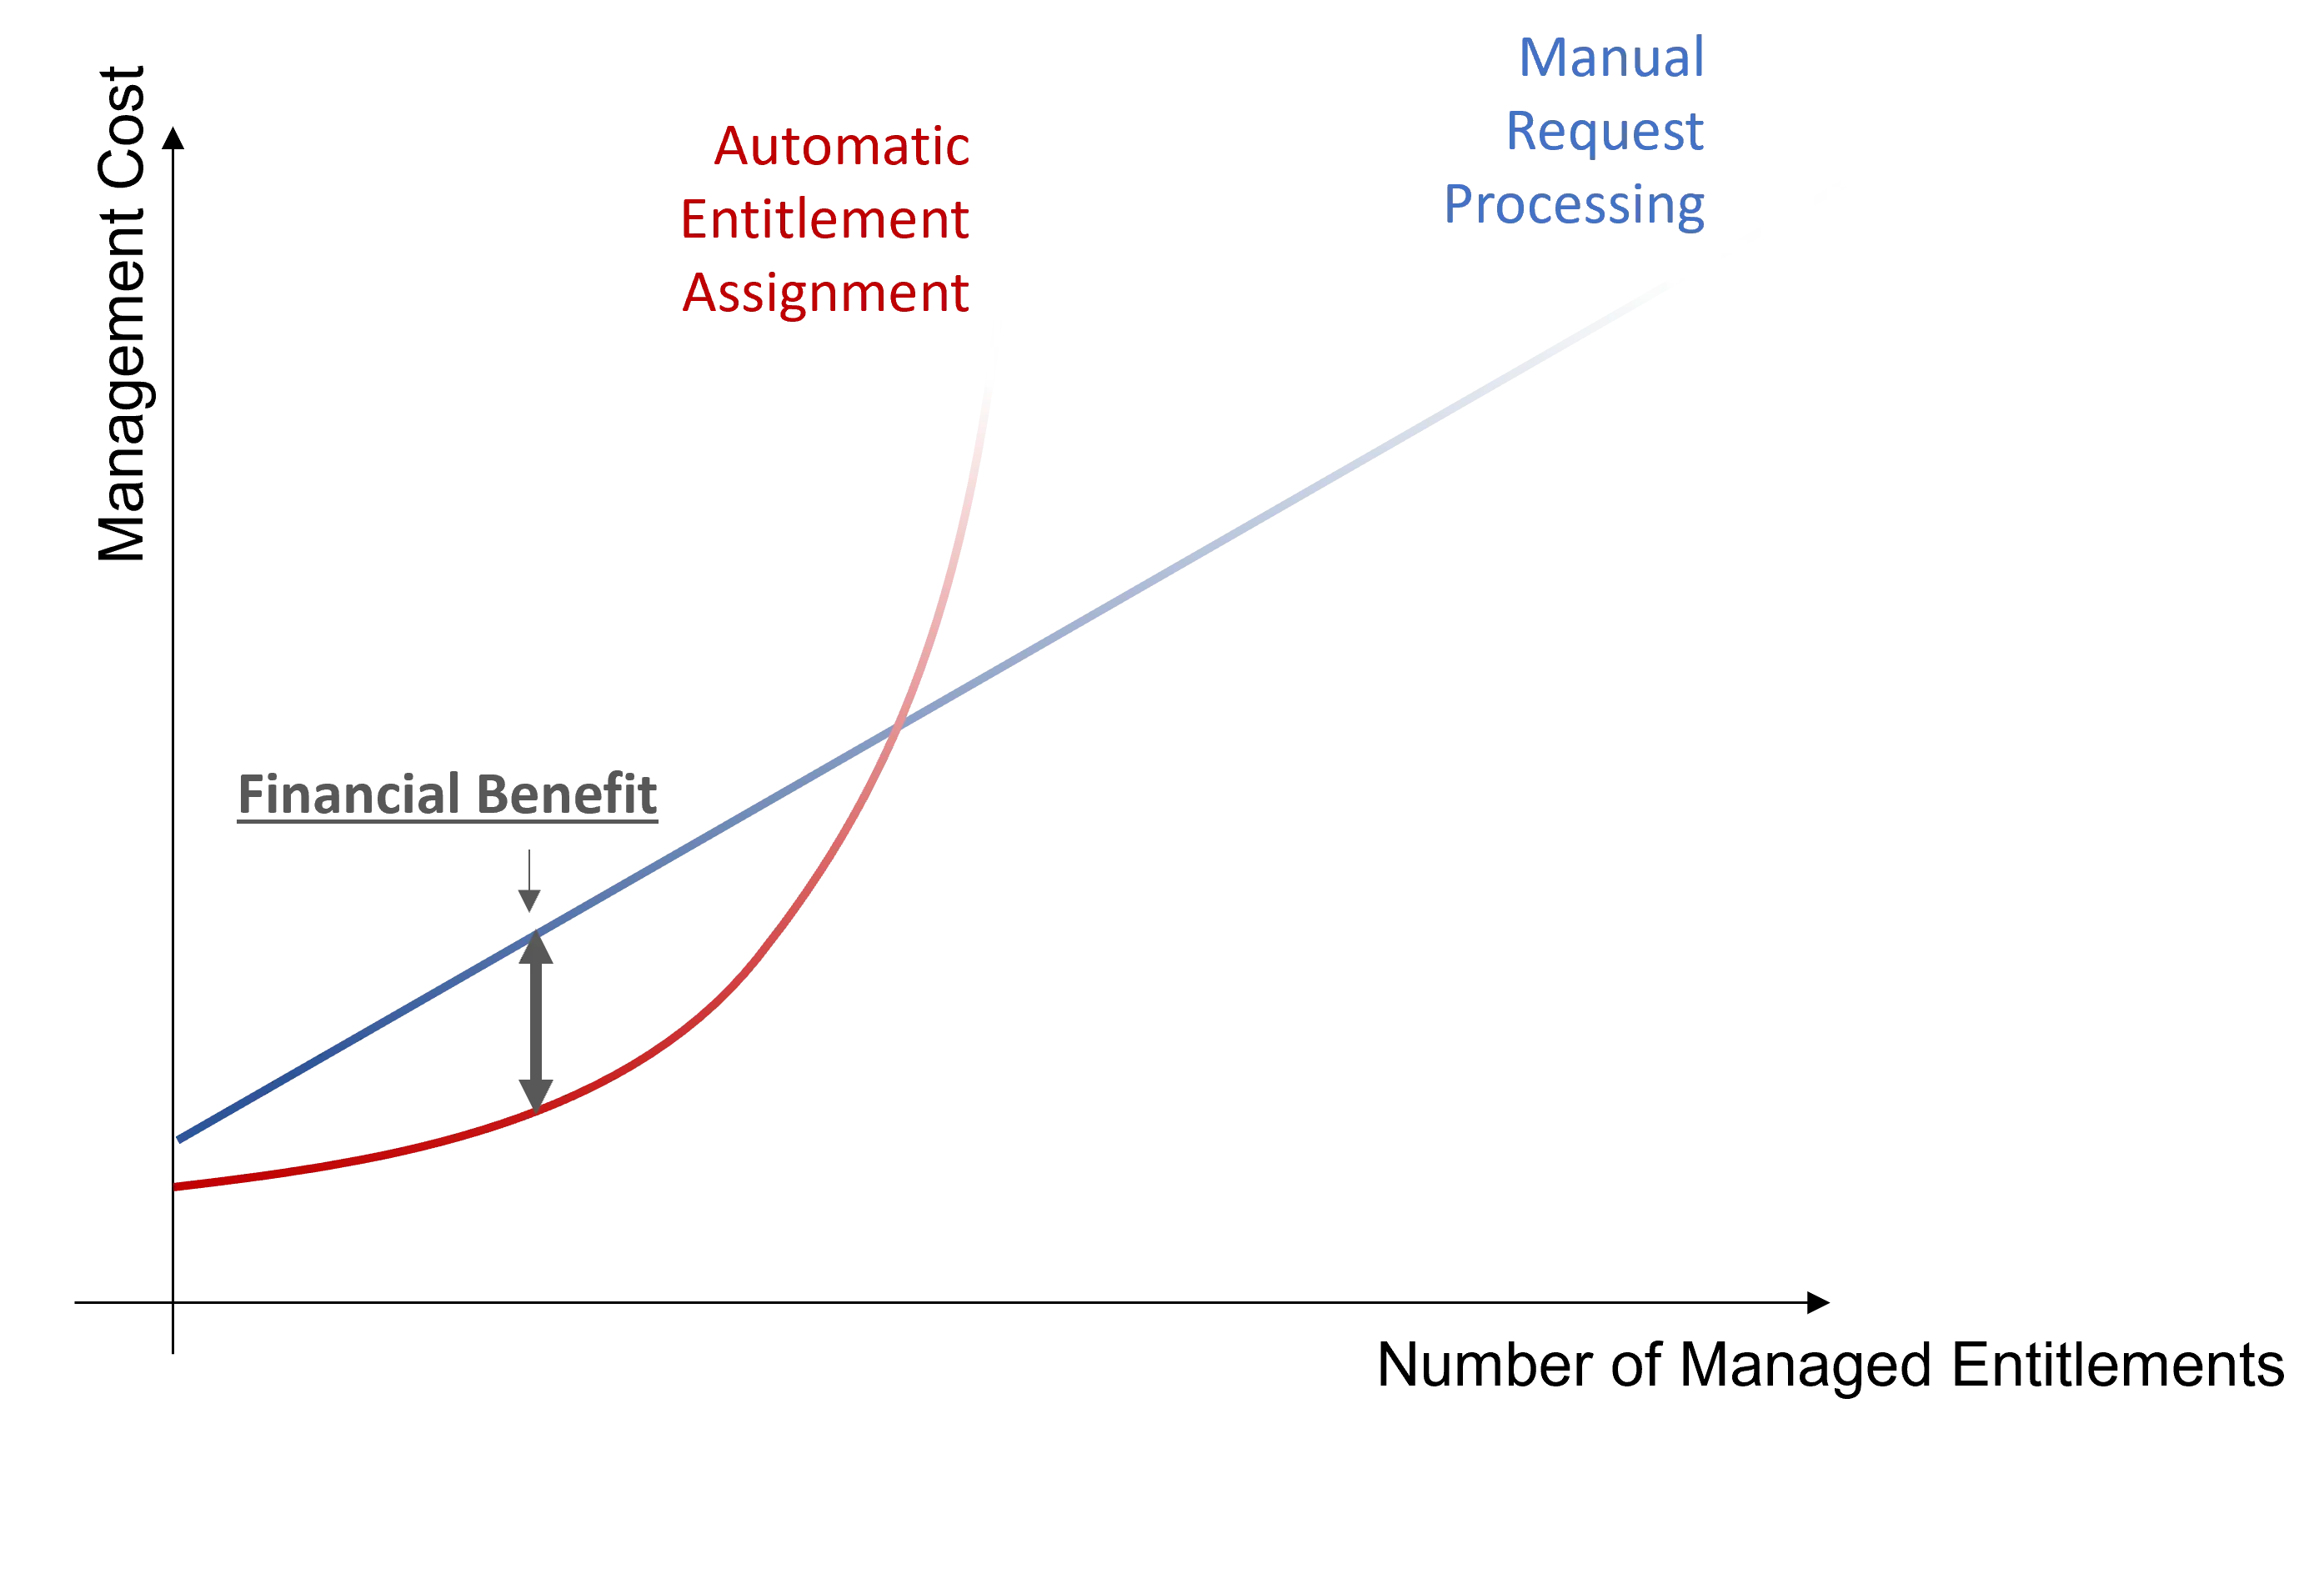
The main goal of automation is to reach the optimal cost, playing on assignment efficiency, quality and quantity.
Assessment of manual assignment
So far, Identity Manager's configuration has enabled users to use workflows to add and remove entitlements to/from identities. These assignments can be fulfilled manually or automatically, but the decision-making process that defines who gets what entitlement is still manual. Manual assignment poses the following risks:
- Delay can happen: on the day a worker joins an organization, they rely on a manual action to get all the entitlements required for them to start working. Even with roles aiming to help managers to understand actual entitlements, delay happens. See the Create Roles in the Role Catalog topic for additional information.Errors can happen: human mistakes are expected in role distribution, even though largely mitigated by the role review process and Perform Access Certification . See the Reconcile a Role topic for additional information.
- It is time-consuming.
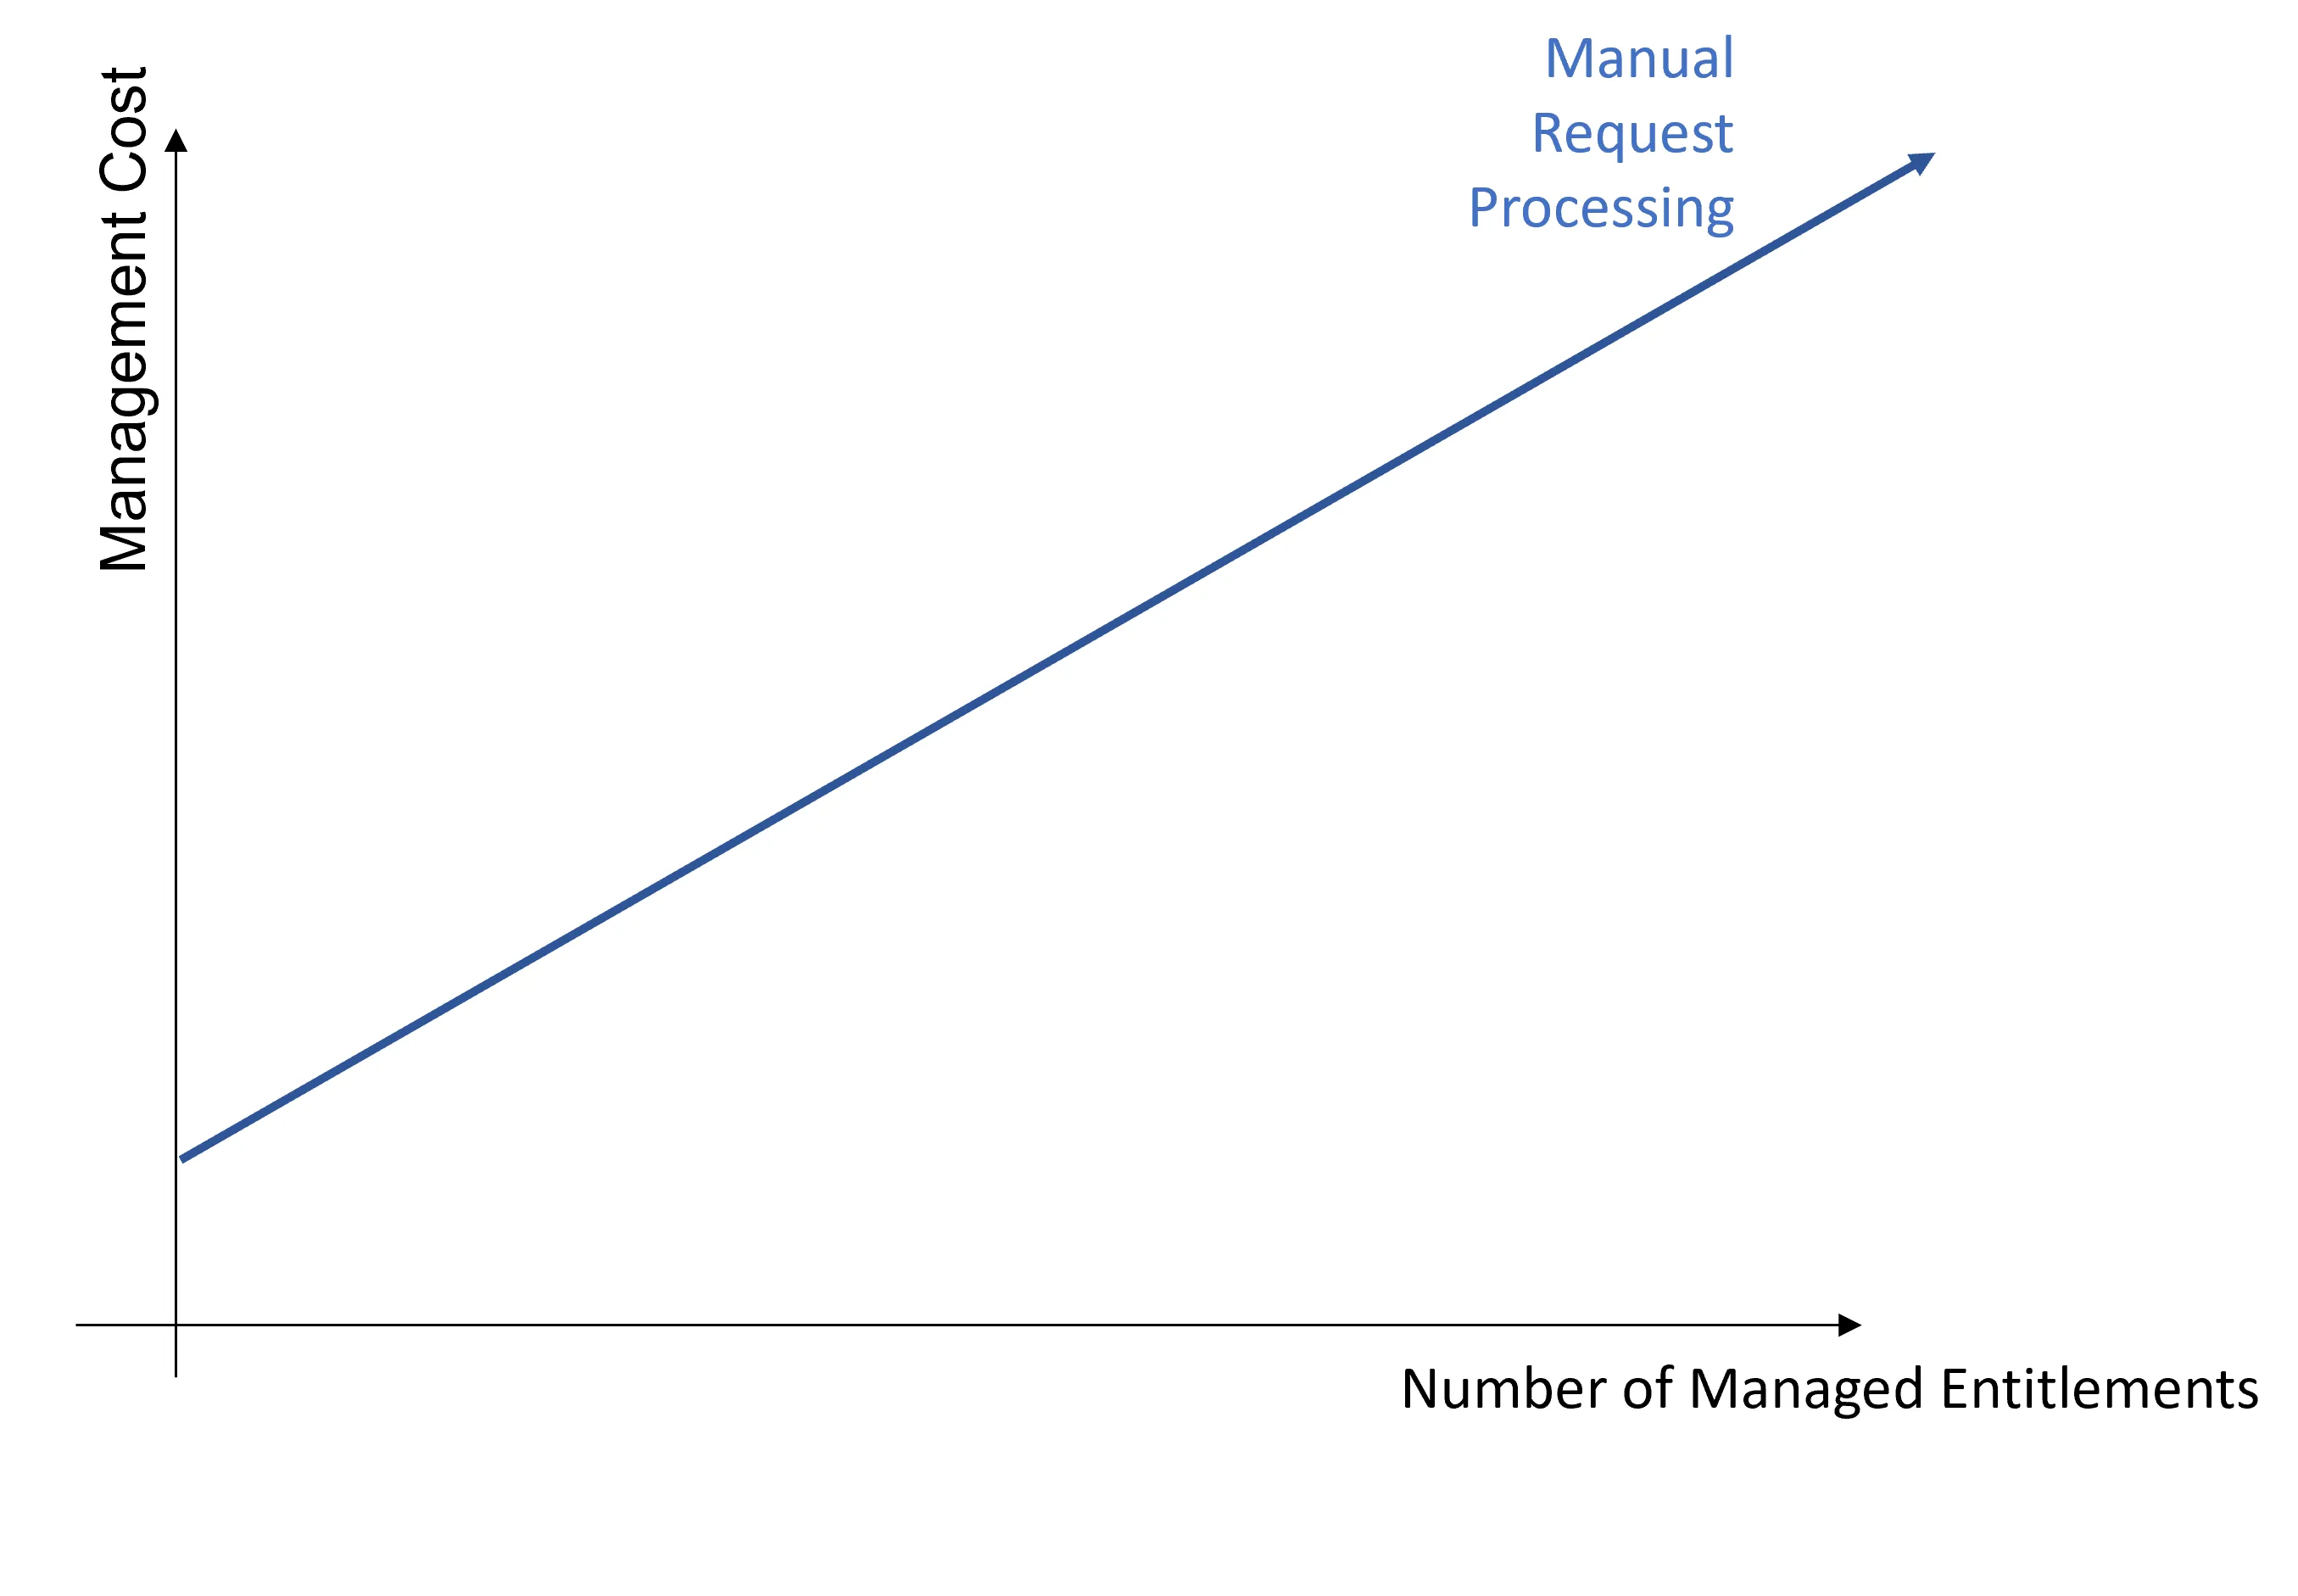
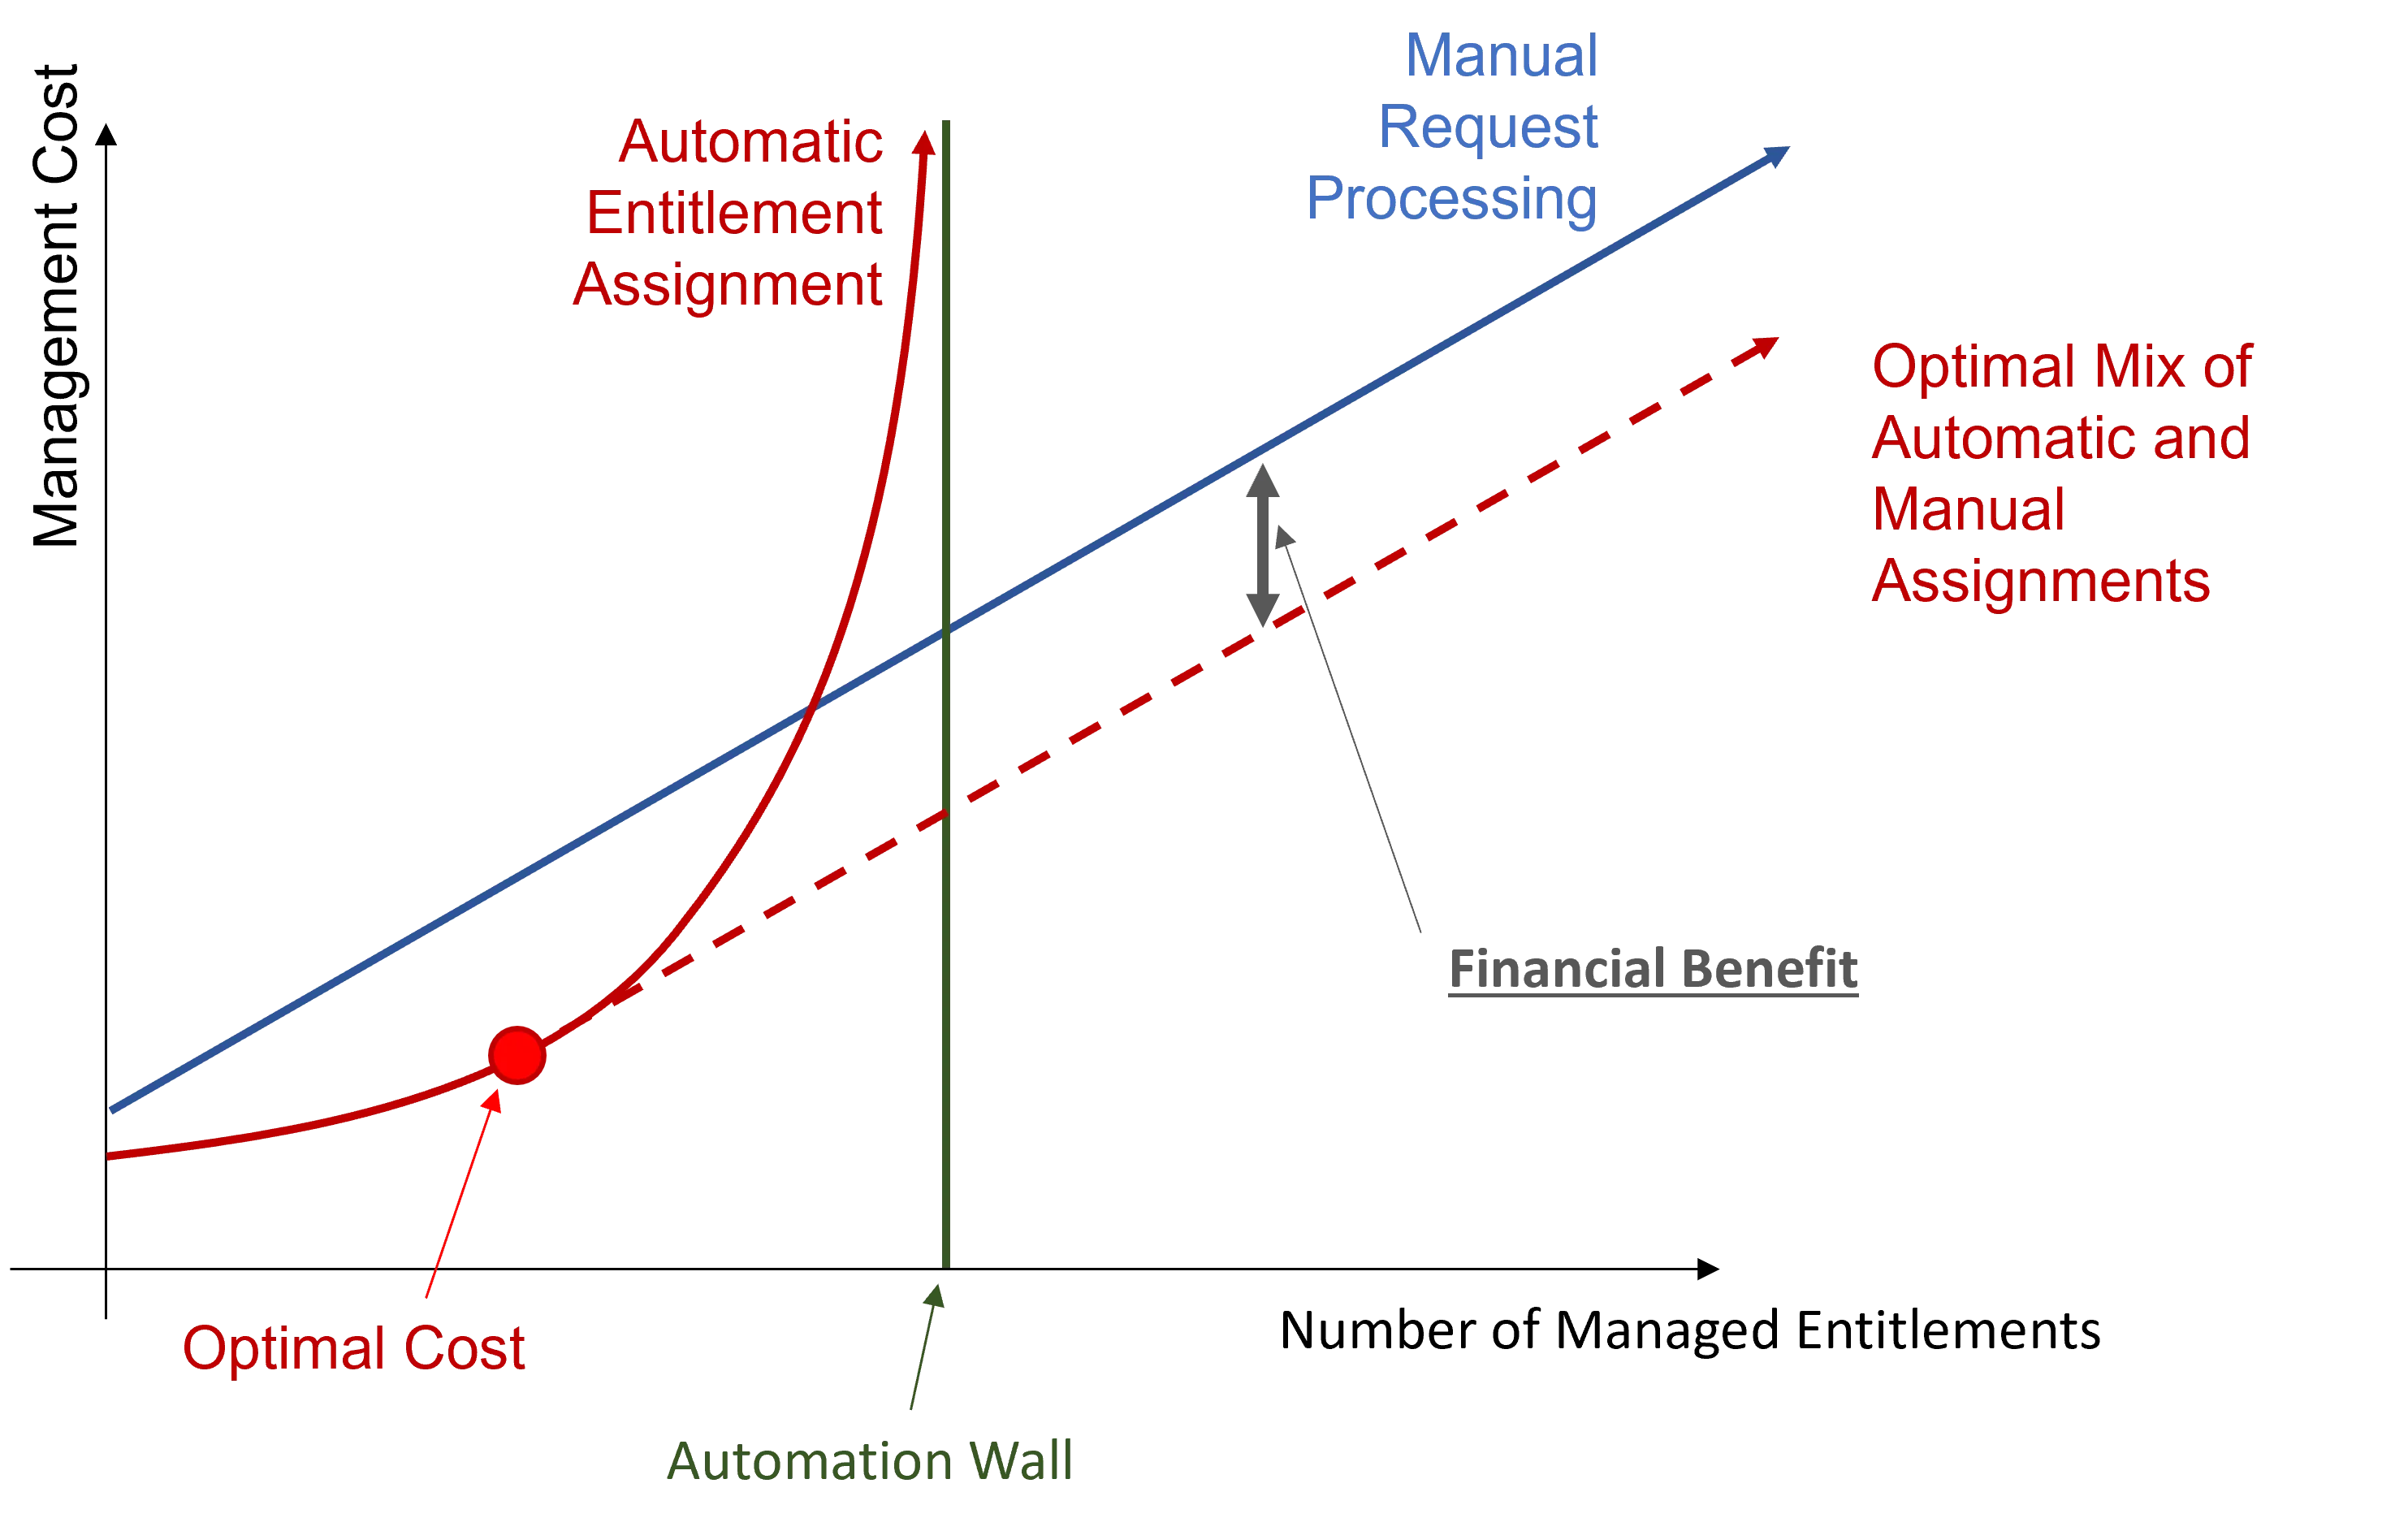
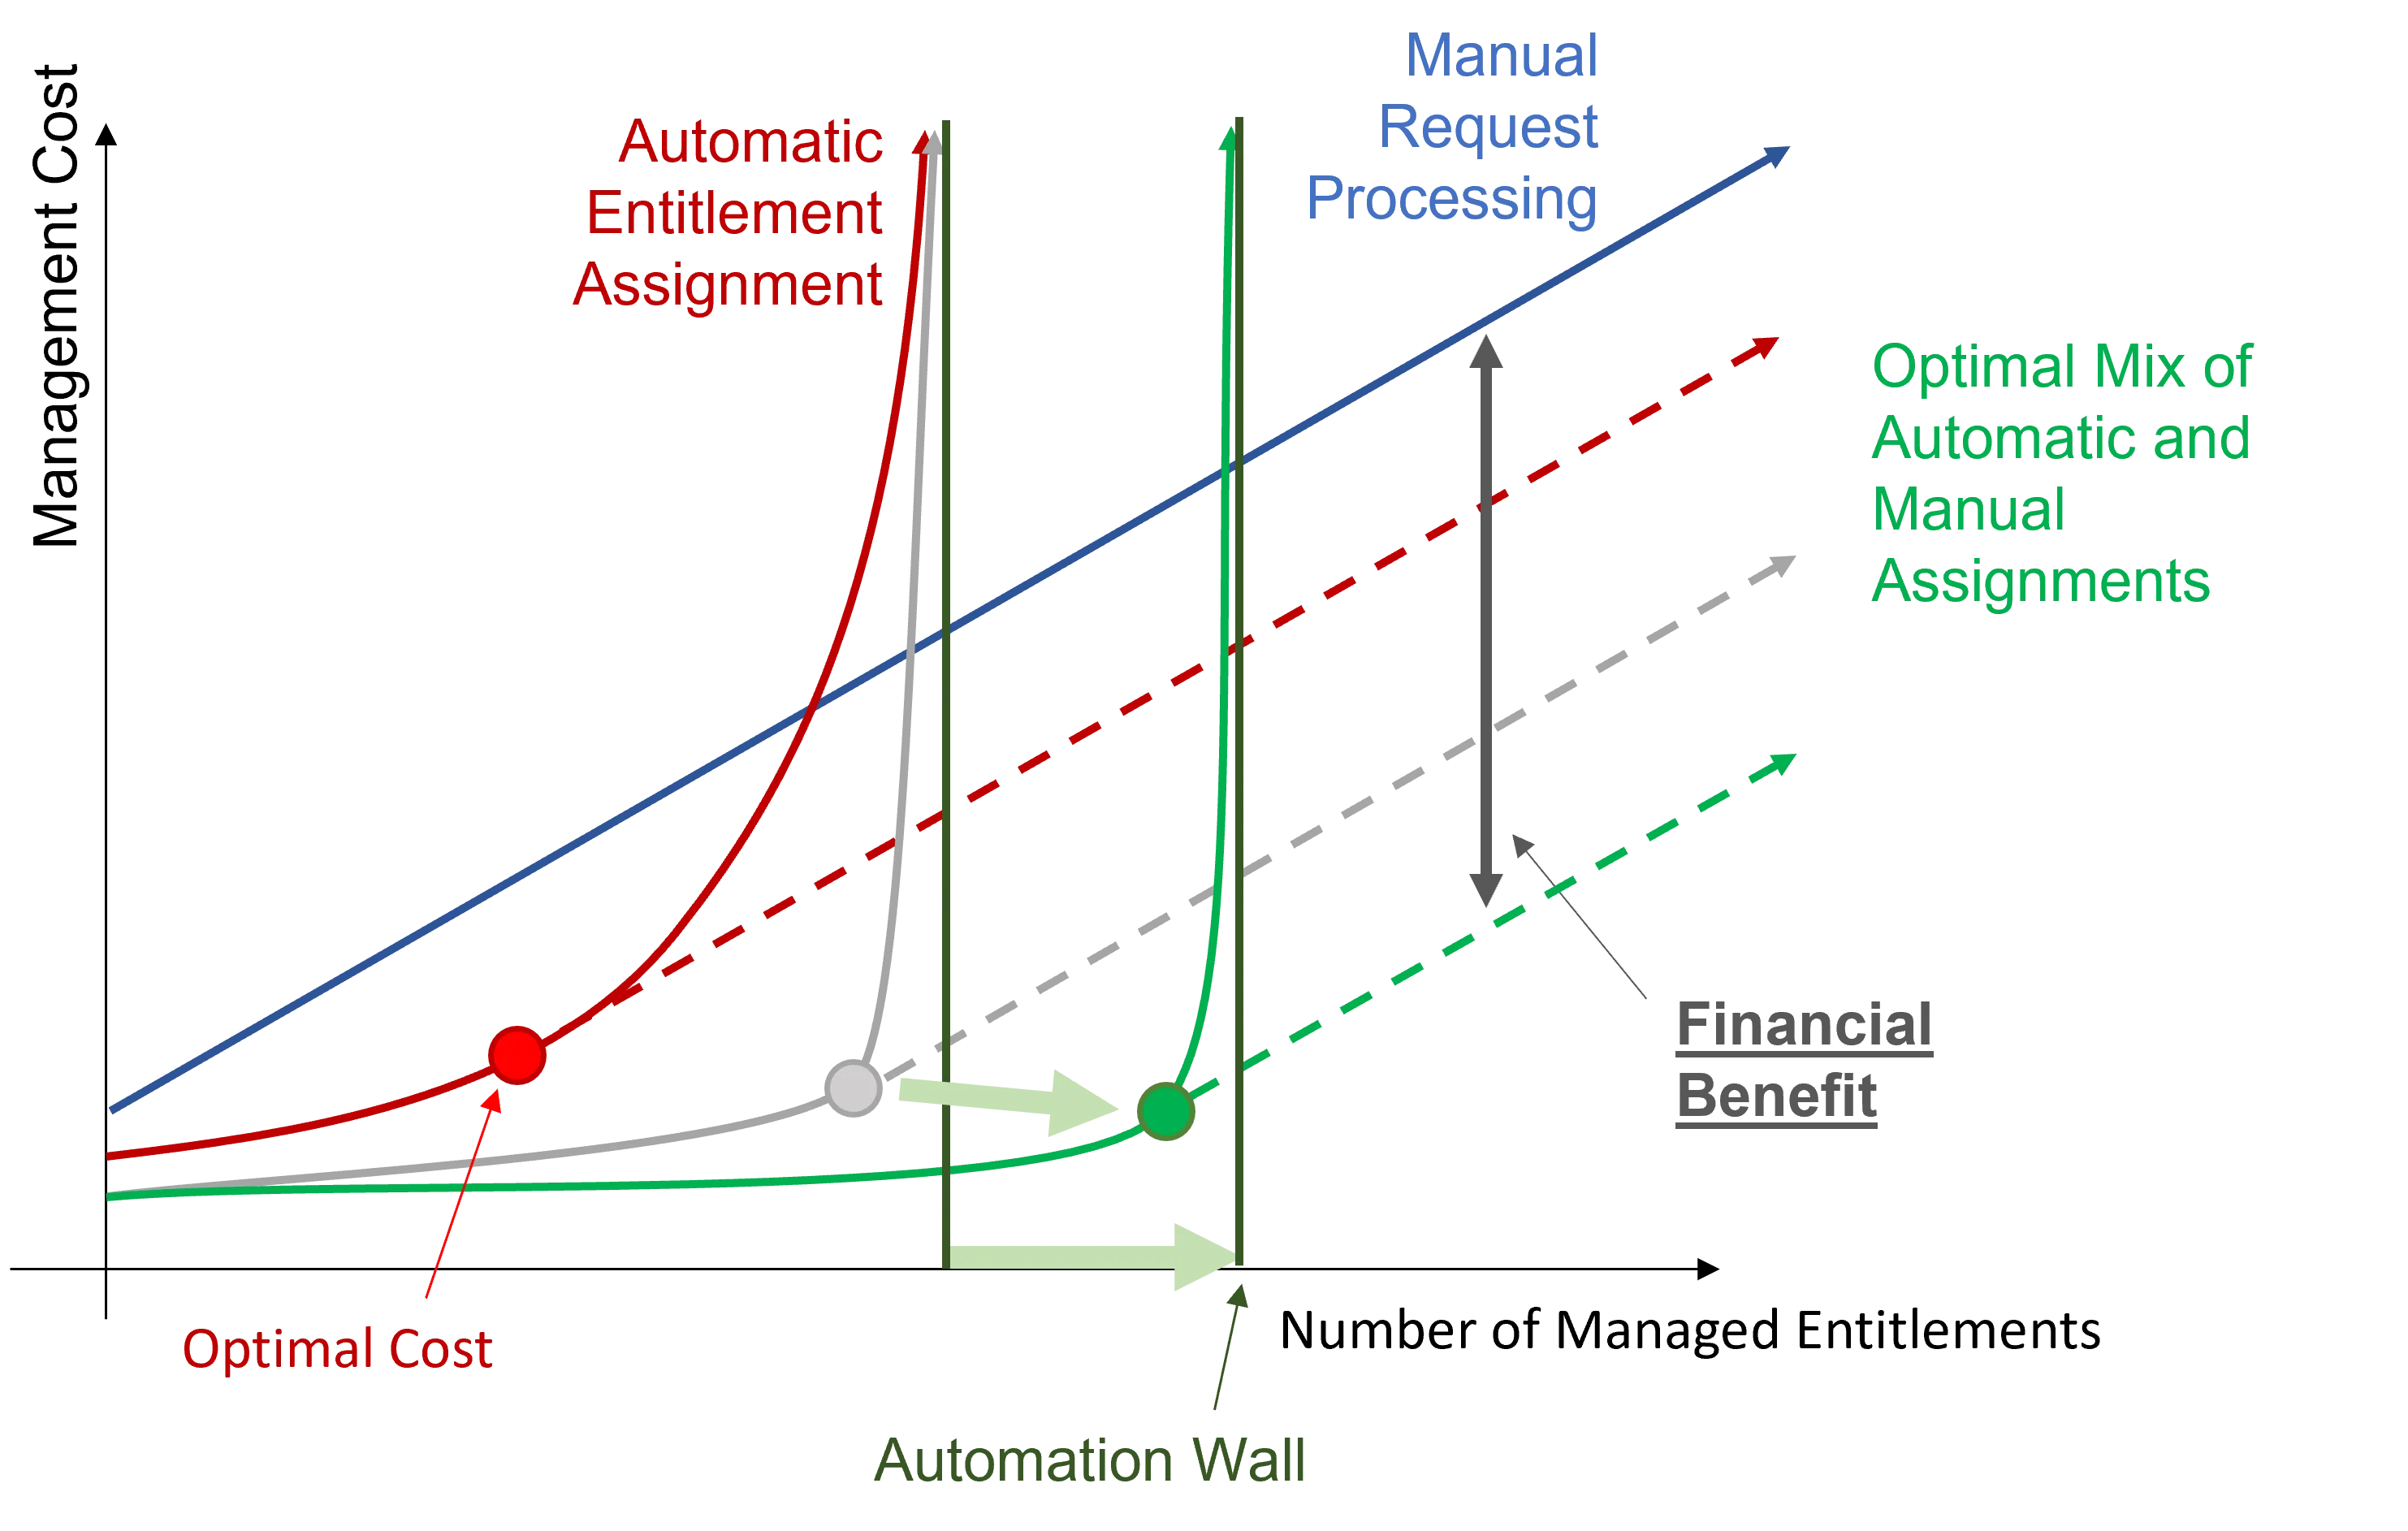
The entitlement management cost mainly varies according to the number of managed entitlements. Manual processing for entitlement requests implies a linear growth of the management cost according to the number of managed entitlements.
Automation benefits
There is a high potential gain coming with the automation of assignment decisions:
- Machine Learning masters the error rate, as it is used as a parameter for Role Mining, i.e. masters false positive assignments (entitlements assigned to a user while they ought not to) which constitute a security breach, and false negative assignments (entitlements not assigned to a user who needs it) which are functionnaly blocking;
- Machine Learning achieves lower error rates than people;
- Machine Learning can compute the role model way faster than a person. Consequently, the model can be computed more frequently and thus sticks closer to reality.
Automation helps integrators find basic assignment rules and face the previous risks, thus reducing cost.
Automation precautions
Assignments do not have to be automated all at once.
On the one hand, before being automatically assigned, entitlements can be merely suggested by Identity Manager and assigned manually.
On the other hand, a distinction can be made between assignments according to their sensitivity, for example using different error rates, or using simulation, or automating the assignment of basic entitlements while suggesting sensitive entitlements, etc.
This way, security can be improved for example by making certification target only the sensitive entitlements that cannot be processed by Machine Learning. There is no need anymore to certify automatic assignments.
Plus, you can also use attributes as additional precautions, such as a grace period during which, after the application of a rule revoking a resource/entitlement, managers can decide for each user individually whether they need to keep said entitlement.
In a way, maturity with Machine Learning in IGA is much like a GPS: once we traveled using only paper maps, before the first navigation tools were commercialized. Then we learned how to use these tools, while keeping a map to be able to verify the GPS instructions. We found secure methods to navigate through all GPS evolutions, until we trusted GPS enough to guide us completely.
Automation limits
However, automation implies an increasing number of rules. And a high number of rules implies a certain complexity in rule model understanding, and consequently hiring expensive expert contractors to write the right rules. It drives up costs considerably and draws you near the automation wall.
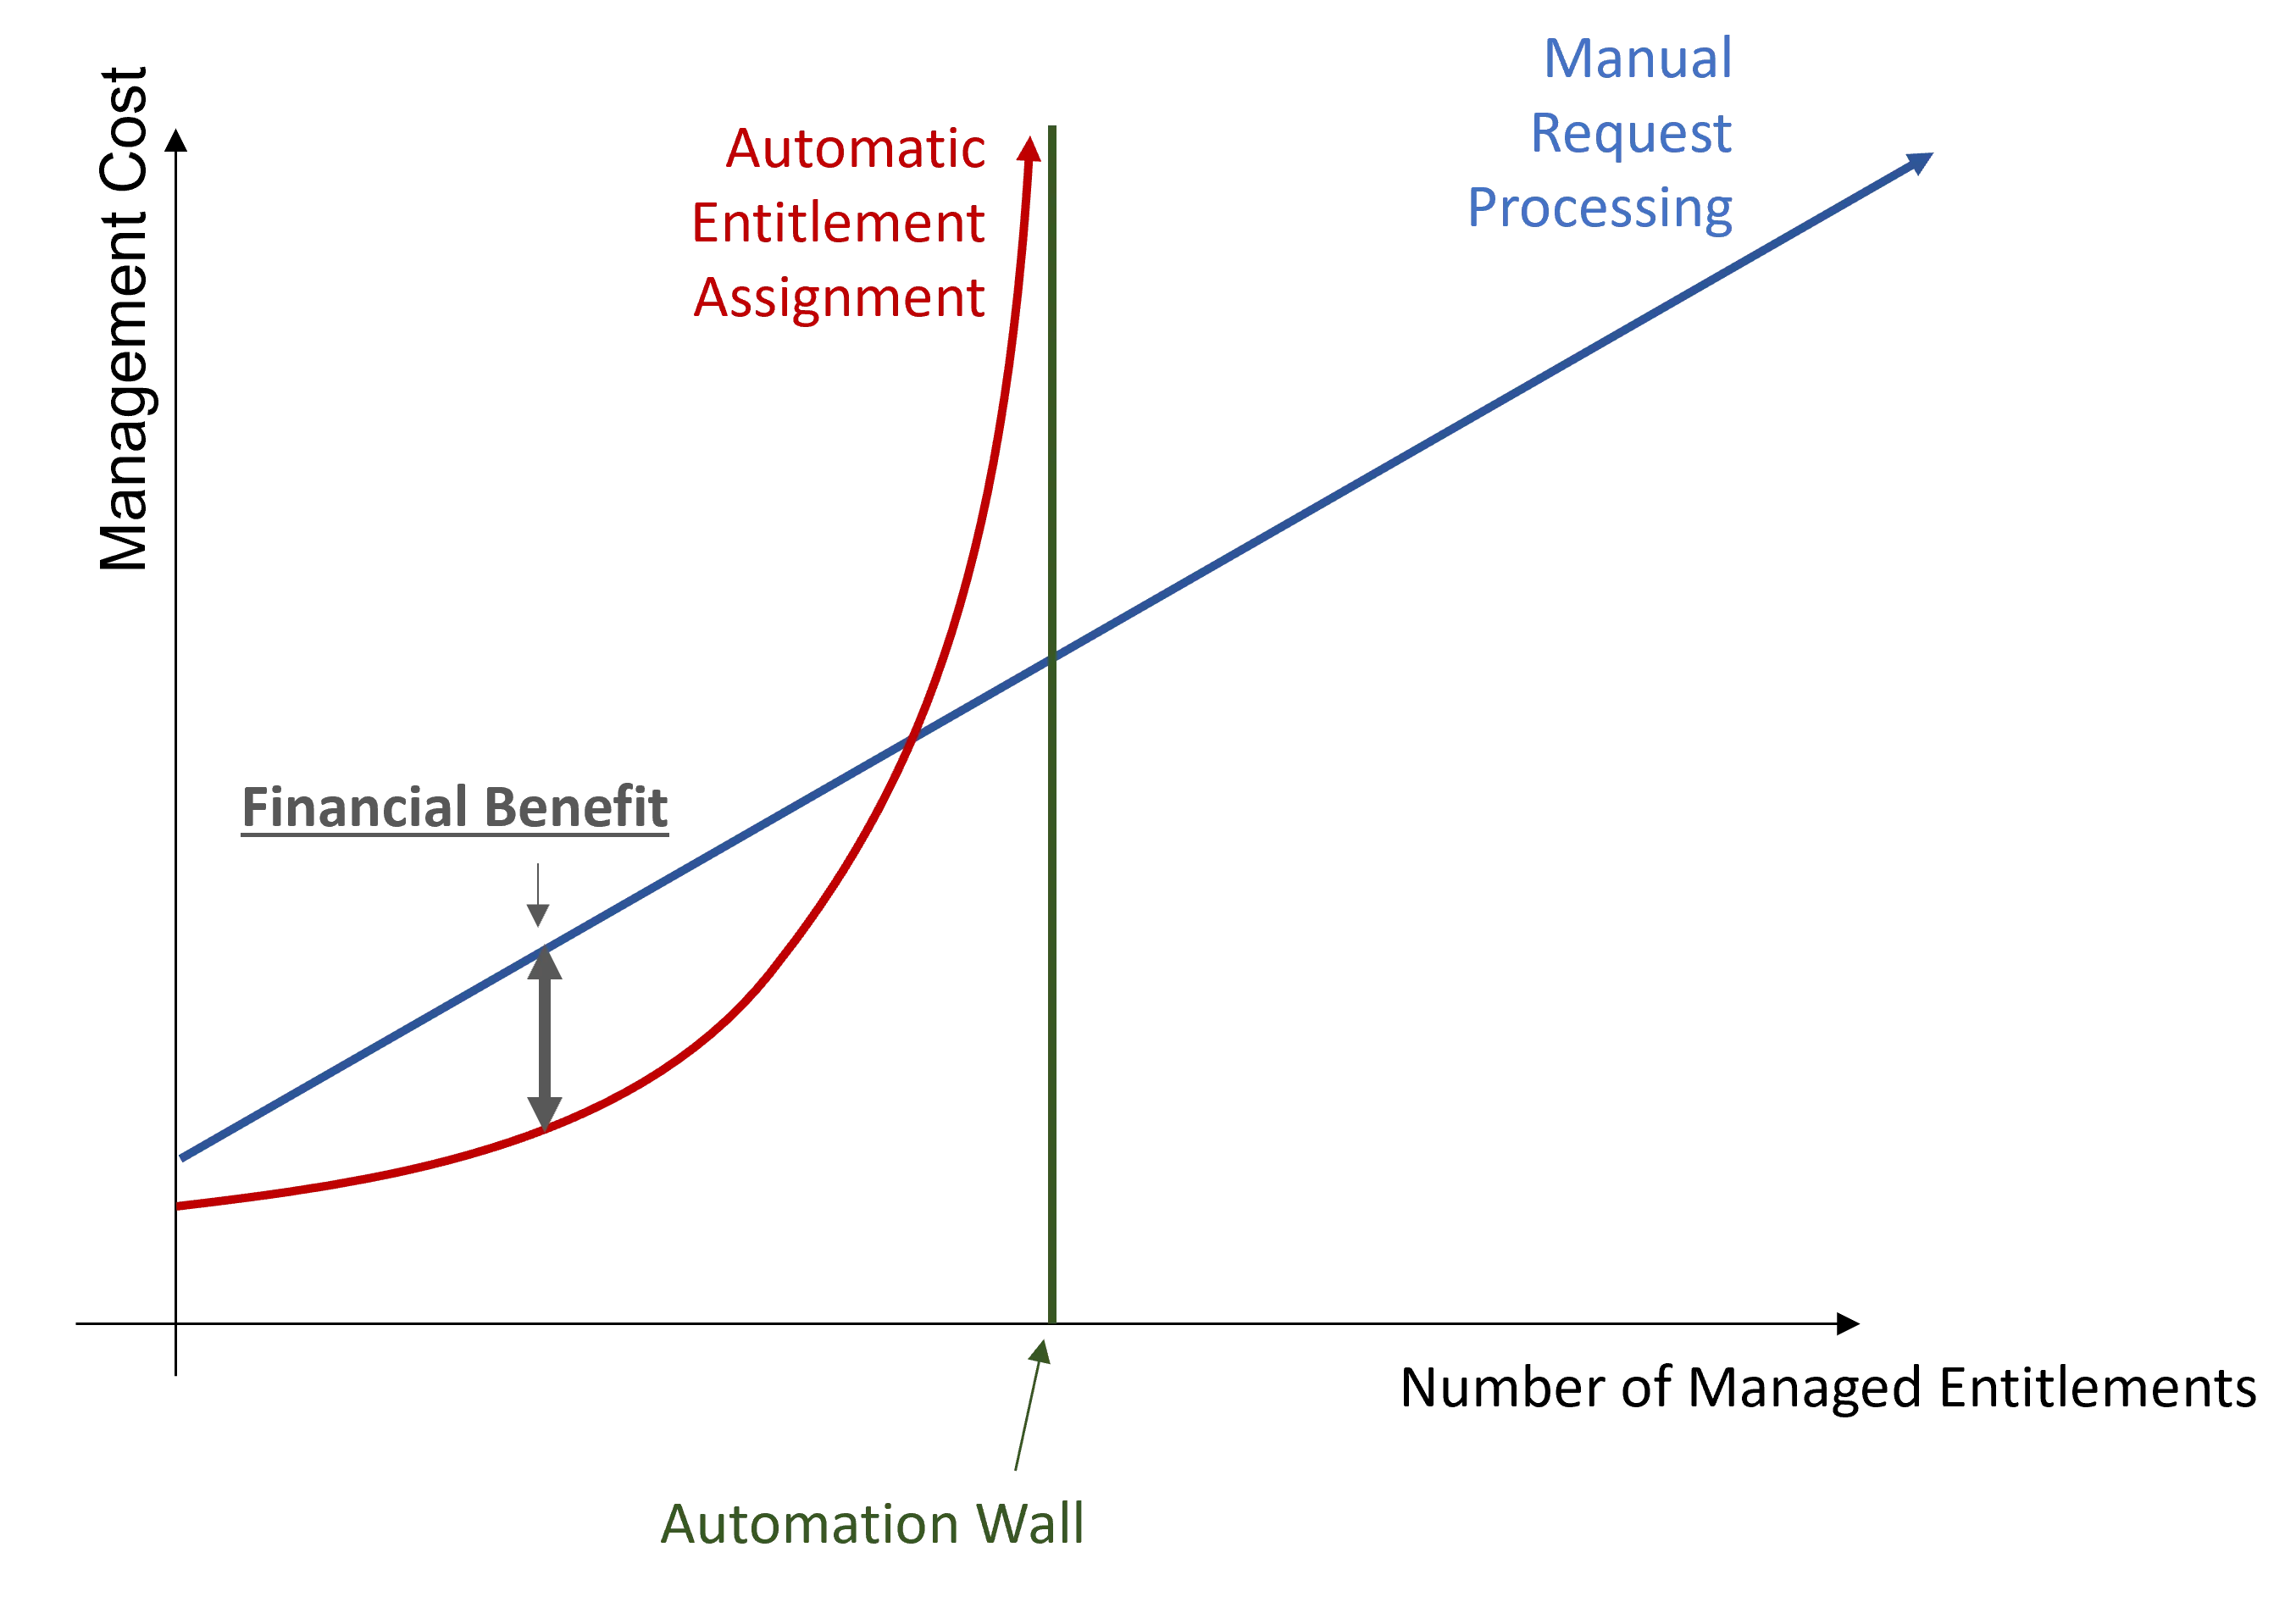
The automation wall represents the automation threshold that cannot be overcome. It mostly comes from the fact that with limited data, automation capabilities are also limited. Everything cannot be automated.
Automation strategy
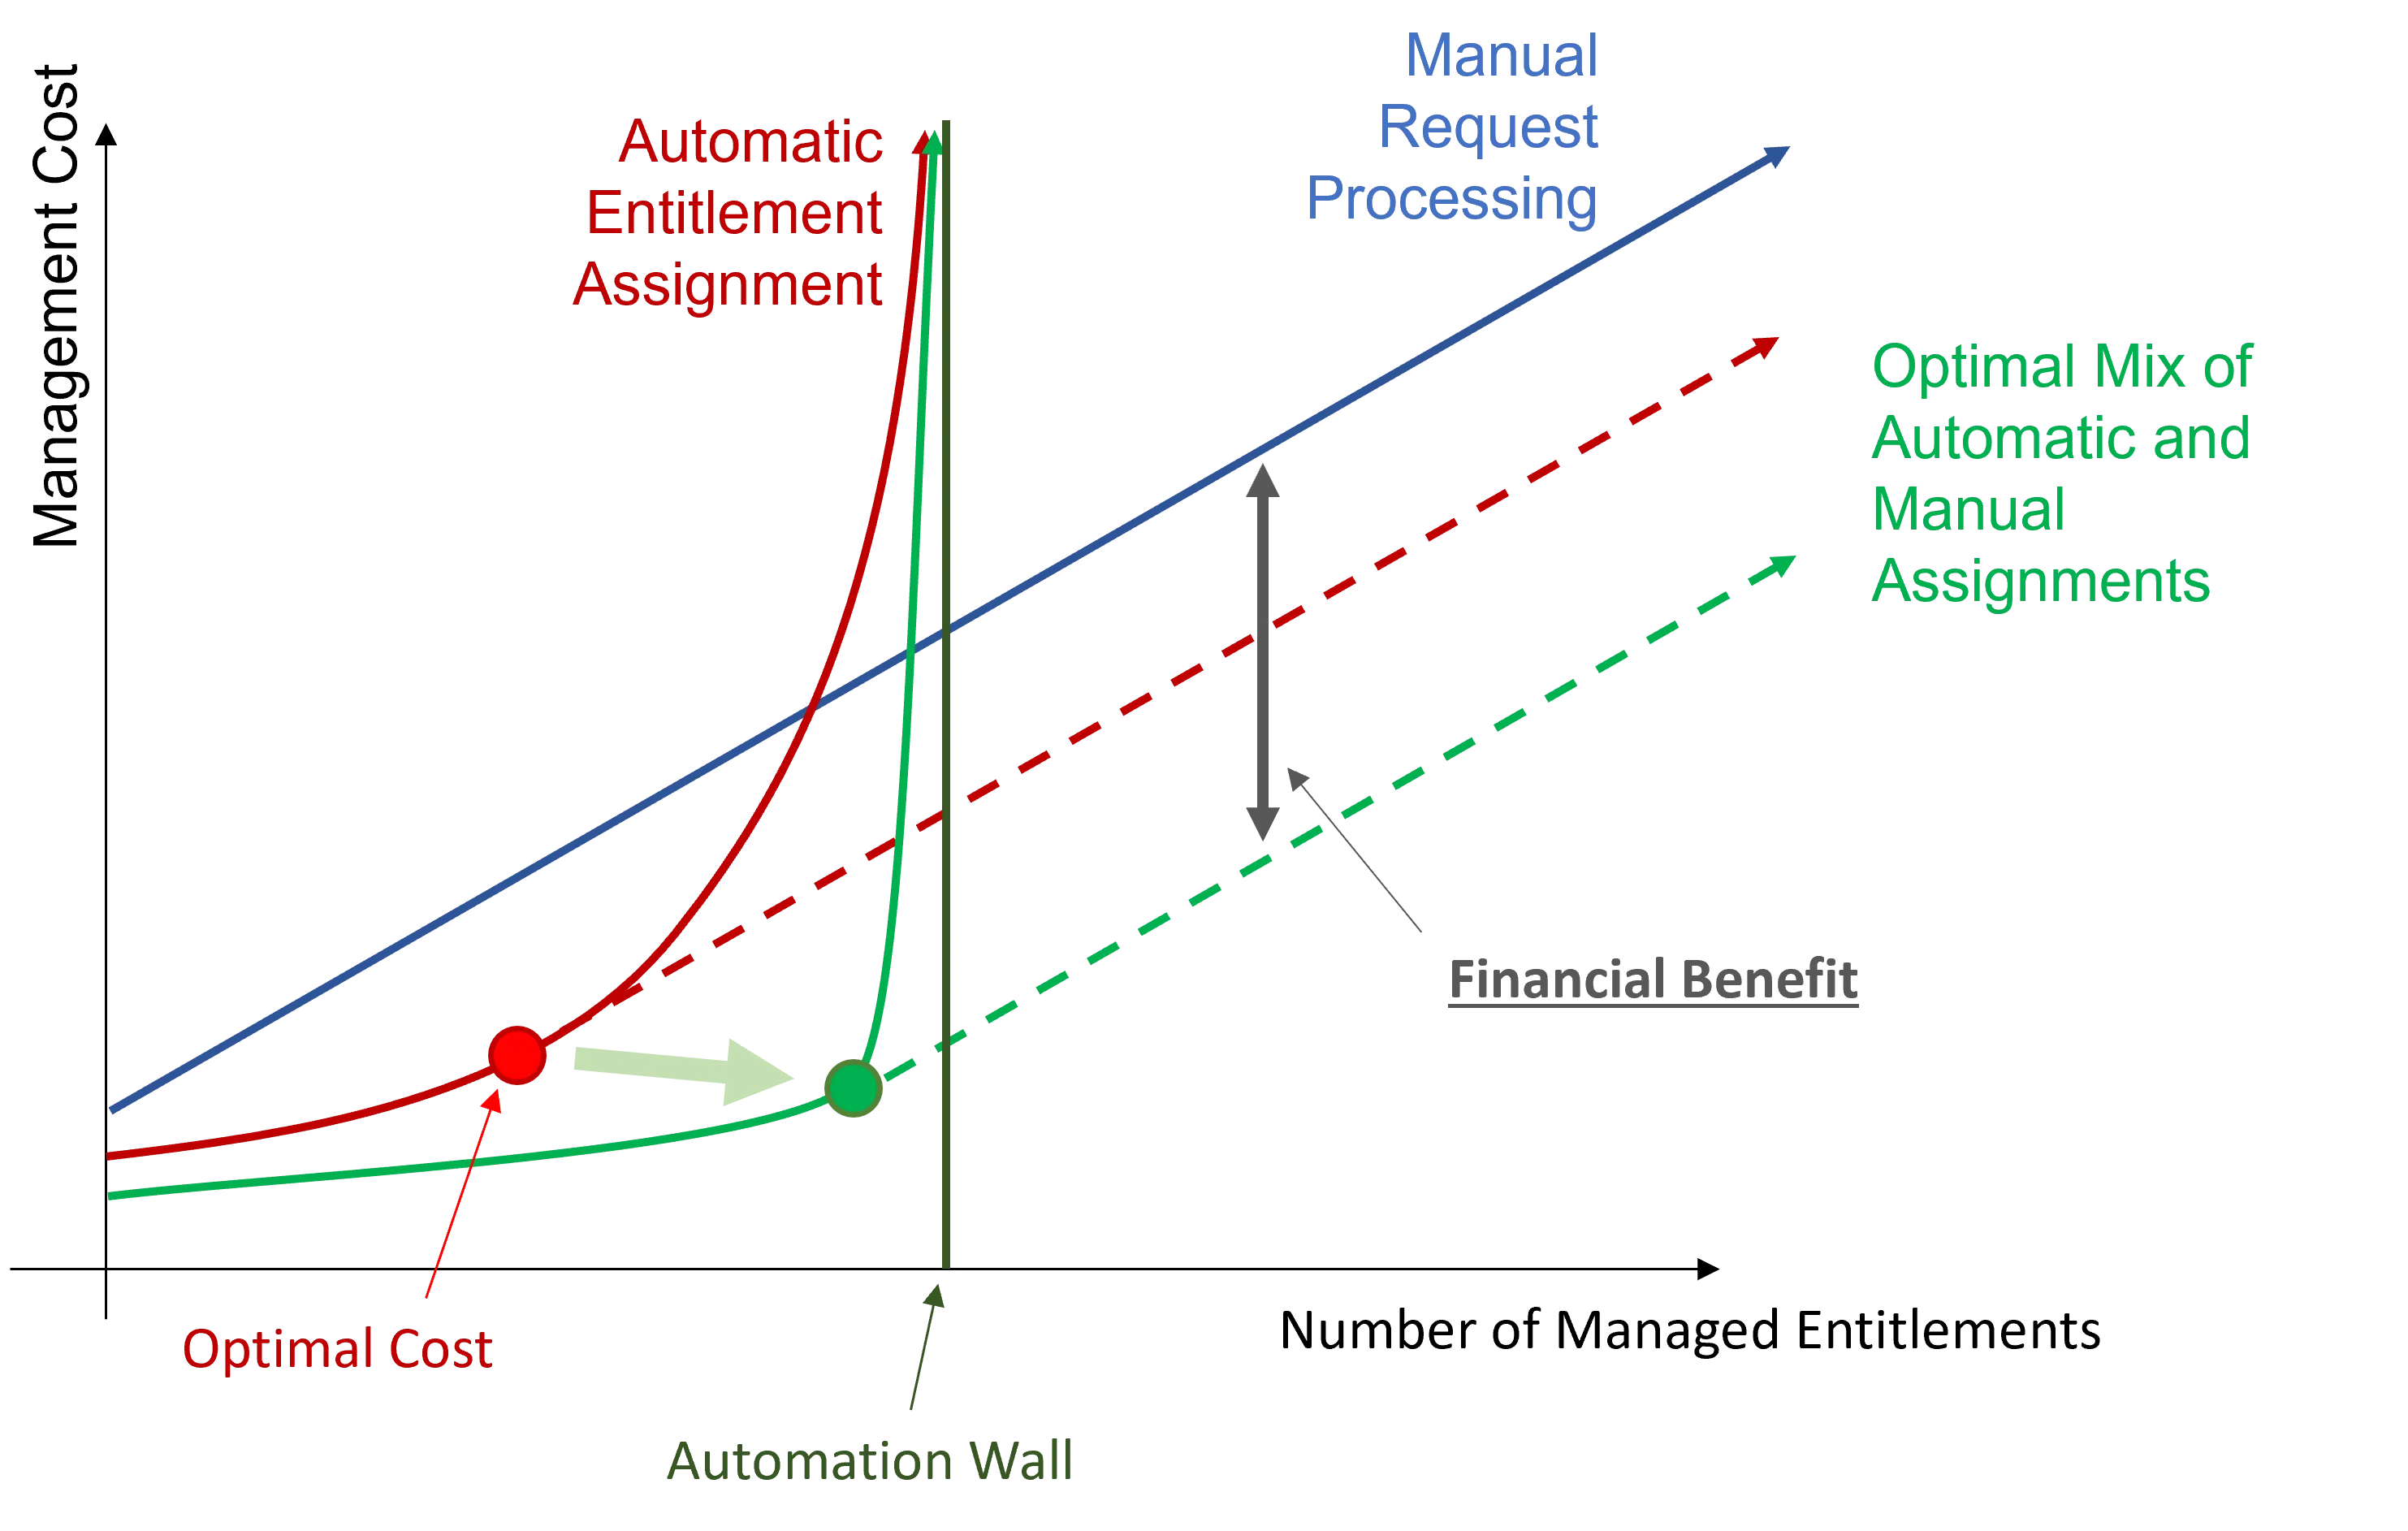
The idea is to stop automation when the automatic cost curve increases faster than the manual cost curve. The optimal profitability is represented on the chart and can be achieved via the optimal mix of automatic and manual assignments.
Automation strategy consists in using Machine Learning through Role Mining to get closer to the automation wall. And, as Role Mining doesn't enable overcoming said wall, the goal is to move the wall further away by improving data quality and quantity.
Participants and Artifacts
At this point, integrators should have all the elements they need to operate.
| Input | Output |
|---|---|
| Role Catalog (required) | Ideally automated role model |
See the Create Roles in the Role Catalog topic for additional information.
Automate Entitlement Assignment
The process of assignment automation is the following:
-
Perform Role Mining to approach the automation wall.
Role Mining covers more use cases than writing assignment rules manually. It diminishes the error rate and implies a lower execution cost. And thus, it brings the optimal cost closer to the automation wall.
Enlarge the number of managed entitlements by tolerating errors:
Automation reduces the error rate by avoiding human mistakes. Errors can still occur such as "false positives", i.e. users receiving inappropriate entitlements, thus creating security issues. However, experience shows that a slight error tolerance in Role Mining can highly benefit automation.
NETWRIX recommends trying Role Mining with 1% tolerated false positives, and 99.5% expected precision. Then adapt to your situation according to the reports.
For example, suppose an organization working with many distinct departments. If you see that the automation rate skyrockets when the error rate reaches the number of workers in one department, then it probably means that Identity Manager misses data concerning one of the departments. Thus the error rate allows Identity Manager to "ignore" one of the departments in the organization, and optimize automation.
-
Generate Reports and analyze them with tools like Power BI to assess the automation wall and identify improvement areas.
For example in the following Power BI chart, automation is, on average, highly implemented except for
SharePoint Projects. This fact reveals a low level of awareness among the workers about their respective projects. This is a typical area for improvement in data quality.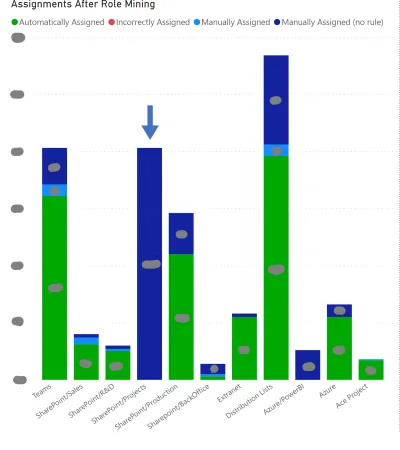
For example, if charts show a high number of identities in the category
No Position, integrators understand that the data model must be completed for role mining to be efficient.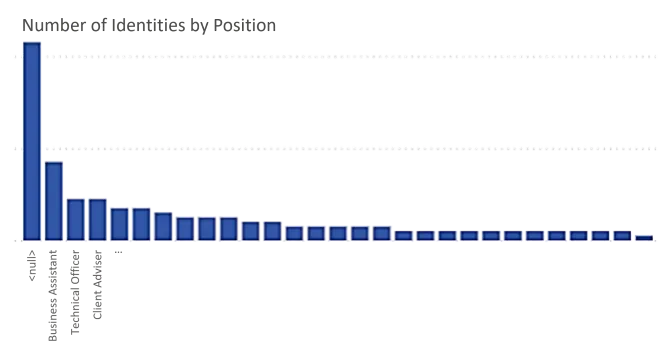
For example, if charts show a high number of unused roles, integrators understand that the role model needs further improvement because roles are not adequate.

For example, if charts show low automation rate per department, integrators will understand that many identities may have switched departments while keeping their previous entitlements.

-
Improve data quality and quantity to move the automation wall.
Whether automatic or manual, assignment decisions are based on existing data analysis. Data quantity and quality therefore define the position of the wall.
Improvement in existing data quantity and quality entails the possibility of managing a higher number of entitlements.
A high quantity of data simplifies data analysis and inferences in assignment rules.
A high quality of data also simplifies data analysis and enables better accuracy in assignment rules.
For example, contractors' data is often less familiar to HR departments. Efforts can be made in this direction to enhance automation.
Moreover, focus must be directed on actual and correct entitlements, using Identity Manager's Perform Access Certification .
Data reliability prevents integrators from easy extrapolation mistakes.
For example, consider the Netwrix Identity Manager (formerly Usercube) team in Marseilles mostly composed of R&D workers. If integrators miss information, they might inadvertently create a rule giving
R&Dgroup membership to all workers in Marseilles, while there are also workers from other departments. -
Repeat.
Remove Redundant Assignments
How to remove redundant assignments, i.e. manual assignments of roles and resource types that are assigned by a rule too. See the Entitlement Assignment topic for additional information.
Overview
Assignment rules can sometimes give to users an entitlement that they had already received manually. Hence, new assignment rules can imply redundancies between the entitlements assigned manually and approved, and those calculated by a rule and assigned automatically. See the Automate Role Assignments topic for additional information.
Netwrix recommends removing redundant assignments after any assignment rule is created or updated.
This guide is about switching the manual assignments, which are allowed by the role model, into calculated automatic entitlements handled by the role model. Once automatic, an entitlement is fully part of the role model and stops constituting an exception.
Assignment validity period
All entitlements are assigned on a given validity period, i.e. from a given start date to a given end date:
- When assigning an entitlement to a user manually, the start and end dates are specified explicitly unless the end date is locked. See the Create a Role Manually topic for additional information.
- When assigning entitlements to users via assignment rules, the start and end dates are based on the owner's data, for example their contract or position start/end dates. These assignments are automatic.
Netwrix recommends always preferring calculated assignments over manual ones, because calculated assignments follow the changes in their owners' data and are consequently more secure.
For example, consider a user Helen who starts working as an architect with a given role. When assigning the role manually, when Helen changes her job, her manager will have to remove the role manually. When assigning the role via a rule, when Helen changes a job, the role will be removed automatically.
Process
This process is an optimization of the role model. It is part of the "compute role model" process where all rules of the role model are applied.
The classic behavior gives priority to approved manual entitlements over calculated automatic ones. A manual assignment stays as is, even if the entitlement is also assigned by a rule.
For example, consider a user who has a given entitlement which was assigned to them manually on several distinct time periods. When creating a rule that assigns the same entitlement to them automatically on a given time period, then we have:
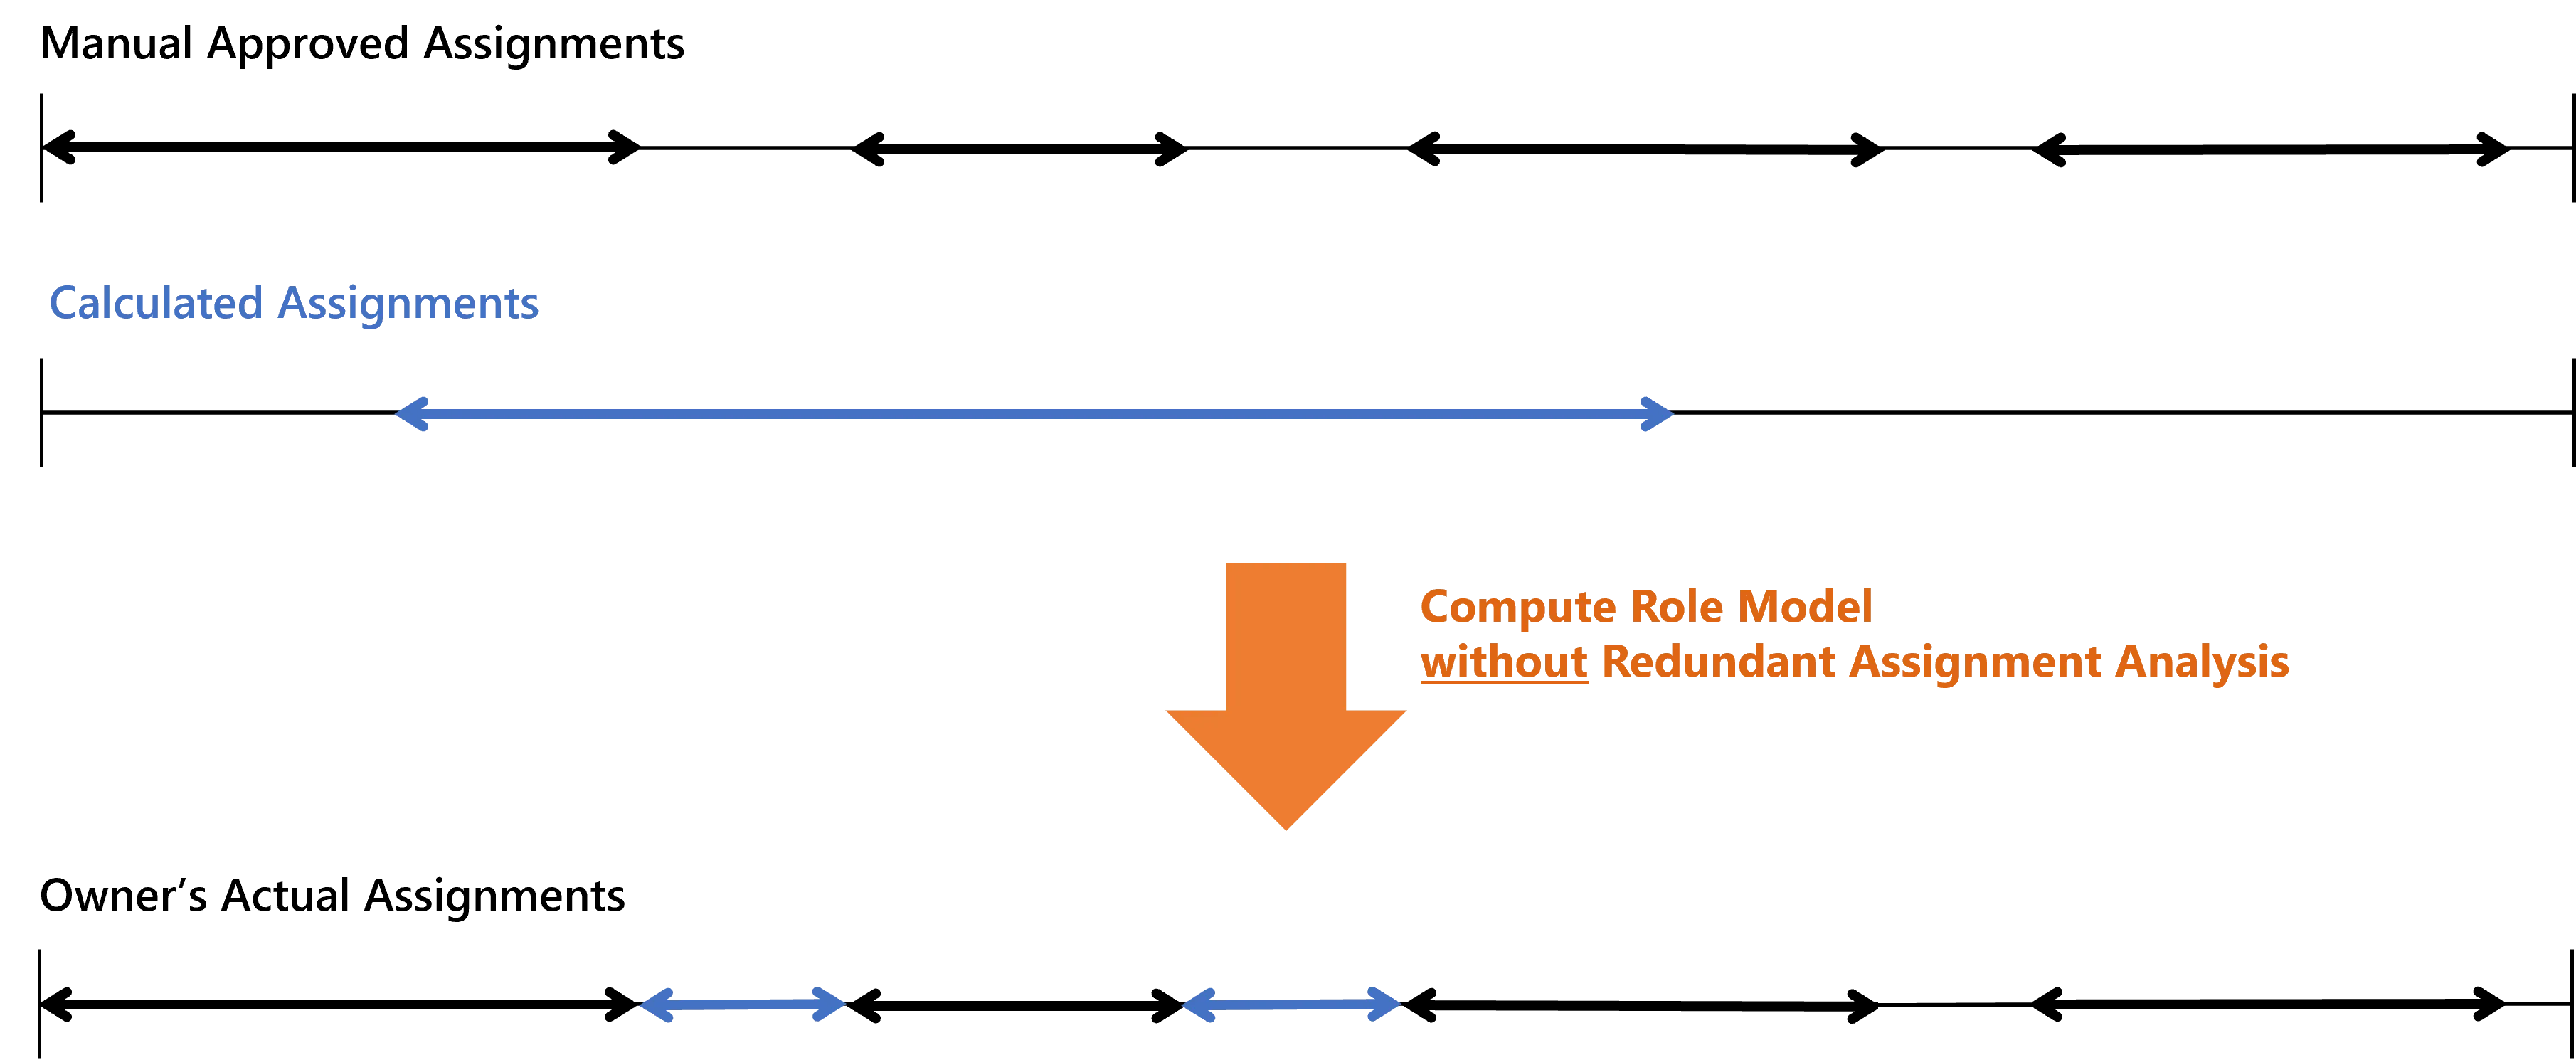
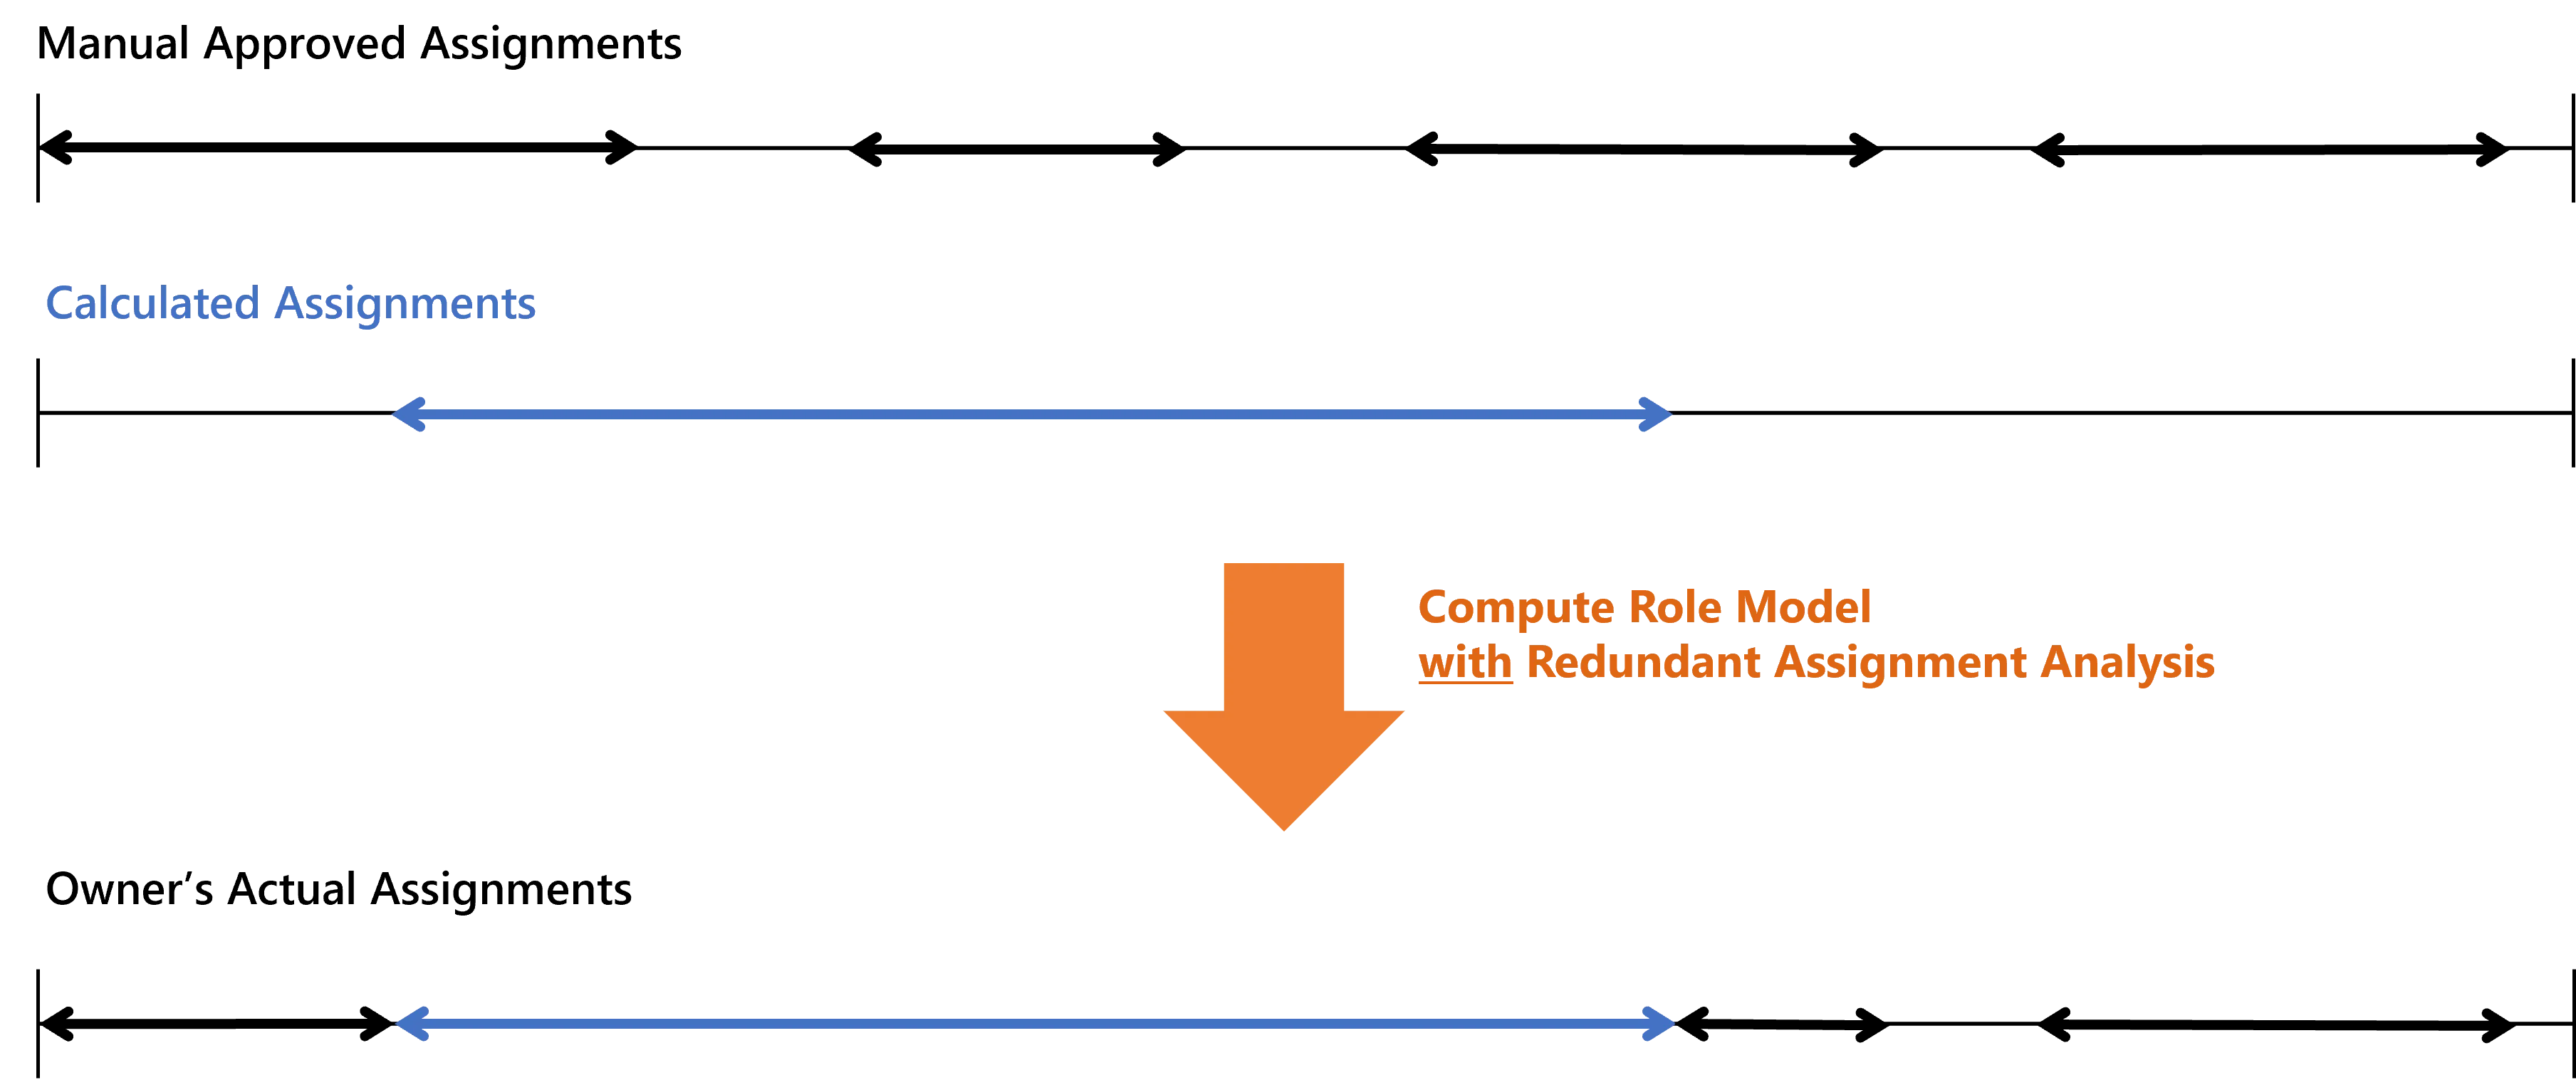
The redundant assignment analysis gives priority to the rules inside the role model and the policy. When an entitlement is assigned via a rule, it is stated as calculated, even if it is also assigned manually. Thus, manual assignments whose start and end dates overlap with the validity period are to be truncated or deleted.
For example, consider the same situation as before. Using the redundant assignments analysis, then we have:
Redundant assignments can be removed by Identity Manager only when the corresponding assigned items are tagged as redundant and displayed in the most recent report. The manual assigned items that are not tagged are still kept as discretionary entitlements and will not be removed.
Participants and Artifacts
For a given managed system, integrators may need the help of the application owner who knows the application's users, entitlements and data model.
| Input | Output |
|---|---|
| Role catalog (required) Role assignment rules (required) Role mining (optional) | Minimized derogation’s |
See the Create Roles in the Role Catalog , Automate Role Assignments , and Perform Role Mining topics for additional information.
Remove Redundant Assignments
Remove redundant assignments by proceeding as follows:

Step 1 – Click on Redundant Assignments on the home page in the Administration section.

Step 2 – Click on Analyze to tag the manual roles and resource types from all policies eligible for conversion to an automatic state.
NOTE: Previous tags are cleared at each instance of this tagging process.
Step 3 – Click on Download Excel to download a dedicated XLSX report which contains one tab per entity type representing identities.

The example states that in the entity type Directory_User, the user Nicholas Acosta had the single role Banking/Sales/Eunomia/Administrator starting from February 28th 2023 (dateA) until May 16th (dateD). A new single role rule assigns him this role from April 14th (dateB) until 25th 2023 (dateC).
It means that Nicholas Acosta will have the role in the Calculated state from dateB to dateC, and he will keep the role in the Approved state from dateA to dateB and from dateC to dateD.
Step 4 – If the report's content is satisfying, then click on Apply to actually switch eligible manual roles to calculated.
Verify Redundant Assignment Removal
In order to verify the process:

Step 1 – Access the user directory from the home page.

Step 2 – For one of the users mentioned in the report, access their permissions.
Step 3 – Check that their roles (mentioned in the report) have actually switched from approved to calculated.

When removing redundant assignments based on the previous report example the setting will be as above.
Once the steps above completed, the state changes to Approved.
Automate Role Assignments
How to manually build rules to automate the assignment of roles to identities. See the Create Roles in the Role Catalog topic for additional information.
Overview
Single role rules and composite role rules are assignment rules. Assignment rules are designed to automatically assign respectively single roles and composite roles (based on specific criteria) to identities. One rule must be created for every role to assign. See the Create Roles in the Role Catalog topic for additional information.
Participants and Artifacts
For a given managed system, integrators may need the help of the application owner who knows the application's users, entitlements and data model.
| Input | Output |
|---|---|
| Role Catalog (required) | Role assignment rules |
See the Create Roles in the Role Catalog topic for additional information.
Create a Role Assignment Rule
Create a role assignment rule by proceeding as follows:
-
Access the rules page by clicking on Access Rules on the home page in the Configuration section.

-
In the dropdown menu at the top left, choose the source entity type for the future scalar rule.

-
Click on the Composite Roles or Single Roles tab and on the addition button at the top right corner.

-
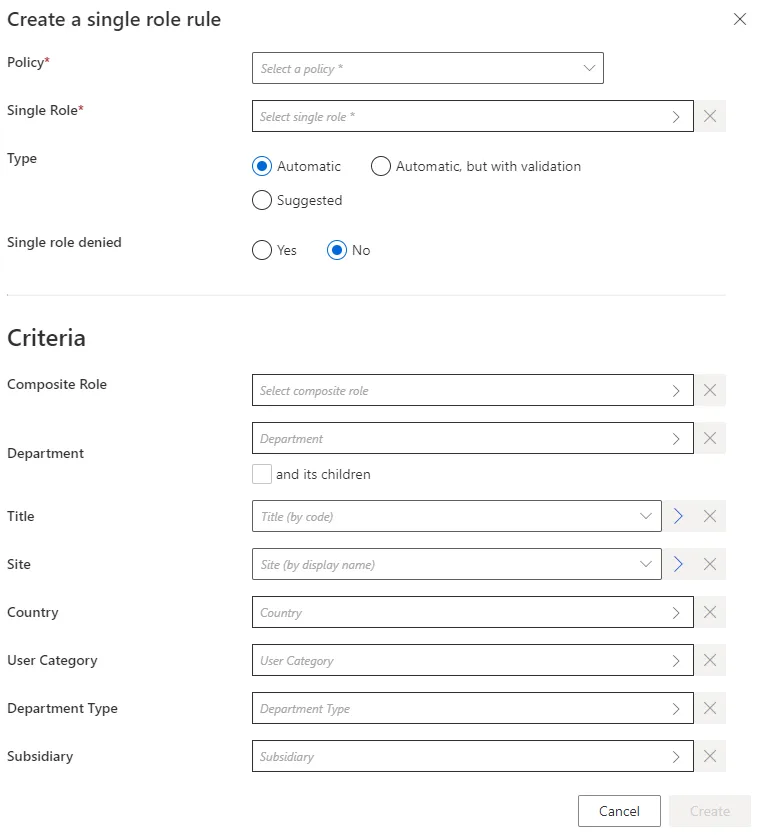
Fill in the fields.
-
Single Role: single role to be automatically assigned in a single role rule.Composite Rolefor a composite role rule. -
Type: assignment type that can be:Suggestedso that the role is listed among suggested permissions in the permission basket of users matching the criteria during an entitlement request, suggested assignments must be selected manually to be requested; orAutomaticso that the role is automatically assigned to users matching the criteria; orAutomatic but with validationso that the role is listed in the permission basket of new workers, these assignments can still be modified.The rule's type can be
Suggestedonly if the related role is allowed to be requested manually. -
Single role denied: option that forbids the assignment instead of applying it. -
Criteria: conditions that, if met, trigger the single role automatic assignment.
Role assignment rules can be based on identity dimensions. Moreover, single role rules can be based on composite roles.
-
-
Click on Create and see a line added on the rules page.
Impact of Modifications
Any modification in a role assignment rule is taken into account when the next Compute Role Model Task runs to compute new assignments. Therefore, if a given rule's criterion is modified, then all corresponding assignments are computed again. If a role was assigned automatically to an identity by a role assignment rule, and if this assignment doesn't comply with the new version of the rule, then the corresponding role is automatically removed.
A modification in a role assignment rule can trigger the removal of a role only on the Identity Manager side. There are several barriers to cross before said role is removed from the managed system.
For example, consider a single role rule that assigns the single role
Business role: electronic bankingto all users in theToursdepartment. Let's say that we replaceTourswithOrleans. Then, after the next launch of the complete job, all users in theOrleansdepartment get said role, while the users in theToursdepartment are deprived of said role.
Perform a Simulation is available in order to anticipate the changes induced by a creation/modification/deletion in role assignment rules.
Assignment rules can sometimes give to users an entitlement that they had already received manually. Hence, new assignment rules can imply redundancies between the entitlements assigned manually and approved, and those calculated by a rule and assigned automatically.
Netwrix Identity Manager (formerly Usercube) recommends removing redundant assignments after any assignment rule is created or updated.
Verify Rule Creation
In order to verify the process, start by checking the rule's details on the Access Rules page. Then, you can:
-
Select a test user in the directory, accessible from the home page.
-
Create a role assignment rule for a role that said user doesn't already have, and based on criteria which the selected user satisfies.
-
Trigger the computation of the role model through the complete job on the Job Execution page in the Administration section.

-
See the new permission in the user's View Permissions tab.
Request Entitlement Assignment
How to send a manual request to add, update or remove an entitlement for an identity.
Overview
Changes in an identity's entitlements can be handled using Identity Manager's predefined workflows to:
- View the list of the identity's entitlements with Identity Manager's suggestions according to the identity's position;
- Modify the identity's entitlements (add, update, remove).
Participants and Artifacts
An assignment can be requested for a user sometimes by said user themselves, most often by their manager, and on some occasions by the involved application owner.
| Input | Output |
|---|---|
| Identity repository (required) Role Catalog (required) | Updated entitlements |
See the Create the Workforce Repository and Create Roles in the Role Catalog topics for additional information.
View Identity's Entitlements
View the identity's entitlements by proceeding as follows:
-
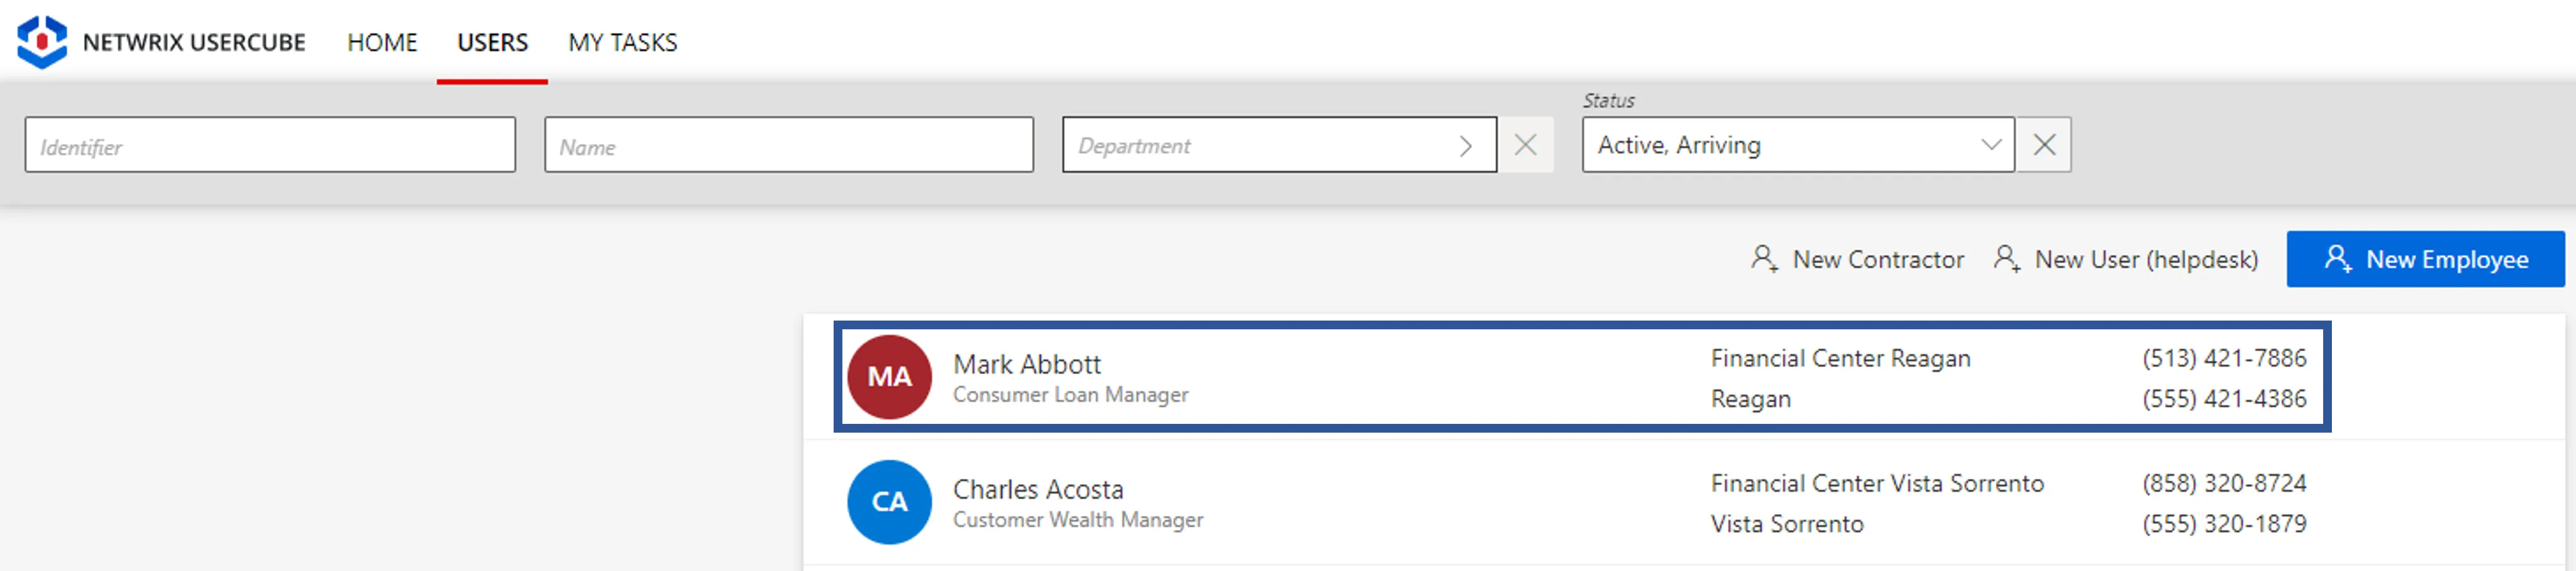
Access the user directory from the home page.
-
Click on the user to be checked.
-
Click on View Permissions to access the entitlement list.
Modify Identity's Entitlements
Act on an existing identity by proceeding as follows:
-
Access the user directory from the home page.
-
Click on the user to be modified.
-
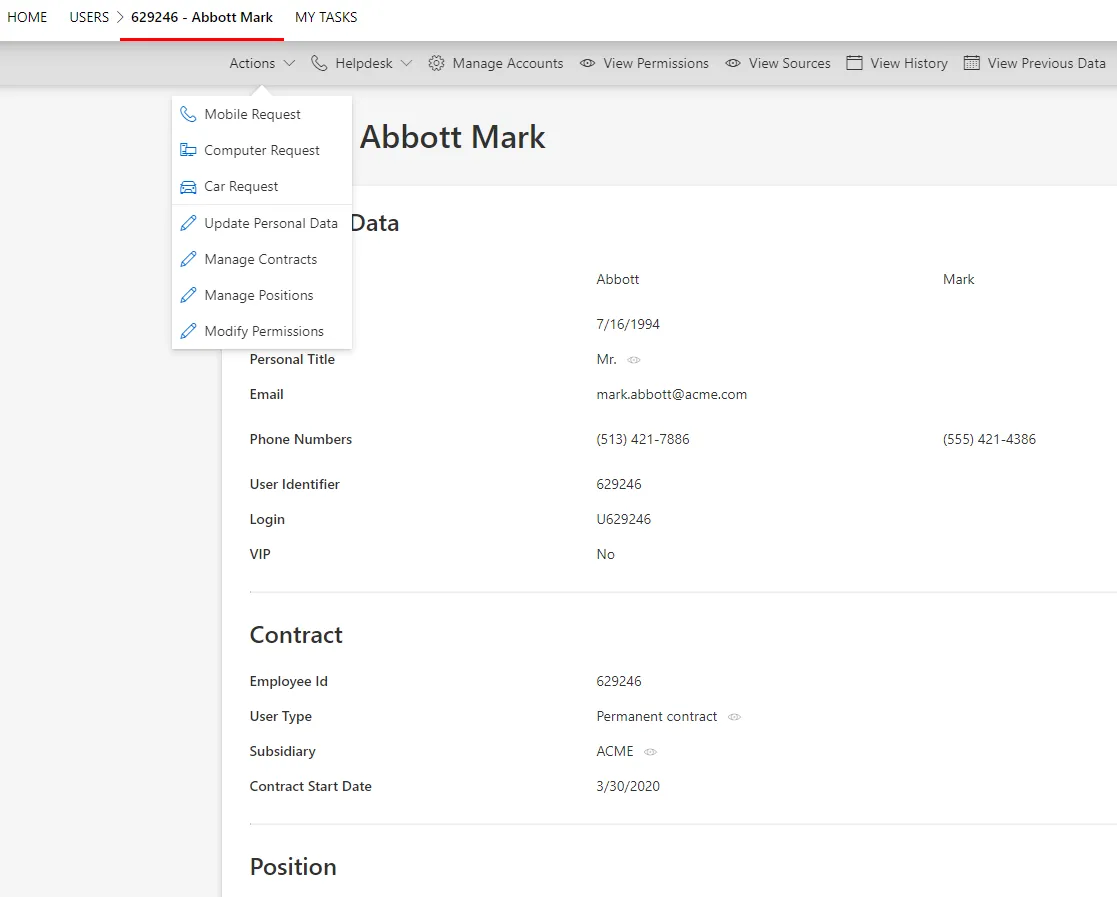
Click on Actions > Modify Permissions to launch the workflow for a manual entitlement request.
-
Follow the workflow's instructions to select entitlements and the action to be performed. You can:
- select entitlements to add;
- modify the potential options of the entitlements you are adding;
- delete entitlements which were assigned or declined manually;
- deny entitlements which were assigned automatically;
- allow denied entitlements by assigning them back manually.
If the request is about assigning an entitlement via a role which requires at least one approval, then sending the request triggers the display of said request on the Role Review screen.
<img
  src="/buttons/Home_roleReview_V523.webp" alt="Home Page - Role Review" style=""/>

```In this case, the requested entitlement will be displayed in the user's \*\*View Permissions\*\* tab only after the request is reviewed.
Verify Entitlement Request
In order to verify the process, check that the change you made in the user's entitlements is displayed in their View Permissions tab in the directory.
Review Assigned Roles
How to review user permissions grouped by categories.
NOTE: Assigned Roles is currently in a preview state and additional functionality will be added in a future release.
Overview
The Assigned Roles section displays a list of the users permissions grouped by categories. This screen is visible for managers and displays the list of employees part of the team, their roles and permissions.
You can review all assigned single roles by category. Through filters you can choose to focus on:
- Entity Type
- Workflow State
- Policy
- Role
- Other custom filters
Participants and Artifacts
This operation should be performed by a user with the right permissions. See the Configure a User Profile topic for additional information.
The following example provides the rights for the Administrator profile to see the Assigned Roles page on the Entity Type directory user. See the Create a Provisioning Rule and Create Roles in the Role Catalog topics for additional information.
Code attributes enclosed with <> need to be replaced with a custom value before entering the
script in the command line.
<AssignedRolesAccessControlRules EntityType="Directory_User" Profile="Administrator" />
Review Assigned Roles
Review the Assigned Roles by proceeding as follows:

Step 1 – On the home page, in the Administration section of the UI click on Assigned Roles.
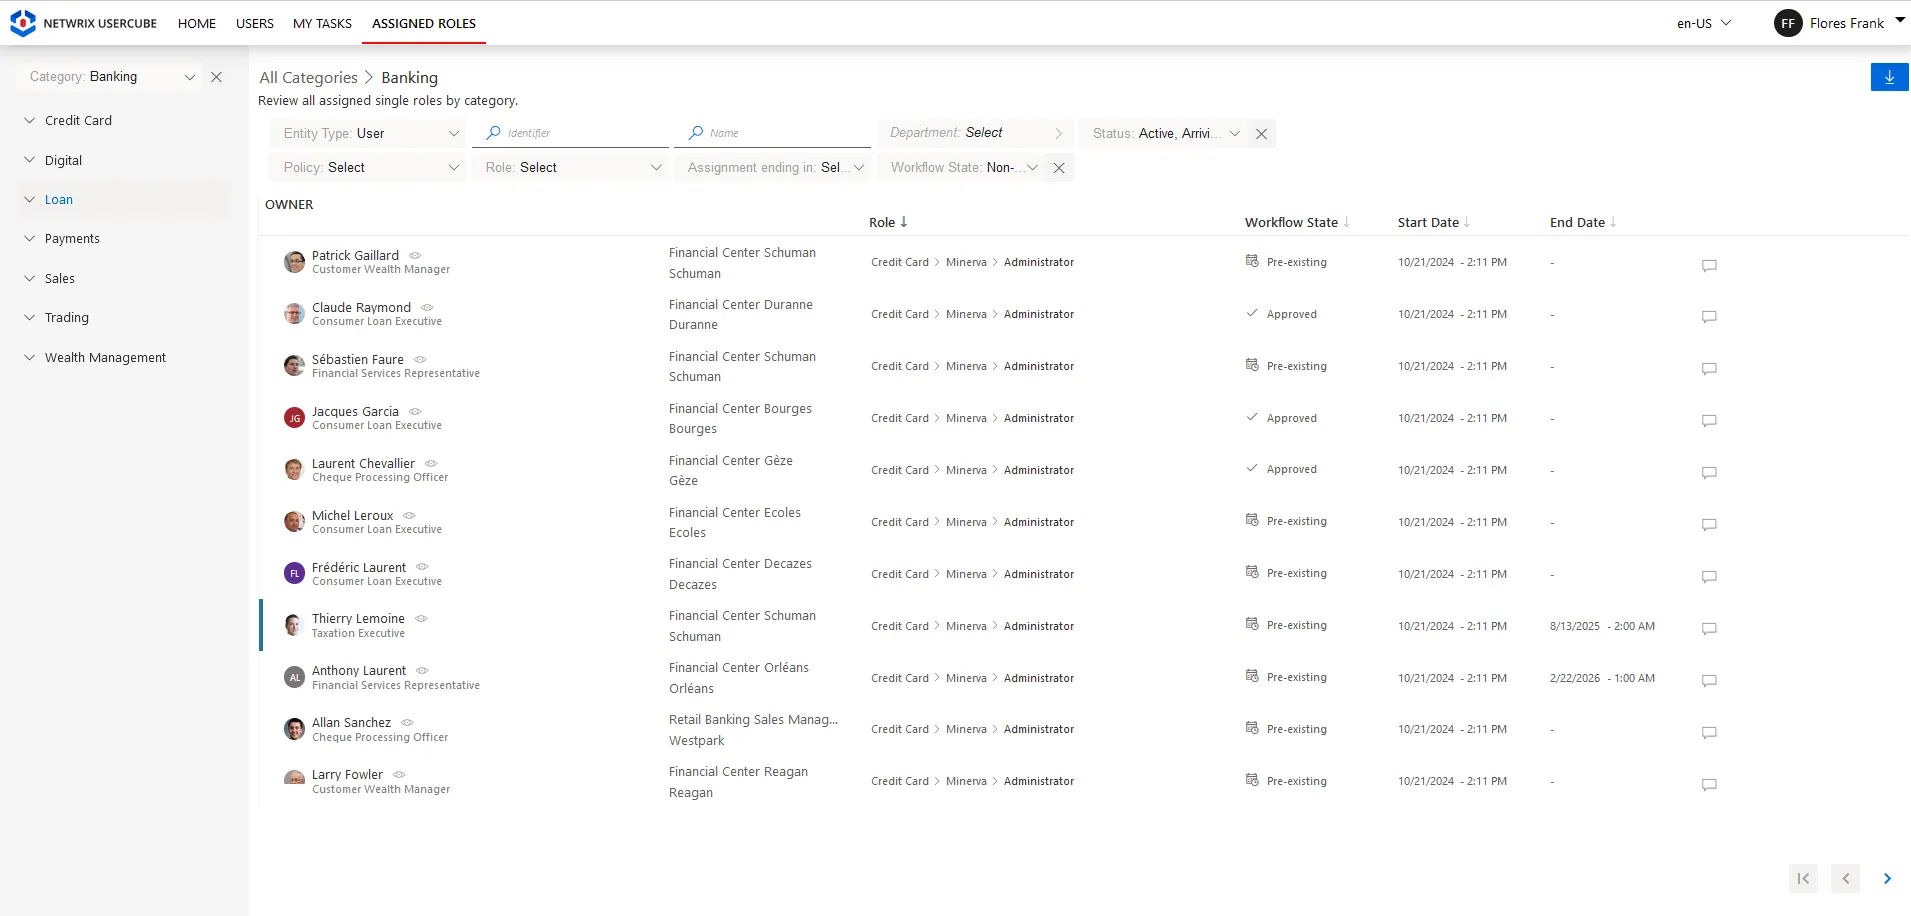
Step 2 – View the list of users with different assigned roles and filter them by Entity Type, Workflow State, Policy, Roleor by using a custom filter.
Step 3 – Download an .xlsx file list of the Assigned Roles users according to the selected filters.
Revisit the Assigned Roles section any time you need to review the information related to Assigned roles.