Export the Configuration
This guide shows how to export the configuration as XML files to a given folder.
Overview
The process for configuration export varies according to the situation:
- when working on-premise, the configuration must be exported locally;
- when working SaaS, the configuration must be exported remotely;
See the Usercube-Export-Configuration topic for additional information.
Export the Configuration Locally
Export your configuration by using the Usercube-Export-Configuration executable and declaring at least:
- the directory where the configuration is to be exported to;
- the connection string of the database.
./identitymanager-Export-Configuration.exe --database-connection-string "data source=.;Database=Usercube;Integrated Security=SSPI;Min Pool Size=10;encrypt=false;" --configuration-directory "C:/identitymanager/ExportedConf"
Export the Configuration Remotely
Export a SaaS configuration by proceeding as follows:
-
Log in for configuration deployment/export with the Usercube-Login executable.
Identity Manager provides an OpenID Connect (OIDC) authentication process in order to ensure strong security, visibility and ease of use.
Netwrix Identity Manager (formerly Usercube) recommends using Identity Manager's dedicated in-house OIDC Identity Provider (IDP), but you can also use your own IDP if you want to manage authentication yourself.
When using your own IDP, make sure that the IDP implements a valid OIDC protocol and serves id tokens.
For example, when using Identity Manager's IDP:
./identitymanager-Login.exeFor example, when using another IDP:
Usercube-Login.exe --authority https://my_oidc_authentication_server.com --client-id
34b3c-fb45da-3ed32
Either method will open your default browser to
http://localhost:5005where you will be redirected to the specified IDP and will be prompted to log in.Specify
--port <port>if you want the login page to use another local port.If you have already successfully deployed or exported your SaaS configuration at least once, then there is no need to communicate the authentication information again. Go directly to step 4.
However, if, since then, there has been a change in the identity deploying/exporting the configuration or in the Identity Provider used to log in at step 1, then go through the whole process again.
-
Log in to the IDP to be redirected back to this screen:
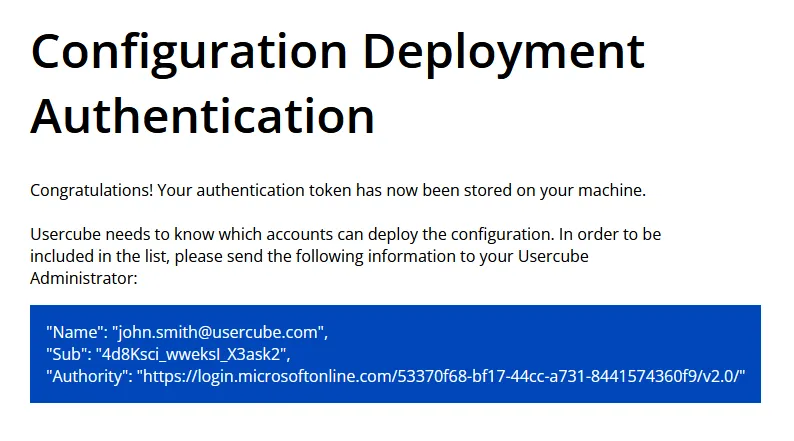
Once authenticated, an identification token is stored on your local machine for the authentication to Identity Manager's deployment and export processes.
-
Copy the entire text within the blue square and send it to your Identity Manager administrator.
The administrator will add the identity information to the configuration of your Identity Manager instance, to allow the configuration deployment/export.
-
Export the configuration by using the Usercube-Export-Configuration and declaring at least:
- the configuration directory;
- the API URL of your Identity Manager instance.
./identitymanager-Export-Configuration.exe -d "C:\Usercube\ExportedConf" --api-url https://my_usercube_instance.com
You can export the configuration by launching only the
Export-Configurationexecutable until the authentication token expires. Then, the token must be refreshed via theLoginexecutable before exporting again.The token served by Identity Manager's IDP expires after one hour.