Console Migration Workflow: Step 3—Rebuild the Console
NOTE: Return to the main workflow page via this link: Console Migration Workflow.
Return to the previous section via this link: Console Migration Workflow: Step 2—Prepare the Database
Proceed to the next section via this link: Console Migration Workflow: Step 4—Validate the Migration.
Overview
This article lists the steps for rebuilding the Netwrix Access Analyzer console during the Access Analyzer Migration.
Installing the Access Analyzer Console
Follow the steps below to rebuild the Access Analyzer Console on the new server. Before installation, ensure that the NAA_Migration folder with the StealthAUDIT.lic license file is stored locally on the new Access Analyzer Console so it can be referenced during the installation process.
-
Confirm that the prerequisites have been met on the Access Analyzer Console Server.
-
Install the Access Analyzer application, as well as the Access Information Center (AIC) application if the server will host both.
IMPORTANT: Do NOT start the Access Analyzer or AIC applications at this time.
Restoring the Backup Files
-
After the initial installation of Access Analyzer and AIC, restore the following contents of the
NAA_Migrationfolder:File/Folder Purpose %SAInstallDir%\JobsContains the jobs from the SA jobs tree %SAInstallDir%\StealthAUDIT.licThe license key for the Netwrix Auditor product %SAInstallDir%\ReportsEnsures that you do not need to republish all reports %SAInstallDir%\CLUContains any Command Line Utility parameters %SAInstallDir%\ODBCProfiles\CustomContains any custom ODBC connect strings for SQL %SAInstallDir%\SADatabase\ViewsContains the host list definitions %SAInstallDir%\SecurityMapContains all of the connection profiles %SAInstallDir%\GlobalOptions.xmlContains the Global Options %SAInstallDir%\SPProfiles.XMLContains the Storage Profiles %SAInstallDir%\rba.confContains the Role-Based Access Configuration %SAInstallDir%\rba-reporting.confPublished Reports role-based access %SAInstallDir%\DC\patternsdef.xmlConfigured SDD Criteria %SAInstallDir%\DC\mypatternsdef.xmlCustom SDD Criteria %SAInstallDir%\FSAAContains short-term data related to file server collections C:\Windows\System32\TasksSpecifically task names beginning with SA*.job -
After you have copied the Reports folder from the old server to the new one, change the report hostname path to show it in the web server:
%SAInstallDir%Reports\v3\<NewServerHostName> -
After you have copied the Scheduled Tasks to
C:\Windows\System32\Tasks, run the script below from an Admin PowerShell to register them:
$InstallPath=Get-ItemPropertyValue -Path HKLM:\SOFTWARE\WOW6432Node\STEALTHbits\StealthAUDIT -Name 'InstallPath'
$NewServerInstallerPath =$InstallPath+'StealthAuditStart.exe'
$ScheduledTaskFilePath="C:\Windows\System32\Tasks"

Get-ChildItem -Path $ScheduledTaskFilePath -Filter SA*.job | Foreach-Object {

$content = [xml] (Get-Content $_.FullName)
$oldServerInstallerPath= $content.Task.Actions.Exec.Command

If($oldServerInstallerPath -ne $NewServerInstallerPath)
{
 $Content.Task.Actions.Exec.Command = $NewServerInstallerPath
 $Content.Save($_.FullName)
}

$taskName = ([System.IO.Path]::GetFileNameWithoutExtension($_.FullName))
$TaskExist=Get-ScheduledTask -TaskName $taskName -ErrorAction SilentlyContinue

if (!$TaskExist)
{
$UserID=$Content.Task.Principals.Principal.UserId
Register-ScheduledTask -Xml (get-content $_.FullName | out-string) -TaskName $taskName -User $UserID -Force
}
 }
-
Open
\NAA_Migration\NAA\Web\webserver.exe.configand copy the content between<appSettings></appSettings>and paste it in place of the<appSettings></appSettings>block in%SAInstallDir%Web\webserver.exe.config.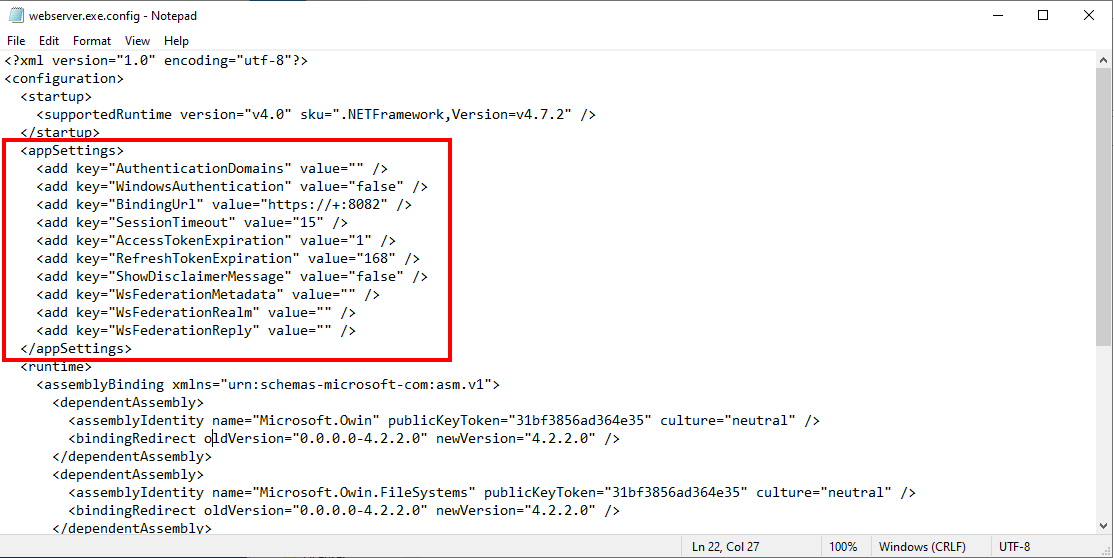
NOTE: Open the destination
webserver.exe.configas an administrator by following these steps:- Search Notepad in Start menu.
- Right-click > Run as administrator.
- In Notepad, click File > Open %SAInstallDir%Web\webserver.exe.config.
-
Open
\NAA_Migration\AIC\AccessInformationCenter.Service.exe.configand copy the content between<appSettings></appSettings>and paste it in place of the<appSettings></appSettings>block in\Program Files\STEALTHbits\Access Information Center\AccessInformationCenter.Service.exe.Config.NOTE: Open the destination
AccessInformationCenter.Service.exe.configas an administrator by following the steps below:- Search Notepad in Start menu.
- Right-click > Run as administrator.
- In Notepad, click File > Open …
\Program Files\STEALTHbits\Access Information Center\AccessInformationCenter.Service.exe.Config.
-
Open the Netwrix Access Analyzer application and follow through the Access Analyzer Configuration Wizard, selecting Choose a StealthAUDIT root folder path to copy from if prompted.

- See the following for more information on the Netwrix Access Analyzer Configuration Wizard: Access Analyzer Initial Configuration
-
After completing the Configuration Wizard, the Access Analyzer Application should open automatically.
-
In the Access Analyzer Console, navigate to Settings > Reporting, and set the Website URL to contain the new console server's name.

-
If using Windows Authentication to connect Access Analyzer to its database (click Settings > Storage), open
services.mscand set the Netwrix Access Analyzer Web Server service to log on as a Windows service account with appropriate permissions on the Access Analyzer database.
Additional Considerations
If using any of the below, please recreate the certificate for the new NAA Console Server:
- Netwrix Access Analyzer for SharePoint Online
- Netwrix Access Analyzer for Exchange Online
- Secured Published Reports Site (HTTPS)
- Secured AIC Site (HTTPS)
Related Links
- Console Migration Workflow
- Console Migration Workflow: Step 2—Prepare the Database
- Console Migration Workflow: Step 4—Validate the Migration
- Netwrix Access Analyzer 12.0 System Requirements
- Access Analyzer Initial Configuration
- Netwrix Access Analyzer for SharePoint Online
- Netwrix Access Analyzer for Exchange Online
- Secured Published Reports Site (HTTPS)
- Secured AIC Site (HTTPS)