Upgrade to Client Version 5.9.4.3
Overview
This article provides instructions for upgrading to Netwrix Endpoint Protector (EPP) client version 5.9.4.3. Follow these procedures to ensure a smooth transition with minimal disruptions.
IMPORTANT: Before starting, capture a snapshot of the Endpoint Protector server.
Instructions
Upgrade the Endpoint Protector Server to 5.9.4.2
- Download the EPP 5.9.4.2 package: Download Link
- In the EPP console, navigate to Dashboard > Live Update > Offline Patch Uploader.
- Select Choose File and upload the EPP 5.9.4.2 package.
- Click Back and allow the upgrade to complete.
- Verify the server displays version 5.9.4.2 in the bottom right corner of the console. Refresh the browser if necessary.
Download the EPP 5.9.4.3 Client Package
- Access the Netwrix Community to download the required offline patches:
- Windows: Download Link
- macOS: Download Link
- New Outlook Add-in: Download Link
- Combined Package: Download Link
NOTE: For installation instructions for the New Outlook Integration, refer to the release notes or the readme documentation within the download package to configure
manifest_template.xml.
Upgrade the Endpoint Protector Client
- Deploy EPP 5.9.4.3 to endpoints manually, via the EPP 5.9.4.2 console, or through your preferred deployment tools.
- Using the EPP 5.9.4.2 console:
- Navigate to Dashboard > Live Update > Offline Patch Uploader.
- Choose the file for Windows, macOS, or the combined package download.
- Complete the installation process and ensure it is successful.
Verify Installation Success
- Navigate to System Configuration > Client Software in the console.
- Windows should display version 6.2.5.1 and macOS 3.0.5.1.
- The EPP appliance should show version 5.9.4.2 at the bottom right.
Configure Client Software Upgrade
- Go to System Configuration > Client Software Upgrade.
- Choose the operating system for agent deployment and select Next.
- Select the relevant group or computer for EPP 5.9.4.3 agent deployment and proceed.
- Confirm upgrade details, initiate the upgrade job, and allow time for completion.
Verify Agent Connectivity
-
From the client computer:
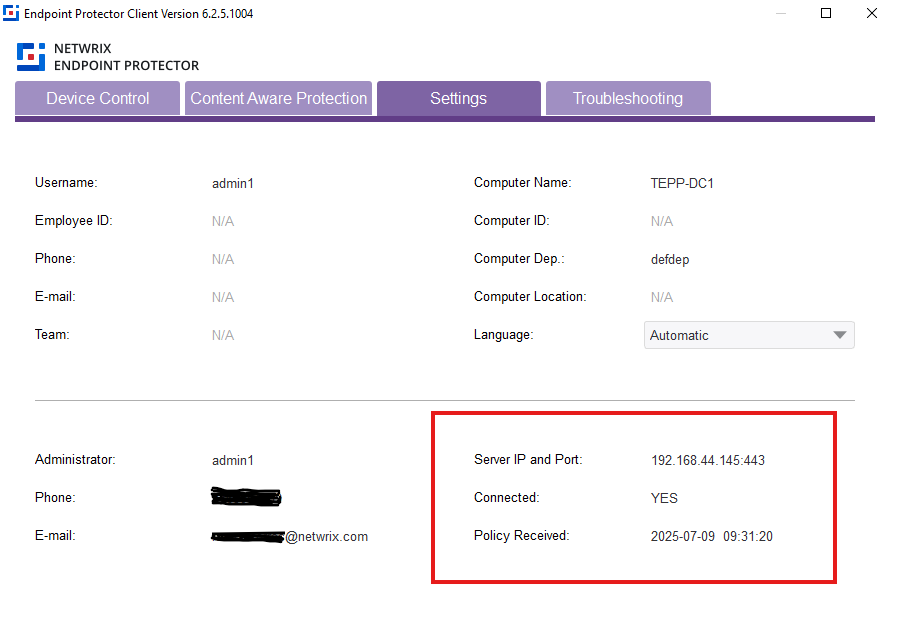
- Open the EPP agent via the system tray icon.
- Navigate to Settings and press
Ctrl + Alt + i(Windows) orCommand + Option + i(macOS).
-
From the EPP server 5.9.4.2 console:
- Navigate to Device Control > Computers > List of Computers.
- Use filters to locate the computer by name or username and select Apply.
- Ensure the computer displays the correct client version and status.
Troubleshooting
- If agents fail to connect, uninstall and reinstall the EPP client software on affected endpoints.
- For discrepancies in computer listings:
- In Device Control > Global Settings, increase Maximum no. of records returned and No. of records per page.
- Verify that all endpoints report accurately and that device control policies are operating correctly.
NOTE: If you encounter client connectivity issues, a clean uninstall and reinstall of the EPP client has resolved such problems previously. Always confirm that you possess the correct upgrade files and follow official upgrade documentation.