Password Reset Client
The Password Reset Client allows users to securely reset their password or unlock their account from the Windows Logon and Unlock Computer screens. Users click Reset Password to access the Password Reset system.
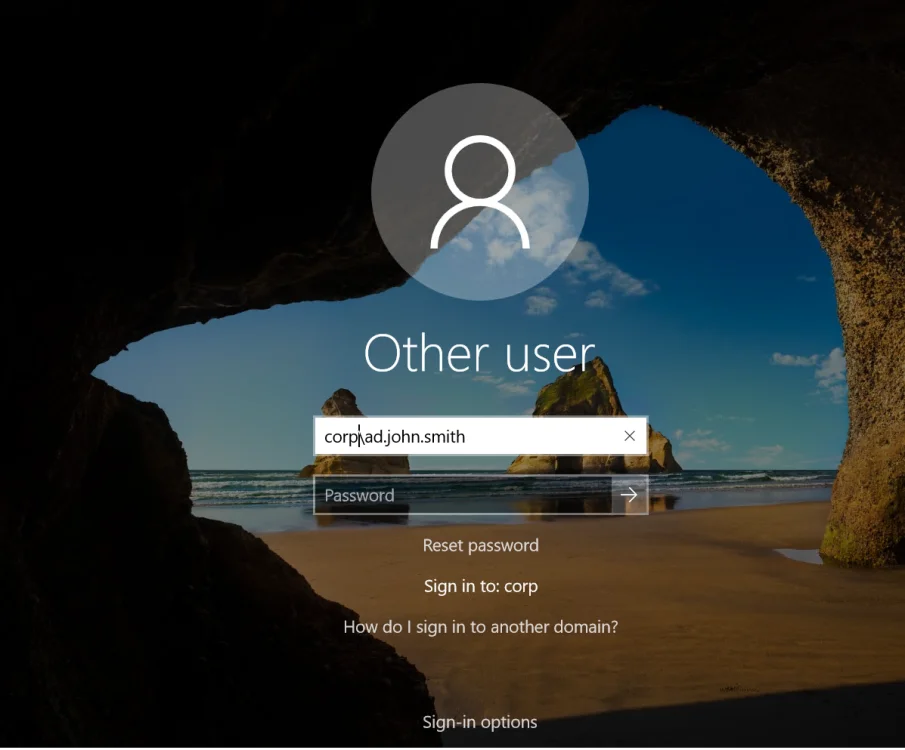
NOTE: The Password Reset Client does not modify any Windows system files.
Installing the PRC
The Password Reset Client is designed to run on Windows XP to Windows 10, and Server 2003 to Server 2019. The PRC is compatible with Remote Desktop Services on these operating systems. Support for Windows XP and Server 2003 is depreciated because the PRC uses Internet Explorer for page rendering, and Internet Explorer 8 has very limited support for HTML5. Send an e-mail to support@netwrix.com if you need to use the Password Reset Client with these older operating systems.
System Requirements
- Windows Vista, 7, 8, 8.1, or 10.
Windows Server 2008, 2008 R2, 2012, 2012 R2, 2016, or 2019.
Windows XP, Server 2003, or 2003 R2 (depreciated). - 1 Megabyte free disk space.
- 128 Kilobytes free RAM (per session if using Remote Desktop Services).
You can install the PRC manually if you only have a few computers, but it is easier to perform an automated installation if you have many computers. Follow the instructions below to perform an automated installation with Group Policy.
Create a Distribution Point
A distribution point can either be a UNC path to a server share, or a DFS (Distributed File System) path. Organizations with large, multi-site networks should use DFS as it offers fault tolerance and load sharing. To create a PRC distribution point:
Step 1 – Log on to a server as an administrator.
Step 2 – Create a shared network folder to distribute the files from.
Step 3 – Give the Domain Computers security group read access to the share, and limit write access to authorized personnel only.
Step 4 – Copy NPRClt330.msi into the distribution point folder.
NOTE: NPRClt330.msi is in the Client folder below the Netwrix Server's installation folder.
(\Program Files\Netwrix Password Reset\ by default).
Step 5 – Give the Domain Computers security group read access to the NPRClt330.msi file in the distribution point.
Create a Group Policy Object
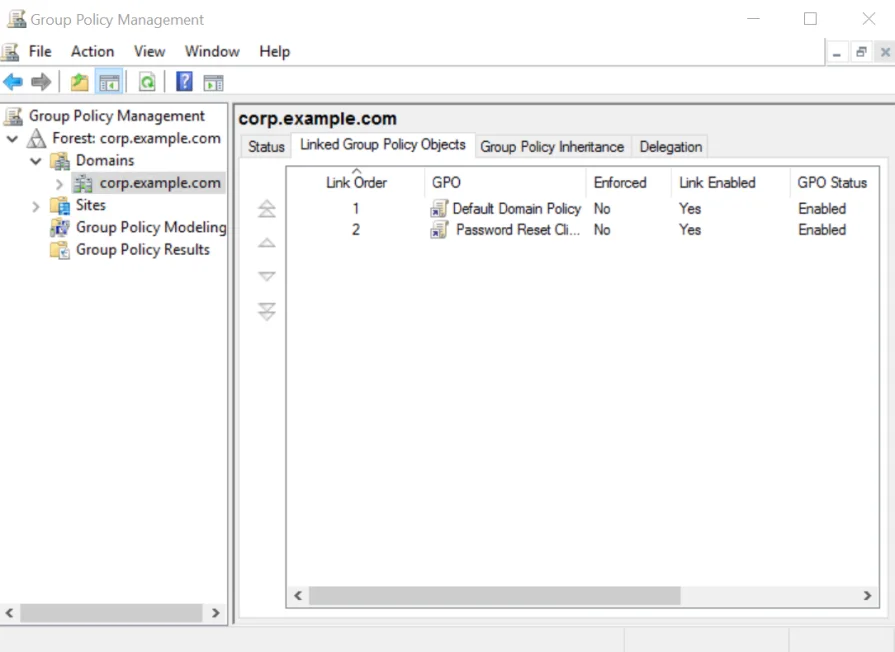
Step 1 – Start the Group Policy Management Console (gpmc.msc).
Step 2 – Expand the forest and domain items in the left pane.
Step 3 – Right-click the domain root node in the left pane, and then click Create a GPO in this domain, and Link it here...
Step 4 – Enter Password Reset Client, then press ENTER.
Edit the Group Policy Object
Step 1 – Right-Click the Password Reset Client GPO, then click the Edit... button.
Step 2 – Expand the Computer Configuration, Policies, and Software Settings items in the left pane.
Step 3 – Right-Click the Software installation item, and then select New > Package.
Step 4 – Enter the full UNC path to NPRClt330.msi in the Open dialog box.
NOTE: You must enter a UNC path so that other computers can access this file over the network. For example, \file server\distributionpointshare\NPRClt330.msi
Step 5 – Click Open.
Step 6 – Select the Assigned deployment method, then click OK.
Step 7 – Close the Group Policy Management Editor.
Complete the Installation
Restart each computer to complete the installation. Windows installs the Password Reset Client during startup. The computer may restart itself automatically to complete the installation.
NOTE: Computers with Fast Logon Optimization enabled may not install the Password Reset Client during the first restart. These computers perform a background refresh of Group Policy, and will install the client on the first restart after the refresh. Microsoft article 305293 has more information about the Fast Logon Optimization feature.
Configuring the PRC
You must install an Active Directory administrative template to configure the Password Reset Client. The administrative template only has to be installed once.
Install PRC Administrative Template
Follow the steps below to install the PRC administrative template.
Step 1 – Use the Group Policy Management Console (gpmc.msc) to display the GPOs linked at the domain level.
Step 2 – Right-click the Password Reset Client GPO, and then click the **Edit...**button.
Step 3 – Expand the Computer Configuration item.
Step 4 – Expand the Policies item if it is visible.
Step 5 – Right-click the Administrative Templates item, and then click Add/Remove Templates...
Step 6 – Click Add... and then browse to the Client folder below the Password Reset Server's
installation folder. (\Program Files\Netwrix Password Reset\ by default).
Step 7 – Select NPRClt.adm, and then click Open.
Step 8 – Click Close.
Configure the PRC
Follow the steps below to configure the Password Reset Client.
Step 1 – Use the Group Policy Management Console (gpmc.msc) to display the GPOs linked at the domain level.
Step 2 – Right-click the Password Reset Client GPO, then click the Edit... button.
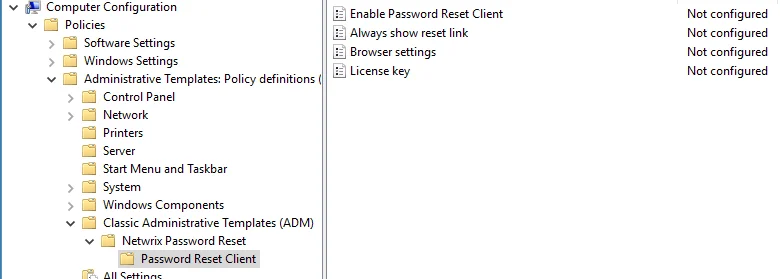
Step 3 – Expand the Computer Configuration, Policies (if it exists), Administrative Templates, Classic Administrative Templates (ADM), Netwrix Password Reset, and Password Reset Client items.
Step 4 – Double-click the Browser settings item in the right pane of the Group Policy Management Editor.
Step 5 – Select the Enabled option.
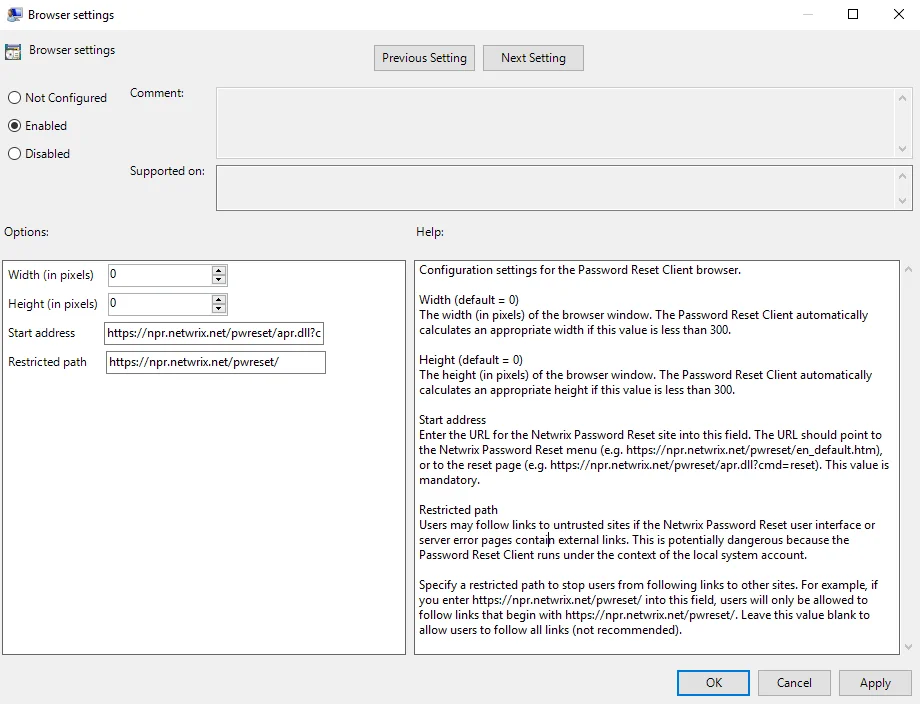
Step 6 – Enter the desired Width and Height of the PRC browser window.
NOTE: Set the Width and Height to 0 to have the PRC calculate an appropriate size.
Step 7 – Enter the Start address (URL) of the Password Reset system. The URL should point to the Password Reset menu or reset page.
NOTE: See the Help box for more information.
Step 8 – Enter a Restricted path (URL) to stop users from following links to other sites from the Password Reset Client browser.
Step 9 – Click OK.
Step 10 – Close the Group Policy Management Editor.
The new PRC configuration is applied to all computers in the domain. This does not happen immediately, as Windows takes some time to apply the changes to Group Policy. You can force an immediate refresh of Group Policy on the local computer with the following command: gpupdate /target:computer
The Password Reset Client only opens URLs with .dll, .htm, and .html extensions. URLs without a filename are not opened. The PRC also blocks some page content, including audio and video files, ActiveX controls and Java applets. Send an e-mail to support@netwrix.com if you need to change the default filename and content restrictions.
CAUTION: Users may follow links to untrusted sites if the Password Reset user interface or server error pages contain external links. This is a security risk because the Password Reset Client runs under the context of the local system account. Specify a restricted path to stop users from following links to other sites from the Password Reset Client. The start address and restricted path should both begin with https://
NOTE: The Enable Password Reset Client, Always show reset link, and Dialog attachment
delay are automatically set by the Password Reset Client, and are normally left in their default
(Not configured) state.
The administrative template contains detailed information about all the PRC configuration settings.
This information is shown on the Help box. The Help box is shown after you double-click one
of the configuration settings in the right pane.
Licensing the PRC
Follow the steps below to add a license key to the PRC configuration.
Step 1 – Open the Configuration Console and install your license key.
Step 2 – Start the Registry Editor (regedit.exe).
Step 3 – Expand the HKEY_LOCAL_MACHINE, SOFTWARE, ANIXIS, ANIXIS Password Reset, and 3.0 registry keys.
Step 4 – Double-click the LicenseKey value, and then copy the entire license key to the clipboard.
Step 5 – Use the Group Policy Management Console (gpmc.msc) to display the GPOs linked at the domain level.
Step 6 – Right-click the Password Reset Client GPO, then click the Edit... button.
Step 7 – Expand the Computer Configuration, Policies (if it exists), Administrative Templates, Classic Administrative Templates (ADM), Netwrix Password Reset, and Password Reset Client items.
Step 8 – Double-click the License key item in the right pane of the Group Policy Management Editor.
Step 9 – Select the Enabled option.
Step 10 – Click inside the License key text box, then paste the license key.
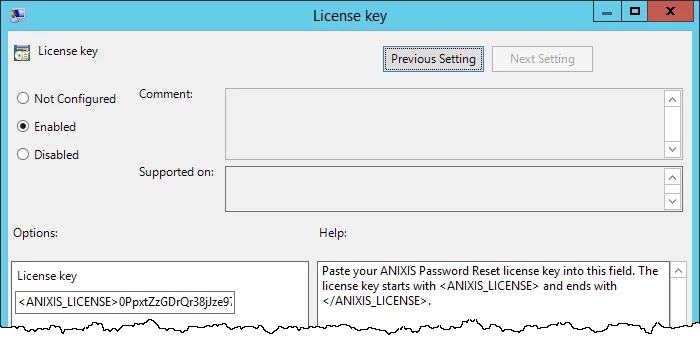
Step 11 – Click OK.
Step 12 – Close the Group Policy Management Editor.
The license key is applied to all computers in the domain. This does not happen immediately, as
Windows takes some time to apply the changes to Group Policy. You can force an immediate refresh of
Group Policy on the local computer with the following command: gpupdate /target:computer
Using Password Reset
Netwrix Password Policy Enforcer is a web application. Users can access it from a web browser, or
from the Password Reset Client. The default URL for the Web Interface
is: http://[server]/pwreset/
See the
Password Reset Client
topic for more information.
You can use URL parameters to open a specific page, and to set the user and domain names. For
example: http://[server]/pwreset/apr.dll? cmd=enroll&username=johnsmith&domain=CORP
Where [server] is the name or IP address of the server hosting the Web Interface.
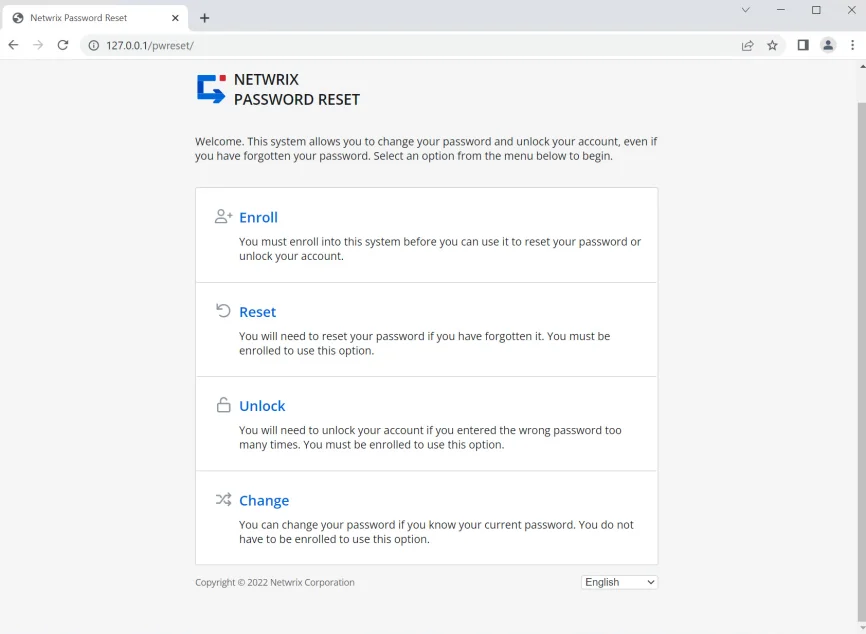
Users access the Enroll, Reset, Unlock, and Change features from the menu. These features are explained on the following pages.
CAUTION: The connection between the Web Interface and Password Reset Server is always encrypted. Install an SSL certificate on the web server and use HTTPS to encrypt connections from the browser to the web server. See the Installing and Using an SSL Certificate topic for more information.
Enroll
Only enrolled users can reset their password and unlock their account. Users can enroll manually by answering some questions about themselves, or they can be enrolled automatically if automatic enrollment is enabled. Users only need to enroll once, but they can enroll again if they are locked out of Password Reset, or if they want to change their questions or answers. See the Verification Codes and Verification Tab topics for more information.
Follow the steps below to manually enroll into Password Reset.
Step 1 – Click the Enroll item in the menu.
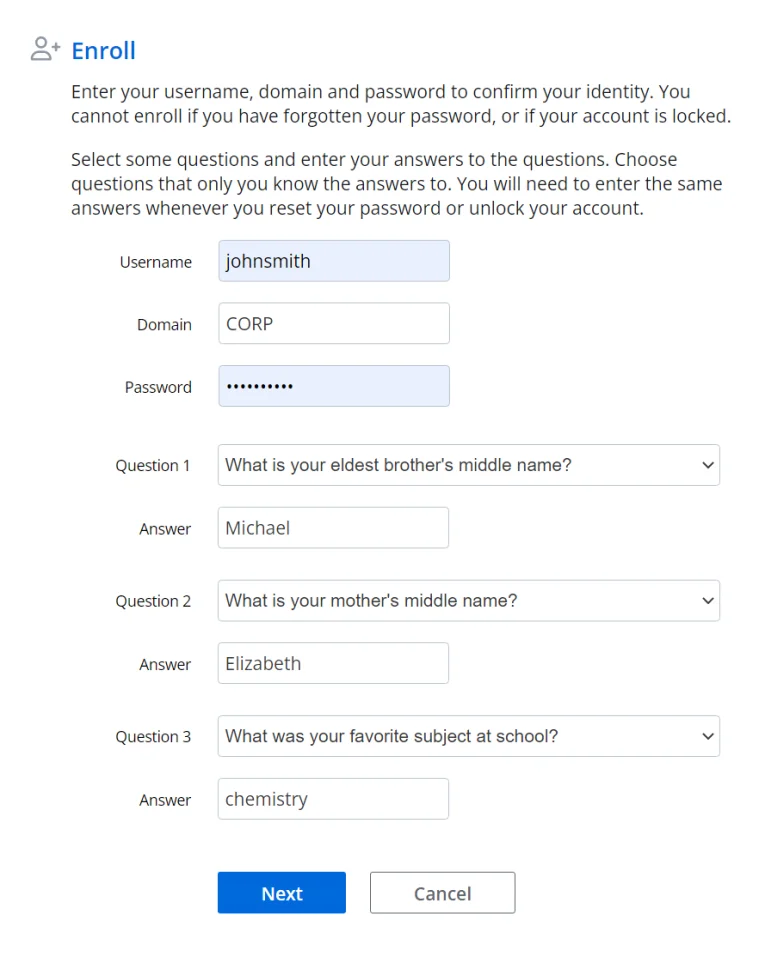
Step 2 – Type a Username, Domain, and Password.
Step 3 – Type an e-mail address if the E-mail text box is visible. See the Options topic for more information.
Step 4 – Select a question from each of the Question drop-down lists, and type an answer to each question in the Answer text boxes.
Step 5 – Click Next, and then click OK to return to the menu.
NOTE: Windows increments the bad password count in Active Directory when a user tries to enroll with an incorrect password. This may trigger a lockout if the Windows account lockout policy is enabled.
Reset
Users should use the Reset feature if they have forgotten their password. Resetting a password also unlocks the account if it is locked.
Follow the steps below to reset an account password.
Step 1 – Click the Reset item in the menu.
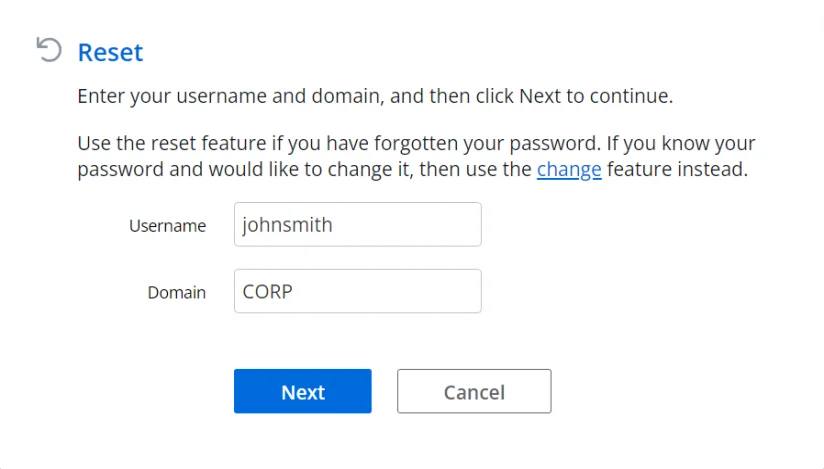
Step 2 – Type a Username and Domain, and then click Next.
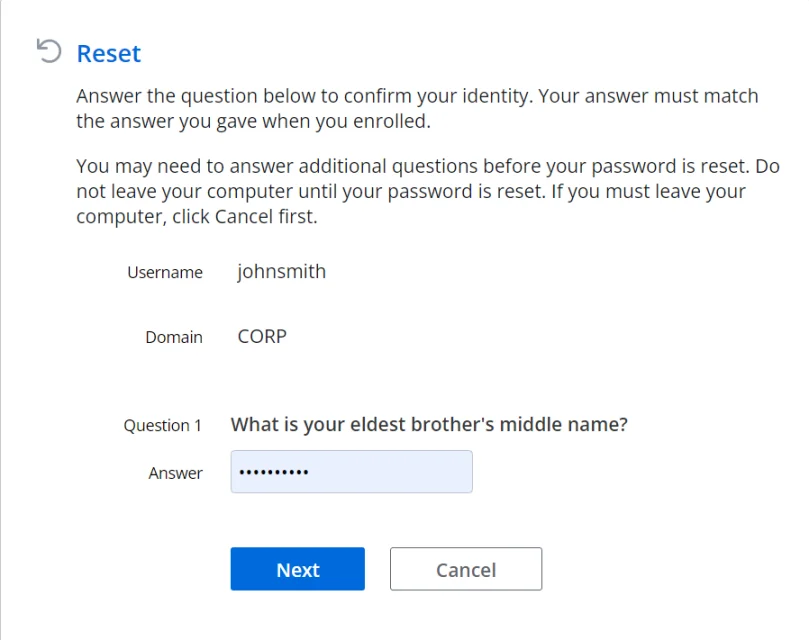
Step 3 – Type the Answer to the first question, and then click Next. Repeat until all questions are answered correctly.
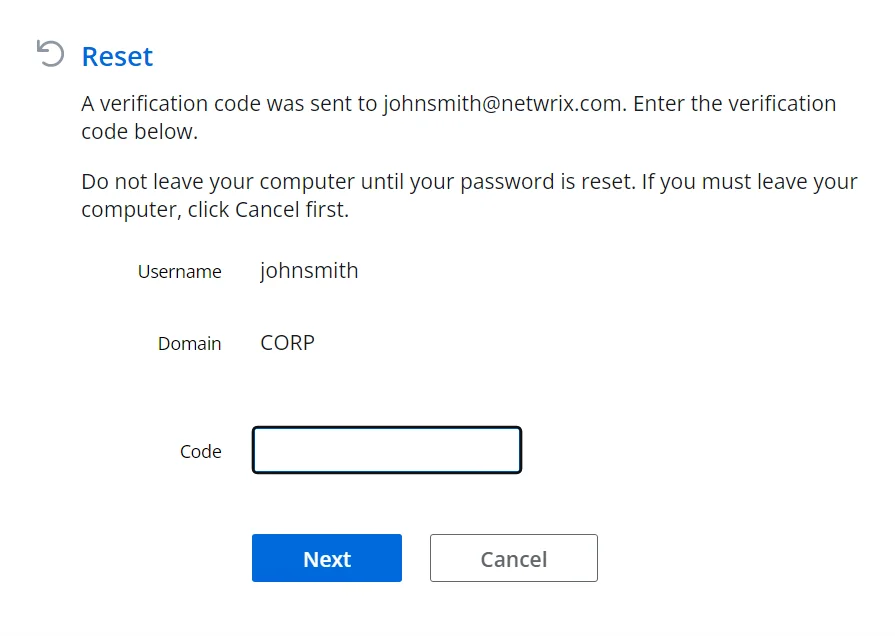
Step 4 – You may be asked to enter a verification code. The verification code is sent to your phone by e-mail or SMS. Type the Code, and then click Next.
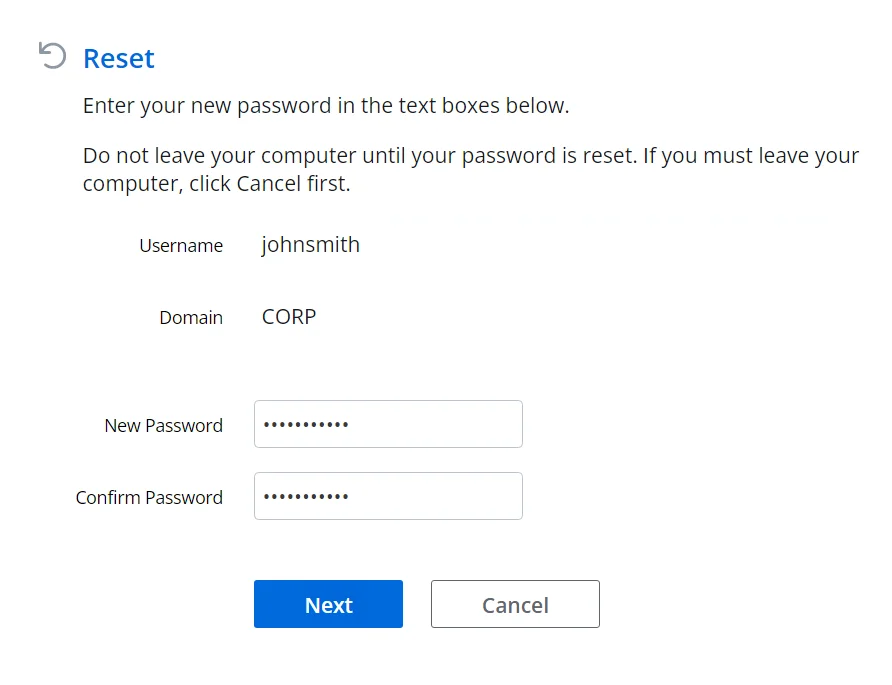
Step 5 – Type the new Password into both text boxes, and then click Next.
Step 6 – Click OK to return to the menu.
Unlock
Users should use the Unlock feature if they know their password, but have entered it incorrectly too many times and locked out their account.
Follow the steps below to unlock an account.
Step 1 – Click the Unlock item in the menu.
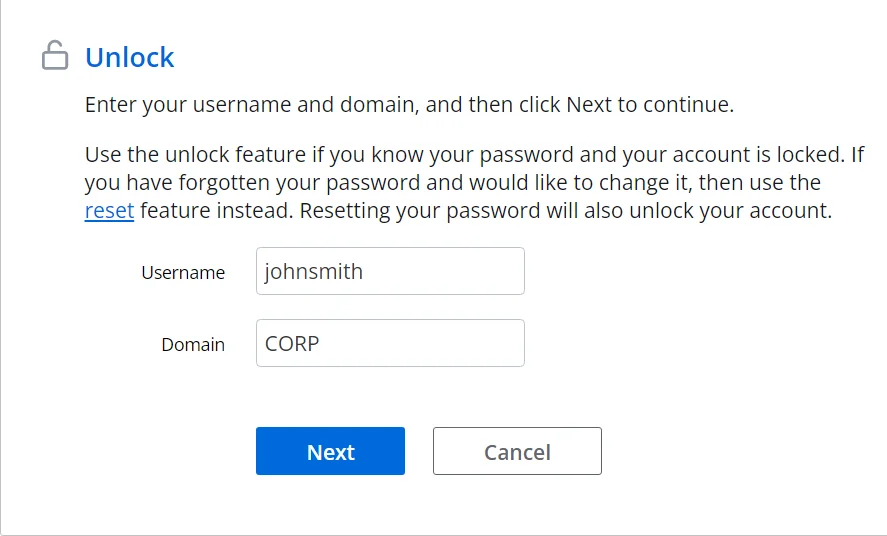
Step 2 – Type a Username and Domain, and then click Next.
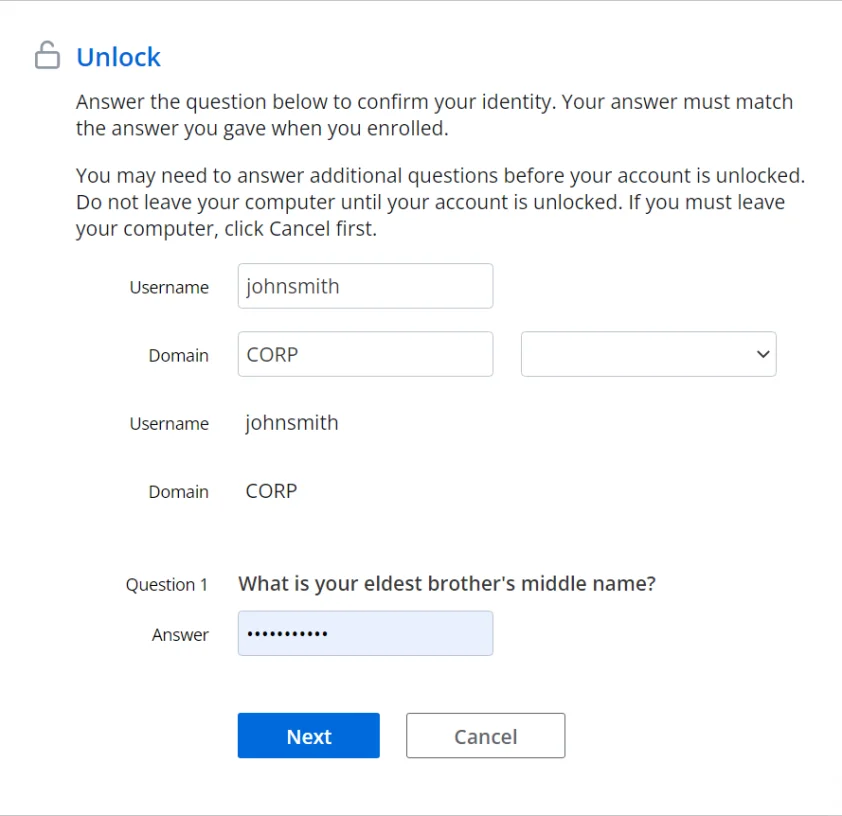
Step 3 – Type the Answer to the first question, and then click Next. Repeat until all questions are answered correctly.
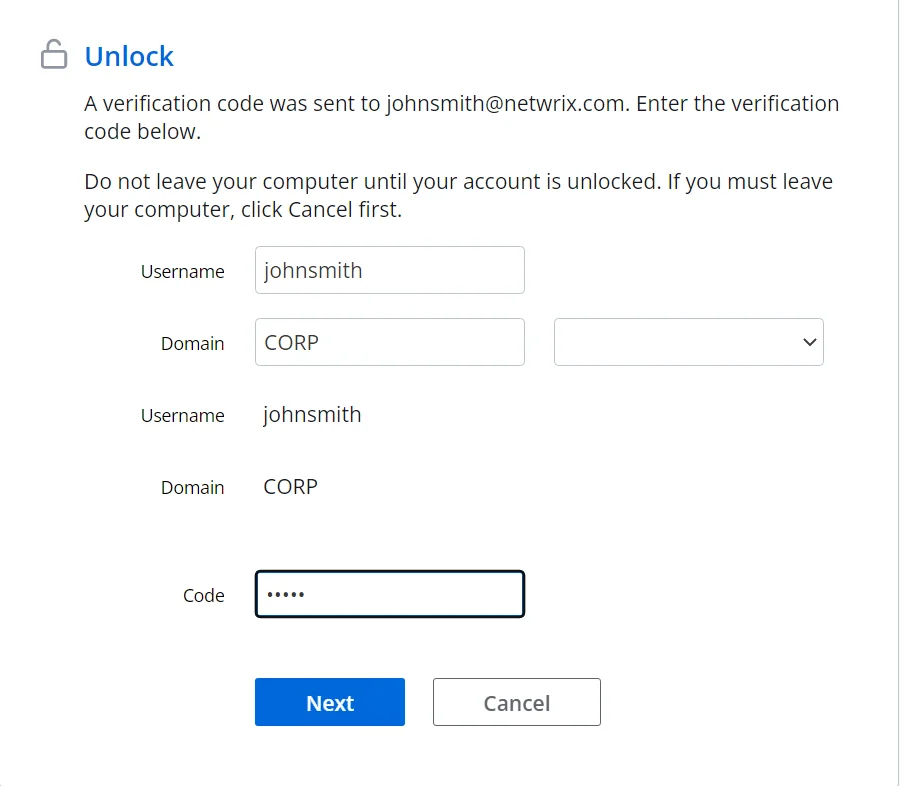
Step 4 – You may be asked to enter a verification code. The verification code is sent to your phone by e-mail or SMS. Type the Code, and then click Next.
Step 5 – Click OK to return to the menu.
NOTE: The Unlock feature unlocks accounts in Active Directory. Users who are locked out of Password Reset should re-enroll to gain access to Password Reset. See the Verification Codes topic for more information.
Change
Users should use the Change feature if they know their password and would like to change it.
Follow the steps below to change an account password.
Step 1 – Click the Change item in the menu.
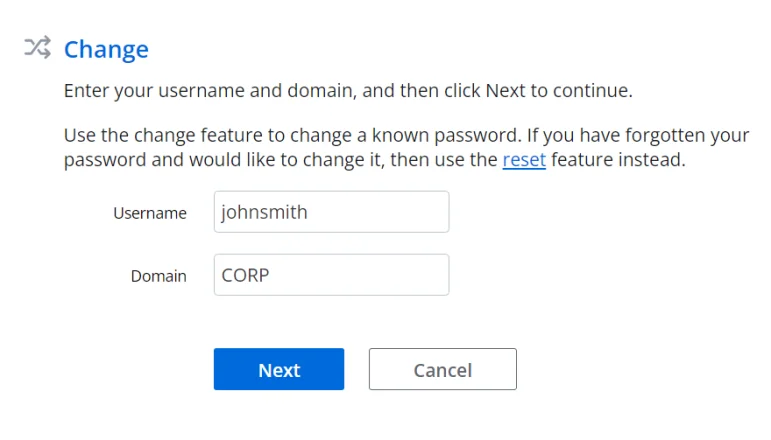
Step 2 – Type a Username and Domain, and then click Next.
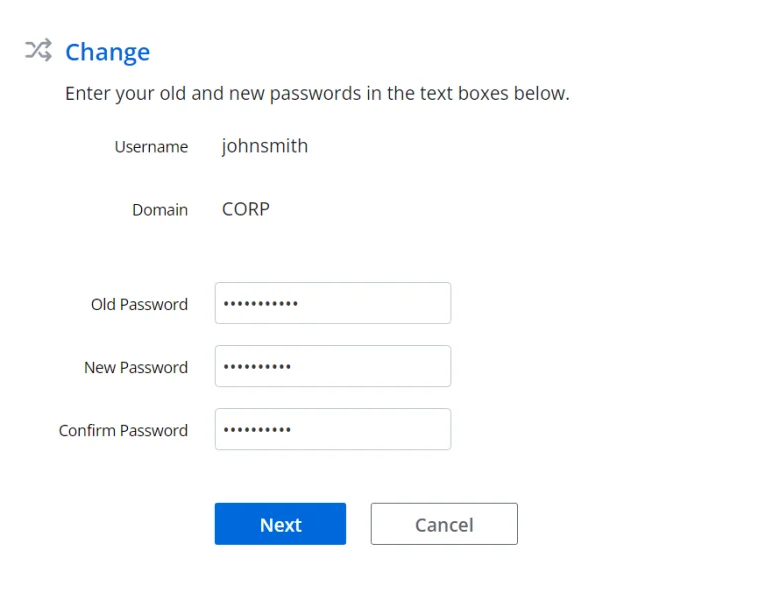
Step 3 – Type the Old Password, New Password, and Confirm Password, and then click Next.
Step 4 – Click OK to return to the menu.
NOTE: Windows increments the bad password count in Active Directory when a user tries to change their password with an incorrect password. This may trigger a lockout if the Windows account lockout policy is enabled.
Error Messages
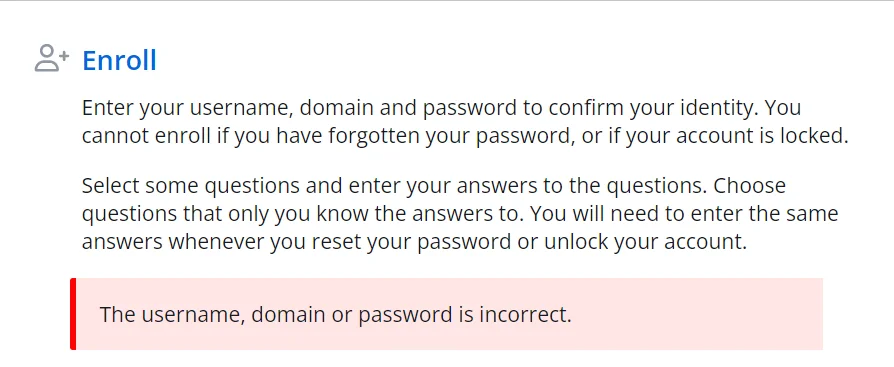
Validation errors are shown in a red box below the page instructions. Validation errors are normally caused by invalid user input. They can often be overcome by changing the value of one or more input fields and resubmitting the form.
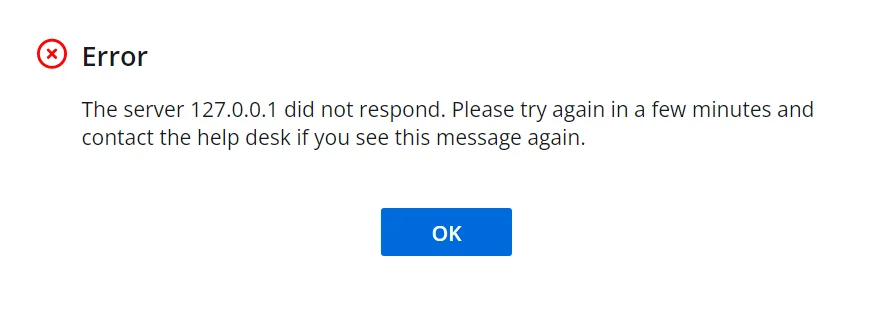
Critical errors are shown on their own page. These errors are mostly a result of configuration or system errors. An event may be written to the Windows Application event log on the Password Reset Server computer when a critical error occurs. Users can sometimes overcome a critical error by following the instructions in the error message, but most critical errors are beyond the user's control.
Validation and critical error messages are stored in the HTML templates. You can modify the default messages by editing the templates. See the Resource Strings topic for more information.