Editing HTML Templates
Password Policy Enforcer/Web's user interface is built with customizable templates. You can easily modify the user interface by editing the templates.
User Interface Files
Password Policy Enforcer/Web installs four .htm files for every language. Each filename starts with a language code. The files for the US English language are:
| Filename | Content |
|---|---|
| en_default.htm | Static HTML for the Welcome page. See the Using Password Policy Enforcer Web topic for additional information. |
| en_ppeweb.htm | Template for the Password Change page. See the Changing a Password topic for additional information. |
| en_finished.htm | Template for the Finished page. |
| en_error.htm | Template for the Password Critical Error page. See the Error Messages topic for additional information. |
The other user interface files are language independent. Most of the formatting is in ppeweb.css,
and some additional CSS for Internet Explorer is in ppeweb_ie.css. The image files are in the images
folder. These files are installed into the \Inetpub\wwwroot\ppeweb\ folder by default.
NOTE: Always backup the user interface files before and after editing them. Your changes may be overwritten when Password Policy Enforcer/Web is upgraded, and some changes could stop Password Policy Enforcer/Web from working correctly. Web browsers display pages differently, so test your changes with several versions of the most popular browsers to ensure compatibility.
The en_default.htm contains static HTML, but the other .htm files contain special comment tags that are used to prepare the pages. Some of these comments define ranges. A range looks like this:
<!—RANGE_NAME-->Some text or HTML<!--/RANGE_NAME-->
Password Policy Enforcer/Web deletes ranges (and the text inside them) when they are not needed. Some ranges span only one word, while others span several lines. The other type of comment tag is called a field.
Fields are replaced by some other information. For example, the field above is replaced with a username.
Resource Strings
Templates end with a resource string section.
<!--RESOURCE_STRINGS--><!—
@RES_EMPTY_FIELD_USERNAME: Enter your username in the Username box.
@RES_EMPTY_FIELD_DOMAIN: Enter your domain name in the Domain box.
-->
Resource strings are mostly validation error messages, but they can contain any text Password Policy Enforcer/Web may need to build the page. See the Error Messages topic for additional information. Do not modify the identifiers on the left, only edit the text on the right. Resource strings are always inside a range called RESOURCE_STRINGS. Password Policy Enforcer/Web deletes this range before sending the page to the user's web browser.
CAUTION: You may rebrand the Password Policy Enforcer/Web user interface, but it is a violation of the License Agreement to modify, remove or obscure any copyright notice. See the License Agreement topic for additional information.
Examples
This topic contains examples of common customizations. Use these examples to gain a better understanding of Password Policy Enforcer/Web's templates. You don't need to be an expert in HTML to follow these examples, but a basic understanding of HTML will help. Work through them carefully, and backup files before you edit them. The examples in this section are from the US English files, but the format is the same for all languages.
Replacing the Netwrix Logo
The Netwrix logo is shown in the top left corner of the Welcome page. The logo is installed into the
\Inetpub\wwwroot\ppeweb\images\ folder by default, and it is called logo.gif. You can replace this
file with one containing your organization's logo.
Your logo may appear distorted if it is not the same size as the Netwrix logo. You can fix this by opening en_default.htm in a text editor such as Notepad. Search for the line shown below, and replace the width (116) and height (69) with the dimensions of your logo in pixels.
<img class="logo" src="images/logo.gif" alt="ANIXIS" width="116" height="69" />
Edit Page Instructions
Instructions appear at the top of the Password Change page in the white section above the input
fields. You can edit these instructions by opening en_ppeweb.htm and searching for the text you
wish to modify.
Instructions are inside ranges called SECTION_A and SECTION_B. Each section contains the instructions for a page in the template. Make sure you edit the instructions in the correct section, or they may be displayed on the wrong page.
<!--SECTION_A-->
<p>Enter your username and domain, and then click Next to continue…</p>
<!--/SECTION_A-->
Enter your old and new passwords in the text boxes below.
Edit Validation Error Messages
Validation error messages are shown in a yellow box below the page instructions. Validation errors are normally caused by invalid user input.
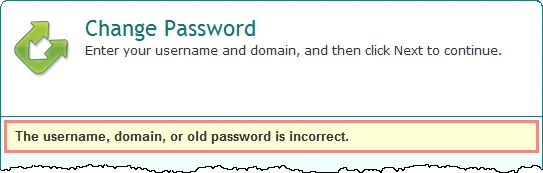
Validation error messages are defined in en_ppeweb.htm. The error messages are in the resource strings section near the end of the file. See the Resource Strings topic for additional information.
| String | Error Message |
|---|---|
| @RES_EMPTY_FIELD_USERNAME | Enter your username in the Username box. |
| @RES_EMPTY_FIELD_DOMAIN | Enter your domain name in the Domain bo… |
| @RES_BAD_USERNAME_OR_PASSWORD | The username, domain, or old password i… |
Edit Critical Error Messages
All the critical error messages are defined in en_error.htm. The error messages are in the
resource strings section near the end of the file. See the Resource Strings
topic for additional information.

You may see placeholders like %1 and %2 in some error messages. These are replaced with more information about the error. You should keep these as they provide important information about the error, but you can delete them if you do not want them.
| String | Error Message |
|---|---|
| @RES_ACCESS_DENIED | You do not have permission to change your pas… |
| @RES_ACCOUNT_LOCKED_OUT | Your account is currently locked out. Try aga… |
| @RES_LICENSE_MISSING | License reminder. Your password was not chang… |
If you want to display some text for all error messages, then insert your text above or below the
<p>{/*ERROR*/}</p> line. For example:
The help desk phone number is 555-555-5555.
Edit Finished Message
The finished message is shown after users successfully change their password. This message is defined in en_finished.htm.

<h1>Finished</h1>
<p>Your password has been changed. You can now logon with your new pass…</p>
Change Font Sizes and Colors
ppeweb.css contains most of the user interface formatting information. You can easily change font
sizes and colors by editing this file. You can even reposition and resize items, but you will need
some understanding of CSS to do this. For example, this is the CSS for the validation error box:
.error {
  background-color: #ffffd6;
  border: 3px solid #ff8080;
  color: #333333;
  font:
    bold 1.3em/1.2em Arial,
    sans-serif;
  margin: 3px 0 0 4px;
  padding: 6px 22px 6px 8px;
  width: 499px;
}
Edit these properties to change the appearance of the error box. You may need to clear your web browser's cache to see the changes.
NOTE: Web browsers display pages differently, so test your changes with several versions of the most popular browsers to ensure compatibility.
Replace URLs to the Welcome Page
Password Policy Enforcer/Web shows the Welcome page when users click OK or Cancel on the Password Change, Error, and Finished pages.
To display a different page when users click OK or Cancel, search for en_default.htm in
en_ppeweb.htm, en_finished.htm, and en_error.htm and replace en_default.htm with an
alternative URL. For example: