Using the Data Console
The Data Console allows you to view and export data collected by Password Reset. Click Start > ANIXIS Password Reset > APR Data Console to open the console.
The Data Console has three tabs. The Recent Activity tab shows a chart of recent requests. The chart is empty when Password Reset is first installed, but it will populate itself as the system is used.
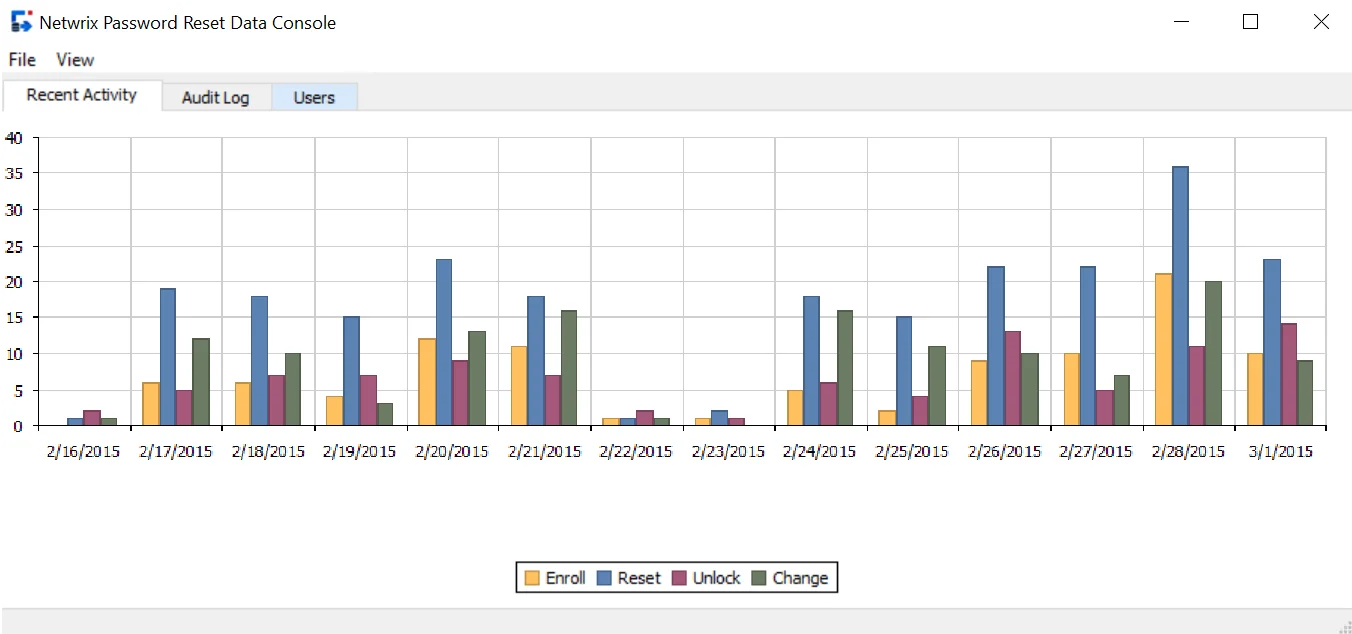
The bars in the chart show how many successful enrollments, resets, unlocks, and changes occurred every day. You can click the bars to see a filtered view of the events for that day. For example, you could click the blue bar on 2/19/2015 to see all the password resets for that day.
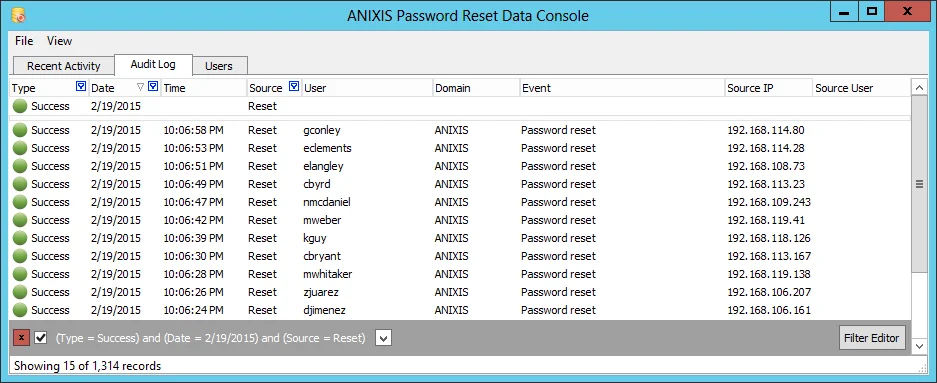
The resulting view shows only the 15 successful password resets on 2/19/2015. These are shown in the Audit Log tab. You can create your own filter to find events in this tab. See the Custom Filters topic for additional information. You can drag a column's header to rearrange the columns, or click a column header to sort the records.
The Audit Log tab has nine columns:
- Type — Event type (Success or Failure)
- Date — Event date
- Time — Event time
- Source — Event source (Reset, Unlock, etc.)
- User — User's Active Directory user logon name
- Domain — User's Active Directory domain
- Event — A description of the event
- Source IP — The request's source IP address
- Source User — The request's source username (blank if anonymous access is enabled)
The Users tab contains Information about each user. All users are shown by default, but you can create filters to find specific users.
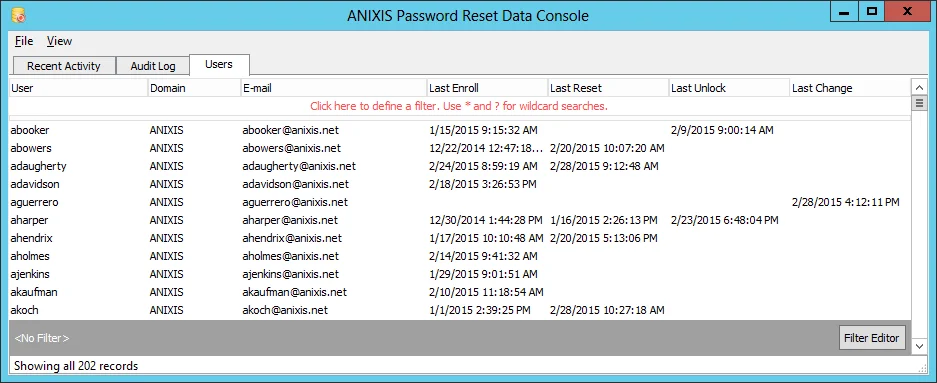
The Users tab has seven columns:
- User — User's Active Directory user logon name
- Domain — User's Active Directory domain
- E-mail — E-mail address entered during enrollment
- Last Enroll — Date and time of last successful enroll
- Last Reset — Date and time of last successful password reset
- Last Unlock — Date and time of last successful account unlock
- Last Change — Date and time of last successful password change
NOTE: The Data Console does not automatically display new information as it is added to the database. Press F5 to refresh the view.
Filtering Data
The Data Console can show thousands of records, but only some of them will be of interest to you at any time. Filters let you focus on the important information.
You can create simple filters by typing values directly into the filter row, or by selecting values from Filtering by Column Values. More complex filters are created with the Custom Filtersand The Filter Editor windows.
The Filter Row
The top row in the Audit Log and Users tabs is called the Filter Row. You can type filter values directly into this row.

The Filter Row is empty when you first open the Data Console. To create a filter, click the Filter Row in the column you wish to filter. A cursor will appear. Type a value, and then press ENTER or TAB.
You may see a button to the right of the cursor. Click the button to shown an editor or selector that helps you enter a value. Values can include wildcard characters. Use a ? to match any single character, or a * to match more than one character.

The image above shows a filter on the Date, Source, and Source IP columns. Only password reset events on 2/5/2015 originating from IP addresses starting with 192.168.115 are shown. The small blue icons in the column headers show which columns have active filters.
NOTE: Rows are shown only if they match all filter values (logical AND). Use the custom filter or the filter editor windows for a logical OR filter.
Filtering by Column Values
You can also create a filter by selecting values from a list in the column headers.

Hover the mouse pointer over a column header until a small button appears on the right side of the header.

Click the button to show a list of values in the column.
Select one or more values from the list. Rows that do not match one of the selected values are hidden.
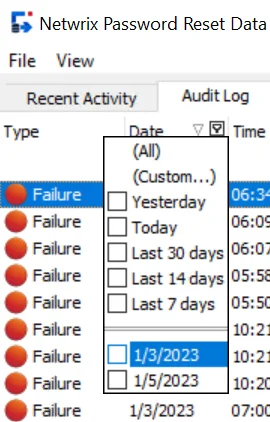
The list of values for date and date/time columns also includes date ranges such as Last 7 days, Today, Yesterday, etc.
Click (All) to clear the filter and display all values. Click (Custom...) to create a custom filter.
Custom Filters
Use custom filters to search for partial matches, find a range of values, or to create more complex filters. Click (Custom...) in a column header's value list to create a custom filter.
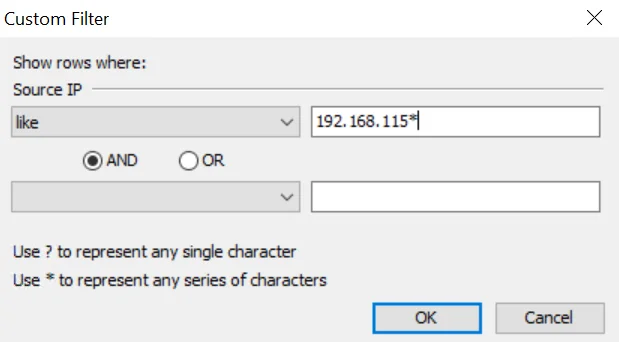
Custom filters can contain one or two conditions for each column. Select an operator for the first condition from the drop-down list below the column name. Only relevant operators are shown for each column.
Type a value for the condition in the text box beside the operator. The text box may have a button on the right. Click the button to shown an editor or selector that will help you enter a value. Values can include wildcard characters. Use a ? to match any single character, or a * to match more than one character.
Select the AND or OR operator if the filter will have two conditions. Select AND if the filter should only show rows that meet both conditions. Select OR if the filter should show rows that meet either condition.
Select an operator and value for the second condition, or leave them blank if your filter only has one condition. Click OK to close the Custom Filter window and apply the filter.
NOTE: The Filter Editor is shown instead of the Custom Filter window if the current filter is too complex for the Custom Filter window.
The Filter Editor
Use the Filter Editor to create complex filters, filters for hidden columns, or to save and open regularly used filters. Press CTRL + F to open the Filter Editor, or click the Filter Editor button in the lower right corner of the Data Console.
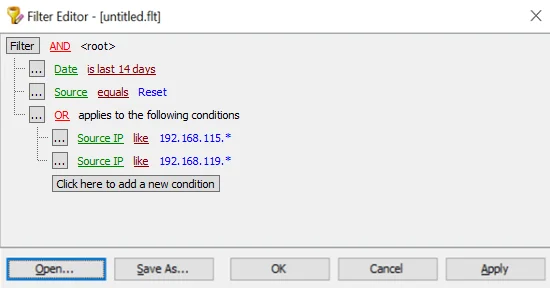
A filter may contain several conditions. Conditions start with a column name, followed by an operator, and sometimes a value. Column names are shown in green, operators in maroon, and values in blue.
A filter also contains a root node and optionally one or more groups. These are used to include Boolean operators in the filter. Boolean operators are shown in red. Grouped conditions are indented.
The filter in the image above contains the root node, one group, and four conditions. It will show all reset requests in the last fourteen days originating from IP addresses starting with 192.168.115 or 192.168.119.
Click the Click here to add a new condition button to add a new condition to the filter. Click the ellipsis button on the left of each line to add or remove conditions and groups. Click column names, operators, and values to edit them. Most can be selected from a list. Values can also contain the ? and * wildcard characters.
Click Save As... to save a filter to a file, or Open... to use a saved filter. Click OK to close the Filter Editor and apply the filter.
Some columns are hidden in the Data Console. You can use the Filter Editor to create filters for these columns. For example, the filter in the image below shows all users with an APR v1 enrollment record.

The Filter and Status Bars
The Status Bar appears at the very bottom of the Data Console. It shows the number of visible records and the total record count. The Filter Bar appears above the Status Bar, and it shows the active filter. The button on the right side of the Filter Bar opens the Filter Editor.

A button and a check box appear on the left side of the Filter Bar when a filter is active. Click the button to clear the filter. Toggle the check box to disable or enable the filter.

A drop-down button appears to the right of the filter. Click it to select a recently used filter.

Exporting Data
You can export the visible rows to Microsoft Excel, HTML, text, and XML formats.
Follow the steps below to export the visible rows in the current tab.
Step 1 – Click the Audit Log or Users tab.
Step 2 – Click the File menu, and then click one of the export menu items.
Step 3 – Type a filename, and then click Save.
NOTE: When exporting to Excel, you can choose the file type from the Export to Excel window. The default file type is .xlsx.
Deleting Users
Users are automatically deleted from Password Reset's database approximately one week after they are deleted from Active Directory. You can also manually delete users from the Data Console.
Follow the steps below to delete a user.
Step 1 – Click the Users tab.
Step 2 – Select the user(s) you wish to delete.
Step 3 – Press the DELETE key, and then click OK.
NOTE: You can still view a user's event history in the Audit Log tab after they are deleted from the Users tab.