Configuring Password Reset
Click Start > ANIXIS Password Reset > APR Configuration Consoleon the Password Reset Server computer to open the Configuration Console.
General Tab
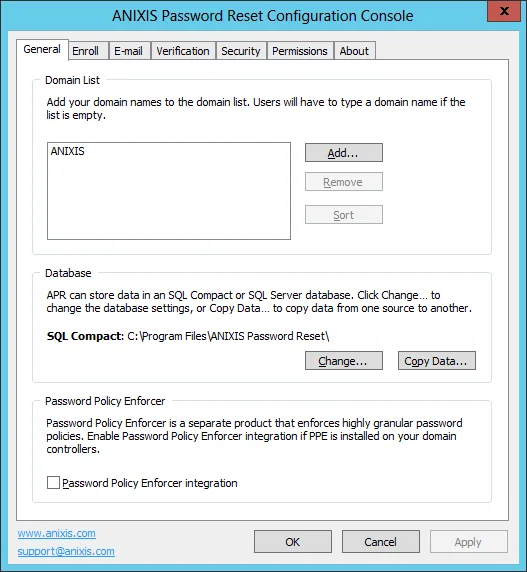
Use the General tab to maintain the list of managed domains, set the database options, and enable the Password Policy Enforcer integration. See the Netwrix Password Policy Enforcertopic for additional information.
Domain List
The Domain List is empty when Password Reset is first installed, and users must type their domain name. You can configure Password Reset to display a list of domains instead of an empty text box.
Add a Domain to the list
Follow the steps below to add a domain to the list.
Step 1 – Click Add...
Step 2 – Type a NetBIOS (NT Compatible) or DNS domain name.
Step 3 – Click OK, and then click Apply.
NOTE: The most frequently used domain should be first in the list as it will be the default. You can rearrange the domains by dragging them to another position. You can also click Sort to sort them alphabetically.
Remove a Domain from the list
Follow the steps below to remove a domain from the list:
Step 1 – Select the domain name in the Domain List.
Step 2 – Click Remove, and then click Yes when asked to confirm.
Step 3 – Click Apply.
Database
Password Reset uses an SQL Server Compact database by default. It creates two database files (apr.sdf and aprlog.sdf) in the Password Reset installation folder.
Follow the steps below to move these files to another folder.
Step 1 – Close the Data Console if it is open.
Step 2 – Stop the Password Reset service.
Step 3 – Move apr.sdfthe and aprlog.sdf to their new location. The database files should remain on a local disk.
Step 4 – Give the Password Reset service account read and write permissions to the database files in their new location.
Step 5 – Open the Password Reset Configuration Console, and click Change... in the General tab.
Step 6 – Click Browse... and select the new database path.
Step 7 – Click OK twice, and then click Apply.
Step 8 – Start the Password Reset service.
Step 9 – Update the backup script to copy from the new folder. See the Working with the Database topic for additional information.
You can also move the database from SQL Server Compact to SQL Server. See the Moving to SQL Server topic for more information.
Netwrix Password Policy Enforcer
Password Reset is a configurable password filter that enforces granular password policies with many advanced features. Password Reset can integrate with Password Policy Enforcer to help users choose a compliant password.
Password Reset displays the Password Policy Enforcer policy message when users are prompted for their new password, and the Password Policy Enforcer rejection message if the new password does not comply with the password policy. Select the Password Policy Enforcer integration check box if you have installed and configured Password Policy Enforcer on your domain controllers.
Password Reset locates and queries a domain controller in the user's domain when Password Policy
Enforcer integration is enabled. You can override this behavior and send all Password Policy
Enforcer queries to a specific IP address by setting the PPEIPAddress registry value to the IP
address of a Password Policy Server. The PPEIPAddress value is in
HKEY_LOCAL_MACHINE\SOFTWARE\ANIXIS\ANIXIS Password Reset\3.0.
Users are more likely to see the Password Policy Enforcer Generic Rejection message rather than the
more detailed Rejection message when this registry value is set. Users may also have the wrong
policy, or no policy enforced if the queried server is not a domain controller in the user's
domain.
Queries to the Password Policy Server are sent to UDP port 1333 by default. You may need to create
firewall rules to open this port. See the
Creating Firewall Rules for the PPC
topic for more information.
NOTE: Password Policy Enforcer is not included with Password Reset. Go to www.netwrix.com/password_policy_enforcer to learn more about Password Policy Enforcer.
Enroll Tab
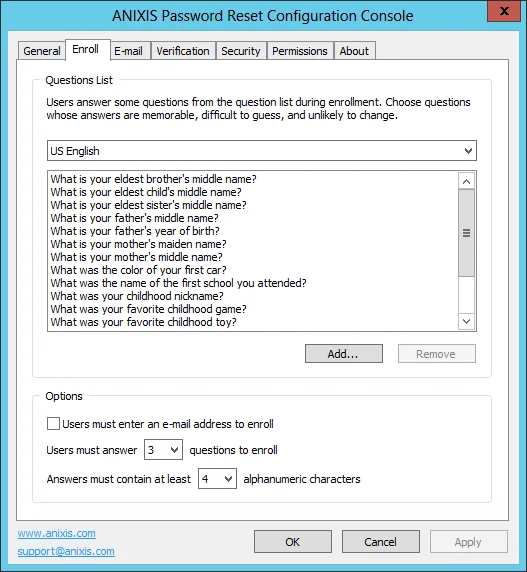
Use the Enroll tab to maintain the list of enrollment questions and options.
Question List
Users must answer some questions about themselves when they manually enroll. They choose their questions from the Question List.
Add a question
Follow the steps below to add a question to the list.
Step 1 – Select a language from the drop-down list above the Question List.
Step 2 – Click Add...
Step 3 – Type the new question, including the question mark.
Step 4 – Click OK, and then click Apply.
Remove a question
Follow the steps below to remove a question from the list.
Step 1 – Select a language from the drop-down list above the Question List.
Step 2 – Select the question in the Question List.
Step 3 – Click Remove, and then click Yes when asked to confirm.
Step 4 – Click Apply.
NOTE: You can rearrange questions by dragging them. You can also replace question lists with text boxes so users can enter their own questions. See the Editing the HTML Templates document for more information
Options
Password Reset can send e-mail alerts to users when a request is submitted for their account. These alerts can be sent to the user's Active Directory e-mail address and/or to an e-mail address in Password Reset's database. Select the Users must enter an e-mail address to enroll check box if users should enter an e-mail address during enrollment.
The number of questions that users must answer to enroll is configurable, and is set to three by default. Select the desired number of questions from the Users must answer... drop-down list.
You can also set a minimum length for each answer. Only alphanumeric characters are counted because Password Reset only checks alphanumeric characters. Select the minimum number of alphanumeric characters in each answer from the Answers must contain at least... drop-down list.
E-mail Tab
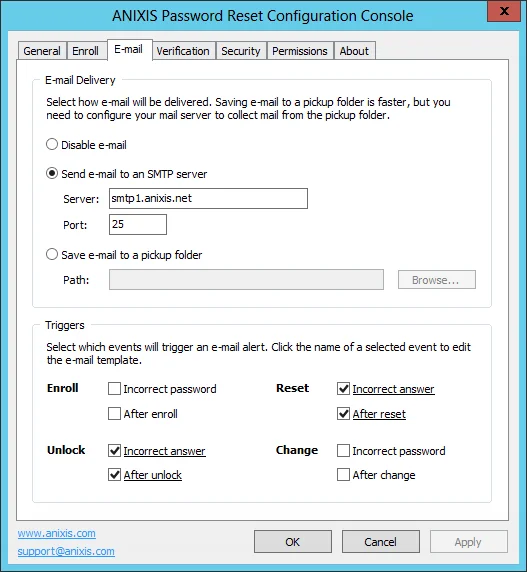
Use the E-mail tab to configure how e-mail is sent to users, when it is sent, and also to edit the e-mail templates.
E-mail Delivery
Password Reset can send e-mail alerts directly to an SMTP server, or save them to a pickup folder.
Select the Send e-mail to an SMTP server option if Password Reset should send e-mails directly
to an SMTP server. Type the name or IP address of an SMTP server in the Server text box, and the
SMTP port number in the Port text box.
Select the Save e-mail to a pickup folder option if APR should save e-mails to a folder for
delivery by a mail server. Click Browse... to select a folder. The mail server must monitor this
folder for new e-mail.
NOTE: Saving e-mail to a pickup folder is the fastest and most reliable delivery method. Use this option if your mail server supports pickup folders.
Triggers
Triggers define when e-mails are sent. If the trigger for an event is enabled, then Password Reset sends an e-mail when the event occurs. Enabled triggers are underlined.
Click the name of an enabled trigger to edit the trigger's e-mail template.
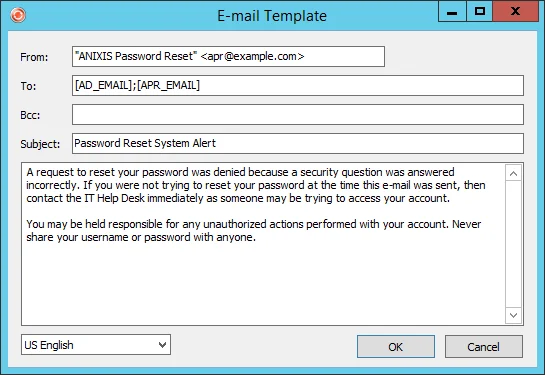
Type the name and e-mail address you wish to appear in the e-mail's From field in the From text
box. The correct format is "Display Name" <mailbox@domain.com>
Type the recipient's e-mail address in the To text box. The correct format is
"Display Name" <mailbox@domain.com>. Separate multiple recipients with a semicolon. You can also
use these macros.
| Macro | Replace with |
|---|---|
| [AD_EMAIL] | The e-mail address in Active Directory |
| [APR_EMAIL] | The e-mail address in Password Reset's database |
| [AD_OR_APR_EMAIL] | The e-mail address in AD, or the e-mail address in Password Resetif the AD address is blank |
| [APR_OR_AD_EMAIL] | The e-mail address in APR, or the e-mail address in AD if the Password Reset address is blank |
NOTE: Use [APR_OR_AD_EMAIL] with caution as Password Reset does not check the validity of e-mail addresses. If the e-mail address in Password Reset's database is no longer valid, then the alert is only sent to the invalid address.
Type additional recipient e-mail addresses in the Bcc text box if you want to send any blind carbon copies. Separate multiple recipients with a semicolon.
Type the e-mail's subject in the Subject text box.
Type the e-mail's body in the large text box. The e-mail is sent as plain text unless the body
contains the <html> tag. Include the entire HTML document when sending e-mail as HTML. You can
also use these macros.
| Macro | Replaced with |
|---|---|
| [AD_DOMAIN] | The user's Active Directory domain name |
| [AD_USER] | The user's Active Directory logon name |
Password Reset stores the user's preferred language every time they successfully complete an Enroll, Reset, Unlock, or Change. E-mail alerts are sent in the user's preferred language, or in the current Web Interface language if the user's preferred language is not known. If an e-mail template is not defined for the user's preferred language, then the alert is sent in English.
Use the drop-down list at the bottom of the E-mail template editor to switch between template
languages. Changes are preserved as you switch between languages. The From, To, and Bcc
are the same for all languages.
A warning icon is shown beside the language drop-down list if an e-mail template is not defined for
every language. You should define an e-mail template for every language to ensure that users can
understand their e-mail alerts.

CAUTION: An attacker may choose a specific language to avoid detection. E-mail alerts are sent in the Web Interface language chosen by the attacker if the target user has not enrolled or changed their password with Password Reset. The target user will receive the e-mail alerts, but they may not understand them. Use the Rest API to remind new users to enroll so their preferred language is known to Password Reset. See the Enabling the API topic for additional information.
Verification Tab
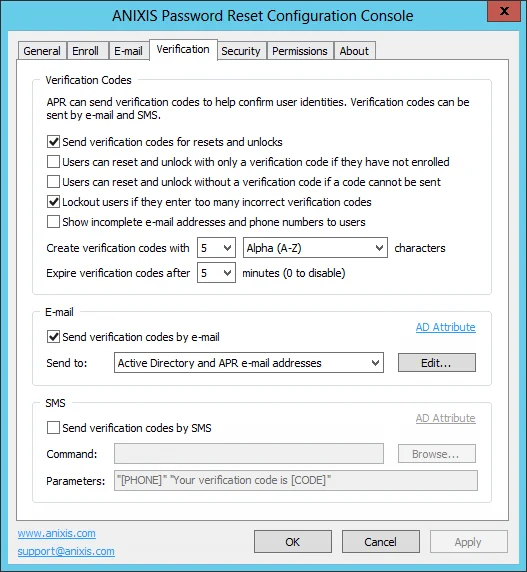
Use the Verification tab to enable verification codes for resets and unlocks. Verification codes are used for two-factor authentication, and to authenticate users that have not manually enrolled. A verification code is sent to the user's mobile phone by e-mail and/or SMS, and the user enters the verification code to continue.
Verification Codes
Select the Send verification codes for resets and unlocks check box to enable verification codes.
Select the Users can reset and unlock with only a verification code if they have not enrolled check box to enable automatic enrollment. Automatic enrollment allows users to reset their password and unlock their account even if they have not previously enrolled. Password Reset enrolls the users when they request a reset or unlock, and sends them a verification code for authentication. Users that are automatically enrolled can also manually enroll with questions later. Users that are only automatically enrolled cannot continue to reset their password and unlock their account if this option is subsequently disabled. Automatic enrollment should only be used with secure devices connected to a secure network, otherwise a stolen or lost device could be used to reset a user's password.
Automatically enrolled users:
- Do not have an Password Reset e-mail address, so verification codes are only sent to the user's Active Directory e-mail address and/or phone number.
- Must be authenticated with a verification code, so their reset or unlock request will be denied even if the Users can reset and unlock without a verification code if a code cannot be sent check box is selected.
- Need to manually enroll if the sending of verification codes, or automatic enrollments are disabled after they are automatically enrolled.
- Can manually enroll at any time. Authenticating users with questions and verification codes is more secure than using only verification codes.
- Are not sent the After Enroll e-mail alert.
Select the Users can reset and unlock without a verification code if a code cannot be sent check box if users should be allowed to continue when a verification code cannot be sent. Verification codes can only be sent to users that have a mobile phone number or e-mail address in Active Directory, or an e-mail address in Password Reset's database. Even if this information is present, an error could stop the verification code from being sent. If this check box is not selected, then users will need to contact the help desk if a verification code cannot be sent.
Select the Lockout users if they enter too many incorrect verification codes check box if the incorrect answer count should be incremented when users submit an incorrect verification code. A user's Password Reset record can be locked out if they enter too many incorrect answers or verification codes. The lockout threshold is set on the Security tab.
Select the Show incomplete e-mail addresses and phone numbers to users check box if APR should hide parts of the e-mail address and phone number when requesting a verification code. This is especially important if automatic enrollment is enabled, as it stops an attacker from discovering information about the user.

Verification codes are of a specified length, and may contain both alpha and numeric characters. Select the desired options from the Create verification codes with... drop-down lists. Longer, more complex (alphanumeric) verification codes are harder to guess, but also harder to enter. Verification codes do not need to be very long or complex if the verification code lockout and expiry features are enabled.
Select a value from the Expire verification codes after... drop-down list to limit how long users have to enter their verification code. Set it to 0 minutes if the verification code should not expire. A new verification code is sent for every reset and unlock. This setting limits how long a user has to enter their verification code, it does not allow old verification codes to be reused.
E-mail
Select the Send verification codes by e-mail check box to send verification codes to users via e-mail. You must configure the E-mail delivery options in the E-mail tab to send verification codes by e-mail. See the E-mail Tab topic for additional information.
Verification codes can be sent to the Active Directory e-mail address and/or the Password Reset e-mail address. Select the desired option from the Send to drop-down list.
Click Edit... to edit the e-mail template for verification codes. The [CODE] macro is replaced with the verification code, so include the [CODE] macro in the e-mail subject or body.
The user's Active Directory e-mail address is read from the mail attribute by default. Click AD Attribute if you want to use an e-mail address from a different attribute. Type the name of the attribute, and then click OK.
SMS
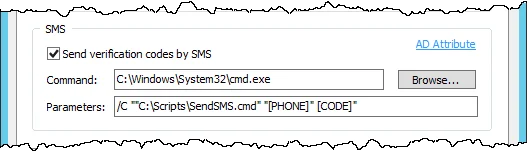
Select the Send verification codes by SMS check box to send verification codes to users via SMS. Any SMS provider with a Windows command-line interface (CLI) can be used.
Click Browse... to select the executable that sends the SMS. The executable is supplied by your SMS provider.
Type the command-line parameters in the Parameters text box. Refer to your SMS provider's documentation for the expected parameters. You can also use the macros in the table below. Use quotes around parameters and macros that may contain space characters.
| Macro | Replaced with |
|---|---|
| [CODE] | Verification code |
| [PHONE] | User's Active Directory phone number |
| [USERNAME] | User's Active Directory user login name |
| [DOMAIN] | User's Active Directory domain name |
| [LANG] | Current Web Interface language code |
The user's Active Directory mobile phone number is read from the mobile attribute by default. Click AD Attribute if you want to use a phone number from a different attribute. Type the name of the attribute, and then click OK.
NOTE: Use a script to perform additional processing before sending the SMS. For example, a script could read the user's phone number from a database, or send a language-specific SMS based on the value of the [LANG] macro. Put the path of the scripting engine executable in the Command text box, and the path to the script file and other parameters in the Parameters text box.
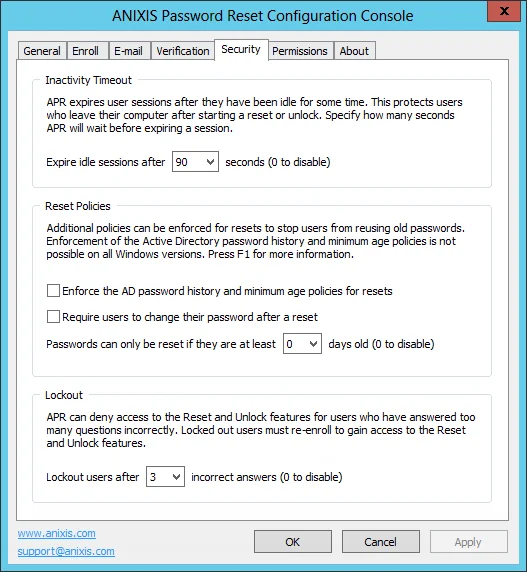
Security Tab
Use the Security tab to configure the inactivity timeout, password reset policies, and the lockout threshold.
Inactivity Timeout
Users should remain at their computer while resetting their password or unlocking their account. Their account could be compromised if they leave their computer after answering the first question. APR protects user accounts by expiring sessions if users take too long to respond. Select the inactivity timeout from the Expire idle sessions after... drop-down list. Set it to 0 seconds to disable the inactivity timeout.
Reset Policies
Select the Enforce the AD password history and minimum age policies for resets check box to enforce these Active Directory password policies during a reset. Older Windows versions cannot enforce these policies for password resets. This capability was added as a hotfix for Windows 2008 and 2008 R2. See the KB2386717 Microsoft knowledge base article for additional information. The hotfix is included with SP1 for Windows 2008 R2, and is a standard feature on later Windows versions.
Users are more likely to forget a password shortly after changing it. Enforcing a minimum age for password resets may increase the number of help desk calls because users won't be able to reset recently changed passwords. One solution is to clear the check box above, and select the Require users to change their password after a reset check box instead. The Active Directory password history policy won't be enforced for the password reset, but it will be enforced for the password change when the user logs on. This stops users from reusing a recent password, but it won't stop them from resetting a recently changed password.
Users whose passwords are set to never expire in Active Directory will not be forced to change their password during logon, even if this check box is selected.
NOTE: Password Policy Enforcer's History rule is enforced for password resets if the Enforce policy when password is reset check box is selected in the PPS properties page, and if the Enforce this rule when a password is reset check box is selected in the History rule's properties page. Netwrix Password Policy Enforcer does not enforce the Minimum Age rule for password resets. See the Netwrix Password Policy Enforcer topic for additional information.
Users may try to evade the password history policy by resetting their password several times in quick succession to push a password off the password history list. Select a value from the Passwords can only be reset if they are at least... drop-down list to stop users from doing this. Set it to 0 days to disable this feature. If the Active Directory minimum password age policy is also enforced for password resets, then the effective minimum age is the greater of the AD and APR minimum ages.
Lockout
Password Reset's lockout should not be confused with the Windows lockout policy. A Windows lockout stops users from logging on, whereas an Password Reset lockout stops users from resetting their password and unlocking their account. Windows locks out users when they enter too many incorrect passwords. Password Reset locks out users when they enter too many incorrect answers or verification codes.
Select a value from the Lockout user after... drop-down list to specify how many incorrect answers Password Reset accepts before locking out a user. Set it to 0 incorrect answers to disable the lockout feature. Incorrect verification codes are counted as incorrect answers if the Lockout users if they enter too many incorrect verification codes check box is selected on the Verification tab.
NOTE: Locked out users must re-enroll before they can use Password Reset to reset their password or unlock their account. The incorrect answer count is reset when a user enrolls, or answers all questions during a reset or unlock.
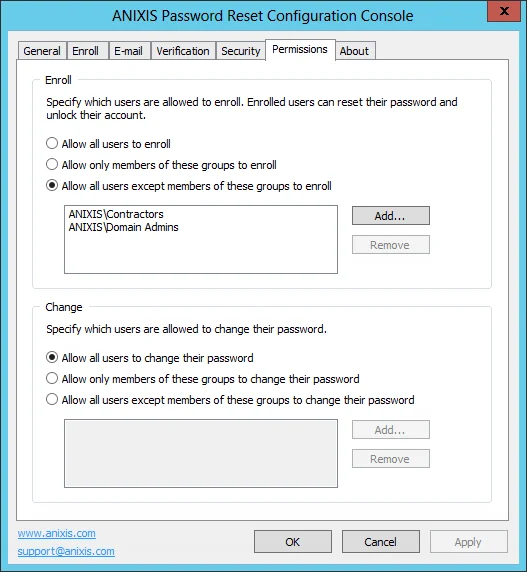
Permissions Tab
Use the Permissions tab to control which users can use Password Reset.
Enroll
Select the Allow all users to enroll option if all users are permitted to enroll. Only enrolled users can reset passwords and unlock accounts.
Select the Allow only members of these groups to enroll option if users are permitted to enroll only if they belong to a specified group. Click Add... to choose which groups are permitted to enroll.
Select the Allow all users except members of these groups to enroll option if users are permitted to enroll unless they belong to a specified group. Click Add... to choose which groups are not permitted to enroll.
To remove a group from the list, select it and then click Remove. Enrolled users can continue to reset their passwords and unlock their accounts even if they are no longer allowed to enroll.
Change
These settings specify which users can change their password with Password Reset.
About Tab
Use the About tab to check the version and license information, and to install a new license key.
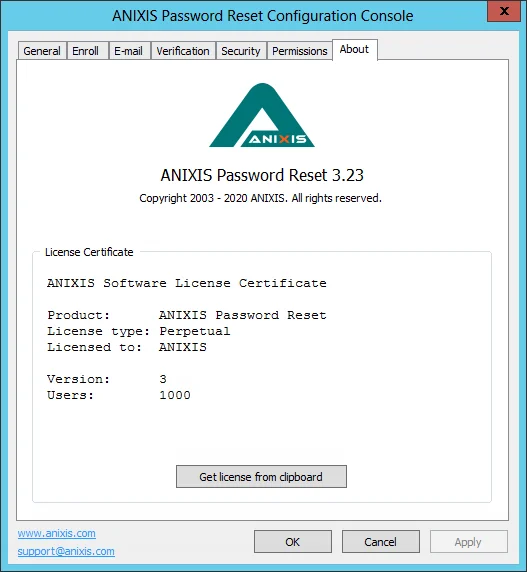
To install a new license key, copy the entire license e-mail to the clipboard, and then click Get license from clipboard.
NOTE: Password Reset includes a 30-day evaluation license for up to 50 users. Please contact Netwrix support if you would like to evaluate Password Reset with more than 50 users.