Microsoft Entra ID connection
More and more companies use cloud services. Therefore, also the management of users is outsourced. Instead of a classic Active Directory via LDAP, an Entra ID is used more often. Netwrix Password Secure integrates the possibility to bring in users and roles from Azure. To use users and roles from multiple Entra IDs, you can create multiple profiles.
Introduction
Why Entra ID?
More and more companies use cloud services. Therefore, also the management of users is outsourced. Instead of a classic Active Directory via LDAP, an Entra ID is used more often. Netwrix Password Secure integrates the possibility to bring in users and roles from Azure. To use users and roles from multiple Entra IDs, you can create multiple profiles.
Remember, In order to use Azure login with the windows application, WebView2 from Microsoft must be installed on the client device.
Differences to the LDAP connection
The connection to the Entra ID differs in one special point from the connection to a conventional Active Directory. While Netwrix Password Secure queries the users, groups, and roles actively from the conventional AD, the Entra ID is pushing them automatically to our server. For this a so-called SCIM service is used.
To login to Netwrix Password Secure, after entering the username a popup opens for the authentication with the entered Microsoft account. Here, a possible configured second factor is also requested. The authentication is handled via the Open ID Connect protocol.
Linking Entra ID
Below you will find instructions on how to connect Entra ID to Netwrix Password Secure. In the Azure portal, go to the management page of your Microsoft Entra ID. Use an account with administrative permissions for this. During this, login to Netwrix Password Secure with an account that has the user right "Display organisational structure module", "Can manage Entra ID profiles", and "Can create new Entra ID profiles" enabled.
Setup
New enterprise application
Login to the Azure portal and go to the management page of your Microsoft Entra ID.
NOTE: You need an account with administrative permissions
- Write down your "Tenant ID" shown in the Azure console or by using PowerShell:
Connect-AzureAD
- Navigate in your Entra ID to "Enterprise applications"
- Add an own application, that is not listed in the Azure Gallery – in our example, we name it "Netwrix Password Secure"
NOTE: A key feature of Netwrix Password Secure is, that it is self-hosted by our customers. However, to be listed in Azure Gallery, a SaaS model is required. Therefore, Netwrix Password Secure is not available in the Azure Gallery.
- When the application was created successfully, you are redirected to it automatically
- Write down the "Application ID"
- In the navigation, click "Users and groups"
- Add the Users and groups that should be available to Netwrix Password Secure
CAUTION: The import of Azure groups as Netwrix Password Secure roles is only possible if you have booked the Azure package Entra ID Premium P1!
- Navigate to the "Provisioning" page
- Configure the Provisioning Mode to "Automatic"
Netwrix Password Secure Entra ID configuration
NOTE: Your Netwrix Password Secure user need the following permissions:
- Display organisational structure module
- Can manage Azure AD profiles
- Can create new Azure AD profiles
- Navigate to the module "Organisational structure"
- In the toolbar, click on "Manage profiles" in the category "Entra ID"
- Create the profile with your information
- Insert the
Tenant IDand theApplication ID - As soon as the profile has been saved, a popup opens for generating a token
- Choose a desired expiration date (max. 10 years) and click "Generate token"
- Write down the values of the fields "Tenant URL" and "Secret Token"
Azure provisioning configuration
Fill the fields "Tenant URL" and "Secret Token" with the information provided by Netwrix Password Secure Click "Test Connection" When the test has been successful, click on "Save" at the top of the page Back on the "Provisioning" page, click "Start provisioning" In the settings of the provisioning, check if "Provisioning Status" is set to "On" All allocated users and groups are created in Netwrix Password Secure now
NOTE: Azure´s default provisioning interval is 40 Minutes. So it may some time until the users and roles are shown in Netwrix Password Secure.
CAUTION: Please note that Azure establishes the connection to Netwrix Password Secure. For this, the client URL must be accessible from an external network / provisioning agent and any used SSL certificate must be valid! If the users are not created in Netwrix Password Secure, consult the Azure Enterprise Application Provisioning log for more information.
Azure login configuration
To enable the Azure login for your users, a few more steps are required:
- Navigate to the Overview page of your Entra ID
- Navigate to "App registrations"
- If no application is displayed, click "All applications"
- Click on "Netwrix Netwrix Password Secure" and navigate to "Authentication"
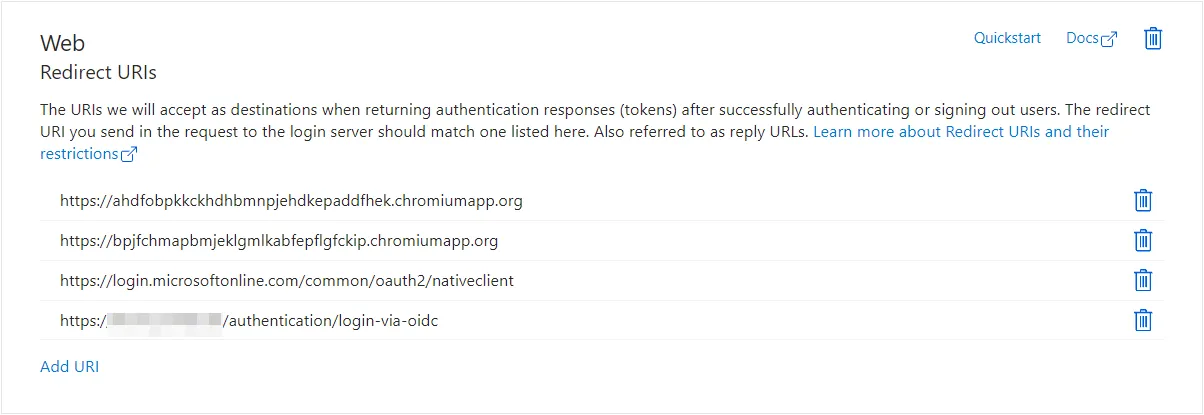
- Click on "Add a platform", select "Web" and configure the required URIs:
| Client | URI |
|---|---|
| Web Application | https://Web Application_URL/authentication/login-via-oidc |
| Advanced view & Autofill | https://login.microsoftonline.com/common/oauth2/nativeclient |
| Google Chrome Extension | https://bpjfchmapbmjeklgmlkabfepflgfckip.chromiumapp.org |
| Microsoft Edge Extension | https://ahdfobpkkckhdhbmnpjehdkepaddfhek.chromiumapp.org |
| Firefox Extension | https://28c91153e2d5b36394cfb1543c897e447d0f1017.extensions.allizom.org |
Click on "Add a platform", select "Mobile & desktop applications" and configure the required mobile-app URI:
| Client | URI |
|---|---|
| iOS & Android | psrmobile://auth |

Create client secret
Navigate to your Netwrix Netwrix Password Secure App registration -> Certificates & secrets -> Client secret
Create a client secret:
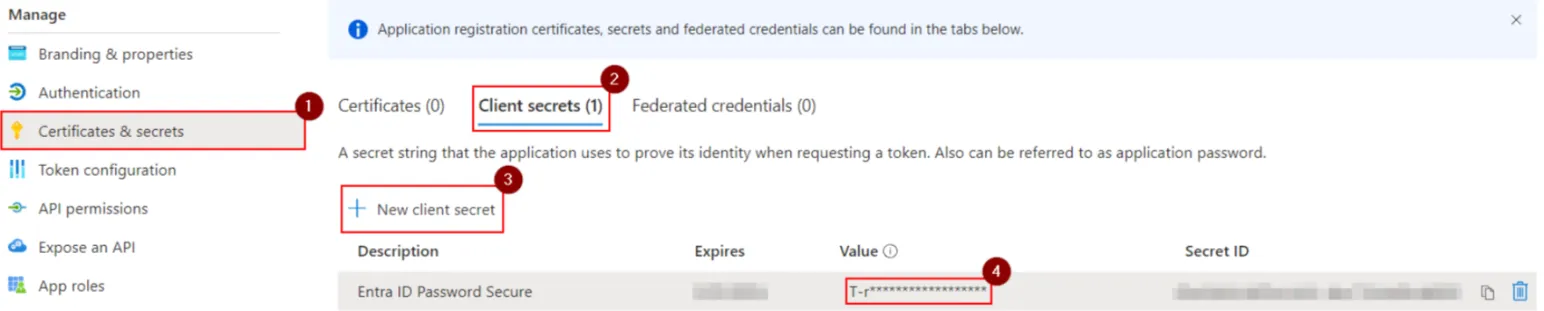
Copy it over to the Netwrix Password Secure Entra ID profile:

Set API permissions
Finally, the API permissions for the Azure API have to be set, so the login to can be performed successfully.
- Navigate to "API permissions" and click "Add a permission"
- Select "Microsoft Graph" and then "Delegated permissions"
- Set the checkboxes for "openid" and "profile" just under "OpenId permissions"
- Click on "Add permissions"
- Click on "Grant admin consent for YOUR_AD_NAME"
Microsoft Entra ID Services FAQ
Is it possible to migrate from LDAP to Entra ID?
Currently, an automated migration from LDAP users (E2E as well as MasterKey) to Entra ID users is not possible!
Which port is used for the SCIM endpoint for provisioning users/groups from Entra ID to the Application Server?
11015 is the port that will be used for the communication from Entra ID to Netwrix Password Secure.
Does the Entra ID connection support nested groups?
Due to Azure based technical limitations, Netwrix Password Secure does not support nested groups.
Does Entra ID work on servers that are only available internally?
An integration on servers, that are not accessible from external sources, the integration of Entra
ID is also possible. For this, you can use the
Entra ID on-premises application provisioning to SCIM-enabled apps.
This can be installed on all or only one application server. It must be noted that the IP or DNS
name of the "Tenent URL" specified in the subsequently created enterprise application is present in
the alternative application names in the server certificate. Tip: https://127.0.0.1:11015/scim can
also be specified as the "Tenent URL", in which case 127.0.0.1 must again be present in the
alternative application names in the server certificate.
- Download the Provisioning Agent
- Install the Provisioning Agent on the server with the Netwrix Password Secure Server
- Start "AAD Connect Provisioning Agent Wizard"
- Select "On-premises application provisioning Entra ID to application", click next
- Click "Authenticate" and authenticate with a user.This user should be a Hybrid administrator or a global administrator.
- Click "Confirm"
- Wait for the application to finish the registration in Azure
- Switch to the Azure Portal
- Click "Microsoft Entra ID"
- Click "Enterprise applications"
- Click "New application"
- Search for "On-premises SCIM app"
- Click "On-premises SCIM app"
- Adjust the name
- Click "Create"
- Wait for the operation to end
- Click the created application in the overview of "Enterprise applications"
- Click "Provisioning"
- Click "Get started"
- Set provisioning mode "Automatic"
- Unhide "On-Premises Connectivity"
- Assign the just installed agent to this application by selecting it and click "Assign Agent(s)"
- It takes about 20 minutes until the agent is correctly connected to your application and you can proceed.