Configuring Email for PingCastle Enterprise
Email
PingCastle Enterprise sends email for password reset requests and notifications, including weekly reports. Configure email on Configuration > Settings > Email in the PingCastle Enterprise web interface.
Most changes on this screen take effect within about 30 seconds, without a restart. A few settings across the Settings UI require a restart, and PingCastle Enterprise schedules that restart automatically when needed.
Choosing an email provider
Select one of two providers under Email Provider:
- SMTP — Sends email through a traditional SMTP server.
- Microsoft Graph — Sends email through the Microsoft Graph API using OAuth 2.0 authentication. Choose this option for Office 365 environments that require modern authentication instead of a shared mailbox password.
Both providers share two common fields:
- From Address — The email address that appears as the sender on messages PingCastle sends.
- From Display Name — The display name that appears alongside the From address.
Configuring the SMTP provider
When you select SMTP as the email provider, configure these fields:
- SMTP Host — The fully qualified domain name (FQDN) or IP address of the SMTP server.
- SMTP Port — The port the SMTP server listens on. Common values are 25 (unencrypted), 465, and 587 (TLS/SSL).
- SMTP Login — The username PingCastle uses to authenticate to the SMTP server. Leave this field blank if the server doesn't require authentication.
- SMTP Password — The password for the SMTP login. Leave this field blank if the server doesn't require authentication.
- Enable SSL — Encrypts the connection to the SMTP server. Enable this option when your SMTP server requires TLS/SSL, such as on port 465 or 587.
Configuring the Microsoft Graph provider
When you select Microsoft Graph as the email provider, configure these fields:
- Tenant ID — The Entra ID tenant ID for your organization.
- Client ID — The application (client) ID from the Entra ID app registration that PingCastle uses to send email.
- Authentication Method — The credential type the app registration uses: a client secret or a certificate.
- Client Secret — The application's client secret. This field applies only when you set Authentication Method to client secret.
- Certificate fields (location, file, thumbprint, store location, and store name) — These fields apply only when you set Authentication Method to certificate. They identify which certificate PingCastle uses to authenticate.
See Modern authentication with Office 365 using Graph API for the full walkthrough on setting this up securely.
Notifications
Configuring the web host
Configure these fields on Configuration > Settings > Notifications:
- Webhost — The base URL PingCastle Enterprise uses when it builds links in outgoing emails, such as links back to a report or the login page. Set this to the URL your users use to reach PingCastle Enterprise.
For example, if your PingCastle Enterprise instance is reachable at https://pingcastle.contoso.com, set Webhost to that address so email links resolve correctly for recipients.
Configuring reminders and the weekly report
PingCastle Enterprise can remind administrators before scheduled items expire and can send a weekly summary report. Configure these fields on Configuration > Settings > Notifications.
- Default Domain Reminder Days — The number of days before an Active Directory domain's scheduled review that PingCastle sends a reminder email.
- Default Entra Reminder Days — The number of days before an Entra ID tenant's scheduled review that PingCastle sends a reminder email.
- Monday Hour — The hour of the day, on Mondays, when PingCastle sends the weekly report.
For example, setting Default Domain Reminder Days to 7 sends a reminder email one week before a domain's next scheduled review.
Modern authentication with Office 365 using Graph API
PingCastle Enterprise supports sending emails using Microsoft Graph API with modern authentication. Netwrix recommends this method for Office 365 environments, as it provides enhanced security through OAuth 2.0 authentication.
This configuration uses RBAC for Applications (Role-Based Access Control for Applications) in Exchange Online, which allows the application to send emails from a specific shared mailbox without requiring a user account with mailbox access permissions.
Prerequisites:
Before starting this configuration, ensure you have:
- Global Administrator or Exchange Administrator permissions
- Application Developer permissions in Entra ID
- Exchange Online PowerShell module installed or use the Cloud Management Shell
- Microsoft Graph PowerShell module installed (optional, for PowerShell automation)
This configuration uses "PingCastle-Email" throughout as an example name. You can substitute any name that fits your organization's naming conventions.
Create and Export Certificate (For Entra ID Certificate Authentication)
If you prefer certificate-based authentication instead of client secrets, use this PowerShell script to create and export a self-signed certificate:
# Create Self-Signed Certificate for use with Entra App Registration for dev environments.
$Name = "PingCastle-Email"
$password = "ENTER PASSWORD"

# Create a self-signed certificate
$cert = New-SelfSignedCertificate -Subject "CN=PingCastle-Email" -CertStoreLocation "Cert:\LocalMachine\My" -KeyExportPolicy Exportable

# Create a password for the PFX
$pwd = ConvertTo-SecureString -String $password -Force -AsPlainText

# Export the certificate as PFX
Export-PfxCertificate -Cert $cert -FilePath "$env:USERPROFILE\$Name.pfx" -Password $pwd

# Export the certificate as CER for Entra
Export-Certificate -Cert $cert -FilePath "$env:USERPROFILE\PingCastle-Email.cer" -Type CERT

Write-Output "Certificate exported to: $env:USERPROFILE\$Name.pfx"
For production environments, use certificates issued by your organization's Certificate Authority (CA) instead of self-signed certificates.
- Manual Configuration
- PowerShell Automation
Part 1: Create Entra ID app registration
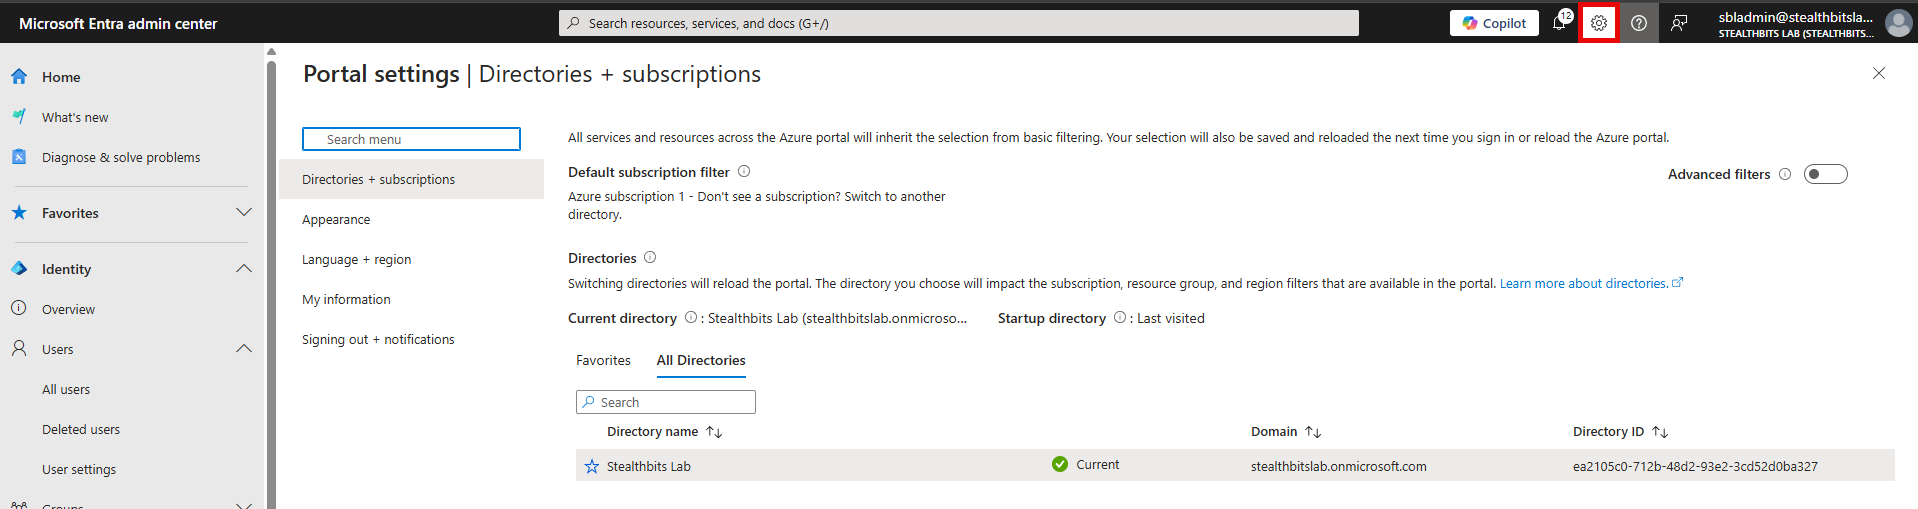
Step 1: Access the Microsoft Entra admin center
- Open a web browser and navigate to https://entra.microsoft.com
- Sign in with your administrator account
- If you have access to multiple tenants, use the Settings gear icon in the top menu to switch to the correct tenant
Step 2: Navigate to app registrations
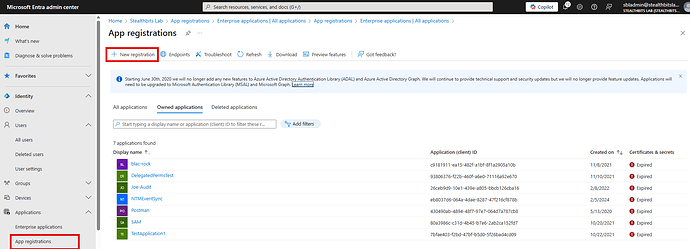
- In the left navigation pane, expand Identity
- Click Applications
- Select App registrations
- Click + New registration at the top of the page
Step 3: Configure application registration
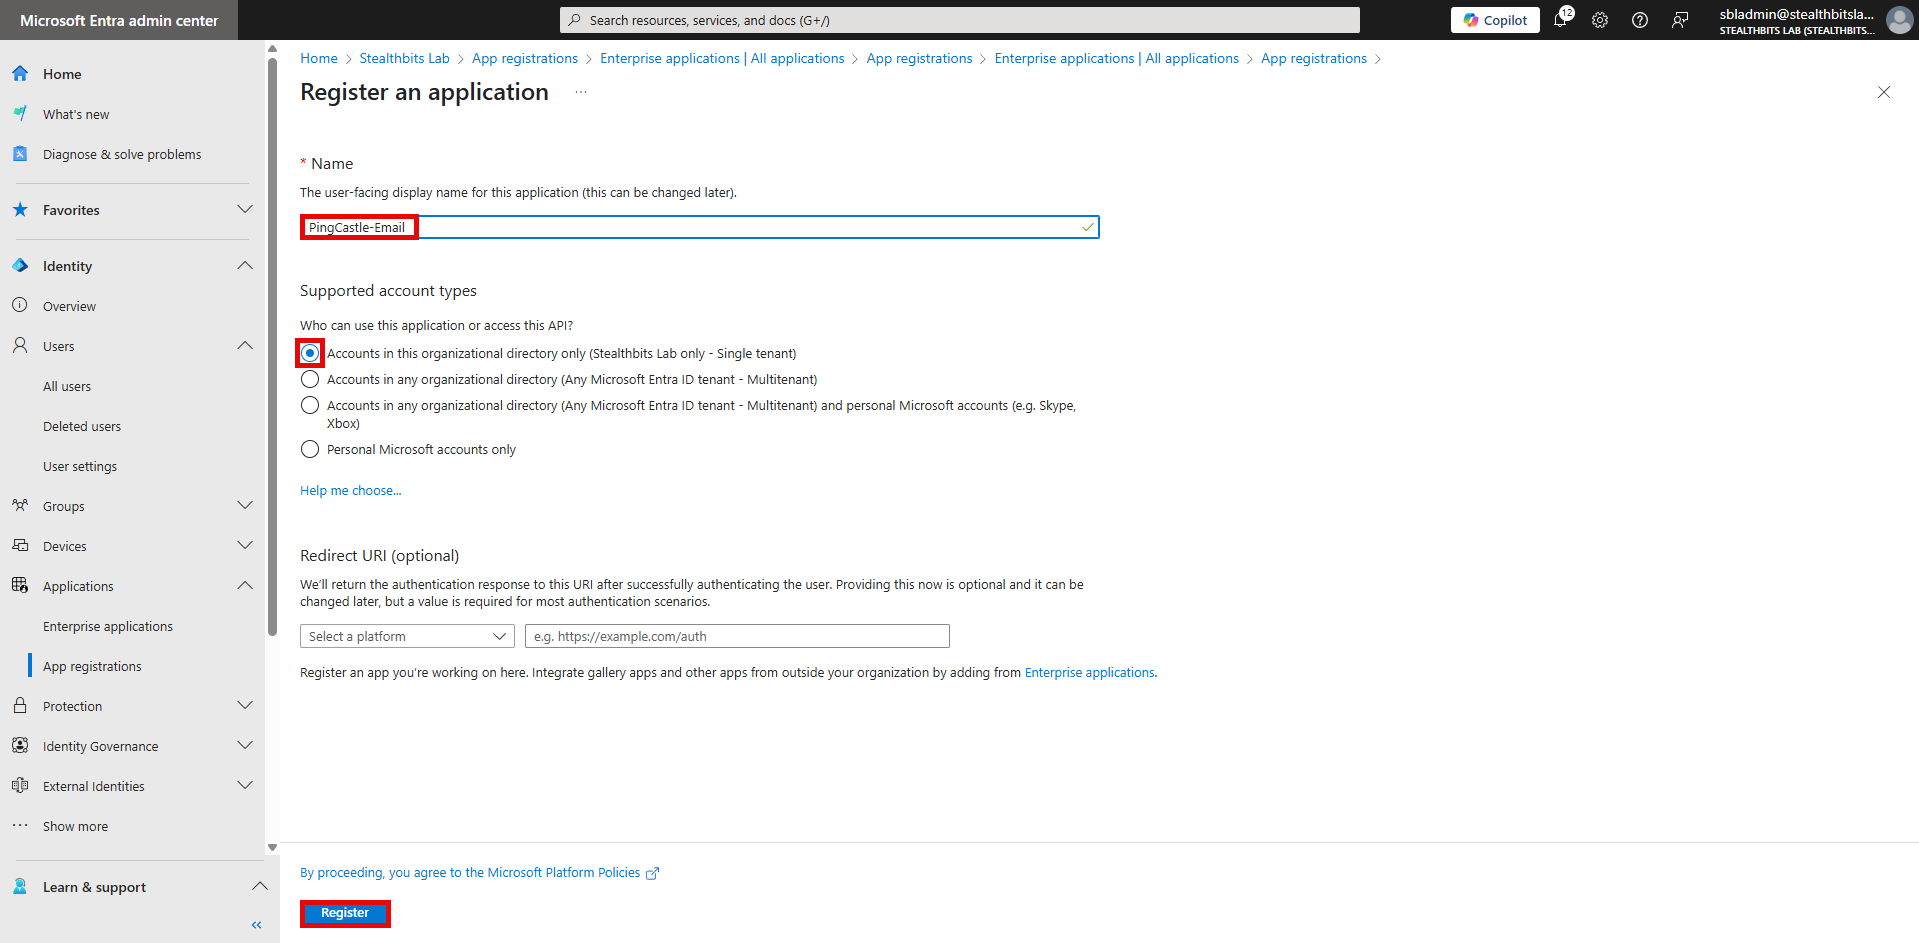
- In the Name field, enter:
PingCastle-Email - Under Supported account types, select Accounts in this organizational directory only
- Leave Redirect URI (optional) blank for now
- Click Register
Step 4: Create client secret
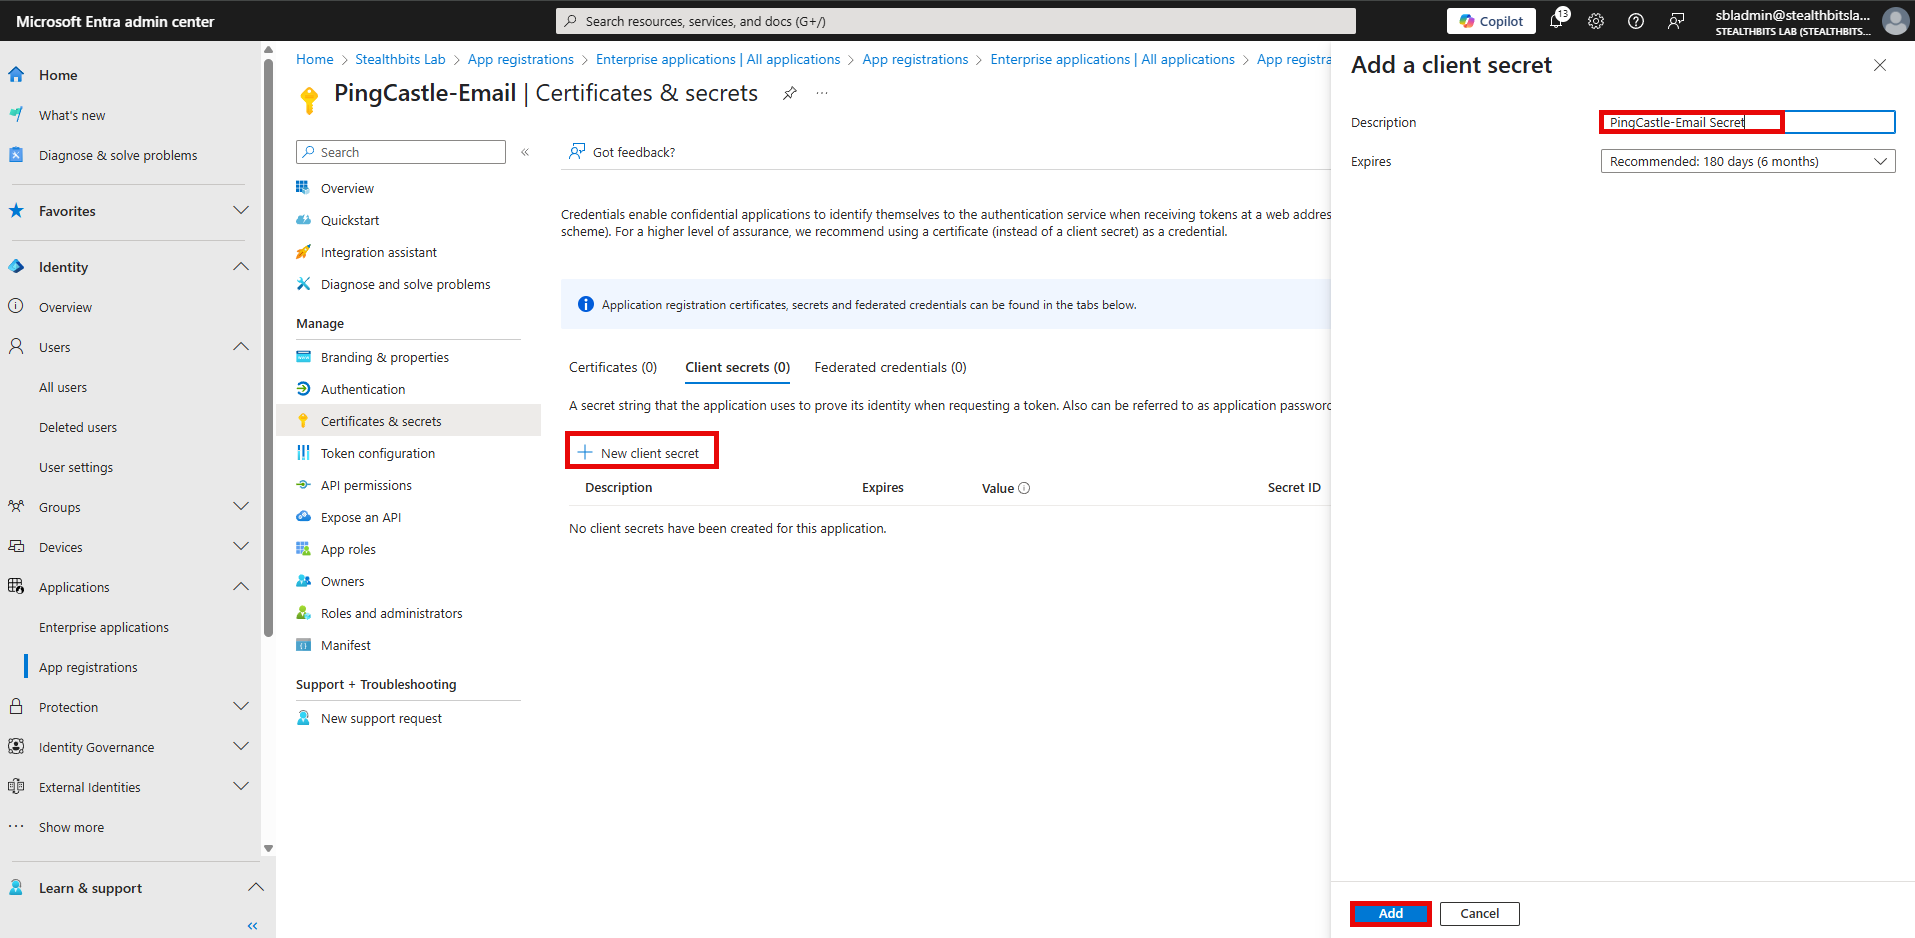
- In the left menu under Manage, click Certificates & secrets
- Click + New client secret
- Add a description:
PingCastle-Email Secret - Set expiration to 12 months (or as per your policy)
- Click Add
- Important: Copy the secret Value immediately - you won't see it again
- Paste it in Notepad or a password manager for later use
If you misplace your secret, you can return to this screen and generate a new one.
Part 2: Create shared mailbox
Step 5: Access the Exchange admin center
- Navigate to https://admin.exchange.microsoft.com
- Sign in with your Exchange administrator account
- In the left navigation, expand Recipients
- Click Mailboxes
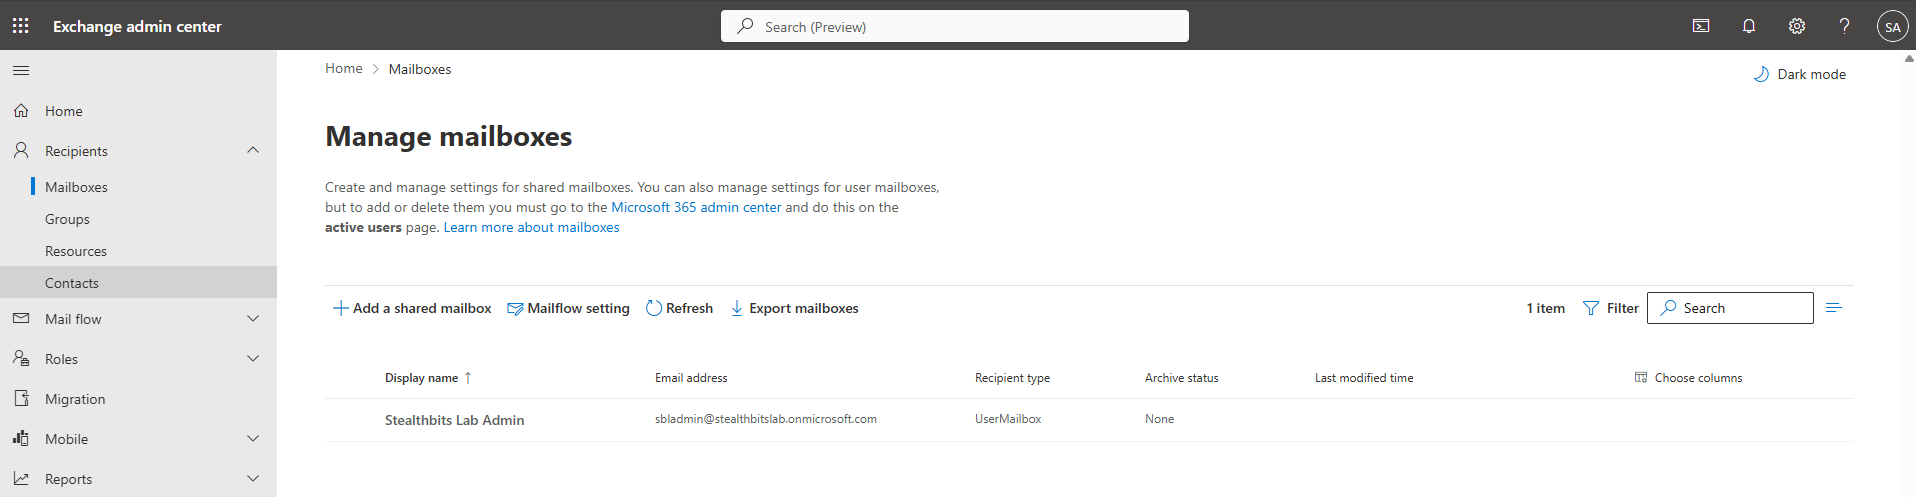
Step 6: Create shared mailbox
- Click + Add a shared mailbox
- Fill in the following details:
- Display Name: PingCastle
- Email Address: pingcastle (the domain should auto-populate with your domain)
- Alias: pingcastle (optional)
- Click Create
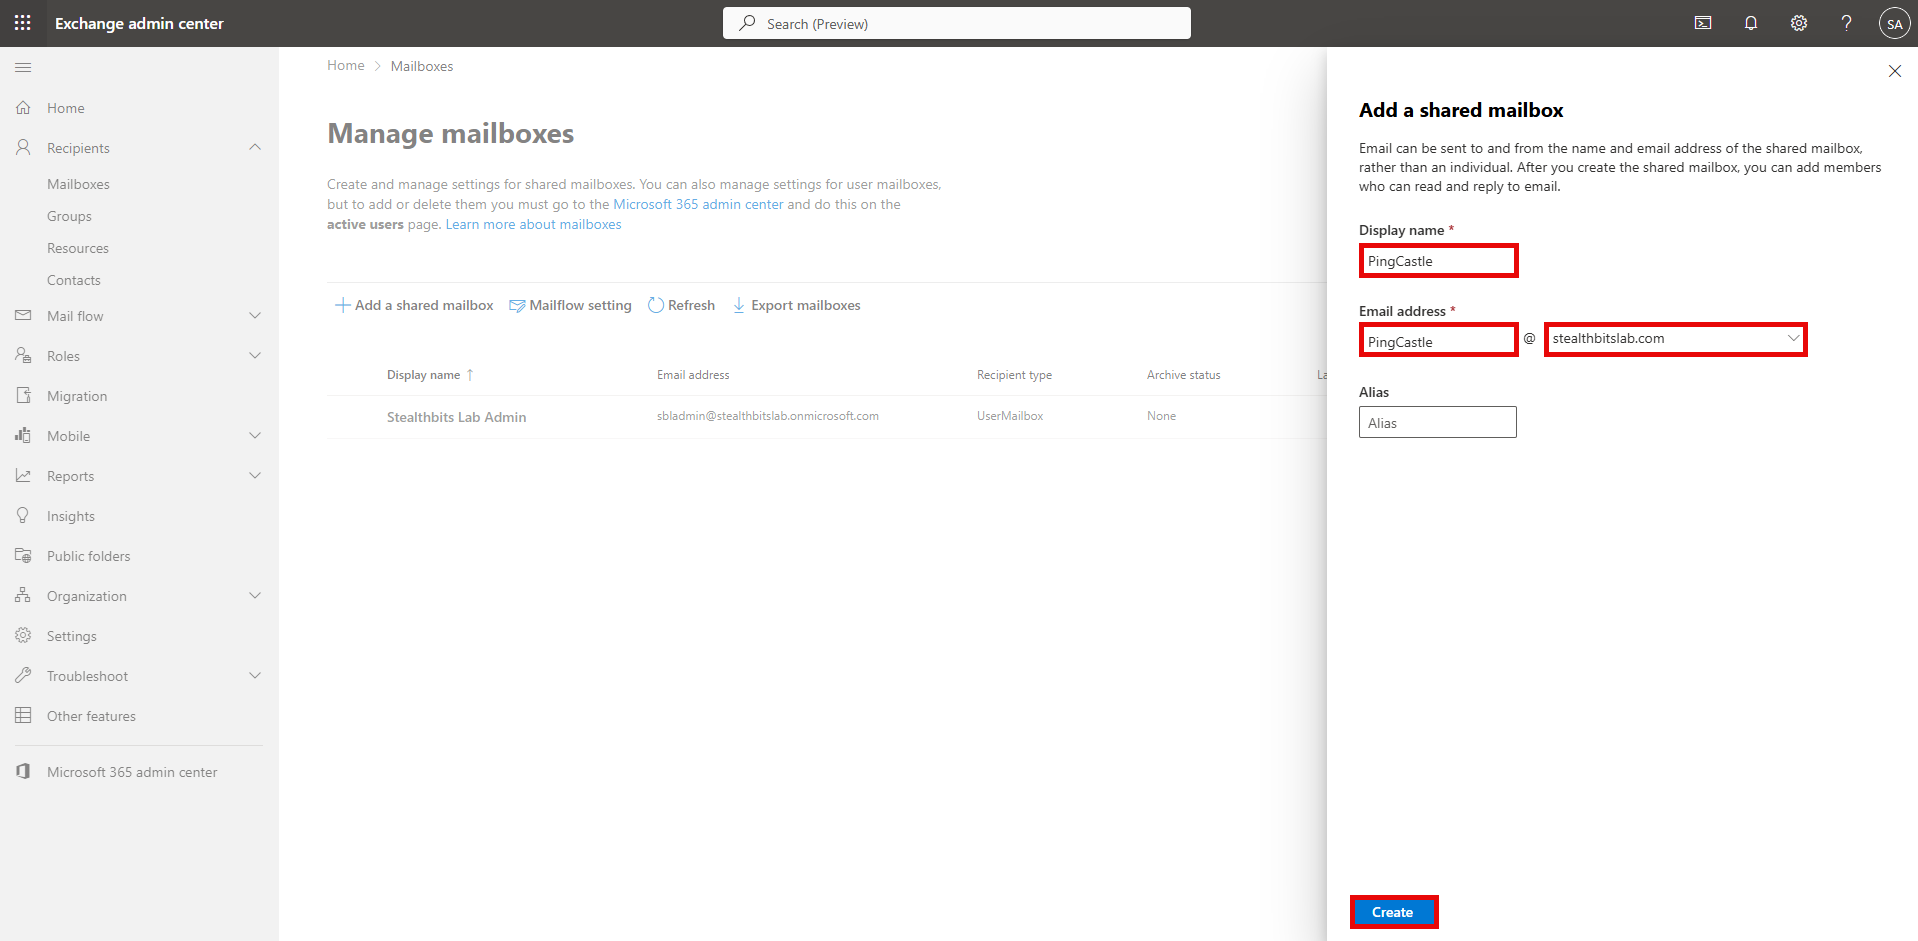
Step 7: Verify shared mailbox creation
- Wait for the mailbox creation process to complete
- Verify the mailbox appears in the mailboxes list
- Note the full email address (e.g.,
pingcastle@yourdomain.com)
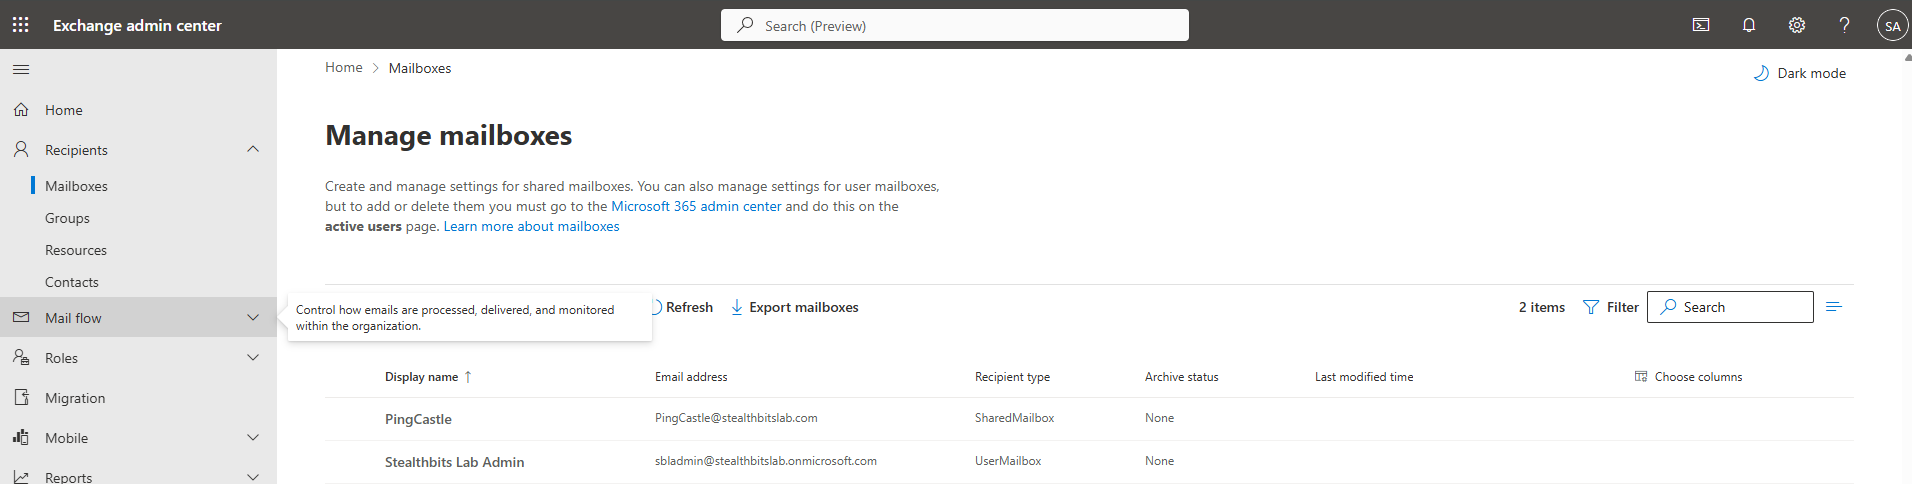
Step 8: Block shared mailbox sign-in
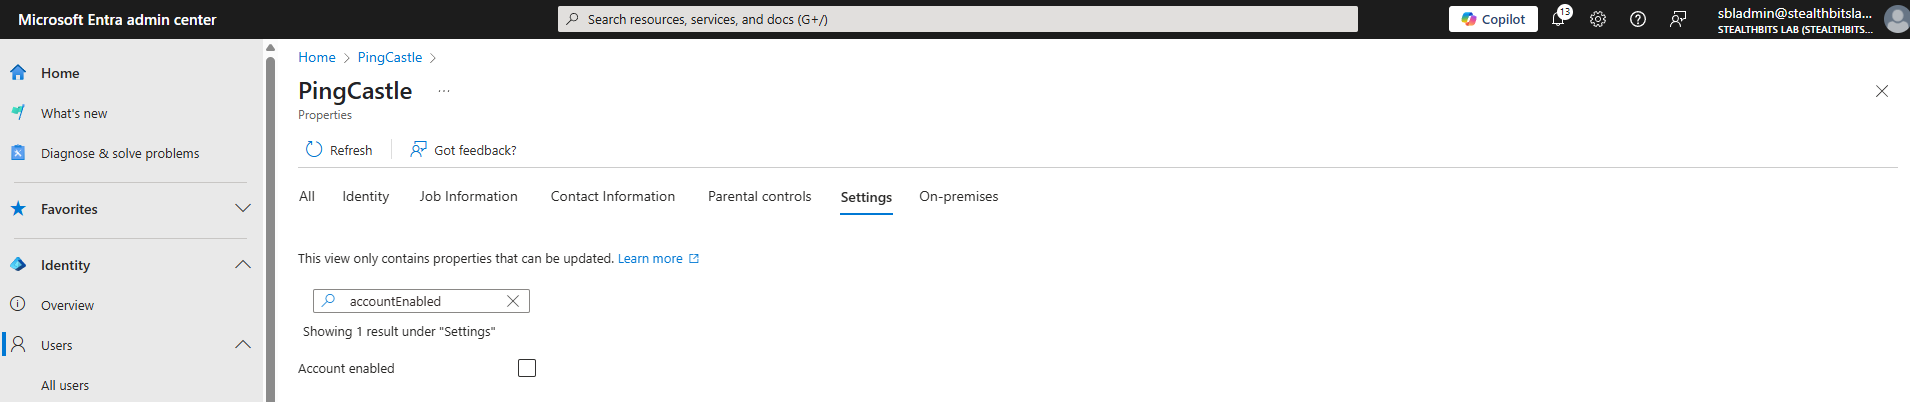
This should be automatically configured, but verify it:
- Navigate to https://entra.microsoft.com/
- Go to Users > All Users
- Search for and select the user account corresponding to the shared mailbox
- Click Edit Properties
- Click the Settings tab
- Ensure the Account Enabled checkbox is unchecked
- Click Save
Part 3: Configure RBAC for applications
Step 9: Connect to Exchange Online PowerShell
Open Windows PowerShell as Administrator and run the following commands:
# Install Exchange Online Management module if not already installed
Install-Module -Name ExchangeOnlineManagement -Force -AllowClobber

# Import the module
Import-Module ExchangeOnlineManagement

# Connect to Exchange Online
Connect-ExchangeOnline
Step 10: Create service principal
Using the values from your app registration, create the service principal:
# Define variables (replace with your actual values)
$AppId = "YOUR_APPLICATION_CLIENT_ID"
$ObjectId = "YOUR_APPS_SERVICE_PRINCIPAL_OBJECT_ID" # Get this from the Enterprise Applications screen in Entra ID

# Create Service Principal
New-ServicePrincipal -AppId $AppId -ObjectId $ObjectId -DisplayName "PingCastle-Email"
The $ObjectId is the Service Principal Object ID from Enterprise Applications, not the Object ID from App Registrations.
Step 11: Create management scope
Create a management scope that restricts access to only the PingCastle shared mailbox:
# Create Management Scope
$EmailAddress = "pingcastle@yourdomain.com" # The email address of the shared mailbox
New-ManagementScope -Name "PingCastle-Email-Scope" -RecipientRestrictionFilter "EmailAddresses -eq '$EmailAddress'"
Step 12: Assign application role
Assign the Application Mail.Send role to the service principal with the custom scope:
# Create Role Assignment
$ExchangeSPObjectId = "" # The Exchange Service Principal Object Id (This is output in Step 10)
New-ManagementRoleAssignment -Role "Application Mail.Send" -App $ExchangeSPObjectId -CustomResourceScope "PingCastle-Email-Scope"
Part 4: Test configuration
Step 13: Test service principal authorization
Verify the configuration works correctly:
# Test Service Principal Authorization
$EmailAddress = "pingcastle@yourdomain.com" # The email address of the shared mailbox
$ExchangeSPObjectId = "" # The Exchange Service Principal Object Id (This is output in Step 10)

Test-ServicePrincipalAuthorization -Identity $ExchangeSPObjectId -Resource $EmailAddress
Expected Output:
- RoleName: Application Mail.Send
- InScope: True
Step 14: Verify scope restriction
Test that the service principal can't access other mailboxes:
# Test with a different email address
$EmailAddress = "otheruser@yourdomain.com" # A random email that the application should not be able to send as
$ExchangeSPObjectId = "" # The Exchange Service Principal Object Id (This is output in Step 10)

Test-ServicePrincipalAuthorization -Identity $ExchangeSPObjectId -Resource $EmailAddress
Expected Output:
- InScope: False
This confirms the application can only send from the designated shared mailbox.
Automated Configuration with PowerShell
This PowerShell function automates the complete process of creating an Entra ID app registration, shared mailbox, and configuring RBAC for Applications in Exchange Online.
<#
.SYNOPSIS
    Advanced PowerShell function to automate RBAC for Applications setup in Exchange Online

.DESCRIPTION
    This function automates the complete process of creating an Entra ID app registration,
    shared mailbox, and configuring RBAC for Applications in Exchange Online.

    Specifically designed for PingCastle-Email configuration.

.PARAMETER TenantId
    The Entra ID tenant identifier (GUID) where the application and service principal will be created.

.PARAMETER ClientSecretExpiration
    The lifetime of the client secret in months. Defaults to 12.

.PARAMETER SharedMailboxDomain
    The SMTP domain portion for the new shared mailbox (e.g. "contoso.com").

.PARAMETER CertificateAuth
    Switch to enable certificate-based authentication instead of client secret.

.PARAMETER CertificatePath
    File system path to the certificate (PFX) to use when CertificateAuth is enabled.

.PARAMETER AppName
    The display name of the Entra ID application to create. Defaults to "PingCastle-Email".

.PARAMETER ServicePrincipalName
    The name of the service principal for the application. Defaults to "PingCastle-Email".

.PARAMETER ManagementScopeName
    The name of the custom role scope to assign to the service principal. Defaults to "PingCastle-Email".

.PARAMETER SharedMailboxName
    The local part of the shared mailbox alias. Defaults to "pingcastle-email".

.PARAMETER SharedMailboxDisplayName
    The display name for the shared mailbox. Defaults to "PingCastle-Email".

.EXAMPLE
    Set-PingCastleEmailRBAC -TenantId "your-tenant-id" -SharedMailboxDomain "contoso.com"

.EXAMPLE
    Set-PingCastleEmailRBAC -TenantId "your-tenant-id" -SharedMailboxDomain "contoso.com" -CertificateAuth -CertificatePath "C:\Certs\pingcastle.pfx"

.NOTES
    Version: 1.0
    Requires: Exchange Online Management Module, Microsoft Graph PowerShell Module
#>

function Set-PingCastleEmailRBAC {
    [CmdletBinding()]
    param(
        [Parameter(Mandatory = $true)]
        [string] $TenantId,

        [Parameter(Mandatory = $false)]
        [int]    $ClientSecretExpiration = 12,

        [Parameter(Mandatory = $true)]
        [string] $SharedMailboxDomain,

        [Parameter(Mandatory = $false)]
        [switch] $CertificateAuth,

        [Parameter(Mandatory = $false)]
        [string] $CertificatePath,

        [Parameter(Mandatory = $false)]
        [string] $AppName                  = "PingCastle-Email",

        [Parameter(Mandatory = $false)]
        [string] $ServicePrincipalName     = "PingCastle-Email",

        [Parameter(Mandatory = $false)]
        [string] $ManagementScopeName      = "PingCastle-Email-Scope",

        [Parameter(Mandatory = $false)]
        [string] $SharedMailboxName        = "pingcastle-Email",

        [Parameter(Mandatory = $false)]
        [string] $SharedMailboxDisplayName = "PingCastle-Email"
    )

    $SharedMailboxAddress = "$SharedMailboxName@$SharedMailboxDomain"

    # Results object to store all configuration details
    $Results = @{
        Success = $false
        AppRegistration = @{}
        SharedMailbox = @{}
        ServicePrincipal = @{}
        ManagementScope = @{}
        RoleAssignment = @{}
        TestResults = @{}
        Errors = @()
    }

    Write-Host "Starting PingCastle-Email RBAC Configuration..." -ForegroundColor Cyan
    Write-Host "=============================================" -ForegroundColor Cyan

    try {
        # Step 1: Check and install required modules
        Write-Host "Step 1: Checking required PowerShell modules..." -ForegroundColor Yellow

        $RequiredModules = @("Microsoft.Graph.Applications", "Microsoft.Graph.Users", "ExchangeOnlineManagement")

        foreach ($Module in $RequiredModules) {
            if (!(Get-Module -ListAvailable -Name $Module)) {
                Write-Host "Installing module: $Module" -ForegroundColor Green
                Install-Module -Name $Module -Force -AllowClobber -Scope CurrentUser
            }
            Import-Module -Name $Module -Force
        }

        # Step 2: Connect to Microsoft Graph
        Write-Host "Step 2: Connecting to Microsoft Graph..." -ForegroundColor Yellow

        $GraphScopes = @(
            "Application.ReadWrite.All",
            "Directory.ReadWrite.All",
            "User.ReadWrite.All"
        )

        Connect-MgGraph -TenantId $TenantId -Scopes $GraphScopes

        # Step 3: Create Entra ID App Registration
        Write-Host "Step 3: Creating Entra ID App Registration..." -ForegroundColor Yellow

        $AppRegistration = New-MgApplication -DisplayName $AppName -SignInAudience "AzureADMyOrg"

        if ($AppRegistration) {
            Write-Host "App Registration created successfully" -ForegroundColor Green
            $Results.AppRegistration = @{
                ApplicationId = $AppRegistration.AppId
                ObjectId = $AppRegistration.Id
                DisplayName = $AppRegistration.DisplayName
            }
        }

        # Step 4: Create Service Principal
        Write-Host "Step 4: Creating Service Principal..." -ForegroundColor Yellow

        $ServicePrincipal = New-MgServicePrincipal -AppId $AppRegistration.AppId

        if ($ServicePrincipal) {
            Write-Host "Service Principal created successfully" -ForegroundColor Green
            $Results.ServicePrincipal = @{
                ObjectId = $ServicePrincipal.Id
                AppId = $ServicePrincipal.AppId
                DisplayName = $ServicePrincipal.DisplayName
            }
        }

        # Step 5: Create Authentication Credential
        Write-Host "Step 5: Creating Authentication Credential..." -ForegroundColor Yellow

        if ($CertificateAuth -and $CertificatePath) {
            # Certificate-based authentication
            if (Test-Path $CertificatePath) {
                $Certificate = New-Object System.Security.Cryptography.X509Certificates.X509Certificate2($CertificatePath)
                $KeyCredential = @{
                    Type = "AsymmetricX509Cert"
                    Usage = "Verify"
                    Key = $Certificate.RawData
                }

                Update-MgApplication -ApplicationId $AppRegistration.Id -KeyCredentials $KeyCredential
                Write-Host "Certificate credential added" -ForegroundColor Green

                $Results.AppRegistration.AuthenticationType = "Certificate"
                $Results.AppRegistration.CertificateThumbprint = $Certificate.Thumbprint
            } else {
                throw "Certificate file not found at: $CertificatePath"
            }
        } else {
            # Client secret authentication
            $ClientSecret = Add-MgApplicationPassword -ApplicationId $AppRegistration.Id -PasswordCredential @{
                DisplayName = "PingCastle-Email Secret"
                EndDateTime = (Get-Date).AddMonths($ClientSecretExpiration)
            }

            Write-Host "Client secret created (expires in $ClientSecretExpiration months)" -ForegroundColor Green
            $Results.AppRegistration.ClientSecret = $ClientSecret.SecretText
            $Results.AppRegistration.SecretId = $ClientSecret.KeyId
            $Results.AppRegistration.AuthenticationType = "ClientSecret"
        }

        # Step 6: Connect to Exchange Online
        Write-Host "Step 6: Connecting to Exchange Online..." -ForegroundColor Yellow

        Connect-ExchangeOnline -ShowBanner:$false

        # Step 7: Create Shared Mailbox
        Write-Host "Step 7: Creating Shared Mailbox..." -ForegroundColor Yellow

        # Check if mailbox already exists
        $ExistingMailbox = Get-Mailbox -Identity $SharedMailboxAddress -ErrorAction SilentlyContinue

        if (!$ExistingMailbox) {
            $SharedMailbox = New-Mailbox -Shared -Name $SharedMailboxDisplayName -PrimarySmtpAddress $SharedMailboxAddress -Alias $SharedMailboxName

            if ($SharedMailbox) {
                Write-Host "Shared mailbox created successfully" -ForegroundColor Green
                $Results.SharedMailbox = @{
                    DisplayName = $SharedMailbox.DisplayName
                    PrimarySmtpAddress = $SharedMailbox.PrimarySmtpAddress
                    Alias = $SharedMailbox.Alias
                    Created = $true
                }
            }
        } else {
            Write-Host "! Shared mailbox already exists" -ForegroundColor Yellow
            $Results.SharedMailbox = @{
                DisplayName = $ExistingMailbox.DisplayName
                PrimarySmtpAddress = $ExistingMailbox.PrimarySmtpAddress
                Alias = $ExistingMailbox.Alias
                Created = $false
            }
        }

        # Step 8: Block shared mailbox sign-in
        Write-Host "Step 8: Blocking shared mailbox sign-in..." -ForegroundColor Yellow

        $MailboxUser = Get-Mailbox -Identity $SharedMailboxAddress
        if ($MailboxUser.ExternalDirectoryObjectId) {
            Update-MgUser -UserId $MailboxUser.ExternalDirectoryObjectId -AccountEnabled:$false
            Write-Host "Shared mailbox sign-in blocked" -ForegroundColor Green
        }

        # Step 9: Create Service Principal in Exchange Online
        Write-Host "Step 9: Creating Service Principal in Exchange Online..." -ForegroundColor Yellow

        $ExoServicePrincipal = New-ServicePrincipal -AppId $AppRegistration.AppId -ObjectId $ServicePrincipal.Id -DisplayName $ServicePrincipalName

        if ($ExoServicePrincipal) {
            Write-Host "Exchange Online Service Principal created" -ForegroundColor Green
        }

        # Step 10: Create Management Scope
        Write-Host "Step 10: Creating Management Scope..." -ForegroundColor Yellow

        $ManagementScope = New-ManagementScope -Name $ManagementScopeName -RecipientRestrictionFilter "EmailAddresses -eq '$SharedMailboxAddress'"

        if ($ManagementScope) {
            Write-Host "Management Scope created" -ForegroundColor Green
            $Results.ManagementScope = @{
                Name = $ManagementScope.Name
                RecipientFilter = $ManagementScope.RecipientFilter
            }
        }

        # Step 11: Create Role Assignment
        Write-Host "Step 11: Creating Role Assignment..." -ForegroundColor Yellow

        $RoleAssignment = New-ManagementRoleAssignment -Role "Application Mail.Send" -App $ServicePrincipal.Id -CustomResourceScope $ManagementScopeName

        if ($RoleAssignment) {
            Write-Host "Role Assignment created" -ForegroundColor Green
            $Results.RoleAssignment = @{
                Name = $RoleAssignment.Name
                Role = $RoleAssignment.Role
                RoleAssignee = $RoleAssignment.RoleAssignee
                CustomResourceScope = $RoleAssignment.CustomResourceScope
            }
        }

        # Step 12: Test Configuration
        Write-Host "Step 12: Testing Configuration..." -ForegroundColor Yellow

        Start-Sleep -Seconds 30  # Wait for replication

        $TestResult = Test-ServicePrincipalAuthorization -Identity $ServicePrincipal.Id -Resource $SharedMailboxAddress

        if ($TestResult) {
            $Results.TestResults = @{
                RoleName = $TestResult.RoleName
                GrantedPermissions = $TestResult.GrantedPermissions
                InScope = $TestResult.InScope
                AllowedResourceScope = $TestResult.AllowedResourceScope
            }

            if ($TestResult.InScope -eq $true) {
                Write-Host "Configuration test passed - Service Principal has access to shared mailbox" -ForegroundColor Green
                $Results.Success = $true
            } else {
                Write-Host "✗ Configuration test failed - Service Principal does not have access to shared mailbox" -ForegroundColor Red
                $Results.Errors += "Test failed: Service Principal not in scope for shared mailbox"
            }
        }

        # Step 13: Display Summary
        Write-Host "`n" -NoNewline
        Write-Host "Configuration Summary" -ForegroundColor Cyan
        Write-Host "=====================" -ForegroundColor Cyan
        Write-Host "App Name: $AppName" -ForegroundColor White
        Write-Host "Application ID: $($AppRegistration.AppId)" -ForegroundColor White
        Write-Host "Object ID: $($ServicePrincipal.Id)" -ForegroundColor White
        Write-Host "Shared Mailbox: $SharedMailboxAddress" -ForegroundColor White
        Write-Host "Management Scope: $ManagementScopeName" -ForegroundColor White
        Write-Host "Authentication Type: $($Results.AppRegistration.AuthenticationType)" -ForegroundColor White

        if ($Results.AppRegistration.AuthenticationType -eq "ClientSecret") {
            Write-Host "Client Secret: $($Results.AppRegistration.ClientSecret)" -ForegroundColor Yellow
            Write-Host "WARNING: Save the client secret securely - it cannot be retrieved again!" -ForegroundColor Red
        }

        if ($Results.AppRegistration.AuthenticationType -eq "Certificate") {
            Write-Host "Certificate Thumbprint: $($Results.AppRegistration.CertificateThumbprint)" -ForegroundColor White
        }

        Write-Host "`nConfiguration completed successfully!" -ForegroundColor Green

    } catch {
        $Results.Success = $false
        $Results.Errors += $_.Exception.Message
        Write-Host "Error: $($_.Exception.Message)" -ForegroundColor Red
        throw
    } finally {
        # Disconnect from services
        Disconnect-ExchangeOnline -Confirm:$false -ErrorAction SilentlyContinue
        Disconnect-MgGraph -ErrorAction SilentlyContinue
    }

    return $Results
}
Usage Examples
Basic usage with client secret authentication:
Set-PingCastleEmailRBAC -TenantId "your-tenant-id-guid" -SharedMailboxDomain "contoso.com"
With certificate authentication:
Set-PingCastleEmailRBAC -TenantId "your-tenant-id-guid" `
                        -SharedMailboxDomain "contoso.com" `
                        -CertificateAuth `
                        -CertificatePath "C:\Certs\pingcastle.pfx"
Custom configuration:
Set-PingCastleEmailRBAC -TenantId "your-tenant-id-guid" `
                        -SharedMailboxDomain "contoso.com" `
                        -AppName "MyCustomPingCastle" `
                        -SharedMailboxName "security-reports" `
                        -SharedMailboxDisplayName "Security Reports" `
                        -ClientSecretExpiration 24
What the Function Does
The function performs the following steps automatically:
- Checks and installs required PowerShell modules
- Connects to Microsoft Graph
- Creates the Entra ID App Registration
- Creates the Service Principal
- Creates authentication credentials (client secret or certificate)
- Connects to Exchange Online
- Creates the shared mailbox
- Blocks sign-in for the shared mailbox user account
- Creates the Service Principal in Exchange Online
- Creates the Management Scope to restrict access
- Assigns the Application Mail.Send role
- Tests the configuration
- Displays a summary with all configuration details
Save the output, especially the Client Secret if you're using secret-based authentication. You can't retrieve the secret again after the function completes.
Entering the values in the Settings UI
After completing either the manual or PowerShell configuration, go to Configuration > Settings > Email and enter the values from your app registration:
- Set Email Provider to Microsoft Graph.
- Set From Address to the shared mailbox address (e.g.,
pingcastle@yourdomain.com). - Set Tenant ID and Client ID to the values from your Entra ID app registration.
- Set Authentication Method to Client Secret or Certificate, matching how you created the app registration's credential.
- For Client Secret, set Client Secret to the secret value you copied during app registration.
- For Certificate, set the certificate location to File or Store, then fill in the matching fields: the certificate file path and password for File mode, or the thumbprint, store location, and store name for Store mode.