Entra Scanning
PingCastle Enterprise 4.0 adds Entra scanning, a data source that assesses a Microsoft Entra ID tenant and its connected Microsoft 365 services for security risks. Entra scanning works the same way the Active Directory scanner does: it collects data from the tenant, evaluates it against a set of risk definitions, and reports the results in PingCastle Enterprise so you can review and remediate findings alongside your Active Directory data.
Entra scanning is distinct from Entra ID Authentication. Entra ID Authentication is a login method that lets administrators and users sign in to PingCastle Enterprise through OpenID Connect. Entra scanning is a data source that assesses your Entra tenant for security risks. See Authentication for the login method.
Architecture
The Entra scanner runs as a separate microservice called CloudAPI. When you install PingCastle Enterprise 4.0, the setup installs CloudAPI as its own application pool in a CloudAPI subfolder under the PingCastle Enterprise installation path.
Risk coverage
The Entra scanner's risk definitions aren't a fixed count. PingCastle Enterprise fetches them live from an external microservice as versioned, updatable bundles covering Entra ID and connected Microsoft 365 services. (By comparison, the Active Directory scanner evaluates a fixed set of 193 static rules — 187 rule classes plus 6 static cloud rules.) Each Entra risk definition is its own file. You can download a risk definition, edit its logic, and re-upload it to change how the scanner evaluates that risk.
Setting up tenant scanning
To connect a tenant for scanning, you need:
- The tenant ID of the Entra ID tenant you want to scan.
- An Entra app registration that the scanner uses to authenticate to the tenant.
The app registration can authenticate using either a client secret or a certificate. Choose whichever method fits your organization's security requirements.
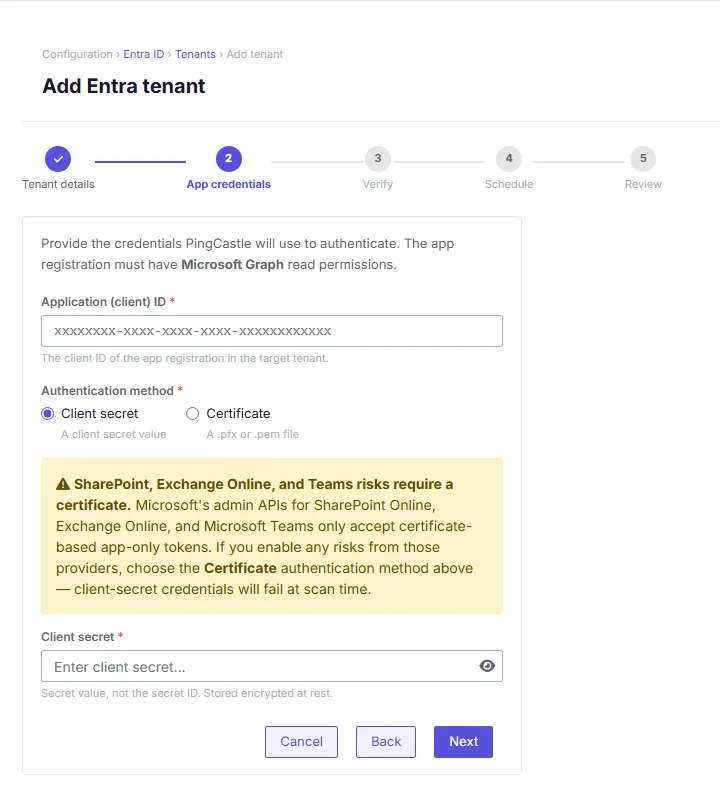
If you plan to scan SharePoint Online, use certificate authentication. The SharePoint Online admin REST endpoint rejects client-secret tokens. See SharePoint Online.
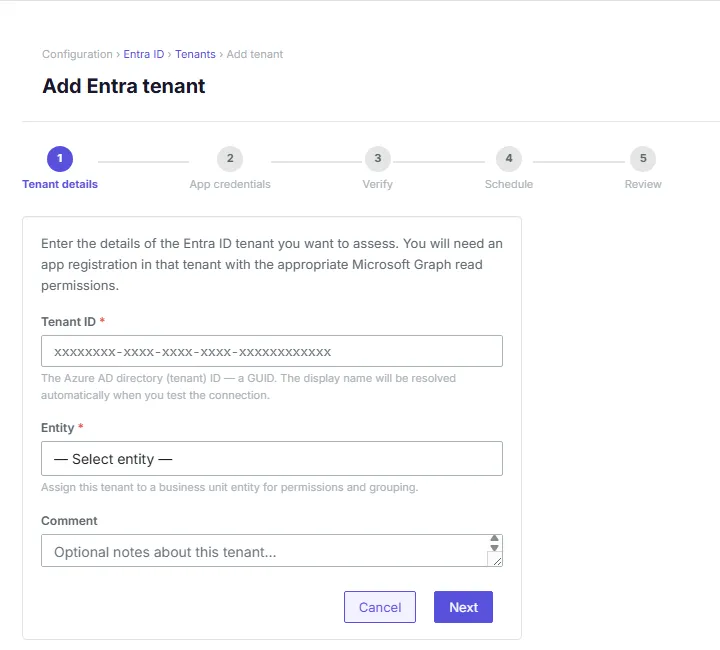
To connect a tenant:
- Go to Configuration > Entra Scan Config and click Add tenant.
- Enter the tenant ID for the Entra ID tenant you want to scan.
- Enter the Application (client) ID of the Entra app registration the scanner uses to authenticate.
- Select the app registration authentication method: Client secret or Certificate.
- Provide the client secret or certificate for the app registration.
- Continue through the wizard's scheduling step to create a scheduled scan for the tenant, or skip it to schedule the scan later.
For the full list of Microsoft Graph, Exchange, SharePoint, Teams, and Azure role-based access control (RBAC) permissions the app registration needs, see Entra scanner permissions.
Scheduling an Entra scan
The Add tenant wizard includes its own scheduling step, so you can create a schedule as part of connecting the tenant.
To schedule an Entra scan for a tenant that's already connected, or to add another schedule for an existing tenant:
-
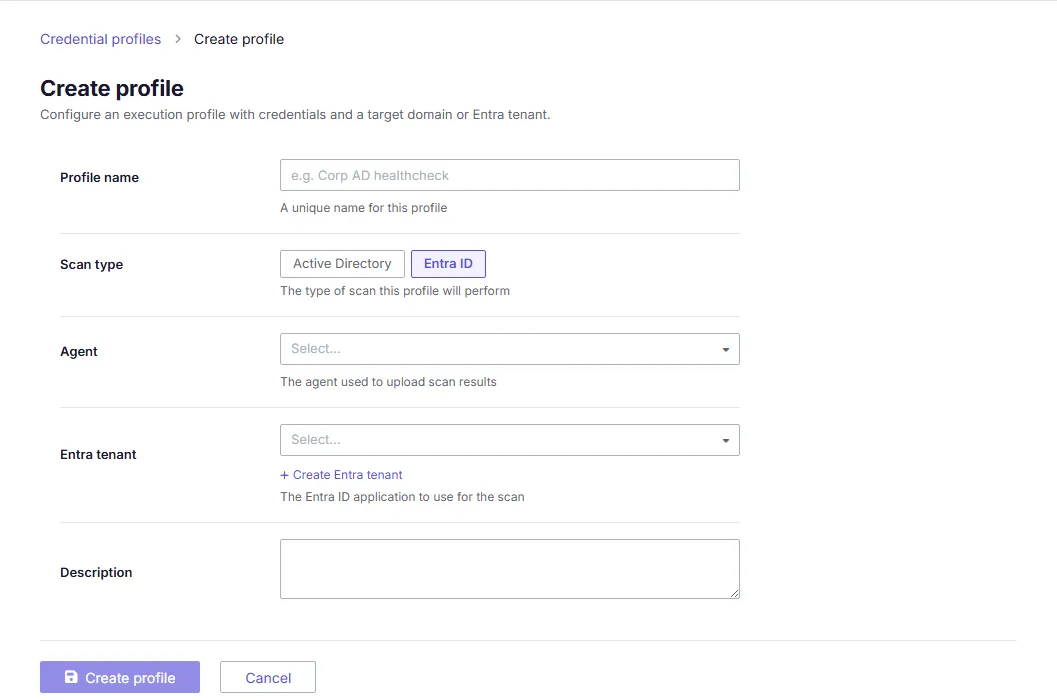
Go to Configuration > Scheduler > Credential Profiles, then click Create profile.
-
Select Entra ID as the scan type, select the Agent, and select the tenant you connected in Setting up tenant scanning.
-
Click Create profile to save the profile.
-
Go to Scheduled scans, then Create schedule, and select this execution profile. See Scheduled scans for the field reference.
Entra scanner permissions
This section lists every permission and role assignment the scanner's Entra app registration needs, organized by resource, along with the steps to grant each one.
The scanner authenticates as an Entra app registration using app-only authentication, with either a client secret or a certificate. The scanner is read-only — it doesn't write back changes to any of the resources it connects to. The following sections cover each resource the scanner connects to: Microsoft Graph, Exchange Online, SharePoint Online, Microsoft Teams, and Azure RBAC.
Each permission maps to specific risk checks. The Used by column in the Microsoft Graph table shows which checks each permission enables. A missing permission only disables the risk checks that depend on it — those checks show as unable to run, with no data. The scan and the rest of the app registration continue working normally. This applies to every resource in this section, including Microsoft Graph.
Download script to set up all permissions
This script provisions the app registration and grants every permission and role listed in the following sections in one run. Use it instead of the manual steps if you want an automated setup.
Download: Setup-EntraScannerApp.ps1
Usage:
.\Setup-EntraScannerApp.ps1 -DisplayName "PingCastle-EntraScanner" -AuthMethod Certificate
The script requires the Microsoft.Graph, ExchangeOnlineManagement, and Az.Resources PowerShell modules.
Microsoft Graph permissions reference
The scanner requires application permissions on Microsoft Graph (appId 00000003-0000-0000-c000-000000000000). All permissions in the following table are application permissions, not delegated permissions, so they don't require a signed-in user. Every permission requires tenant admin consent.
| Permission | GUID | Used by |
|---|---|---|
| Application.Read.All | 9a5d68dd-52b0-4cc2-bd40-abcf44ac3a30 | App registration and service principal risk checks |
| AuditLog.Read.All | b0afded3-3588-46d8-8b3d-9842eff778da | Sign-in and audit log based checks |
| Directory.Read.All | 7ab1d382-f21e-4acd-a863-ba3e13f7da61 | Directory object checks (users, groups, apps); also a dependency for SharePoint Online checks — see SharePoint Online |
| Domain.Read.All | dbb9058a-0e50-45d7-ae91-66909b5d4664 | Domain configuration checks |
| IdentityRiskyUser.Read.All | dc5007c0-2d7d-4c42-879c-2dab87571379 | Identity Protection risky-user checks |
| Policy.Read.All | 246dd0d5-5bd0-4def-940b-0421030a5b68 | Conditional Access and authentication policy checks |
| RoleManagement.Read.Directory | 483bed4a-2ad3-4361-a73b-c83ccdbdc53c | Privileged role assignment checks |
| SharePointTenantSettings.Read.All | 83d4163d-a2d8-4d3b-9695-4ae3ca98f888 | Tenant-level SharePoint and OneDrive settings checks |
| Sites.FullControl.All | N/A | SharePointModernAuthNotEnabled, SharePointSharedLinksNeverExpire, SharingInvitationsNotMonitored |
| User.Read.All | df021288-bdef-4463-88db-98f22de89214 | User profile based checks |
| UserAuthenticationMethod.Read.All | 38d9df27-64da-44fd-b7c5-a6fbac20248f | Multi-factor authentication (MFA) and authentication method checks |
| Exchange.ManageAsApp | N/A | Exchange Online Admin API checks |
Exchange.ManageAsApp belongs to the Office 365 Exchange Online resource app. Grant it as part of the Exchange Online setup.
Sites.FullControl.All belongs to the SharePoint Online resource app. Grant it as part of the SharePoint Online setup.
Microsoft Graph
Required: the permissions listed in the Microsoft Graph permissions reference table.
Grant Microsoft Graph permissions from the Entra admin center
- Go to App registrations, select the scanner app, and click API permissions.
- Click Add a permission > Microsoft Graph > Application permissions.
- Select each permission from the Microsoft Graph permissions reference table, then click Add permissions.
- Click Grant admin consent for the tenant.
Microsoft Graph permissions cover most risk checks that the scanner performs, either on their own or combined with the Exchange Online provider.
Exchange Online
Required:
- The
Exchange.ManageAsAppapplication permission on the Office 365 Exchange Online resource app (appId 00000002-0000-0ff1-ce00-000000000000). This requires admin consent. - An Exchange Online role-based access control (RBAC) role assignment on the app's service principal. Graph consent alone doesn't authorize Exchange Online cmdlets — the scanner also needs the RBAC role assignment.
Grant the Exchange Online permission from the Entra admin center
- Go to App registrations, select the scanner app, and click API permissions.
- Click Add a permission > APIs my organization uses, then search for Office 365 Exchange Online.
- Click Application permissions, select
Exchange.ManageAsApp, click Add permissions, and grant admin consent. - Add the app's service principal to the View-Only Organization Management Exchange Online role group.
View-Only Organization Managementis the role group for a read-only scanner deployment.
SharePoint Online
Required: the Sites.FullControl.All and Directory.Read.All permissions listed in the Microsoft Graph permissions reference table.
Sites.FullControl.All is a broad permission — it grants full control over every site collection in the tenant. It enables three risk checks: SharePointModernAuthNotEnabled, SharePointSharedLinksNeverExpire, and SharingInvitationsNotMonitored. If you don't grant it, those three checks show as unable to run, but the rest of the scan, including the other SharePoint and OneDrive checks, still works.
SharePoint Online only accepts certificate-based authentication for the scanner app. If the app registration uses a client secret, SharePoint risk checks fail even when you grant the correct permissions.
Grant the SharePoint Online permission from the Entra admin center
- Go to App registrations, select the scanner app, and click API permissions.
- Click Add a permission > APIs my organization uses, then search for SharePoint.
- Click Application permissions, select
Sites.FullControl.All, click Add permissions, and grant admin consent.
Microsoft Teams
Required: assign the Global Reader Entra directory role to the app's service principal.
The directory role you assign to the app determines Teams authorization, rather than a fixed Graph permission list. Global Reader covers the read-only Teams cmdlets the scanner uses.
Grant the Global Reader role from the Entra admin center
- Go to Entra ID > Roles and administrators, then select Global Reader.
- Click Add assignments and select the scanner app's service principal.
Don't configure the "Skype and Teams Tenant Admin API" permission on the app registration. Microsoft's documentation states this permission can cause failures for app-only authentication.
Azure RBAC
Required: assign the Reader and Key Vault Reader Azure RBAC roles to the app's service principal at subscription scope.
Grant Azure RBAC roles from the Azure portal
- Go to your subscription, click Access control (IAM), then click Add role assignment.
- Select the Reader role, choose the scanner app as the member, and click Review + assign.
- Repeat these steps for the Key Vault Reader role.