Active Directory scan scheduling
Overview
PingCastle Enterprise 4.0 replaces Task Scheduler-based scanning with PingCastleSchedulerService, a dedicated Windows service built on Quartz.NET. The installer sets up and starts PingCastleSchedulerService automatically, so there's nothing to configure at the operating system level. You manage every scheduled scan from the PingCastle Enterprise web interface instead of the Windows Task Scheduler console.
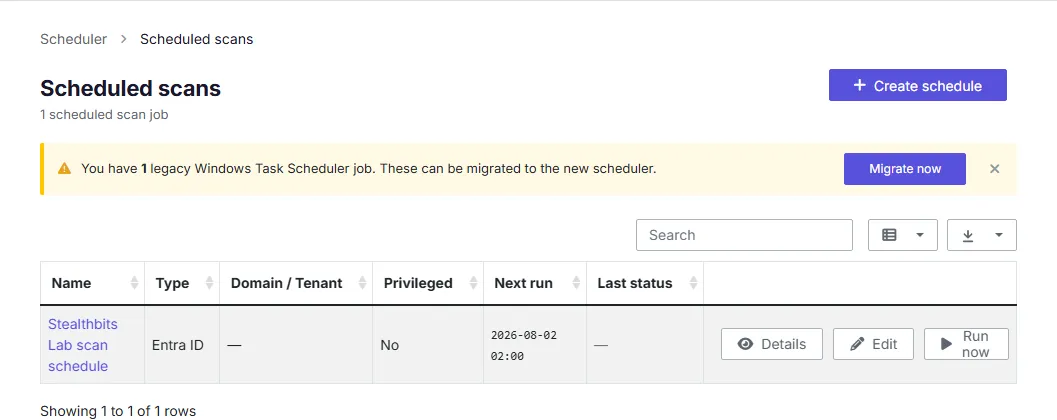
Most configuration changes you make in PingCastle Enterprise, including scheduler settings, take effect within about 30 seconds. A small number of settings require a service restart, and the application schedules that restart automatically. See the settings documentation for the restart behavior of individual settings.
Credential profiles
A credential profile bundles the information PingCastle Enterprise needs to run an unattended scan: an Agent and the configuration for a specific scan type. The Agent holds the API key that authenticates the scan results it uploads to PingCastle Enterprise. You create a credential profile once, then select it whenever you set up a scheduled scan.
The scheduled scan wizard labels this field "execution profile." Credential profile and execution profile refer to the same thing.
Manage credential profiles from Configuration > Scheduler > Credential Profiles. Click Create profile to add one.
An Active Directory credential profile needs:
- An Agent.
- A Domain to scan.
- Optionally, a custom run-as account. If you don't specify one, the scan runs under the
PingCastleSchedulerServiceservice account.
Scheduled scans
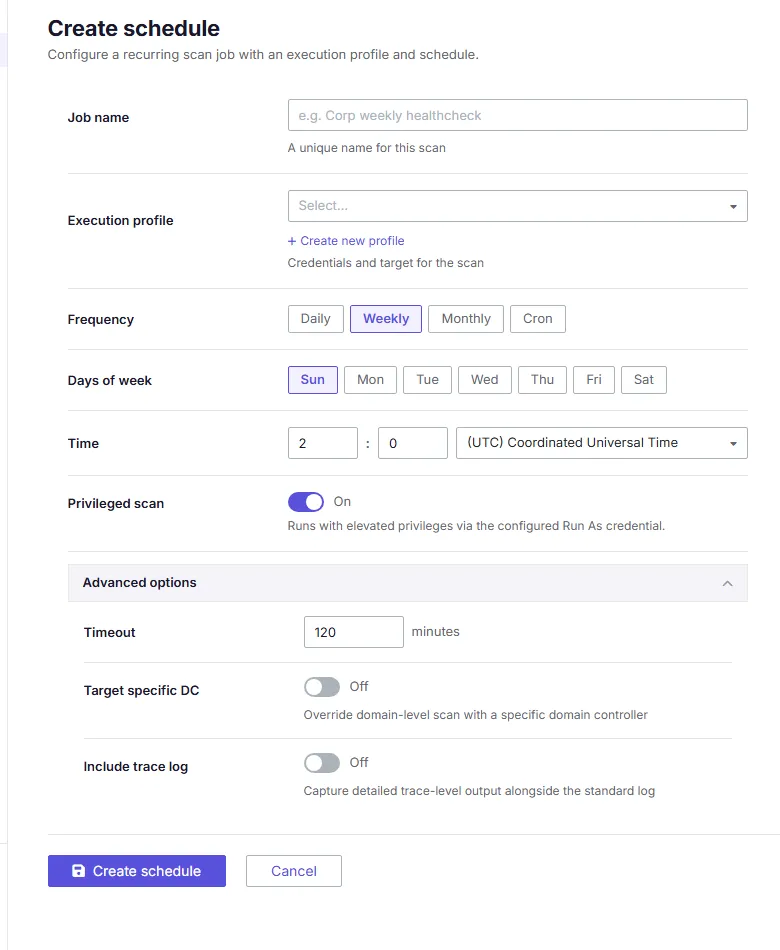
A scheduled scan job ties a credential profile to a recurring schedule. Manage scheduled scans from Configuration > Scheduler > Scheduled scans. Click Create schedule to add one.
Each job has:
- Job name: the name you use to identify the job in the scheduler list.
- Execution profile: the credential profile the job runs under.
- Frequency: how often the job runs.
Each job also supports the following options:
- Privileged Scan: runs the scan in privileged mode, so PingCastle can evaluate checks that need elevated read access. See Running privileged scans for the account requirements.
- Target Specific DC: points the scan at a specific domain controller instead of letting PingCastle select one automatically.
- Scan Timeout: sets the maximum time the scan can run before
PingCastleSchedulerServicestops it. - Include trace logging: turns on verbose diagnostic logging for the scan run, useful when troubleshooting a failed or stalled job.
Granting permissions for custom run-as accounts
A custom run-as account you configure on a credential profile needs, at minimum, the Log on as a batch job right on the server running PingCastleSchedulerService. Grant this right through Group Policy or Local Security Policy.
Grant the right through Group Policy
- Open the Group Policy Management Console (
gpmc.msc). - Edit a Group Policy Object (GPO) linked to the organizational unit that contains the server running
PingCastleSchedulerService, or create a new GPO for this purpose. - Go to Computer Configuration > Policies > Windows Settings > Security Settings > Local Policies > User Rights Assignment.
- Double-click Log on as a batch job.
- Click Add User or Group and add the custom run-as account.
- Click OK to save the GPO.
- On the target server, run
gpupdate /force, or wait for the next policy refresh.
Grant the right through Local Security Policy
- On the server running
PingCastleSchedulerService, open Local Security Policy (secpol.msc). - Go to Security Settings > Local Policies > User Rights Assignment.
- Double-click Log on as a batch job.
- Click Add User or Group and add the custom run-as account.
- Click OK to apply the change.
Running privileged scans
You can run a privileged scan in one of two ways:
- Using a privileged
PingCastleSchedulerServiceservice account. Netwrix doesn't recommend this option, because it grants elevated Active Directory permissions to every scan the service runs, not just the ones that need them. - Using a privileged run-as account configured on the credential profile. This scopes the elevated permissions to the specific scans that use that credential profile.
For the Active Directory permissions a privileged account needs, see Privileged Mode.