PingCastle Pro Installation and Configuration
Description
PingCastle Pro is a tool that helps you improve and follow your overall Active Directory security level. The software is compatible with most existing configurations and provides reliable data that presents the situation to management for improvement over time.
Requirements
System Specifications
PingCastle Pro supports the following operating systems:
-
For PingCastle scanning functions:
- All operating systems starting from Windows 2000 or subsequent
-
For PingCastle Pro:
-
All operating systems starting from Windows 10 22H2 / Windows 2012 (with extended security updates) or subsequent, where the asp.net 8.0 is supported
-
On demand, you can include any operating systems, including Linux, if asp.net core 8.0 supports them
-
See the Windows Lifecycle Fact Sheet for details regarding each Windows release lifecycle.
See the .NET 8.0 Supported Operating System documentation here.
Database
PingCastle Pro uses a database to store its data.
The current supported databases are:
-
Any supported editions of SQL Server (including SQL Server Express)
-
Any supported editions of PostGres
Netwrix may support any database that Entity Framework Core 2 supports (SQLite, MySQL, and others) on demand. Contact Netwrix to request support for a specific database.
External System Dependencies
PingCastle Basic and PingCastle Professional require "dotnet framework 2.0" or subsequent versions.
PingCastle Enterprise uses the "asp.net core 8.0 framework" but still relies on "dotnet standard 2.0".
Netwrix recommends not exposing the web application directly. Use a reverse proxy such as IIS, Apache2, or Nginx.
Third party authentication system
PingCastle relies on the Windows account to perform scans and doesn't use third party authentication system.
PingCastle Pro requires Microsoft Entra ID or a Windows Active Directory to
perform authentication. If you use Entra ID, the application must be able
to get the token from Entra ID (typically login.microsoftonline.com).
License
PingCastle Pro licensing depends on the number of domains you manage, up to a maximum of five domains. The number of domains include subdomains of a forest.
Licensing counts only domains, not domain controllers.
Example
If you have contoso.com with two subdomains called uk.contoso.com and
us.contoso.com, then you would require three licenses.
Architecture
PingCastle uses a distributed architecture.
PingCastle Basic acts as a standalone agent. The program assesses the Active Directory and produces a report in two forms: an XML file and an HTML file. These two files provide two representations of the same data. By default, PingCastle filters the XML file to remove potential private data such as account names from this collected data. To deactivate this filter, run the program with the --level Full flag.
You then push the data contained in the xml file into PingCastle Pro directly via the API, or indirectly via an import such as email. In this case, you can encrypt the data to ensure its confidentiality.
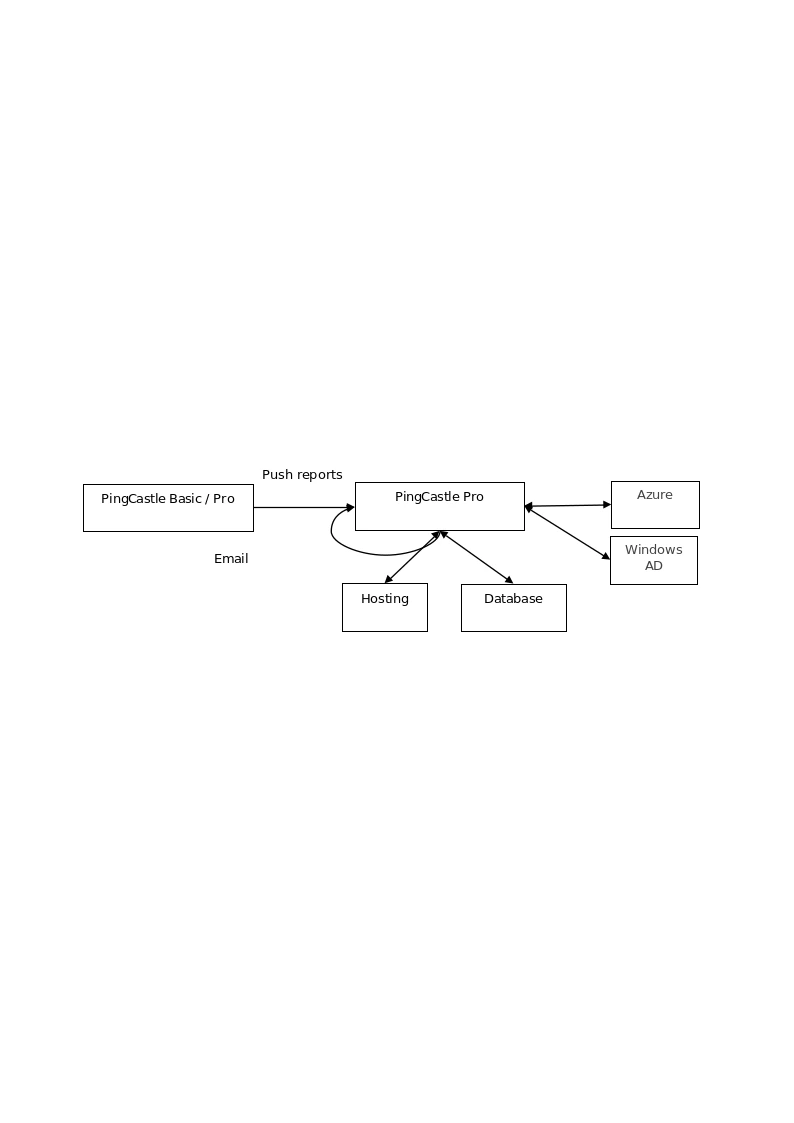
PingCastle Pro then provides services around the data and stores it in the database.
Minimal Entra ID Configuration
At the end of the procedure, you receive a Tenant ID and a Client ID.
Connect to "Azure Portal" located at https://portal.azure.com

Then authenticate.
Select the App Registrations pane.
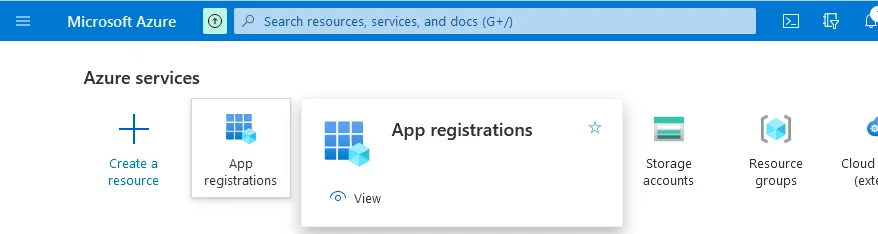
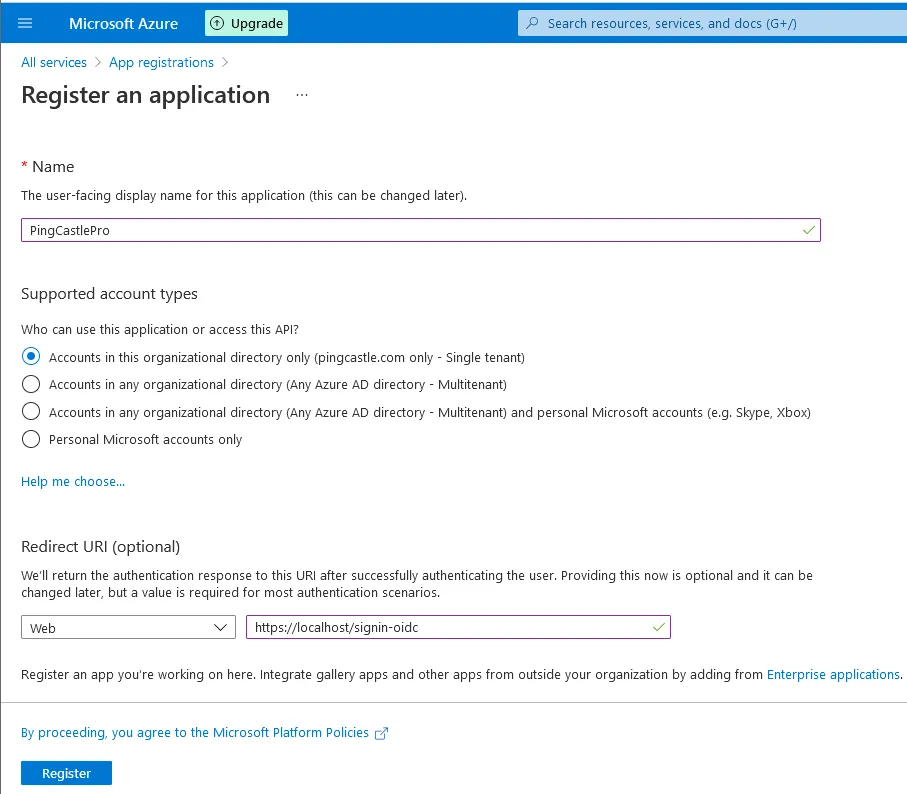
Click New registration from the toolbar at the top. A Register an app dialog opens.

Add a name but also the redirect Uri.
The redirect URI must point to the fully qualified domain name (FQDN) of the server you are accessing. It must start with HTTPS and end with /signin-oidc.
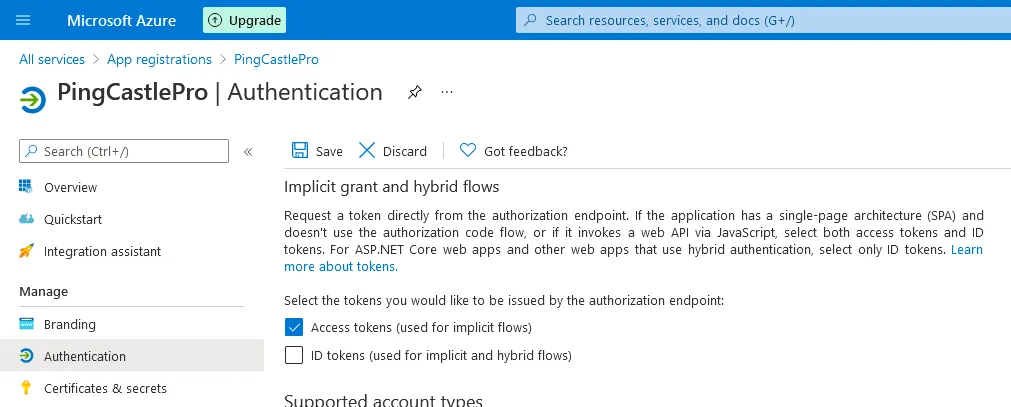
Go to authentication and enable "Access tokens (used for implicit flows".
After you create the app, open the app by clicking on its name and copy ClientID and TenantID and keep it with you.
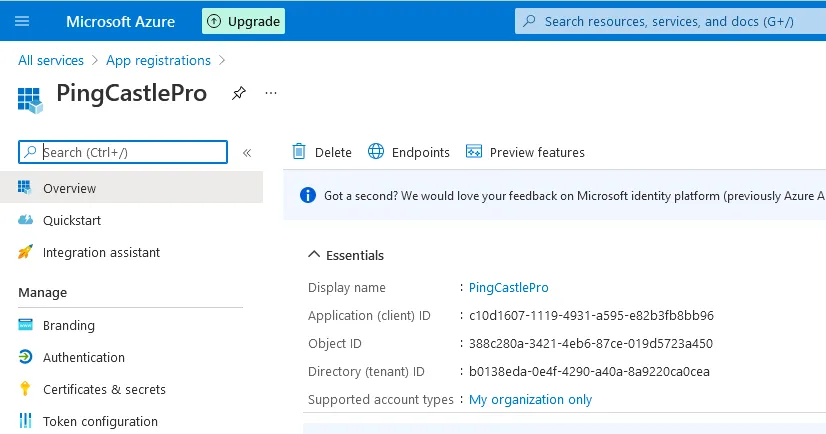
The first user connecting to the application can grant the permission implicitly.
SQL Express installation
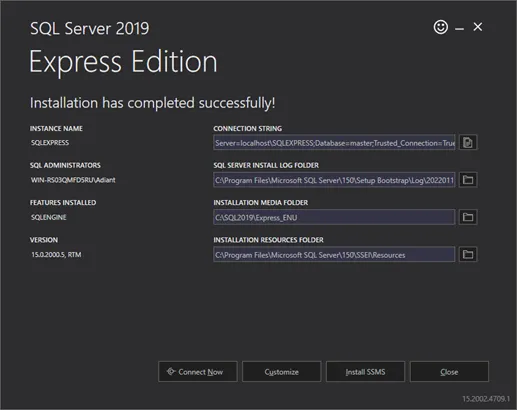
This chapter describes the installation of SQL Express.
Any edition of SQL Server is compatible.
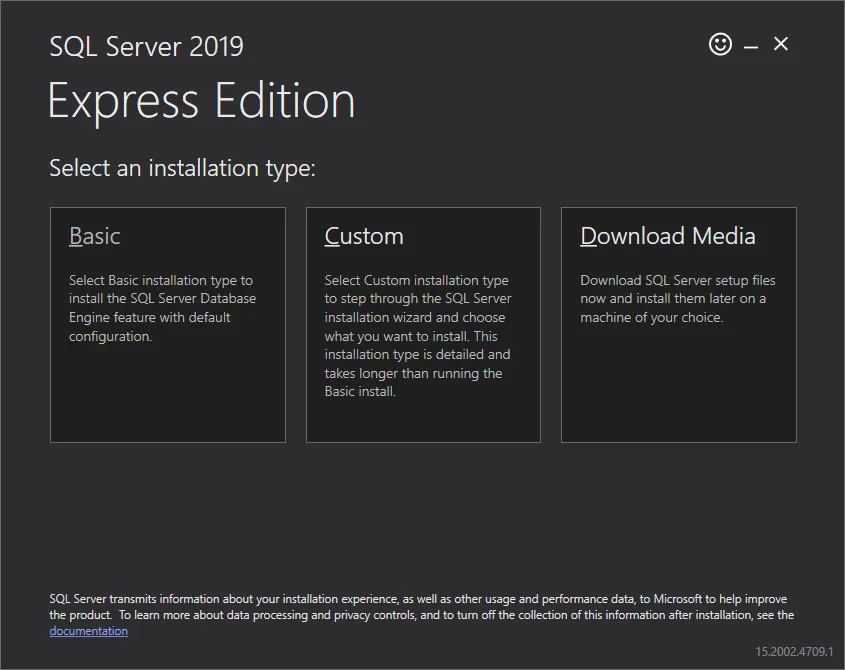
Download SQL Express 2019 here:
https://www.microsoft.com/en-us/Download/details.aspx?id=101064
Select Basic and let the installation proceed.

Quick Installation
PingCastle Pro supports a setup that minimizes the requirements and manipulations. Netwrix recommends this scenario for tests but not in production, because it doesn't support all IIS and SQL Server upgrade mechanisms.
Requirements
It requires:
-
IIS installed (it is a Windows component)
-
An SQL database such as SQL Express installed
-
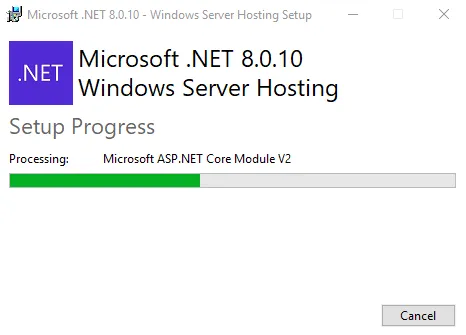
The asp.net core 8.0 "Hosting Bundle" available at:
https://dotnet.microsoft.com/en-us/download/dotnet/8.0
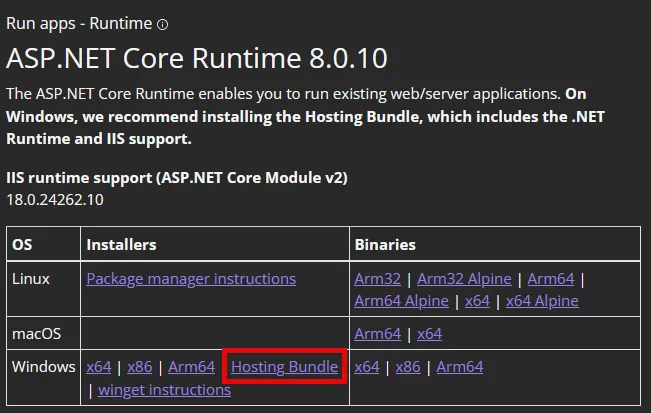
Install IIS before the ASP.NET 8.0 Hosting Bundle. If you don't, you may need to repair the Hosting Bundle installation.
API Key and endpoint
Before starting the setup, provide the Tenant ID and Client ID of the application.
The Client Secret, Notification group, and SMTP configuration are optional; you can modify them later in the appsettings.Production.json file.
Procedure
The Windows Installer (MSI) file guides the installation of the software:
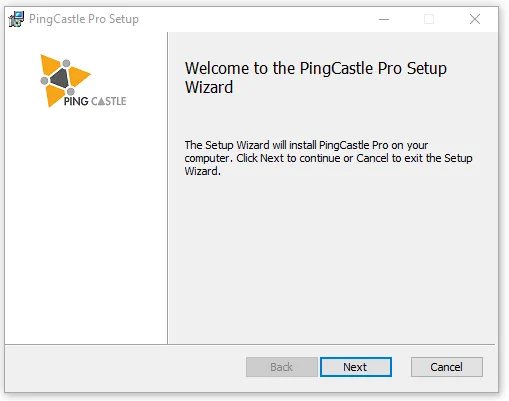

After you accept the license terms, the software requires a license key that Netwrix distributes alongside the MSI files.
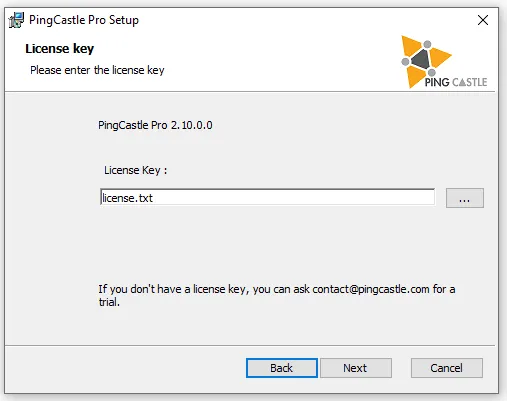
If the license key is missing, contact PingCastle support.
You can configure the database in two ways:
-
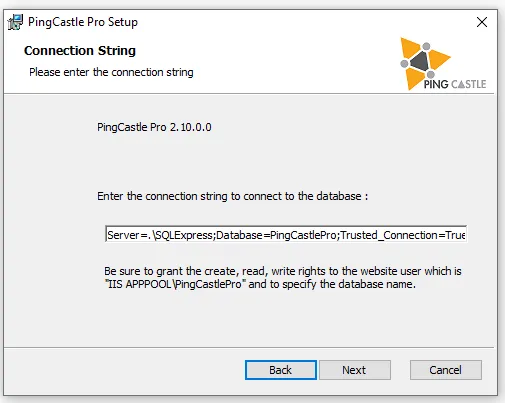
Using a connection string you provide directly
-
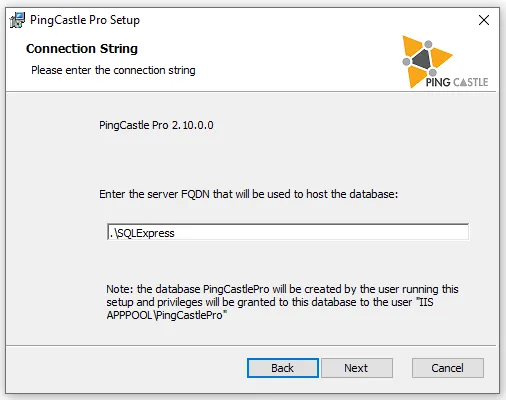
Using a connection to a database: the software then creates the database on your behalf
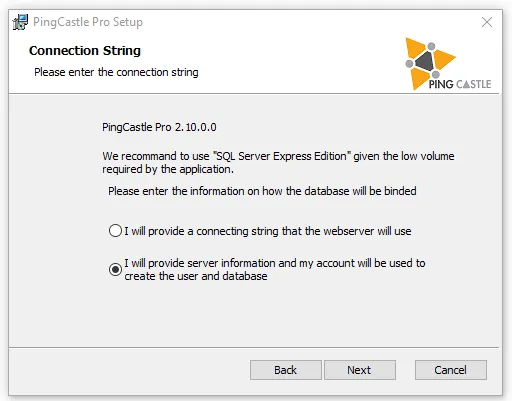
Option which creates the database:
Option with the direct connection string:
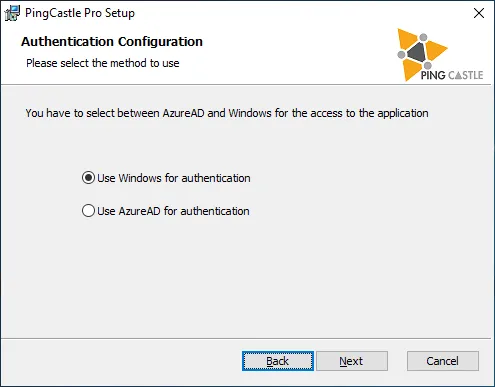
Then the setup asks for the authentication configuration.
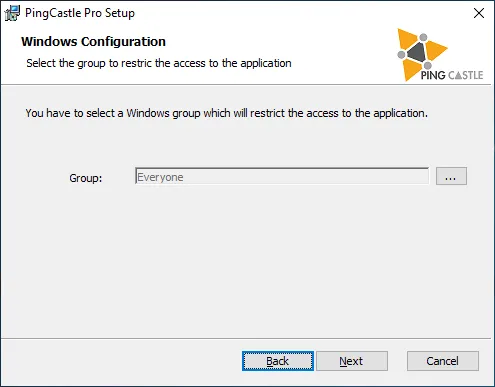
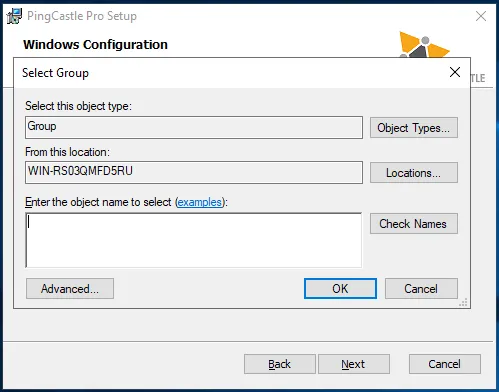
For Windows, PingCastle allows the Everyone group by default. To change the group, select the browse button. A new dialog appears.
If you select "Domain admins" this group won't work. Windows strips the group from the restricted token, so the application doesn't see the user as a "Domain admins" member even if the user belongs to the group. Run whoami /all in a command prompt to see the groups the token presents to the application.
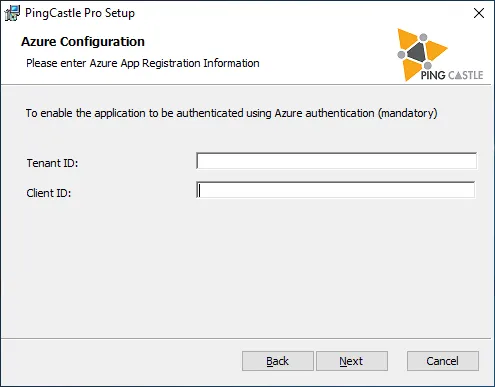
For Azure, enter the tenant ID and client ID you collected earlier here.
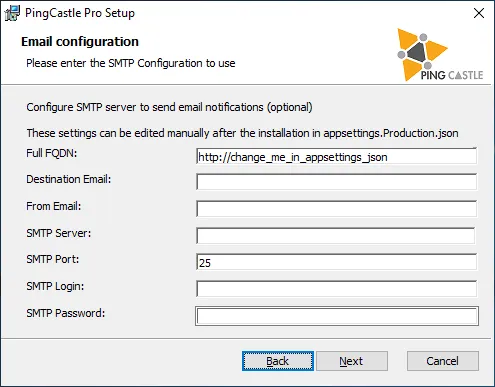
To send email notifications, you can set the SMTP configuration. Enter the email addresses that will receive the email notifications here as "destination email".
Then the setup is ready to perform its activity.
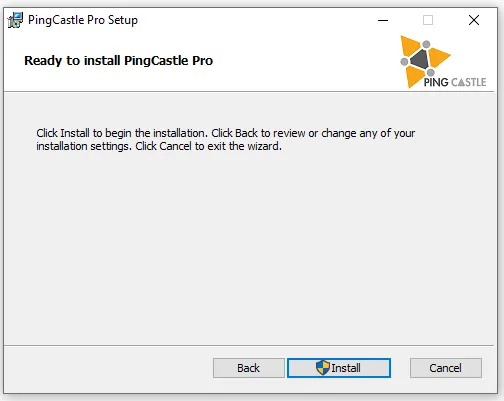
The setup automatically configures the website, the database, and the application, and if it creates the database, grants the database permission to IIS (application pool)
When you remove the software, the setup doesn't remove the database.
Post installation
To use Azure authentication, enable HTTPS.
Check that IIS lists the PingCastlePro website.
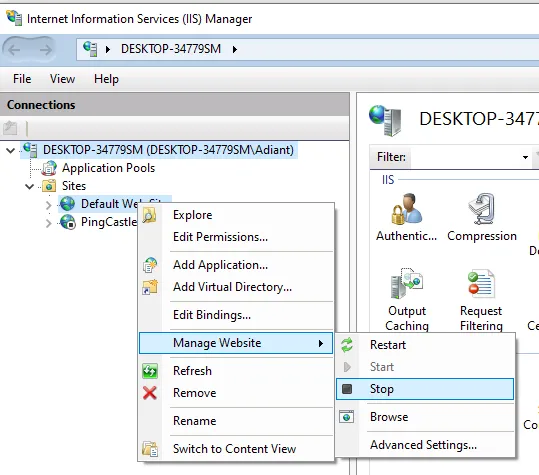
Sometimes the PingCastlePro website doesn't start because the Default Web Site is running instead. Look for the black square icon to the right of the PingCastlePro website, which indicates that it's stopped.
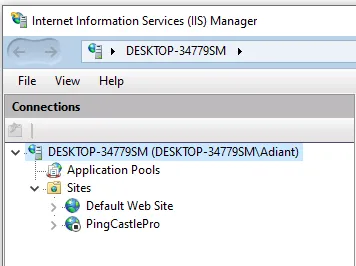
If this happens, stop the Default Web Site and start the PingCastlePro website.
Ensure you have a certificate installed. If this isn't the case, you can create one with the Server Certificates configuration option.
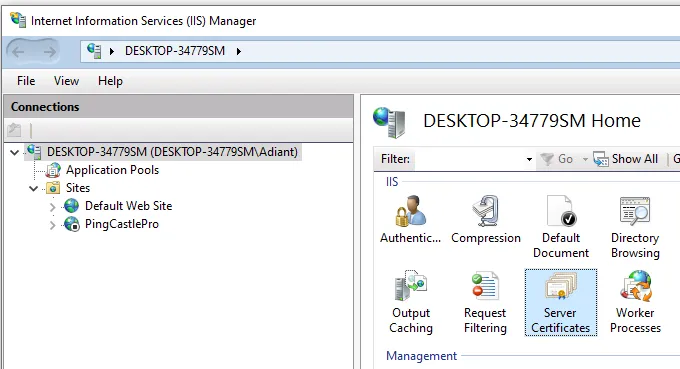
Select "Create Self Signed Certificate" at the right to do so.

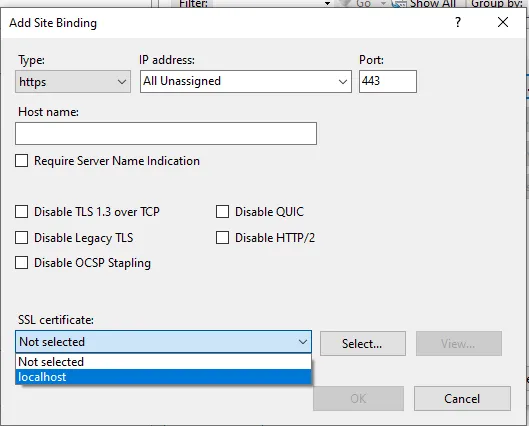
Then edit the binding of the website:
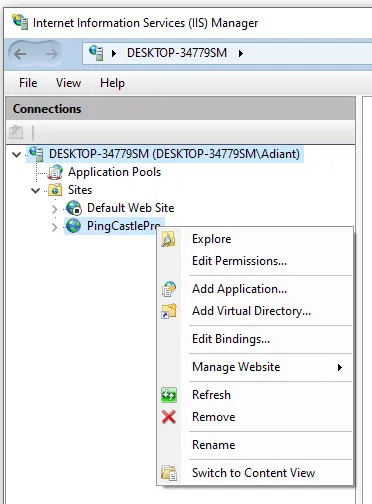

Then add an HTTPS binding and be sure to select an SSL certificate, like the one you created earlier.
Custom installation
You can install PingCastle Pro like a classic asp.net core application.
That means copy all the files in a directory, configure the proxy (IIS, apache, Nginx), prepare a database and configure the application.
Hosting
The application works on any infrastructure that the asp.net core 8.0 middleware supports.
Microsoft has procedures to install the .NET 8.0 runtime:
-
Linux installation
https://learn.microsoft.com/en-us/dotnet/core/install/linux -
Windows installation
https://learn.microsoft.com/en-us/dotnet/core/install/windows
The following list references Microsoft's procedures for setting up the hosting of the application:
Host ASP.NET Core on Windows with IIS
https://learn.microsoft.com/en-us/aspnet/core/host-and-deploy/iis/?view=aspnetcore-8.0Host ASP.NET Core on Linux with Nginx
https://learn.microsoft.com/en-us/aspnet/core/host-and-deploy/linux-nginx?view=aspnetcore-8.0Host ASP.NET Core on Linux with Apache
https://learn.microsoft.com/en-us/aspnet/core/host-and-deploy/linux-apache
You can change the upload quota to allow large file uploads in Interoperability mode.
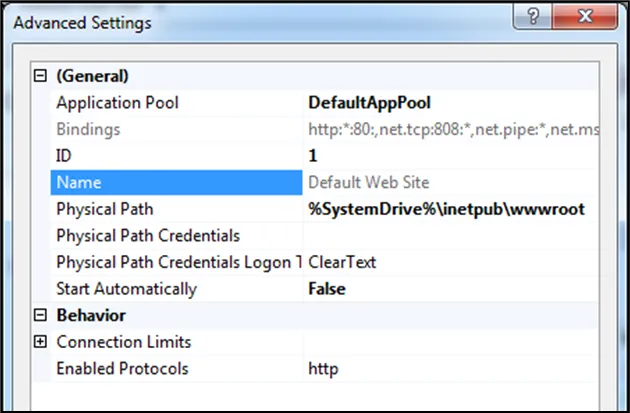
IIS installs a "Default Web Site" by default, which may conflict with the PingCastle Pro application.
The solution is to stop the default website and configure it to not start automatically.
Database
Configuring the database backup is the customer's responsibility.
PingCastle Pro requires a user account on this database. By default, PingCastle Pro creates the tables at the initial run and can add or modify existing tables when a software update requires it. If you use this default pattern, the database user MUST be owner of the database.
PingCastle Pro supports limited privileges on the database (it needs only read, modify, and delete data) on demand. In this case, Netwrix provides a SQL script to apply database changes before you apply a software update.
On IIS, PingCastle runs in an application pool that needs privileges on the database.
The application pool uses a special Windows account that you must create manually.
The following SQL can grant these permissions:
If not Exists (select loginname from master.dbo.syslogins
where loginname = 'IIS APPPOOL\PingCastlePro')
Begin
CREATE LOGIN [IIS APPPOOL\PingCastlePro] FROM WINDOWS;
End
use PingCastlePro;
exec sp_addrolemember 'db_owner', 'IIS APPPOOL\PingCastlePro';
For example, here are some commands for PostGres on Ubuntu 17:
sudo apt-get install postgresql postgresql-contrib
sudo /etc/init.d/postgresql start
By default no password for the user postgres
sudo -u postgres createuser pingcastle
sudo -u postgres psql
alter user pingcastle with password 'pingcastle';
sudo -u postgres createdb -O pingcastle pingcastle
On PostGres, the collation (sort order) doesn't account for some special characters, which puts the [Default] container in a different position than the start of the list of entities.
Using a Database hosted on another server
Configure SQL Server with a local DB account
You first need to create a local account inside Sql Server.
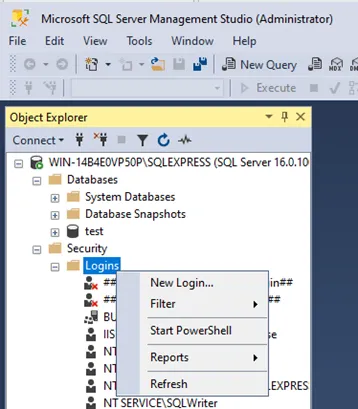
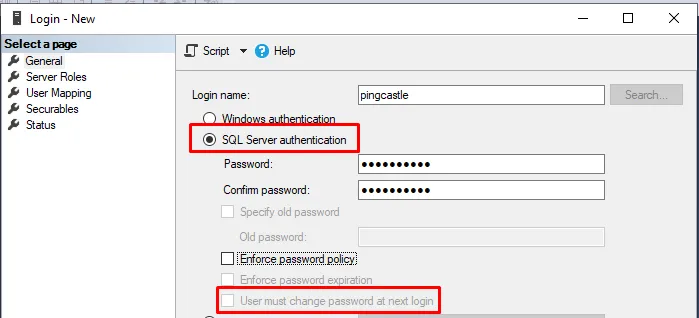
Select SQL Server authentication.
Be sure to uncheck "user must change password at the next login" as PingCastleEnterprise doesn't support password rotation. (you can change the password later inside the application.Production.json file)
Then create a database.
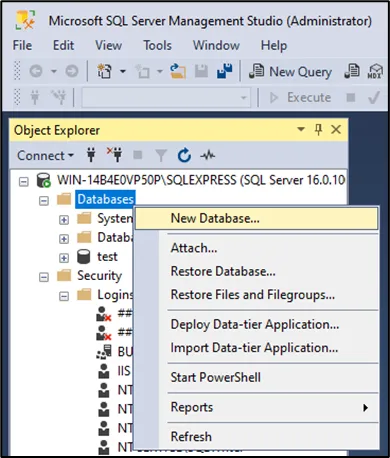
Then create a database
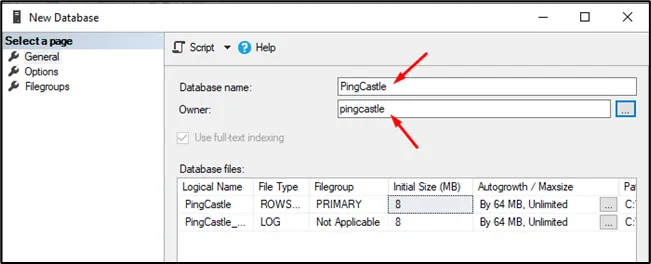
Set the owner as the user you created earlier.
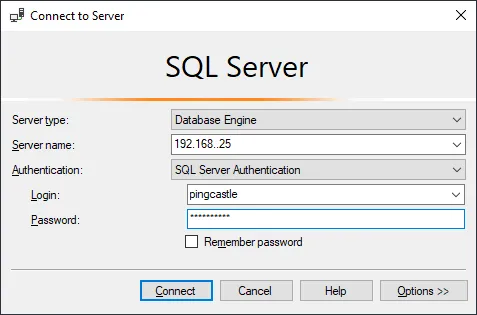
Verify that the credentials are correct and that the server is available before continuing.
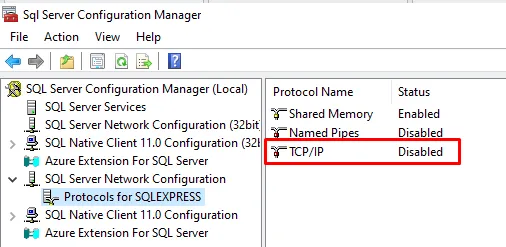
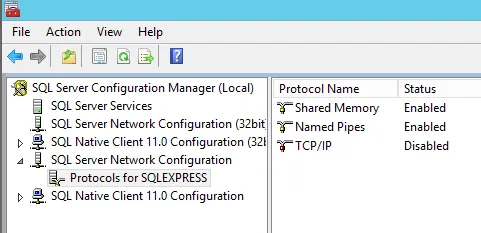
In SQL Server configuration, a typical mistake is to use tcp connection. You must enable TCP/IP manually in SQL Server because SQL Server disables it by default.
At the installation step, indicate that you want to use an ad-hoc connection string.
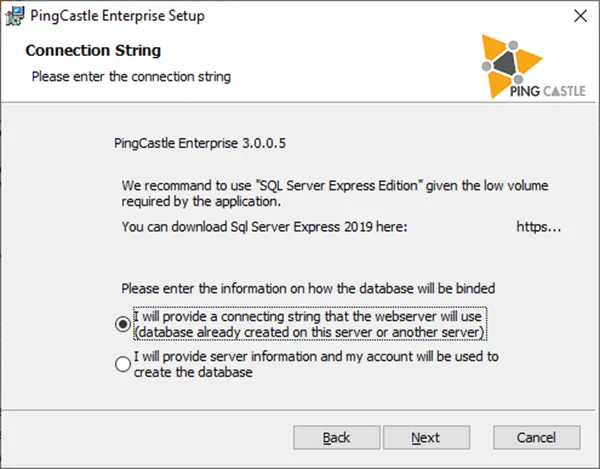
Specify the following:
Server=tcp:server.fqdn.com;Database=PingCastle;User Id=pingcastle;password=pingcastle;Trusted_Connection=True;MultipleActiveResultSets=true
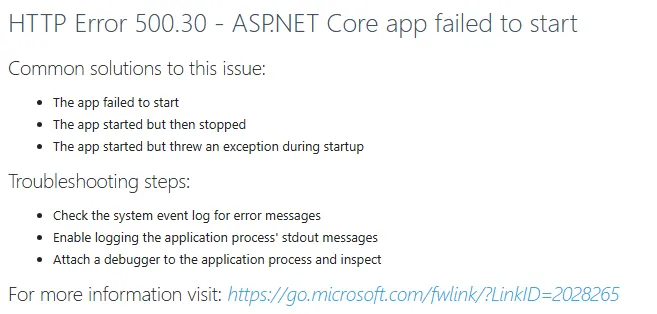
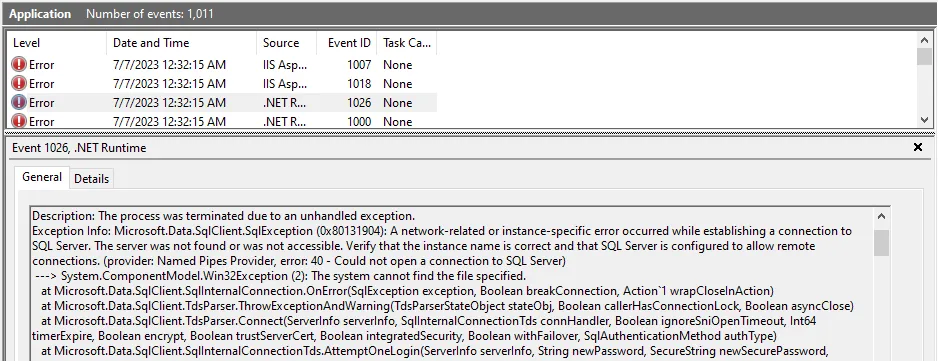
The server doesn't create the database at installation time. Any issues appear on first run. Check the event log for the full error message. You can
change the connection string after installation by editing appsettings.production.json. You must escape special characters in the connection string because the value is inside a JSON string.
Configure SQL Server with an Active Directory user
You need to first create this Windows user.
You have to create a new Windows login. Go to create a new login.
Then select the Windows user you created.
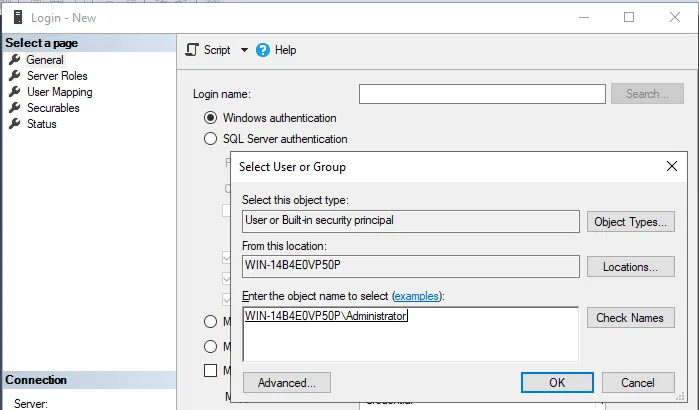
You can then create a database with the Windows user as the owner of the database:
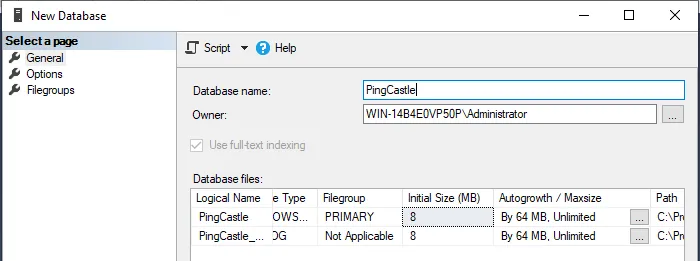
At the installation step, indicate that you want to use an ad-hoc connection string.
Specify the following:
Server=tcp:server.fqdn.com;Database=PingCastle;Trusted_Connection=True;MultipleActiveResultSets=true
The installation continues.
After the installation, you need to
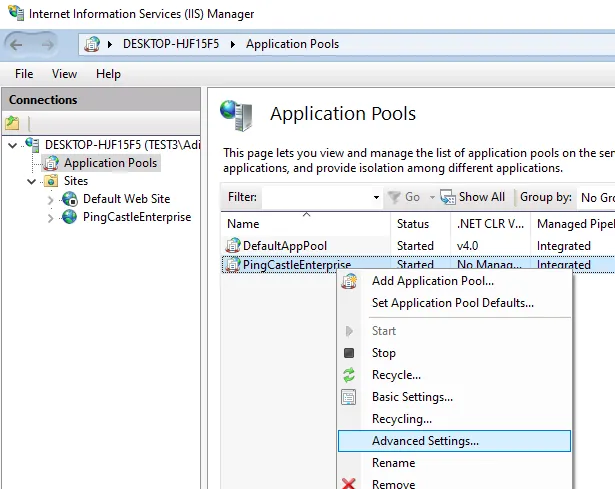
change the Application Pool identity.
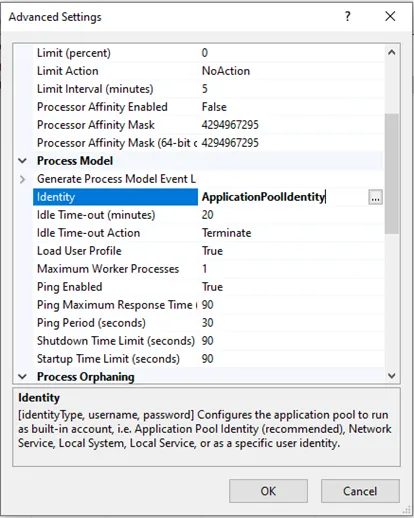
Go to IIS and select the application pool. Go to the advanced settings
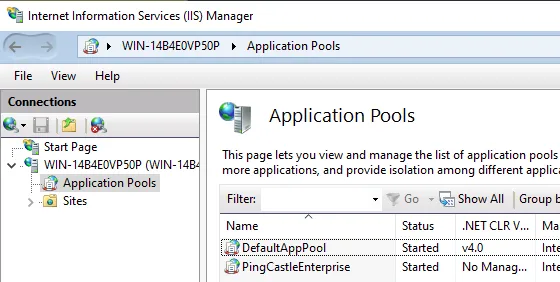
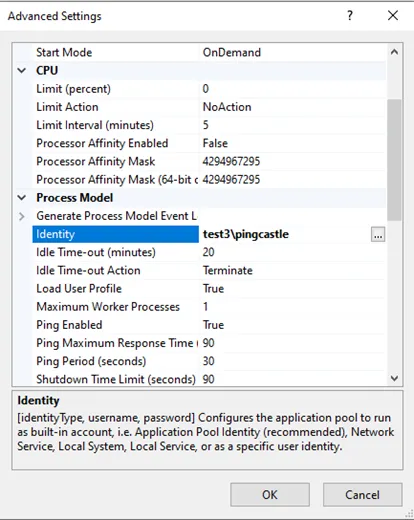
Go to Identity and select the custom user account:
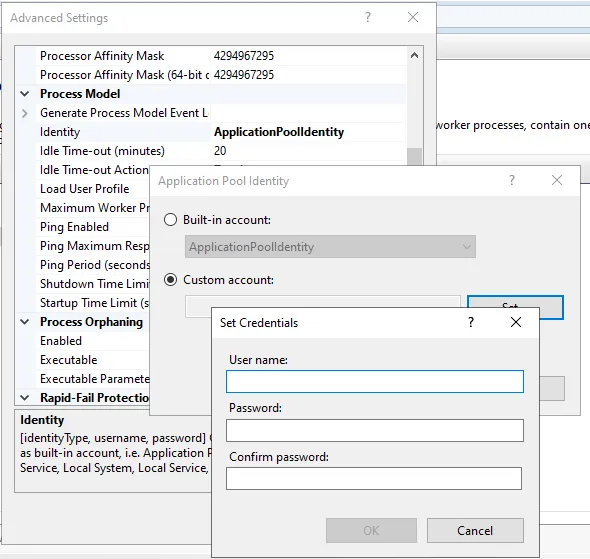
Restart IIS.
Configuration of PingCastle Pro
The settings are in the appsettings.Production.json file at the root of the application folder.
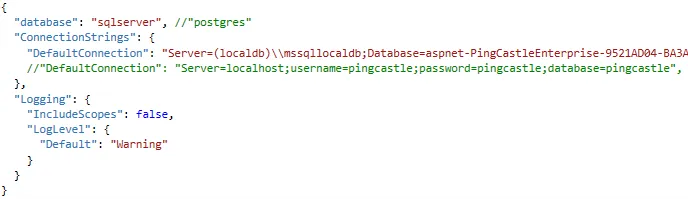
The application needs two settings: the database and the license information.
To change the database type, change the "database" settings. PingCastle Pro supports the following values:
-
sqlserver
-
postgres
To connect to the database, provide a "connection string" in the "DefaultConnection" parameter.
PingCastle Pro stores connection strings in JSON, so you must escape them properly — for example, \ becomes \\. The same applies to double quotes.
For the license, use the "License" setting.
Here are some connection string examples:
Sql Local DB
"Server=(localdb)\\mssqllocaldb;Database=aspnet-PingCastlePro-9521AD04-BA3A-41DC-A454-F2BD464E9391;Trusted_Connection=True;MultipleActiveResultSets=true"
PostGres
"DefaultConnection": "Server=localhost;username=pingcastle;password=pingcastle;database=pingcastle"
PingCastle requires configuration to send emails.
This configuration is in the appsettings.Production.json file.

The Email is the address PingCastle uses to send email.
The login and password are the credentials PingCastle uses to connect to the smtp server. These aren't mandatory.
The host and port is the address of the smtp server.
The email functionality sends notifications such as weekly reports.
Azure hosting
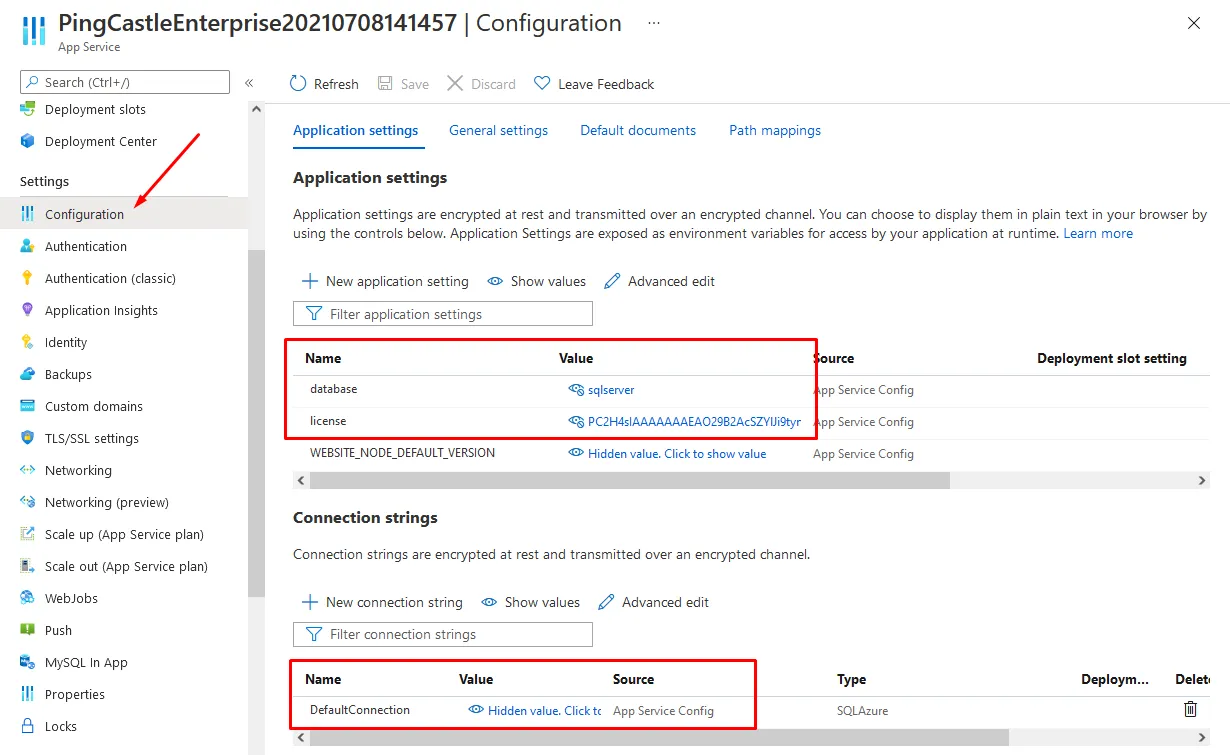
PingCastle Pro works with Azure. In that case, you must create a managed application and a database.
Then you must replicate the application configuration into the Azure Configuration page.
The minimal required fields are: database, license, and the connection string, named "DefaultConnection".
Initial startup
At the first run, the application creates the database. If an error occurs with the database (missing right, invalid connection string) or hosting, the next screen doesn't appear.
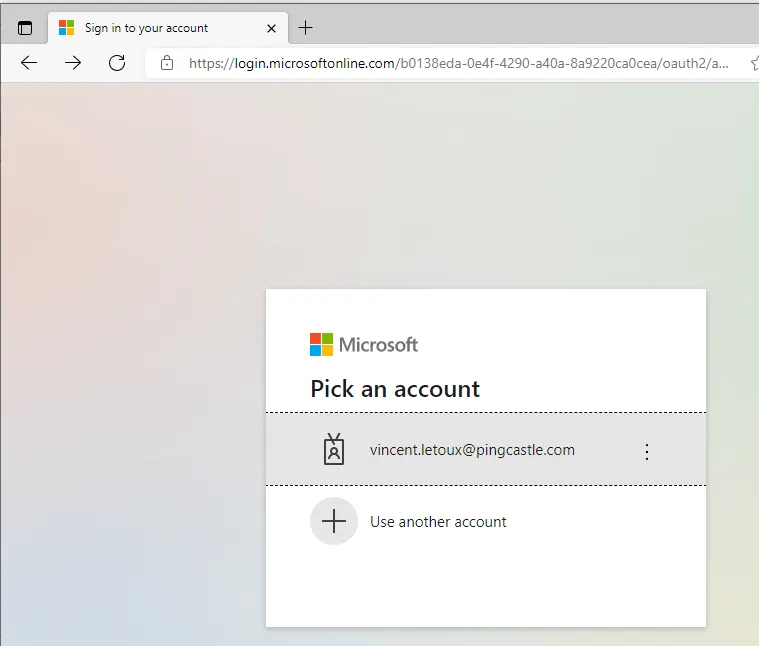
For Azure configuration, the application asks you to connect using Azure.
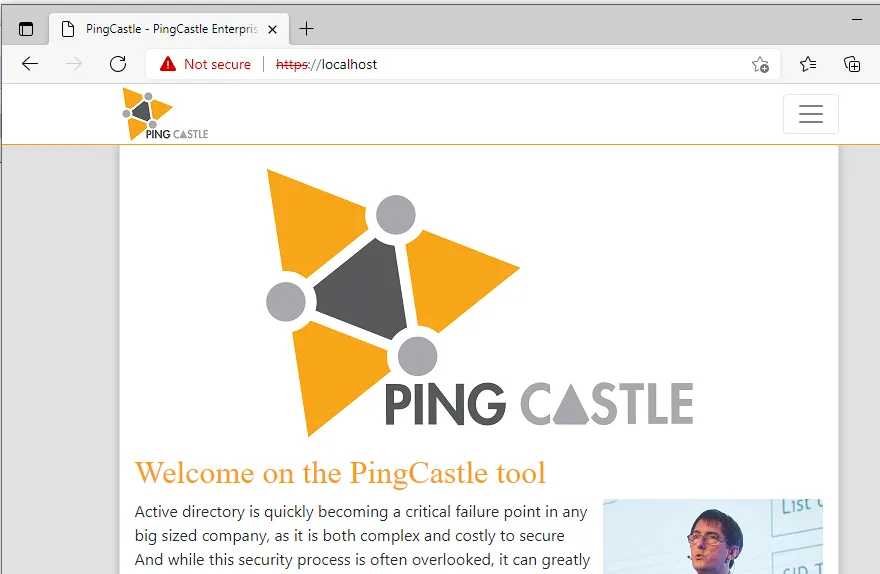
It then display the welcome screen
Initial configuration
For more details see the user documentation.
Encryption
PingCastle Pro doesn't ship with a functional default encryption key. The configuration includes a placeholder entry named default, but its key value is empty, so no usable encryption key exists until you add one.
To add a custom ciphering key, go to Advanced > Decryption.
Bulk Import of existing reports
You can import existing report using the bulk import functionality. It is a feature of the command line client. You need to create an API key (Agents page) and use the application URL to use this feature.
Agents
You can configure PingCastle program to send their report to the program.
You need to set up an API key for an agent using the Advanced -> Agent feature.
Then use the command switches --api-endpoint <endpoint> and
--api-key <key> in the health check mode.
You can upload existing reports stored in the current directory with the command:
pingcastle.exe --upload-all-reports --api-endpoint https://endpoint.com --api-key abdsnhvdsklLksf
Post Installation - Scheduler
Quick installation
PingCastle lets the application administrator schedule scans. It is useful when you install the solution in a central forest and need to scan all child domains.
By default, PingCastle runs as a limited user. It can't access the network nor modify system settings. To use the scheduler, you must change permissions.
One approach is to change the user from Application to LocalSystem.
Open the IIS console and go to the application pools settings. Go to advanced settings.
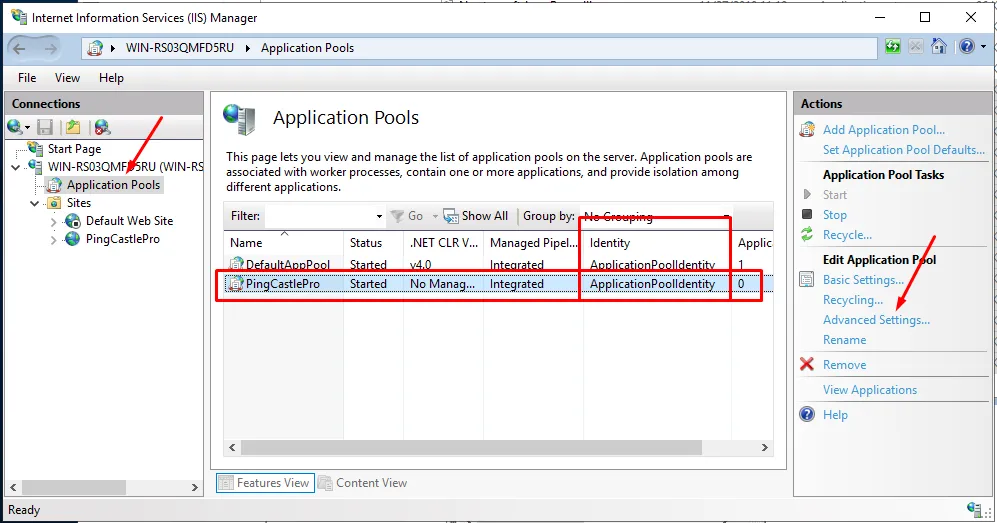
Find the Identity setting and change ApplicationPoolIdentity to LocalSystem.


Then restart the application pool.
If you are using a custom identity for the application pool (to access a database hosted in another server), you have to promote this user as local admin. This is a Windows restriction of the permission model, and you can't delegate access to the task scheduler.
Custom installation
PingCastle uses a folder named "PingCastle" in the task scheduler. The COM API exposes the security descriptor, which the native PowerShell API doesn't.
If you want PingCastle to start or stop tasks but not edit them (which requires the account to be local admin), you need to delegate the permission to start and run tasks. You can perform the following actions as admin in powershell:
# connect to the task scheduler service
$scheduleObject = New-Object -ComObject schedule.service
$scheduleObject.connect()
$rootFolder = $scheduleObject.GetFolder("")
$PingCastleFolder = $rootFolder.GetFolder("PingCastle")
$PingCastleFolder.GetTasks(1) | Foreach-Object {
    $sddl = $_.GetSecurityDescriptor(1+2+4+8)
    # add full control to the task
    $sddl += "(A;S-1-XXX-XXX-XXX;FA;;;SY)"
    $_.SetSecurityDescriptor($sddl, 0)
}
Replace S-1-XXX-XXX-XXX with the SID of the account running the PingCastle web application.
Task edition
You can modify tasks outside of the PingCastle application. For a task to appear here, the application checks that this is a weekly schedule on one selected day and that the action matches classical command line options. That means you can modify --server or add additional parameters (for example --log-console). You can also modify the identity running the scheduled task (default is system)
However, if you edit the task within the web application, it overwrites your customizations.
PingCastle "agent" deployment
To avoid any gap in the security architecture, PingCastle can run scans outside the web application. That means that in this case the local domains have to push their information into PingCastle Enterprise.
Program
Run the latest official version of PingCastle. The PingCastle.exe program in the same directory as PingCastleEnterprise is suitable for use.
PingCastle Enterprise supports running the PingCastle audit program at a higher or lower version. If a newer version adds features, they won't appear unless you update the PingCastle Enterprise program, but you lose no data meanwhile.
Schedule
The best way to schedule it is to run your own scheduler. Indeed, you may have purchased a batch product which is looking for failure or dependencies.
Alternatively, the last page of the PingCastle audit program documentation describes how to run it using the Windows scheduler.
The recommended frequency is every week, using a normal user account (not privileged) running on a batch server (not a DC).
Command
You need to create an API key with the upload right (the "Agent" page as admin).
You need to test the command line before scheduling it.
The typical command line is:
PingCastle --healthcheck (optional --server <other domain>) --level Full --api-endpoint https://youservername --api-key yourapikey --out run_logs.txt
The typical pitfalls are enabling TLS1.2 for the server but not installing the TLS1.2 client package on the server running the audit.
Troubleshooting
Netwrix recommends starting the application manually to view any problem such as:
-
TCP port already used
-
connection string invalid
The method to run the application manually is to run the command:
dotnet.exe PingCastlePro.dll
(By default, dotnet.exe is in c:\program files\dotnet)
Additionally, you can open the application on the network by
specifying the --server.urls parameter:
dotnet.exe PingCastlePro.dll --server.urls=http://*:8080
However, if a permission problem exists in the database, this method won't display an error because the database connects under the user context, not the system context. Typically on Windows, the IIS service connect under IIS APPPool\AppName. To grant rights to the application pool account on SQL Server, see How to add the ApplicationPoolIdentity to a SQL Server login.
Then, depending on the platform, PingCastle can store additional logs.
On Windows, you can edit the web.config file at the root to generate debug logs. The event viewer can also store debugging data.
On Linux, the command service <name-of-service> status can indicate if
the service is running or not. If an error prevents the service from
starting, the command shows the log.
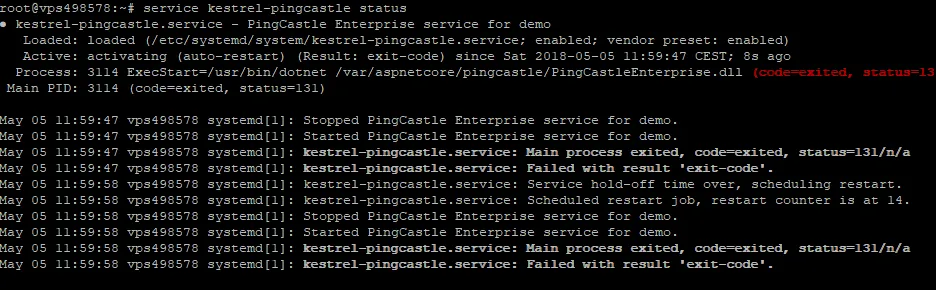
When no log is available, you can run the program manually outside of the service scope to get a more detailed error message.
Example:
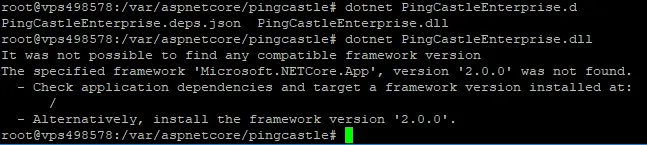
Here are a couple of well-known errors, their description and their solution
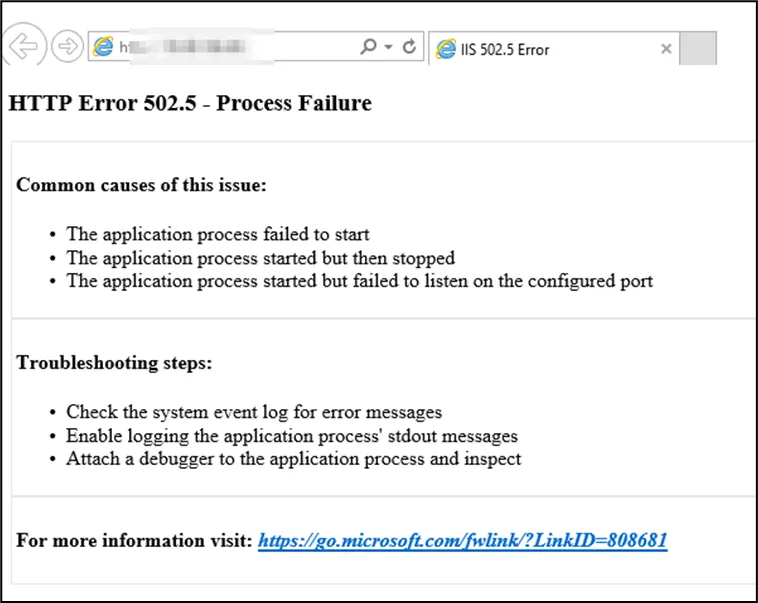
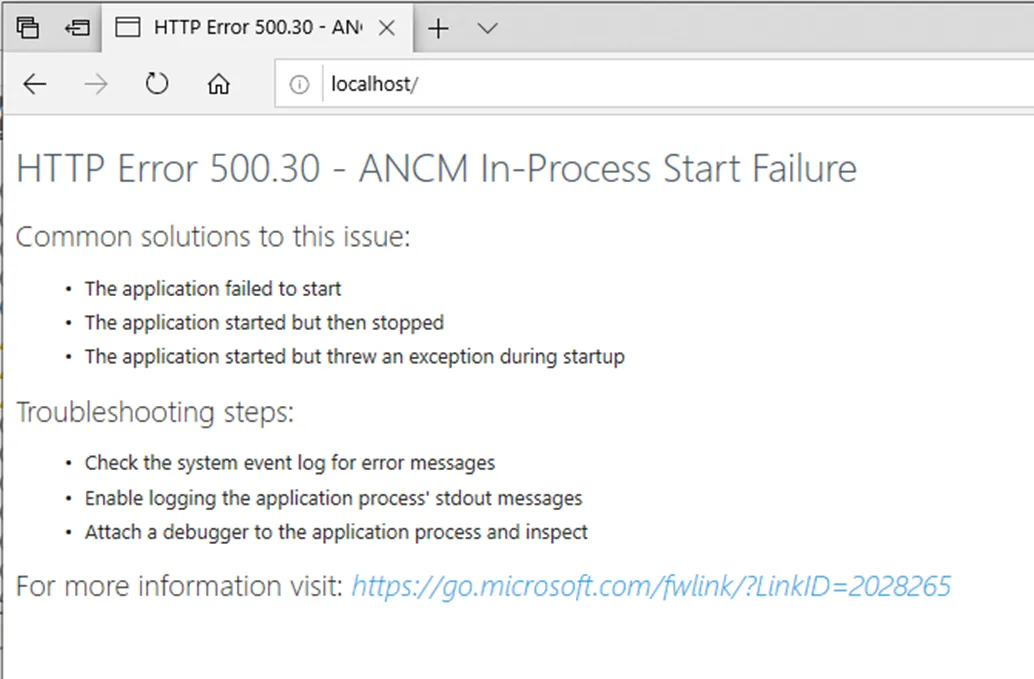
Incorrect version of the asp.net core middleware
Here are the messages that appear when the application runs under a service:

And the message when running on the command line:
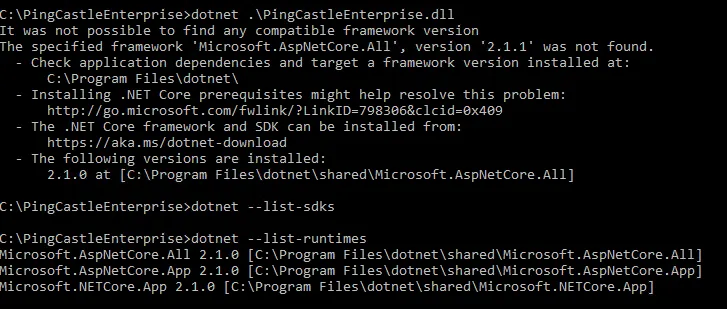
 Solution:
identify the correct version of the framework and install it. Install the IIS middleware if you are installing on IIS.
The last error was related to the missing KB KB2533623
Error at the application startup
When the application can't start, the following messages appear:

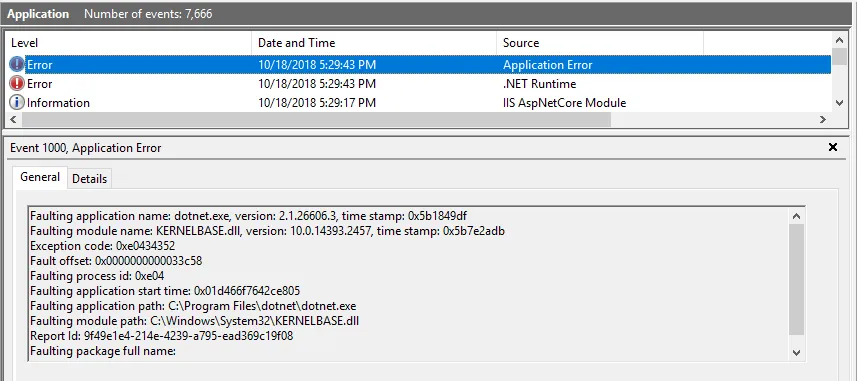
A more detailed message appears in the event log or directly on the command line:
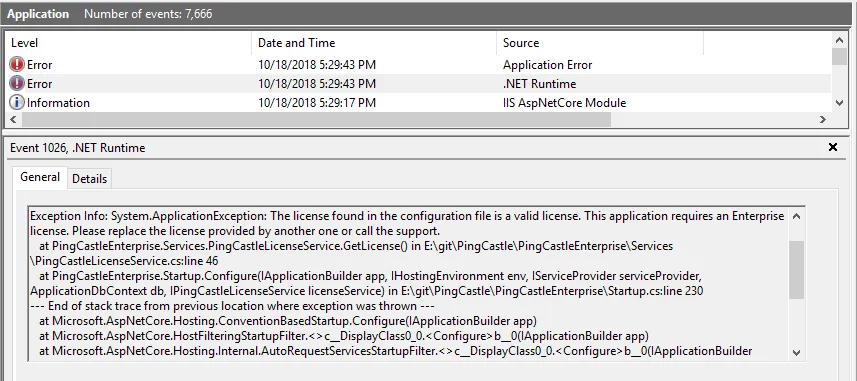
In this case, the license was invalid and you must replace it in the file appsettings.Production.json.
Accurate permissions on the database
When the database doesn't contain the tables it needs, the application tries to create them. If you haven't granted the permissions, PingCastle generates a message and the application can't start.
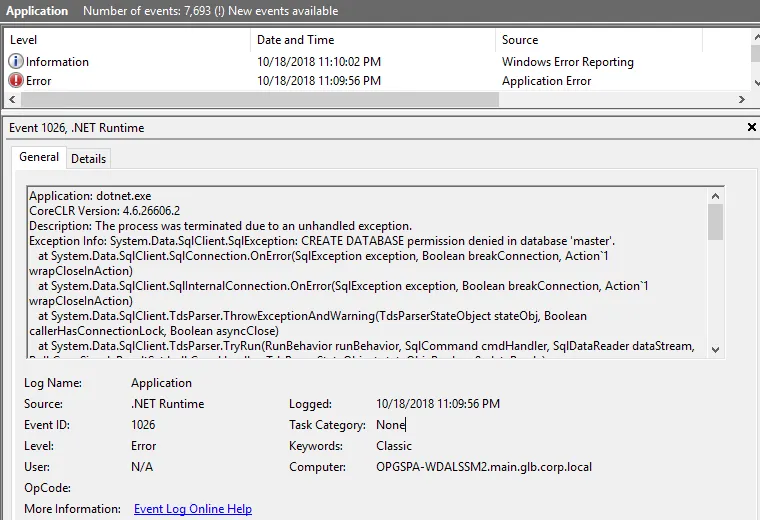
Solution:
Grant the right to create tables in the database or run a SQL script to create this table. This script is available on demand.
The inability to create tables is a symptom of insufficient permissions. If the application pool identity can't add or remove records in the database, the application can't start.
If you're running PingCastle from another SQL Server, the default identity the application pool uses won't have access.
Be sure you can connect from another computer than your SQL database server. Indeed, by default you have a firewall preventing remote connection and that the database may not be exposed. Be sure that it is available through TCP. (in the following case, remote access is forbidden because TCP/IP is disabled)
You have 2 solutions to grant PingCastle an identity allowed on SQL Server:
- Changing the application pool identity to match an Active Directory user that has permissions to the database
- You can use a SQL Server local account and specify its login password in the connection string
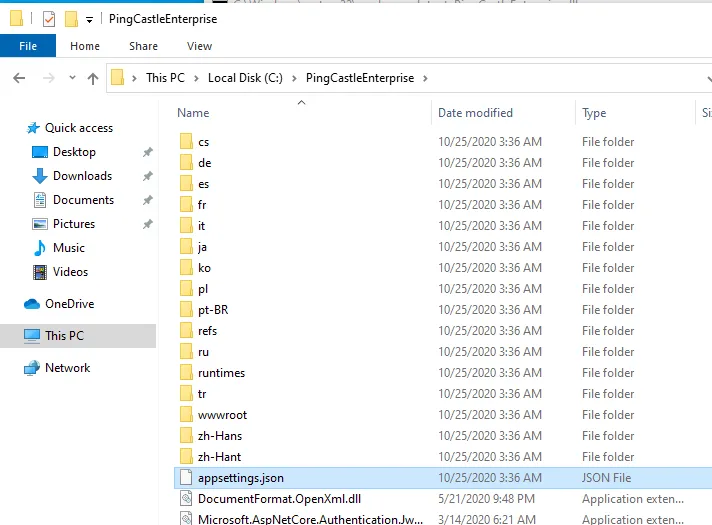
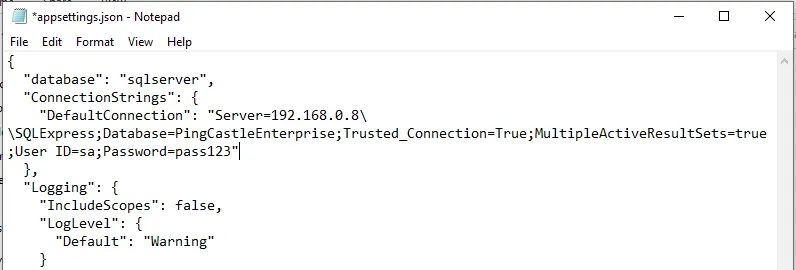
Edit the application.setting file and locate the connection string. Then
add ;User ID=sa;Password=pass123
Enable Debug Logging
-
Log in to the PingCastle Pro Server.
-
Locate the appsettings.json file.
-
This is usually located at: C:\PingCastlePro
-
Edit the Appsettings.json file so the Logging section matches the following:
"Logging": {
    "IncludeScopes": false,
    "LogLevel": {
        "Default": "Debug",
        "System": "Information",
        "Microsoft": "Information"
    }
}
- From the same directory, open the web.config file and edit the aspNetCore tag so stdoutLogEnabled=true.
Example
<aspNetCore processPath="dotnet" arguments=".\PingCastlePro.dll" stdoutLogEnabled="true" stdoutLogFile=".\logs\stdout" hostingModel="InProcess" />
-
Open PowerShell as Administrator and type in IISRESET to restart the web services.
-
Log in and perform actions in the PingCastle Pro web portal. Check C:\PingCastlePro\logs\ to ensure PingCastle Pro is writing logs.