Setting Up Policies
- Policy Information general information about the policy.
- Set Up a Default Policy procedure to set up your default policy and approvers.
- Change Controls reference information for the Change Controls tab.
- Approvals reference information for the Approvals tab.
- Process Policies reference information for the Process Policies tab.
- Customization Policies reference information for the Customization Policies tab.
- Control Policies reference information for the Control Policies tab.
- SoD Policies reference information for the SoD Policies tab.
- Set Up Additional Policies set up additional policies as required.
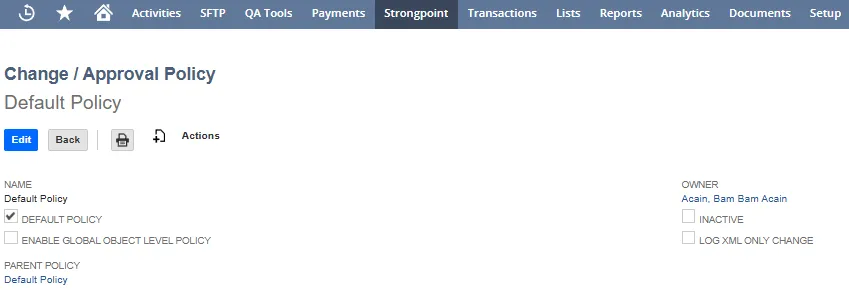
Policy Information
- Name: Policy name.
- Default Policy: Checked if it is the default policy.
- Enable Global Object Level Policy: Disabled by default. Check to enable.
Change Policy picking process with Global Object Level Policy disabled:- If customizations or customization processes are attached to specific policies, pick the most stringent policy.
- If there are no object-specific policies, pick Default Policy.
Change Policy picking process with Global Object Level Policy enabled: - If customizations or customization processes are attached to specific policies, pick the most stringent policy.
- If there are no object-specific policies, look for policies that are not attached to any customization or process. Compare the change level among all resulting policies and the Default Policy, then pick the most stringent policy.
- Parent Policy: Parent policy information to help organize policies, does not impact the process. This field is not available when editing the Default Policy. For child policies, it can be changed when the policy is edited.
- Owner: Person who created the policy.
- Inactive: Checked if the policy is not active.
- Log XML Only Change: Checked to track online changes that occur in the XML, such as NetSuite internal changes.Recommended to leave this unchecked due to the volume of false positives you would need to manage.
Set Up a Default Policy
- Open Strongpoint > Change Management Tools > Change/Approval Policy
- Edit the Default Policy so that it has the following settings:
-
Header: Everything in the Header should remain the same including the name Default.
-
Change Controls:
-
Approvals: Select the policy approvers on the Approvals tab.
- Click Save
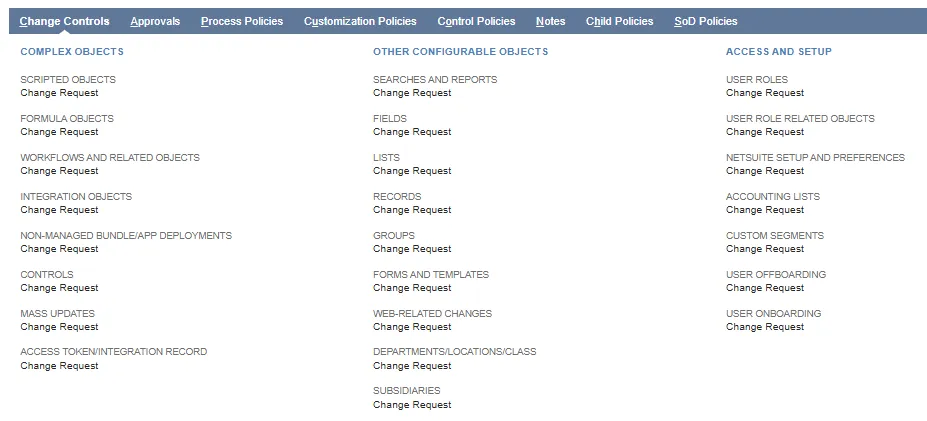
Change Controls
Each object type has an independent change level. The change level specifies what approval is required for changes to the objects to be compliant with this policy.
Change Levels
No Logs Created: changes to these objects update the customization documentation is updated but does not create change logs. A warning text is displayed when the Administrator sets the change level to No Logs Created.
Log Changes Only: changes to these objects are automatically marked compliant.
Process Issue Only: changes to these objects require an Approved Process Issue with a status not set to Completed.
Change Request: changes to these objects require an Approved Change Request with a status not set to Completed.
Sandbox Development & Testing: changes to these objects require an Approved Change Request in the Stage Deployment Record with a status not set to Completed.
Full Software Development Lifecycle: changes to these objects require an Approved Change Request in the Stage Deployment Record with a status not set to Completed, and a parent Change Request attached to the Deployment Record.
To add new change levels, select New or use the + next to a field when editing the policy.
Object Types
Complex Objects
- Scripted Objects: Scripts, Workflows and any object upon with a script or workflow dependency. Default: Log Changes Only
- Formula Objects: Fields used in Formulas. Default: Sandbox Development & Testing
- Workflows and Related Objects: Changes to Workflows, or any objects used by a Workflow. When an object is used by a Script and a Workflow, we use the higher level between Scripted Objects, and Workflows and Related Objects change controls. Default: Change Request
- Integration Objects: Changes to External Records, External Fields, External Systems, and Integrations. Default: Log Changes Only
- Non-Managed Bundle/App Deployments: Bundle or SuiteApp Deploy into an account, updates of the bundle or SuiteApp object are handled by object type. (Only non-managed bundles/Apps). Default: Sandbox Development & Testing
- Agent Controls: Changes to Control Searches. Default: Log Changes Only
- Mass Updates: Changes to Mass Updates Default: Log Changes Only
Other Configurable Objects
- Searches and Reports: Searches and Reports not flagged as controls or scripted. Default: Change Request
- Fields: Changes to custom fields. Default: Log Changes Only
- Lists: Changes to custom lists. Default: Log Changes Only
- Records: Changes to custom records. Default: Log Changes Only
- Groups: Changes to groups. Default: Log Changes Only
- Forms and Template Changes: Changes to Forms and Templates. Default: Log Changes Only
- Web-Related Changes: Objects affecting web objects, for example fields displayed in a site or any part of SuiteCommerce Advanced. Default: Log Changes Only
- Departments/Locations/Class: Changes to department, location, or class. Default: Log Changes Only
- Subsidiaries: Changes to subsidiary. Default: Log Changes Only
Access and Setup
- User Roles: Changes to role assignments on the Change Control. Default: Log Changes Only
- User Role Assignment: Changes to user role assignments on the Change Control. Default: Log Changes Only
- User Role Related Objects: Changes related to user role changes on the Change Control. Default: Log Changes Only
- NetSuite SetUp and Preferences: Changes to NetSuite setup objects including accounting lists, segments, enabled features and preferences. Default: Log Changes Only
- Accounting Lists: Changes to accounting lists. Default: Log Changes Only
- Custom Segments: Changes to custom segments. Default: Log Changes Only
- User Offboarding: Available when Enhanced User Provisioning is enabled.
- User Onboarding: Available when Enhanced User Provisioning is enabled.
Approvals
Approvers initiate the change request and enable it to move to the next stage.
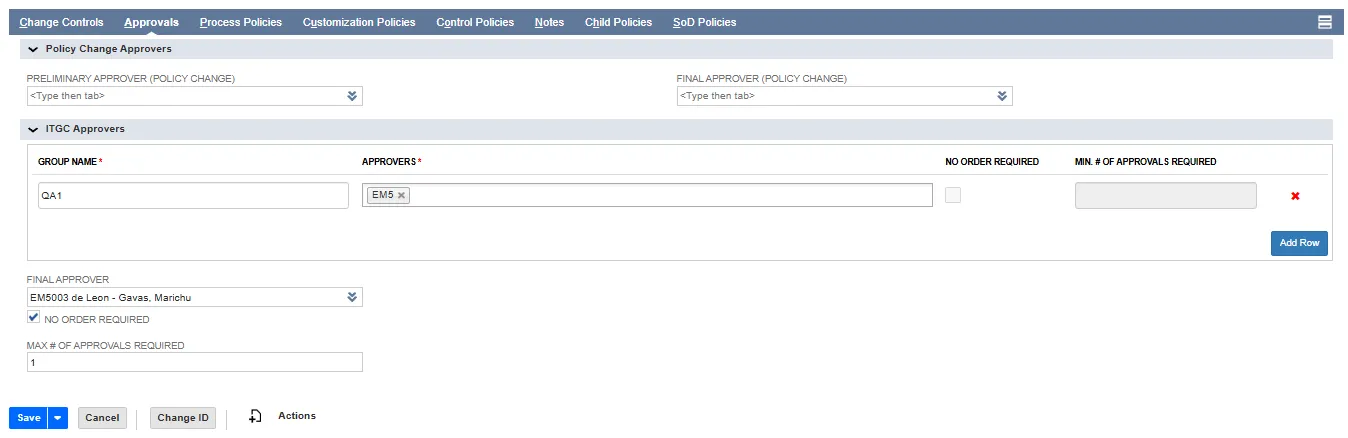
Policy Change Approvers
This section is only applies to the default policy.
-
Preliminary Approver (Policy Change): Specifies the preliminary approver required for a policy change. They are listed as the first approver in the Change Request.
-
Final Approver (Policy Change): Specifies the final approver required for a policy change. The person who needs to approve after all other approvals have been obtained.
NOTE: Specifying a Final Approver locks the default policy and all child policies. If a user attempts to change a policy, a notice is displayed. Click Request Approval. The form is launched, with your proposed changes populated.

ITGC Approvers
Groups are an efficient method to specify approvers. For example, if you need one approver from each of several company functions, you can create a group for each functional area, and select a minimum of 1 approval. Once each group has approved, the policy moves on to the Final Approver.
- Group Name: enter a descriptive name to identify the approvers.
- Approvers: click in the entry box and select approvers from the available user list.
- No Order Required: check the box if approvers can approve in any order. If not checked, approvers must approve in the order specified in the Approvers entry.
- Min # of Approvals Required: select the minimum number of approvers for the group. This option is not available if No Order Required is not checked.
- Add Row: click to add another ITGC Approver Group. Click the red X to delete an existing group.
Final Approver
- Final Approver: Specifies the final approver of changes affected by given policies.
- No Order Required: Check this box to allow concurrent approvers. If blank, approvals route in order. Default is blank.
- Max # of Approvals Required: Specifies the maximum number of approvals to consider a change complete. If blank, all approvers are required.
- Change ID: Opens a form displaying the Name, Old ID and an input field for the New ID. Change ID is available as a button when you Edit the policy.
Process Policies
Process Policies specify which processes the policy applies to and how they should be managed. Process Policies are only applicable if you implement Manage Process Risk.
- Require Affected Process Approval: Check to require approval from process owners on the Change Request. Default is checked.
- Include Process Editors as Alternates: Check to include Process Editors as alternate approvers. Process Editors are specified on the Continuous Improvement tab of the Process record. Default is not checked.
- Require Impacted Process Approval: Check to require approval from process owners of related objects. Often these owners are not specifically listed in the Change Request. Default is not checked.
- Require Parent Process Owner Approval: Owners of processes at or above the parent level must approve. Default is not checked.
- New Process: Launches the new Process form.
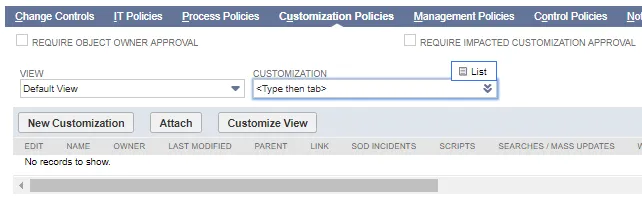
Customization Policies
Customization Policies specifies the objects affected by the policy.
- Require Object Owner Approval: Owner of the customization record. Likely the person who created the object. Default is not checked. Recommend checking this box.
- Require Impacted Customization Approval: Owner of any impacted customization record in NetSuite. Default is not checked.
- View and Customization: Select a View and navigate to a Customization. Click Attach to add the selected customization to the Policy.
- New Customization: Launches the new Customization form.
- Customize View: Launches the Active Customizations Search results.
Control Policies
Control Policies specify controls for this policy.
- Control Assignee Approval: Checked if there is a control assignee in Control Policies.
- Process Owner(s): Checked if there are any process owners in Control Policies.
- Control Owner: Checked if there is a control owner in Control Policies.
SoD Policies
Segregation of Duties Policies specify the approvers for this policy.
- SoD Preliminary Approver: One or more preliminary SoD approvers for changes affected by the policy.
- SoD Final Approver: One or more final SoD approvers for changes affected by the policy.
- Require Change Request: If checked, a Change Request is Required for any changes to the policy.
Set Up Additional Policies
In some cases, you may want stricter controls on certain objects. For example, many of our public companies create a specific policy for SOX related searches, since they want it tighter than Log Only for those objects. To set up object specific policies, the initial spider must be complete, so you can attach the Customization Record to the policy.
To set up additional policies:
- Open Strongpoint> Change Management Tools > Change/Approval Policy > New
- Enter the policy information.
- Assign the Change Levels on the Change Controls tab.
- Assign the Approvers on the IT Policies tab.
- Click Save
- Click Edit
- Open the Customization Policies tab.
- Check Require Object Owner Approval if needed.
- Check Require Impacted Customization Approval if needed.
- Add Customizations. Attaching customizations to the policy is how Platform Governance for NetSuite knows a particular policy should be applied to specific objects. If there are multiple policies applied to specific objects, the higher change level is selected to keep the change compliant.
- Change the View to help locate the desired customization.
- Enter all of part of the customization in Customization, or click the double down arrow icon to select the List option.
- Select the customization.
- Click Attach.
- Click Save when you are finished adding customizations to the Policy.
Another method to add customization is through NetSuite's Mass Update. Here is the basic process. Refer to the NetSuite help for more information on Mass Update.
- Open Lists > Mass Updates
- Expand General Updates > Custom Records > Customization
- Use the Criteria tab to locate and Add your customizations.
- Open the Mass Update Fields tab.
- Locate the Change/ Approval Policy field. (You can use your browser’s Find function.)
- Check the box and select your new Policy.
- Save and run the Mass Update.
- Save your Change Approval Policy.