Finding Change Requests from Jira
To find your change requests that originated in Jira:
Create a Saved Search:
- Open Lists > Search > Saved Searches > New
- Click Change Request
- Best practice is to title the search something meaningful, such as Find Change Requests from Jira
- You can add it to your dashboard, list view, reminders, or show it in your menu if you use this search frequently.
- Add the filter:
Originated system
is
Set by Jira - Click Preview to review your search.
- Save your Search.
The search runs when you save it. To run it in the future:
- Open Lists > Search > Saved Searches
- Select View by your search.
Jira Walkthrough Example
This walkthrough is one example based on our test account. You must install and configure the Jira integration, including setting up the Jira Statuses prior to using this walkthrough.
The walkthrough demonstrates these steps:
- Create a Jira Ticket
- Enter your Credentials
- Add Customizations
- Perform Risk Assessment
- Ready for Development
- Deploy Changes and Complete the Ticket
Create a Jira Ticket
-
Login to your Jira account.
-
Open a Project.
-
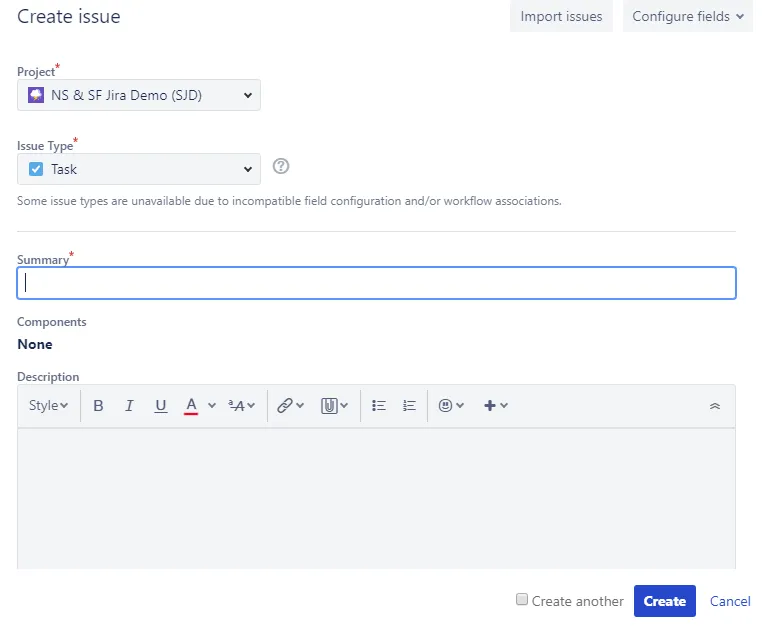
Click Create (+).
-
Enter your information on the Create issue form:
- Project: Select your Project. NS & SF Jira Demo (SJD) is selected for this example.
- Issue Type: Select your Jira type. Task is selected for this example.
- Summary: Add a name
- Description (optional)
-
Click Create.
Alerts and notifications may occur during this walkthrough, and are not included in these steps. For example, override alert, notifications for approvers, and notification for the change request.
Enter your Credentials
-
Open your new Jira ticket. If you look at the Open Change Request, the status is Not logged in your account.
-
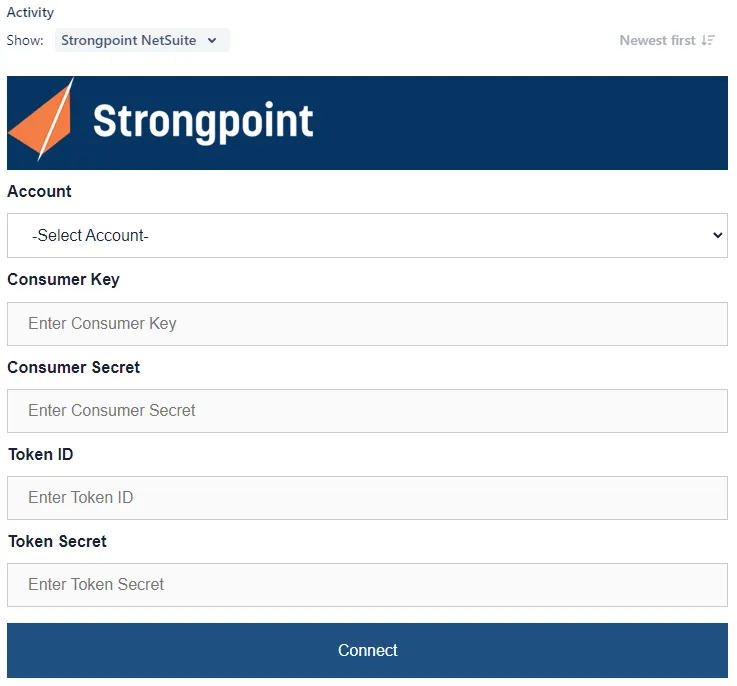
Expand Comments and select Strongpoint NetSuite.

-
Select your NetSuite Account and enter your Consumer Key/Secret and Token ID/Secret. If your account has an optional Integration User role, enter the Email and Password credentials supplied by your administrator
-
Click Connect. If the connection is successful, the form is displayed (see Add Customizations section). The Synchronized withstatus displays the account you are logged into for NetSuite.
You cannot login if you do not have the appropriate role permissions to create a Change Request.
If you do not enter the correct email or password, an error is displayed. After six unsuccessful consecutive attempts to login, your account is suspended for 30 minutes.

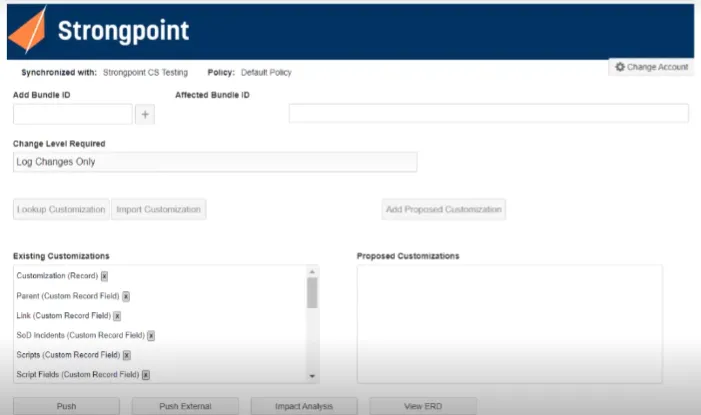
Add Customizations
Once you have logged in, the form is displayed.
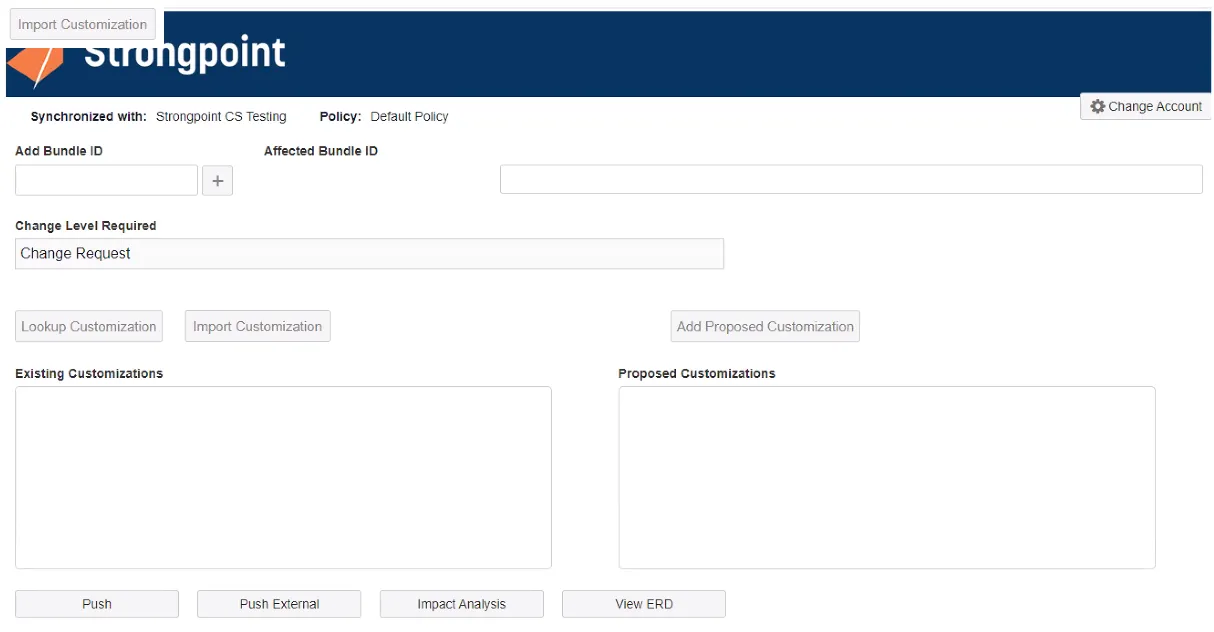
- Synchronized with displays the connected account. Click Change Account to switch to a different Account.
- Policy is blank until Customizations have been added. The Policy is determined by the Customization with the strictest policy.
- Affected Bundle ID can be added to the ticket. Enter the ID in the Add Bundle ID entry box
and click (+) to add it. You can delete an Affected Bundle ID with the
 icon.
icon. - Change Level Required is Log Changes Only until Customizations have been added. If there are multiple change levels, the most stringent one is applied.
- Specify the Customizations you are changing or adding.
- Lookup Customization search for a customization. If the Customization exists in your account, it is added to the Existing Customizations list.
- Import Customization if you have either an xml file generated from an existing ticket,
or an SDF zip file created in your Sandbox account, you can import the customizations.
Click Import Customization, navigate to your file, and click Import.
Modified customizations are added to the Existing Customizations list, new customizations are added to the Proposed Customizations list. - Add Proposed Customization adds a new customizations are added to the Proposed
Customizations list. You can delete added Customizations with the
icon.
- Push creates the Change Request in NetSuite. Push is also used to manually update your Change Request if you are not using the Automatic Synchronization feature.
- Push External same as Push except you can specify a different Jira account.
- Impact Analysis and View ERD are tools to Perform Risk Assessment.
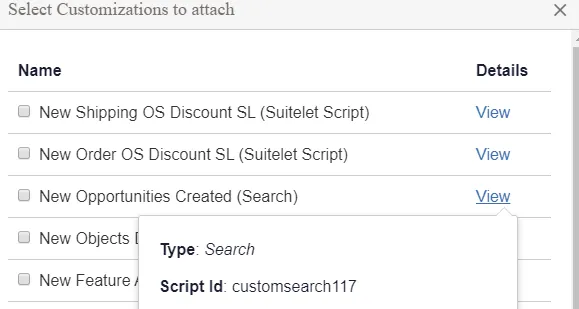
Add Existing Customizations by Name or Script ID
-
Click Lookup Customization.
-
Enter all or part of a Name.. For this example, enter new.
-
Click + to search for matching Customizations. View displays the Type and Script ID for a Customization.
-
Select one or more Customizations. For this example, select New Opportunities Created (Search).
-
Click Add Selected Customizations. The selected Customization is added to the Existing Customizations list.

-
Enter the Script ID custentity_fmt_cust_credit_on_hold in Add Customizations and click +.
-
The Set Customer Credit on Hold (Entity Field) is displayed. Select it, and click Add Selected Customizations. The selected Customization is added to the Existing Customizations list. The Change Level Required changes from Log Changes Only to Change Request, which is the policy for the Set Customer Credit on Hold field.
Add Proposed Customizations
In this procedure, we are adding a new Customization.
-
Enter a new, valid Script ID in the Add Customizations field. For this example, enter customlist_customer_priorities.
-
Click (+) to add it. If the Script ID is valid, and does not match an existing Script ID, the new Customization is added to the Proposed Customizations list.

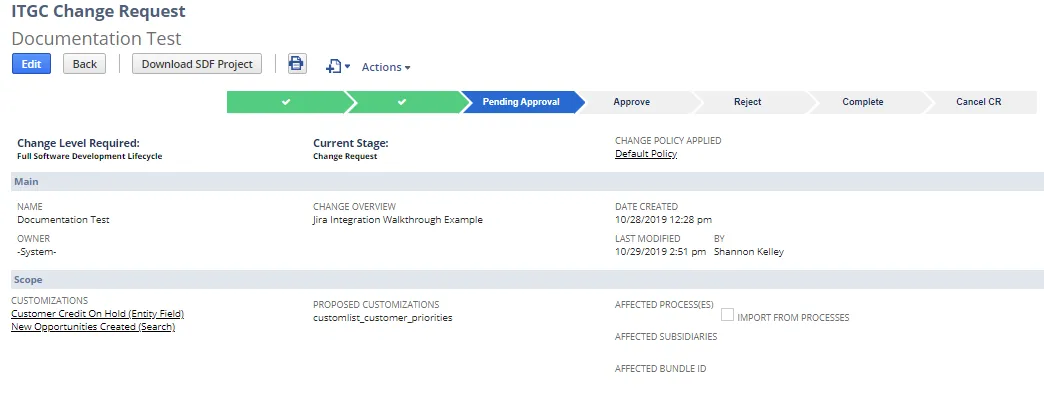
Create the Change Request
If you expand the Change Request field on the right, the status is Not Synced with Strongpoint.
-
Change the Jira status of your ticket to match the status set up for Jira Statuses for In Progress Status. For example, In Progress.
-
Click Push to create the Change Request. This step is required for both manual and automatic synchronization. A confirmation your Change Request was Created/Updated is displayed. The change request is created in NetSuite with the In Progress status. If you mapped some of your Jira statuses, then Push is only available those mapped statuses.
-
Expand the Change Request field on the right. The status is now In Progress. There is a link to open the Change Request in NetSuite.

Import Customizations from Jira
In this procedure, we are adding customizations exported into an xml file. This is not required, but is an alternative if you have a lot of customizations.
-
Click Import Customization.

-
Click Choose File, navigate to your xml file and click Open.
-
Click Import. The customizations appear in the Existing Customizations list.
Perform Risk Assessment
Impact Analysis
The impact analysis tool reviews your customizations for dependencies or risks. Click Impact Analysis to run the tool. Here is an example report:
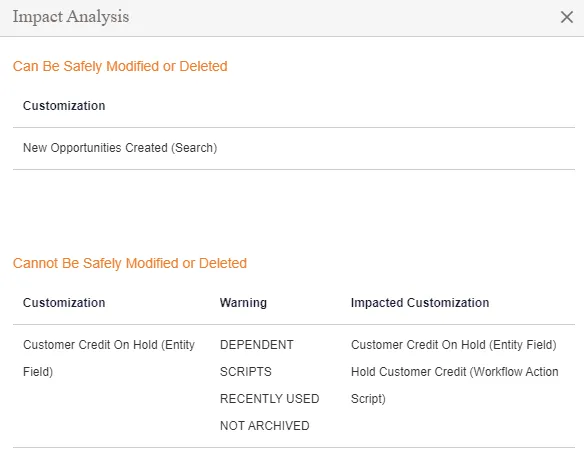
Before proceeding with your changes, review each warning to ensure your change does not break something. Dependencies can easily be reviewed with the ERD tool.
View ERD
The Entity Relationship Diagram (ERD) tool graphically displays your Customizations and all dependencies.
-
Click View ERD.
-
Select the Customization to view from the list. For this example, select Set Customer Credit on Hold (Entity Field).
-
When the diagram opens, you can explore the dependencies to evaluate the effect of your intended changes.

Ready for Development
Once you have resolved any risk or conflicts, your changes are ready for development:
-
Change the Jira status of your ticket to match the status set up for Jira Statuses for Pending Approval Status. For example, Selected for Development.
-
Click Push if you are not using Automatic Synchronization to push status changes. A confirmation your Change Request was Created/Updated is displayed.
-
Expand the Change Request field on the right. The status is now Pending Approval. There is a link to open the Change Request in NetSuite.

-
Click the Go To Record link to view the Change Request.
Deploy Changes and Complete the Ticket
When development is done, and the Change Request is approved according to your policy, the Jira ticket is ready to be updated.
- Expand the Change Request field on the right. The status is Approved.

- Change the Jira status of your ticket to match the status set up for Jira Statuses for Approved Status. In our example set up, we have two possible statuses: Ready for Deployment and Done. Setting up two statuses enables you to split up the deployment and the ticket closure if you want to monitor the deployment task separately. Both statuses are valid for Deployment, but only Done closes the Jira ticket and updates the Change Request to Completed.
- Click Push if you are not using Automatic Synchronization to push status changes. A confirmation your Change Request was Created/Updated is displayed.
- If you used Ready for Deployment, update your Jira status to Done once your deployment and verification activities are complete.
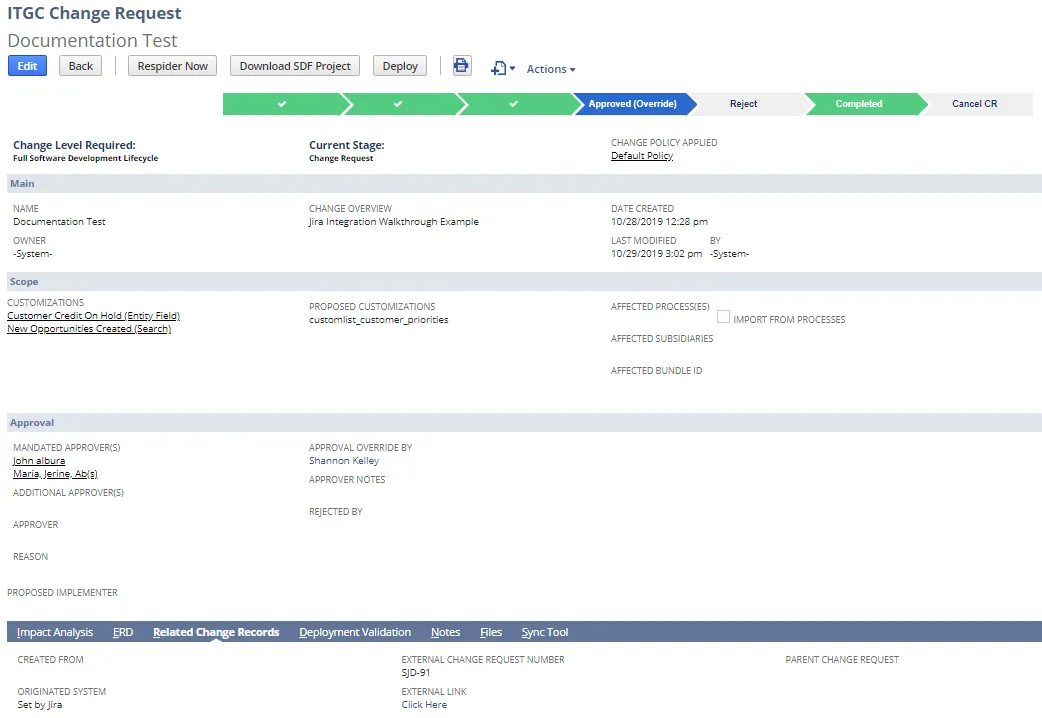
If you open the Change Request in NetSuite:
-
All Customizations added from Jira are displayed.
-
Affected Bundle ID is added (if used).
-
Change Overview is set to the Jira ticket description.
-
Change Request is Approved and ready to be deployed.
-
Originated System, External Change Request Number and External Link to the Jira ticket are populated on the Related Change Records tab.
-
If the Jira status is Done, the Change Request shows as Completed.