Clearing a Control Incident
Unresolved Control Incidents are filtered and displayed under the Unresolved Control Incidents Report.
Here is the process to clear/resolve a control incident:
-
Open Strongpoint > Financial Controls > Unresolved Control Incidents
-
Click on the Customization to display the incidents.
-
Click Edit on the Incident record to clear/resolve.
-
Add the Resolution Description.
-
Set Status to Closed.
-
Save the Change Log.
The incident moves from Unresolved Control Incident Log to Resolved Control Incident Log.
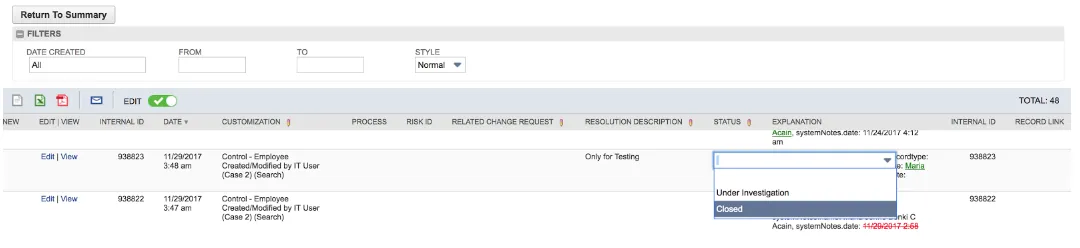
Alternatively, you can complete this process by inline editing of the Unresolved Control Incidents Report::
- Click on EDIT in the report tool bar. When enabled, it is green with a check mark.
- Click on the red pencil icon in the column head. Columns without the pencil icon cannot be edited.
- Click in the column to open a text box.
Example: Set an Agent Control
Here is the process to create a control to monitor changes:
- Create a Saved Search
- Create the Customization Record
- Designate the Customization as a Control
Create a Saved Search
-
Open Lists > Search > Saved Searches > New
-
Select Employee for the Search Type
-
Add Control Employee Purchase Limit and Purchase Approval Limit Control for Search Title
-
Check Public
-
Add filters on the Criteria tab:
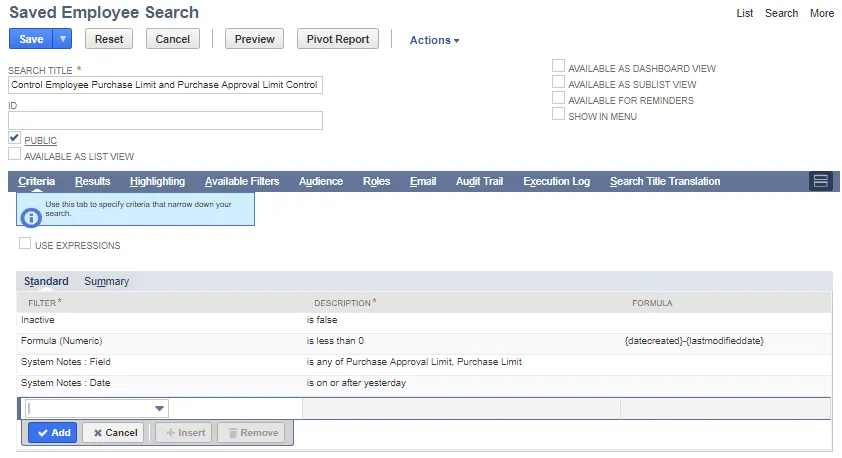
Select Filter What to Set Resulting Description Formula To Set Inactive Select No Is false Formula (Numeric) Select less than for Formula (Numeric) Enter 0 for Value is less than 0 {datecreated}-{lastmodifieddate} System Notes Fields Select Field Select any of Click Purchase Approval Limit Ctrl-Click Purchase Limit Is any of Purchase Approval Limit, Purchase Limit System Notes Fields Select Date Select on or after Select yesterday is on or after yesterday Field Summary Type --- --- Name Group System Notes: Field Group System Notes: Date Maximum System Notes: Old Value Group System Notes: New Value Group System Notes: Set by Group Internal ID Group -
Open the Results tab. You can Remove all to clear the defaults. Add the following fields:
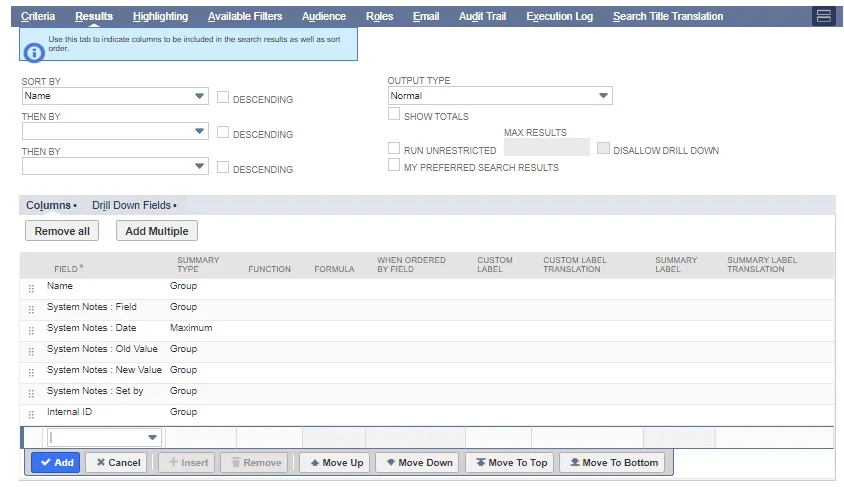
-
Save the search.
-
Note the assigned ID for your new Search. For example, customsearch5673
Create the Customization Record
You can wait until the next AutoSpider run, or manually create the customization record:
-
Open Strongpoint > Customizations > Customization > New
-
Enter information in the required fields:
-
Custom Form: Use the Simplified Form, or select a different form if you want to add a Process/Step, such as Financial.
-
Name: Best practice is to enter a meaningful Name and Description. For this example, Name is the same as the Saved Search:
Control Employee Purchase Limit and Purchase Approval Limit Control -
Type: Select Search
-
Script ID: Enter the ID from your Saved Search. For example, customsearch5673

-
-
Save the customization.
-
Click Respider Now
Leave the Customization Record open.
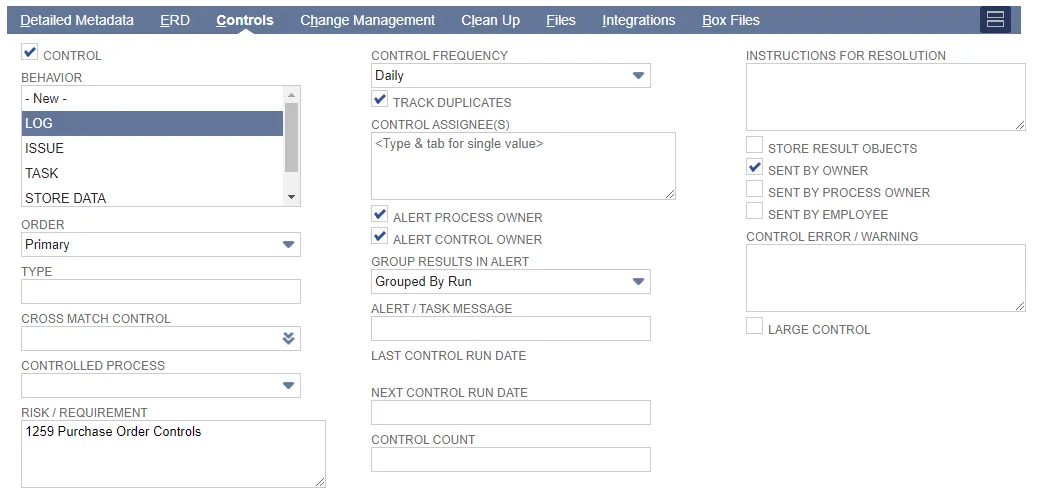
Designate the Customization as a Control
From the customization record:
- Click Edit
- Open the Controls tab.
- Check the Control box.
- Fill in the following fields:
- Behavior: Select Log.
- Controlled Process: If you added a Process/Step when you created the customization, select it here.
- Risk/Requirement: Assign or create a new Control Process and Risk Requirement. For example, 1259 Purchase Order Controls.
- Control Error/Warning: warnings or errors are displayed in this box.
- Cross Match Control, Cross Match Field and Cross Match Operator can be set to effectively perform a double join to filter your data and eliminate false positives. For example, a script to create an invoice from the user interface is saved to be run as administrator. A user creates the invoice from the interface as part of their work flow. Running a search for administrator-touched transactions causes false positives as the user is not an administrator. Using cross match, the first Saved Search is for all transactions by an administrator. The second Saved Search is an employee search using the administrator role. Cross Match returns the intersection of those two searches, showing only the transactions performed by administrators.
- Check the Large Control box if the expected results for this control are over 1000.
- Set other optional values.
-
Save the record.
The control is triggered as configured and all instances are logged under Unresolved Control Incidents, Resolved Control Incidents or Pre-approved Control Incidents.
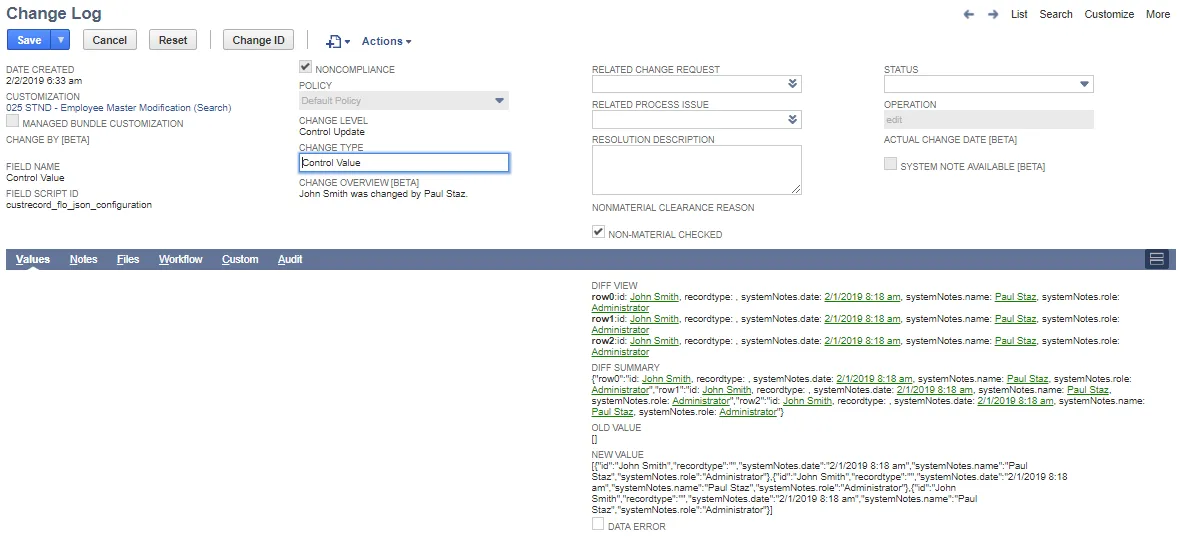
Example: Unresolved Control Incident
A modification has been made to the Purchase Limit and Purchase Approval Limit for Luigi Derossi from 0.00 to 5,000.00. The change has been saved and the control has been run from the Customization record. Since the change was made without prior approval, the change is logged and can be found under Unresolved Control Incidents.
To view unresolved control incidents:
-
Open Strongpoint > Financial Controls > Unresolved Control Incidents
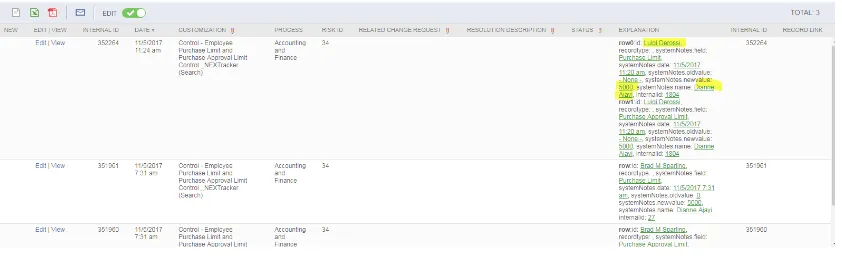
-
Click View by the record with the Purchase Limit and Purchase Approval Limit changes to open the Change Log.
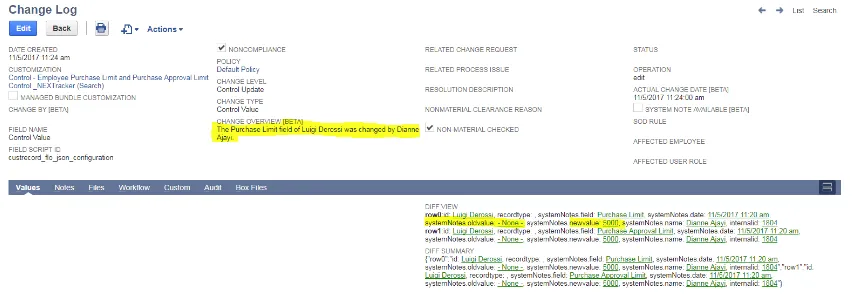
Change Overview shows what change was made and who made the change. The Diff View on the Values tab displays both the old and new values.