How do I transition from PolicyPakusing Group Policy or SCCM method to PolicyPak Cloud
Transitioning from PolicyPak using Group Policy or SCCM method to PolicyPak Cloud is very straightforward.
Remember, Once PolicyPak settings are created, they are transferable to XML, which can be used with any method: Group Policy, Intune, SCCM, or PolicyPak Cloud.
This topic assumes you will have policies in the Group Policy editor and want to transfer them to PolicyPak Cloud. The actual current delivery method you are starting from doesn’t matter. You can start from Group Policy, SCCM, or an MDM service like Intune and transfer over to PolicyPak Cloud.
Here is an overview of the steps involved in transitioning an existing investment in PolicyPak with Group Policy or SCCM method over to PolicyPak Cloud:
Step 1 – Pre-testing that PolicyPak Cloud is working at all with the built-in policies.
Step 2 – Exporting existing PolicyPak settings within Group Policy to XML and importing them into PolicyPak Cloud.
Step 3 – Optional: Backup and Restore entire GPO to PolicyPak cloud.
Step 4 – Use In-Cloud Editors to create and update rules.
Step 5 – Using PolicyPak Cloud to create company groups and/or use PolicyPak Cloud to Azure connector.
Step 6 – Linking PolicyPak Cloud XML to PolicyPak Cloud Company Groups or Azure Groups.
Step 7 – Deploying the PolicyPak Cloud Client and/or CSE to endpoints.
Step 8 – Removing existing Group Policy, SCCM or Intune based PolicyPak setting settings from machines
Step 9 – Report using PolicyPak Cloud to verify expected settings are achieved.
Step 10 – Keeping PolicyPak Cloud computers up to date with client software using PolicyPak Cloud Groups.
Pre-testing that PolicyPak Cloud is working at all with the built-in policies.
Start by verifying that your PolicyPak Cloud account is generally working. See the PolicyPak Cloud: QuickStart topic for additional information.
You will be verifying that your PolicyPak Cloud account is licensed, operational and working as expected.
Exporting existing PolicyPak settings within Group Policy to XML and importing them into PolicyPak Cloud.
Continue to export your existing invested PolicyPak settings into XML format.
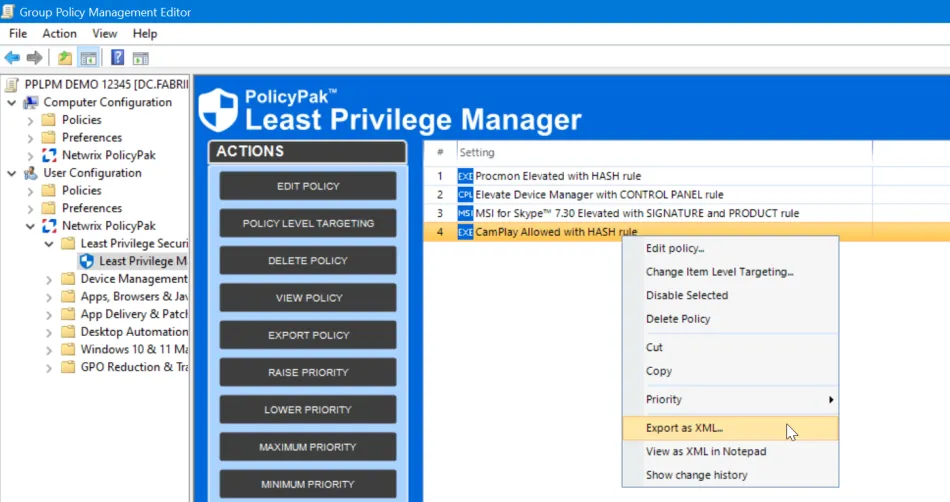
You can export one setting at a time like this:
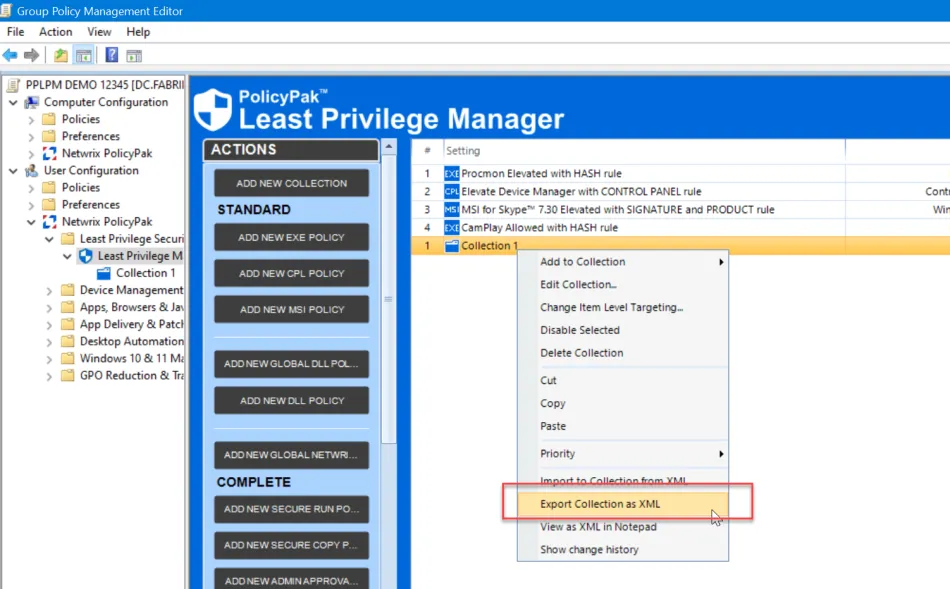
You can export a Collection like this:
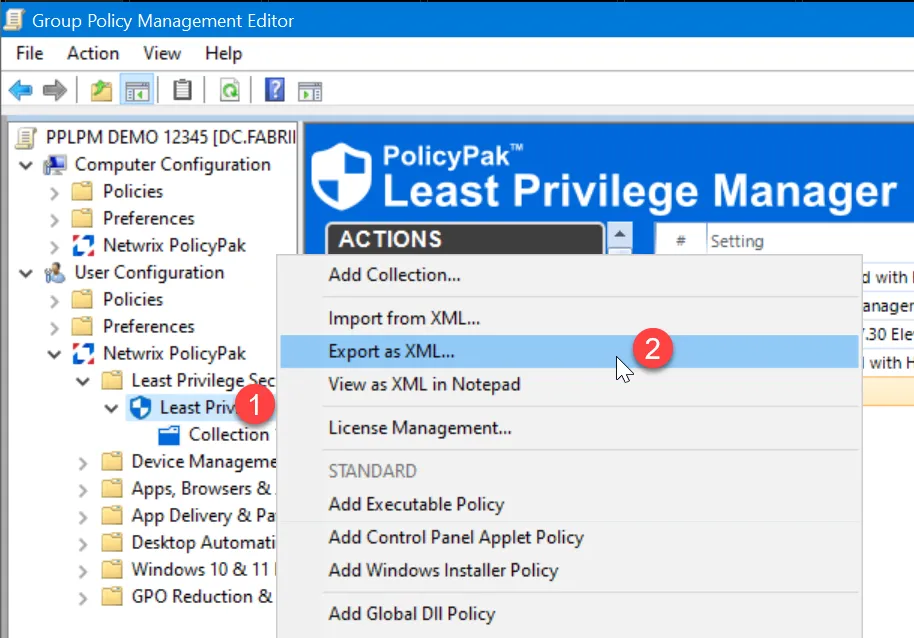
Or you can export a whole category like this:
You can also export settings en-mass across multiple GPOs using the PolicyPak Exporter Utility. The steps to do that are here Deploying PolicyPakdirectives without Group Policy (PolicyPak Exporter Utility)
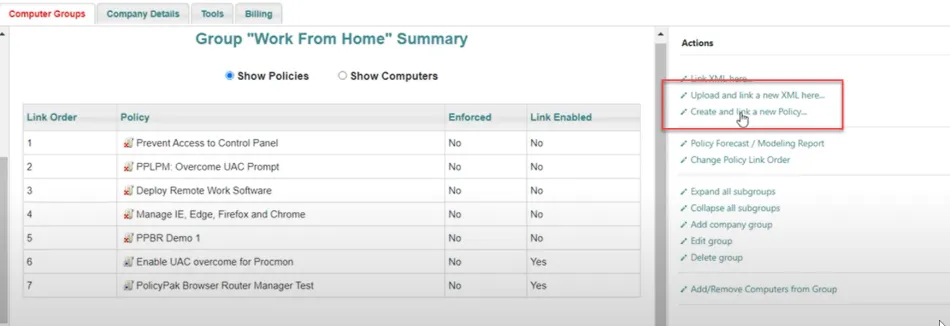
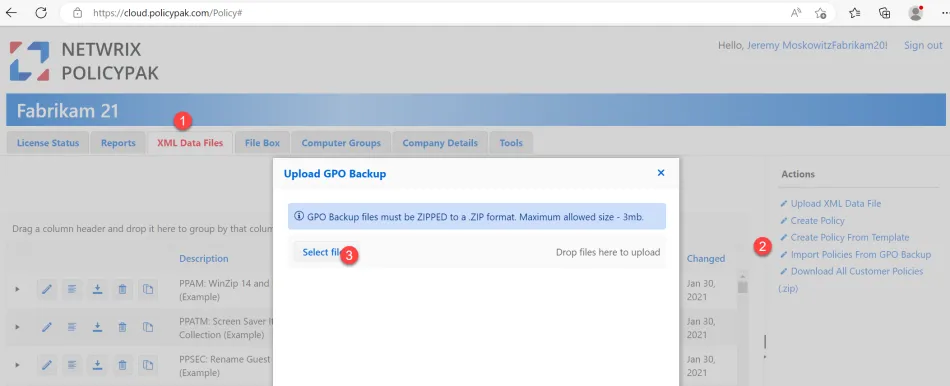
Then you can upload them straight into PolicyPak cloud using the Upload and link a new XML here. Or you can go to the XML Settings tab (not shown) and also upload them there for later use.
You may also view the XML in notepad and copy/paste the XML straight into PolicyPak cloud using the same setting, Upload and link a new XML here as seen around the 5 minute and 20 second mark continuing onward.
See the PolicyPakCloud: How to deploy PolicyPak specific settings (using in-cloud editors and exporting from on-prem) topic for additional information.
Optional: Backup and Restore entire GPO to PolicyPak cloud
You might also have a GPO with a lot of settings, which contain Microsoft and/or PolicyPak settings. You can transfer the whole contents of that GPO with a GPO Backup and PolicyPak Cloud Import.
The result will be a de-constructed GPO with all relevant parts as XML, available to re-link later to Company or Azure groups.
See the How to import GPOs to PolicyPak Cloud topic for additional information.
Use In-Cloud Editors to create and update rules (for most policies)
Now that all your rules are lifted and shifted from GPO Editor to XML to Cloud, you can use the in-cloud editors to perform most new policy types and edit existing policies.
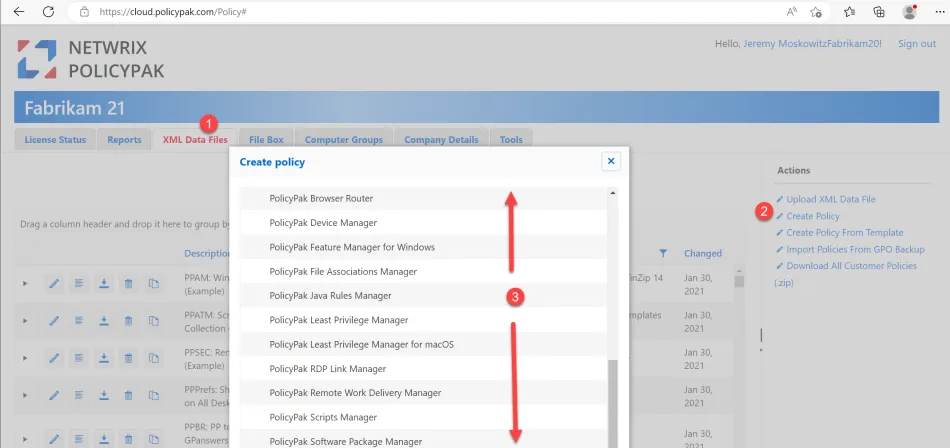
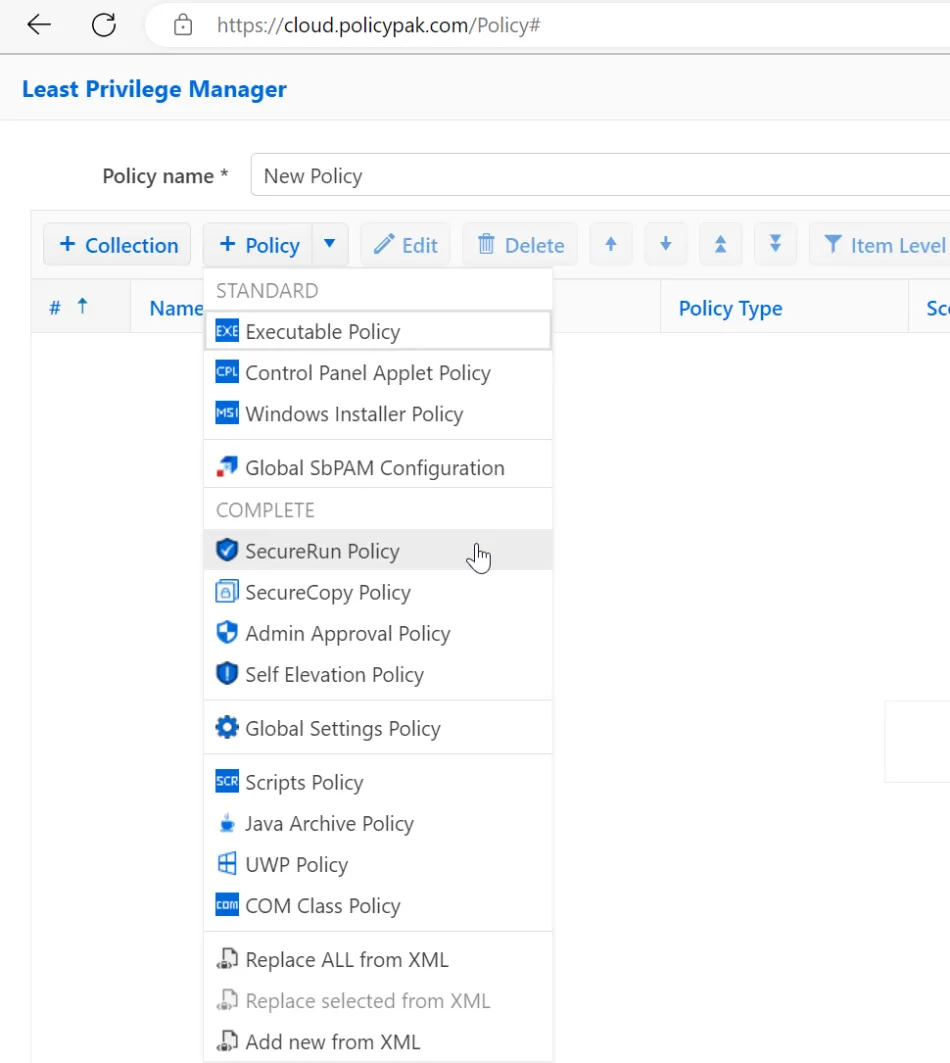
Here’s an example of how to use the PolicyPak Cloud in-cloud editors to create and edit PolicyPak Least Privilege Manager items.
See the Use PolicyPak Cloud to deploy PP Least Privilege Manager rules topic for additional information.
You are advised to maintain a Windows based MMC editing station for testing because not every editing function may be available in the PolicyPak Cloud editors. Most items are, but a few are not. Details about PolicyPak Cloud and Test Lab Best Practices are here: Getting Started with Cloud > Knowledge Base.
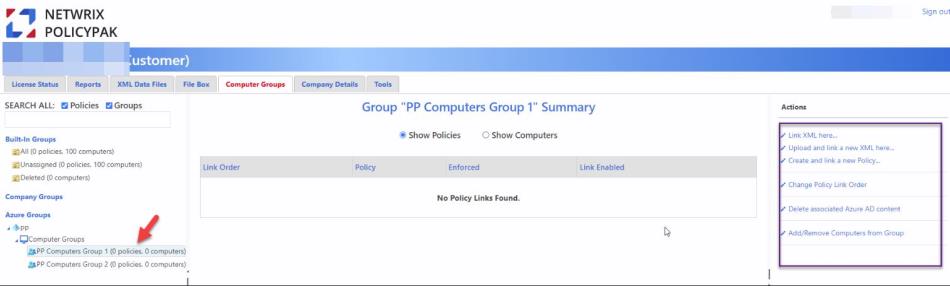
Using PolicyPak Cloud to create company groups and/or use the PolicyPak Cloud to Azure connector
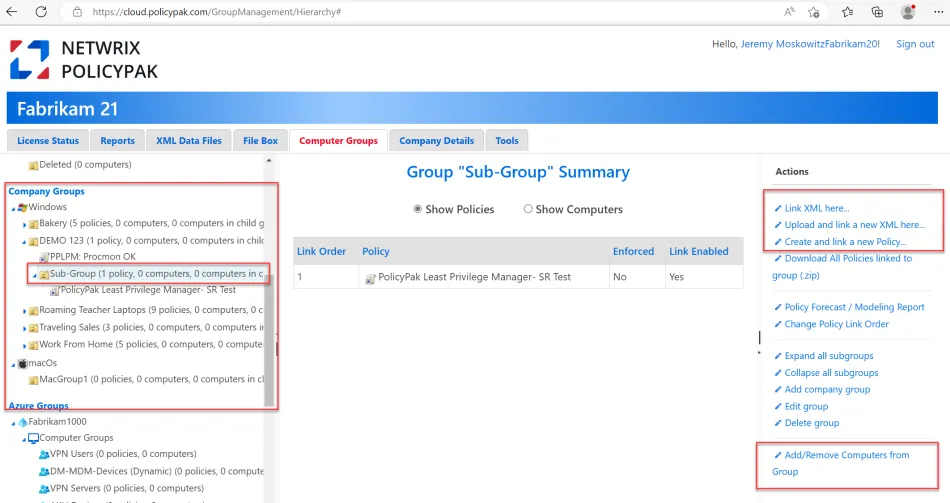
Now you can craft your Company Group assignment and then adding computers to it.
See the Working with Groups topic for additional information.
An example of crafting your own Company groups, linking existing XMLs, creating new policies and Adding/Removing computers from these Company Groups can be seen here.
Another option is the ability to mate your PolicyPak Cloud instance with your Azure Instance and use Azure Groups as well. You can establish a connection between PolicyPak Cloud and Azure using these steps:

Then Azure groups will appear at the same level as Company Groups and you can link XML to those Azure groups.
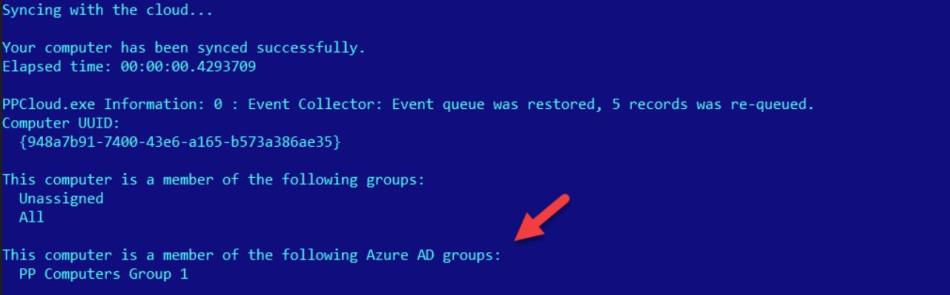
Provided the PolicyPak Cloud Client is on the machine (one of the next steps), the
computer will pick up the policies in either the Computer Group or Azure Group. (PPCLOUD /sync
will show these details.)
Linking PolicyPak Cloud XML to PolicyPak Cloud Company Groups or Azure Groups
Because your XML policies are now uploaded to PolicyPak Cloud, you are ready to link them over to the Company Group or Azure Group of your choice. Remember that PolicyPak Cloud acts nearly the same as on-prem GPO with the following attributes:
- Groups are like OUs, though a computer may be in two PolicyPak Cloud Groups (where in on-prem AD it may only be in one.)
- Block Inheritance is available
- Enforced is available
- Precedence is available
See the Working with Groups topic for additional information.
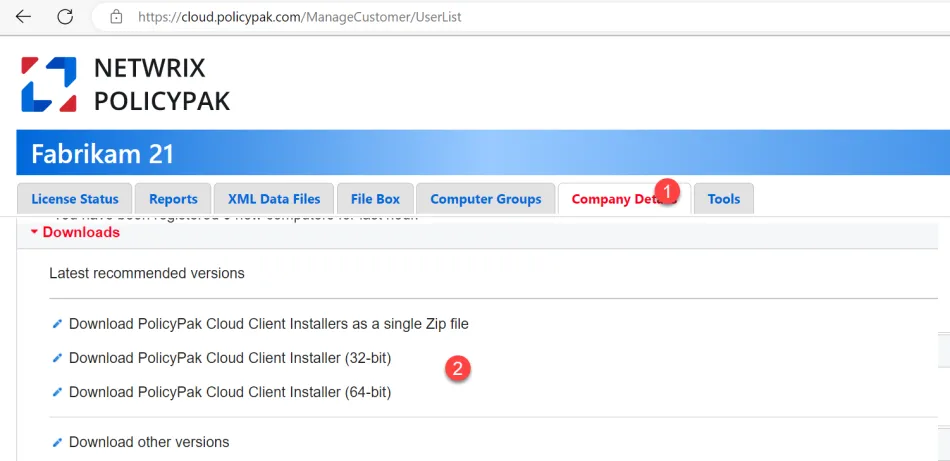
Deploying the PolicyPak Cloud Client and/or CSE to endpoints
Now you’re ready to deliver the PolicyPak Cloud client to your machines, which will join the machines to PolicyPak Cloud.
If the machines already have the PolicyPak CSE installed, there is no need to uninstall the PolicyPak CSE. It is permitted to pre-install the CSE on the machine before the PolicyPak Cloud client and could actually save you a lot of time during PolicyPak Cloud client rollout.
There are a myriad of ways to install the PolicyPak Cloud client, since it is just an MSI. When the Cloud Client is installed it will automatically install the PolicyPak CSE if it is not present on the machine like what’s seen here.
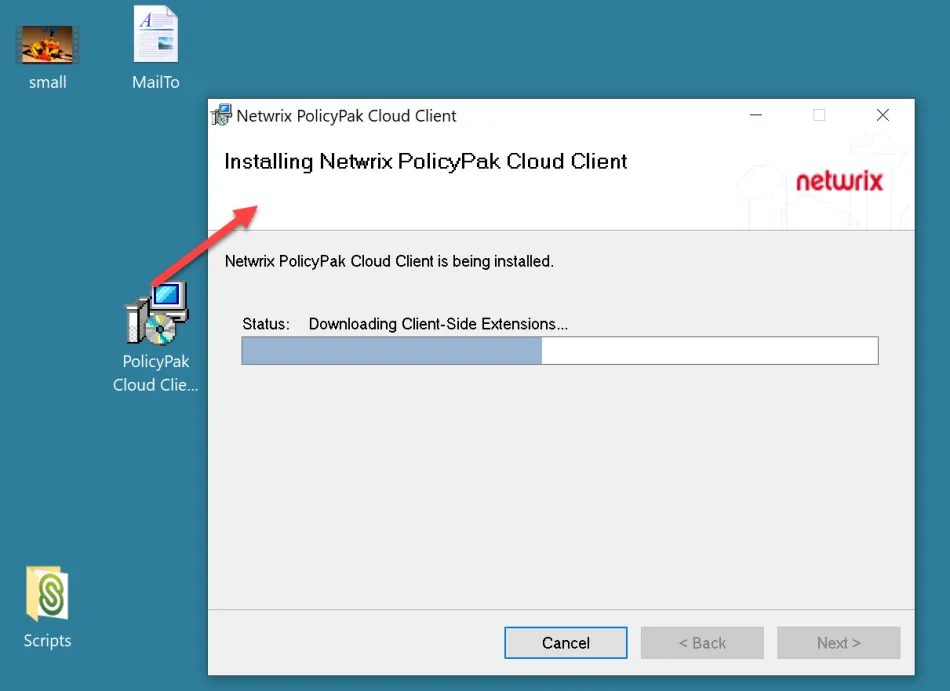
The machine may also upgrade to a later CSE if a PolicyPak Cloud group dictates a later CSE; but the CSE will never downgrade. (See the last section in this guide for more details.)
Additionally, you may wish to investigate the idea of having computers automatically join the PolicyPak Cloud group of your choice with the Jointoken property. Two videos on that topic are:
- PolicyPak Cloud: Automatically Join Groups with JOINTOKEN
- PolicyPak Cloud + MDM Services: Install Cloud Client + automatically join PPC Groups and get policy.
There are some other KB topicswith advanced scenarios on installing the PolicyPak Cloud client for Azure Virtual Desktops, VDI and other scenarios. Please open a ticket at Netwrix Support, if you have trouble locating those articles.
Here's some command line examples to help install the PolicyPak Cloud client silently. See the How do I deploy the PolicyPak Cloud Client via command line silently? topic for additional information.
Removing existing settings to machines (GPO and Non-GPO method)
Now you are ready to remove existing policy from machines. This will vary depending on the source method of deploying policy.
- For GPO, we recommend unlinking the GPO(s) which have PolicyPak / now transferred
settings. Then run
GPupdate /force, thenGPresult /h out1.htmland ensure the settings you want are now absent from the Group Policy Results. - For SCCM and MDM/Intune, perform an uninstall of the wrapped up XMLs / MSIs. You can also verify the XML settings are removed from your endpoint from the Users or Groups or Computer folder. See the What is the processing order of all policies and how are conflicts resolved (and how can I see the final RsOP) of those policies (between GPO, Cloud, XML, etc)? topic for additional information.
Report using PolicyPak Cloud to verify expected settings are achieved
There are two ways to determine if your endpoint(s) got the policies you expected.
On the client
Method one is akin to GP update and you simply run PPCLOUD /sync (performs a SYNC then displays)
or PolicyPak Cloud /status (no sync, just displays), and you can see any specific
machines' current state and policies.

See the Manually Syncing with PolicyPak Cloud topic for additional information.
On the server
Additionally, you may mass report upon machines using the PolicyPak Cloud reporting mechanism.
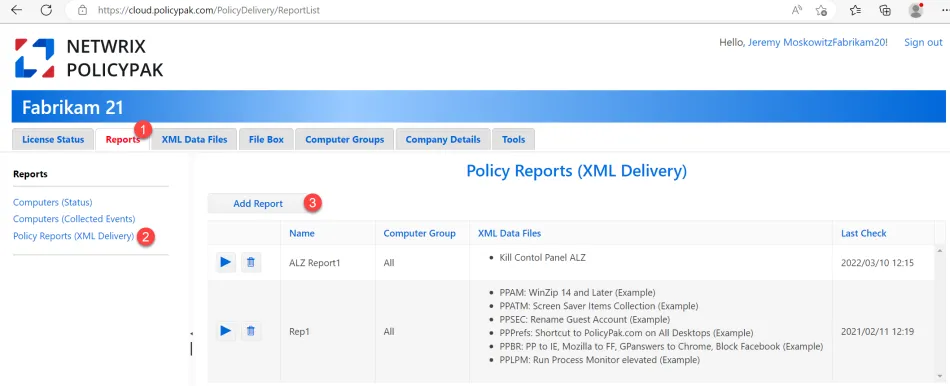
See the PolicyPak Cloud Reporting Demo topic for additional information.
Either method will inform you if the settings you lifted and shifted to PolicyPak Cloud are now on the endpoint.
Keeping PolicyPak Cloud Client and PolicyPak CSE up to date
Finally, it is important to keep the PolicyPak Cloud Client and the PolicyPak CSE up to date. PolicyPak Company Groups control the versions of the PolicyPak Cloud Client and PolicyPak CSE.
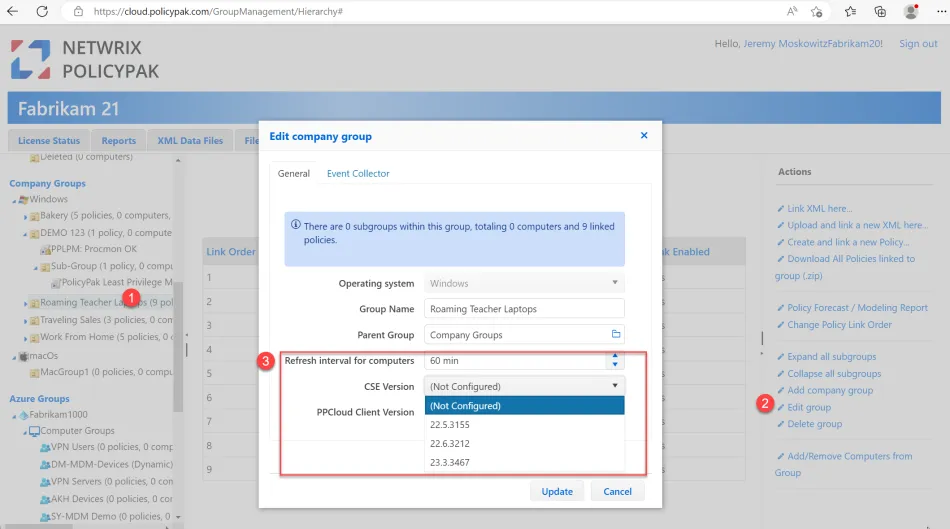
You should always do small scale testing of upgrades of the PolicyPak CSE and PolicyPak Cloud Client version to ensure safety before you roll it out to everyone via the All group.
See the Using Rings to Test and Update the PolicyPak Client-Side Extension and/or Cloud Client (And How to Stay Supported) topic for additional information on the Microsoft Ring methodology, which aligns to PolicyPak best practices.
See the PolicyPak Cloud Groups CSE and Cloud Client Small-Scale Testing and Updates topic for additional information on how to perform small scale testing before large scale upgrades.