Windows Platform Policy Configuration
The Windows menu displays the configuration options for Windows platforms.
Details for the selected platform are displayed on the right side of the page. Below are the configuration options for a Windows Platform.
- Name — Displays the name of the policy
- Description — Description of the policy
- Built-in Account — The built-in administrator account for the resources on the selected platform. If multiple built-in administrator accounts are required, create a copy of the platform. For Windows platforms, the built-in account is defined via the well-known SID (S-1-5-21*-500).
- Password Complexity Policy — The password complexity rules for managed accounts created on the resources defined by the selected platform. See the Password Complexity Page topic for additional information.
- Password Length — The number of characters required by the selected password policy
- Arrow icon — Show or Hide password policy details. Click the icon to display the password complexity requirements of the selected password policy.
- Protection Policy Schedule — How often the Protection Policy is run. See the Protection Policies Page topic for additional information.
- Scheduled Change Policy — How often the credentials for a managed account are changed (credential rotation). See the Credentials Dashboard and Schedule Policies Page topic for additional information.
- Scan Schedule — How often to perform a host scan on the resources defined by the selected platform (local users, groups, windows services and scheduled tasks). This scan can also be run ad-hoc from the Resources Page.
- Verification Schedule — How often to verify the credentials for managed accounts on the resources defined by the selected platform. See the Credentials Dashboard topic for additional information on managed accounts.
- Reset on Mismatch — When selected, this option will force a password rotation if the password verification step finds that the existing password for an account does not match what Privilege Secure expects.
If any of these settings are modified, Save and Cancel buttons are displayed. Click Save to commit the modifications. Click Cancel to discard the modifications.
Configure Secure WinRM Connection Window
Follow the steps to configure secure WinRM connection for the selected host:
Step 1 – Navigate to the Resources page.
Step 2 – Select the resource(s) to modify.
Step 3 – Click the WinRM Config button.
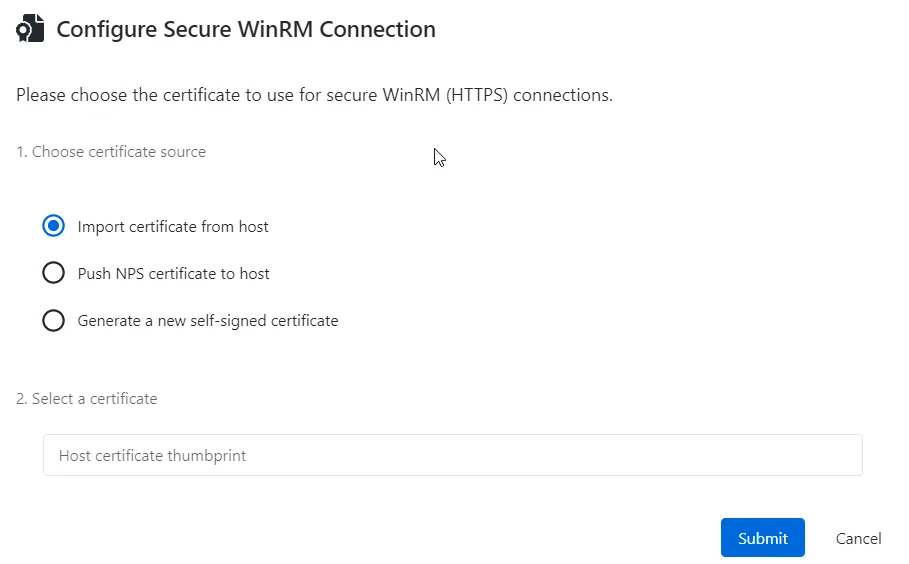
Step 4 – Perform the following steps:
-
Choose certificate source – Select the source to apply the certificate for the secure WinRm connection to the desired host resource. The following options are available:
- Import certificate from host;
- Push NPS certificate to host;
- Generate a new self-signed certificate .
-
Select a certificate – Provide a certificate thumbprint.
NOTE: This option is applicable to the host and NPS certificates. If you selected a new self-signed certificate option, it will be generated automatically and imported to Netwrix Privilege Secure.
Step 5 – Click Submit.
Secure WinRM connection has been configured for the selected host.