OpenID Connect Authentication
Okta
The following sections provide configuration information to use OpenID with an Okta account.
Adding Users
In order to use the OpenID login functionality with Privilege Secure an Okta user must match a user in an AD domain that Privilege Secure is aware of.
NOTE: The user will also need to be given access to Privilege Secure by assigning them a role from the Config->Role Management screen.
To create a new user click the Directory menu item and select People from the drop-down. You should see this screen.

If your screen doesn’t look like this then you’re probably in Developer Console view. Click in the top left corner (where it says Developer Console) and choose Classic UI.
To add a new user, click the Add Person button:

Privilege Secure will use the ‘Username’ value to search the host-user table for the matching user.
The OpenID Connector configuration screen gives 3 options for the host-user field that the Okta Username will be matched against – under the Login Format dropdown:
- sAMAccountName
- User Principal Name
- Email Address
NOTE: Okta doesn’t allow sAMAccountName to be used as the Username so we can’t use that one here.
Users in sbpam.local are all set up with both UPN and Email Address – but they’re not the same.
The two Okta users below both map to the same sbpam.local user

To use the first account the Privilege Secure OpenID Connector Login Format should be set to Email, for the second UPN.
So, to create a user enter the appropriate Username value and other data. I recommend setting the Password option to ‘Set by Admin’ and setting it yourself. If the user is required to set (or reset) their own password then it will be handled on the Okta side – which won’t give control back to Privilege Secure until it’s done.
Assigning Users to Applications
Currently we only have one application and users are being automatically assigned – but that may not always be the case, so…
When the user has been created click on their name and you will see the User Details screen:

If the application you want to use is not listed, click the ‘Assign Applications’ button and select it.
OpenID Connect Configuration Wizard
The OpenID Connect Configuration wizard is opened with the Configuration Wizard button in the Configuration > Authentication Page for an OpenID Connect Authentication Connector Type.

It contains three pages:
- Configure Client
- Test Login
- Configure Id Mapping
Configure OpenID Connect Authentication Connector
Follow the steps to verify the OpenID Connect configuration:
Step 1 – Navigate to the Configuration > Authentication page.
Step 2 – In the Connectors list, select the applicable authentication connector and click Configuration Wizard.
Step 3 – On the Configure Client page, enter the following information:
-
Issuer – The OpenId Connect provider issuer URI. Out-going redirection requires the correct “Issuer” path to be set. Incorrect settings will generally result in a 404 error.
-
Client Id – The OpenId Connect provider application Id for Privilege Secure
-
Callback Address – The OpenID Connect provider requires the Privilege Secure callback path to be authorized. Generally this is displayed by the provider after redirection. Enter the address and port of the Privilege Secure server:
[protocol]//[hostname]:[port]/callback
-
CORS – The OpenID Connect provider requires the Privilege Secure callback location to be configured for CORS. This will either be displayed by the provider after redirection, or a 500 error is returned. If an error is returned, CORS is probably not configured with the correct information. Enter the address and port of the Privilege Secure server:
[protocol]//[hostname]:[port]
CAUTION: In the next step, verify that the Sign In page displays as expected, but do NOT sign in at this step.
Step 4 – Click Test Connection to verify the connection configuration. This opens the Sign In page in the browser. Do not sign in.
- If the Sign In page does not display as expected, review the values configured for the OpenID Connect connector and modify them where needed. Then, verify the Sign In page again.
- NOTE: When configuring OpenID Connect for Okta, it may be necessary to ensure that the Grant type in Okta is set to Implicit (hybrid) and the sub-settings Allow ID Token with implicit grant type and Allow Access Token with implicit grant type are both enabled.
Step 5 – Click the browser’s back arrow to return to the Configure Client wizard page.
Step 6 – If the Sign In page displayed as expected, click Next.
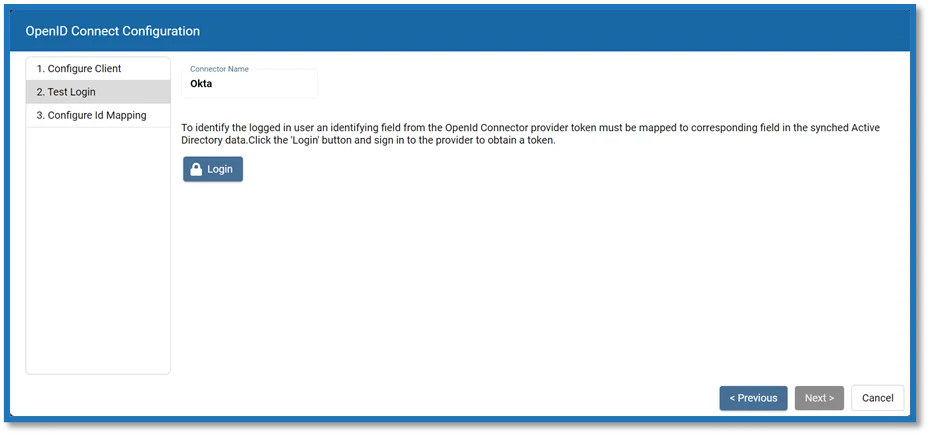
Step 7 – On the Test Login page, click Login. The Sign In page opens in the browser.
Step 8 – Enter valid credentials for the OpenID Connect provider and sign in.
Step 9 – If the sign in was successful, the generated access token will display. This is passed to the UserTokenController so that the user information can be extracted. Click Next.
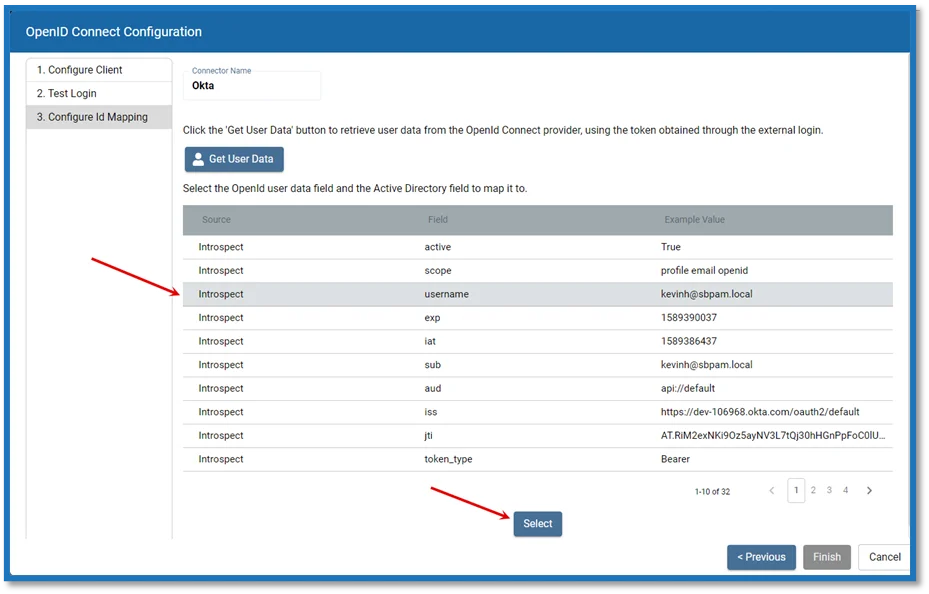
Step 10 – On the Configure ID Mapping page, click Get User Data.
SpPAM will use the access token to retrieve user data from the OpenId Connect provider. The OpenID Connect provider requires a User Id Field for sign in. It is necessary to specify which field in Active Directory should map to that User Id Field, so that Privilege Secure can automatically fill in the required credentials at login. The value provided is used to sign in to the multi factor authenticator (MFA) when a user logs in to the Privilege Secure Console.
In order to connect a user from the OpenID Connect provider to a user in the Privilege Secure copy of the AD data, it is necessary to map a field in the provider list to a field in the Privilege Secure host user table. The exact fields to map will vary between providers and according to the user’s AD configuration.
The table displays the retrieved data that can be used for the host user lookup. The user must select from the displayed records a field that corresponds to a value in their AD configuration. For example, if the AD data contains email addresses, they can select any of the fields which contain email addresses.
Field values will vary according to the information supplied by the provider. Example Values come from the provider and will vary:
-
Source – There are three ways to extract the data, depending on the provider and the application configuration in the provider (unfortunately, there is no consistency in how the data is formatted):
- Introspection Endpoint – (Preferred) Not supported by all providers. Also validates the token.
- UserInfo Endpoint – Microsoft Entra ID has two User Info endpoints which return slightly different data sets (be sure to check both). Some providers require authorization for this endpoint. May otherwise validate the token.
- Token parsing – (Least preferred) The access token contains claims which include some user information. This is the least secure method since the token is received indirectly. This option should not be used unless all other options have failed.
-
Field – Shows the possible fields used by the OpenID Connect provider detected by Privilege Secure.
-
Example Value – Shows an example value for the field based on the login credentials provided in the previous step. This represents the format of the value that will be used to sign in to the MFA during log in.
NOTE: These are not the credentials that will be used during the login process; only an example of the format of those credentials. The actual credentials used are unique to each user and are setup during the MFA registration process for that user.
Step 11 – Select a field to use for the User Id Field and click Select.
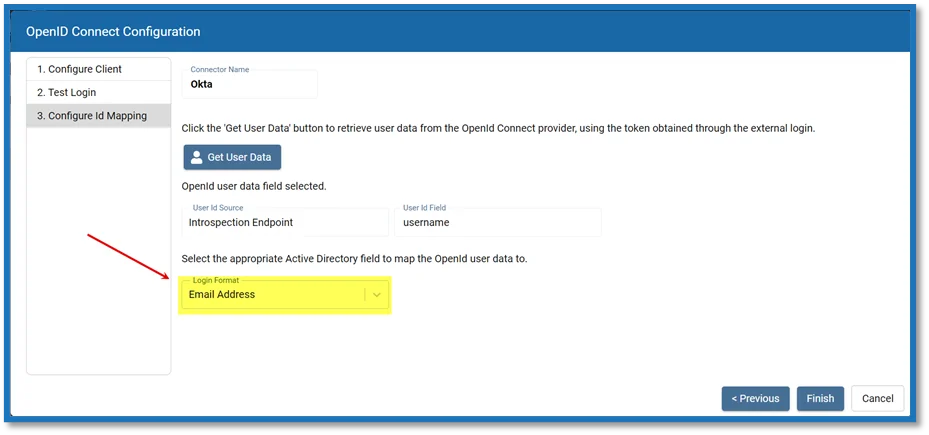
Step 12 – The selected Source and User ID fields from the previous table are shown. Now map the applicable AD field to the User Id Field. This is the value that will be used to sign in to the MFA during login. In the Login Format drop-down, select the applicable AD field to map to the User Id Field.
Step 13 – Click Finish. A window will display the updated configuration settings.
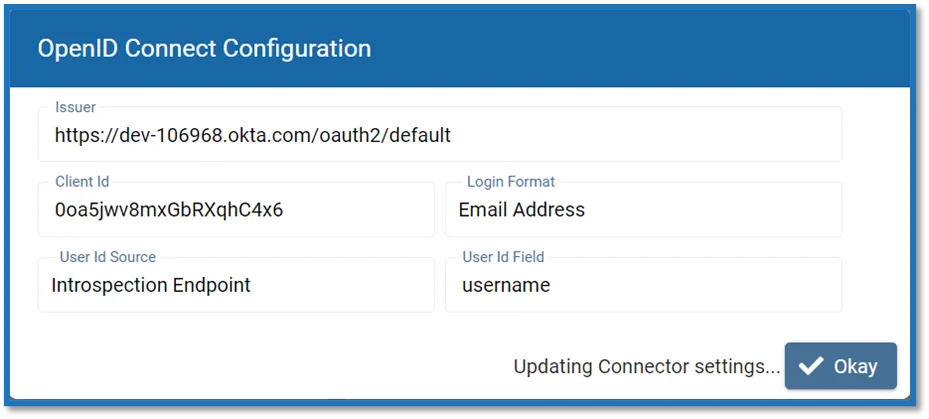
Step 14 – Click Okay to close the wizard and click Save on the Authentication page to accept the changes.
The Authentication Connector is configured and added to the Connectors list.