Activities Page
The Activities page is accessible from the Navigation pane under Activities. It shows the configured activities, which contain the actions that will run during the session such as granting admin privileges.
Activities are for singular activities based on a specific platform whereas Activity Groups can be used for cross platform activities such as granting local administrator access. See the Activity Groups Page topic for additional information.
It is also possible to configure an activity to automatically run any Protection Policy associated with the resource when the session completes, instead of waiting for the scheduled sync. See the Add Action Window topic for additional information.
The pane on the left side of the page displays a list of the configured activity. This pane has the following features:
- Search — Searches the table or list for matches to the search string. When matches are found, the table or list is filtered to the matching results.
- Green + button — Create a new activity. See the Add Activity topic for additional information.
- Copy icon — Clones the activity and adds a new entry to the Activities list. Icon appears when activity is hovered over.
- Trashcan icon — Deletes the activity. Icon appears when activity is hovered over. A confirmation window will display.
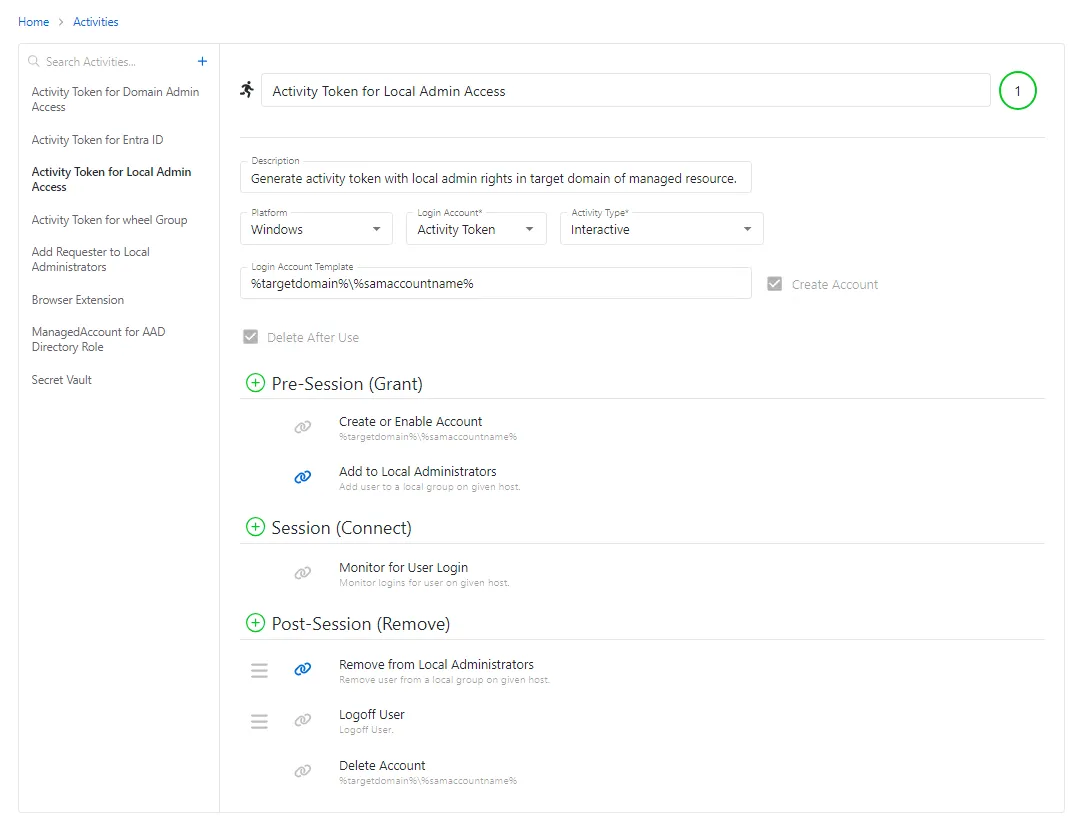
The selected activity details display at the top of the main pane:
-
Name — Displays the name of the activity
-
Description — Description of the policy
-
Platform — Displays the type of platform, which defines the resource: Active Directory, Microsoft Entra ID, Cisco, Linux, Microsoft SQL Server, Oracle, Website, and Windows
-
Login Account — Controls the type of account used to log into the resource: Requester, Managed, Activity Token, Resource, and Vault. See the Login Account Types topic for additional information.
-
Activity Type — Controls the type of actions for the activity:
- Interactive — Activity expects the requester to log on to a host desktop or CLI interface either directly or via the proxy
- Interactive App Launch — Activity will launch an application on the requested resource
- Task Automation — Activity will run an automated script requiring no user interaction
-
Requester Login Format — Indicates the format that will be used to prefill the Username field for logging into the resource. It must exactly match the username defined on the resource. This option is only visible when the Login Account is set to Requester. The format options include: Domain\SamAccountName, SamAccountName, UPN (User Principal Name), Email, and Custom
-
Login Account Template — Template determines the format of the account created for Managed, Activity Token, Resource, and Vault Login Accounts. The template is also used if the Requester login format is set to Custom. See the Login Account Templates topic for additional information.
-
Create Account checkbox — Indicates whether an account is created at the beginning of the activity if it does not already exist. When the Activity starts, a check is made to determine if an account exists. If the account exists, the user is connected to the account on the resource. If the account does not exist, the account is created and a password is set. The user is then connected to the account on the resource. This option is only visible when the Login Account is set to Activity Token or Managed. It cannot be disabled for Activity Token.
-
Delete After Use checkbox — Indicates whether the account will be deleted at the end of the activity. If an account was created to perform the activity, check this option to remove the account after the activity is complete. Otherwise, the account will be disabled at the end of the activity session. This option is only visible when the Login Account is set to Activity Token or Managed. It cannot be disabled for Activity Token.
NOTE: A built-in administrator account cannot be deleted or disabled at the end of a session.
-
Valut Connector — Displays the name of the assigned vault connector. This option is only visible when the Login Account is set to Vault. Additional fields may appear based on the selected vault.
NOTE: To view the password fetched from the vault, the Allow User to View Password checkbox must be selected in the connection profile associated with the access policy that gives the requester rights to the activity. See the Connection Profiles Page topic for additional information.
-
Application to Launch — Indicates the application that will be launched on the RDS server that the user is connected to by Privilege Secure. This option is only visible when the Activity Type is set to Interactive App Launch.
-
The following variables can be supplied within the Application to Launch field:
- %loginaccount% — The Login Account Name determined by the Login Account Template
- %sessionid% — The NPS session ID for the activity session
- %token% — The NPS one time use token generated by the Proxy Service
-
-
Preferred RDS Host — Displays the name of the RDS server that will launch the application specified in the Application to Launch field. This option is only visible when the Platform is set to Active Directory.
-
Connect Account — Provides a list of service accounts that will be used by the Proxy Service for impersonation for Interactive App Launch activities. If no account is selected, the account specified by the Login Account Template will be used and no impersonation will occur. This option is only visible when the Platform is set to Active Directory.
-
Logon URL — Displays the primary logon page. When this field has a value, it will override the Logon URL defined on the Website resource. This option is only visible when the Platform is set to Microsoft Entra ID or Website. See the Microsoft Entra ID Details Page and Website Details Page topics for additional information.
If any of these settings are modified, Save and Cancel buttons are displayed. Click Save to commit the modifications. Click Cancel to discard the modifications.
Below the activity details in the main pane are the session details, the actions that will occur before, during, and after the session:
- Pre-Session (Grant) — List of actions that will run before the session begins. These actions may be paired with a corresponding Post-Session action.
- Session (Connect) — List of actions that will run during the session
- Post-Session (Remove) — List of actions that will run after the session completes. These actions may be paired with a corresponding Pre-Session action.
A Link icon shows actions that are linked. Deleting a linked action will delete the corresponding action it is paired with. See the Add Action Window topic for additional information.
NOTE: It is not possible to edit the Action Type. Delete the existing action and then create a new action to get a new Action Type.
Login Account Types
Privilege Secure supports the use of various login account types that perform different functions in the environment. See each account type for a description.
| Account Type | Description |
|---|---|
| Requester | The Requester login account type will use the user's own account to run the activity. The user will either log onto the resource directly or be connected to the resource via the proxy. In both cases the user will have to enter their user name and password. This login account should be used to avoid having a separately managed account. The user needs to have a matching account on the endpoint and needs to know the password to login. |
| Managed | The Managed login account type will used an account managed by Privilege Secure to run the activity. Once created, a Managed account will persist to the endpoint. When a session ends or is canceled, the password is automatically rotated. The account will not be removed afterward, but it will be disabled when at rest. The primary use case is for instances where the user desktop experience should persist across sessions. A Managed account can be a specific account name or based on any variable added to the Login Account Template. The password for a managed account is available to the user via the UI during an active session. |
| Activity Token | The Activity Token login account will use a unique time-limited ephemeral account created when the Activity is started and removed when it is completed. The account name is automatically generated from the user’s sAMAccountName and Session ID, filled out to as many characters as configured for the activity token. See the Activity Token Complexity Page topic for additional information. The account name can be entirely random or based on variables or text added to the Login Account Template. The primary use case is where the user profile should be destroyed after each session and have the user log-in to a clean desktop every time they connect; a common use case for remote vendors and contractors. |
| Resource | The Resource login account is only available when the Platform is set to Website. It allows manually managed user accounts on website resources to be used to log into activities. The user name is defined in the Requester Login Format field and must exactly match the username defined on the website resource. |
| Vault | The Vault login account will use an account that is checked out of the specified vault to run the activity. The password provided by the vault is available to the user via the UI during an active session. When a session ends or is canceled, the password is checked into the vault. |