Add Activity
Follow the steps to add activities to the console.
Step 1 – Navigate to the Activities page.
Step 2 – In the Activities list, click the Add Activity icon.
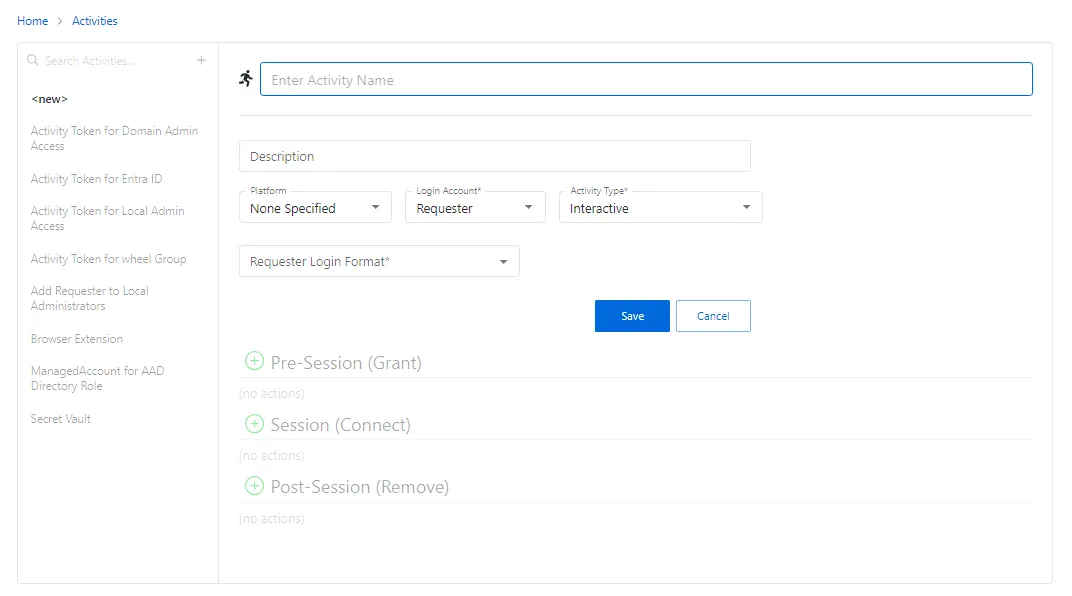
Step 3 – Enter the information for the desired activity. The configuration options will vary depending on each selection.
The pane on the left side of the page displays a list of the configured activities. This pane has the following features:
- Search — Searches the table or list for matches to the search string. When matches are found, the table or list is filtered to the matching results.
-
- button - Add an activity to the list.
- Copy icon — Clones the activity and adds a new entry to the Activities list. Icon appears when activity is hovered over.
- Trashcan icon — Deletes the activity. Icon appears when activity is hovered over. A confirmation window will display.
Step 4 – Enter the configuration information on the right side of the page. Configuration options include:
- Name — Displays the name of the activity.
- Description — Description of the policy.
- Platform — Displays the type of platform, which defines the resource.
- Login Account — Displays the account used to log onto the resource.
- Activity Type — Controls the type of actions for the activity.
- Requester Login Format — Indicates the format that will be used to prefill the Username field for logging into the resource. It must exactly match the username defined on the resource.
- Application to Launch — Indicates the application that will be launched on the RDS server that the user is connected to by Privilege Secure
- Logon URL — Displays the primary logon page
Step 5 – Click Save to create the new activity.
Step 6 – With the new activity selected, configure the following settings. See the Add Action Window topic for additional information:
- Pre-Session (Grant) — List of actions that will run before the session begins. These actions may be paired with a corresponding Post-Session action.
- Session (Connect) — List of actions that will run during the session
- Post-Session (Remove) — List of actions that will run after the session completes. These actions may be paired with a corresponding Pre-Session action.
The new activity is added to the console and is shown in the Activities list.
Add Activities Window
The Add Activities window provides a list of Activities that have been created. Activities are created in the Activities Page.
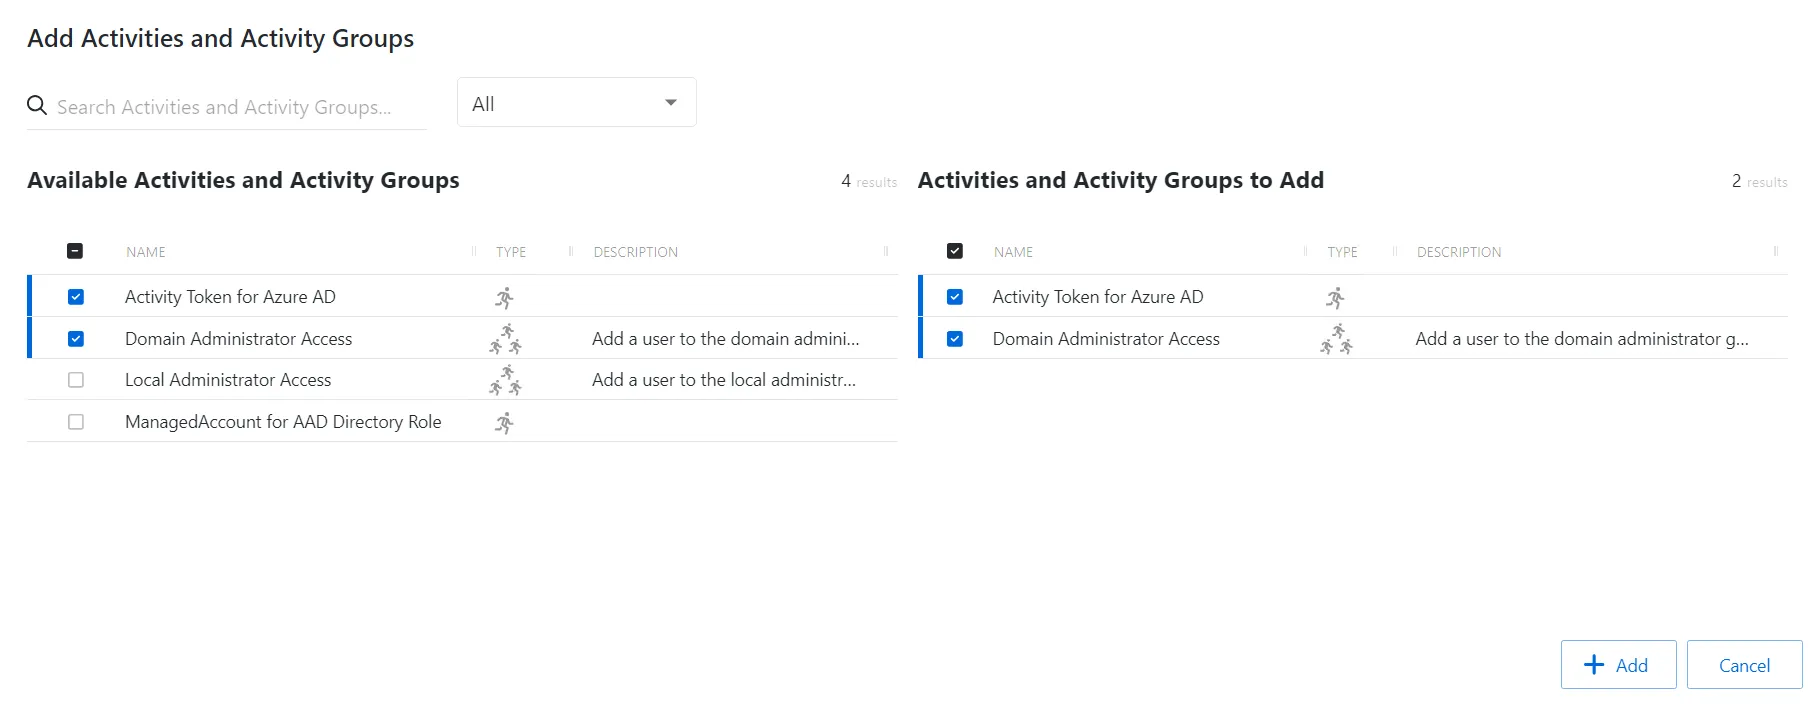
The window has the following features:
- Search — Searches the table or list for matches to the search string. When matches are found, the table or list is filtered to the matching results.
- Available Activities — Shows all available activities
- Activities to Add — Shows selected activities
- Add button — Closes the window
Both tables have the following columns:
- Checkbox — Check to select one or more items
- Type — Classification of the activity
- Name — Displays the name of the activity
- Description — Description of the policy
- Created — Date timestamp when the item was created
Add Activities
Follow the steps to add activities to an activity group.
Step 1 – Navigate to the Policy > Access Policies page.
Step 2 – In the Activity Groups list, select the name of the activity group.
Step 3 – Click Add to open the Add Activities window.
The Add Activities and Activity Groups window has the following features:
-
Search – Searches the Name and Operating System columns to match the search string. When matches are found, both tables are filtered to the matching results.
-
Available Credentials and Groups– Shows all Credentials and Groups that have been added to the console
-
Credentials and Groups to Add – Shows the Credentials and Groups to be added to the protection policy
-
Column headers can be sorted in ascending or descending order
- Name – The name of the activity
- Type – The type of activity, individual or group
- Description – Additional details for the activity
Step 4 – To add an activity to the activity group, click a row in the Available Activities list and it is immediately moved to the Activities to Add list.
Step 5 – (Optional) Click a row in the Activities to Add list to move it back to the All Activities list.
Step 6 – Click Add to add the activities to the activity group.
The activities are added to the activity group.