Authentication Page
The Authentication page is accessible from the Navigation pane under Configuration. It shows the configured multi-factor authentication (MFA) or other third-party authentication connectors such as OpenID Connect and SAML.
Once configured, an authentication method may be assigned to any users who will use the method for accessing the application. See the Authentication Connector Tab topic for additional information.
The pane on the left side of the page displays a list of the configured authentication connectors. This pane has the following features:
- Search — Searches the table or list for matches to the search string. When matches are found, the table or list is filtered to the matching results.
-
- button — Create a new connector. See the Add Authentication Connector topic for additional information.
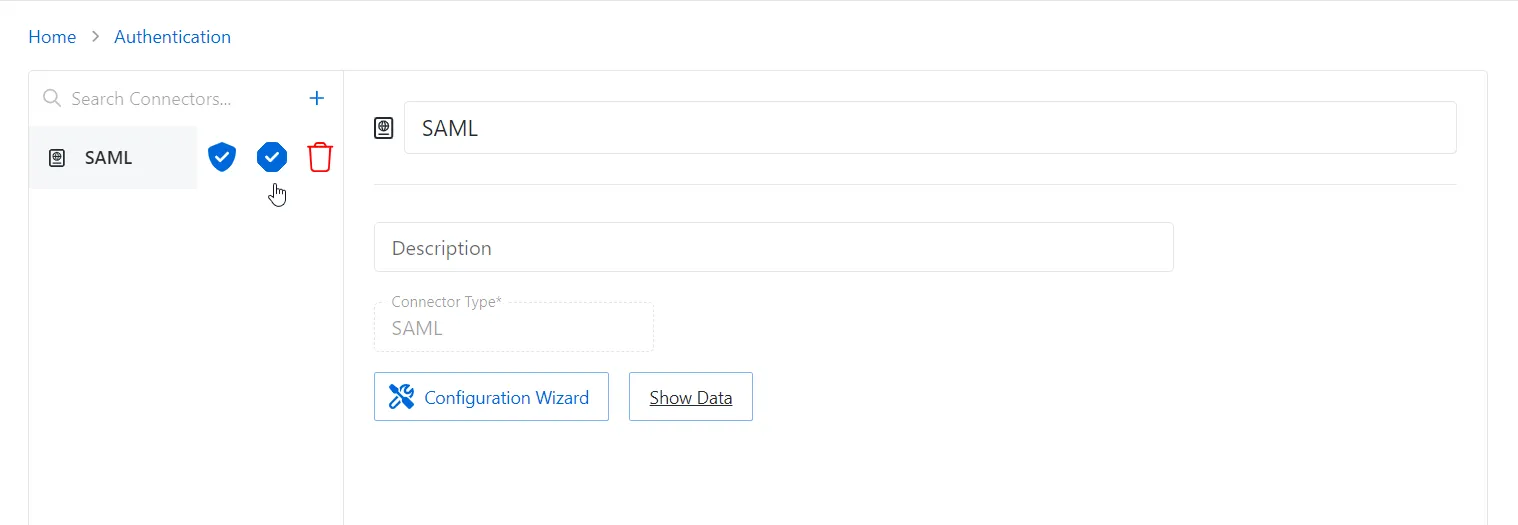
- Default icon — Indicates if connector is set as default. Icon appears when activity is hovered over. Click the icon to change or clear the default.
- Exclusive icon — Indicates if connector is set as exclusive. Icon appears when activity is hovered over. Click the icon to change or clear the default.
- Trashcan icon — Deletes the connector. Icon appears when activity is hovered over. A confirmation window will display.
The selected connector details display at the top of the main pane:
- Name — Displays the name of the authentication connector
- Description — Description of the policy
- Connector Type — Indicates the type of authentication: MFA, OpenID Connect, and SAML. Remaining fields vary based on the Connector Type selected.
If any of these settings are modified, Save and Cancel buttons are displayed. Click Save to commit the modifications. Click Cancel to discard the modifications.
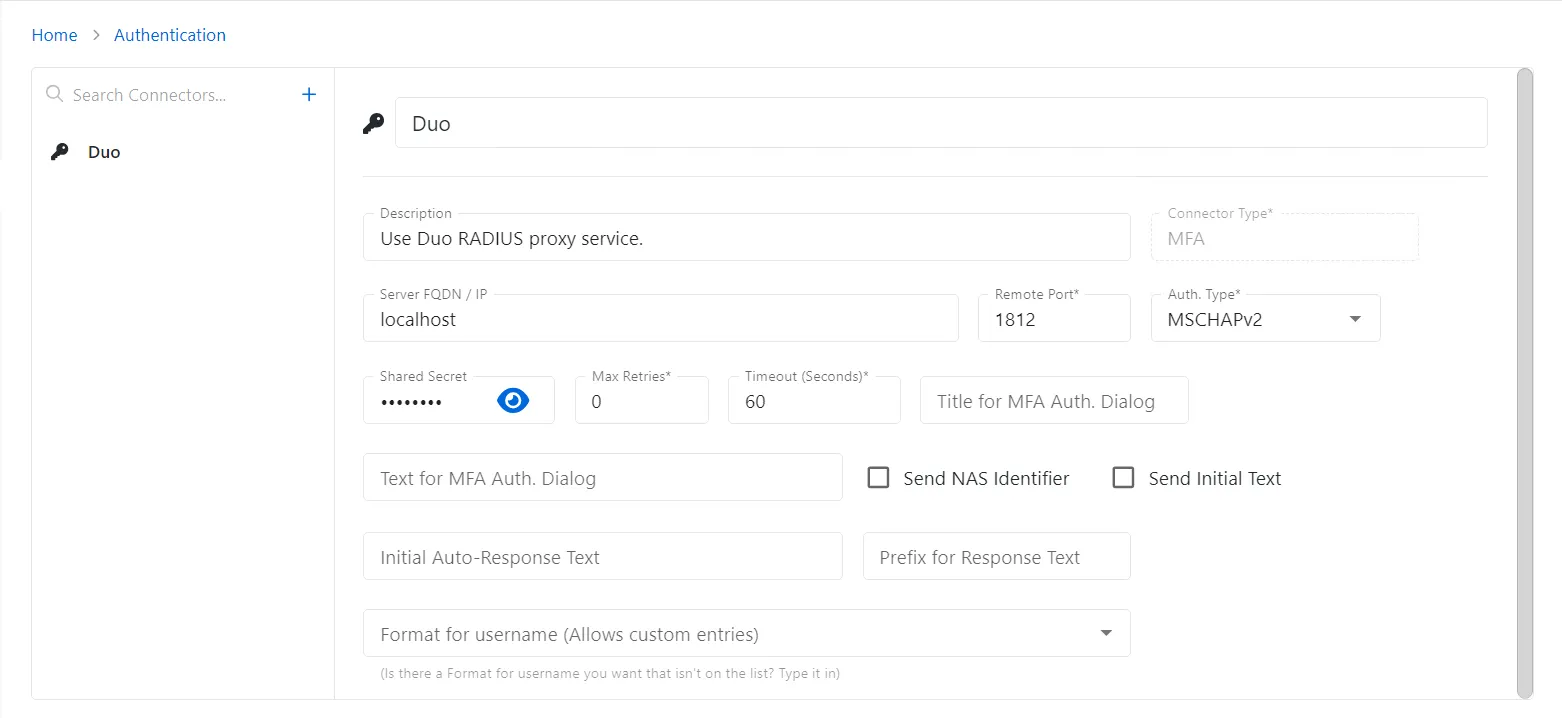
MFA Connector Type
The following fields apply to the MFA Connector Type:
- Server FQDN / IP — Address of the RADIUS server proxy
- Remote Port — Port of the RADIUS server proxy
- Auth Type — Security protocol used for communications between the Privilege Secure server and the RADIUS proxy
- Shared Secret — Shared secret for the RADIUS proxy
- Max Retries — Indicates how many times the Privilege Secure server will attempt to communicate with the RADIUS proxy
- Timeout (Seconds) — Indicates how long before Privilege Secure determines that the communication with the RADIUS proxy has failed
- Title for MFA Auth Dialog — Title that will appear at the top of the authentication dialog
- Text for MFA Auth Dialog — Text that will be displayed to the user prompting for action
- Send NAS Identifier checkbox — Indicates if the NAS identifiers are transmitted to the RADIUS proxy. This is required for certain RADIUS proxy implementations that require it. The NAS IP Address value is the IP address of the Privilege Secure server; the NAS Identifier is “SbPAM”.
- Send Initial Text checkbox — Indicates if the value in the Initial Auto Response Text is automatically sent to the RADIUS proxy without user action
- Initial Auto Response Text — This value is sent to the RADIUS server automatically if the Send Initial Text option is enabled. For example, this might be “push” to immediately have the user’s phone app prompt for authorization.
- Prefix for Response Text — Displays the value that is added to the beginning of the responses. The value will vary according to server.
- Format for Username (Allows Custom Entries) — Displays the Username value that is sent to the RADIUS server (default: SAMAccountname@NetBiosDomain). This format will be used by the authenticator at log in. If configured to use "Email" or "UPN" (optional attributes) the authenticator will use that format at log in, but send the default value to the RADIUS server.
OpenID Connect Connector Type
The following fields apply to the OpenID Connect Connector Type:
- Configuration Wizard button — Opens the Configuration Wizard for the selected type of connector. See the OpenID Connect Configuration Wizard topic for additional information.
- Show / Hide Data link — Click the link to view or hide additional details
- Issuer — Displays the OpenID Connect provider issuer URI
- Client Id — Displays the OpenID Connect provider application Id for Privilege Secure
- Login Format — Indicates which Active Directory user ID property is used for the user login name: sAMAccountName, User Principal Name, Email, or SID
- User Id Source — Displays the source from which the User Id data is extracted
- User Id Field — Displays the value from the extracted data to use for host-user lookup
SAML Connector Type
The following fields apply to the SAML Connector Type:
- Configuration Wizard button — Opens the Configuration Wizard for the selected type of connector. See the SAML Configuration Wizard topic for additional information.
- Show / Hide Data link — Click the link to view or hide additional details
- Login URI — Displays the SAML provider issuer URI
- Name ID Policy — Displays the name of the ID Policy
- Login Format — Indicates which Active Directory user ID property is used for the user login name: sAMAccountName, User Principal Name, Email, or SID
- User Claim — Displays the name of the user attribute to use
- Check Certificate checkbox — Select to check if a safe certificate is needed
- Certificate — Provide your certificate file
- Logout URI — Displays the simple logout address (not a SAML SLO endpoint), which takes a parameter for the post logout redirection
Set Authentication as Default Login
Once a third-party authentication connector is configured, it can be set as the default form of authentication, or it can be set as the exclusive form of authentication. Hover over the authentication connector to display the configuration options.
There are two options that can be configured for the authentication connector, Set as Default and Set as Exclusive.
| Description | Option | Login Screen |
|---|---|---|
| Set as Default — Sets the authentication connector as the default login option and includes the option to login with Active Directory credentials |  |  |
| Set as Exclusive — Sets the authentication connector as the only option to login and the option to login with Active Directory credentials is removed |  |  |
Once the authentication connector is set to Default or Exclusive, the login will be updated to reflect the configuration selected.