Add Connection Profile
Follow the steps to add a connection profile to the console. See the Connection Profiles Page topic for detailed descriptions of the fields.
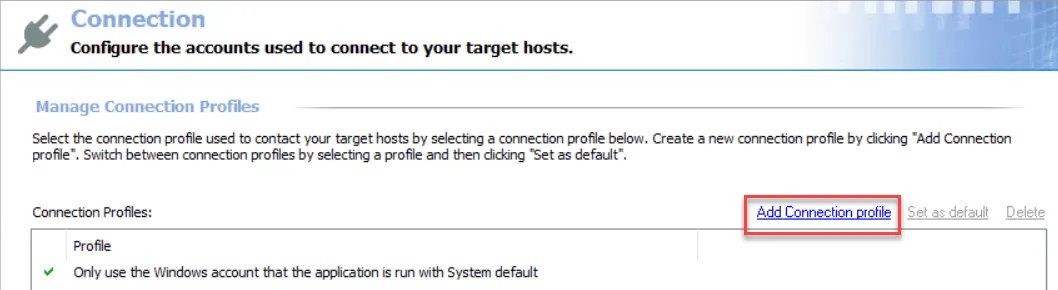
Step 1 – Navigate to the Policy > Access Policies > Connection Profiles page.
Step 2 – In the Connection Profiles list, click the Plus icon.
Step 3 – Enter the desired information to configure a new connection profile.
-
Name – Provide a unique name for the connection profile
-
Description – Provide an optional description to indicate the purpose of connection profile
-
Configure the Proxy settings, which control what proxy server will be used to start the session. When customizing to use a specific proxy RDP (port 4489) and SSH (port 4422) proxy server, only one server can be listed.
-
NOTE: If you want to use more than one proxy server, a load balancer must be used in front of the servers.
-
Session Control – Configure the Session Control settings to set up session duration and user login parameters for a connection profile.
NOTE: On this step, you will need to also select a default Activity Token Complexity policy for the connection profile
-
Credential Management – Configure the Credential Management settings, which control parameters for the password used for this connection profile
-
Website Settings – Configure the Website settings which control cleaning of the website data and allow recording the computer audio, if needed
-
Custom Fields – Configure the Custom Fields settings to create additional data entries for the connection profile
-
Approval Workflow –Configure the Approval Workflow settings
Step 4 – Click Save to create the new connection profile.
Step 5 – The new connection profile is created. To add an Approval Workflow, see the Add Approval Workflow topic for additional information.
The new connection profile is added to the Connection Profiles list.
Connection Profiles Page
The Connection Profiles page is accessible from the Navigation pane under Policy > Access Policy > Connection Profiles. It shows the configuration options for managing the session of the selected access policy. An approval workflow can be configured so that the session must be approved before the requester of the session can log in.

The pane on the left side of the page displays a list of the configured connection profiles. This pane has the following features:
- Search — Searches the table or list for matches to the search string. When matches are found, the table or list is filtered to the matching results.
- Blue + button — Create a new connection profile. See the Add Connection Profile topic for additional information.
- Trashcan icon — Deletes the connection profile. Icon appears when profile is hovered over. A confirmation window will display.
The selected profile details display in the main pane:
-
Name — Name of the connection profile that is unique
-
Description — Description that indicates the purpose of connection profile
-
Proxy settings:
- RDP Proxy — Specific proxy, format
host:port, that should be used for RDP activities in an access policy. If the field is blank, the local Proxy on the Privilege Secure server will be used. - SSH Proxy — Specific proxy, format
host:port, that should be used for SSH activities in an access policy. If the field is blank, the local Proxy on the Privilege Secure server will be used. - Allow Proxy Auto Connects — If disabled, the requester will be prompted for secondary authentication (password and MFA) when executing proxy connects from the Active Dashboard.
- Record Proxy Sessions — Specify if the proxy will record the session. This will allow a user with the admin role to watch a remote session live, or review it later. See the Replay Viewer Window topic for additional information.
- RDP Proxy — Specific proxy, format
-
Session Control settings:
-
Max Duration (minutes) — Length of time that sessions will be scheduled for when making a new Activity Request
-
Session End Notification (minutes) — Determines the time prior to the end of the session that the requester will be notified within their RDP or SSH clients. This option will work whether the requestor logs on directly to the Resource, or connects via the proxy.
-
Enable Session Extension — Check to allow user to extend their current session. See the Start Activity Session topic for additional information.
-
Extend By — The additional number of minutes that the session will be extended. See the Start Activity Session topic for additional information.
-
Session Extension Limit — The number of times the user will be able to extend their session. See the Start Activity Session topic for additional information.
-
Monitor for Logon — Monitor user logon to the resource
-
Monitor Interval (minutes) — Indicates how often Privilege Secure will poll a resource to determine whether a user has logged on
-
LSA Lookup Cache — Controls the size of the SID Lookup cache. Disabling the cache is useful for managed domain accounts with the “Delete After Use” option enabled:
- Do Not Change — Do not change the cache value
- Disable and Revert — Set the value to 0 and restore to the original value when the activity session ends
- Disable — Permanently disable the cache value
-
Leave Existing Members in Group — If checked, a user will be left in a group for an activity if that user was already in the group before the activity started and the user was not added to the group by a different activity
-
Validate Users for SSH Sessions — When checked, the action service will connect to all valid domain controllers for the Linux host to check that the target account exists and is enabled. This setting is recommended if users are encountering authentication issues with direct connect SSH sessions.
NOTE: This will increase the session creation time for Linux based activities with managed domain users and activity token domain users.
-
Require Notes for Sessions — Require the user to enter information in the Notes field when creating a session
-
Require Ticket Number for Sessions — Require the user to enter a ticket number in the Ticket Number field when creating a session
-
Activity Token Complexity Policy — Establishes how complex an activity token must be. Users can choose custom polices created on the Activity Token Complexity Page. Left blank, the Console will use the default activity token complexity policy.
-

-
Credential Management settings:
- Allow User to Access Password — When checked, the user will be able to view or copy the password from the Active Dashboard for the managed account that is used for the activity. The password that the user sees is valid only while the session is active. This option is enabled by default.
- Enable credential auto-fill in browser extension — When checked, the Console will allow auto-fill in the browser extension. This option is enabled by default.
- Enable 'Show Password' option in user interface and browser extension — When checked, the Console will enable the 'Show Password' icon on the login page of both the Console and the browser extension. This option is disabled by default
- View Password Timeout (seconds) — Enter he number of seconds the user will be able to view their password in the login page
-
Website settings:
- Clear Website Data Before Start — Clear browser cache before starting the session
- Clear Website Data After Stop — Clear browser cache after the session is ended
- Record Session Audio — Records the computer audio during the session
-
Custom Fields settings:
-
Label — Display name of the custom field
-
Variable Name — Name of the custom field for the PowerShell script
-
Description — Description of the custom field
-
Required — When selected, the entry for the custom field is required to be completed
-
Data Type — The type of entry for the custom field
- Integer — Numeric value
- String — String value (maximum length of 12 characters)
- Options — Custom limited selection value
-
-
Approval Workflow settings:
- Automatic – No approval is required for the session
- Tiered – Approval is required for the session. See the Add Approval Workflow topic for additional information.
If any of these settings are modified, Save and Cancel buttons are displayed. Click Save to commit the modifications. Click Cancel to discard the modifications.