Add Application
Applications are a special type of user that allow external entities to interact with Privilege Secure via the REST API interface. Capabilities within the product are identical to standard users with the exception that Applications are not able to log on through the product UI. Each Application has a unique name that is used to identify the application calling the API; authentication is via a combination of certificate serial number and API key.

Follow the steps to add an Application to an Access Policy.
Step 1 – Navigate to the Users & Groups page.
Step 2 – Click Add Application.
Step 3 – Enter a new Application Name in the provided field. This will be displayed to represent the application.
Step 4 – Enter a Certificate Serial Number in the provided field. This is the serial number of the client certificate used to authenticate the application. The certificate should be signed by a Certificate Authority (CA). Ensure the certificate is trusted by IIS by adding the CA trusted root certificate to the Trusted Root Certification Authorities on the Privilege Secure server.
Step 5 – Enter the API Key. This is the unique key used as part of Application authentication.
Step 6 – Click the Save button when finished.
The new Applicationhas been added to the the Users & Groups page.
Add New Microsoft Entra ID Tenant
Follow the steps to add Microsoft Entra ID (formerly Azure AD) resource to the Privilege Secure Console.
Step 1 – Navigate to the Resources page.
Step 2 – Click Add > New Microsoft Entra ID Tenant
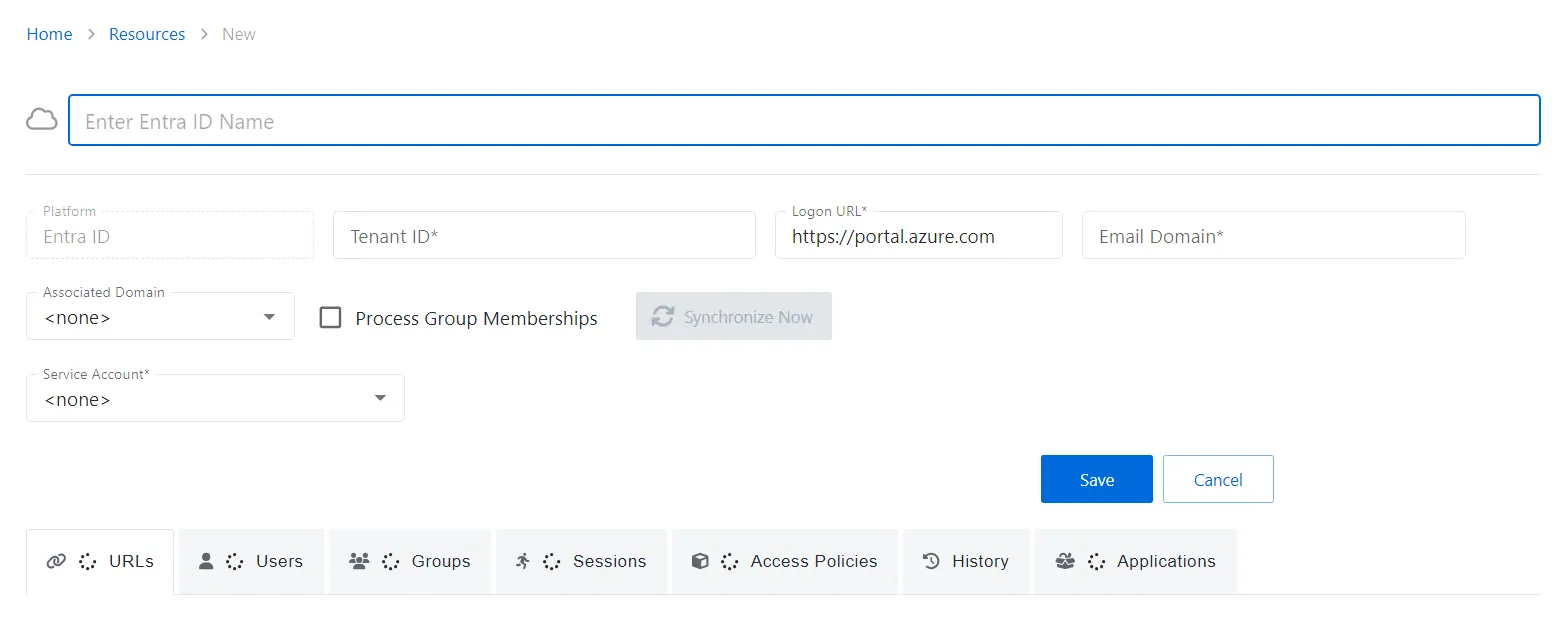
Step 3 – Enter the following information:
- Enter Entra ID Name — Displays the name of the resource
- Platform — Displays the type of platform, which defines the resource
- Tenant ID — Displays the globally unique identifier for the targeted tenant implementation as found in Entra ID
- Logon URL — Displays the primary logon page
- Email Domain — Displays the domain part of the user principal name used by the Tenant as found in Entra ID on the Users page, under “Identity Issuer”
- Associated Domain — For hybrid Entra ID environments, assign the on-premises Active Directory domain that is synchronized with the tenant, otherwise leave set to None
- Process Group Memberships — Select this checkbox to enable Netwrix Privilege Secure to collect group membership information. This is unchecked by default.
- Synchronize Now button — Scans the domain for users, groups, members, and computers. The Cancel button, which is only visible when scanning can be used to stop the resource scan. This scan can also be scheduled from the Platforms Page.
- Service Account — Displays the service account associated with the resource
-
- Visit icon — Go to the Service Account page to view details of the selected service account.
- Add New Service Account icon — Open the Add New Service Account window. The fields are identical to those on the Service Accounts page.
Step 4 – Click Save to add the Microsoft Entra ID Tenant to the console.
The new Microsoft Entra ID tenant has been on-boarded. See the Microsoft Entra ID Details Page topic for additional information.
Microsoft Entra ID Details Page
The Microsoft Entra ID (formerly Azure AD) Details page shows additional information for the selected Microsoft Entra ID Tenant resource. This page is opened from any linked resource within the various interfaces.
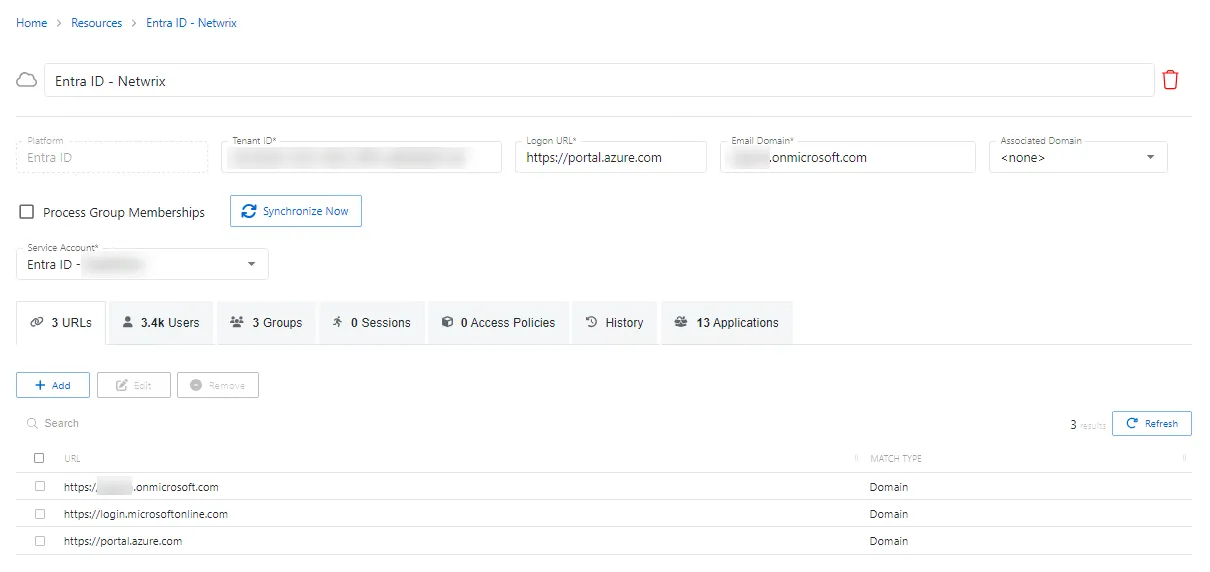
The details page shows the following information:
- Name — Displays the name of the resource
- Trashcan icon — Removes the selected resource from being managed by the application. A confirmation window will display.
- Platform — Displays the type of platform, which defines the resource
- Tenant ID — Displays the globally unique identifier for the targeted tenant implementation as found in Entra ID
- Logon URL — Displays the primary logon page
- Email Domain — Displays the domain part of the user principal name used by the Tenant as found in Entra ID on the Users page, under “Identity Issuer”
- Associated Domain — For hybrid Entra ID environments, assign the on-premises Active Directory domain that is synchronized with the tenant, otherwise leave set to None
- Process Group Memberships — Select this checkbox to enable Netwrix Privilege Secure to collect group membership information. This is unchecked by default.
- Synchronize Now button — Scans the domain for users, groups, members, and computers. The Cancel button, which is only visible when scanning can be used to stop the resource scan. This scan can also be scheduled from the Platforms Page.
- Service Account — Displays the service account associated with the resource
If any of these settings are modified, Save and Cancel buttons are displayed. Click Save to commit the modifications. Click Cancel to discard the modifications.
The details page has the following tabs:
- URLs Tab for Microsoft Entra ID
- Users Tab for Microsoft Entra ID
- Groups Tab for Microsoft Entra ID
- Sessions Tab for Microsoft Entra ID
- Access Policies Tab for Microsoft Entra ID
- History Tab for Microsoft Entra ID
- Applications Tab for Microsoft Entra ID
Microsoft Entra ID Platform Policy Configuration
The Microsoft Entra ID (formerly Azure AD) menu displays the configuration options for Microsoft Entra ID platforms.
Details for the selected platform are displayed on the right side of the page. Below are the configuration options for an Microsoft Entra ID Platform.
- Name — Displays the name of the policy
- Description — Description of the policy
- Built-in Account — The built-in administrator account for the resources on the selected platform. If multiple built-in administrator accounts are required, create a copy of the platform. For Windows platforms, the built-in account is defined via the well-known SID (S-1-5-21*-500). This feature informs Netwrix Privilege Secure which account(s) to discover and onboard for a given platform during its discovery process.
- Password Complexity Policy — The password complexity rules for managed accounts created on the resources defined by the selected platform. See the Password Complexity Page topic for additional information.
- Password Length — The number of characters required by the selected password policy
- Arrow icon — Show or Hide password policy details. Click the icon to display the password complexity requirements of the selected password policy.
- Scheduled Change Policy — How often the credentials for a managed account are changed (credential rotation). See the Credentials Dashboard and Schedule Policies Page topic for additional information.
- Scan Schedule — How often to perform a host scan on the resources defined by the selected platform (local users, groups, windows services and scheduled tasks). This scan can also be run ad-hoc from the Resources Page.
- Verification Schedule — How often to verify the credentials for managed accounts on the resources defined by the selected platform. See the Credentials Dashboard topic for additional information on managed accounts.
- Reset on Mismatch — When selected, this option will force a password rotation if the password verification step finds that the existing password for an account does not match what Privilege Secure expects.
If any of these settings are modified, Save and Cancel buttons are displayed. Click Save to commit the modifications. Click Cancel to discard the modifications.