Host Details Page
The Host Details page shows additional information for the selected host resource. This page is opened from any linked resource within the various interfaces.
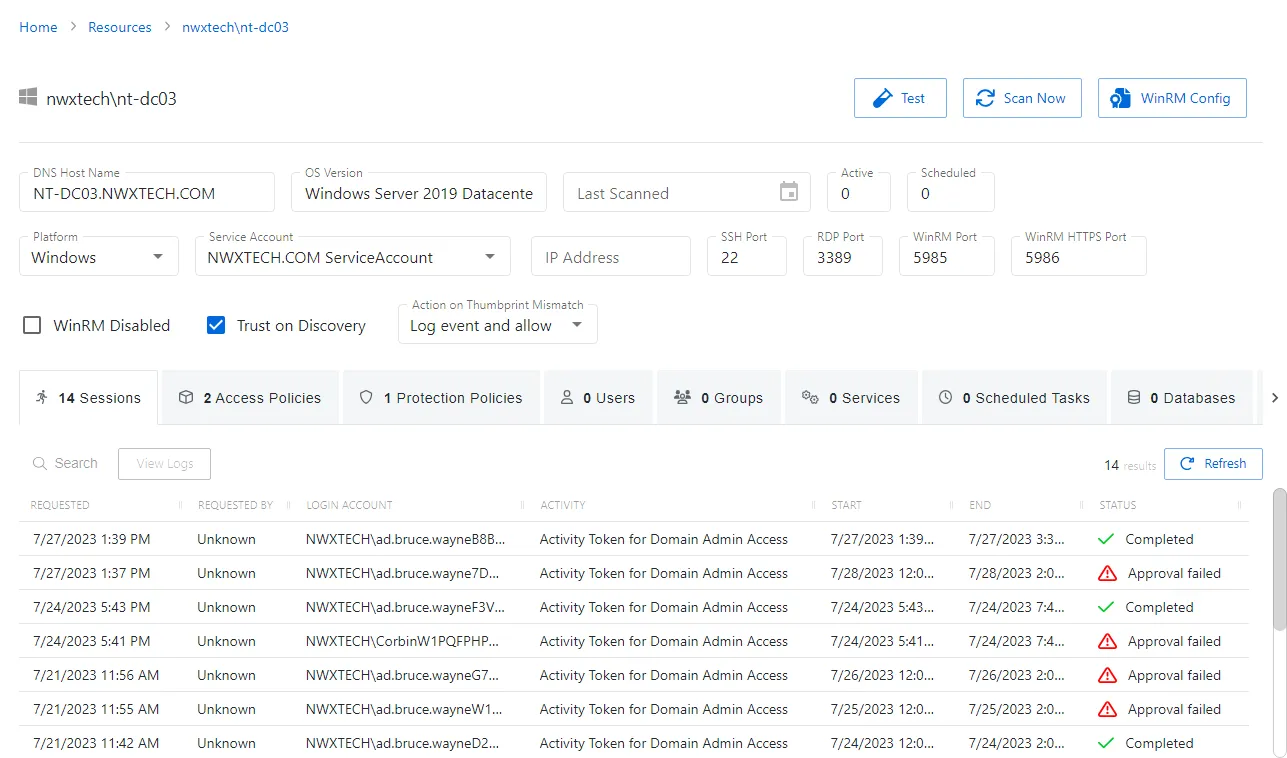
The details page displays the following information:
-
Name — Displays the name of the resource
-
OS Version — Displays the operating system of the resource
-
Last Scanned — Date timestamp for the last time the resource was scanned
-
Active — Displays the number of active sessions on the resource
-
Scheduled — Displays the number of sessions scheduled for the resource
-
Test button — Opens the Test Resource Connectivity window. See the Test Resource Connectivity Window topic for additional information.
-
Scan Now button — Scans a host resource for local users, groups, windows services, and scheduled tasks. A confirmation window will display.. The Cancel button, which is only visible when scanning can be used to stop the resource scan. This scan can also be scheduled from the Platforms Page.
-
WinRM Config button — Opens the Configure Secure WinRM Connection window. See the Configure Secure WinRM Connection Window topic for additional information.
-
Platform — Displays the type of platform, which defines the resource
-
Service Account — Displays the service account associated with the resource
-
Blue arrow button — Opens the Service Account details page. See the Service Accounts Page topic for additional information.
-
Green plus button — Opens the Add New Service Account window. See the Add New Service Account Window topic for additional information.
-
IP Address — Displays the IP address for the resource
-
SSH Port — Displays the SSH port number
-
RDP Port — Displays the RDP port number
-
WinRM Port — Displays the WinRM port number
-
WinRM HTTPS Port — Displays the WinRM HTTPS port number
-
WinRM Disabled checkbox — If this checkbox is selected, Netwrix Privilege Secure will not attempt to communicate to the target resource via WinRM. This value is determined during the initial host scan of the resource, but will not be automatically changed during subsequent host scans.
-
Trust on Discovery checkbox — If this checkbox is selected, the certificate that is used with WinRM HTTPS will be trusted when the host is first scanned. Otherwise, the NPS administrator needs to manually trust the host.
-
Action on Thumbprint Mismatch — This menu selection determines the course of action when a thumbprint mismatch occurs during a connection to the resource.
- Allow Connection — This setting will allow a connection to the host. (No event is generated.)
- Log Event and Allow — This setting will allow a connection to the host and log an event in the Event table. If a SIEM connection is configured, an event will be sent to SIEM as well.
- Log Event and Block — This setting will block the connection to the host and log an event in the Event table. If a SIEM connection is configured, an event will be sent to SIEM as well.
If any of these settings are modified, Save and Cancel buttons are displayed. Click Save to commit the modifications. Click Cancel to discard the modifications.
The details page has the following tabs:
- Sessions Tab for Host
- Access Policies Tab for Host
- Protection Policies Tab for Host
- Users Tab for Host
- Groups Tab for Host
- Services Tab for Host
- Scheduled Tasks Tab for Host
- History Tab for Host
- Installed Software Tab for Host
Windows Platform Policy Configuration
The Windows menu displays the configuration options for Windows platforms.
Details for the selected platform are displayed on the right side of the page. Below are the configuration options for a Windows Platform.
- Name — Displays the name of the policy
- Description — Description of the policy
- Built-in Account (Allows custom entries) — The built-in administrator account for the resources on the selected platform. If multiple built-in administrator accounts are required, create a copy of the platform. For Windows platforms, the built-in account is defined via the well-known SID (S-1-5-21*-500). This feature informs Netwrix Privilege Secure which account(s) to discover and onboard for a given platform during its discovery process.
- Password Complexity Policy — The password complexity rules for managed accounts created on the resources defined by the selected platform. See the Password Complexity Page topic for additional information.
- Password Length — The number of characters required by the selected password policy
- Arrow icon — Show or Hide password policy details. Click the icon to display the password complexity requirements of the selected password policy.
- Protection Policy Schedule — How often the Protection Policy is run. See the Protection Policies Page topic for additional information.
- Scheduled Change Policy — How often the credentials for a managed account are changed (credential rotation). See the Credentials Dashboard and Schedule Policies Page topic for additional information.
- Scan Schedule — How often to perform a host scan on the resources defined by the selected platform (local users, groups, windows services and scheduled tasks). This scan can also be run ad-hoc from the Resources Page.
- Verification Schedule — How often to verify the credentials for managed accounts on the resources defined by the selected platform. See the Credentials Dashboard topic for additional information on managed accounts.
- Reset on Mismatch — When selected, this option will force a password rotation if the password verification step finds that the existing password for an account does not match what Privilege Secure expects.
If any of these settings are modified, Save and Cancel buttons are displayed. Click Save to commit the modifications. Click Cancel to discard the modifications.