Getting Started
Getting Started
Getting Started
Prior to install of Netwrix Privilege Secure there are several steps that the Customer Success team will arrange:
- Rollout planning meeting - this allows the team to align their goals and ensure that any constraints are discussed
- Shipping and configuration documentation for appliances
- Disaster Recovery approach
Appliances will be shipped by the Netwrix team. These should each have 2 IP addresses available. One for the main application connection and one for iDRAC support. iDRAC support is key in case of any issues during implementation.
In order to install and configure Privilege Secure, SSH access needs to be confirmed once the appliances are racked (or VMs created). iDRAC access should also be confirmed.
Install Netwrix Privilege Secure for Discovery
In order to install Privilege Secure, the Netwrix Customer Success (CS) team will require SSH access
to the appliances or virtual machines setup forPrivilege Secure.
The Netwrix Customer Success team will install Privilege Secure. This can either be on appliances or
on VMs. Some key questions need to be determined prior to install:
- Which datacenter will house the production environment? It is generally recommended that a three node High Availability (HA) cluster is used. This utilizes Docker Swarm to provide a very resilient environment for running Privilege Secure.
- Which datacenter will house the DR environment? DR is a separate environment that would only be used in the case of a serious impact to the production environment that takes down multiple nodes.
The Customer Success team can provide guidance and documentation to determine the best approach for
DR.
For a VM installation, the required virtual machine sizes are in this article:
Virtual Machines
Allow
for a two hour window to install the production environment and another two hour window to install
the DR environment. A further 2hr window should be setup for backup and restore scripts to be
created and DR testing.
Setup Scan Mode
Prerequisites
- In order to successfully install Privilege Secure several domain accounts will be required (Bind, Scan and Protect), these are detailed in this article
These need to be added to Privilege Secure in the server configuration screen (Config, Server Configuration). This is domain specific and is opened by clicking the > sign next to the domain:
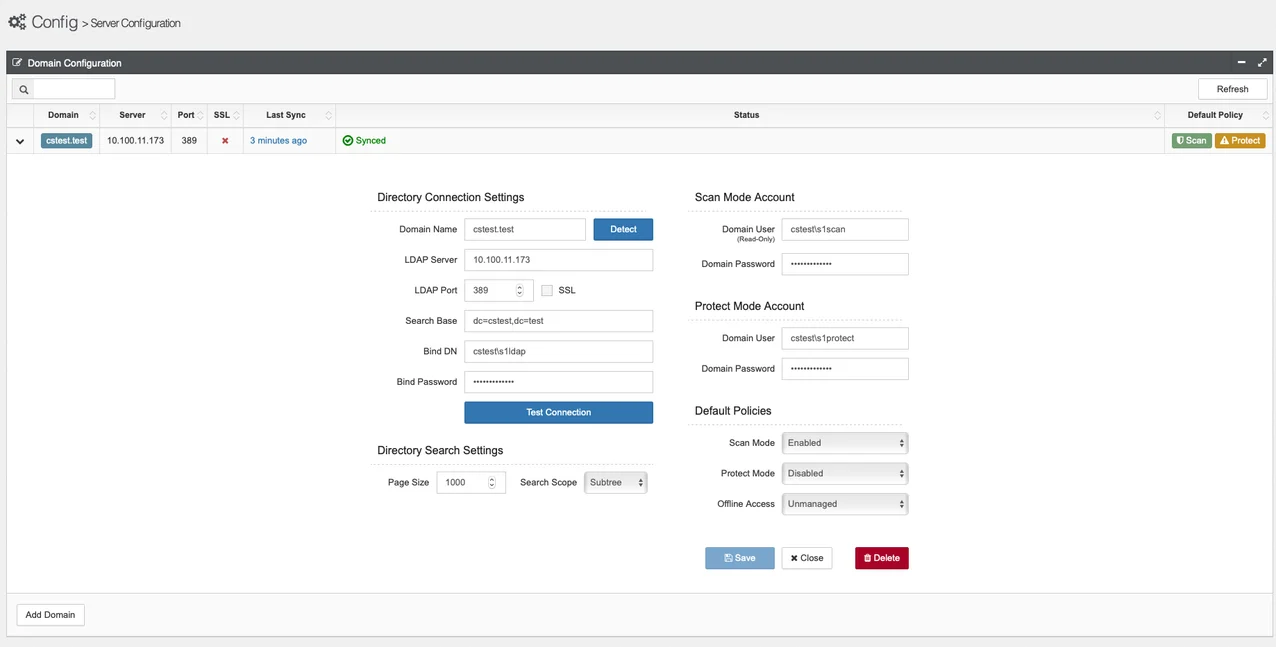
- The scan mode account should then be used to rollout a GPO change to ensure all Windows machines are able to be scanned. The details on how to make this GPO change are detailed in this article: Scan GPO Guide (Server 2012 or 2008 Domain Controllers)
- Set the domain to be scanned
Once these are set the domain can be scanned.
NOTE: We require a static DC to ensure S1 can correctly detect and account for changes made to Groups, OUs, Users, etc. A load balanced connection will cause group updates to not be recognized correctly.
The dashboard can now be reviewed. An explanation of the dashboard is available in this article: Dashboard Guide
Adding Users To Privilege Secure
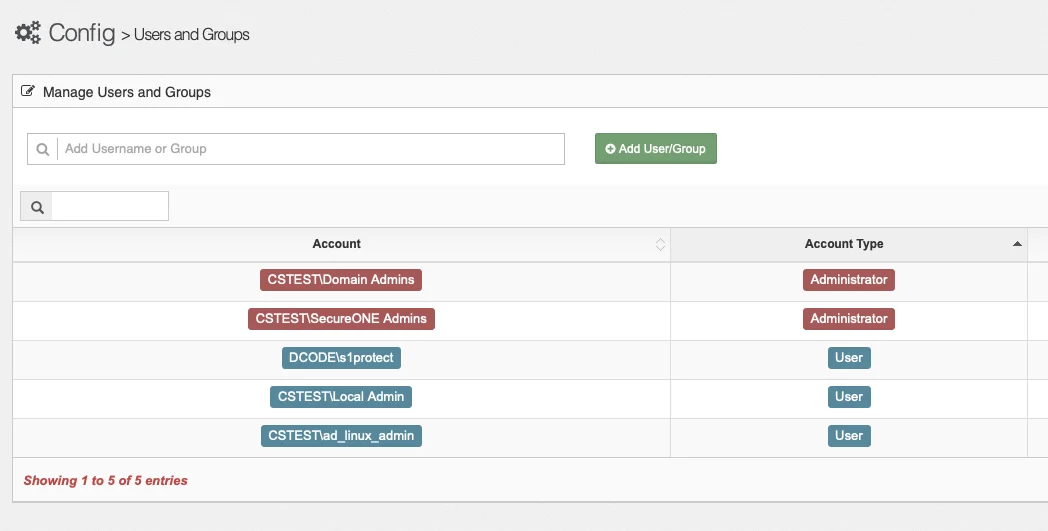
Privilege Secure utilizes two levels of user accounts, User and Administrator. These are explained
in the article below:
Add a User or Group to a Systems' Administrator Account Inventory
Before
protect mode is rolled out users that would require privileged access should be added to Privilege
Secure. This is typically done by means of an AD group. The Config/Users and Groups page is used to
add the group:
Adding the Protect Account to Local Administrator Group
Add the protect account to the local administrator group on the machines to be protected. This account is used to update the local administrator group with the necessary privileges. This account should be a non-interactive account with a complex password.
Add Test Server to Protect Mode - individual server
To rollout a server in protect mode several steps should be executed prior to actually moving to protected status:
- Determine exactly what service accounts needs to be persistent - This is the most critical as software may not function as expected if access is removed. Persistent access ensures these service accounts remain functional.
- Determine what groups and users need privileged access to the system - Often with nested groups and accounts, access does not match what is truly required. This should be reviewed and cleaned as part of the move to protected status.
The accounts with access to a machine can be viewed from the Insight/Computer page in Privilege Secure:
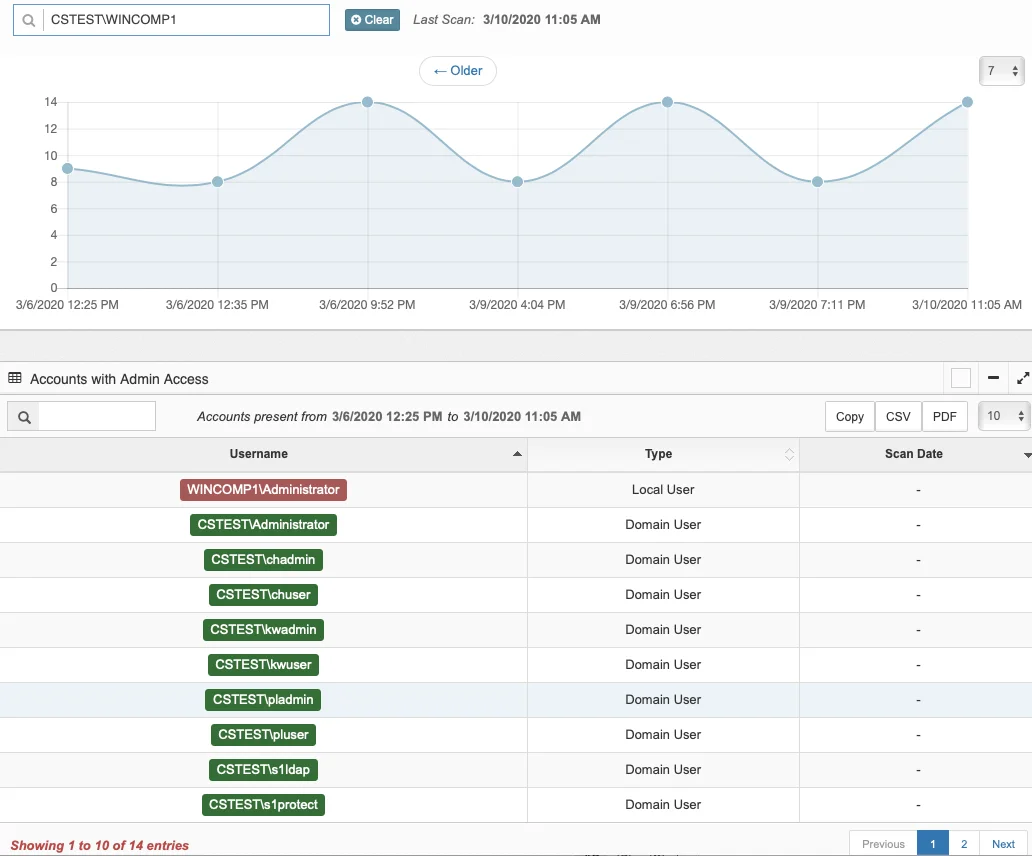
Here all the accounts groups are listed over several pages.
Once the access has been determined, and Active Directory cleaned up, the machine can be added to
protect mode JITA. This can be done from the Access/Grant Access page.
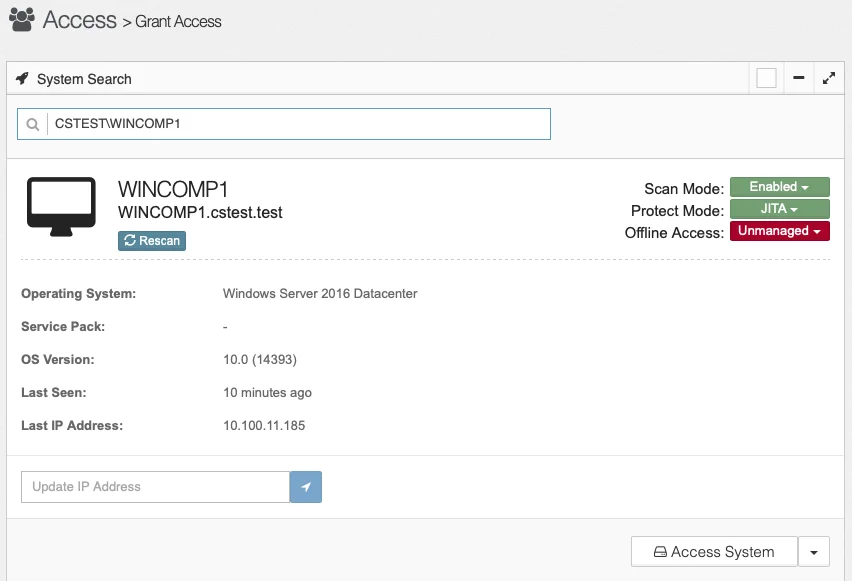
Placing the server into protect mode removes the accounts, that are not persistent, from the server and adds them to Privilege Secure. These remain available for use, but they are now available for use on a Just In Time Access (JITA) approach. This means that a user of Privilege Secure can access the system provided that they also a member of an AD group that has access to the system. Privilege Secure does not manipulate Active Directory.
Add Multiple Servers to Protect Mode (Quickstart)
Obviously, the method of adding each server individually to Protect Mode would be very time consuming and cumbersome. Once an understanding has been achieved of how Privilege Secure functions for JITA access, the next step of adding multiple servers to protect mode can be taken. The tool that is used to accomplish this is the Quickstart reporting tool. This pulls an Excel file of the systems scanned and allows for review and ultimately a method for uploading a set of configuration detail toPrivilege Secure for multiple systems in one go.
Install Python Version 2.7
Follow the following article to install Python: Linux Registrations Prerequisites
Download Privilege Secure Reporting Tools (Quickstart)
Privilege Secure has a Python script that can be used for multiple purposes. The script provides a way of understanding the full access across the organization by system and also allows for a method of making changes to Privilege Secure in bulk.
- Download the script zip file from: QuickStart Script
- Run
pip install -r requirements.txtwith the path to the requirements.txt file that comes with the latest quickstart script. This requires Python 2.7 and PIP to be installed (PIP is installed by default with Python).
Quickstart is now almost ready to be run, but authentication to Privilege Secure must be configured. This is done with the help of the Postman application.
Installing and Configuring Postman
Install and configure Postman in preparation for running the Quickstart process. Quickstart is used for updating and enrolling multiple machines into Privilege Secure. Part of the initial configuration of this requires Postman. Postman is a tool for running APIs within Privilege Secure.
Running Quickstart
Once Postman is install and configured, one final item needs to be done before running the Quickstart reporting script. Modify the reports-2.1.py script to reflect the admin user that will be used to run Quickstart (this information was captured during the setup of Postman).
Edit reports.py and change the configuration options:
config = {'baseUrl': 'https://10.100.11.192/api/v1', # Url of PrivilegeSeucre API'userId': '5e566054dea345d0a59eabfa', # PrivilegeSecure Admin Account'provisionUser': 'kwadmin' # Name of PrivilegeSecure Admin Account}
Quickstart can now be run from the folder containing the Quickstart python script.
- The API key must be used the first run (it is then stored for several hours without needing to be reused). The API key should be stored only in a safe and secure location.
- Use the —insecure option (two dashes) when running Quickstart.
- The Quickstart help can be obtained by using the —help or -h options.
More information for running Quickstart is available from the following articles:
How To: Offline Access Management (OAM) - Extended:
How To: QuickStart - Offline Access Management and Registering Linux Computers