Installation
These topics describes the installation and initial configuration process of Netwrix Privilege Secure. Prior to installing Privilege Secure, ensure that all installation requirements have been met. See the Requirements topic for additional information.
Privilege Secure comes with a temporary 30-day license. Please contact the organization’s sales representative to purchase a license.
System Architecture
Netwrix Privilege Secure consists of a number of components that work together to manage and report on activity:
- Web Interface – Allows the user to access and configure the Privilege Secure Console, via the Web Service.
- Web Service – The central web service is responsible for database access and communication out to each service component i.e. licensing, email, action, and proxy. The web service communicates to components on TCP/6500 but can be configured to run on any port e.g. https port 443.
- Service Mesh – The service mesh connects remote services to the central Web Service. Each remote “leaf” node is configured as a mesh so traffic may be routed via the most efficient route back to the web service. The service mesh registers to the webservice on TCP/6520 and all subsequent communication is over TCP/6523 for Leaf nodes and TCP/6524 for cluster nodes.
- License Service – The Privilege Secure license service by default installs with a 30 day / 10 user license. When the license expires, only the built in Admin account can log into the product until a valid license is added; under these conditions, a red error is displayed on the main login page. The license service communicates with the central web service via TCP/6500 by default.
- Email Service – The email service connects Privilege Secure to an external SMTP server. It supports authenticated and unauthenticated connections as well as TLS. The email service communicates with the central web service via TCP/6500 by default.
- Scheduler Service – The scheduler service is responsible for setting up and maintaining any date/time-specific actions such as password changes and system scans etc. It is installed by default on the Privilege Secure server; remote nodes communicate back to the central web service via the Service Mesh
- SIEM Service – The SIEM service is responsible for processing events that enter the SIEM table, and forward onto a configured SIEM provider. It supports both on-prem and cloud-based services, and leverages a template configuration for portability; out of the box templates are available for CEF and LEEF. It is installed by default on the Privilege Secure server; remote nodes communicate back to the central web service via the Service Mesh.
- Action Service – Connects Privilege Secure to managed resources and runs actions defined in the console on those resources, such as Active Directory synchronization, password changes and account orchestration. Many action services may be connected to the Privilege Secure web service via the Service Mesh. Outgoing connections will vary according to action.
- Proxy Service (Session Proxy) – The Privilege Secure proxy service connects users to resources via RDP and SSH protocols; the proxy is also responsible for storage of session recordings via its iolog component. Many proxies can be implemented for load balancing and redundancy and recording/storage functions can be enabled according to preference. The proxy may be implemented on Windows, Linux, or Docker Container. Incoming user connections from user desktops are over TCP/4489 (RDP) and TCP/4422 (SSH). Outgoing server connection are via TCP/3389 (RDP) and TCP/22 (SSH). For remote proxies, all communication back to the central webservice is via the service mesh.
- Remote Desktop Monitor Service – The Privilege Secure Remote Desktop Monitor service monitors the Windows event activity that occurs during an RDP session. It must be installed on the target host prior to the launching of an RDP session. The service listens for terminal services connections. When a session begins, the service attaches to the session when it identifies the channel used by the Privilege Secure Proxy service and sends the Windows events back to the application. It specifically monitors what windows are opened and what menus are selected during an RDP session. See the Install Remote Desktop Monitor Service on Target RDP Hosts topic for additional information.
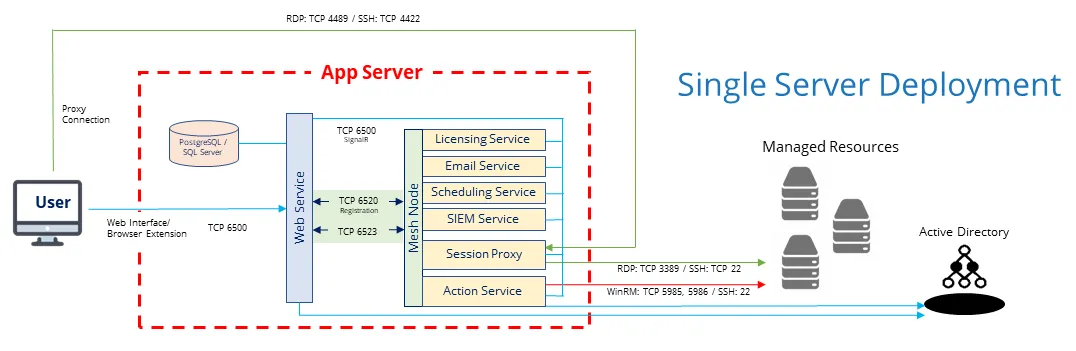
Single Privilege Secure Server
Privilege Secure for Access Management can be installed on a single Windows server. Typically, this architecture is only used for Proof of Concepts or testing purposes. All components are installed on the application server. This scenario provides rapid start capability, and in most cases, installation and initial configuration can be completed in as little as 20 minutes.
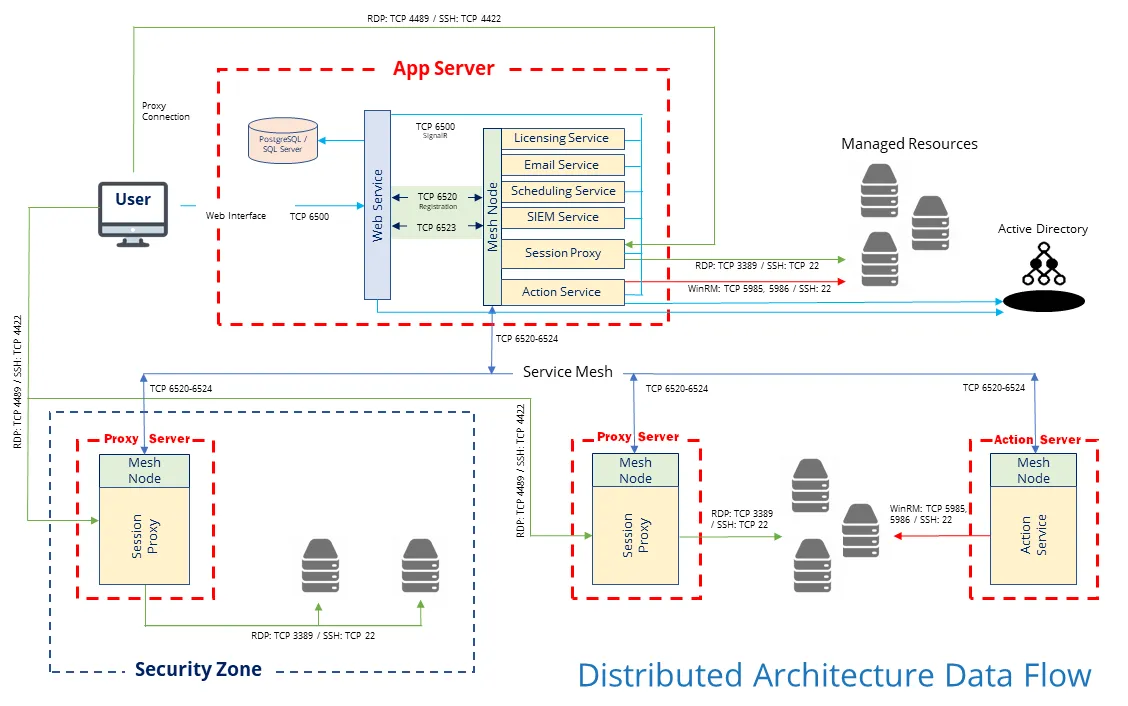
Privilege Secure Server with Remote Services
The Proxy and Action services will consume resources according to load. Often it is necessary to install Proxy and Action Services on additional hosts for scalability, redundancy, or network segmentation. Adding these services to other hosts provides the option to disable these services on the application server.
The user can contact the Web service over port 6500, illustrated with a blue arrow. They can also talk directly to the Proxy service, illustrated with a green arrow over port:
- RDP port is TCP 4489
- SSH port is TCP 4422
The Proxy will talk to the managed resources over their native ports:
- RDP port is TCP 3389
- SSH port is TCP 22
The Action service executes actions on manage resources and Active Directory using PowerShell remoting over:
- WinRM port TCP 5985 or 5986
- SSH port 22
The Action service also needs to communicate with Active Directory on a variety of different ports. See the Ports topic for additional information.
The Service Mesh connects remote services to the central Web service. Each remote “leaf” node is configured as a mesh so traffic may be routed via the most efficient route back to the web service. The Service Mesh registers to the Web service on TCP 6520. All subsequent communication is over:
- Leaf nodes port TCP 6523
- Cluster nodes Port TCP 6524
Active-Passive Database Deployment with PostgreSQL Database
For high-availability, the application allows two identical servers to be configured such that at any one time, all components of all hosts are active for the purposes of load-balancing and redundancy, with a replicated database pair. When the Primary becomes unavailable, a high-availability configuration tool is used to manually instigate failover. All external components on operational resources continue to service requests.
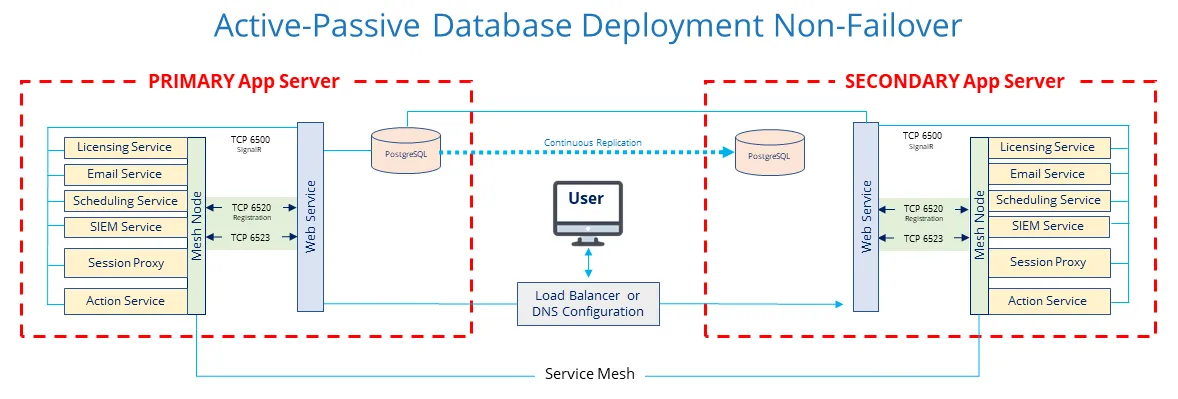
The Active-Passive configuration, which is only available with the PostgreSQL database, allows you to leverage the embedded database. It is also the simplest option for configuring high-availability. However, it does require the manual intervention to failover.
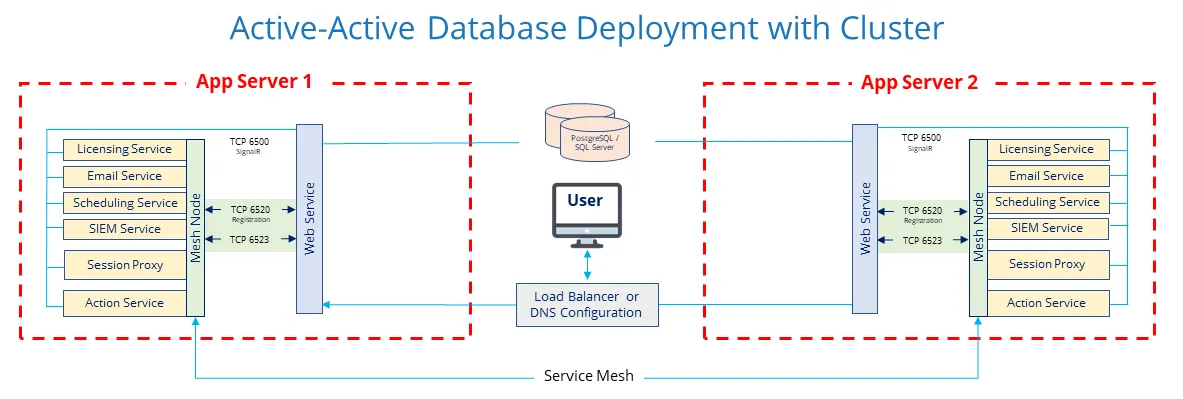
Active-Active Database Deployment
The Active-Active configuration for high-availability is available for both the PostgreSQL and SQL Server database options. No manual intervention is required. Many application servers can be added to the database for redundancy and scalability. However, setup is more complex than an Active-Passive configuration. Also, you will need an additional server for the database.
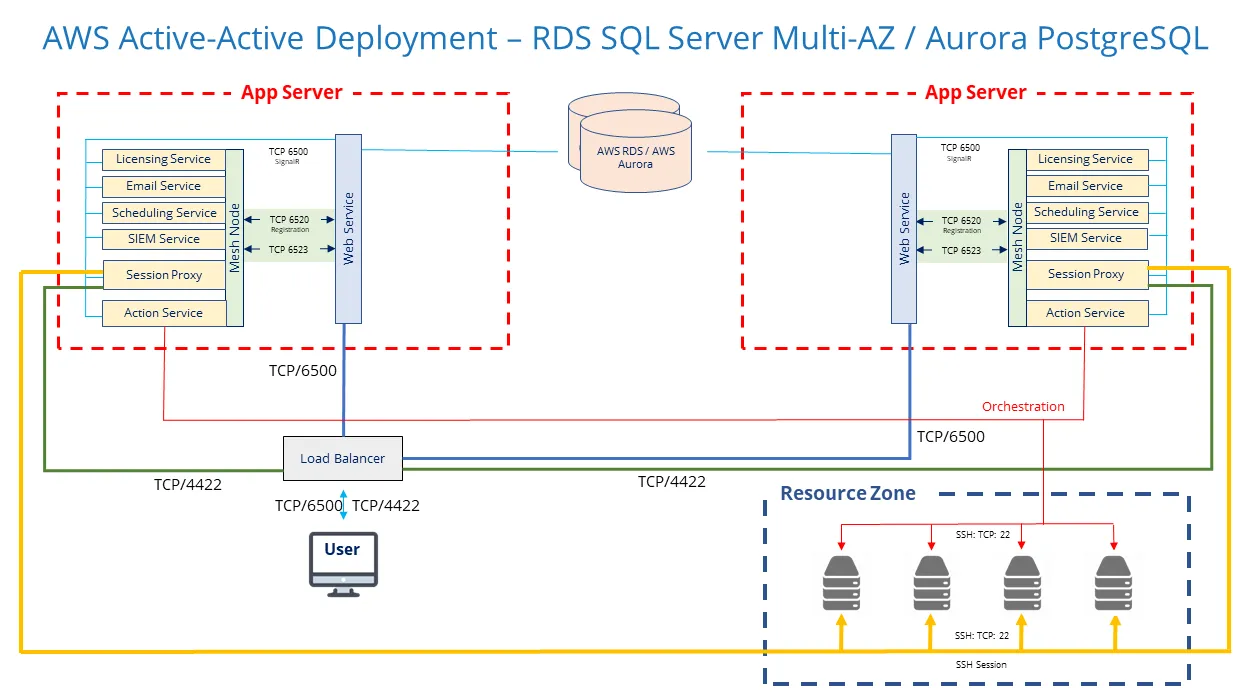
Cloud-Native Database Deployment
Cloud-native databases can be used for Active-Active configuration. They benefit from having built-in high-availability and auto-scaling. AWS supports databases for PostgreSQL (Aurora PostgreSQL) and SQL Server (RDS SQL Server). Azure also supports databases for PostgreSQL and SQL Server.
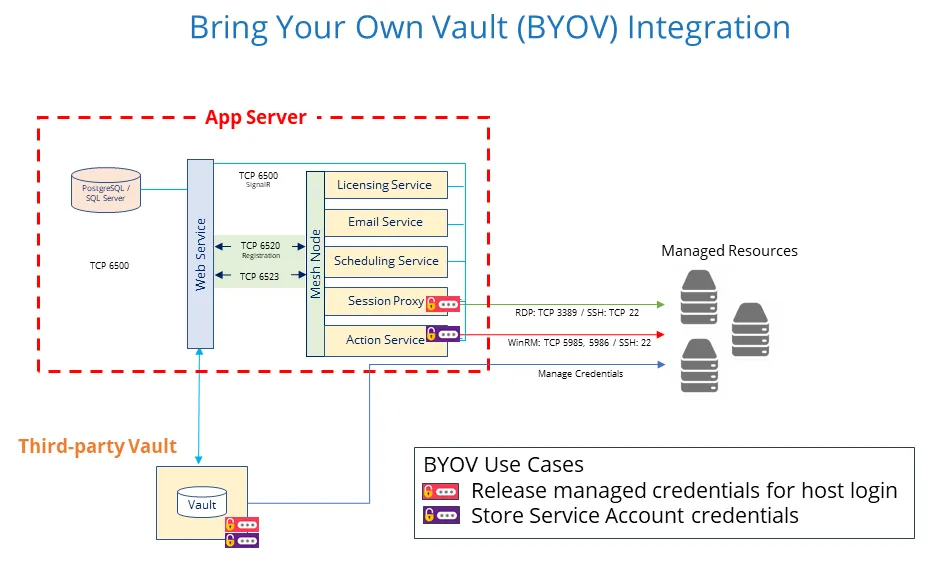
Third-Party Vault Integration
Often it is desirable to pull managed credentials from existing vaults into Privilege Secure activities. Benefits include:
- Faster deployment
- Consolidate multiple vendors into a single user interface
- Onboard credentials without having to change API references in applications
- Build on existing infrastructure
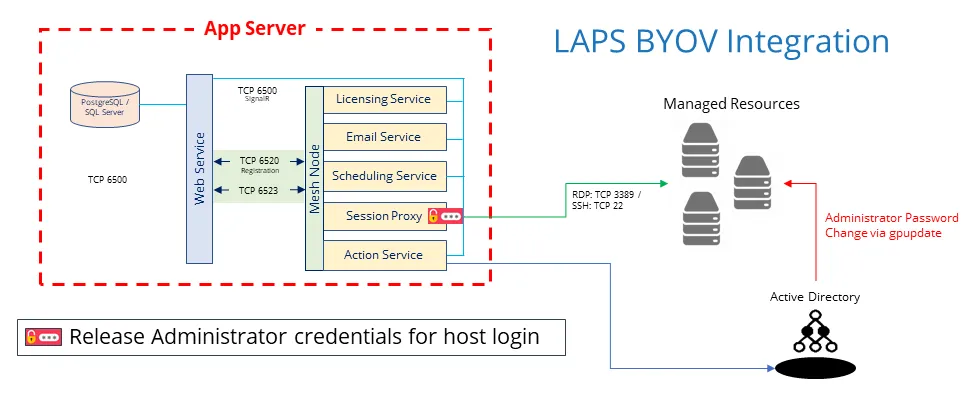
LAPS Integration
Microsoft Active Directory supports the changing of local Administrator passwords. The LAPS integration allows those passwords to be utilized for Privilege Secure activities. Benefits include:
- Leverage existing investment in local password management
- Faster deployment time
- Offboard password changing process to Active Directory