Managing Non-domain-joined Windows Computers with Netwrix Privilege Secure
Overview
This article describes the process for managing a non-domain-joined Windows computer with Netwrix Privilege Secure.
Before You Begin
Make sure that you have the following:
- A local Administrator account on the target computer, for which you know the password
- PowerShell Remoting enabled on the target computer (
Enable-PSRemoting⸱ Microsoft) (https://learn.microsoft.com/en-us/powershell/module/microsoft.powershell.core/enable-psremoting?view=powershell-7.2) - Port 5985 open for connections from the Netwrix Privilege Secure server (and any hosts running remote action services, if applicable)
Instructions
Adding the Netwrix Privilege Secure Service Account
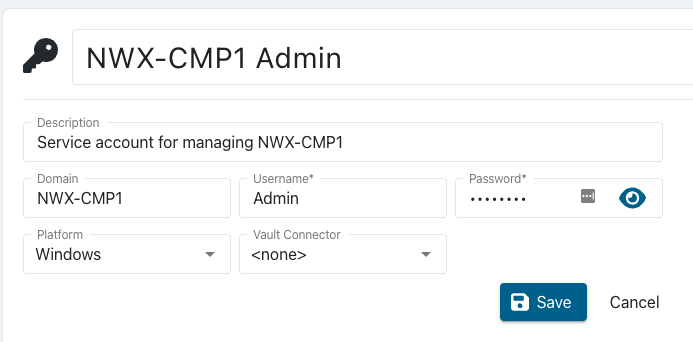
- As a user with the Administrator role, open Netwrix Privilege Secure. Navigate to the Configuration > Service Accounts page.
- Click the green plus button to create a new Service Account
- Enter the required information
- Name (a friendly name that is displayed in the rest of the UI for this account)
- Description (additional text for identifying this account)
- Domain (This MUST be the
NETBIOSname of the target computer) - Username (A Local Administrator account on the target computer)
- Password (The password for the local administrator account)
- Platform (
Windows) - Vault Connecter (
<none>)
- Click Save
Adding the Computer to Netwrix Privilege Secure
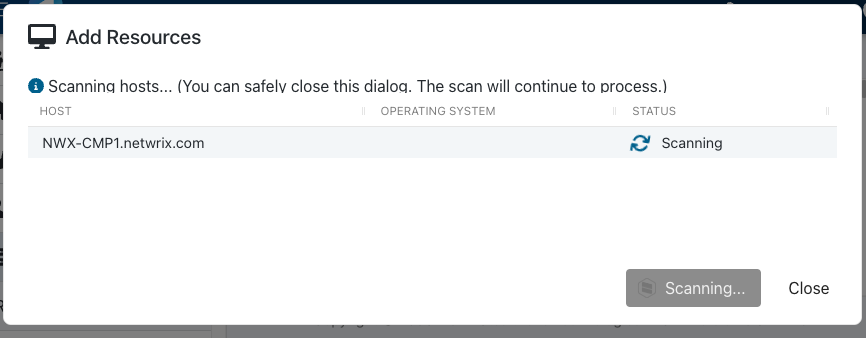
- Navigate to the Resources page
- Click the Add button
- Select New Server from the dropdown list
- Click the Add Manually radio button
- Enter the FQDN of the target computer
- Click Add
- In the lower right, select the Service Account created in the previous step.
- Click Add
This will start the scanning step, you can close the dialog or wait for the scan to complete. If there are failures during the scan you can review the logs by navigating to the resource page.
Troubleshooting a Failed Scan
If the scan fails, you can troubleshoot it by viewing the scan logs on the Resources page.
-
Search for the computer you attempted to add
-
Click on the Resource name of the computer
-
Click on the History tab
-
Select the last scan event and click View Logs

Additional Troubleshooting: "Access Denied""
In the event that you see "Access Denied" when investigating the logs, refer to Netwrix Privilege Secure: Resolving "Access Denied" When Connecting to a Non-domain-joined Windows Resource (https://kb.netwrix.com/8526).
Summary
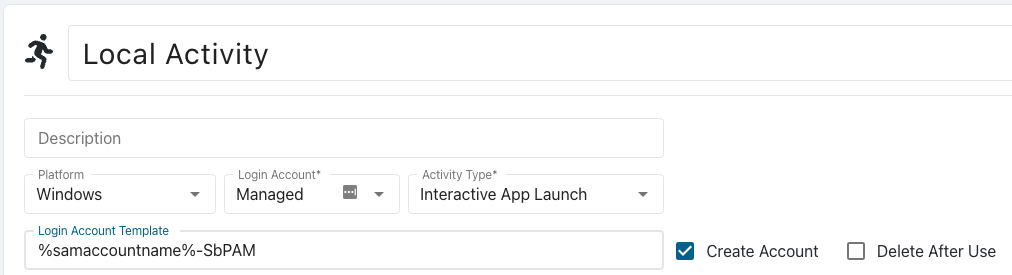
After going through this process, you can use this computer's resource in Activities. A non-domain joined Windows computer can be used in any activity that doesn’t require Active Directory. You can create local Activity Token users and local managed accounts. Requester and accounts that require Active Directory will not work.
To configure a local Activity Token/Managed Account activity, when creating the activity remove the “%targetdomain%\” portion of the default Login Account Format. Make sure to use the Windows Platform as well.