How to Configure Local Administrator Password Solution (LAPS) Integration
Summary
This article outlines how to integrate Netwrix Privilege Secure activities with the Microsoft Local Administrator Password Solution (LAPS), enabling activities to access Windows resources using the built-in Administrator account managed by LAPS.
Instructions
-
Ensure prerequisites
- Install LAPS on the target Windows workstations and servers.
- Place the computers in the appropriate Organizational Units (OUs) in Active Directory.
-
Prepare a service account
- Create a service account, or identify an existing account, that Netwrix Privilege Secure will use to integrate with LAPS.
- Delegate the ability to read and reset LAPS passwords to that service account by using the Microsoft PowerShell cmdlets available with the LAPS UI fat client installer: https://www.microsoft.com/en-us/download/details.aspx?id=46899
Use the following PowerShell commands (replace
<laps_ou>and<service_account>):Set-AdmPwdReadPasswordPermission -OrgUnit "<laps_ou>" -AllowedPrincipals "<service_account>"Set-AdmPwdResetPasswordPermission -OrgUnit "<laps_ou>" -AllowedPrincipals "<service_account>"- In these commands, replace
<laps_ou>with the OU containing the computers managed by LAPS, and replace<service_account>with the service account that you will use during the LAPS integration configuration in Netwrix Privilege Secure.
Example: if the computers managed by LAPS are in an OU named "LAPS PCs" and the service account is
svc_sbpam@lab.local, run:Set-AdmPwdReadPasswordPermission -OrgUnit "LAPS PCs" -AllowedPrincipals "lab\svc_sbpam"Set-AdmPwdResetPasswordPermission -OrgUnit "LAPS PCs" -AllowedPrincipals "lab\svc_sbpam" -
Configure the LAPS connector in Netwrix Privilege Secure
- Log in to Netwrix Privilege Secure as an admin.
- If the service account you granted permissions to is not yet added to Netwrix Privilege Secure, add it via Configuration > Service Accounts.
- Navigate to Configuration > Integration Connectors.
- Create a new connector and select LAPS from the Connector Template dropdown.
- Select the service account that has read and reset permissions for the LAPS OU(s) from the ServiceAccount dropdown.
- Add the domain name (for example,
lab.local) in DomainName and click Save.

-
Create an activity that uses the LAPS connector
- Navigate to Activities to create an activity that provides the built-in Administrator access to a Windows resource managed by LAPS.
- Create a new activity and set the Login Account dropdown to Vault.
- For Vault Connector, select the LAPS connector you created in the previous step.
- Set Platform to Windows.
- Ensure the Login Account Template matches the expected built-in admin account name (in most cases this is the default value
Administrator).
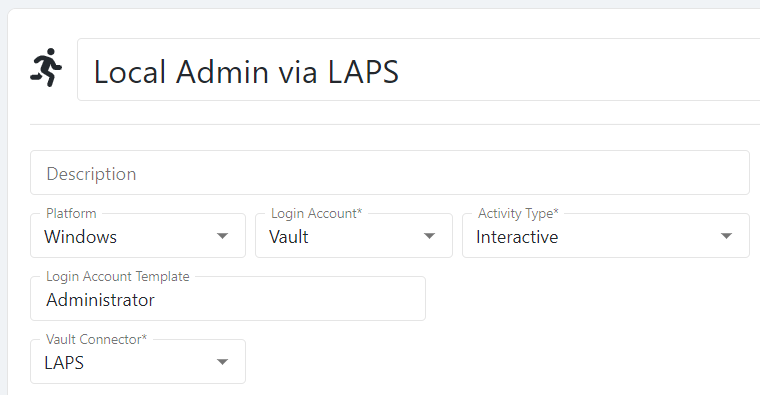
- Add any other desired actions to the activity.
-
Create Access Policies
- Create one or more Access Policies to determine which Netwrix Privilege Secure users can provision this activity session and which resources they can access.
- Configure policies with combinations of Netwrix Privilege Secure users, the LAPS activity you created, and the Windows resources managed by LAPS.
-
Provision and use LAPS-integrated sessions
- Users added to the appropriate Access Policies can now provision the LAPS activity.
- Provisioned sessions allow users to RDP to Windows resources managed by LAPS as the built-in Administrator account.
- When a LAPS-integrated session ends, Netwrix Privilege Secure triggers a password rotation via LAPS, ensuring the built-in admin account for the accessed resource is secured.