Microsoft Entra ID Configuration
For enhanced security, you can integrate Microsoft Entra ID OpenID Connect with Threat Manager using Proof Key for Code Exchange (PKCE).
Make sure the following requirements are fulfilled before configuring Microsoft Entra ID OpenID Connect in Threat Manager.
- Full Netwrix Threat Manager version 3.0.473+ or RO 3.0.90+ is installed
- Direct users (not groups) are supported in the Access User List
- MSAL.js 2.0 version is supported. See the Microsoft MSAL.js 2.0 is now generally available with support for authorization code flow article for additional information.
First, you need to register an application for Threat Manager in Microsoft Entra ID and then use the registered application's information for configuring Microsoft Entra ID OpenID Connect in Threat Manager.
Register and configure an application
Follow the steps to register and then configure the application.
Step 1 – Login to Microsoft Entra admin center (https://portal.azure.com/) with a user that is part of the “Global Administrator” role or any role that has rights to register an app, such as the “Application administrator” role. This is required in order to give consent to certain permissions in the application.
Step 2 – In the Microsoft Entra admin center, go to Microsoft Entra ID > App registration and click New registration.
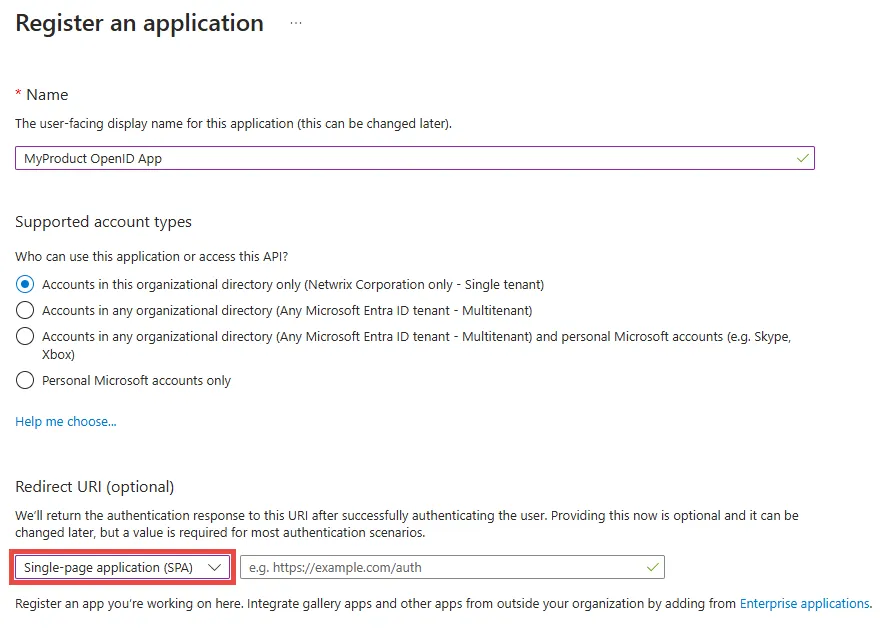
Step 3 – Fill out the Name field, for example, MyProduct OpenID App.
Step 4 – Choose one of the options in the Supported account types section based on your needs, for example, Accounts in this organizational directory only.
Step 5 – In the Redirect URI section, select the Single-page application (SPA) option from the Select a plateform drop down.
Step 6 – Enter the URL in the following specified format
{HTTP/S protocol}://{IP address or DNS name}:{port if needed}/callback
-
HTTP/S protocol – Use depending on your configuration (http or https)
-
IP address or DNS name – Provide the domain name or IP address, (for example, threatManager.MyCompany.com or 192.168.74.200)
-
Port – Threat Manager’s default port is 8080, but it could be changed according to your needs
-
End the URL with /callback
The full Redirect URL will be in one of the following format:
Step 7 – Click Register.
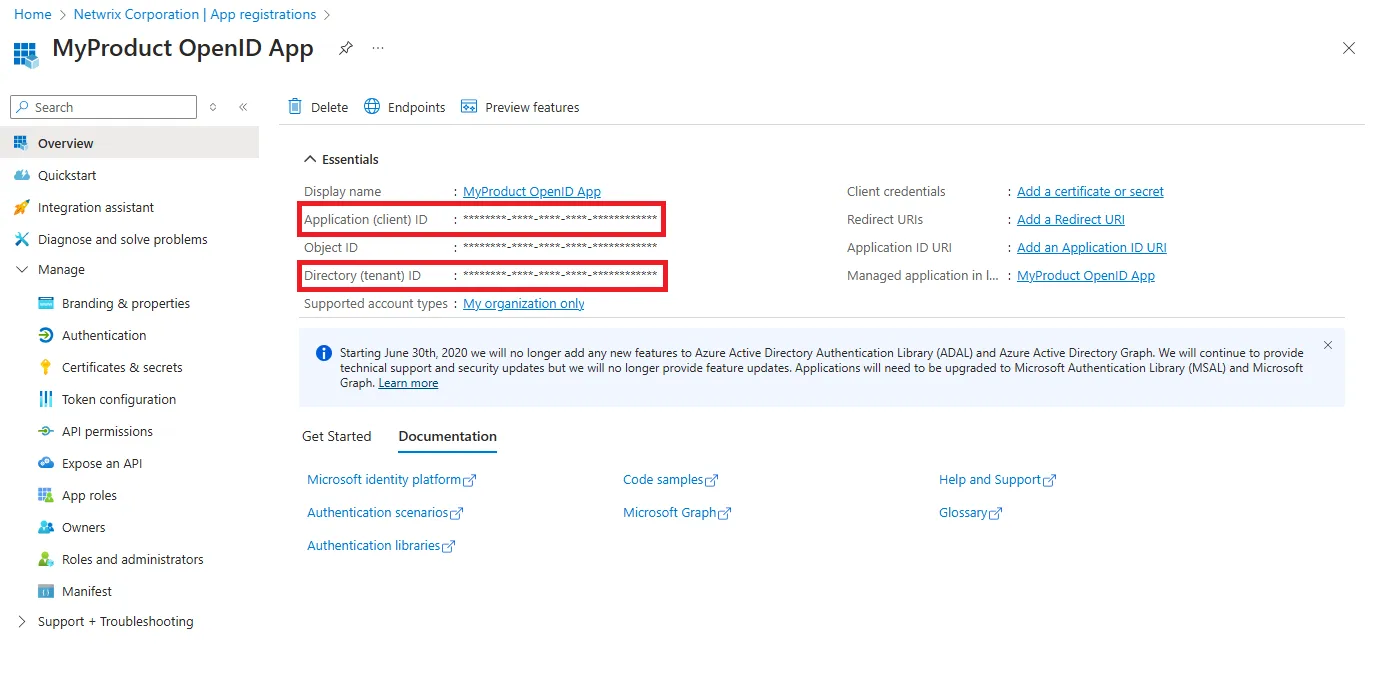
Step 8 – The Overview page is displayed. Copy the Application (client) ID and Directory (Tenant) ID and keep them safe.
Step 9 – In the left pane, select Authentication.
Step 10 – In the Implicit grant and hybrid section, select the Access tokens as necessary to support the implicit flow, especially for Single-Page Application (SPA).
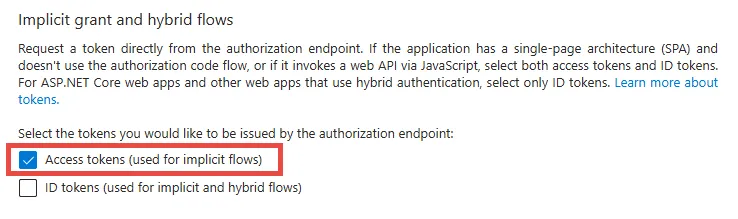
Step 11 – Click Save.
Step 12 – Under the Manage section, select Token Configuration.
Step 13 – Click Add optional claim.
Step 14 – Select ID token type.
Step 15 – In the Claim column, select onprem_sid check box.
Step 16 – Click Add.
Step 17 – Click Add optional claim.
Step 18 – Select Access token type.
Step 19 – Check onprem_sid field.
Step 20 – Click Add.

Configure Entra ID OpenID Connect
Follow the steps to configure Microsoft Entra ID OpenID connect in Threat Manager.
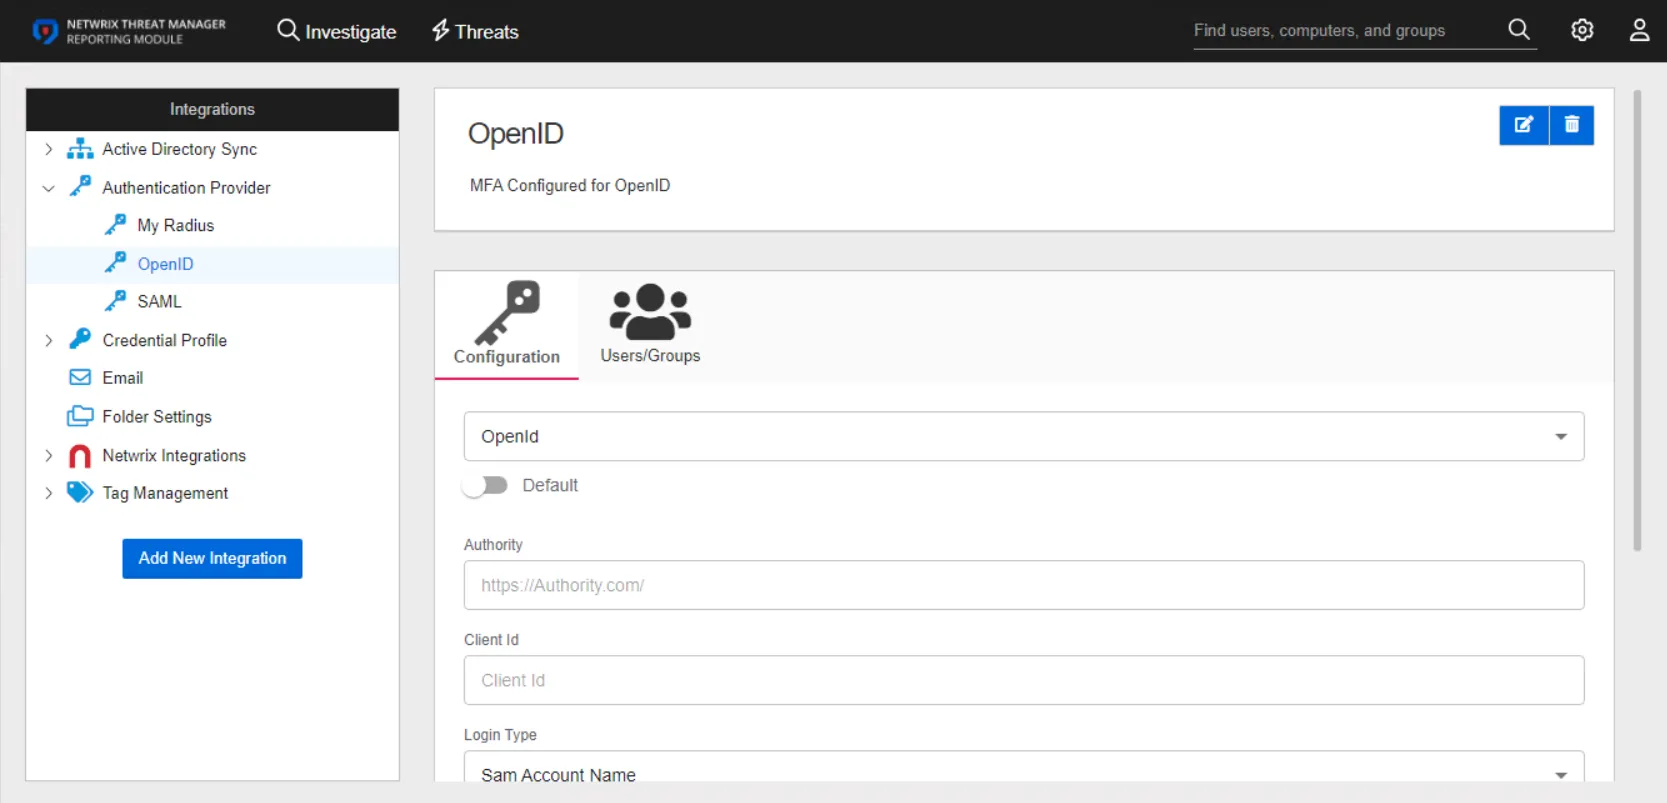
Step 1 – On the Integrations interface, select the OpenID Authentication Provider under the Authentication Provider node.
The page for the OpenID provider had two tabs:
- Configuration
- Users/Groups
Configuration Tab
Follow the steps to configure Microsoft Entra ID OpenID Connect in Threat Manager.
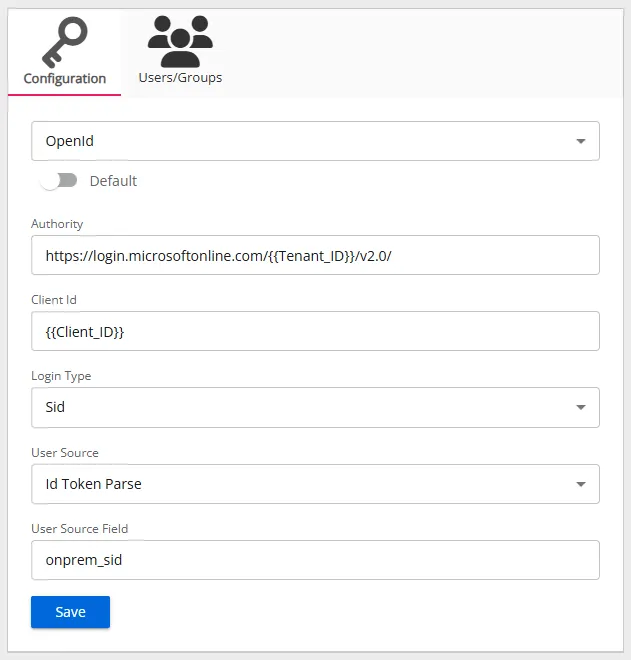
- Default – The default profile applied when a user is assigned multiple authentication profiles. When off, the profile will be determined in alphabetical order of the profile name. Toggle off and on as desired.
- Authority – The Microsoft Entra ID OpenID Connect provider authority URL. It should be in the
following format:
https://login.microsoftonline.com/{Tenant ID}/v2.0
Use the tenant ID of the registered application. - Client Id – The ID assigned to the registered application in Microsoft Entra ID.
- Login Type – The login type to use to log into the account. For Microsoft Entra ID, select Sid from the drop-down list.
- User Source – The source type to use to validate the user from the token. For Microsoft Entra ID, select Id Token Parse from the drop-down list.
- User Source Field – The field in the token to use for validating the user. For Microsoft Entra ID, select onprem_sid from the drop-down list.
Users/Group Tab
The Users/Groups tab displays users and groups that are currently assigned to this authentication profile. To give access to the application to new users, click the New Access button, which opens the Add Console Access window. To assign this authentication provider to existing users, go to System Settings > User Access Page.

The table displays the following information:
-
Access rule type – Indicates the access type as Allow, which enables console access, or Deny, which disables console access
-
Login name – The NTStyle domain name for the user or group account
-
Display name – The display name for the user or group account
-
Domain name – Name of the domain. This may be either the domain DNS name or domain controller hostname.
-
Role – The role assigned to the user or group for accessing this application
-
Authentication Type – Type of MFA authentication assigned to the user or group
-
Action – This column has the following icons for conducting actions on the user or group:
- Edit icon – Allows you to edit the columns in the selected row by enabling drop-down menus. The edit icon changes to a save icon while in edit mode.
- Trash icon – Opens a Warning window to confirm the action of deleting the user or group. Removing a user or group removes console access for it.
- Reset MFA button – Forces the user or every user in the group to reconfigure MFA on the next login. This option is only available if an MFA authentication type is applied to the user or group.
Troubleshooting
In case the Microsoft Entra ID OpenID Connect configurations do not work and an error is displayed, you can perform the following steps to troubleshoot the error.
Step 1 – Open any site or tool that provides the possibility to decode a JWT token, for
example, https://jwt.io/.
Step 2 – Right click on the Threat Manager login page and select Inspect. The Dev Tools page opens.
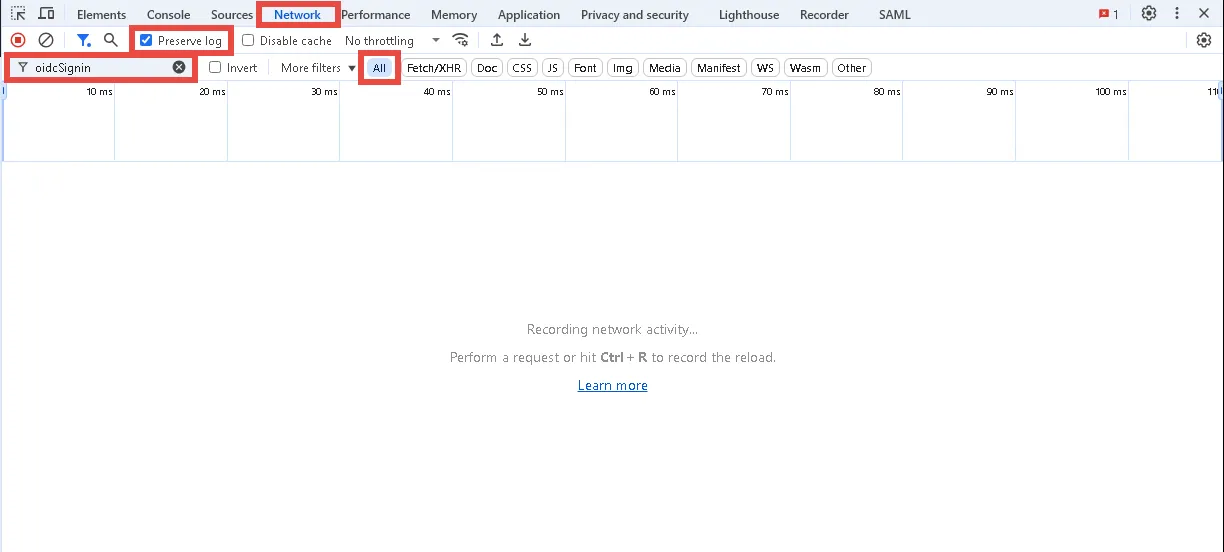
Step 3 – Click the Network tab and check the Preserve log check box.
Step 4 – Enter oidcSignin in the Filter field and select All to show all requests.
Step 5 – Click the Microsoft Entra ID OpenID Connect button on the Threat Manager login page.
Step 6 – Log in to Microsoft Entra ID.
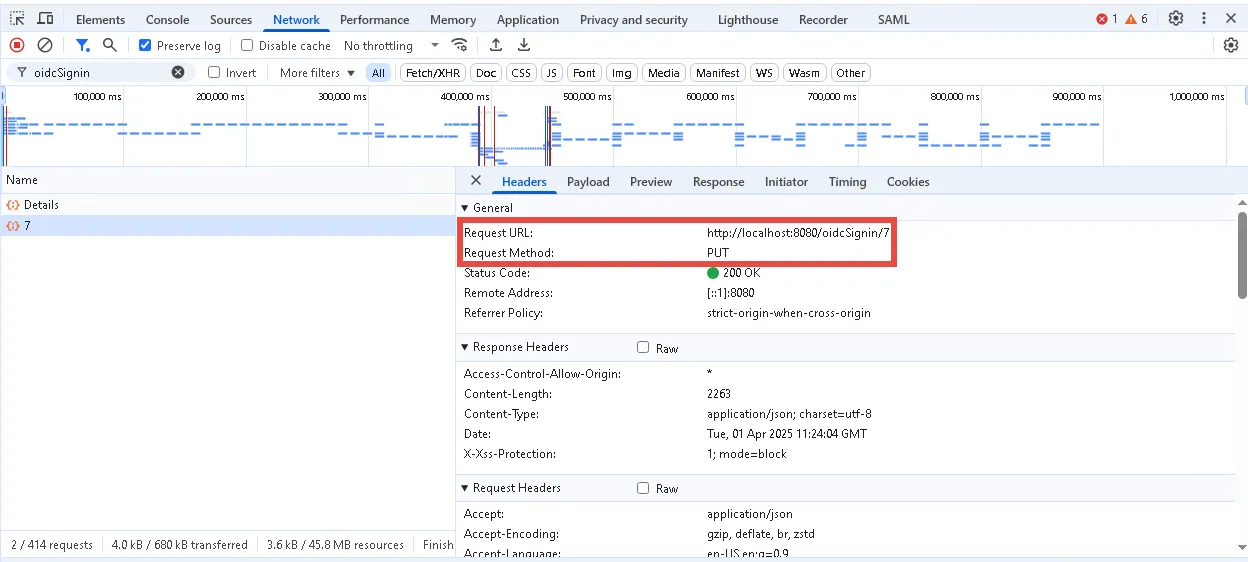
Step 7 – On the Dev Tools page, find a request with the PUT method which has the following format:
{HTTP/S protocol}://{NTM IP address or DNS name}:{port if needed}/oidcSignin/{ID}
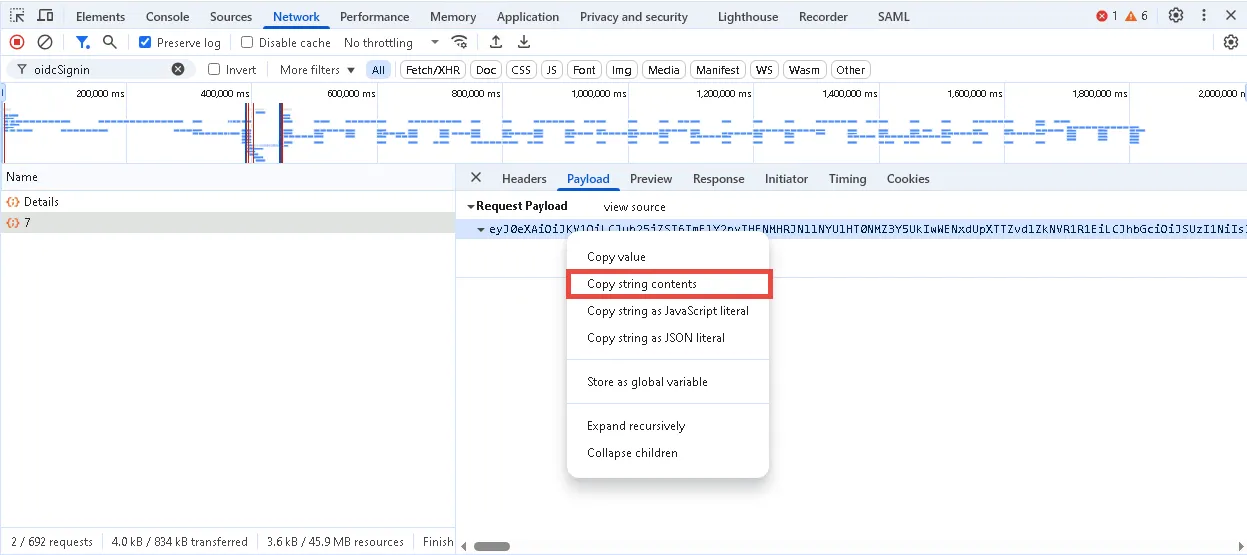
Step 8 – Open the Payload tab and copy the value from the Request Payload box.
Step 9 – Open https://jwt.io/ and insert the Request Payload value in the ENCODED VALUE
section.

Check that the field from the claims setting exist and has the value. If claims don’t exist, please check the claims configuration in Microsoft Entra ID.
OpenID Authentication Provider
OpenID is an open standard for authentication that allows users to log into multiple websites using a single set of credentials, eliminating the need for multiple usernames and passwords. Unlike traditional authentication methods, OpenID delegates authentication to a third-party provider, allowing users to authenticate with their chosen identity provider.
Follow the instructions to integrate the OpenID authentication provider with Threat Manager.
The details page for an OpenID authentication provider has two tabs:
- Configuration
- Users/Groups
Configuration Tab
Configure the following settings for an OpenID provider on the Configuration tab:
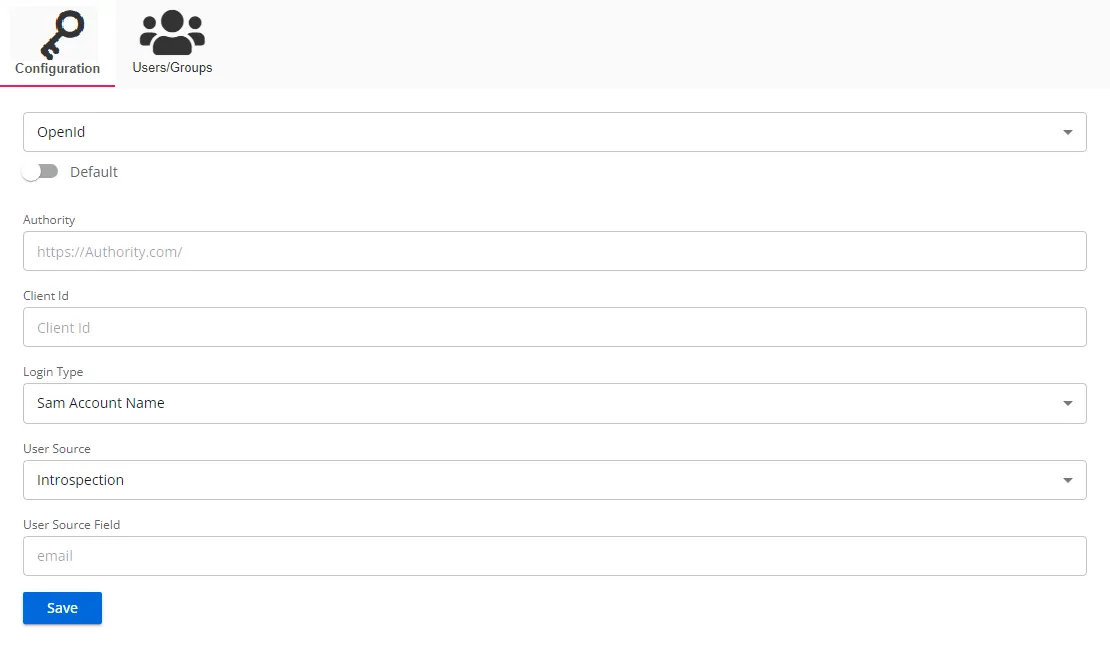
- Default – The default profile applied when a user is assigned multiple authentication profiles. When off, the profile will be determined in alphabetical order of the profile name. Toggle off and on as desired.
- Authority – The OpenId Connect provider authority URI. Out-going redirection requires the correct Authority path to be set. Incorrect settings will generally result in a 404 error.
- Client Id – The ID assigned to an application that allows it to request authentication and interact with the identity provider
- Login Type – The login type to use to log into the account. Use the drop-down menu to select one of the following: Sam Account Name, User Principal Name, Email Address, or Sid
- User Source – The source type to use to validate the user from the token. Use the drop-down menu to select one of the following: Introspection, User Info, Token Parse, or Id Token Parse
- User Source Field – The field in the token to use for validating the user
Click Save to commit the configuration settings.
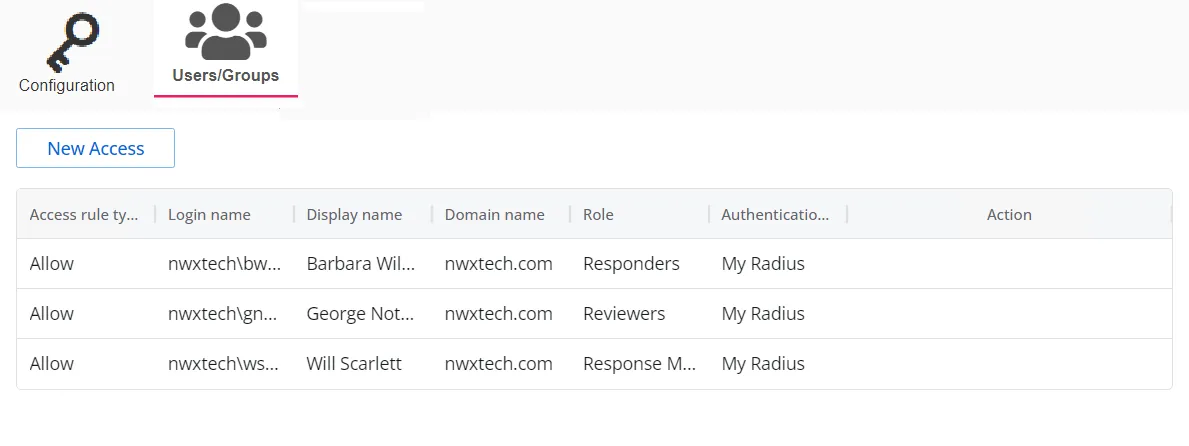
Users/Groups Tab
The Users/Groups tab displays users and groups that are currently assigned to this authentication profile. To give access to the application to new users, click the New Access button, which opens the Add Console Access window. To assign this authentication provider to existing users, go to System Settings > User Access Page.
The table displays the following information:
-
Access rule type – Indicates the access type as Allow, which enables console access, or Deny, which disables console access
-
Login name – The NTStyle domain name for the user or group account
-
Display name – The display name for the user or group account
-
Domain name – Name of the domain. This may be either the domain DNS name or domain controller hostname.
-
Role – The role assigned to the user or group for accessing this application
-
Authentication Type – Type of MFA authentication assigned to the user or group
-
Action – This column has the following icons for conducting actions on the user or group:
- Edit icon – Allows you to edit the columns in the selected row by enabling drop-down menus. The edit icon changes to a save icon while in edit mode.
- Trash icon – Opens a Warning window to confirm the action of deleting the user or group. Removing a user or group removes console access for it.
- Reset MFA button – Forces the user or every user in the group to reconfigure MFA on the next login. This option is only available if an MFA authentication type is applied to the user or group.
See the User Access Page topic for additional information.
Authentication Provider Page
The Authentication Provider page provides configuration settings for third-party authentication providers using RADIUS, OpenID, and SAML integrations.
Use the gear icon in the upper right corner of the console to open the Configuration menu. Then select Integrations to open the Integrations interface.

Click Authentication Provider in the navigation pane to view a list of already configured authentication providers, if any.
The table displays the provider name, as supplied during configuration, and an icon indicating if the integration is enabled. To view provider details or make modifications, select a provider from the table or select it from the Credential Profile drop-down in the navigation pane.
Add an Authentication Provider
Follow the steps to add an authentication provider.
Step 1 – On the Integrations interface, click Add New Integration in the navigation pane. The Add New Integration window opens.

Step 2 – In the Type drop-down list, select Authentication Provider.
Step 3 – Provide a unique name and description for the authentication provider.
Step 4 – Click Add. The Add New Integration window closes.
The authentication provider is listed in the Integrations navigation pane and the configuration window for the provider opens. You must configure the provider for use with a supported authentication provider type, i.e., OpenID, RADIUS, or SAML.
Supported Types of Authentication Providers
On the Integrations interface, select an authentication provider under the Authentication Provider node in the navigation pane or from the table to configure, view, or modify its details.
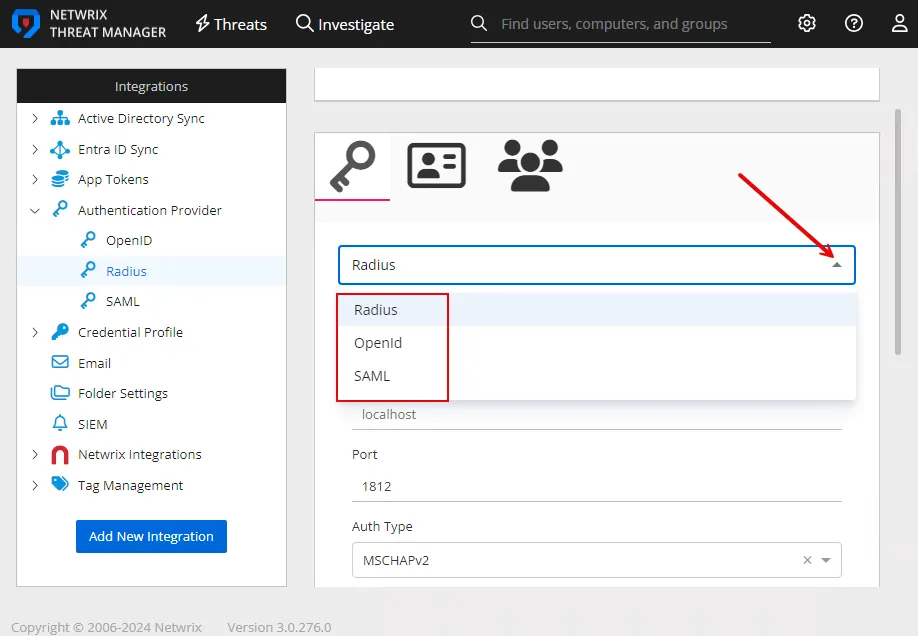
The following authentication provider types are supported; you can configure an authentication provider for any of these:
- RADIUS – See the RADIUS Authentication Provider topic for additional information.
- OpenID – See the OpenID Authentication Provider topic for additional information.
- SAML – See the SAML Authentication Provider topic for additional information.
RADIUS Authentication Provider
The Remote Authentication Dial-In User Service (RADIUS) is a networking protocol that provides centralized authentication, authorization, and accounting management for users connecting to a network service.
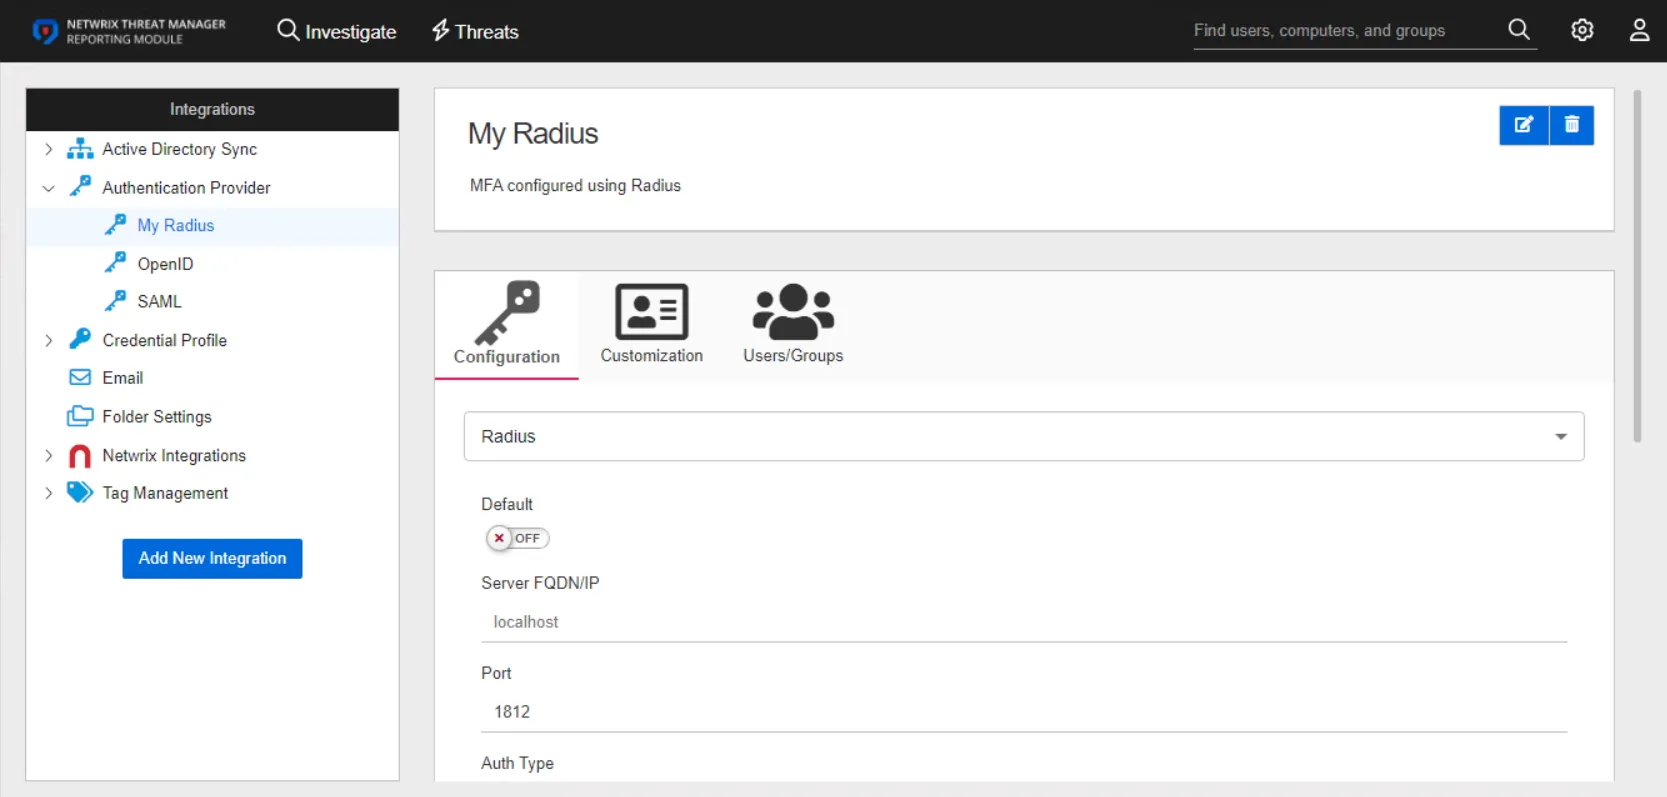
The details page for a RADIUS authentication provider has three tabs:
- Configuration
- Customization
- Users/Groups
Configuration Tab
Configure the following settings for a RADIUS provider on the Configuration tab:

-
Default – The default profile applied when a user is assigned multiple authentication profiles. When off, the profile will be determined in alphabetical order of the profile name. Toggle off and on as desired.
-
Server FQDN/IP – The address of the RADIUS proxy
-
Port – The port for the RADIUS proxy
-
Auth Type – The security protocol used by the RADIUS proxy. Use the drop-down menu to select either MSCHAPv2 or PAP.
-
Shared Secret – A secret shared between the application server and the RADIUS proxy
-
User Name Format Type – Active Directory attribute or attributes that will be sent to the RADIUS authentication provider to identify the user. Some common identification attributes are available in the drop-down list. If necessary, a custom option is also provided. This option instructs the application to send a custom value to the RADIUS provider based on the user's Active Directory attribute, supplied in the Custom Name Format field.
-
Custom Name Format – This field appears when the Custom User Name Format Type is selected. It has a unique syntax as follows:
-
Active Directory Attribute:
{attributename}- Example –
{firstname}_{lastname}
- Example –
-
First Character(s) of an Active Directory Attribute:
{3:AttributeName}– Where "3" is the number of characters to select- Example –
{1:firstname}_{lastname}
- Example –
-
Last Character(s) of an Active Directory Attribute:
{AttributeName:3}– Where "3" is the number of characters to select- Example –
{firstname}_{telephoneNumber:4}
- Example –
-
Text values can be hard coded to send a static text value for each user:
- Example –
MyCompany_{lastname}
- Example –
-
-
Max Retries – The maximum number of times to attempt reconnecting to the RADIUS proxy if unable to connect
-
Timeouts (in seconds) – The default timeout value for RADIUS connection and authentication requests. The default value is 60 seconds.
Click Save to commit the configuration settings.
Customization Tab
The Customization tab is unique to RADIUS authentication providers. It contains the following settings that need to be configured:

- Title for MFA Authentication dialog – The title that is displayed to the user when prompted for MFA
- Text for MFA Authentication dialog – The text description that is displayed to the user when prompted for MFA
- Send Initial Text – If On, the value in the Initial Auto Response Text is automatically sent to the RADIUS proxy without user action. Toggle On or Off as desired.
- Initial Auto Response Text – This value is sent to the RADIUS server automatically if the Send Initial Text option is enabled. For example, this might be “push” to immediately have the user’s phone app prompt for authorization.
- Prefix for Response Text – This value is added to the start of the responses. The value will vary according to server.
- Send NAS Identifier – When On, NAS identifiers are transmitted to the RADIUS proxy. This is needed for certain RADIUS proxy implementations that require it. Toggle On or Off as desired.
Click Save to save the configuration settings.
Users/Groups Tab
The Users/Groups tab displays users and groups that are currently assigned to this authentication profile. To give access to the application to new users, click the New Access button, which opens the Add Console Access window. To assign this authentication provider to existing users, go to System Settings > User Access Page.
The table displays the following information:
-
Access rule type – Indicates the access type as Allow, which enables console access, or Deny, which disables console access
-
Login name – The NTStyle domain name for the user or group account
-
Display name – The display name for the user or group account
-
Domain name – Name of the domain. This may be either the domain DNS name or domain controller hostname.
-
Role – The role assigned to the user or group for accessing this application
-
Authentication Type – Type of MFA authentication assigned to the user or group
-
Action – This column has the following icons for conducting actions on the user or group:
- Edit icon – Allows you to edit the columns in the selected row by enabling drop-down menus. The edit icon changes to a save icon while in edit mode.
- Trash icon – Opens a Warning window to confirm the action of deleting the user or group. Removing a user or group removes console access for it.
- Reset MFA button – Forces the user or every user in the group to reconfigure MFA on the next login. This option is only available if an MFA authentication type is applied to the user or group.
See the User Access Page topic for additional information.
SAML Authentication Provider
The Security Assertion Markup Language (SAML) is an XML framework for exchanging authentication and authorization information. It provides functions to describe and transmit security-related information. This means that you can use one set of credentials to log in to many different websites. It is much easier to manage one login per user than separate logins for email, Customer Relationship Management (CRM) software, Active Directory, and more.
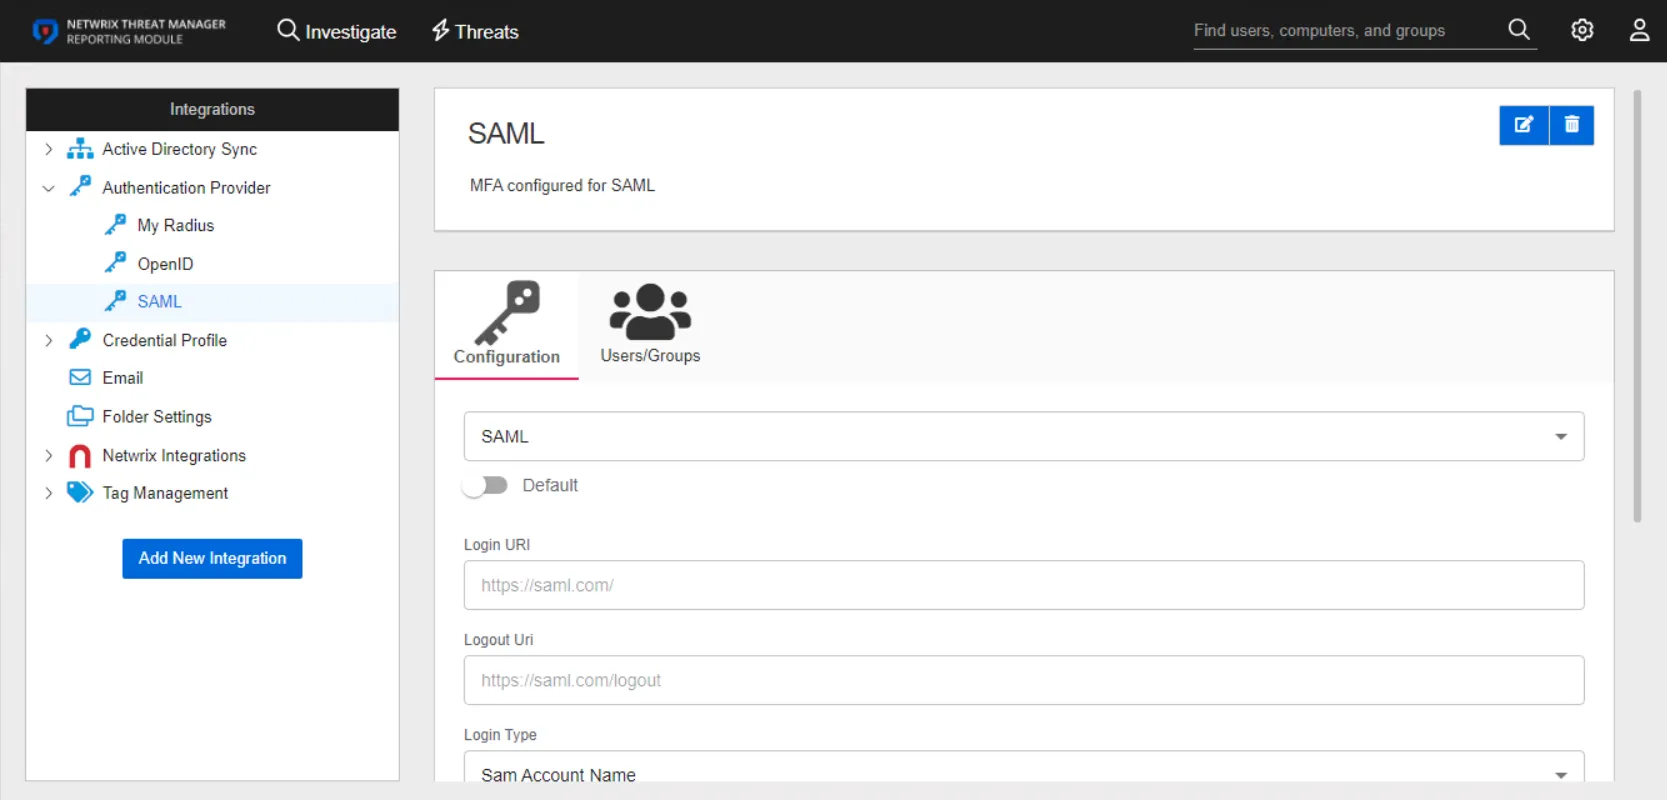
The details page for a SAML authentication provider has two tabs:
- Configuration
- Users/Groups
Prerequisites
For users to be able to use SAML, "SMTP" must be set up and an email address must be stored with the respective users.
Configuration Tab
Configure the following settings for a SAML provider on the Configuration tab:
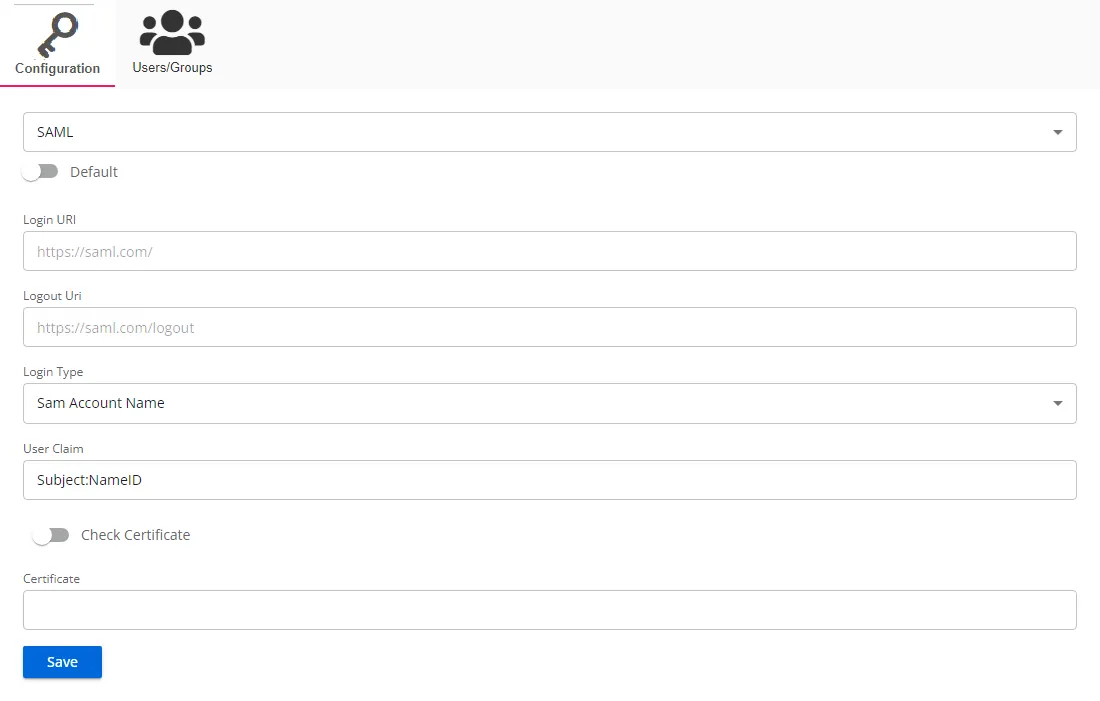
- Default – The default profile applied when a user is assigned multiple authentication profiles. When off, the profile will be determined in alphabetical order of the profile name. Toggle off and on as desired.
- Login URI – Login URI is a specific web address where users can authenticate themselves to access a web application or service
- Logout Uri – A logout URI is a specific web address where users are directed to terminate their authenticated session in a web application or service
- Login Type – The login type to use to log into the account. Use the drop-down menu to select one of the following: Sam Account Name, User Principal Name, Email Address, or Sid
- User Claim – A user claim is an assertion made by the identity provider about a user, such as their name, role, or email, that the service provider can use for authorization decisions
- Check Certificate – If enabled, this validates the response certificate to the certificate provided in the Certificate field. Use the toggle button to enable and disable this setting.
- Certificate – A certificate is a digital credential used to validate the identity of parties and secure communications between an Identity Provider (IdP) and a Service Provider (SP)
Click Save to commit the configuration settings.
Users/Groups Tab
The Users/Groups tab displays users and groups that are currently assigned to this authentication profile. To give access to the application to new users, click the New Access button, which opens the Add Console Access window. To assign this authentication provider to existing users, go to System Settings > User Access Page.
The table displays the following information:
-
Access rule type – Indicates the access type as Allow, which enables console access, or Deny, which disables console access
-
Login name – The NTStyle domain name for the user or group account
-
Display name – The display name for the user or group account
-
Domain name – Name of the domain. This may be either the domain DNS name or domain controller hostname.
-
Role – The role assigned to the user or group for accessing this application
-
Authentication Type – Type of MFA authentication assigned to the user or group
-
Action – This column has the following icons for conducting actions on the user or group:
- Edit icon – Allows you to edit the columns in the selected row by enabling drop-down menus. The edit icon changes to a save icon while in edit mode.
- Trash icon – Opens a Warning window to confirm the action of deleting the user or group. Removing a user or group removes console access for it.
- Reset MFA button – Forces the user or every user in the group to reconfigure MFA on the next login. This option is only available if an MFA authentication type is applied to the user or group.
See the User Access Page topic for additional information.