Upgrade Threat Manager from 2.6/2.7 To 2.8
Follow the steps to upgrade Threat Manager 2.6/2.7 to 2.8 or to apply a hotfix to Threat Manager.
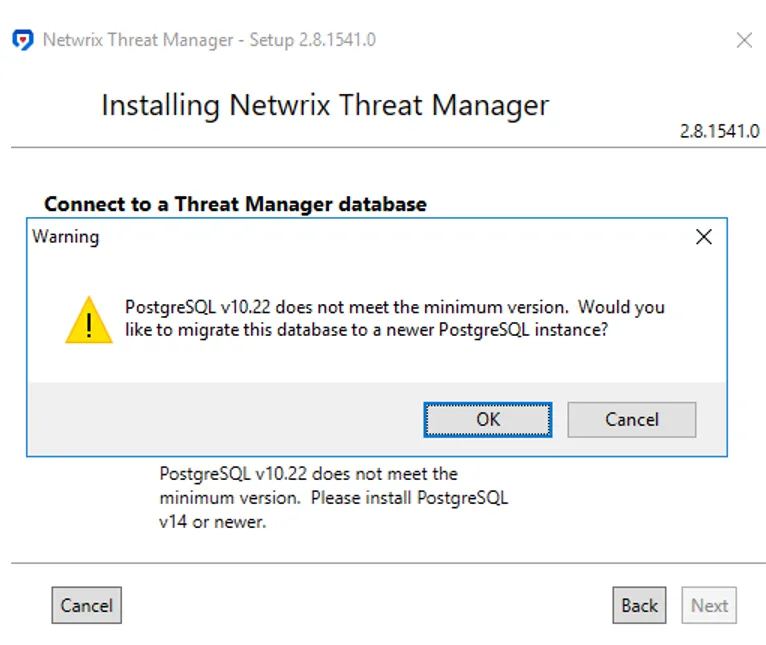
Step 1 – Install the new version of PostreSQL.

NOTE: The migration of PostgreSQL 10 to 14 will require a migration of theThreat Manager database. You may proceed through the migration process in the following menu.
Step 2 – Configure the following settings:
-
Only transfer events associated with a threat – this option provides a migration of the events only associated with threats that have been detected
-
Show Advanced Settings – Advanced settings contains the following parameters:
-
PG Tools Directory – Path to the directory where PostgreSQL binaries are located

-
Compression Level – Select the compression level to be applied to the data. It contains the following options:
- None – Compression will not be applied to the data
- Low – Lower level of compression requires more disk space to perform the migration, but takes faster to complete
- Medium – Medium level of compression balances disk space usage and migration speed
- High – Higher level of compression reduces the disk space needed for the migration, but it increases the time required for completion
NOTE: The compression algorithm option is used on the exported data. It does not affect either the old or the new database.

-
Number of Threads – Select the number of threads to be applied. Adding more threads can considerably reduce the time to import data to the target server. It contains the following options:
- Reliable – One thread
- Recommended – Number of threads equal to half of the available processor cores
- Performant – Number of threads equal to the number of processor cores
-
Reduce Source Databaze Size – This action will lead to the migration dropping the indexes in the old databases, prior to performing the migration
NOTE: This setting is not recommended as it will leave the old database in a broken state, but the data is preserved. Some users may need this option if they do not have enough free disk space to perform the migration.
If the migration fails, it can be re-run from the installer.
This option is also reveals a Delete Source Database checkbox. After exporting the data from the old database, the old database will be deleted.
CAUTION: The use of Delete Source Database is an extreme option that highly not recommended. It should only be used if you fully understand its purpose and the actions it entails.
If the migration fails, user will need to manually import the data into the new database from the export file.
-
Step 3 – Click Validate to proceed. Then, click Next in the bottom right corner.
NOTE: The migration of PostgreSQL 10 to 14 may require significant disk space to perform safely. The disk space required for the backup does not need to be on the same disk as the database itself.
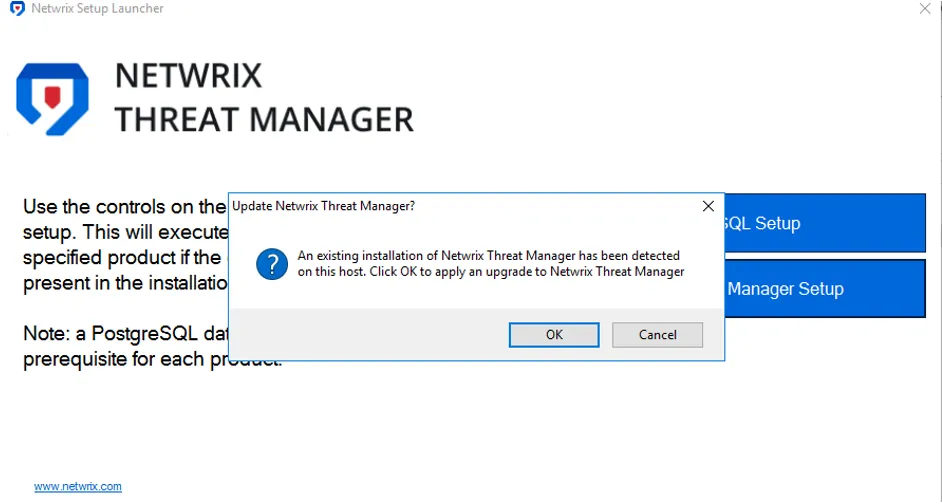
Step 4 – Install the new version of Threat Manager.
Step 5 – Click Test on the Connect to a Threat Manager Database page. The installer should see the existing PostgreSQL database and prompt to migrate.
Step 6 – Click OK, click Next, then click Test. You will see the following message.

Step 7 – Click Next.
NOTE: Migrating a large database can take about 24 hours or more. During this time Netwrix Threat Manager will not work. Installing Netwrix Threat Manager 2.8 with a new database, and directing event streams to that server after the installation is complete, will eliminate downtime.
Clean up Dependencies
After installation it is necessary to clean up dependencies associated with the previous version of the Threat Manager. To do this, uninstall the following dependencies:
- PGSQL10
- Python 3.7 and below
- .NET Runtime 5
- ASP.NET Core 5
Complete any post-installation tasks required for your configured environment. See the following topics for additional information:
Clear the cache of the browser that will be used to view the Threat Manager Console prior to launching Threat Manager.
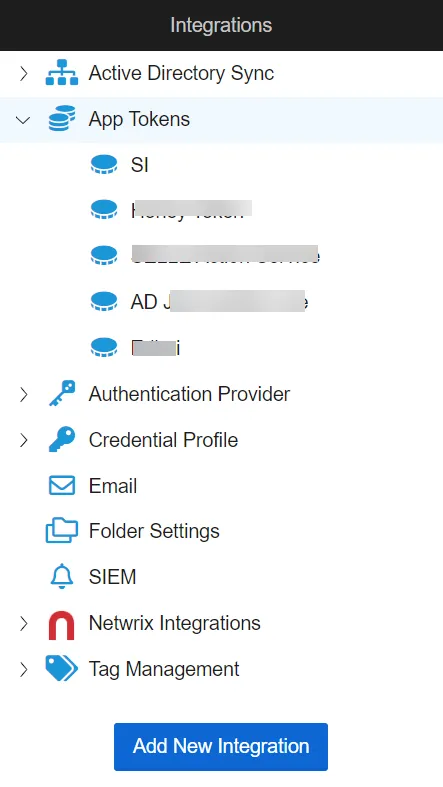
Check for Deprecated App Tokens
If upgrading from a version prior to 2.8, the app tokens may have been deprecated. This can be identified by navigating to the Integrations page in Threat Manager. If an app token is deprecated, it is necessary to create a new one for the application to use.
Identify and Update App Tokens
Follow the steps to identify and create new app tokens.
Step 1 – In the Threat Manager Console, navigate to the Integrations page.
Step 2 – Expand the App Tokens section of the Integrations box and identify any of the app tokens that have been deprecated during the upgrade. A deprecated app token can be identified by the presence of a red warning triangle.
NOTE: Non-local action services will need their app tokens updated. Local action services will be automatically updated.
Step 3 – Take note of the app token name and description and create a new one to be used with the application. See the App Tokens Page topic for additional information.
Step 4 – Update the application to use the new app token. See the Integration with Other Netwrix Products topic for additional information.
Step 5 – Delete the old, deprecated app token.